
DELBC178 - Fridge DELONGHI - Free user manual and instructions
Find the device manual for free DELBC178 DELONGHI in PDF.


| Product Type | Freestanding Refrigerator |
| Brand | DeLonghi |
| Model | DELBC178 |
| Total Net Capacity | 178 Liters |
| Refrigerator Capacity | 145 Liters |
| Freezer Capacity | 33 Liters |
| Energy Efficiency Class | E |
| Annual Energy Consumption | 152 kWh |
| Noise Level | 39 dB |
| Climate Class | N-ST |
| Dimensions (H x W x D) | 1430 x 540 x 580 mm |
| Weight | 42 kg |
| Power Supply | 220-240 V, 50 Hz |
| Defrost Type | Automatic (refrigerator), Manual (freezer) |
| Refrigerant | R600a |
| Number of Shelves | 4 glass shelves + 1 vegetable drawer |
| Door Reversibility | Yes |
| Cooling System | Static |
| Interior Light | LED |
Frequently Asked Questions - DELBC178 DELONGHI
User questions about DELBC178 DELONGHI
0 question about this device. Answer the ones you know or ask your own.
Ask a new question about this device
Download the instructions for your Fridge in PDF format for free! Find your manual DELBC178 - DELONGHI and take your electronic device back in hand. On this page are published all the documents necessary for the use of your device. DELBC178 by DELONGHI.
USER MANUAL DELBC178 DELONGHI
De'Longhi Wine & Beverage Cabinet
Model
DELWC46S & DELWC166S - Single Zone Wine Cabinets
DELWC46D - Dual Zone Wine Cabinet
DELBC178 - 178 Can Beverage Cabinet
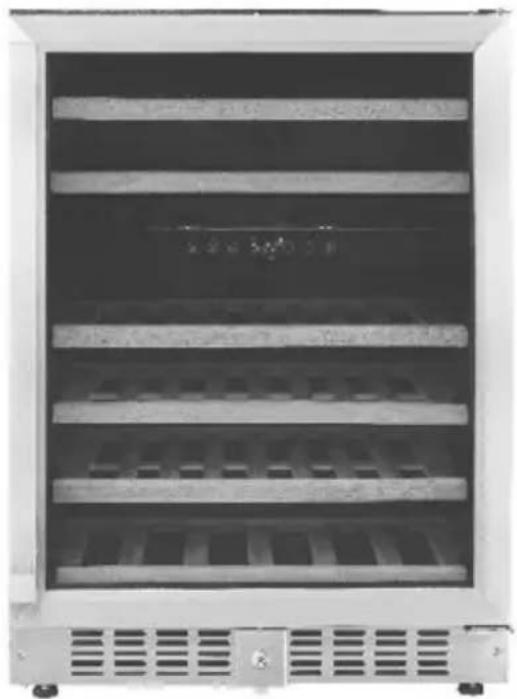
natural_image
Front view of a stainless steel refrigerator with multiple horizontal shelves and ventilation grilles (no visible text or labels)Contents
Parts and Features 03
De'Longhi Safety Precautions 05
Wine/Beverage Cabinet Safety Precautions....07
Installation Safety Precautions....10
Installation....11
-Warnings
- Before using your Wine/Beverage Cabinet
- Installation of your Wine/Beverage Cabinet
- Recessed Installation
- Cabinet Dimensions
- Installing the Handle
- Adjusting the Height & Levelling
- Locking & Unlocking the Door
- Reversing the Door Swing
Using your Wine/Beverage Cabinet....21
- Energy Saving
- Working Climate
- Wine Storage
- Control Panel
- Power On/Off Control
- Unlocking the Control Panel
- Interior Lighting On/Off Control
- Temperature Display Window
- Temperature Range Setting
- Temperature Setting
- Selecting Fahrenheit or Celsius
- Function Indicating Light
Care and Cleaning 26
Troubleshooting 28
Help us Help You 29
Warranty Information....30
Model Features
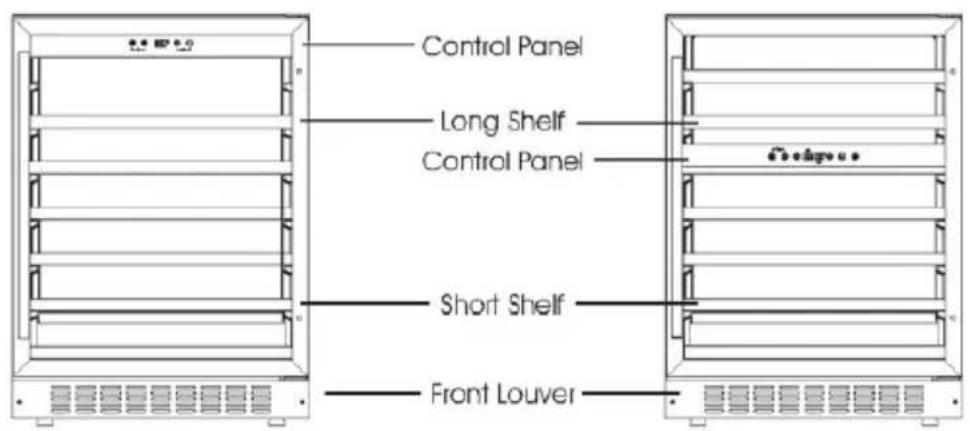
DELWC46S (Single Zone)
46 Wine Bottles
DELWC46D (Dual Zone)
46 Wine Bottles
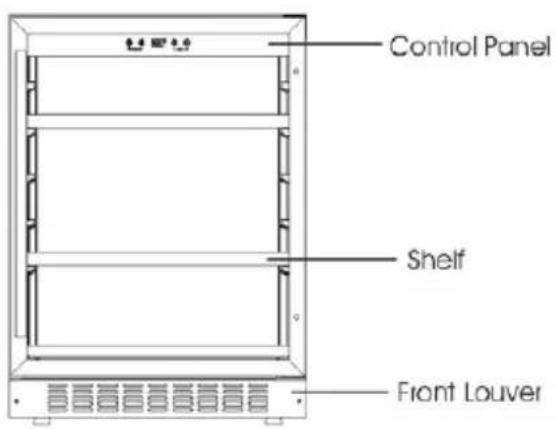
DELBC178 (Single Zone) 178 Can Beverages
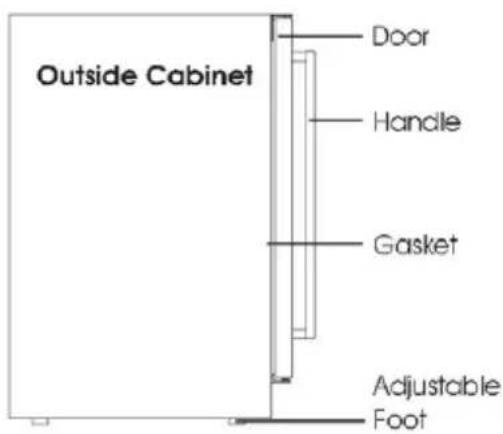
Dimensions (Cabinet Housing)
Height: 813-833mm
Width: 595mm
Depth: 570mm
Capacity: 46 Bottles (Models DELWC46S/DELWC46D)
Capacity: 178 Cans (Model DELBC178)
Model: DELWC166S (Single Zone Wine Cabinet)
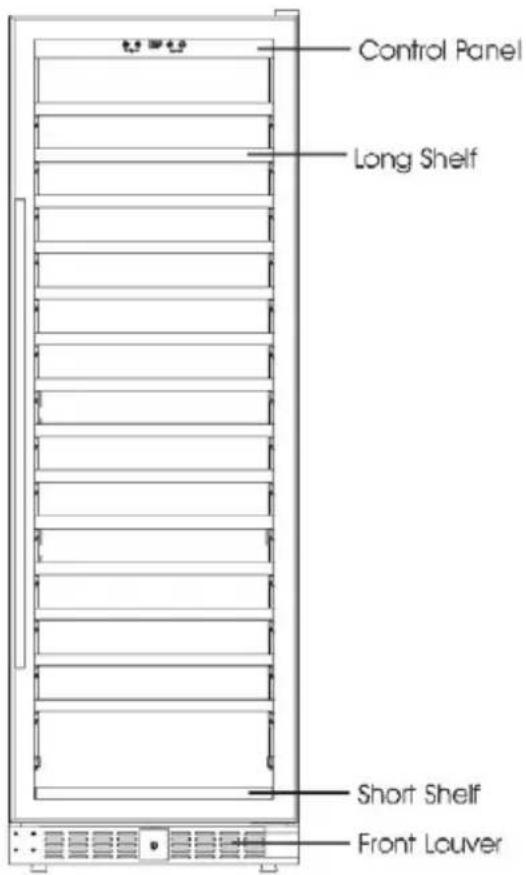
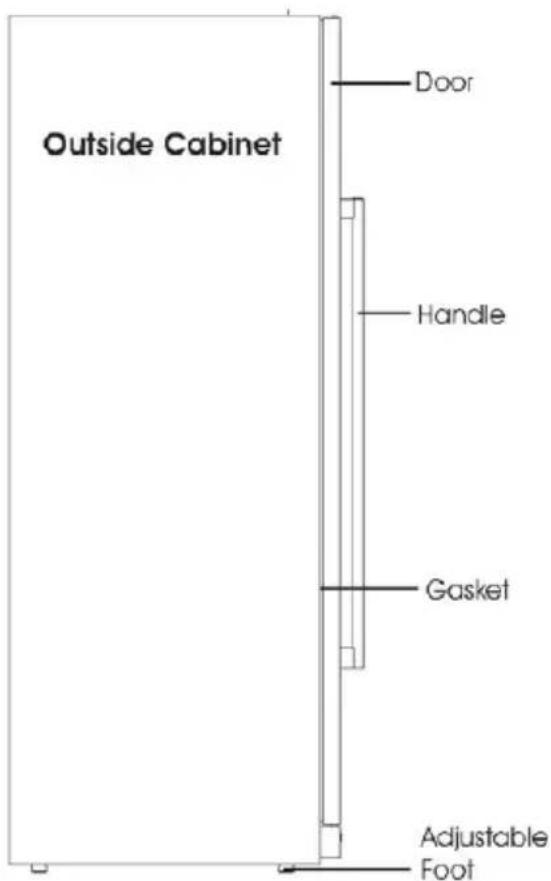
Dimensions (Cabinet Housing)
Height: 1770mm
Width: 595mm
Depth: 680mm
Capacity: 166 bottles
De'Longhi's Safety Precautions
De'Longhi pride themselves on their innovative range of the highest quality consumer products.
De'Longhi ensures all of its products are 100% safe through quality design and manufacture. All products meet or exceed stringent laboratory-tested safety requirements.
It is necessary for anyone using an electrical appliance to be safety conscious. The following precautions are essential for the safe use of an electrical appliance. Carefully read all of the instructions provided with your appliance:
- Always turn the power off at the power outlet before you insert or remove a plug. Remove by grasping the plug, do not pull on the cord.
- Do not use your appliance with an extension cord unless this cord has been checked and tested by a qualified technician or service person. The extension cord must be a VDE-Listed, 3-wire grounding extension cord that has a grounding plug and outlet and that the electrical rating of the cord is 220-240 volts and at least 10 amperes.
• Always use your appliance from a power outlet of the voltage (A.C. only) marked on the appliance. - Do not use an appliance for any purpose other than its intended use.
- Do not attempt to repair an electrical appliance. Return a damaged or malfunctioning appliance to a qualified service centre for adjustment or repair if required.
-
The appliance must be positioned so the AC plug is accessible.
-
This appliance is designed exclusively for household use. All other uses are strictly forbidden.
- The appliance is not intended for use by persons (including children) with reduced physical, sensory or mental capabilities, or lack of experience and knowledge, unless they have been given supervision or instruction concerning use of the appliance by a person responsible for their safety.
• Children should be supervised to ensure that they do not play with the appliance. - If the power cable is damaged, it must be replaced by the manufacturer, an authorised service centre or a qualified electrician in order to eliminate all risk.
- WARNING: Do not damage the refrigerant circuit.
IMPORTANT SAFETY INSTRUCTIONS - READ ALL INSTRUCTIONS BEFORE USING, AND SAVE FOR FUTURE REFERENCE.
Your safety and the safety of others is very important. Safety messages are displayed in this manual and on your appliance.
Read and obey these safety messages as they will alert you to potential hazards and tell you how to reduce the chance of injury.

Safety Alert Symbol
This symbol alerts you to potential hazards.
DANGER
WARNING
CAUTION
Danger
Danger indicates a high level of risk to yourself and others. Ensure that care is taken to avoid severe injury or even death.
Warning
Warning indicates a moderate level of risk to yourself, others and the product. Ensure that care is taken to avoid extensive product damage or serious injury.
Caution
Caution indicates a level of risk to yourself, others and the product. Ensure care is taken to avoid moderate product damage or injuries.

Before the appliance is used, it must be properly positioned and installed as described in this manual, so read the manual
carefully. To reduce the risk of fire, electrical shock or injury when using the appliance, follow basic precaution, including the following:
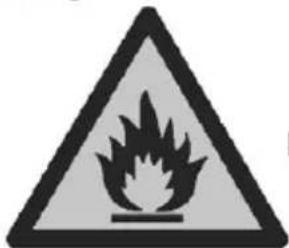
Caution: risk of fire
! DANGER !
- Plug into a grounded 3-prong outlet, do not remove grounding prong, do not use an adapter, and do not use an extension cord.
- It is recommended that a separate circuit, serving only your appliance be provided. Use receptacles that cannot be turned off by a switch or pull chain.
- Never clean appliance parts with flammable fluids. These fumes can create a fire hazard or explosion. And do not store or use gasoline or other flammable vapours and liquids in the vicinity of this or any other appliance. The fumes can create a fire hazard or explosion.
- Do not connect or disconnect the electric plug when your hands are wet.
- Unplug the appliance or disconnect power before cleaning or servicing. Failure to do so can result in electrical shock or death.
- Do not attempt to repair or replace any part of your appliance unless it is specifically recommended in this material. All other servicing should be referred to a qualified technician.
R600a Refrigerant Warning
- This appliance contains a small quantity of R600a refrigerant which is environmentally friendly, but flammable. It does not damage the ozone layer, nor does it increase the greenhouse effect.
- During transportation and installation, ensure that the tubing of the refrigerant circuit is not damaged.
- Leaking refrigerant can ignite and may damage the eyes.
- In the event any damage does occur, avoid exposure to open fires and any device which creates a spark. Disconnect the appliance from the mains power.
- Thoroughly ventilate the room in which the appliance is located for several minutes.
- Notify your local authorised service agent for necessary action and advice.
In Queensland contact:
Endeavour Refrigeration Tel - 07 3137 3622
Kerrs Electrical and Refrigeration Tel - 07 5491 2188
In all other states:
Go to the De'Longhi Service Locator on our website in the Support Section.
- The room for installing the appliance must be at least 1 cubic metre per 8 grams of refrigerant. The refrigerant quantity contained in this appliance is noted on the Rating Plate of the appliance.
- It is hazardous for anyone other than an Authorised Service Person to service this appliance. In Queensland - the authorised Service Person MUST hold a Gas Work Authorisation for hydrocarbon refrigerants, to carry out Servicing or repairs which involve the removal of covers.
WARNING
FOLLOW WARNINGS BELOW ONLY WHEN APPLICABLE TO YOUR MODEL
- This appliance is intended to be used in household and similar applications such as:
- staff kitchen areas in shops, offices and other working environments;
- farm houses and by clients in hotels, motels and other residential type environments;
- bed and breakfast type environments;
-Catering and similar non-retail applications.
- This appliance is intended to be used exclusively for the storage of wine or beverages, not for the preservation of fresh food. Any other use is considered dangerous and the manufacturer will not be responsible for any omissions. Also it is recommended that you take note of the warranty conditions.
- The Wine/Beverage Cabinet contains a refrigerant gas (R600a: isobutane) and insulating gas (cyclopentane), with high compatibility with the environment, that are, however, inflammable.
• We recommend that you follow the following regulations so as to avoid situations dangerous to you: Before performing any operation, unplug the power cord from the power socket.
- The refrigeration system positioned behind and inside the appliance contains refrigerant. Therefore, avoid damaging the tubes.
- If a leak is noticed in the refrigeration system, do not touch the wall outlet and do not use open flames. Open the window and let air into the room. Then call a service centre to ask for repair.
- Do not scrape with a knife or sharp object to remove frost or ice that occurs. With these, the refrigerant circuit can be damaged, the spill from which can cause a fire or damage your eyes.
- Do not install the appliance in humid, oily or dusty places, nor expose it to direct sunlight and to water.
- Do not install the appliance near heaters or inflammable materials.
- Do not excessively pull or fold the power cord or touch the plug with wet hands.
- Do not damage the plug and/or the power cord; this could cause electrical shocks or fires.
- It is recommended to keep the plug clean, any excessive dust residues on the plug can be the cause fire.
- Do not use mechanical devices or other equipment to hasten the defrosting process.
Wine & Beverage Cabinet Safety Precautions
- Absolutely avoid the use of open flame or electrical equipment, such as heaters, steam cleaners, candles, oil lamps and the like in order to speed up the defrosting phase.
- Do not use or store inflammable sprays, such as spray paint, near the appliance. It could cause an explosion or fire.
- Do not use electrical appliances inside the food storage compartments, unless they are of the type recommended by the manufacturer.
- Do not place or store inflammable and highly volatile materials such as ether, petrol, LPG, propane gas, aerosol spray cans, adhesives, pure alcohol, etc. These materials may cause an explosion.
- Do not store medicine or research materials in the appliance. When the material that requires a strict control of storage temperatures is to be stored, it is possible that it will deteriorate or an uncontrolled reaction may occur that can cause risks.
- Maintain the ventilation openings in the appliance enclosure or in the built-in structure, free of obstruction.
- Do not place objects and/or containers filled with water on the top of the appliance.
-
Do not perform repairs on this appliance. All interventions must be performed solely by qualified personnel.
-
The appliance shall not be installed in the laundry
- Do not store explosive substances such as aerosol cans with a flammable propellant in this appliance.
- WARNING: Keep ventilation openings, in the appliance enclosure or in the built-in structure, clear of obstruction.
- WARNING: Do not use mechanical devices or other means to accelerate the defrosting process, other than those recommended by the manufacturer.
- WARNING: Do not damage the refrigerant circuit.
- WARNING: Do not use electrical appliances inside the food storage compartments of the appliance, unless they are of the type recommended by the manufacturer
Installation Safety Precautions
Electrical Connection
- This appliance should be properly grounded for your safety. The power cord of this appliance is equipped with a three-prong plug which mates with standard three prong wall outlets to minimise the possibility of electrical shock.
- Do not under any circumstances cut or remove the third ground prong from the power cord supplied. For personal safety, this appliance must be properly grounded.
- This appliance requires a standard 240 Volt AC \~/50Hz electrical ground outlet with three-prong. Have the wall outlet and circuit checked by a qualified electrician to make sure the outlet is properly grounded. When a standard 2-prong wall outlet is encountered, it is your responsibility and obligation to have it replaced with a properly grounded 3-prong wall outlet.
- The cord should be secured behind the appliance and not left exposed or dangling to prevent accidental injury.
- The appliance should always be plugged into its own individual electrical outlet which has a voltage rating that matches the rating label on the appliance. This provides the best performance and also prevent overloading house wiring circuits that could cause a fire hazard from overheated. Never unplug the appliance by pulling the power cord. Always grip the plug firmly and pull straight out from the receptacle. Repair or replace immediately all power cords that have become frayed or otherwise damaged. Do not use a cord that shows cracks or abrasion damage along its length or at either end. When moving the appliance, be careful not to damage the power cord.
Extension Cord
- Because of potential safety hazards under certain conditions, it is strongly recommended that you do not use an extension cord with this appliance. However, if you must use an extension cord it must be checked and tested by a qualified technician or service person.
The extension cord must be a VDE-Listed, 3-wire grounding extension cord that has a grounding plug and outlet and that the electrical rating of the cord is 220-240 Volts and at least 10 amperes.
WARNING
- To prevent damaging the door gasket, make sure to have the door fully open when pulling shelves out of the rail compartment.
- The appliance must be positioned so that the plug is accessible. Release the electric cord. Move your cabinet to its final location. Do not move your Cabinet while loaded with wine. You might distort the body. The wine cooler should be installed in a suitable place in order to avoid touching the compressor with the hand.
- If the supply cord is damaged, it must be replaced by manufacturer of its Service agent or a similarly qualified person in order to avoid a hazard.
WARNING
To reduce the risk of fire, electrical shock, or injury when using your appliance, follow these basic precautions:
- Read all instructions before using the appliance.
• DANGER or WARNING: Risk of child entrapment.
Child entrapment and suffocation are not problems of the past. Junked or abandoned appliances are still dangerous . . . even if they will "just sit in the garage a few days". - Before you throw away your old Wine/Beverage Cabinet: Take off the door. Leave the shelves in place so that children may not easily climb inside.
- Never allow children to operate, play with, or crawl inside the appliance.
- Never clean appliance parts with flammable fluids. The fumes can create a fire hazard or explosion.
- Do not store or use gasoline or any other flammable vapors and liquids in the vicinity of this or any other appliance. The fumes can create a fire hazard or explosion.
Before using your Wine/Beverage Cabinet
- Please remove all packaging, stickers and films from the products surface and clean the product's surfaces with a damp cloth and mild detergent before using for the first time.
- Let the appliance stand upright for approximately 24 hours before connecting it to the power source, which helps to reduce the possibility of a cooling-system malfunction from handling during transportation.
- When disposing of your appliance, please choose an authorised disposal site in your local area.
Installation of your Wine/Beverage Cabinet
- Place your appliance on a floor that is strong enough to support it when it is fully loaded. To level your appliance, adjust the levelling legs at the bottom of the Cabinet.
- Locate the appliance away from direct sunlight and sources of heat (stove, heater, radiator, etc.). Direct sunlight may affect the acrylic coating and heat sources may increase electrical consumption. Extreme cold ambient temperatures may also cause the unit not to perform properly.
- Avoid locating the unit in moist areas.
- Plug the appliance into an exclusive, properly installed-grounded wall outlet. Do not under any circumstances cut or remove the third (ground) prong from the power cord. Any questions concerning power and/or grounding should be directed toward a certified electrician or an authorised service center.
- IMPORTANT: The front louver at the base of the appliance is for ventilation. Nothing should be placed in front of this front louver; otherwise your appliance may not operate properly.
- A decorative plinth can be fitted to the front of the base vent, a cut-out should be made in the plinth with bigger size than the front louver. The cut out is required whether the front louver is removed or not.
- WARNING: When positioning the appliance, ensure the supply cord is not trapped or damaged.
- WARNING: Do not locate multiple portable socket-outlets or portable power supplies at the rear of the appliance.
Recessed Installation of your Wine/Beverage Cabinet - Models DELWC46S, DELWC46D & DELBC178
Your Wine Cabinet can be recessed into a cavity space as long as there is sufficient ventilation surrounding the appliance.
- Ensure that the installation cavity is large enough to contain the Wine/Beverage Cabinet including the required ventilation and that the floor is strong enough to support the weight of it when full. For the required ventilation dimensions, please refer to the illustrations.
- Avoid locating the unit in moist areas.
- For the best performance of your Wine/Beverage cabinet, locate it in a dry area away from direct sunlight and sources of heat. The recommended temperature for the installed location is 18-30°C (64-86°F).
- Level the Wine Cabinet by adjusting the front levelling legs at the bottom of the appliance.
- Plug the appliance into an exclusive, properly installed-grounded wall outlet. Do not under any circumstances cut or remove the third (ground) prong from the power cord. Any questions concerning power and/or grounding should be directed toward a certified electrician or an authorised De'Longhi product service center.
-
Push the Cabinet into the cavity ensuring the AC supply cord and plug do not get pinched or damaged.
-
IMPORTANT: The front louver at the base of the appliance is for ventilation. Nothing should be placed in front of this front louver; otherwise your appliance may not operate properly.
- A decorative plinth can be fitted to the front of the base vent, a cut-out should be made in the plinth with bigger size than the front louver. The cut out is required whether the front louver is removed or not.
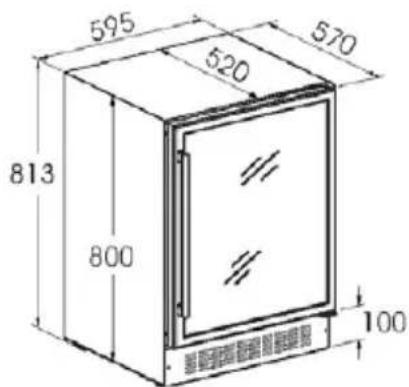
Height Adjustment: 813mm - 833mm
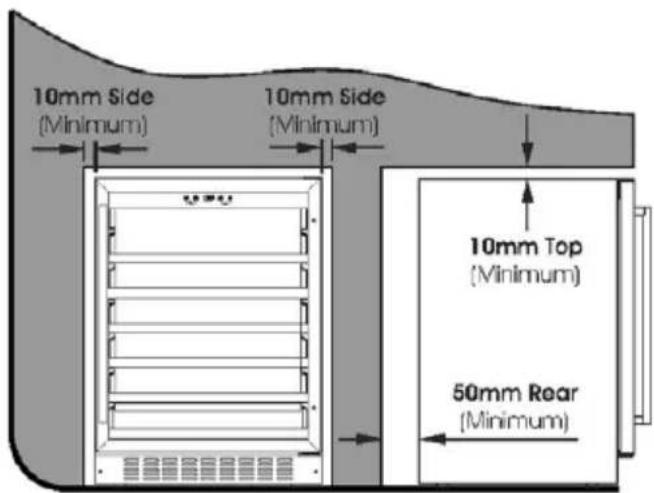
Clearances for Ventilation
Recessed Installation of your Wine Cabinet - Models DELWC166S
Your Wine Cabinet can be recessed into a cavity space as long as there is sufficient ventilation surrounding the appliance.
- Ensure that the installation cavity is large enough to contain the Wine/Beverage Cabinet including the required ventilation and that the floor is strong enough to support the weight of it when full. For the required ventilation dimensions, please refer to the illustrations.
- Avoid locating the unit in moist areas.
- For the best performance of your Wine/Beverage cabinet, locate it in a dry area away from direct sunlight and sources of heat. The recommended temperature for the installed location is 18-30°C (64-86°F).
- Level the Wine Cabinet by adjusting the front levelling legs at the bottom of the appliance.
- Plug the appliance into an exclusive, properly installed-grounded wall outlet. Do not under any circumstances cut or remove the third (ground) prong from the power cord. Any questions concerning power and/or grounding should be directed toward a certified electrician or an authorised De'Longhi product service center.
- Push the Cabinet into the cavity ensuring the AC supply cord and plug do not get pinched or damaged.
- IMPORTANT: The front louver at the base of the appliance is for ventilation. Nothing should be placed in front of this front louver; otherwise your appliance may not operate properly.
- A decorative plinth can be fitted to the front of the base vent, a cut-out should be made in the plinth with bigger size than the front louver. The cut out is required whether the front louver is removed or not.
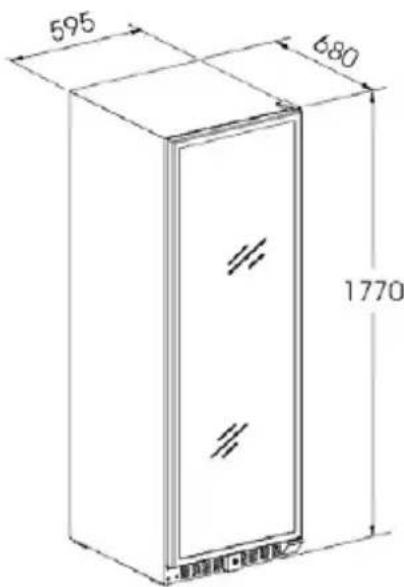
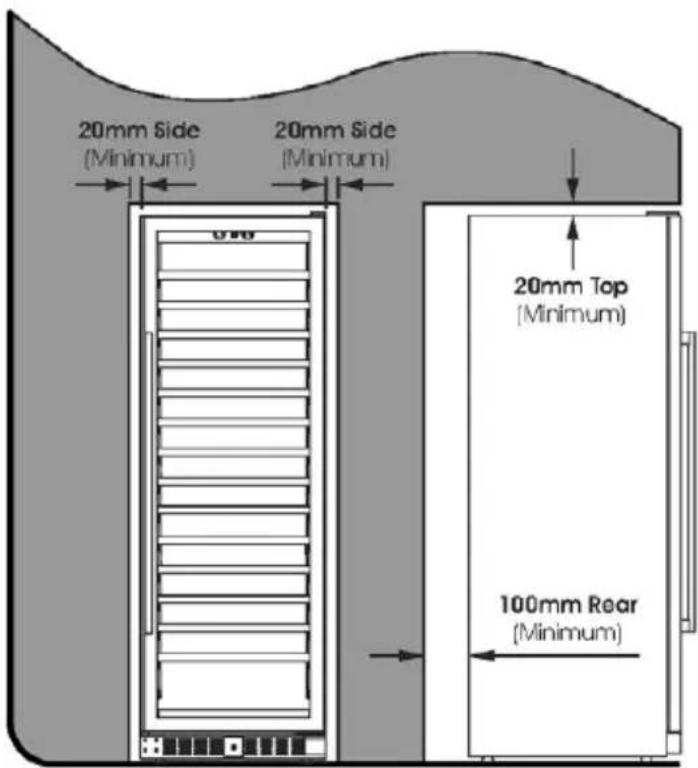
Clearances for Ventilation
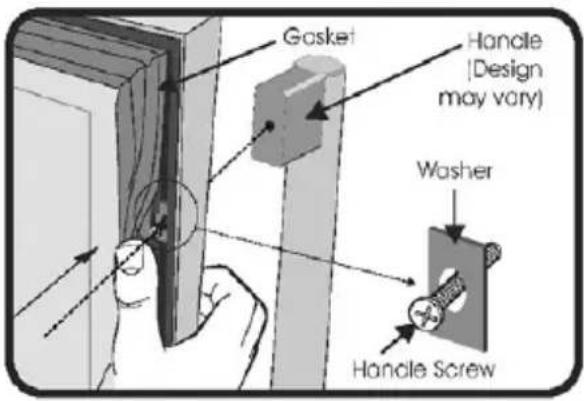
Installing the Handle
- Remove the door Gasket slightly to expose the two screw holes.
- Fix the Handle by screwing the two Handle Screws tightly, the Handle Screws with Washers are pre-installed inside the screw holes. Do not unscrew the Handle Screws too much in case the Washers fall off.
• Refit the Gasket into position.
Adjusting the height and levelling
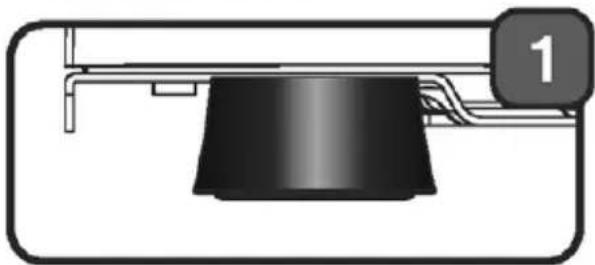
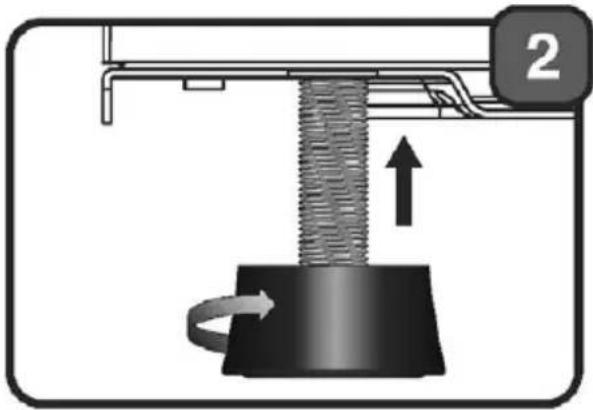
- The appliance is equipped with adjustable feet, so that the height may be adjusted to level the cabinet on uneven floor surfaces.
• We recommend that two people carry out this procedure. - The height must be adjusted prior to building the appliance into the housing unit and it should be set at such a height that the top panel of the appliance fits exactly below the kitchen worktop.
1) Tilt the appliance approximately 60° to allow access to the adjustable feet.
Take care to ensure the cabinet is supported at all times).
natural_image
Pure diagram of a mechanical component with no text, numbers, or symbols2) Twist the foot into a suitable position to level the cabinet.
natural_image
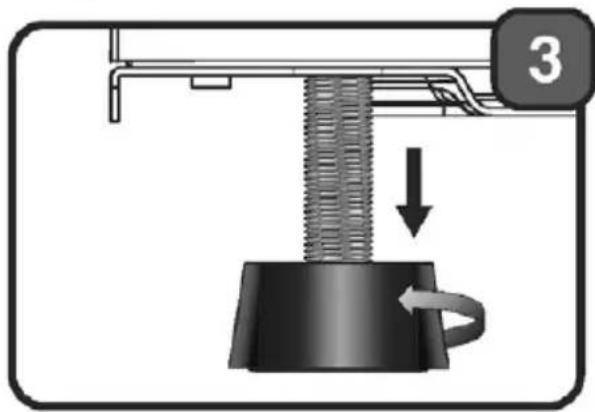
Diagram of a mechanical device with a threaded rod and rotating base, showing directional arrows (no text or symbols)3) Repeat these steps for the other adjustable feet.
natural_image
Mechanical assembly diagram showing a spring-loaded component with a downward arrow indicating motion (no text or symbols)IMPORTANT: If the appliance is not level, then the door and door seal may be affected.
IMPORTANT: Do not move the appliance when the feet are adjusted high.
Locking & Unlocking the Door
- The Lock is an optional function. If your appliance has such function, a key should be attached inside the packing of this Manual.
- Insert the key into the lock and turn it counter-clockwise to unlock the door. To lock it, please turn clockwise. Please keep the key somewhere safe.
Reversing the Door Swing - Models DELWC46S, DELWC46D & DELBC178
- Open the door, and loosen the 2 screws from the Pivot Hinge of the Bottom Right Hinge.
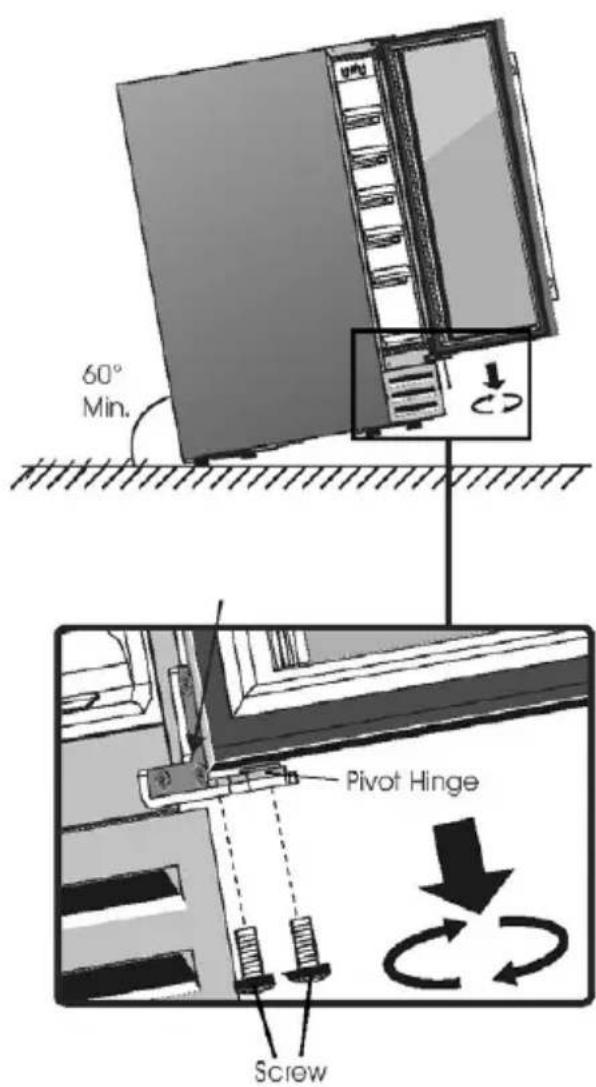
- Carefully remove the door from the Upper Right Hinge and prevent it from scratching. Take out the Pivot Hinge from the door hinge hole.
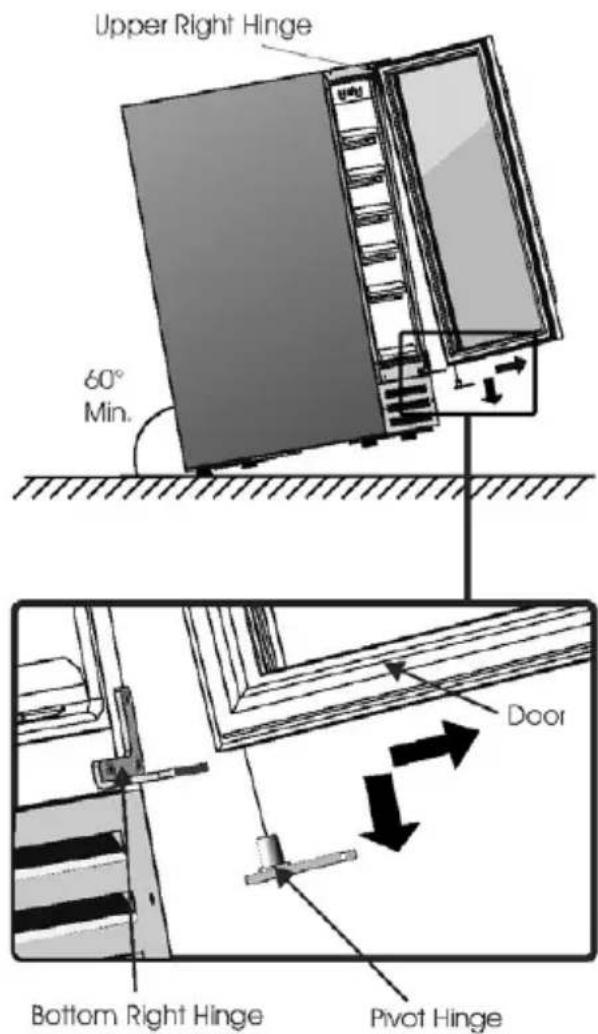
Installation
- Unscrew the Upper Right Hinge and Bottom Right Hinge from the cabinet. Keep them aside for door re-installation.
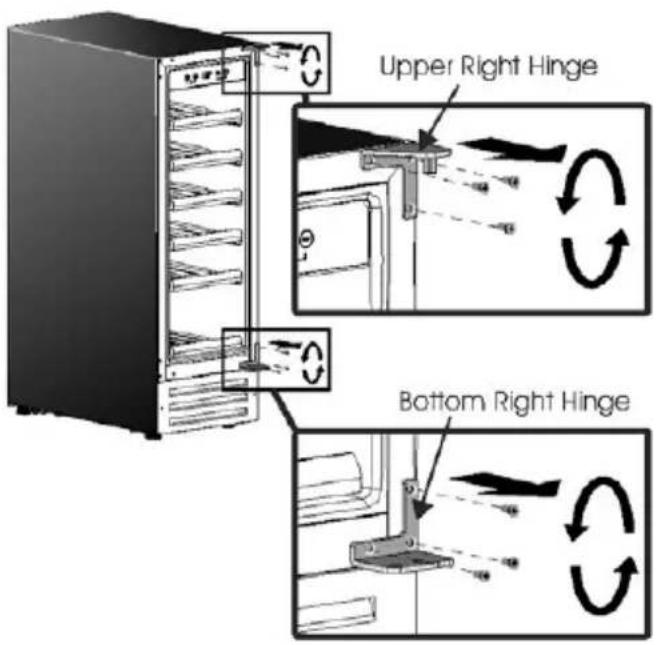
- Pull out the 6 Plastic Caps at the front left corner of the cabinet. And move them all to the right side.
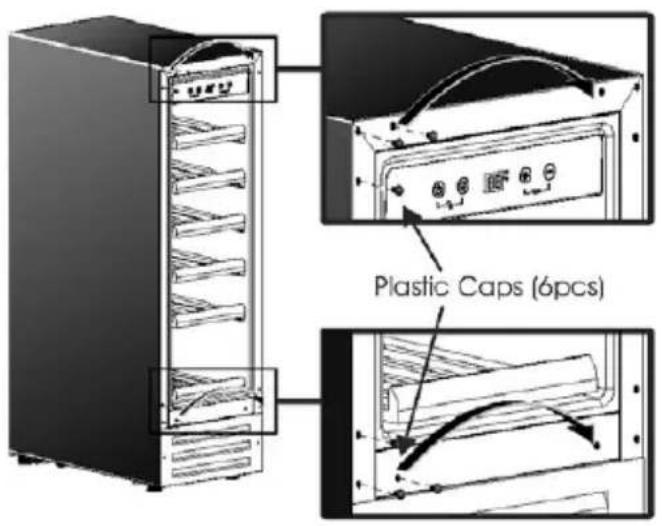
- Install the removed hinge brackets onto the opposite side. Upper Right Hinge becomes Bottom Left Hinge and Bottom Right Hinge becomes Upper Left Hinge. Make sure the screws are tightened.
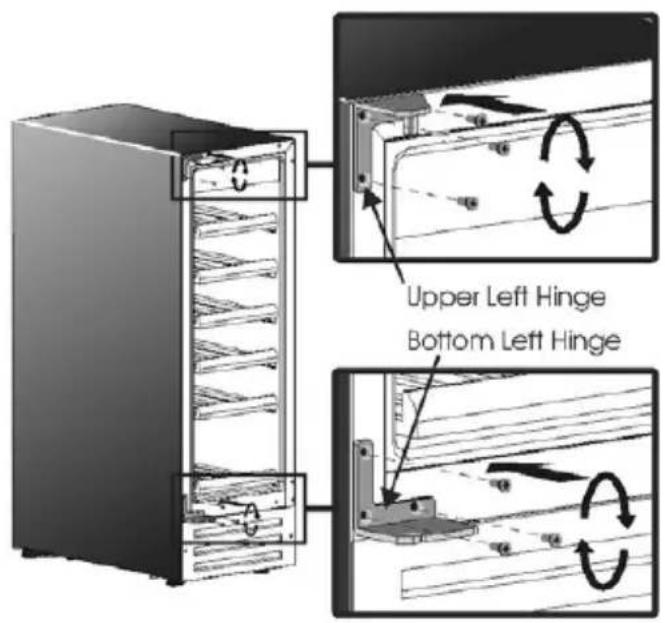
- Move the Hinge Hole Cap (at the top of the door) from the left side to the right side.
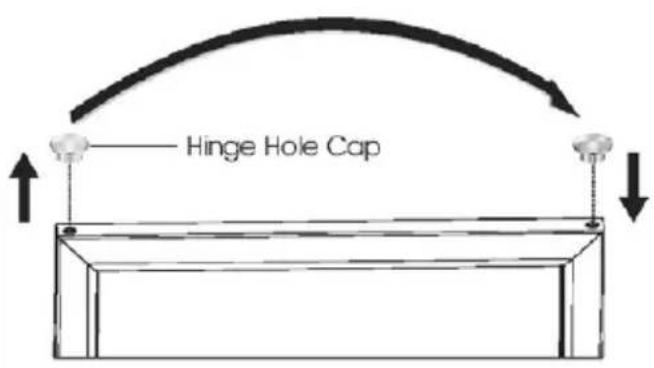
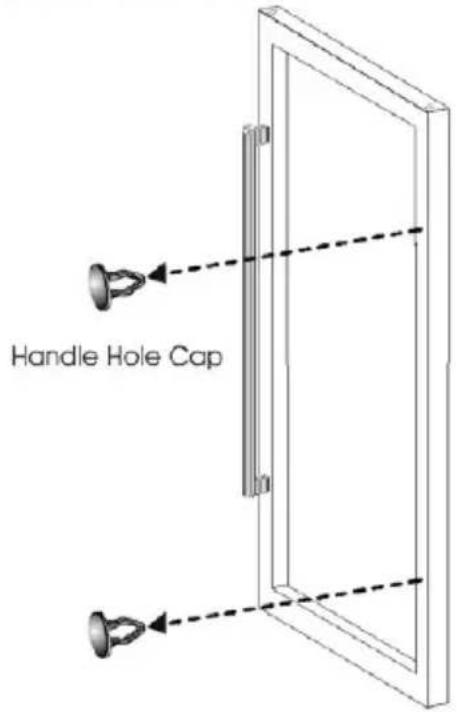
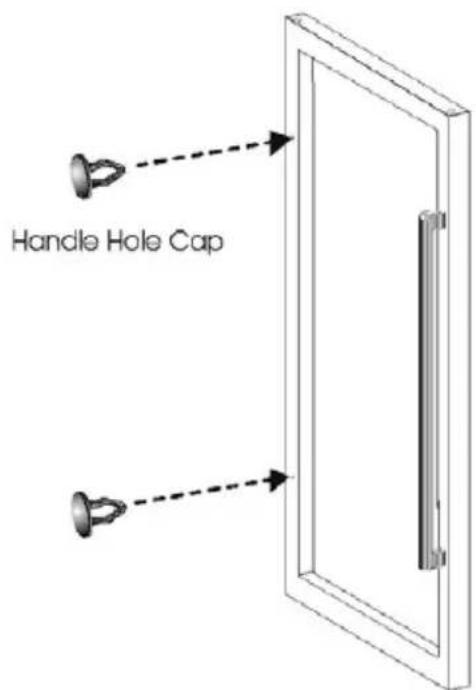
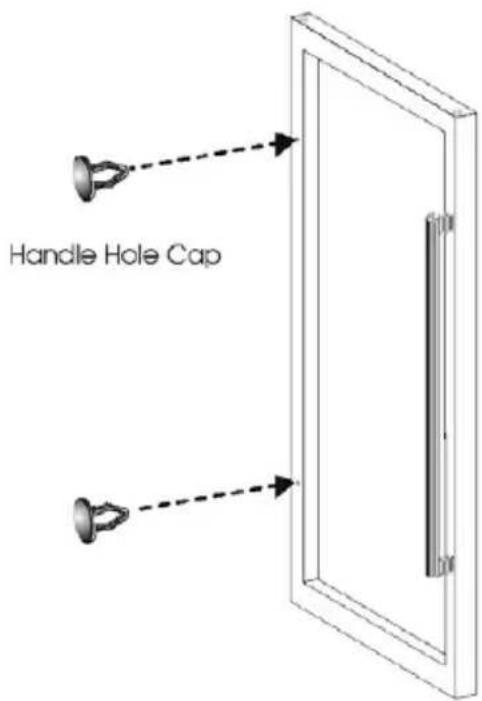
- Remove the Handle Hole Cap (2pcs) on the right side of Door by prying it out gently with a small flat screwdriver.
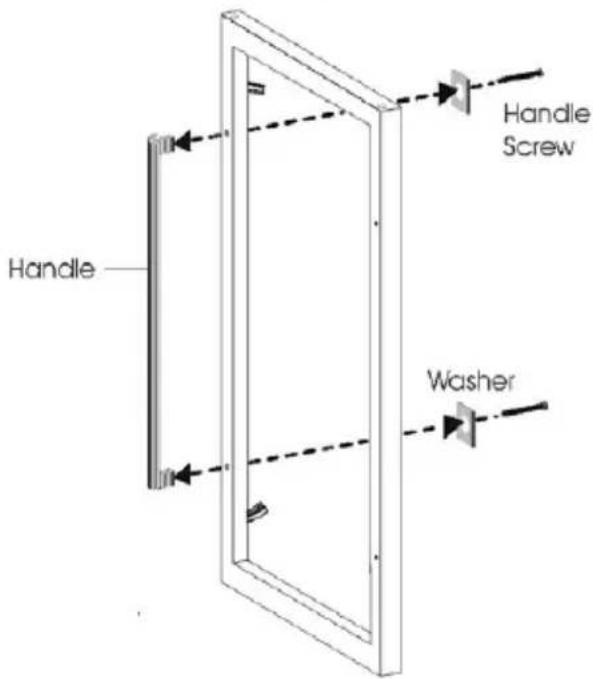
- Gently pull the door gasket to one side to reveal the Handle Screws (2pcs) on the left side of the Door. Unscrew it with a cross screwdriver and Remove the Handle (Leave the Washers in place).
- Install the Handle to the right side of the door by screwing the Handle Screws (2PCS) in tightly.
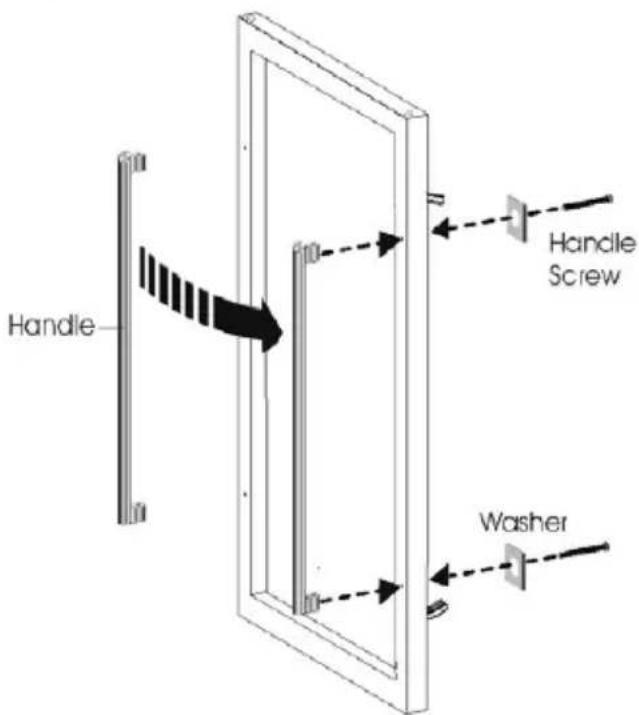
- Push the Handle Hole Cap (2pcs) into the Handle Holes on the left side of the Door.
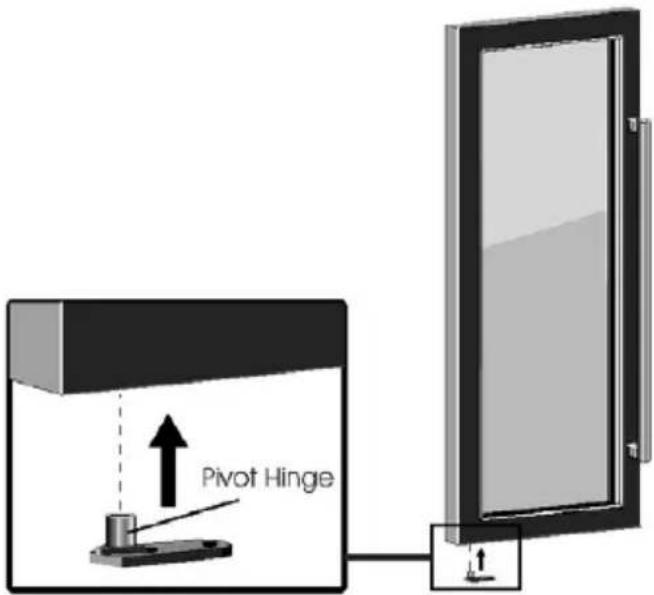
- Insert the Pivot Hinge into the bottom hinge hole of the door.
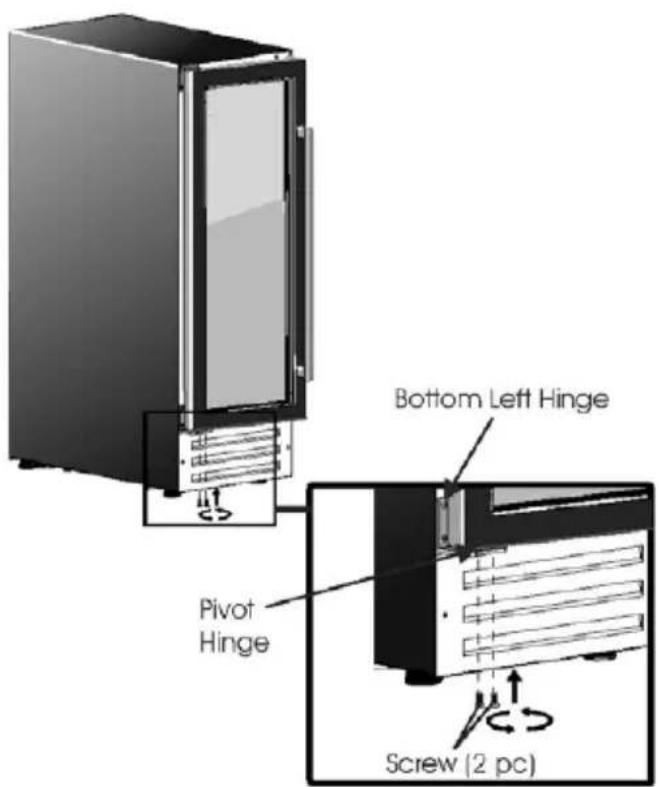
- Install the door to the left hinge side by tightening the Pivot Hinge with the 2 screws.
Reversing the Door Swing - Model DELWC166S
IMPORTANT INFORMATION: We recommend that you secure the racks in place using adhesive tape to prevent causing damage when handling the appliance and store all removed parts carefully.
- Remove the Hole Cover and Upper Hinge Cover on top side using a flat-head screwdriver. Remove the Upper Hinge by unscrewing the Hex Head Screws (4pcs). Now carefully lift the Door off the Bottom Hinge with your assistant and gently set it aside. It is important to keep the Hinge Washer on the top of Bottom Hinge for re-installation.
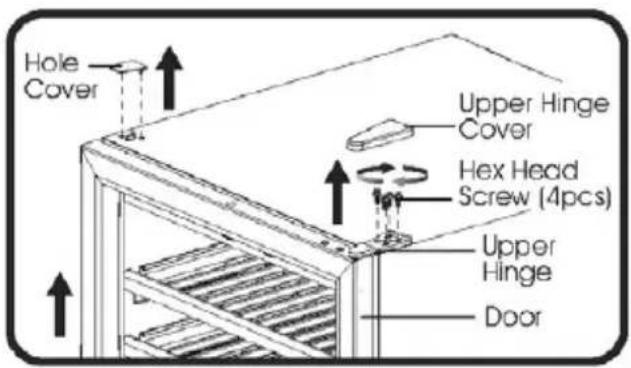
- Move the Hinge Hole Cap (at the top of the door) from the left side to the right side. Move the Pivot Hinge (at the bottom of the door) from the right to the left side.
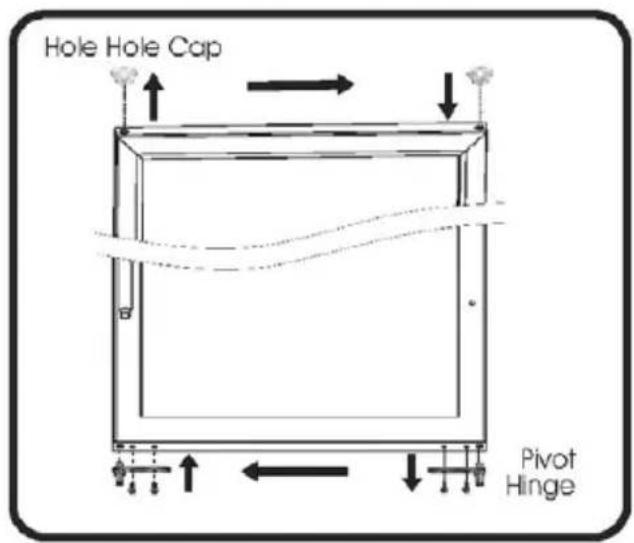
Installation
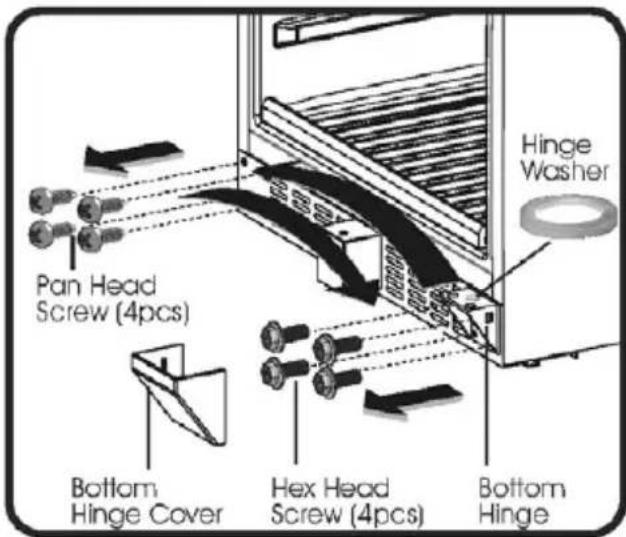
- Remove the Bottom Hinge Cover by prying it off gently with small flat screwdriver. Remove the Bottom Hinge by unscrewing the Hex Head Screw (4pcs). Unscrew the Pan Head Screw (4pcs) from bottom left side. Now move the Bottom Hinge to the bottom left side and screw it tightly with the Hex Head Screws (4pcs). Move the Pan Head Screw (4pcs) to the bottom right side and screw it in.
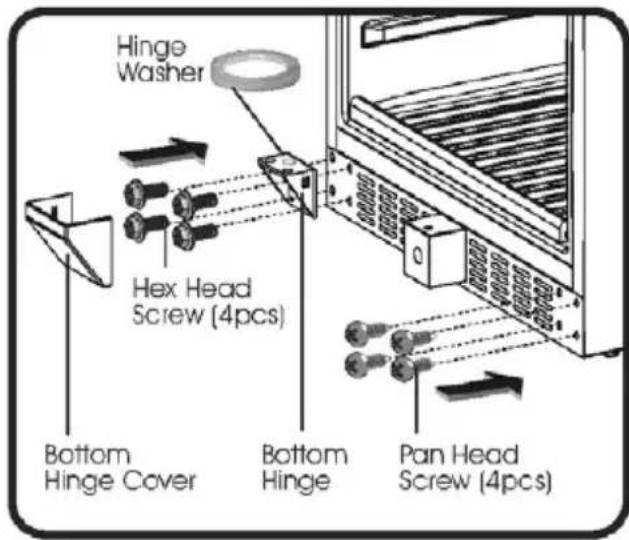
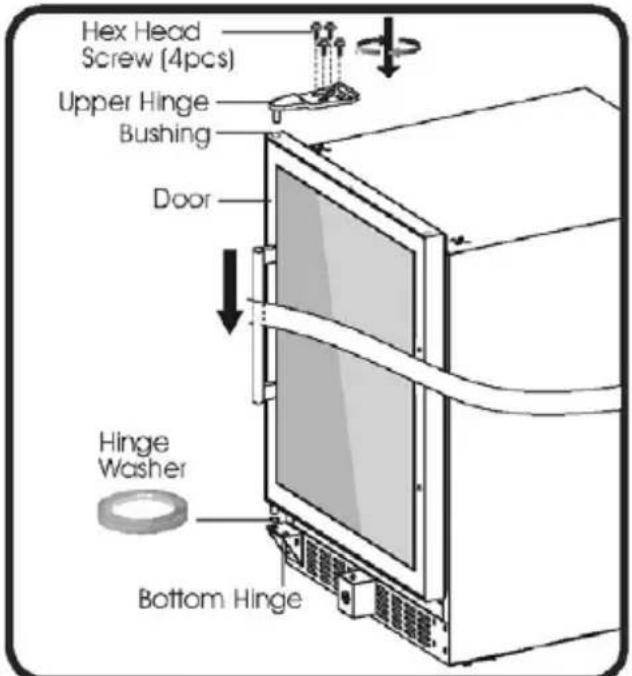
- Hold the Door carefully with your assistant and place it on the top of the Bottom Hinge, make sure the Pivot Hinge is in the correct place through the Hinge Washer. Insert the pin of the Upper Hinge into the Bushing on the top right and fix it with Hex Head Screw (4pcs). Cover the Upper Hinge and Bottom Hinge with Upper Hinge Cover and Bottom Hinge Cover. Cover hinge screw holes on the top right with the Hole Cover.
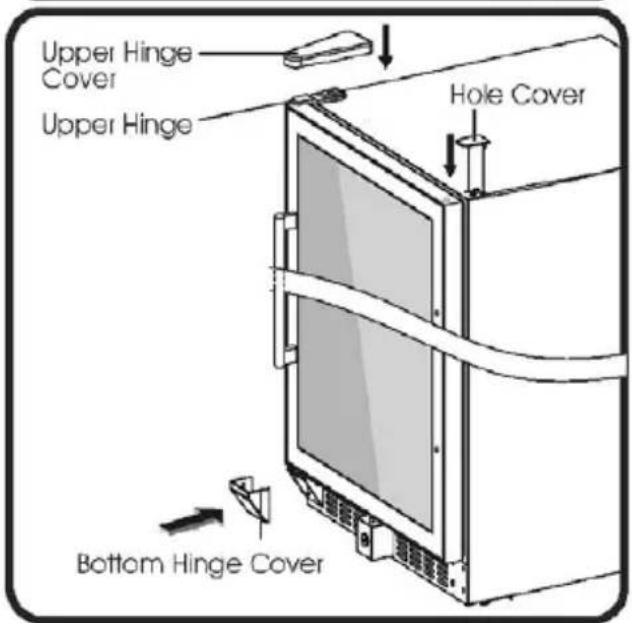
Installation
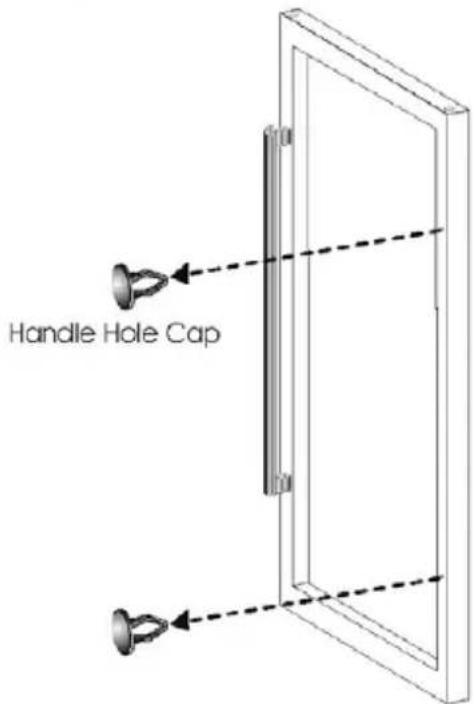
- Remove the Handle Hole Cap (2pcs) on the right side of the door by prying it out gently with a small flat screwdriver.
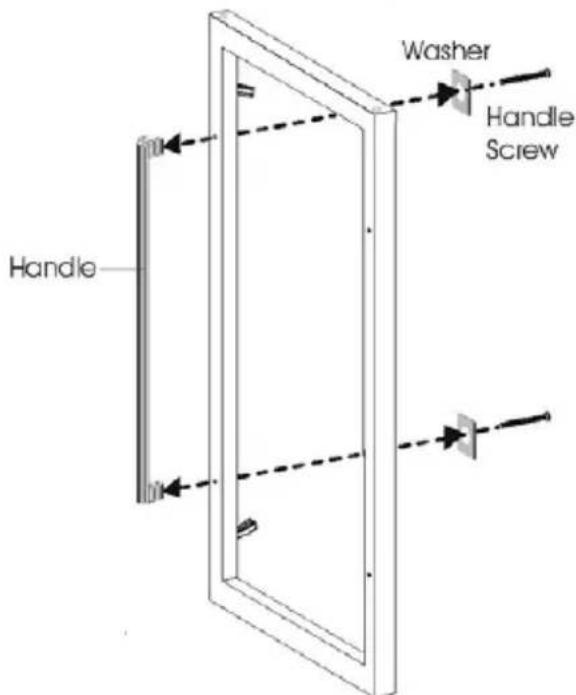
- Gently pull the door gasket to one side to reveal the Handle Screws (2pcs) on the left side of the Door. Unscrew it with a cross screwdriver and remove the Handle (Leave the Washers in place).
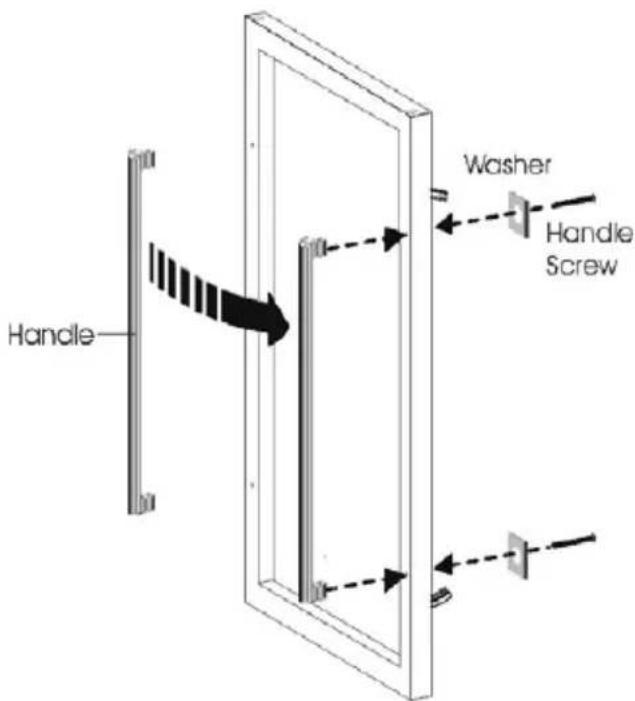
- Install the Handle to the right side of the door by screwing the Handle Screws (2PCS) in tightly.
- Push the Handle Hole Cap (2pcs) into the Handle Holes on the left side of the Door.
Using Your Wine/Beverage Cabinet
Energy Saving
• Always ensure good ventilation. Do not cover ventilation opening or grille.
• Always keep fan louvers clear.
- Do not place the appliance in areas of direct sunlight or close to a stove, heater or similar object.
- Open or keep the doors open as little as possible.
- Remove dust present on the rear of the appliance.
Working Climate
- The appliance is designed for operating at the T climate class (16-43°C). For best operation it is recommended to maintain the ambient temperature around 22-25°C which helps the appliance working with low power consumption.
- If the ambient temperature is above or below the designed climate range, the performance of the unit may be affected. For example, the appliance operating in extreme cold or hot conditions may cause interior temperatures to fluctuate, and the temperature set 5-22°C may not be reached sometimes.
Wine Storage
- The standard shelves are designed perfectly for Bordeaux bottle storage. The maximum loaded bottles may vary subject to the different size or dimension wine bottles you store.
- The shelves are allowed to be pulled out by about 1/3 length for easy access to the wine storage.
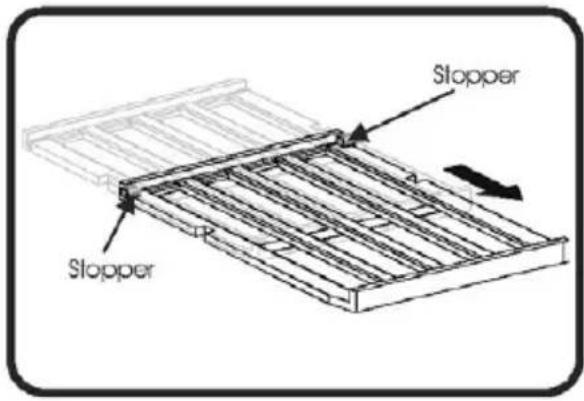
• To prevent damaging the door gasket, make sure to have the door opened fully all the way before pulling the shelves out.
- Please store wine in sealed bottles.
- Do not cover the shelves with aluminum foil or any other shelf material which may prevent air circulation.
- Should the cabinet be left empty for long periods it is suggested that the appliance is unplugged, and after careful cleaning, leave the door ajar to allow air to circulate inside the cabinet in order to avoid possible condensation, mold or odours forming.
- Recommended temperatures for chilling/storing your wines.
| Wine Type | Recommended Temp. |
| Red Wine | 15-18°C |
| Dry/White Wines | 9-14°C |
| Rose Wines | 10-11°C |
| Sparkling Wines | 5-8°C |
Using Your Wine/Beverage Cabinet
Control Panel - Single Zone models
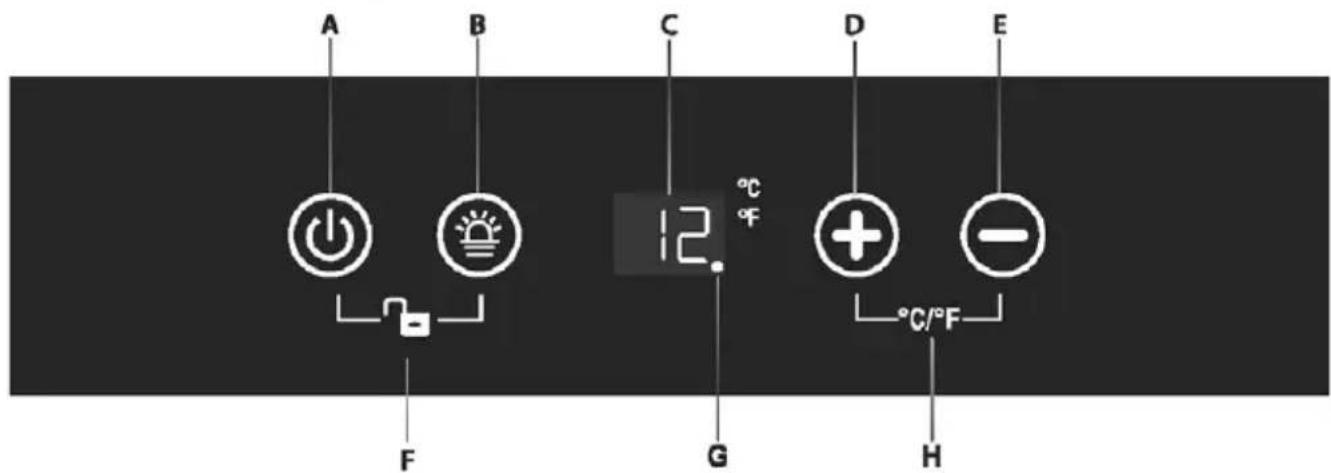
A Power
B Lighting
© Display Window
D Temp (PLUS)
E Temp (MINUS)
F Lock/Unlock
G Function Indicator
H °C/°F Switch
Control Panel - Dual Zone models
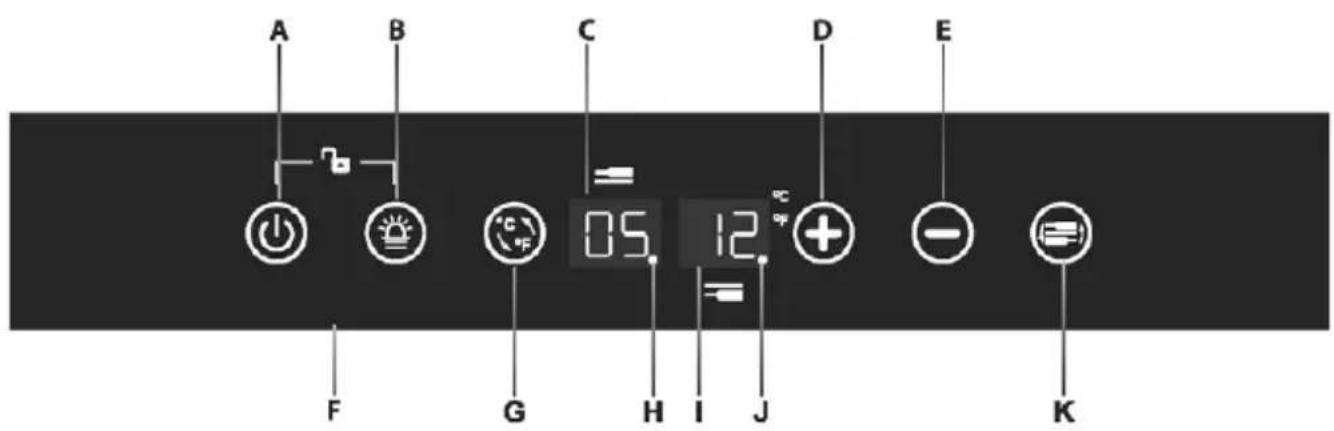
A Power
B Lighting
© Upper Zone Display Window
D Temp (PLUS)
E Temp (MINUS)
F Lock/Unlock
G °C/°F Switch
H Function Indicator 1
① Lower Zone Display Window
J Function Indicator 2
K Zone Select
Using Your Wine/Beverage Cabinet
Power ON/OFF Control
- When the appliance is plugged in to a power outlet, it powers on automatically.
- Touch the power mark ⏻ and hold for 10 seconds to turn off (or turn on) the appliance.
- Whether it is under a locked or unlocked condition, you can turn off the appliance by touching the power mark ⓑ and holding it for 10 seconds.
WARNING: To avoid damaging the compressor, please do not turn on the appliance again within 5 minutes after you turn it off.
Unlocking the Control Panel
- To unlock the control panel, touch the power mark and lighting mark Ⓞ with 2 fingers at the same time and hold for 3 seconds. When unlocked a buzz sound will be heard.
- The control panel will be automatically locked with a buzz sound heard after 10 seconds without being touched.
- Under the locked condition, the control panel will not react to any presses except for Lighting On/Off and Temperature Setting.
Interior Lighting ON/OFF Control
- Under the unlocked condition, touch the lighting mark ⚙️ to turn on (or turn off) the interior cool LED lighting.
- The lighting will stay on until it is manually turned off.
Temperature Display Window
- The temperature is displayed in digital format. The number is shown when you are setting the temperature.
- When the temperature probe is out of order, the display window will show with "HH" or "LL" instead of a digital figure while continuous buzz sound will be heard. In case of this happening, this appliance is designed to keep periodically running the compressor and fans which help to keep the coldness of the inside cabinet to protect your stored wines.
WARNING: To avoid destroying your stored wines, it is strongly recommended to have the appliance repaired immediately, as the periodical running cannot ensure that the appliance will achieve the temperature you have set.
Temperature Range Setting
(For Single Zone)
- The default temperature setting range is E: 5-22°C (41-72°F).
- To set a temperature range as desired, please make sure the control panel is under locked condition.
- Press the mark ⊖ for 3 seconds, the display window will flash "E"--"F"--"H"--"L" in loop with a sound of beep by every pressing.
- Leave the window flashing for 3 seconds with a sound of beep to confirm the setting.
| Display | Temp Range (Single Zone) |
| E (Default) | 5-22°C |
| F | 2-20°C |
| H | 10-19°C |
| L | 0-20°C |
Temperature Range Setting (For Dual Zone)
- The default temperature setting ranges are E: 5-12 °C (41-54 °F) for the upper zone and 12-22 °C (54-72 °F) for the bottom zone.
- To set a temperature range as desired, please make sure the control panel is under the locked condition.
- Press the mark ⊖ for 3 seconds, the display windows will flash "E"--"F"--"H"--"L" in loop with a beeping sound for every press.
- Leave the display window flashing for 3 seconds with a beeping sound to confirm the setting.
| Display | Temp Range (Dual Zone) | |
| Upper Zone | Lower Zone | |
| E (Default) | 5-12°C | 12-22°C |
| F | 2-12°C | 12-20°C |
| H | 5-12°C | 8-19°C |
| L | 2-10°C | 12-22°C |
Temperature Setting (For Single Zone)
- The default temperature setting range is E: 5-22°C (41-72°F).
- Directly touch the ⭕ or ⊖ mark to set the wine cooler temperature as you want.
- The first touch on ⭕ or ⊖ mark will recall the previous set temperature displayed.
- Touch the mark ⬕ to increase the set temperature by 1°C (or by 1°F). On the contrary, touch the mark ⬇ to decrease the set temperature by 1°C (or by 1°F).
Temperature Setting (For Dual Zone)
- The default temperature setting ranges are E: 5-12 °C (41-54 °F) for the upper zone and 12-22 °C (54-72 °F) for the bottom zone.
- You need to select the set zone by touching the mark ☐ before touching the mark + or - to set the desired temperature. The zone temperature will flash when it is ready to be set.
- The first touch on mark ⊕ or ⊖ will recall the previous set temperature displayed in the digital window.
- Touch the mark ⊕ to increase the set temperature by 1°C (or by 1°F). On the contrary, touch the mark ⊖ to decrease the set temperature by 1°C (or by 1°F).
Selecting Fahrenheit (°F) or Celcius (°C) on the Display (For Single Zone)
- Touch the marks Ⓞ with 2 fingers at the same time and hold for 5 seconds, you can interchange the Fahrenheit and Celsius display.
Selecting Fahrenheit (°F) or Celsius (°C) on the Display (For Dual Zone)
- Directly touch the mark 📋 you can interchange the Fahrenheit and Celsius display for both zones at the same time.
Using Your Wine/Beverage Cabinet
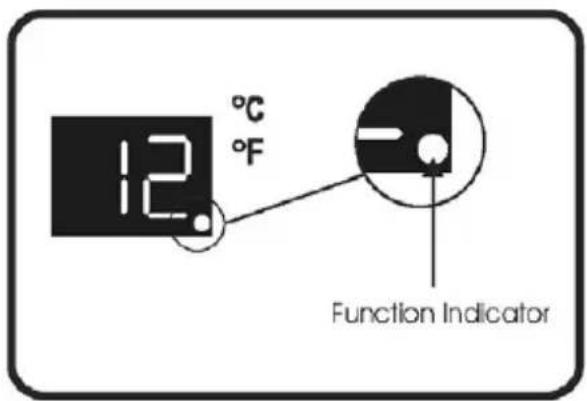
Function Indicating Light (For Single Zone)
- When the compressor starts to work, the Indicator will stay on;
• In other conditions, the Indicator will be off.
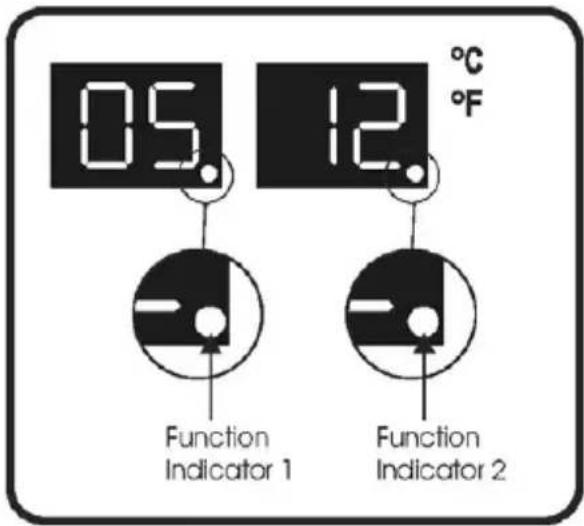
Function Indicating Light (For Dual Zone)
- The Indicator 1 will flash every 2 seconds when the unit is plugged in;
- The Indicator 1 will stay on when the compressor starts to work;
- The Indicator 2 will flash every 3 seconds when the heating function of lower zone starts to work;
- The Indicator 2 will stay on when the cooling function of lower zone starts to work.
Cleaning the Wine Cooler
- Turn off the power, unplug the appliance, and remove all items including shelves.
- Wipe the inside surfaces with a sponge and baking soda solution. The solution should be about 2 tablespoons of baking soda to 1 litre of warm water.
- Wash the shelves with a mild detergent solution. Allow wooden shelves to dry before placing back into the wine cooler.
- Wring excess water out of the sponge or cloth when cleaning area of the controls, or any electrical parts.
- Wipe the outside cabinet with warm water and mild liquid detergent. Wipe dry with a clean soft cloth.
- Do not use steel wool or steel brush on the stainless steel. These will scratch the stainless steel with steel particles and rusting may occur.
Removing the Shelves
- Before removing a Shelf from the appliance, it is necessary to remove all the bottles on the Shelf.
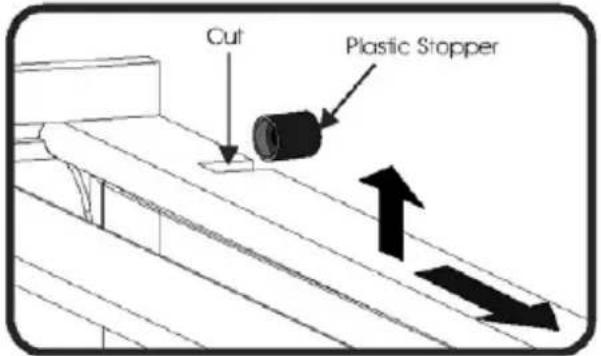
- For a model without Telescopic Rail, move the shelf to the position where the cut of the wooden shelf is directly under the plastic stopper and lift the wooden shelf.
- Please ensure these are replaced when the shelf is put back.
- Make sure the shelves are fully engaged before loading any bottle into the cabinet. Pull the shelves out all the way to the STOPPER position and push them back in several times to make sure the shelves are properly engaged.
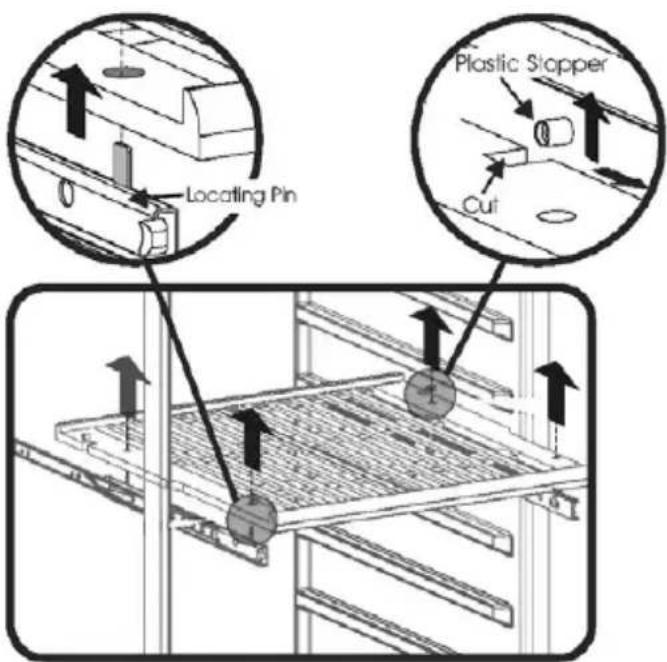
- For models with Telescopic Rail, lift the whole Shelf upwards horizontally to get it off the 4 Locating Pins of the Telescopic Rail.
Carbon Filter Change (Wine Cabinet models only)
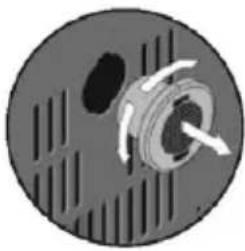
- A good ambient air quality is important for wine maturing. The Carbon Filter is very helpful to absorb odour and improve air quality. For the models with Carbon Filter, we suggest to replace it once a year. Please contact your dealer to get the filter.
- Removing the Carbon Filter: Hold the Carbon Filter and turn it 90° to the left or right to remove it.
• Reinstalling the Carbon Filter:
Hold the Carbon Filter and turn it 90° to the left or right until it clicks into place.
natural_image
Circular mechanical component with internal gear and ventilation slots (no text or symbols)Defrosting
- A Defrosting occurs automatically inside of the appliance during operation. The defrost water is collected by the evaporating tray and evaporates automatically.
- The evaporating tray and defrost water drain hole should be cleaned periodically. This will prevent water from collecting in the bottom of the appliance, instead of flowing down the defrost drainage channel and drain hole.
- You can also pour a small amount of water down the drain hole to clean inside of it.
- You should be careful to make sure that wine bottles do not touch the rear wall of the appliance, as this can interrupt the automatic defrosting process and deflect water into the base of your appliance.
Moving your Cabinet
If you need to move your appliance to another location you should follow the steps outlined below.
- Remove all items from the cabinet.
- Securely tape down all loose items such as the shelves inside of the appliance.
- Turn the adjustable foot up to the base to avoid damage.
- Tape the door closed.
- Ensure the appliance stays secure in the upright position during transportation. Also protect the outside of the appliance with a blanket or similar item.
Power Failure
- If power is cut to the appliance, for a few hours it will be able to maintain the temperature inside the cabinet. Providing that the number of times that the door is opened is kept to a minimum.
- If the power cut is for longer than a few hours, then you will need to store the contents in an alternate location to prevent them being affected by temperature rise.
IMPORTANT: If the appliance is unplugged, the power is lost or turned off you must wait 5 minutes before restarting the appliance. If you attempt to restart before this time delay, the compressor could be damaged.
Vacation Time
- Short vacations: Leave the appliance in operation for holidays of less than 3 weeks.
- Long vacations: If your appliance is not going to be in use for a period of time, you should remove the bottles of wine and switch off the appliance
- The interior should be cleaned with a solution of bicarbonate of soda and lukewarm water.
- The interior should then be thoroughly dried.
- To prevent mould growth, the door should be left slightly ajar.
Disconnecting from Power
- If the unit is unplugged, or there is a power cut, you must wait for 5 minutes before restarting. Attempting to restart the appliance before 5 minutes has elapsed, may cause it not to function.
If you feel the appliance is not working properly, follow these instructions to try to see if you can solve the problem easily by yourself before calling for service.
The Appliance does not operate
- Not plugged in.
• The appliance is turned off. - The circuit breaker tripped or a blown fuse.
The Appliance is not cold enough
- Check the temperature control setting.
- External environment may require a higher setting.
• The door is opened too often.
• The door is not closed completely.
• The door gasket does not seal properly.
Turns on and off frequently
- The room temperature is hotter than normal.
- A large amount of contents has been added to the appliance.
• The door is opened too often.
• The door is not closed completely. - The temperature control is not set correctly.
• The door gasket does not seal properly.
The light does not work
- Not plugged in.
- The circuit breaker tripped or a blown fuse.
• The light button is "OFF".
Too much vibration
- Check to assure that the appliance is level.
- Check to assure no parts inside the cabinet or in the compressor chamber are loose.
The Appliance seems to make too much noise.
- The rattling noise may come from the flow of the refrigerant, which is normal.
- As each cycle ends, you may hear gurgling sounds caused by the flow of refrigerant.
- Contraction and expansion of the inside walls may cause popping and crackling noises.
• The appliance is not level.
The door will not close properly.
• The appliance is not level.
- The door was reversed and not properly installed.
• The gasket is dirty.
• The shelves are out of position.
The display window is shown with "HH" or "LL" instead of a digital figure, and/or with continuous buzzing sound.
• The temperature probe is out of order.
Consumer Help
If you have any concerns or questions regarding the performance or use of your appliance, please visit:
www.delonghi.com.au
or
www.delonghi.co.nz
Australia
Phone: 1800 126 659
Fax: 1800 007 289
New Zealand
Phone: 0508 200 300
Fax: 0508 200 301
Help us Help You
Read this guide carefully, it is intended to help you operate and maintain your new appliance properly.
Keep it handy to answer your questions. If you don't understand something or you need more assistance, please call the De'Longhi Helpline.
To help us provide prompt answers to your queries, please record your appliance model and serial numbers. You'll find them on a plate located on the rear outside wall of the appliance.
Wine/Beverage Cabinet details
Date of Purchase
Model Number
Serial Number
Before you call for service
Check the Troubleshooting Section on page 28. It lists causes of minor operating problems that you can correct yourself.
STAPLE OR AFFIX PURCHASE RECEIPT HERE
Warranty Information
The De'Longhi Wine/Beverage Cabinet is warranted against faults resulting from manufacturing or material defects. The warranty period for normal domestic installation and use is three years from the date of purchase. In non-domestic use De'Longhi limits the voluntary warranty to 6 months.
De'Longhi undertakes to repair or replace the Wine/Beverage Cabinet at our discretion if the product is found to be defective due to a manufacturing fault during the warranty period.
This warranty excludes any damage caused by misuse, neglect, shipping accident, or incorrect installation. Normal wear and tear is also expressly excluded. The warranty claim is void if no fault is found with the product or if work is carried out by anyone other than an authorised De'Longhi Service Agent.
In Australia, this warranty is additional to the conditions and guarantees which are mandatory as implied under the Trade Practices Act 1974 and State and Territory legislation.
How to contact us about a warranty claim
Talk to a De'Longhi representative for further warranty or product information please call the number in your country:
Australia
www.delonghi.com.au
Phone: 1800 126 659
New Zealand
www.delonghi.co.nz
Phone: 0508 200 300
Notes
Consumer Helpline
Australia
Phone: 1800 126 659
Fax:1800 007 289
New Zealand
Phone: 0508 200 300
Fax: 0508 200 301
www.delonghi.com.au
www.delonghi.co.nz
Distributed by De'Longhi Australia Pty Ltd.
ABN 49 104 012 857
P.O. Box 4540 Casula Mall, NSW 2170
Distributed by De'Longhi New Zealand Ltd.
P.O. Box 58-056 Botany, MANUKAU 2163
Is a registered Trademark
of De'Longhi Australia Pty Ltd.
ABN 49 104 012 857.
© 2018 De'Longhi Australia Pty Ltd.
- De'Longhi Wine & Beverage Cabinet
- Contents
- Dimensions (Cabinet Housing)
- De'Longhi's Safety Precautions
- IMPORTANT SAFETY INSTRUCTIONS - READ ALL INSTRUCTIONS BEFORE USING, AND SAVE FOR FUTURE REFERENCE.
- Safety Alert Symbol
- DANGER
- WARNING
- CAUTION
- ! DANGER !
- R600a Refrigerant Warning
- FOLLOW WARNINGS BELOW ONLY WHEN APPLICABLE TO YOUR MODEL
- Wine & Beverage Cabinet Safety Precautions
- Installation Safety Precautions
- Electrical Connection
- Extension Cord
- Before using your Wine/Beverage Cabinet
- Installation of your Wine/Beverage Cabinet
- Recessed Installation of your Wine/Beverage Cabinet - Models DELWC46S, DELWC46D & DELBC178
- Recessed Installation of your Wine Cabinet - Models DELWC166S
- Installing the Handle
- Adjusting the height and levelling
- Locking & Unlocking the Door
- Reversing the Door Swing - Models DELWC46S, DELWC46D & DELBC178
- Installation
- Reversing the Door Swing - Model DELWC166S
- Using Your Wine/Beverage Cabinet
- Energy Saving
- Working Climate
- Wine Storage
- Power ON/OFF Control
- Unlocking the Control Panel
- Interior Lighting ON/OFF Control
- Temperature Display Window
- Temperature Range Setting
- (For Single Zone)
- Temperature Range Setting (For Dual Zone)
- Temperature Setting (For Single Zone)
- Temperature Setting (For Dual Zone)
- Selecting Fahrenheit (°F) or Celcius (°C) on the Display (For Single Zone)
- Selecting Fahrenheit (°F) or Celsius (°C) on the Display (For Dual Zone)
- Function Indicating Light (For Single Zone)
- Function Indicating Light (For Dual Zone)
- Cleaning the Wine Cooler
- Removing the Shelves
- Carbon Filter Change (Wine Cabinet models only)
- Defrosting
- Moving your Cabinet
- Power Failure
- Vacation Time
- Disconnecting from Power
- The Appliance does not operate
- The Appliance is not cold enough
- Turns on and off frequently
- The light does not work
- Too much vibration
- The Appliance seems to make too much noise.
- The door will not close properly.
- The display window is shown with "HH" or "LL" instead of a digital figure, and/or with continuous buzzing sound.
- Consumer Help
- Australia
- New Zealand
- Help us Help You
- Wine/Beverage Cabinet details
- Before you call for service
- Warranty Information
- How to contact us about a warranty claim
- Notes
- Consumer Helpline
Brand : DELONGHI
Model : DELBC178
Category : Fridge