ACT60GX - Cooker ALTUS - Free user manual and instructions
Find the device manual for free ACT60GX ALTUS in PDF.


| Product Type | Gas Cooktop (Freestanding or Built-in) |
| Brand | Altus |
| Model | ACT60GX |
| External Dimensions (H x W x D) | 44 mm x 610 mm x 510 mm |
| Installation Dimensions (W x D) | 560 mm x 480-490 mm |
| Voltage / Frequency | 220-240 V~, 50 Hz |
| Gas Type | Natural Gas (1.0 kPa) – convertible to Universal LPG (2.75 kPa) |
| Total Gas Consumption (NG) | 38.0 MJ/h |
| Total Gas Consumption (LPG) | 28.9 MJ/h |
| Number of Burners | 4 (Wok, 2 Normal, 1 Auxiliary) |
| Wok Burner Power (NG / LPG) | 18.0 MJ/h / 12.5 MJ/h |
| Normal Burner Power (NG / LPG) | 8.0 MJ/h / 6.5 MJ/h |
| Auxiliary Burner Power (NG / LPG) | 4.0 MJ/h / 3.4 MJ/h |
| Ignition System | Spark ignition (automatic) |
| Safety Features | Flame failure device (thermocouple) on each burner; gas shut-off safety |
| Material | Stainless steel / enamel surface |
| Cleaning Method | Manual cleaning with mild detergent; removable burner caps and heads |
| Number of Knobs | 4 (one per burner) |
| Pan Support | Enamelled steel pan supports (removable) |
| Recommended Pan Diameters | Auxiliary: 12-18 cm; Normal: 18-20 cm; Wok: 20-26 cm |
| Gas Connection | Rear right hand side; flexible hose (AS/NZS 1869 Class B or D) |
| Electrical Connection | Rear centre; plug or fixed installation; min. H05V2V2-F3 x 0.75 mm² cable |
Frequently Asked Questions - ACT60GX ALTUS
User questions about ACT60GX ALTUS
0 question about this device. Answer the ones you know or ask your own.
Ask a new question about this device
Download the instructions for your Cooker in PDF format for free! Find your manual ACT60GX - ALTUS and take your electronic device back in hand. On this page are published all the documents necessary for the use of your device. ACT60GX by ALTUS.
USER MANUAL ACT60GX ALTUS
natural_image
Simple line icon of a steaming hot pot with bubbles rising (no text or symbols)ACT60GX
EN
185.9289.29/R.AA/11.08.2021
7754786387
Please read this user manual first!
Dear Customer,
Thank you for purchasing this Altus product. We hope that you get the best results from your product which has been manufactured with high quality and state-of-the-art technology. Therefore, please read this entire user manual and all other accompanying documents carefully before using the product and keep it as a reference for future use. If you handover the product to someone else, give the user manual as well. Follow all warnings and information in the user manual.
Remember that this user manual is also applicable for several other models.
Differences between models will be identified in the manual.
Explanation of symbols
Throughout this user manual the following symbols are used:

Important information or useful hints about usage.

Warning of hazardous situations with regard to life and property.

Warning of electric shock.

Warning of risk of fire.

Warning of hot surfaces.
1 Important instructions and warnings for safety and environment 4
General safety....4
Safety when working with gas 5
Electrical safety 6
Product safety....7
Intended use....8
Safety for children 8
Disposing of the old product 9
Package information....9
2 General information 10
Overview 10
Technical specifications 11
Injector table....12
3 Installation 13
Before installation....13
Installation and connection.... 16
Gas conversion....20
Bypass screw adjustment (turns out) ..... 22
4 Preparation 23
Tips for saving energy 23
Initial use....23
First cleaning of the appliance......23
5 How to use the hob 24
General information about cooking.....24
Using the hobs....24
6 Maintenance and care 26
General cleaning information 26
Cleaning the hob 27
Cleaning the control panel....29
7 Troubleshooting 30
1 Important instructions and warnings for safety and environment
This section contains safety instructions that will help protect from risk of personal injury or property damage. Failure to follow these instructions shall void any warranty.
General safety
- The appliance is not intended for use by persons (including children) with reduced physical, sensory or mental capabilities, or lack of experience and knowledge, unless they have been given supervised or instruction concerning use of the appliance by a responsible person for their safety.
- Young children should be supervised to ensure that they do not play with the appliance.
- The appliance is not to be used by persons (including children) with reduced physical, sensory or mental capabilities, or lack of experience and knowledge, unless they have been
given supervision or instruction.
Children being supervised not to play with the appliance.
- If the product is handed over to someone else for personal use or second-hand use purposes, the user manual, product labels and other relevant documents and parts should be also given.
- Installation and repair procedures must always be performed by Authorised Service Agents. The manufacturer shall not be held responsible for damages arising from procedures carried out by unauthorised persons which may also void the warranty. Before installation, read the instructions carefully.
- Do not operate the product if it is defective or has any visible damage.
- Ensure that the product function knobs are switched off after every use.
Safety when working with gas
- Any works on gas equipment and systems may only be carried out by authorised qualified persons who are Gas Safe registered.
- Prior to the installation, ensure that the local distribution conditions (nature of the gas and gas pressure) and the adjustment of the appliance are compatible.
- This appliance is not connected to a combustion products or evacuation device. It shall be installed and connected in accordance with current installation regulations. Particular attention shall be given to the relevant requirements regarding ventilation; See Before installation, page 13
- The use of gas cooking appliance results in the production of heat and moisture in the room in which it is installed. Ensure that the kitchen is well ventilated: keep natural ventilation holes open or
install a mechanical ventilation device (mechanical extractor hood). Prolonged intensive use of the appliance may call for additional ventilation, for example increasing the level of the mechanical ventilation where present.
- Gas appliances and systems must be regularly checked for proper functioning. Regulator, hose and its clamp must be checked regularly and replaced within the periods recommended by its manufacturer or when necessary.
- Clean the gas burners regularly. The flames should be blue and burn evenly.
- Good combustion is required in gas appliances. In case of incomplete combustion, carbon monoxide (CO) might develop. Carbon monoxide is a colourless, odourless and very toxic gas, which has a lethal effect even in very small doses.
- Request information about gas emergency telephone numbers and safety
measures in case of gas smell from your local gas provider.
What to do when you smell gas
- Do not use open flame or do not smoke. Do not operate any electrical buttons (e.g. lamp button, door bell and etc.) Do not use fixed or mobile phones. Risk of explosion and toxication!
- Open doors and windows.
- Turn off all valves on gas appliances and gas meter at the main control valve, unless it's in a confined space or cellar.
- Check all tubes and connections for tightness. If you still smell gas leave the property.
- Warn the neighbours.
- Call the fire-brigade. Use a telephone outside the house.
- Do not re-enter the property until you are told it is safe to do so.
Electrical safety
- If the product has a failure, it should not be operated unless it is repaired by an
Authorised Service Agent. There is the risk of electric shock!
- Only connect the product to a grounded outlet/line with the voltage and protection as specified in the “Technical specifications”. Have the grounding installation made by a qualified electrician while using the product with or without a transformer. The Manufacturer shall not be liable for any problems arising due to the product not being earthed in accordance with the local regulations.
- Never wash the product by spreading or pouring water onto it! There is the risk of electric shock!
- Never touch the plug with wet hands! Never unplug by pulling on the cable, always pull out by holding the plug.
- The product must be disconnected during installation, maintenance, cleaning and repairing procedures.
- If the power connection cable for the product is damaged, it must be
replaced by the manufacturer, its service agent or similarly qualified persons in order to avoid a hazard.
- The appliance must be installed so that it can be completely disconnected from the mains supply. The separation must be provided by a switch built into the fixed electrical installation, according to construction regulations.
- Any work on electrical equipment and systems should only be carried out by authorised and qualified persons.
- In case of any damage, switch off the product and disconnect it from the mains. To do this, turn off the fuse at home.
• Make sure that fuse rating is compatible with the product.
Product safety
- WARNING: The appliance and its accessible parts become hot during use. Care should be taken to avoid touching heating elements. Children less
than 8 years of age shall be kept away unless continuously supervised.
- Never use the product when your judgment or coordination is impaired by the use of alcohol and/or drugs.
- Be careful when using alcoholic drinks in your dishes. Alcohol evaporates at high temperatures and may cause fire since it can ignite when it comes into contact with hot surfaces.
- Do not place any flammable materials close to the product as the sides may become hot during use.
- Keep all ventilation slots clear of obstructions.
- Do not use steam cleaners to clean the appliance as this may cause an electric shock.
- WARNING: Unattended cooking on a hob with fat or oil can be dangerous and may result in fire. NEVER try to extinguish a fire with water, but switch off the appliance and then cover flame e.g. with a lid or a fire blanket.
- CAUTION: The cooking process has to be supervised. A short term cooking process has to be supervised continuously.
- WARNING: Danger of fire: Do not store items on the cooking surfaces.
• DO NOT SPRAY AEROSOLS IN THE VICINITY OF THIS APPLIANCE WHILE IT IS IN OPERATION.
• DO NOT USE OR STORE FLAMMABLE MATERIALS NEAR THIS APPLIANCE.
• DO NOT USE THIS APPLIANCE AS A SPACE HEATER.
• DO NOT PLACE ARTICLES ON OR AGAINST THIS APPLIANCE.
• NOT SUITABLE FOR USE WITH AFTERMARKET LIDS OR COVERS.
• DO NOT MODIFY THIS APPLIANCE.
• Prevention against possible fire risk!
- Ensure all electrical connections are secure and tight to prevent risk of arcing.
- Do not use damaged cables or extension cables.
- Ensure liquid or moisture is not accessible to the electrical connection point.
• To prevent gas leakage ensure that the gas connection is sound.
Intended use
- This product is designed for domestic use. Commercial use will void the guarantee.
- This appliance is for cooking purposes only. It must not be used for other purposes, for example room heating.
- The manufacturer shall not be liable for any damage caused by improper use or handling errors.
Safety for children
- WARNING: Accessible parts may become hot during use. Young children should be kept away.
- The packaging materials will be dangerous for children. Keep the packaging materials away from children. Please dispose of all parts of the packaging according to environmental standards.
• Electrical and/or gas products are dangerous to
children. Keep children away from the product when it is operating and do not allow them to play with the product.
- Do not place any items above the appliance that children may reach for.
Disposing of the old product Compliance with the WEEE Directive and Disposing of the Waste Product:
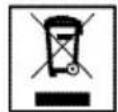
This product complies with EU WEEE Directive (2012/19/EU). This product bears a classification symbol for waste electrical and electronic equipment (WEEE).
This product has been manufactured with high quality parts and materials which can be reused and are suitable for recycling. Do not dispose of the waste product with normal domestic and other wastes at the end of its service life. Take it to the collection center for the recycling of electrical and electronic equipment. Please consult your local authorities to learn about these collection centers.
Compliance with RoHS Directive:
The product you have purchased complies with EU RoHS Directive (2011/65/EU). It does not contain harmful and prohibited materials specified in the Directive.
Package information
- Packaging materials of the product are manufactured from recyclable materials in accordance with our National Environment Regulations. Do not dispose of the packaging materials together with the domestic or other wastes. Take them to the packaging material collection points designated by the local authorities.
2 General information
Overview
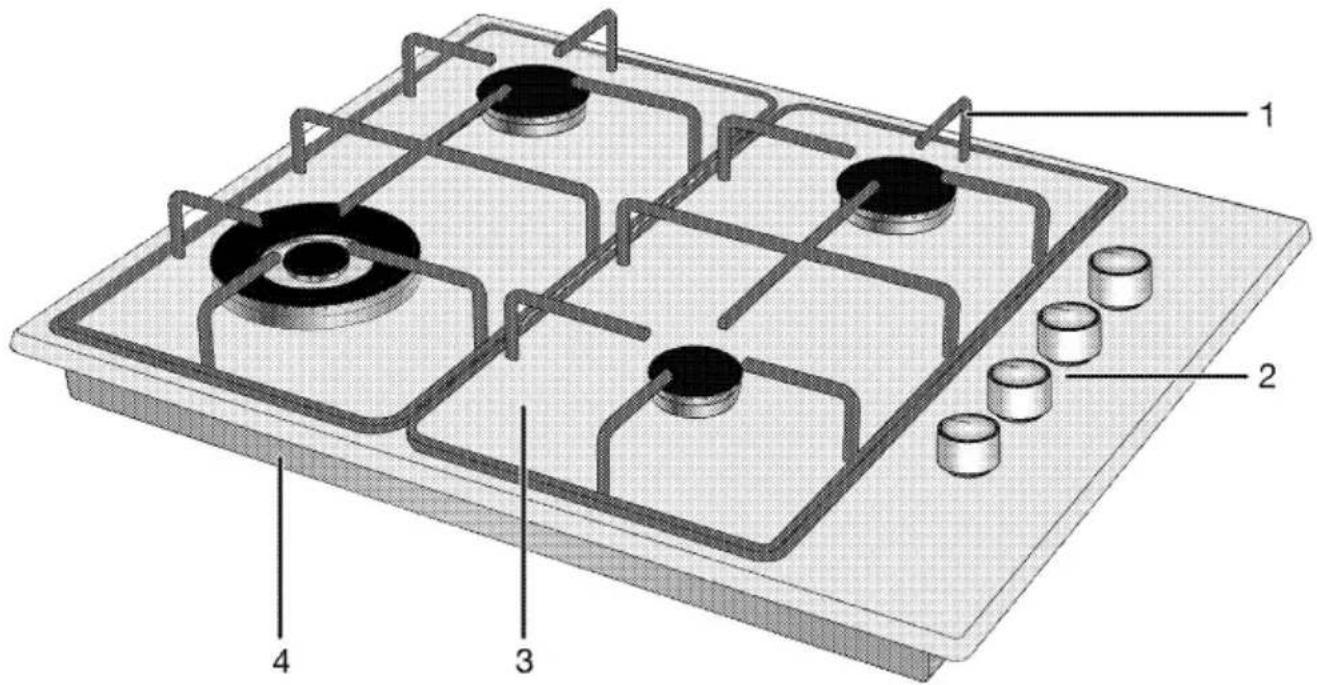
1 Pan support
2 Gas burners knob
3 Burner plate
4 Base cover
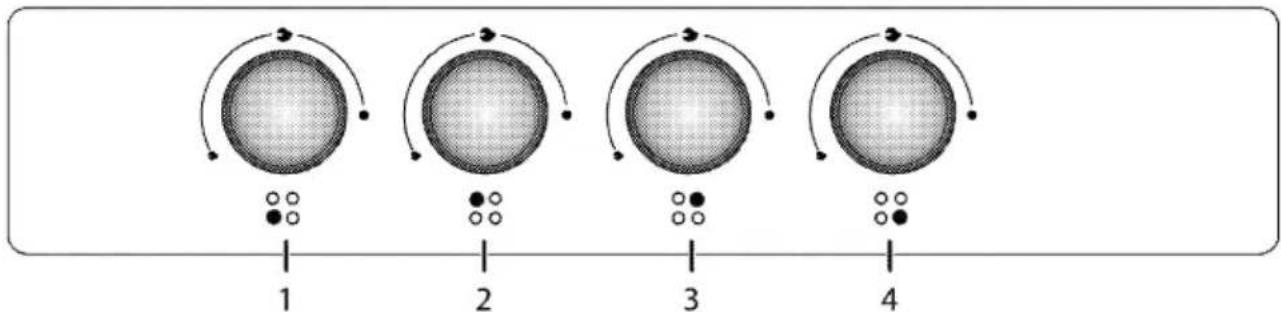
1 Auxiliary burner Front right
2 Wok burner Front left
3 Normal burner Rear left
4 Normal burner Rear right
Technical specifications
| Voltage / frequency | 220-240 V~; 50 Hz |
| Cable type / section | min.H05V2V2-F3 x 0,75 mm ^2 |
| Gas type / pressure / Total gas consumption | Natural Gas /1.0 kPa 38.0 Mj/h |
| Converting the gas type / pressure ^\}$ - optional | Universal LPG /2.75 kPa 28.9 Mj/h |
| External dimensions (height / width / depth) | 44 mm/610 mm/510 mm |
| Installation dimensions (width / depth) | 560 mm/480-490 mm |
| Burners | |
| Front right | Auxiliary burner |
| Power | 4.0 MJ/h (NG) / 3.4 MJ/h (LPG) |
| Front left | Wok burner |
| Power | 18.0 MJ/h (NG) / 12.5 MJ/h (LPG) |
| Rear left | Normal burner |
| Power | 8.0 MJ/h (NG) / 6.5 MJ/h (LPG) |
| Rear right | Normal burner |
| Power | 8.0 MJ/h (NG) / 6.5 MJ/h (LPG) |

Technical specifications may be changed without prior notice to improve the quality of the product.

Figures in this manual are schematic and may not exactly match your product.

Values stated on the product labels or in the documentation accompanying it are obtained in laboratory conditions in accordance with relevant standards. Depending on operational and environmental conditions of the product, these values may vary.
This cooker has been designed and constructed in accordance with the following codes and regulations:
• AS/NZS 5263.1.1 - Approval requirements for Domestic Gas Cooking Appliances
AS / NZS 60335-1 - General requirements for Domestic Electrical Appliances
AS / NZS 60335-2.6 - Particular Requirements for Domestic Electrical Cooking Appliances
AS / NZS 1044 - Electromagnetic Compatible Requirements.
Injector table
| Hotplate | Burner | Gas type | Injector Size (mm) | TPP (kPa) | NGC (Mj/h) |
| All models | Auxiliary | Natural gas | 0.90 | 1.0 | 4.0 |
| Semi-Rapid | 1.25 | 8.0 | |||
| Wok | 1.90 | 18.0 |
| Hotplate | Burner | Gas type | Injector Size (mm) | TPP (kPa) | NGC (Mj/h) |
| All models | Auxiliary | Universal LPG | 0.50 | 2.75 | 3.4 |
| Semi-Rapid | 0.72 | 6.5 | |||
| Wok | 1.02 | 12.5 |
3 Installation
This appliance must be installed by an authorised person in accordance with this instruction manual, AS/NZS 5601 – Gas installations (installation and pipe sizing), local gas fitting regulations, local electrical regulations, local water regulations, local health regulations, Building Code of Australia and any other government authority. Product must be installed by a qualified person in accordance with the regulations in force. The manufacturer shall not be held responsible for damages arising from procedures carried out by unauthorized persons which may also void the warranty.

Preparation of location and electrical and gas installation for the product is under customer's responsibility.

The product must be installed in accordance with all local gas and/or electrical regulations.

Prior to installation, visually check if the product has any defects on it. If so, do not have it installed. Damaged products cause risks for your safety.
Before installation
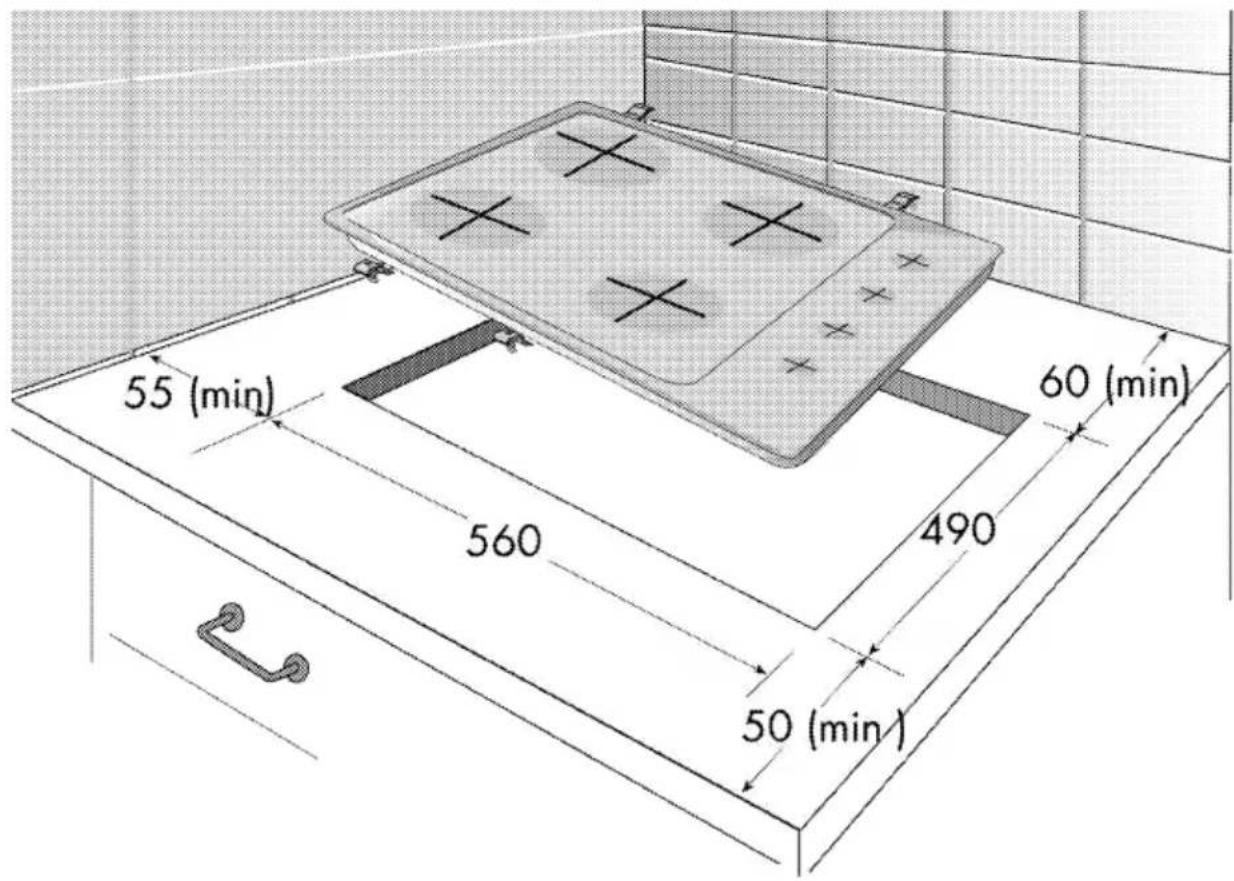
The hob is designed for installation into commercially available work tops. A safety distance must be left between the appliance and the kitchen walls and furniture. See figure (values in mm).
- It can also be used in a free standing position. Allow a minimum distance of 750 mm above the hob surface.
- (*) If a cooker hood is to be installed above the cooker, refer to cooker hood manufacturer' instructions regarding installation height. If not defined any size in the hood manual, this height should be at least 650 mm.
- Remove packaging materials and transport locks.
- Surfaces, synthetic laminates and adhesives used must be heat resistant (100 °C minimum).
- The worktop must be aligned and fixed horizontally.
- Cut aperture for the hob in worktop as per installation dimensions.
- Hob dimensions are 510mm x 610mm. Gas inlet is located at the rear right hand side. Electrical terminal is located at the rear centre.
- Gas leakage and operation of the appliance must be tested by the installer before leaving. Check burner flames are blue in colour, stable and completely ignite at both high and low flame settings with no appreciable yellow tipping, carbon deposition, lifting, floating, lighting back or objectionable odour. Test burners individually and in combination, When satisfied with the operation of the cooker, please instruct the user on the correct method of operation.
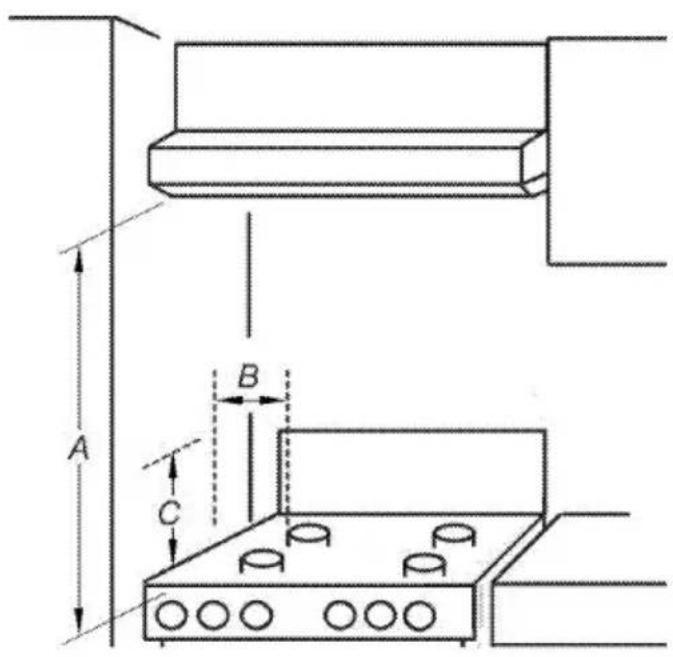
Requirement 1 Overhead clearances—
(Measurement A) Range hoods and exhaust fans shall be installed in accordance with the manufacturer's relevant instructions. However, in no case shall the clearance between the highest part of the hob of the gas
cooking appliance and a rangehood be less than 600 mm or, for an overhead exhaust fan, 750 mm.
Requirement 2 Side clearances—(Measurements B, & C) Where B, measured from the periphery of the nearest burner to any vertical combustible surface, or vertical combustible surface covered with toughened glass or sheet metal, is less than 200 mm, the surface shall be protected to a height C of not less than 150 mm above the hob for the full dimension (width or depth) of the cooking surface area. Where the gas cooking appliance is fitted with a ‘splashback’, protection of the rear wall is not required.
Maximum height of the top of the pan support with respect to the surface that supports the appliance is 50mm.
Hose connection
Flexible hose assembly (if used) must comply with AS/NZS 1869 Class B or D, be of appropriate internal diameter, be kept as short as possible (not to exceed 1.2 metres), must not be kinked or in contact with any hot surface. The supply connection point shall be accessible with the appliance installed.
Natural Gas (The appliance test point is located at the regulator)
The supplied regulator must be fitted to the appliance inlet connection. Gas pressure must be adjusted to 1.0 kPa when approximately 50% of the burners are on high flame.
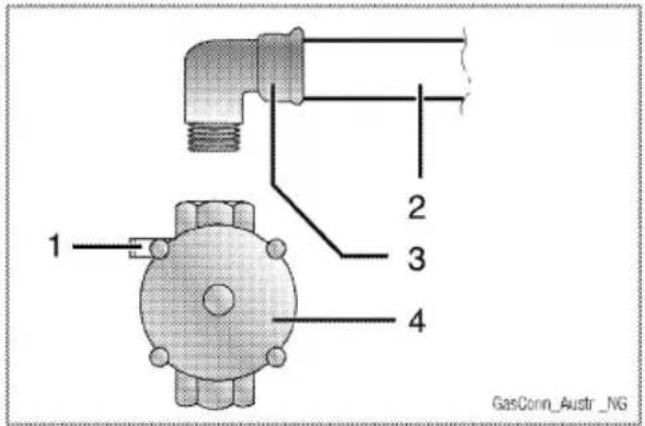
1 Test point location
2 Gas inlet pipe
3 Elbow
4 Regulator
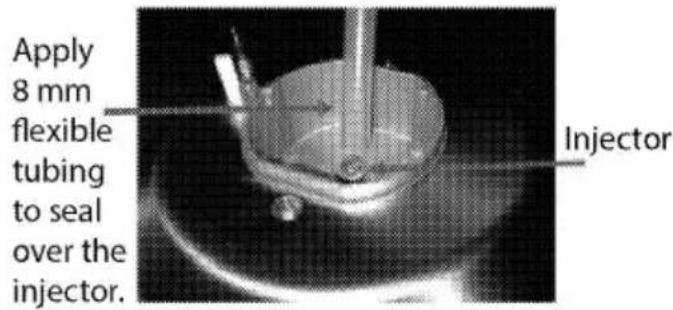
Universal LPG (The appliance test point is located at the injector)
Gas pressure must be checked to confirm the appliance operating pressure is 2.75 kPa, the appliance test point is the Rapid burner injector as shown.
- Disconnect power.
- Light the auxiliary burner and set to high flame. Ensure all other burners are off.
- Zero manometer, then apply flexible
tubing to seal over the Semi-Rapid burner injector, hold securely in place and check the gas pressure by pressing in the corresponding burner control knob in, then turning to high flame position.
- If the pressure is 2.75 kPa, reassemble the burner and perform the final checks as per this instruction manual.
- If the pressure is not 2.75 kPa, disconnect the appliance and check / adjust / replace the LPG cylinder regulator(s) as appropriate in accordance with AS/NZS 5601.
Patent 2015101170. For enquires contact Gas Approval Consulting Pty Ltd. BEKO licence 047 AGA 8977 G.
Room ventilation
All rooms require an openable window, or equivalent, and some rooms will require a permanent vent as well. The air for combustion is taken from the room air and the exhaust gases are emitted directly into the room. Good ventilation is essential for safe operation of your appliance.
Rooms with doors and/or windows which open directly to the outer environment
The doors and/or windows that open directly to the outer environment must have a total ventilation opening of the dimensions specified in the table below which is based on the total gas power of the appliance (total gas power consumption of the appliance is shown
in the technical specification table of this user manual). If the doors and/or windows do not have a total ventilation opening corresponding to the total gas consumption of the appliance as specified in the table below, then there must definitely be an additional fixed ventilation opening in the room to ensure that the total minimum ventilation requirements for the total gas consumption of the appliance is achieved. The fixed ventilation opening can include openings for existing airbricks, extraction hood ducting opening dimension etc.
| Total gas consumption (kW) | min. Ventilation opening ( cm^2 ) |
| 0-2 | 100 |
| 2-3 | 120 |
| 3-4 | 175 |
| 4-6 | 300 |
| 6-8 | 400 |
| 8-10 | 500 |
| 10-11.5 | 600 |
| 11.5-13 | 700 |
| 13-15.5 | 800 |
| 15.5-17 | 900 |
| 17-19 | 1000 |
| 19-24 | 1250 |
Rooms that do not have openable doors and/or windows that open directly to the outer environment
If the room where the appliance is installed does not have a door and/or a window that opens directly to the outer environment, other products shall be sought that definitely provide a fixed nonadjustable and non-closable ventilation opening which meets the total minimum ventilation opening requirements for the total gas consumption of the appliance as indicated in the above table. Also the
appropriate building regulations advise should be followed.
Where a room or internal space contains more than one gas appliance, additional ventilation area shall be provided on top of the requirement given in the table above. Size of additional ventilation area shall be appropriate to regulations of other gas appliances.
There should also be a minimum clearance of 10mm on the bottom edge of the door that opens to the inner environment in the room where the appliance is installed. You must ensure that items such as carpets and other floorcoverings etc., do not affect the clearance when the door is closed.
The cooker may be located in a kitchen, kitchen/diner or a bed-sitting room, but not in a room containing a bath or a shower. The cooker must not be installed in a bed-siting room of less than 20m^3 .
Do not install this appliance in a room below ground level unless it is open to ground level on at least one side.
Installation and connection
- The product must be installed in accordance with all local gas and electrical regulations.
Electrical connection
Connect the product to a grounded outlet/line protected by a miniature circuit breaker of suitable capacity as stated in the "Technical specifications" table. Have the grounding installation made by a qualified electrician while using the product with or without a transformer. Our company shall not be liable for any damages that will arise due to using the product without a grounding installation in accordance with the local regulations.

The product must be connected to the mains supply only by an authorised and qualified person.
The product's warranty period starts only after correct installation.
Manufacturer shall not be held responsible for damages arising from procedures carried out by unauthorised persons.

The power cable must not be clamped, bent or trapped or come into contact with hot parts of the product.
A damaged power cable must be replaced by a qualified electrician.
Otherwise, there is risk of electric shock, short circuit or fire!
- Connection must comply with national regulations.
- The mains supply data must correspond to the data specified on the type label of the product. Type label is at the rear housing of the product.
- Power cable of your product must comply with the values in "Technical specifications" table.

Before starting any work on the electrical installation, disconnect the product from the mains supply.
There is the risk of electric shock!

Power cable plug must be within easy reach after installation (do not route it above the hob).

While performing the wiring, you must apply with the national/local electrical regulations and must use the appropriate socket outlet/line and plug for oven. In case of the product's power limits are out of current carrying capability of plug and socket outlet/line, the product must be connected through fixed electrical installation directly without using plug and socket outlet/line.
Plug the power cable into the socket.
Gas connection

Product can be connected to gas supply system only by an authorised and qualified person or technician with licence.
Risk of explosion or toxication due to unprofessional repairs!
Manufacturer shall not be held responsible for damages arising from procedures carried out by unauthorised or unlicensed persons.

Before starting any work on the gas installation, disconnect the gas supply.
There is the risk of explosion!
- Gas adjustment conditions and values are stated on labels (or on type label).

Your product is equipped for natural gas (NG).
- Natural gas installation must be prepared before installing the product.
- There must be a pipe (Piping advised to be buyed from a licensed installer), must comply with local gas standard, at the outlet of the installation for the natural gas connection of your product and the tip of this pipe must be closed with a blind plug. Service Representative will remove the blind plug during connection and connect your product by means of a straight connection device (coupling).
- Make sure that the natural gas valve is readily accessible.

If you need to use your product later with a different type of gas, you must consult the Authorised Service Agent for the related conversion procedure.
Leakage check at the connection point
- Make sure that all knobs on the product are turned off. Make sure that the gas supply is open. Prepare soapy foam and apply it onto the connection point of the hose for gas leakage control.
- Soapy part will froth if there is a gas leakage. In this case, inspect the gas connection once again.
• Instead of soap, you can use commercially available sprays for gas leak check.

Never use a match or lighter to make the gas leakage control.

The flexible gas hose must be connected in a way that it does not contact the moving parts around it and is not trapped when the moving parts are travelling. (e.g. drawers). Besides, it should not be placed in spaces where it might get squeezed.

The gas hose must not be clamped, bent or trapped or come into contact with hot parts of the product.
There is the risk of explosion due to damaged gas hose.
Installing the product
- Remove burners, burner caps and grills on the hob from the product.
- Turning the hob upside down, place it on a flat surface.
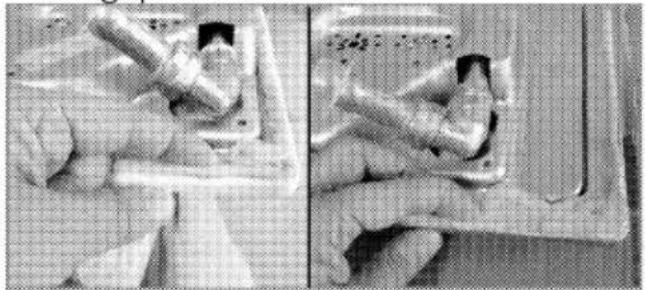
- In order to avoid the foreign substances and liquids penetrate between the hob and the counter, please apply the putty supplied in the package on the contours of the lower housing of the hob but make sure that the putty does not overlap.
- Fill the corners by forming bends at the corners as illustrated in the figure.
Form as much bend as required to fill the gap in the corners.
natural_image
Two-panel photo showing a hand holding a metal object, with no visible text or symbols.Make sure that the skirting sections on the lower housing of the hob are filled with putty.
- Place the hob on the counter and align it.
- Using the installation clamps secure the hob by fitting through the holes on the lower casing.
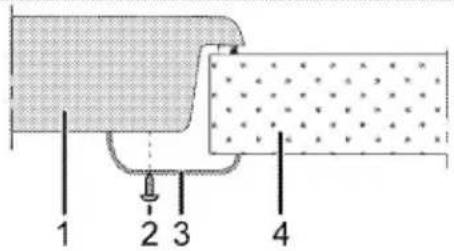
1 Hob
2 Screw
3 Installation clamp
4 Counter
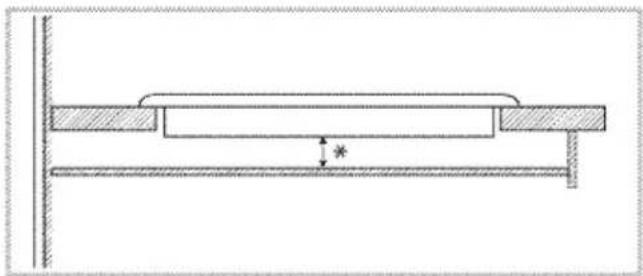
When installing the hob onto a cabinet, a shelf must be installed in order to separate the cabinet from the hob as illustrated in the above figure. This is not required when installing onto a built-under oven.
For example, if it is possible to touch the bottom of the product since it is installed onto a drawer, this section must be covered with a wooden plate.
natural_image
Pure technical diagram of a mechanical assembly with no text, numbers, or symbols* min. 15 mm
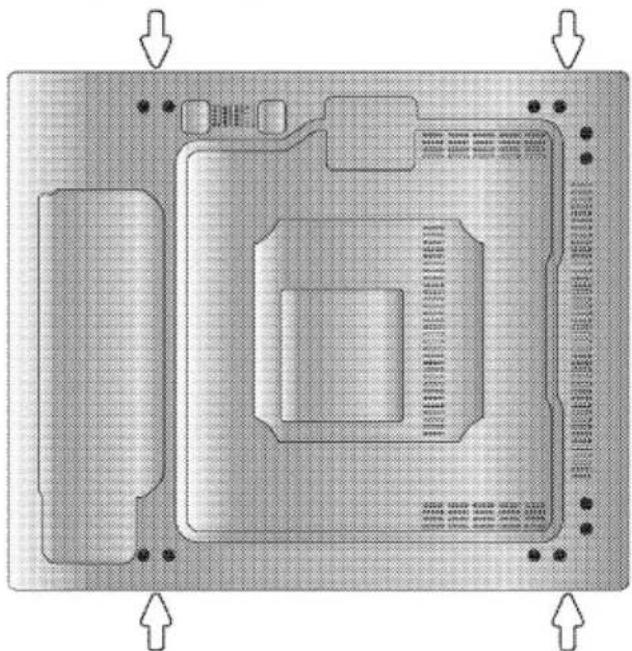
Rear view (connection holes)
Location of the connection holes shown in the below figure are schematic, may vary depending on the product model. Fix them according to connection holes on your product.
natural_image
Technical diagram of a mechanical component with mounting holes and internal channels (no text or symbols)Place the burner plates, burner plate caps and grills back to their seating after installation.
Making connections to different holes is not a good practice in terms of safety since it can damage the gas and electrical system.

There are gas and electrical components contained within this hob, therefore when fitting the mounting springs/clamps only attach the supplied fixings to the connection holes shown in this manual. Failure to observe this advise may lead to life and property safety
Final check (installer to check before leaving)
- Open gas supply.
- Check gas installations for secure fitting and tightness.
- Ignite burners and check appearance of the flame.
- Gas leakage, setting the test point, setting the turndown, ensuring complete ignition of all burners.
- For other minor adjustments or if the appliance does not perform correctly contact: Beko A and NZ Pty Ltd 1300 282 356
Gas conversion

Before starting any work on the gas installation, disconnect the gas supply.
There is the risk of explosion!
In order to change your appliance's gas type, change all injectors and make flame adjustment for all valves at reduced flow rate position.
Exchange of injector for the burners
- Take off burner cap and burner body.
- Unscrew injectors by turning the counter-clockwise.
- Fit new injectors.
- Check all connections for secure fitting and tightness.

New injectors have their position marked on their packing or injector table on Injector table, page 11 can be referred to.

((Varies depending on the product model.))
On some hob burners, the injector is covered with a metal piece. This metal cover must be removed for injector replacement.
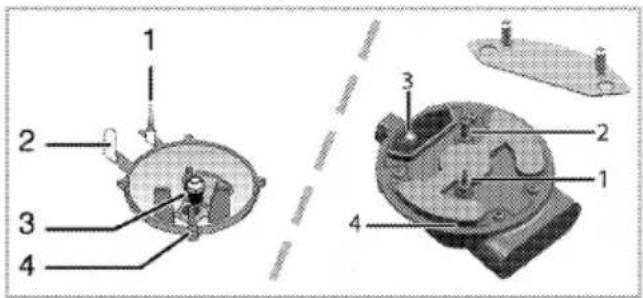
1 Flame failure device (model dependant)
2 Spark plug
3 Injector
4 Burner

Unless there is an abnormal condition, do not attempt to remove the gas burner taps. You must call an Authorised service agent or technician with licence if it is necessary to change the taps.
Reduced gas flow rate setting for hob taps
- Ignite the burner that is to be adjusted and turn the knob to the reduced position.
- Remove the knob from the gas tap.
- Use an appropriately sized screwdriver to adjust the flow rate adjustment screw.
For LPG (Butane - Propane) turn the screw clockwise. For the natural gas, you should turn the screw counter-clockwise once.
» The normal length of a straight flame in the reduced position should be 6-7 mm.
4. If the flame is higher than the desired position, turn the screw clockwise. If it is smaller turn anticlockwise.
5. For the last control, bring the burner both to high-flame and reduced positions and check whether the flame is on or off.
Depending on the type of gas tap used in your appliance the adjustment screw position may vary.
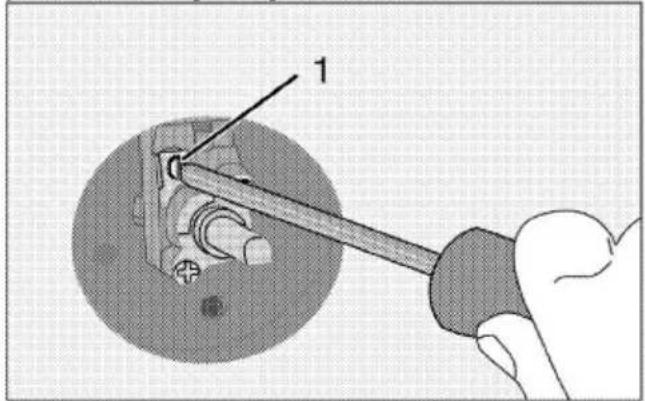
1 Flow rate adjustment screw
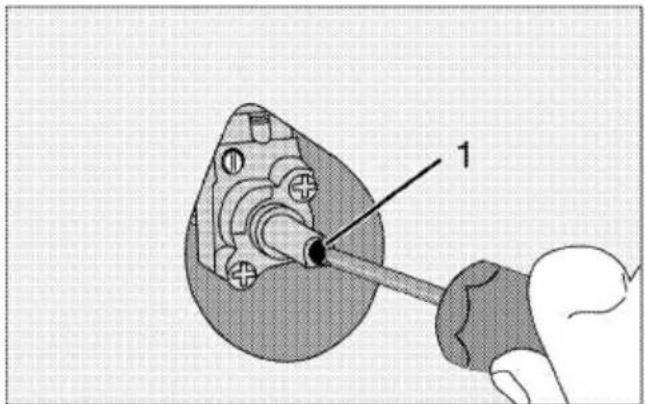
1 Flow rate adjustment screw

If the gas type of the unit is changed, then the rating plate that shows the gas type of the unit must also be changed.
Leakage check at the injectors
Before carrying out the conversion on the product, ensure all control knobs are turned to off position. After the correct conversion of injectors, for each injectors should be gas leak checked.
- Make sure that the gas supply to the product is on, still maintaining all control knobs turned to off position.
- Each injector hole is blocked with a finger applying reasonable force to stop the gas leakage when corresponding control knob turned to on and it held at depressed position to allow gas reach the injector.
- Apply prepared soapy water at the injector connection with a small brush, if there is leakage of gas at the injector connection the soapy water will begin to froth. In this case, tighten the injector with a reasonable force and repeat step 3 process once again.
- If the froth still persist you must turn off the gas apply to the product immediately and call an Authorised service agent or technician with licence. Do not use the product until the authorized service has intervened in the product.
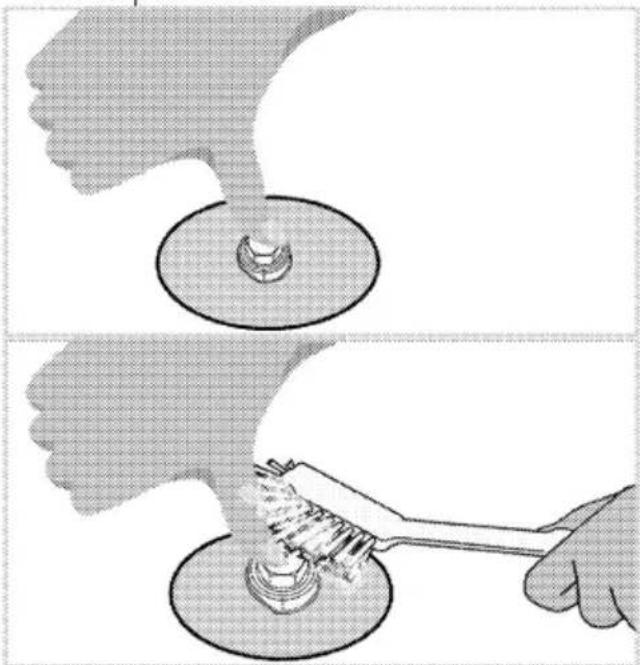
natural_image
Illustration showing a hand using a tool to clean or store a small object, with no visible text or symbols.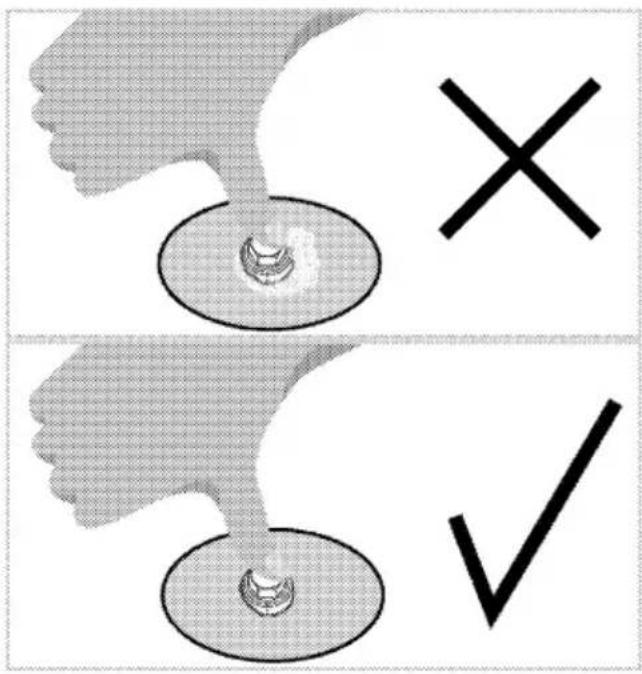
Bypass screw adjustment (turns out)
| Burner | Natural Gas | ULP Gas |
| Auxiliary (small) | 1/4 | Closed |
| Semi-Rapid (Normal) | 1/2 | 14 from fully closed |
| Wok | 1 1/4 | Closed |
The test point pressure is set with 'wok' and one 'Semi-Rapid' on maximum.
4 Preparation
Tips for saving energy
The following information will help you to use your appliance in an ecological way, and to save energy:
- Defrost frozen dishes before cooking them.
- Use pots/pans with cover for cooking. If there is no cover, energy consumption may increase 4 times.
- Select the burner which is suitable for the bottom size of the pot to be used. Always select the correct pot size for your dishes. Larger pots require more energy.
Initial use
First cleaning of the appliance

The surface might get damaged by some detergents or cleaning materials.
Do not use aggressive detergents, cleaning powders/creams or any sharp objects during cleaning. Do not use harsh abrasive cleaners or sharp metal scrapers to clean the oven door glass since they can scratch the surface, which may result in shattering of the glass.
- Remove all packaging materials.
- Wipe the surfaces of the appliance with a damp cloth or sponge and dry with a cloth.
5 How to use the hob
General information about cooking

Never fill the pan with oil more than one third of it. Do not leave the hob unattended when heating oil. Overheated oils bring risk of fire. Never attempt to extinguish a possible fire with water!
When oil catches fire, cover it with a fire blanket or damp cloth. Turn off the hob if it is safe to do so and call the fire department.
- Before frying foods, always dry them well and gently place into the hot oil. Ensure complete thawing of frozen foods before frying.
- Do not cover the vessel you use when heating oil.
- Place the pans and saucepans in a manner so that their handles are not over the hob to prevent heating of the handles. Do not place unbalanced and easily tilting vessels on the hob.
- Do not place empty vessels and saucepans on cooking zones that are switched on. They might get damaged.
- Operating a cooking zone without a vessel or saucepan on it will cause damage to the product. Turn off the cooking zones after the cooking is complete.
- As the surface of the product can be hot, do not put plastic and aluminum vessels on it.
Such vessels should not be used to keep foods either. - Use flat bottomed saucepans or vessels only.
- Put appropriate amount of food in saucepans and pans. Thus, you will
not have to make any unnecessary cleaning by preventing the dishes from overflowing.
Do not put covers of saucepans or pans on cooking zones.
Place the saucepans in a manner so that they are centered on the cooking zone. When you want to move the saucepan onto another cooking zone, lift and place it onto the cooking zone you want instead of sliding it.
Gas cooking
- Size of the vessel and the flame must match each other. Adjust the gas flames so that they will not extend the bottom of the vessel and center the vessel on saucepan carrier.
Using the hobs
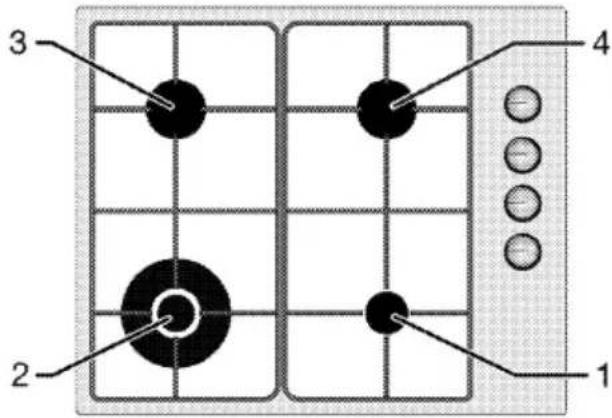
1 Auxiliary burner 12-18 cm
2 Wok burner 20-26 cm
3 Normal burner 18-20 cm
4 Normal burner 18-20 cm is list of advised diameter of pots to be used on related burners.

Do not use cooking pans beyond the dimension limits given above. Using larger pans causes risk of carbon monoxide poisoning, overheating of adjacent surfaces and control knobs. Using smaller pans causes your risk of being burned by the flame.
Large flame symbol indicates the highest cooking power and small flame symbol indicates the lowest cooking power. In turned off position (top), gas is not supplied to the burners.
Igniting the gas burners
- Keep burner knob pressed.
- Turn it counter clockwise to large flame symbol.
» Gas is ignited with the spark created. - Adjust it to the desired cooking power.
Turning off the gas burners
Turn the keep warm zone knob to off (upper) position.
Gas shut off safety system (in models with thermic component)
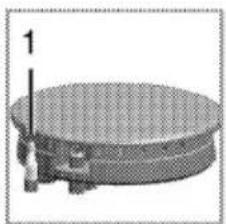
natural_image
3D rendered diagram of a circular mechanical component with a central shaft and flange (no text or symbols)- Gas shut off safety
As a counter measure against blow out due to fluid overflows at burners, safety mechanism trips and shuts off the gas.
- Push the knob inwards and turn it counter clockwise to ignite.
• After the gas ignites, keep the knob pressed for 3-5 seconds more to engage the safety system. - If the gas does not ignite after you press and release the knob, repeat the same procedure by keeping the knob pressed for 15 seconds.

Release the button if the burner is not ignited within 15 seconds. Wait at least 1 minute before trying again. There is the risk of gas accumulation and explosion!
Wok burner
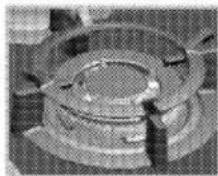
Wok burners help you to cook faster.
Wok, which is particularly used in Asian kitchen is a kind of deep and flat fry-pan made of sheet metal, which is used to cook minced vegetable and meat at strong flame in a short time.
Since meals are cooked at strong flame and in a very short time in such fry-pans that conduct the heat rapidly and evenly, the nutrition value of the food is preserved and vegetables remain crispy. You can use wok burner for regular saucepans as well.
6 Maintenance and care
General cleaning information
General warnings
- Wait for the product to cool before cleaning the product. Hot surfaces may cause burns!
- Do not apply the detergents directly on the hot surfaces. This may cause a permanent stains.
- The appliance shall be thoroughly cleaned and dried after each operation. Thus, food residues shall be easily cleaned and these residues shall be prevented from burning when the appliance is used again later. Thus, the service life of the appliance extends and frequently faced problems are decreased.
- Do not use steam cleaning products for cleaning.
- Some detergents or cleaning agents may damage the surface. Do not use abrasive detergents, cleaning powders, cleaning creams, descalers or sharp objects during cleaning.
- There is no need for a special cleaning agent for cleaning after each use. Clean the appliance using dish soap, warm water and a soft cloth or sponge and dry with a dry microfiber cloth.
- Be sure to completely wipe off any remaining liquid after cleaning and immediately clean any food splashing around during cooking.
- Do not wash any component of your appliance in a dishwasher.
For the hob:
- Acidic dirt such as milk, tomato paste and oil may cause permanent stains on the cookers and components of the burners, clean any overflown fluids
immediately after cooling down the cooker by turning it off.
- Wok type vessels used at high temperatures may change colour. This is normal.
- Moving some cookware may cause metal marks on the pot holders. Do not slide the pans and pots on the surface.
- As burner caps contact the fire directly and exposed to high temperatures, change and loss of colour in time is normal. This does not cause a problem while using the cooker.
- Annual servicing by an authorised person is recommended. If the appliance produces unusual odour, yellow tipping flame, flame lifting off the burner or is not performing as per the original installation, or for service contact: Beko A and NZ Pty Ltd 1300 282 356
Inox and stainless surfaces
- Do not use acid or chlorine-containing cleaning agents to clean stainless or inox surfaces and handles.
- Stainless or inox surface may change colour in time. This is normal. After each operation, clean with a detergent suitable for the stainless or inox surface.
- Clean with a soft soapy cloth and liquid (non-scratching) detergent suitable for inox surfaces, taking care to wipe in one direction.
- Remove lime, oil, starch, milk and protein stains on the inox-stainless and glass surfaces immediately without waiting. Stains may rust under long periods of time.
Glass surfaces
- When cleaning glass surfaces, do not use hard metal scrapers and abrasive
cleaning materials. They can damage the glass surface.
- Clean the appliance using dishwashing detergent, warm water and a microfiber cloth specific for glass surfaces and dry it with a dry microfiber cloth.
- If there is residual detergent after cleaning, wipe it with cold water and dry with a clean and dry microfiber cloth. Residual detergent residue may damage the glass surface next time.
- Under no circumstances should the dried-up residue on the glass surface be cleaned off with serrated knives, wire wool or similar scratching tools.
- You can remove the calcium stains (yellow stains) on the glass surface with the commercially available descaling agent, with a descaling agent such as vinegar or lemon juice.
- If the surface is heavily soiled, apply the cleaning agent on the stain with a sponge and wait a long time for it to work properly. Then clean the glass surface with a wet cloth.
• Discolorations and stains on the glass surface are normal and not defects.
Plastic parts and painted surfaces
- Clean plastic parts and painted surfaces using dishwashing detergent, warm water and a soft cloth or sponge and dry them with a dry cloth.
- Do not use hard metal scrapers and abrasive cleaners. It may damage the surfaces.
- Ensure that the joints of the components of the appliance are not left as damp and with detergent. Otherwise, corrosion may occur on these joints.
Cleaning the hob Cleaning the gas burners
- Before cleaning the hob, remove pot holders, burner caps and heads from the hob.
- Clean the surface of the hob as per the recommendations included in the general cleaning information according to the surface type (enamelled, glass, inox, etc.).
- Clean the burner chamber with a cloth soaked in detergent or with non-scratching, soft brush. Ensure that no food remains are left.
- Clean the spark plugs and thermal elements (in models with ignition and thermal element) with a well squeezed cloth. Then dry with a clean cloth. Pay attention that the spark plug and the thermal element are completely dry.
- Clean the burner caps and heads with detergent water after each operation and then dry them.
- For persistent stains, keep burner caps and heads in detergent water or warm soapy water at least for 15 minutes. Clean with a non-metallic and non-scratching brush.
- You may use the Quick&Shine cleaning agents for the oven interiors and grills, used on enamelled surfaces and recommended by the authorized service, especially for persistent stains on enamelled burner caps.
- Do not contact burner caps with aggressive detergents such as oven interior cleaning agents, descalers while cleaning them, this may cause discolouration.
- Clean the pot holders with detergent water and non-scratching, soft brush after each operation and then dry them.
- When the burner caps and pot holders are used as wet, persistent
lime stains may occur as a result of the heat. Ensure that it is dried before operation.
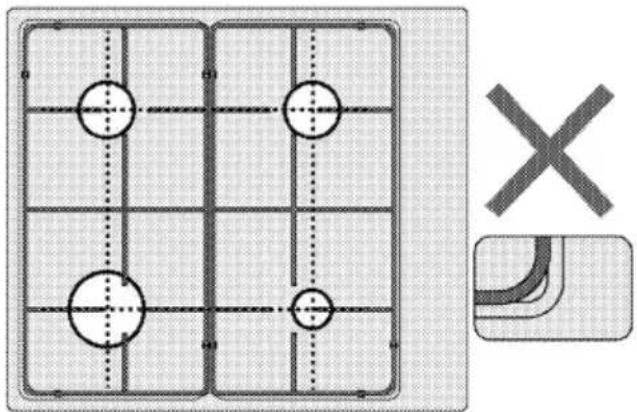
- Place burner heads, caps and pot holders respectively.
- When placing the pot holders, ensure that they centre the burners.
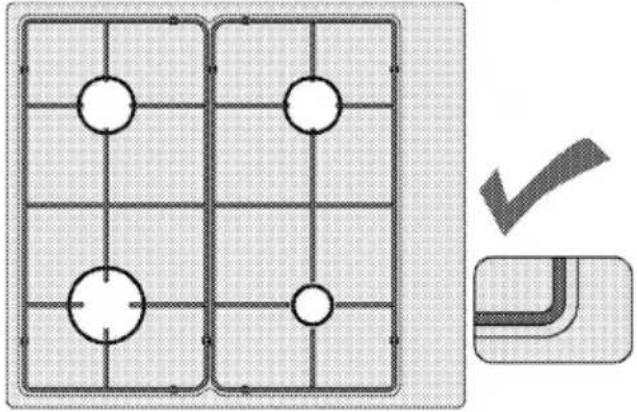
natural_image
Diagram showing a grid layout with circular nodes and dashed lines, alongside a cross symbol (no text or labels)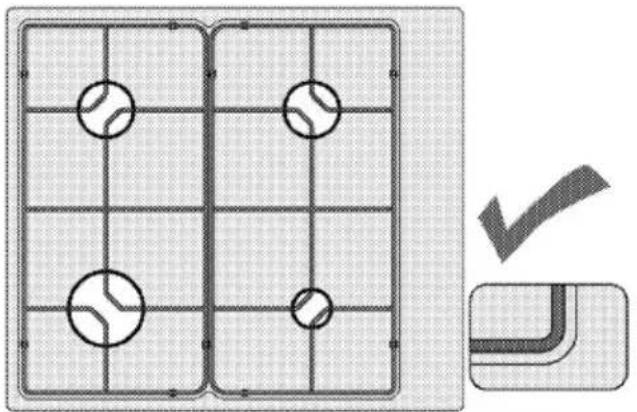
natural_image
Diagram showing a grid layout with circular elements and a checkmark indicating selection (no text or symbols present)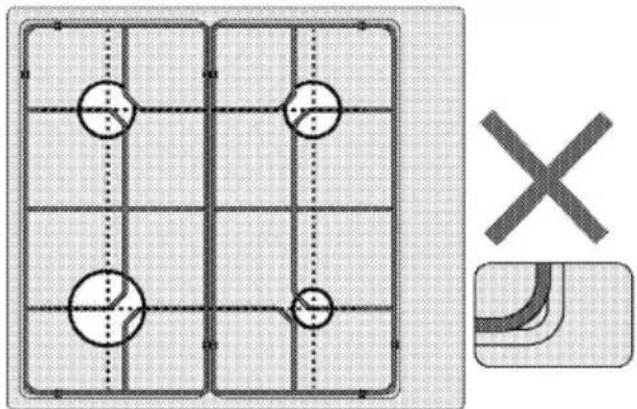
natural_image
Diagram showing a grid with circular nodes and dashed lines, alongside a cross symbol and a corner detail (no text or labels)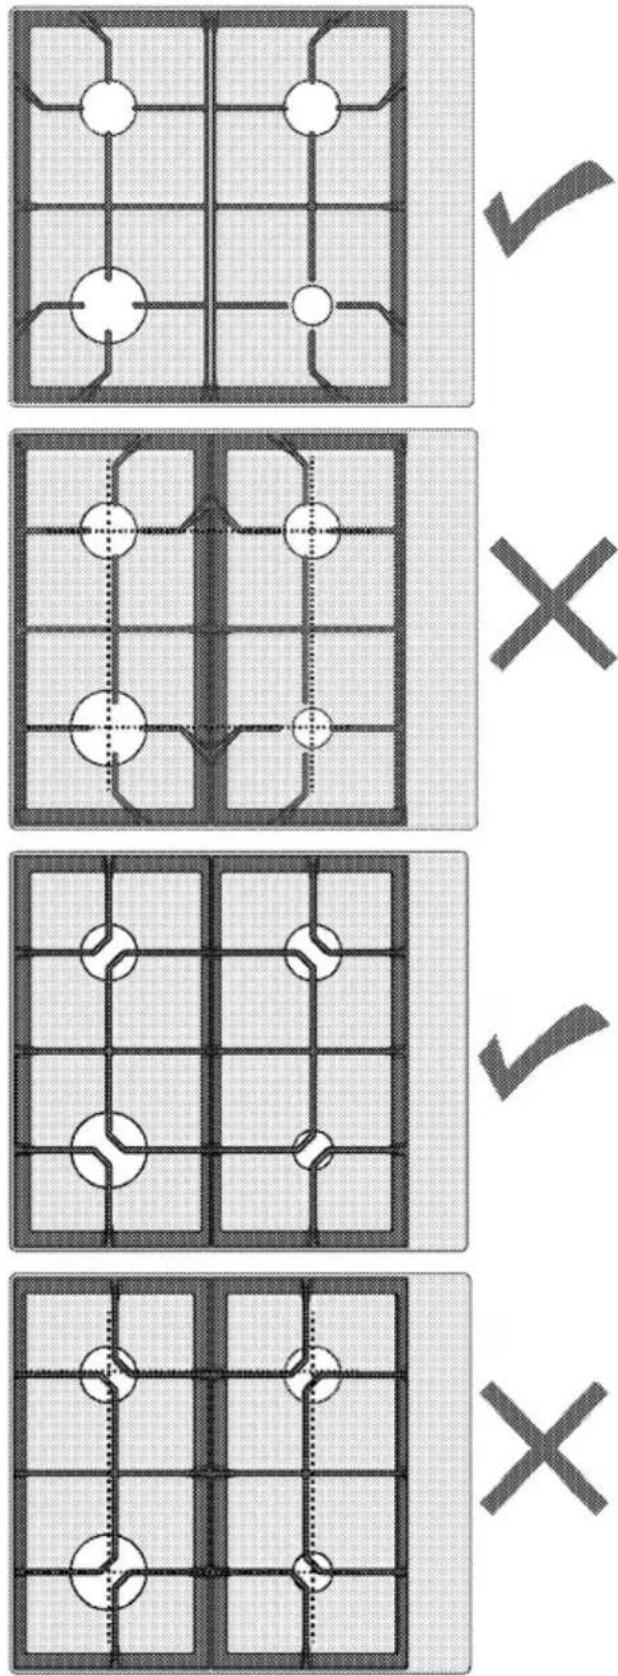
Assembling the burner parts
Place the parts as in the figure after cleaning the burners.
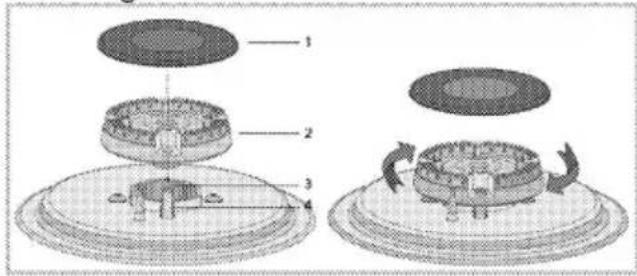
1 Burner cap
2 Burner head
3 Burner chamber
4 Spark plug (in models with ignition)
1. Place the burner head ensuring that it passes through the burner spark plug (4). Turn the burner head right and left to make sure that it is seated in the burner chamber.
2. Place the burner cap on the burner head.
Cleaning the control panel
- When cleaning the panels with knob control, wipe the panel and knobss with a damp soft cloth and dry with a dry cloth. Do not remove the knobs and gaskets underneath to clean the control panel. The control panel and knobs may be damaged.
- While cleaning the inox panels with knob control, do not use inox cleaning agents around the knobs. The indicators around the knobs may be deleted.
- Clean the touch control panels with a damp soft cloth and dry with a dry cloth. If your product has a key lock feature, set the key lock before performing control panel cleaning. Otherwise, incorrect detection may occur on the keys.
7 Troubleshooting
Product emits metal noises while heating and cooling.
- When the metal parts are heated, they may expand and cause noise. >>> This is not a fault.
There is no ignition spark.
- No current. >>> Check fuses in the fuse box.
There is no gas.
- Main gas valve is closed. >>> Open gas valve.
• Gas pipe is bent. >>> Install gas pipe properly.
Burners are not burning properly or at all.
- Burners are dirty. >>> Clean burner components.
- Burners are wet. >>> Dry the burner components.
- Burner cap is not mounted safely. >>> Mount the burner cap properly.
• Gas valve is closed. >>> Open gas valve. - Gas cylinder is empty (when using LPG). >>> Replace gas cylinder.
Consult the Authorised Service Agent or technician with licence or the dealer where you have purchased the product if you can not remedy the trouble although you have implemented the instructions in this section. Never attempt to repair a defective product yourself.

- Please read this user manual first!
- Explanation of symbols
- Important instructions and warnings for safety and environment 4
- General information 10
- Installation 13
- Preparation 23
- How to use the hob 24
- Maintenance and care 26
- Troubleshooting 30
- Important instructions and warnings for safety and environment
- General safety
- Safety when working with gas
- What to do when you smell gas
- Electrical safety
- Product safety
- Intended use
- Safety for children
- Disposing of the old product Compliance with the WEEE Directive and Disposing of the Waste Product:
- Compliance with RoHS Directive:
- Package information
- General information
- Overview
- Installation
- Before installation
- Requirement 1 Overhead clearances—
- Hose connection
- Natural Gas (The appliance test point is located at the regulator)
- Universal LPG (The appliance test point is located at the injector)
- Room ventilation
- Rooms with doors and/or windows which open directly to the outer environment
- Rooms that do not have openable doors and/or windows that open directly to the outer environment
- Installation and connection
- Electrical connection
- Gas connection
- Leakage check at the connection point
- Installing the product
- Rear view (connection holes)
- Final check (installer to check before leaving)
- Gas conversion
- Exchange of injector for the burners
- Reduced gas flow rate setting for hob taps
- Leakage check at the injectors
- Preparation
- Tips for saving energy
- Initial use
- First cleaning of the appliance
- How to use the hob
- General information about cooking
- Gas cooking
- Igniting the gas burners
- Turning off the gas burners
- Gas shut off safety system (in models with thermic component)
- Wok burner
- Maintenance and care
- General cleaning information
- General warnings
- For the hob:
- Inox and stainless surfaces
- Glass surfaces
- Plastic parts and painted surfaces
- Cleaning the hob Cleaning the gas burners
- Assembling the burner parts
- Cleaning the control panel
- Troubleshooting
- Product emits metal noises while heating and cooling.
- There is no ignition spark.
- There is no gas.
- Burners are not burning properly or at all.
Brand : ALTUS
Model : ACT60GX
Category : Cooker