
BRC7EA632 - Controller DAIKIN - Free user manual and instructions
Find the device manual for free BRC7EA632 DAIKIN in PDF.


| Product Type | Wireless Controller |
| Brand | Daikin |
| Model | BRC7EA632 |
| Dimensions (W x H x D) | Approx. 145 x 75 x 22 mm |
| Weight (without batteries) | Approx. 150 g |
| Power Supply | 2 x AAA alkaline batteries (DC 3 V) |
| Battery Life | Approx. 1 year under normal use |
| Operating Temperature Range | 0°C to 50°C (32°F to 122°F) |
| Storage Temperature Range | -10°C to 60°C (14°F to 140°F) |
| Wireless Communication | Infrared (IR) |
| Control Range | Up to 7 meters (23 feet) in front of indoor unit |
| Supported Functions | On/Off, Temperature setting, Fan speed, Mode (Cool/Heat/Dry/Fan/Auto), Swing, Timer (On/Off), Sleep, Powerful, Quiet |
| Display Type | LCD with backlight |
| Display Information | Set temperature, room temperature, mode, fan speed, timer, clock, battery indicator |
| Backlight Duration | Approx. 10 seconds after key press |
| Temperature Setting Range | 16°C to 30°C (61°F to 86°F) in 0.5°C increments |
| Timer Setting Range | 0.5 to 24 hours |
| Maintenance | Clean with a soft dry cloth; avoid water or cleaners; replace batteries when low |
| Safety Precautions | Do not drop, expose to moisture or heat, or mix old/new batteries |
| Spare Parts | Batteries (AAA), replacement controller available from Daikin |
| Repairability | Non-user-serviceable; replace batteries; for defects contact Daikin service |
| Compatibility | Designed for select Daikin air conditioning systems with IR receiver |
| Certification | CE, RoHS |
Frequently Asked Questions - BRC7EA632 DAIKIN
User questions about BRC7EA632 DAIKIN
0 question about this device. Answer the ones you know or ask your own.
Ask a new question about this device
Download the instructions for your Controller in PDF format for free! Find your manual BRC7EA632 - DAIKIN and take your electronic device back in hand. On this page are published all the documents necessary for the use of your device. BRC7EA632 by DAIKIN.
USER MANUAL BRC7EA632 DAIKIN
Wireless Remote Controller Kit
BRC7EA628
BRC7EA629
BRC7EA630
BRC7EA631
BRC7EA632
1
1-3 COOL/HEAT CHANGEOVER REMOTE CONTROL SWITCH
1
2
CONTENTS
Safety precautions.... 1
Handling of wireless remote controller ..... 5
Operation range 6
Operation procedure 6
Not malfunction of the air conditioner..... 13
How to diagnose trouble spots 13
Disposal requirements.... 15
Thank you for purchasing this Daikin optional accessory. Carefully read this operation manual before using the optional accessory. It will tell you how to use the unit properly and help you if any trouble occurs. After reading the manual, file it away for future reference.
PRIOR TO USE
This operation manual is exclusively for instructions on how to use the wireless remote controller.
Read also the operation manual attached to the indoor unit for safe usage of the system and maintenance.
1. Safety precautions
To gain full advantage of the air conditioner's functions and to avoid malfunction due to mishandling, we recommend that you read this instruction manual carefully before use.
This air conditioner is classified under “appliances not accessible to the general public”.
The precautions described herein are classified as WARNING and CAUTION. They both contain important information regarding safety. Be sure to observe all precautions without fail.

WARNING .....
Failure to follow these instructions properly may result in personal injury or loss of life.

CAUTION.....
Failure to observe these instructions properly may result in property damage or personal injury, which may be serious depending on the circumstances.
After reading, keep this manual in a convenient place so that you can refer to it whenever necessary. If the equipment is transferred to a new user, be sure to hand over the manual as well.

WARNING
Be aware that prolonged, direct exposure to cool or warm air from the air conditioner, or to air that is too cool or too warm can be harmful to your physical condition and health.
When the air conditioner is malfunctioning (giving off a burning odor, etc.) turn off power to the unit and contact your local dealer.
Continued operation under such circumstances may result in a failure, electric shocks or fire hazards.
Consult your local dealer to install your equipment.
Doing the work yourself may result in water leakage, electric shocks or fire hazards.
Consult your local dealer regarding modification, repair and maintenance of the air conditioner or the remote controller. Improper workmanship may result in water leakage, electric shocks or fire hazards.
Do not place objects, including rods, your fingers, etc., in the air inlet or outlet. Injury may result due to contact with the air conditioner's high-speed fan blades.
Beware of fire in case of refrigerant leakage.
If the air conditioner is not operating correctly, i.e. not generating cool or warm air, refrigerant leakage could be the cause. Consult your dealer for assistance.
The refrigerant within the air conditioner is safe and normally does not leak. However, in the event of a leakage, contact with a naked burner, heater or cooker may result in generation of noxious gas.
Do not use the air conditioner any longer until a qualified service person confirms that the leakage has been repaired.
Consult your local dealer regarding what to do in case of refrigerant leakage. When the air conditioner is to be installed in a small room, it is necessary to take proper measures so that the amount of any leaked refrigerant does not exceed the concentration limit in the event of a leakage. Otherwise, this may lead to an accident due to oxygen depletion.
Contact professional personnel about attachment of accessories and be sure to use only accessories specified by the manufacturer.
If a defect results from your own workmanship, it may result in water leaks, electric shock or fire.
Consult your local dealer regarding relocation and re-installation of the air conditioner.
Improper installation work may result in leakage, electric shocks or fire hazards.
Be sure to use fuses with the correct ampere reading.
Do not use improper fuses, copper or other wires as a substitute, as this may result in electric shock, fire, injury or damage to the unit.
Be sure to install an earth leakage breaker.
Failure to install an earth leakage breaker may result in electric shocks or fire.
Be sure to earth the unit.
Do not earth the unit to a utility pipe, lightning conductor or telephone earth lead. Imperfect earthing may result in electric shocks or fire.
A high surge current from lightning or other sources may cause damage to the air conditioner.
Consult the dealer if the air conditioner submerges owing to a natural disaster, such as a flood or typhoon.
Do not operate the air conditioner in that case, otherwise a malfunction, electric shock, or fire may result.
Do not start or stop operating the air conditioner with the power supply breaker turned ON or OFF.
Otherwise, fire or water leakage may result. Furthermore, the fan will rotate abruptly if power failure compensation is enabled, which may result in injury.
Do not use the product in the atmosphere contaminated with oil vapor, such as cooking oil or machine oil vapor.
Oil vapor may cause crack damage, electric shocks, or fire.
Do not use the product in places with excessive oily smoke, such as cooking rooms, or in places with flammable gas, corrosive gas, or metal dust.
Using the product in such places may cause fire or product failures.
Do not use flammable materials (e.g., hairspray or insecticide) near the product.
Do not clean the product with organic solvents such as paint thinner.
The use of organic solvents may cause crack damage to the product, electric shocks, or fire.
Be sure to use a dedicated power supply for the air conditioner.
The use of any other power supply may cause heat generation, fire, or product failures.

CAUTION
Do not use the air conditioner for purposes other than those for which it is intended.
Do not use the air conditioner for cooling precision instruments, food, plants, animals or works of art as this may adversely affect the performance, quality and/or longevity of the object concerned.
Do not place objects that are susceptible to moisture directly beneath the indoor or outdoor units.
Under certain conditions, condensation on the main unit or refrigerant pipes, air filter dirt or drain blockage may cause dripping, resulting in fouling or failure of the object concerned.
To avoid oxygen depletion, ensure that the room is adequately ventilated if equipment such as a burner is used together with the air conditioner.
After prolonged use, check the unit stand and its mounts for damage.
If left in a damaged condition, the unit may fall and cause injury.
Do not place flammable sprays or operate spray containers near the unit as this may result in fire.
Before cleaning, be sure to stop unit operation, turn the breaker off or remove the power cord.
Otherwise, an electric shock and injury may result.
To avoid electric shocks, do not operate with wet hands.
Do not place appliances that produce naked flames in places exposed to the air flow from the unit as this may impair combustion of the burner.
Do not place heaters directly below the unit, as resulting heat can cause deformation.
Do not allow a child to mount on the outdoor unit or avoid placing any object on it.
Falling or tumbling may result in injury.
Do not block air inlets nor outlets.
Impaired air flow may result in insufficient performance or trouble.
Be sure that children, plants or animals are not exposed directly to airflow from the unit, as adverse effects may ensue.
Do not wash the air conditioner or the remote controller with water, as this may result in electric shocks or fire.
Do not place water containers (flower vases, etc.) on the unit, as this may result in electric shocks or fire.
Do not install the air conditioner at any place where there is a danger of flammable gas leakage.
In the event of a gas leakage, build-up of gas near the air conditioner may result in fire hazards.
Do not put flammable containers, such as spray cans, within 1 m from the blow-off mouth.
The containers may explode because the warm air output of the indoor or outdoor unit will affect them.
The batteries must be removed from the appliance before it is scrapped and they are disposed of safely.
Arrange the drain to ensure complete drainage.
If proper drainage from the outdoor drain pipe does not occur during air conditioner operation, there could be a blockage due to dirt and debris build-up in the pipe.
This may result in a water leakage from the indoor unit. Under these circumstances, stop air conditioner operation and consult your dealer for assistance.
The appliance is not intended for use by unattended young children or infirm persons.
Impairment of bodily functions and harm to health may result.
Children should be supervised to ensure that they do not play with the unit or its remote controller.
Accidental operation by a child may result in impairment of bodily functions and harm health.
Do not let children play on or around the outdoor unit.
If they touch the unit carelessly, injury may be caused.
Consult your dealer regarding cleaning the inside of the air conditioner.
Improper cleaning may cause breakage of plastic parts, water leakage and other damage as well as electric shocks.
To avoid injury, do not touch the air inlet or aluminum fins of the unit.
Do not place objects in direct proximity of the outdoor unit and do not let leaves and other debris accumulate around the unit.
Leaves are a hotbed for small animals which can enter the unit. Once in the unit, such animals can cause malfunctions, smoke or fire when making contact with electrical parts.
Never touch the internal parts of the controller.
Do not remove the front panel. Touching certain internal parts will cause electric shocks and damage to the unit. Please consult your dealer about checking and adjustment of internal parts.
Do not leave the remote controller wherever there is a risk of wetting.
If water gets into the remote controller there is a risk of electrical leakage and damage to electronic components.
When using the wireless remote controller, do not put a strong light beam or install an inverter fluorescent lamp near the receiving section on the main unit. A malfunction may occur.
Watch your steps at the time of air filter cleaning or inspection.
High-place work is required, to which utmost attention must be paid.
If the scaffold is unstable, you may fall or topple down, thus causing injury.
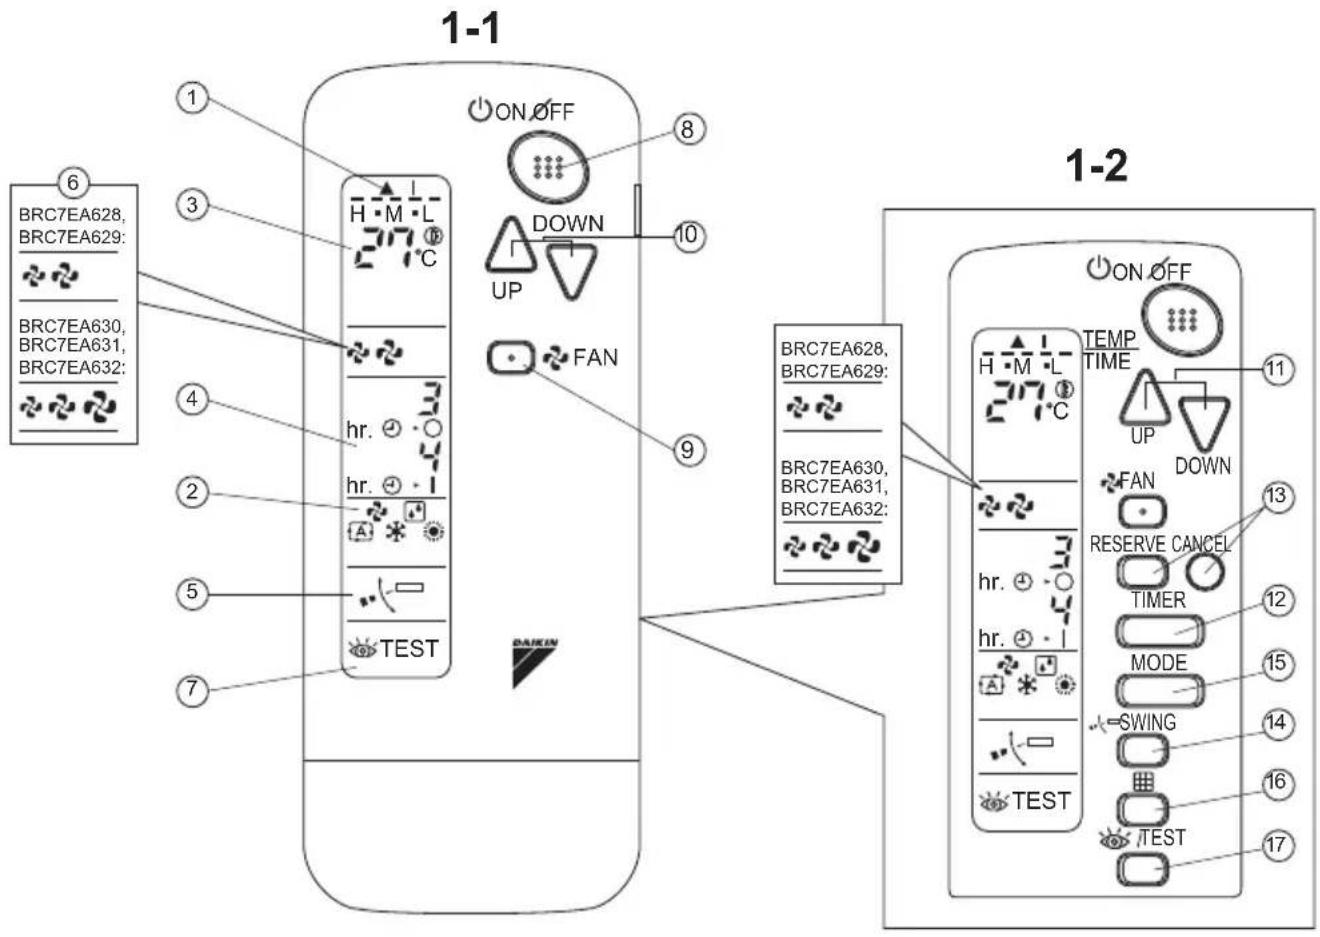
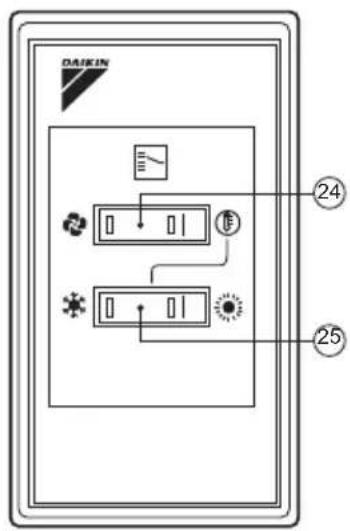
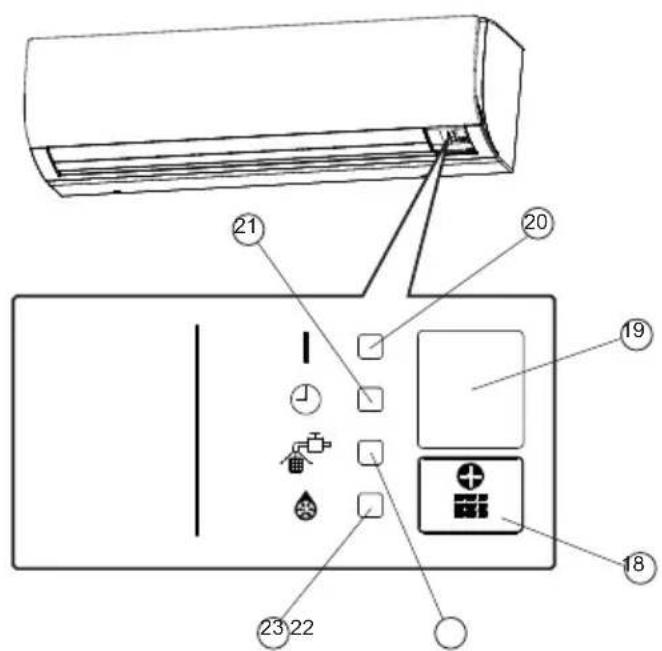
- Names and functions of the operating section (Fig. 1, 2)
| 1 | DISPLAY “▲(SIGNAL TRANSMISSION) |
| This lights up when a signal is being transmitted. | |
| 2 | DISPLAY “◆“”◆“”◆A◆◆“(OPERATION MODE) |
| This display shows the current OPERATION MODE. For cooling only type, “ ”(Auto) and “ ” (Heating) are not installed. | |
| 3 | DISPLAY “●(MH-SET TEMPERATURE) |
| This display shows the set temperature. | |
| 4 | DISPLAY “hr.◆3 hr.◆4(PROGRAMMED TIME) |
| This display shows PROGRAMMED TIME of the system start or stop. | |
| 5 | DISPLAY “ ”(AIR FLOW FLAP) |
| Refer to page 9. | |
| 6 | DISPLAY “◆(FAN SPEED) |
| The display shows the set fan speed. |
| 7 | DISPLAY “TEST” (INSPECTION/ TEST OPERATION) |
| When the INSPECTION/TEST OPERATION BUTTON is pressed, the display shows currently set mode. | |
| 8 | ON/OFF BUTTON |
| Press the button and the system will start. Press the button again and the system will stop. | |
| 9 | FAN SPEED CONTROL BUTTON |
| Press this button to select the fan speed, HIGH/LOW (BRC7EA628/29) or HIGH/MEDIUM/LOW (BRC7EA630, BRC7EA631, BRC7EA632) of your choice. | |
| 10 | TEMPERATURE SETTING BUTTON |
| Use this button for SETTING TEM-PERATURE (Operates with the front cover of the remote controller closed.) | |
| 11 | PROGRAMMING TIMER BUTTON |
| Use this button for programming “START and/or STOP” time. (Operates with the front cover of the remote con-troller opened.) | |
| 12 | TIMER MODE START/STOP BUTTON |
| Refer to page 9. | |
| 13 | TIMER RESERVE/CANCEL BUTTON |
| Refer to page 10. | |
| 14 | AIR FLOW DIRECTION ADJUST BUTTON |
| Refer to page 8. | |
| 15 | OPERATION MODE SELECTOR BUTTON |
| Press this button to select OPERA-TION MODE. | |
| 16 | FILTER SIGN RESET BUTTON |
| Refer to the section of MAINTENANCE in the operation manual attached to the indoor unit. | |
| 17 | INSPECTION/TEST OPERATION BUTTON |
| This button is used only by qualified ser-vice persons for maintenance purposes. | |
| 18 | EMERGENCY OPERATION SWITCH |
| This switch is readily used if the remote controller does not work. | |
| 19 | RECEIVER |
| This receives the signals from the remote controller. | |
| 20 | OPERATING INDICATOR LAMP (Red) |
| This lamp stays lit while the air conditioner runs. It flashes when the unit is in trouble. | |
| 21 | TIMER INDICATOR LAMP (Green) |
| This lamp stays lit while the timer is set. | |
| 22 | AIR FILTER CLEANING TIME INDICATOR LAMP (Red) |
| Lights up when it is time to clean the air filter. | |
| 23 | DEFROST LAMP (Orange) |
| Lights up when the defrosting operation has started. (For cooling only type this lamp does not turn on.) | |
| 24 | FAN/AIR CONDITIONING SELECTOR SWITCH |
| Set the switch to “*FAN) for FAN and “(A/C) for HEAT or COOL. | |
| 25 | COOL/HEAT CHANGEOVER SWITCH |
| Set the switch to “*COOL) for COOL and “(HEAT) for HEAT. | |
| NOTEFor the sake of explanation, all indications are shown on the display in Figure 1 contrary to actual running situations.Fig. 1-2 shows the remote controller with the front cover opened.Fig. 1-3 shows this remote controller can be used in conjunction with the one provided with the VRV system.If the air filter cleaning time indicator lamp lights up, clean the air filter as explained in the operation manual provided with the indoor unit.After cleaning and reinstalling the air filter, press the filter sign reset button on the remote controller. The air filter cleaning time indicator lamp on the receiver will go out.The Defrost Lamp will flash when the power is turned on. This is not a malfunction. | |
3. Handling of wireless remote controller
Precautions in handling remote controller
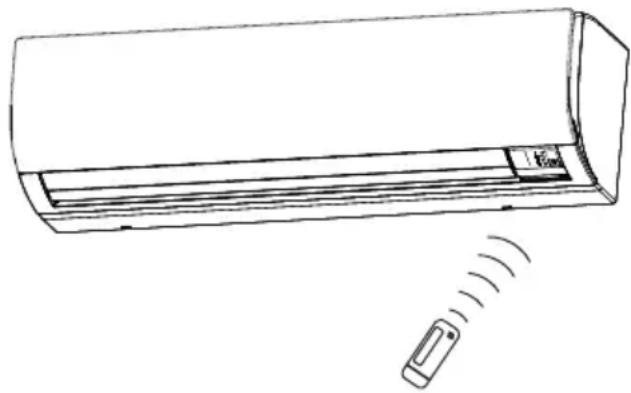
Direct the transmitting part of the remote controller to the receiving part of the air conditioner.
If something blocks the transmitting and receiving path of the indoor unit and the remote controller, such as curtains, it will not operate.
natural_image
Line drawing of a wall-mounted air conditioner unit with a sensor emitting sound waves (no text or symbols)2 short beeps from the receiver indicates that the transmission is properly done.
Transmitting distance is approximately 7 m.
Do not drop or get it wet.
It may get damaged.
Never press the button of the remote controller with a hard, pointed object.
The remote controller may get damaged.
Installation site
- It is possible that signals will not be received in rooms that have electronic fluorescent lighting. Please consult with the salesman before buying new fluorescent lights.
- If the remote controller operated some other electrical apparatus, move that machine away or consult your dealer.
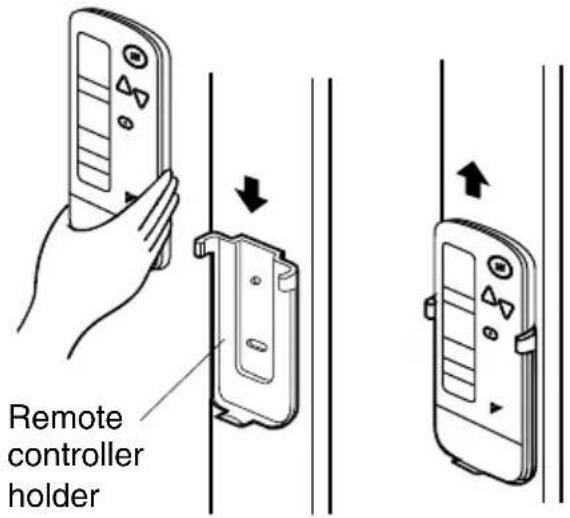
Placing the remote controller in the remote controller holder
Install the remote controller holder to a wall or a pillar with the attached screws. (Make sure it transmits)
Placing the remote controller
Slide from above
Removing the remote controller
Pull it upward
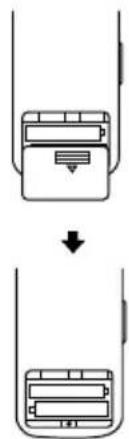
How to put the dry batteries
(1) Remove the back cover of the remote controller to the direction pointed by the arrow mark.
(2) Put the batteries Use two dry cell batteries (AAA.LR03 (alkaline)). Put dry batteries correctly to fit their (+) and (-).
(3) Close the cover.
natural_image
Diagram showing a device being processed from a top panel to a bottom panel, with no visible text or symbols.When to change batteries
Under normal use, batteries last about a year. However, change them whenever the indoor unit doesn't respond or responds slowly to commands, or if the display becomes dark.
[CAUTION]
- Replace all batteries at the same time, do not use new and old batteries simultaneously.
- In case the remote controller is not used for a long time take out all batteries in order to prevent liquid leak of the battery.
IN CASE OF CENTRALIZED CONTROL SYSTEM
If the indoor unit is under centralized control, it is necessary to switch the remote controller's setting.
In this case, contact your DAIKIN dealer.
4. Operation range
VRV and Sky Air System
See the operation manual provided with the air conditioner.
5. Operation procedure
Refer to figure 1 on page [1]
- Operating procedure varies with heat pump type and cooling only type. Contact your Daikin dealer to confirm your system type.
- To protect the unit, turn on the main power switch 6 hours before operation.
- If the main power supply is turned off during operation, operation will restart automatically after the power turns back on again.
COOLING, HEATING, AUTOMATIC, FAN, AND PROGRAM DRY OPERATION
Operate in the following order.
• AUTOMATIC OPERATION can be selected only by Heat pump split system or Heat recovery VRV system.
- For cooling only type, "COOLING", and "FAN" and "DRY" operation are available to select.
《FOR SYSTEMS WITHOUT COOL/HEAT CHANGEOVER REMOTE CONTROL SWITCH》
Refer to figure 1-1, 2 on page [1]
![DAIKIN BRC7EA632 - Refer to figure 1-1, 2 on page [1] - 1](/content/2026/05/983258/images/ff9f662e61dcab66585f90ce235b7356e1db70890121562787fa6740e40fc56b.jpg)
Press OPERATION MODE SELECTOR button several times and select the
OPERATION MODE of your choice as follows.
- In this operation mode, COOL/HEAT changeover is automatically conducted.
■ FAN OPERATION .... “♣”
■ DRY OPERATION ....“
- The function of this program is to decrease the humidity in your room with the minimum temperature decrease.
- Micro computer automatically determines TEMPERATURE and FAN SPEED.
- This system does not go into operation if the room temperature is below 16°C.
ON/OFF
Press ON/OFF button
OPERATION lamp lights up or goes off and the system starts or stops OPERATION.
NOTE

- Do not turn OFF power immediately after the unit stops. Then, wait no less than 5 minutes.
Water may leak or other problems may occur.
《FOR SYSTEMS WITH COOL/HEAT CHANGEOVER REMOTE CONTROL SWITCH》
Refer to figure 1-1,3 on page [1]
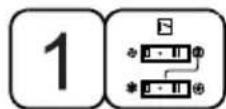
(1) Select OPERATION MODE with the COOL/HEAT CHANGEOVER REMOTE CONTROL SWITCH as follows.
■ COOLING OPERATION ...... “ ”
- See "FOR SYSTEM WITHOUT COOL/HEAT CHANGEOVER REMOTE CONTROL SWITCH" for details on dry operation.
(2) Press OPERATION MODE SELECTOR
button several times and select “ 📋 (This operation is only available during dry operation.)
ON/OFF
Press ON/OFF button
OPERATION lamp lights up or goes off and the system starts or stops OPERATION.
NOTE

- Do not turn OFF power immediately after the unit stops. Then, wait no less than 5 minutes. Water may leak or other problems may occur.
- As the frost on the coil of an outdoor unit increases, heating effect decreases and the system goes into DEFROST OPERATION.
- The fan operation stops and the DEFROST lamp of the indoor unit goes on.
After 6 to 8 minutes (maximum 10 minutes) of DEFROST OPERATION, the system returns to HEATING OPERATION.
Heating capacity & Outdoor air temperature
- Heating capacity drops as outdoor air temperature lowers. If feeling cold, use another heater at the same time as this air conditioner.
- Hot air is circulated to warm the room. It will take some time from when the air conditioner is first started until the entire room becomes warm. The internal fan automatically turns at low speed until the air conditioner reaches a certain temperature on the inside. Wait until the temperature in the room reach desired temperature.
- If hot air accumulates on the ceiling and feet are left feeling cold, it is recommended to use a circulator. For details, contact the place of purchase.
ADJUSTMENT
For programming TEMPERATURE, FAN SPEED and AIR FLOW DIRECTION, follow the procedure as shown in following illustration.
TEMPERATURE SETTING
Press TEMPERATURE SETTING button and program the setting temperature.
Each time this button is pressed, setting temperature rises 1^ C.
Each time this button is pressed, setting temperature lowers 1^ C.
In case of automatic operation
Each time this button is pressed, setting temperature shifts to "H" side.
Each time this button is pressed, setting temperature shifts to "L" side.
[°C]
| H ■ | M ■ | L | |||
| Setting temperature | 25 23 | 22 21 | 19 |
- The setting is impossible for fan operation.
NOTE
- The setting temperature range of the remote controller is 16^ C to 32^ C .
FAN SPEED CONTROL
Press FAN SPEED CONTROL button.
High or Low fan speed can be selected (BRC7EA628/29).
High, Medium or Low fan speed can be selected (BRC7EA630, BRC7EA631, BRC7EA632).
The microchip may sometimes control the fan speed in order to protect the unit.
AIR FLOW DIRECTION ADJUST
Press the AIR FLOW DIRECTION ADJUST button to select the air direction as shown in following illustration.
DISPLAY appears and the air flow direction continuously varies (automatic swing setting).
Press AIR FLOW DIRECTION ADJUST button to select the air direction of your choice.
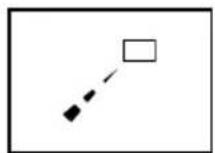
DISPLAY vanishes and the air flow direction is fixed (Fixed air flow direction setting).
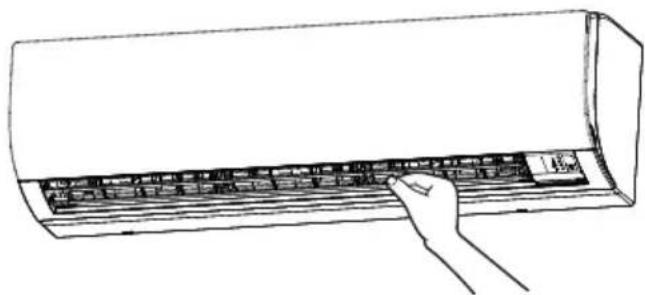
Adjusting left/right air flow direction
Angle the flaps to the left/right from the knob, as wanted or as needed to air condition the room.
natural_image
Line drawing of a hand inserting a card into an air conditioner unit (no text or symbols)NOTE

- Stop flaps from swinging before trying to angle them. Working while the flaps are moving may get your fingers pinched.
MOVEMENT OF THE AIR FLOW FLAP
For the following conditions, micro computer controls the air flow direction so it may be different from the display.
| Operation mode | Cooling Heating | |
| Operation conditions | When operating continuously at downward air flow direction | When room temperature is higher than the set temperatureAt defrost operation (The flaps blow horizontally to avoid blowing cold air directly on the occupants of the room.) |
NOTE

- If you try cooling or programmed drying while the flaps are facing downward, air flow direction may change unexpectedly. There is nothing wrong with the equipment. This serves to prevent dew formed on parts in the air discharge outlet from dripping.
- Operation mode includes automatic operation.
Operate in the following order.
- The timer is operated in the following two ways.
Programming the stop time (✗) - ○ .... The system stops operating after the set time has elapsed.
Programming the start time ( ) · 1 .... The system starts operating after the set time has elapsed. - The timer can be programmed a maximum of 72 hours.
- The start and the stop time can be simultaneously programmed.
TIMER MODE START/STOP
Press the TIMER MODE START/STOP button several times and select the mode on the display.
The display flashes. For setting the timer stop .... “ ” For setting the timer start .... “ ”
PROGRAMMING TIME
Press the PROGRAMMING TIME button and set the time for stopping or starting the system.
When this button is pressed, the time setting advances by 1 hour.
When this button is pressed, the time setting goes backward by 1 hour.
TIMER RESERVE
Press the TIMER RESERVE button.
The timer setting procedure ends. The display changes from flashing light to a constant light.
TIMER CANCEL
Press the TIMER OFF button to cancel programming. The display vanishes.
For example.
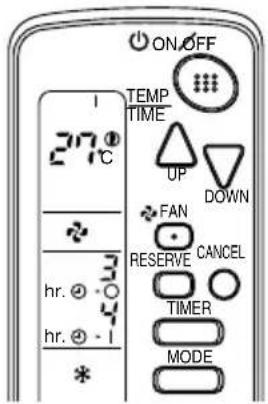
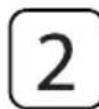
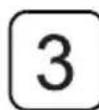
When the timer is programmed to stop the system after
3 hours and start the system after
4 hours, the system will stop after
3 hours and then
1 hour later the sys- tem will start.
NOTE

• After the timer is programmed, the display shows the remaining time.
HOW TO SET MASTER REMOTE CONTROLLER (For VRV system)
- When the system is installed as shown in the following picture, it is necessary to designate the master remote controller.
■ For Heat pump system
When one outdoor unit is connected with several indoor units.
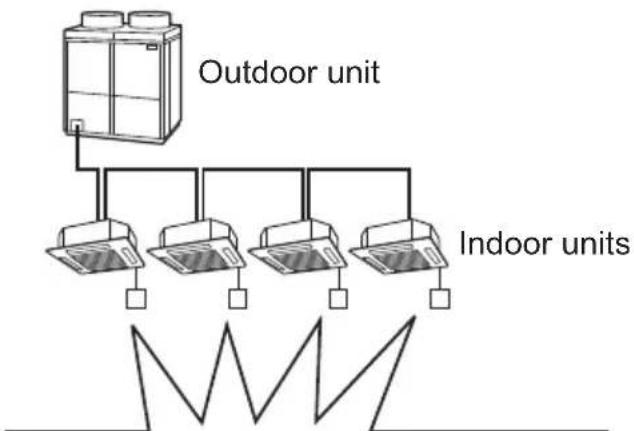
flowchart
graph TD
    A["Outdoor unit"] --> B["Indoor units"]
    B --> C["Line with zigzag line"]
    B --> D["Line with square markers"]
One of these remote controllers needs to be designated as the master remote controller.
■ For Heat recovery system
When one BS unit is connected with several indoor units.
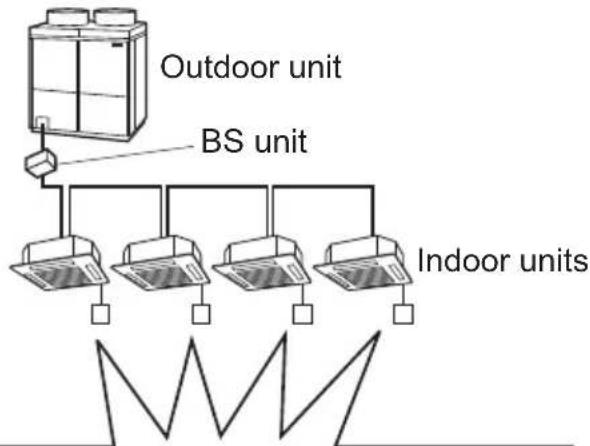
flowchart
graph TD
    A["Outdoor unit"] --> B["BS unit"]
    B --> C["Indoor units"]
    C --> D["Output Line"]
    style A fill:#f9f,stroke:#333
    style B fill:#ccf,stroke:#333
    style C fill:#cfc,stroke:#333
    style D fill:#fcc,stroke:#333
One of these remote controllers needs to be designated as the master remote controller.
- Only the master remote controller can select HEATING, COOLING or AUTOMATIC (only Heat recovery system) OPERATION.
When the indoor unit with master remote controller is set to "COOL", you can switch over operation mode between "FAN", "DRY" and "COOL".
When the indoor unit with master remote controller is set to "HEAT", you can switch over operation mode between "FAN" and "HEAT".
When the indoor unit with master remote controller is set to "FAN", you cannot switch operation mode.
When attempting settings than those consented above, a “beep” is emitted as a warning.
Only with Heat recovery system, you can set the indoor unit to AUTOMATIC. Attempting to do so, a "beep" will be emitted as a warning.
How to designate the master remote controller
Operate in the following order.
Continuously press the OPERATION MODE SELECTOR button for 4 seconds.
The displays showing “” of all slave indoor units connected to the same outdoor unit or BS unit will flash.
Press the OPERATION MODE SELECTOR button to the indoor unit that you wish to designate as the master remote controller. Then designation is completed. This indoor unit is designated as the master remote controller and the display showing “” vanishes.
- To change settings, repeat steps 1 and . 2
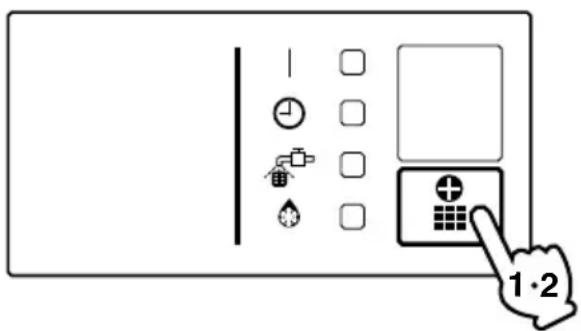
EMERGENCY OPERATION
When the remote controller does not work due to battery failure or the absence thereof, use this switch which is located beside the discharge grille on the main unit. When the remote controller does not work, but the battery low indicator on it is not lit, contact your dealer.
[START]
The machine runs in the previous mode. The system operates with the previously set air flow direction.
[STOP]
PRECAUTIONS FOR GROUP CONTROL SYSTEM OR TWO REMOTE CONTROLLERS CONTROL SYSTEM
This system provides two other control systems beside individual control (one remote controller controls one indoor unit) system. Confirm the following if your unit is of the following control system type.
■ Group control system
One remote controller controls up to 16 indoor units.
All indoor units are equally set.
■ Two remote controllers control system
Two remote controllers control one indoor unit (in case of group control system, one group of indoor units).
The unit follows individual operation.
NOTE

- Cannot have two remote controller control system with only wireless remote controllers. (It will be a two remote controller control system having one wired and one wireless remote controllers.)
- Under two remote controllers control system, wireless remote controller cannot control timer operation.
- During operation of the two controllers connected the same unit, the wireless remote controller displays the OPERATION MODE only.
- If the wired remote controller is used for operation, the display on the wireless remote controller does not change.
- Only the operating indicator lamp out of 3 other lamps on the indoor unit display functions.
NOTE

- Contact your Daikin dealer in case of changing the combination or setting of group control and two remote controller control systems.
6. Not malfunction of the air conditioner
The following symptoms do not indicate air conditioner malfunction
- The system does not restart immediately after the ON/OFF button is pressed.
If the OPERATION lamp lights, the system is in normal condition. It does not restart immediately because a safety device operates to prevent overload of the system. After 5 minutes, the system will turn on again automatically.
- The system does not restart immediately when TEMPERATURE SETTING button is returned to the former position after pushing the button.
It does not restart immediately because a safety device operates to prevent overload of the system. After 5 minutes, the system will turn on again automatically.
- If the reception beep is rapidly repeated 3 times (it sounds only twice when operating normally).
Control is set to the optional controller for centralized control.
- If the defrost lamp on the indoor unit's display is lit when heating is started.
This indication is to warn against cold air being blown from the unit. There is nothing wrong with the equipment.
7. How to diagnose trouble spots
I. EMERGENCY STOP
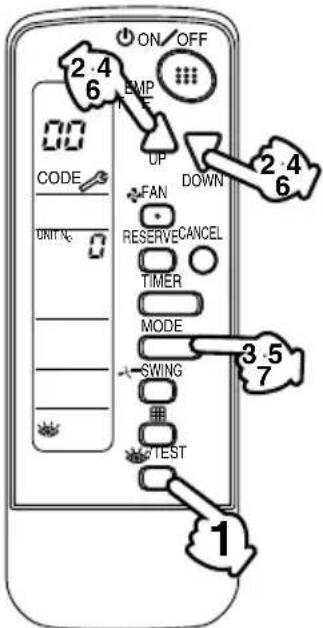
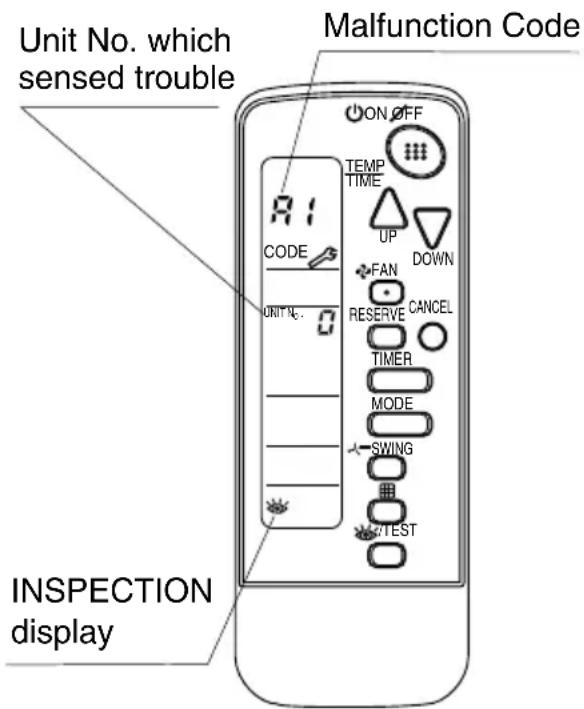
When the air conditioner stops in emergency, the run lamp on the indoor unit starts blinking. Take the following steps yourself to read the malfunction code that appears on the display. Contact your dealer with this code. It will help pinpoint the cause of the trouble, speeding up the repair.
Press the INSPECTION/TEST button to select the inspection mode "
“” appears on display and blinks. “UNIT no.” lights up.
Press PROGRAMMING TIMER BUTTON and change the unit number.
Press to change the unit number until the indoor unit beeps and perform the following operation according to the number of beeps.
Number of beeps
3 short beeps .....Perform all steps from ③ to ⑥.
1 short beep .....Perform and steps
1 long beep ......Normal state
Press OPERATION MODE SELECTOR BUTTON.
“”on the left-hand of the malfunction code blinks.
Press PROGRAMMING TIMER BUTTON and change the malfunction code.
Press until the indoor unit beeps twice.
Press OPERATION MODE SELECTOR BUTTON.
“”on the right-hand of the malfunction code blinks.
Press PROGRAMMING TIMER BUTTON and change the malfunction code.
Press until the indoor unit makes a long beep.
The malfunction code is fixed when the indoor unit makes a long beep.
Reset of the display
Press OPERATION MODE SELECTOR BUTTON to get the display back to the normal state.
II. IN CASE BESIDES EMERGENCY STOP
1. The unit does not operate at all.
- Check if the receiver is exposed to sunlight or strong light. Keep the receiver away from the light.
- Check if there are batteries in the remote controller. Insert the batteries if they are missing.
- Check if the indoor unit number and wireless remote controller number are equal.
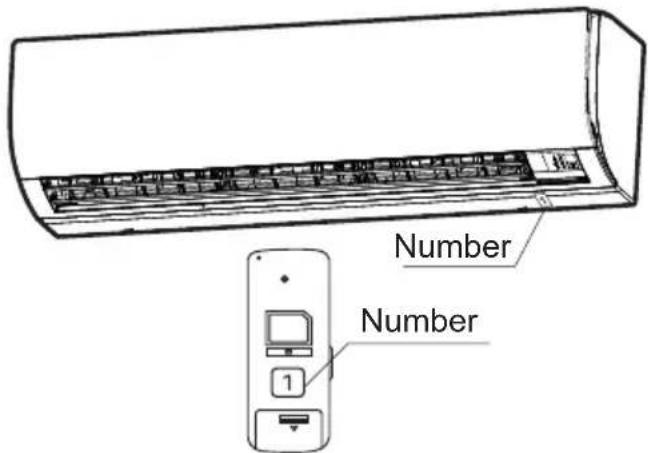
Operate the indoor unit with the remote controller of the same number.
Signal transmitted from a remote controller of a different number cannot be accepted. (If the number is not mentioned, it is considered as "1")
2. The system operates but it does not sufficiently cool or heat.
- If the set temperature is not proper.
- If the FAN SPEED is set to LOW SPEED.
- If the air flow angle is not proper.
Contact the place of purchase in the following case.
—⚠ WARNING
When you detect a burning odor, shut OFF power immediately and contact the place of purchase. Using the equipment in anything but proper working condition can result in equipment damage, electric shock and/or fire.
[Trouble]
The RUN lamp of the indoor unit is flashing and the unit does not work at all.
[Remedial action]
Check the malfunction code (A1 - UF) on the remote controller and contact the place of purchase. (See page 12.)
8. Disposal requirements
Your product and the batteries supplied with the controller are marked with this symbol. This symbol means that electrical and electronic products and
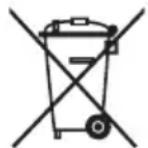
batteries shall not be mixed with unsorted household waste. For batteries, a chemical symbol can be printed beneath the symbol. This chemical symbol means that the battery contains a heavy metal above a certain concentration. Possible chemical symbols are:
■ Pb: lead (>0.004%)
Do not try to dismantle the system yourself. The dismantling of the product, treatment of the refrigerant, of oil and of other parts must be done by a qualified installer in accordance with relevant local and national legislation. Units and waste batteries must be treated at a specialized treatment facility for re-use, recycling and recovery. By ensuring correct disposal, you will help to prevent potential negative consequences for the environment and human health. Please contact the installer or local authority for more information.
natural_image
Simple line drawing of a pencil with a blank eraser (no text or symbols)
natural_image
Blank grid paper with uniform gray squares on white background (no text or symbols)
natural_image
Simple line drawing of a pencil with a blank line at the end (no text or symbols)
natural_image
Blank grid paper with uniform gray lines on white background, no text or symbols presentDAIKIN EUROPE N.V.
- Wireless Remote Controller Kit
- CONTENTS
- PRIOR TO USE
- Safety precautions
- WARNING .....
- CAUTION.....
- WARNING
- CAUTION
- Do not leave the remote controller wherever there is a risk of wetting.
- Watch your steps at the time of air filter cleaning or inspection.
- Handling of wireless remote controller
- Installation site
- Placing the remote controller in the remote controller holder
- Placing the remote controller
- Removing the remote controller
- How to put the dry batteries
- When to change batteries
- [CAUTION]
- IN CASE OF CENTRALIZED CONTROL SYSTEM
- Operation range
- VRV and Sky Air System
- Operation procedure
- Refer to figure 1 on page [1]
- COOLING, HEATING, AUTOMATIC, FAN, AND PROGRAM DRY OPERATION
- 《FOR SYSTEMS WITHOUT COOL/HEAT CHANGEOVER REMOTE CONTROL SWITCH》
- Refer to figure 1-1, 2 on page [1]
- OPERATION MODE of your choice as follows.
- ON/OFF
- Press ON/OFF button
- NOTE
- 《FOR SYSTEMS WITH COOL/HEAT CHANGEOVER REMOTE CONTROL SWITCH》
- Press OPERATION MODE SELECTOR
- Heating capacity & Outdoor air temperature
- ADJUSTMENT
- TEMPERATURE SETTING
- Press TEMPERATURE SETTING button and program the setting temperature.
- In case of automatic operation
- FAN SPEED CONTROL
- Press FAN SPEED CONTROL button.
- AIR FLOW DIRECTION ADJUST
- Press the AIR FLOW DIRECTION ADJUST button to select the air direction as shown in following illustration.
- Adjusting left/right air flow direction
- MOVEMENT OF THE AIR FLOW FLAP
- TIMER MODE START/STOP
- Press the TIMER MODE START/STOP button several times and select the mode on the display.
- PROGRAMMING TIME
- Press the PROGRAMMING TIME button and set the time for stopping or starting the system.
- TIMER RESERVE
- Press the TIMER RESERVE button.
- TIMER CANCEL
- For example.
- HOW TO SET MASTER REMOTE CONTROLLER (For VRV system)
- ■ For Heat pump system
- ■ For Heat recovery system
- How to designate the master remote controller
- EMERGENCY OPERATION
- [START]
- [STOP]
- PRECAUTIONS FOR GROUP CONTROL SYSTEM OR TWO REMOTE CONTROLLERS CONTROL SYSTEM
- ■ Group control system
- ■ Two remote controllers control system
- Not malfunction of the air conditioner
- The following symptoms do not indicate air conditioner malfunction
- How to diagnose trouble spots
- EMERGENCY STOP
- Press the INSPECTION/TEST button to select the inspection mode "
- Press PROGRAMMING TIMER BUTTON and change the unit number.
- Number of beeps
- Press OPERATION MODE SELECTOR BUTTON.
- Press PROGRAMMING TIMER BUTTON and change the malfunction code.
- Reset of the display
- Press OPERATION MODE SELECTOR BUTTON to get the display back to the normal state.
- IN CASE BESIDES EMERGENCY STOP
- The unit does not operate at all.
- The system operates but it does not sufficiently cool or heat.
- Contact the place of purchase in the following case.
- —⚠ WARNING
- [Trouble]
- [Remedial action]
- Disposal requirements
- DAIKIN EUROPE N.V.
Brand : DAIKIN
Model : BRC7EA632
Category : Controller