
DCM010A51 - Interface DAIKIN - Free user manual and instructions
Find the device manual for free DCM010A51 DAIKIN in PDF.


| Product Type | Interface / Control Panel |
| Brand | Daikin |
| Model | DCM010A51 |
| Dimensions (W x H x D) | 120 x 80 x 20 mm |
| Weight | 200 g |
| Power Supply | 24 V AC |
| Display | LCD with backlight |
| Connectivity | Wired (Modbus) |
| Functions | Temperature control, Fan speed control, Mode selection, Scheduling |
| Compatibility | Daikin VRV, split, and multi-split systems |
| Mounting | Wall mount |
| Color | White |
| Certifications | CE, RoHS |
| Operating Temperature | 0°C to 50°C |
| Storage Temperature | -20°C to 60°C |
| Humidity Range | 5% to 95% non-condensing |
| Installation | Professional installation recommended |
| User Interface | Physical buttons with tactile feedback |
| Language Support | Multiple languages (English, French, German, etc.) |
| Backup | Non-volatile memory retains settings |
Frequently Asked Questions - DCM010A51 DAIKIN
User questions about DCM010A51 DAIKIN
0 question about this device. Answer the ones you know or ask your own.
Ask a new question about this device
Download the instructions for your Interface in PDF format for free! Find your manual DCM010A51 - DAIKIN and take your electronic device back in hand. On this page are published all the documents necessary for the use of your device. DCM010A51 by DAIKIN.
USER MANUAL DCM010A51 DAIKIN
User reference guide
Daikin PMS Interface
Table of Contents
1 About this document 2
2 Terms of use 2
3 Installation 4
3.1 System overview 4
3.1.1 System description....4
3.1.2 Example: integration on external PC 5
3.1.3 Example: integration on Vendor Integration Server.... 5
3.2 Before installation....6
3.2.1 Installation site requirements 6
3.2.2 To fill in the information sheet 6
3.3 Installation of the Daikin PMS interface software 6
3.3.1 Compatibility 6
3.3.2 To install the software 6
3.3.3 Demo mode 7
3.4 Initial setup 7
3.4.1 To go through the initial interface configuration...... 7
3.4.2 To log in 8
3.4.3 Connection status 8
4 Setup 8
4.1 Configuration 8
4.1.1 Profiles 8
4.1.2 Room types....9
4.2 Link rooms and units 10
4.2.1 To link rooms and units.... 11
4.2.2 To remove a link 11
4.3 Rooms 11
4.3.1 To assign room types.... 12
4.4 User management.... 12
4.4.1 To add users 12
4.4.2 To edit users 12
4.4.3 To remove a user.... 13
5 Operation 13
5.1 Dashboard.... 13
5.1.1 Dashboard overview 13
5.1.2 To modify the room settings.... 13
5.2 Preheating and precooling 14
5.2.1 Preheating and precooling description.... 14
5.2.2 To enable/disable preheating/precooling.... 14
5.3 Stop control 14
5.3.1 To stop control 14
5.3.2 To start control 15
5.4 Exit application 15
6 Registration and activation 15
6.1 Auto activation.... 15
6.2 Manual activation 15
7 Software upgrade 17
8 System back-up 17
Daikin PMS Interface – Information sheet 18
1 About this document
Thank you for purchasing this product. Please:
- Keep the documentation for future reference.
Target audience
End users
Documentation set
This document is part of a documentation set. The complete set consists of:
- User reference guide:
- Detailed step-by-step instructions and background information for basic and advanced usage
- Format: Digital files on http://www.daikin.eu
Latest revisions of the supplied documentation may be available on the regional Daikin website or via your installer.
The original documentation is written in English. All other languages are translations.
2 Terms of use
Before you can use the Daikin PMS Interface, you have to accept the Terms of use:
Please read through these conditions of use carefully.
These terms and conditions ('Terms of use') are a binding legal agreement between you ('You' or 'Your') and Daikin Europe N.V., a company having its registered offices at Zandvoordestraat 300, 8400 Oostende, Belgium ('Daikin') concerning the use of the Daikin PMS Interface ('Software') and constitutes the complete agreement between Daikin and You. These Terms of use shall supersede any other provisions, terms and conditions set forth by You, and the rights of the parties shall therefore be governed exclusively by the provisions, terms and conditions set forth herein.
By using the Software, You agree to be bound by the terms and conditions of these Terms of use. If You do not agree with these Terms of use, You may not use the Software in any manner.
Use of the Software
Subject to the terms and conditions of these Terms of use, Daikin grants You a non-exclusive and non-transferable license to use the Software on devices with suitable OS as designated by Daikin for the purpose to monitor and control your Daikin equipment in the country of Your choice in the EMEA territory.
These Terms of use do not grant any right of use in any manner other than the above. In particular You are advised that the redistribution, sale, lease, rental or export of the Software in any form without written authority from Daikin is explicitly prohibited. Unless as explicitly permitted under these Terms of use, You shall not copy, reproduce, modify, transmit or distribute the Software or any portion thereof, or facilitate a third party to do so. You will not submit any information on the Software that is unlawful.
You must not use our Software in any way that causes, or may cause, damage to the website or impairment of the availability or accessibility of the website; or in any way which is unlawful, illegal, fraudulent or harmful, or in connection with any unlawful, illegal, fraudulent or harmful purpose or activity. You must not use our Software to copy, store, host, transmit, send, use, publish or distribute any material which consists of (or is linked to) any spyware, computer virus, Trojan horse, worm or other malicious computer software.
You will not submit any information on the Software that is unlawful or illegal, that infringes any third party's legal rights and that is capable of giving rise to legal action whether against You or Daikin or a third party (in each case under any applicable law).
The Software is to be downloaded, installed and used on Your costs and expenses on Your own device in accordance with this Terms of use.
Account registration
You may need a prior registration of an account for certain functions of this Software. The Software is not targeted towards, nor intended for use by minors. Minors are not permitted to use the Software.
Daikin will consider any use of this Software as usage by the User who performed the registration. Daikin shall in no circumstances be liable for any damages arising out of any abuse or misuse of registered accounts by third parties due to Your inappropriate management of Your registered account.
Copyright
Daikin owns or is licensee of all (intellectual) property rights in the Software and its content and You acknowledge that You do not acquire any rights in respect of such intellectual property rights, except as otherwise explicitly provided in these Terms of use.
Trade Name / Trade Marks
All Trade Names and Trade Marks displayed through the Software (if any) that belong to Daikin now or hereafter is/shall be the sole property of or are licensed to Daikin or its affiliate(s). Your use of the Software should not be construed as granting, by implication or otherwise, any license or right to use any Trade Names and Trade Marks displayed through the Software (if any).
Disclaimer of warranty
Daikin has compiled the content of this Software (including translations) to the best of its knowledge. The present Software (and its content) is however drawn up by way of information only and does not constitute an offer binding upon Daikin. Daikin does not warrant that the Software will be error-free. This Software and its content is provided on an 'AS IS' basis, without warranty of any kind - either express or implied, including but not limited to warranty of title and against infringement or implied warranties of merchantability or fitness for a particular purpose - is made in relation to the completeness, availability, accuracy, reliability of the Software or its content and the products and services presented therein.
This Software has inherent limitations including but not limited to possible design faults and programming bugs. The entire risk to the quality and performance of the Software is borne by You, and it is Your responsibility to ensure that it does what You require it to do prior to using it for any purpose (other than testing it).
Limited liability
When You use the Software You acknowledge and accept that You do so at Your sole risk. You agree that under no circumstances You shall have any claim against Daikin or associated companies whether as employee, subcontractor, agent, representative, consultant, installer or otherwise for loss, damages, harm, injury, expense, work stoppage, loss of business information, business interruption, computer failure or malfunction which may be suffered by You or any other party from any cause whatsoever, howsoever arising in connection with the use of the Software and its content even where Daikin were aware or ought to have been aware of the potential of such loss. To the maximum extent permitted by applicable law, Daikin shall not be liable for any direct, indirect, general, special, incidental, punitive and/or consequential damages, costs, expenses, and/or losses arising out of the use or inability to use the Software and/or the interpretation of its content.
Indemnity
You indemnify Daikin and affiliated companies and hold them harmless against any claims which may arise from any loss, damages, harm, injury, expense, work stoppage, loss of business information, business interruption, computer failure or malfunction which may be suffered by You or any other party whatsoever as a consequence of any act or omission of Daikin or affiliated companies, whether negligent or not, arising out of Your use of the Software and its content or from any cause whatsoever, howsoever arising in connection with the Software.
You will safeguard Daikin from any claims for the compensation of any damage, from third parties, which may result from the use of this Software by You.
Amendments
Daikin reserves the right to release new versions of the Software (including changes in functionality or interface) that could replace earlier released versions of the Software or to update the Software's content from time to time at Daikin's own discretion and without prior announcement.
Daikin reserves the right to modify from time to time these Terms of use at Daikin's own discretion and without prior announcement. You are responsible for informing Yourself of the Terms of use in force at the time of access and use of this Software.
Data protection
If applicable, Daikin only collects personal data as You have chosen to download and use the Software, You have thus demonstrated an interest in its content and, accordingly, Your personal data could be made available to the members of our marketing department or the marketing responsibilities of our subsidiaries and/or independent distributors in EMEA territory and allocated by them to keep You informed about the Software or its content, and/or to use the data for anonymous analysis for marketing and sales purposes, such as to measure the use of the Software by country/geographical location. We will not use Your personal data for other purposes.
Daikin will act as a controller of these personal data and will always act in compliance with the Belgian law of 8 December 1992 on Privacy Protection in relation to the Processing of Personal Data and its modifications ('Belgian Privacy Law') and its implementing decrees.
In accordance with the Belgian Privacy Law, You have the right of access to and the right to access, rectify and remove the personal data relating to You. If You want to exercise any of such rights such will be free of charge and upon request sent by e-mail to info@daikineurope.com.
The software doesn't log or transmit customer, room or unit data outside the managed network of the building/hotel. As such Daikin isn't responsible for any export of local stored data outside the managed network of the hotel/building by 3^rd parties or external technologies (e.g. vpn connections, remote access, ...).
You have the right to delete Your personal data by using the Software. After You deleted Your personal data, Your data will still be available in the log files or backups for a limited period in time.
You hereby consent for DENV to use Your Personal Data under the terms of these Terms of use and to share said data with any entity belonging to the Daikin group or with other parties, provided that Daikin ensures that the necessary requirements for data protection are respected and technical and organizational safety measures have been taken to prevent the improper or illegal disclosure or processing of Your personal data or the accidental loss or destruction or damage of personal data.
You hereby explicitly acknowledge and consent that Daikin may transfer Your personal data outside EEA and make use of Cloud Computing Services to store Your Personal Data. Daikin will use commercially reasonable security technologies (such as encryption, password protection and firewall protection) to protect Your Personal Data from unauthorized disclosure. Daikin shall only be responsible if it has finally judicially been determined that it did not take commercially reasonable measures to protect Your Personal Data from unauthorized disclosure.
Miscellaneous
The provisions of these Terms of use shall also apply to and bind Your legal successors, administrators, legal representatives, and Your permitted assignees.
Except where explicitly stated otherwise herein, if any provision of these Terms of use is found to be invalid or unenforceable, the invalidity or unenforceability of such provision shall not affect the other provisions of these Terms of use, and all provisions not affected by such invalidity or unenforceability shall remain in full force and effect. In such cases You agree to attempt to substitute for
3 Installation
each invalid or unenforceable provision a valid or enforceable provision which achieves to the greatest extent possible the objectives and intention of the invalid or unenforceable provision.
The validity and interpretation of these Terms of use will be governed by the laws of Belgium and any claim arising out of these Terms of use shall exclusively be brought for the Courts of Brussels.
3 Installation
3.1 System overview
3.1.1 System description
The Daikin PMS Interface is an Interface between a Hotel Management System and the Daikin HVAC systems that allows to save energy, automate human actions, and improve the hotel customer experience.
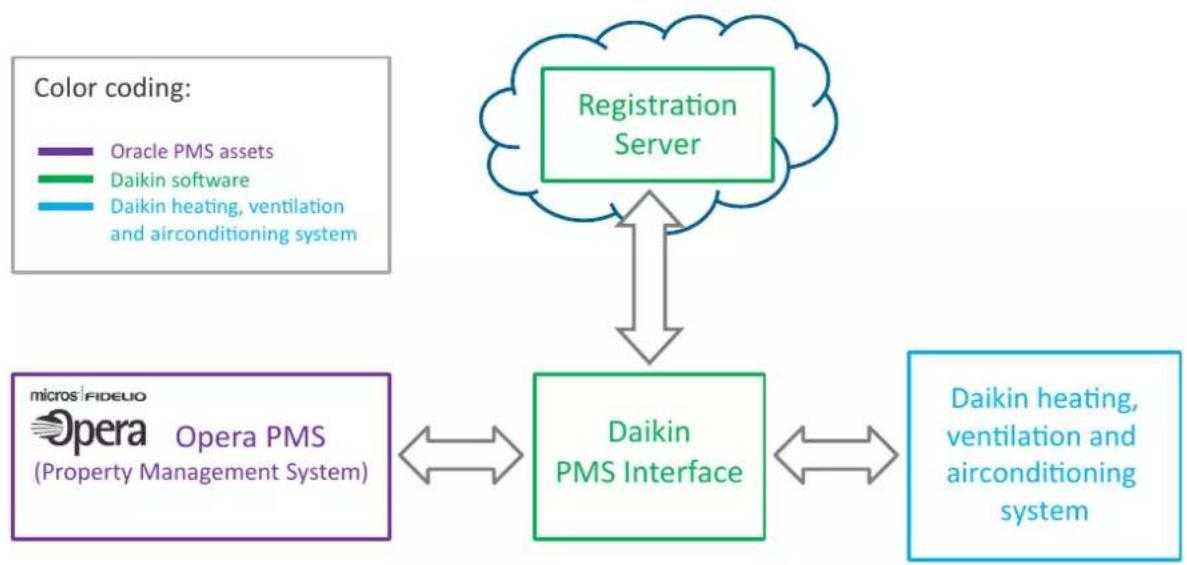
flowchart
graph TD
    A["Registration Server"] <--> B["Daikin PMS Interface"]
    C["Opera PMS (Property Management System)"] <--> B
    D["Color coding: Oracle PMS assets, Daikin software, Daikin heating, ventilation and airconditioning system"] --> A
    E["Daikin heating, ventilation and airconditioning system"] --> B

INFORMATION
The PMS interface only pushes settings to a room indoor unit when there is a check-in, checkout or a trigger for preheating/precooling. At any time, the customer in the hotel room or the hotel front desk manager can change these settings.
The iTM Auto Changeover function can change the operation mode and setpoint on top of the PMS interface settings.
3.1.2 Example: integration on external PC
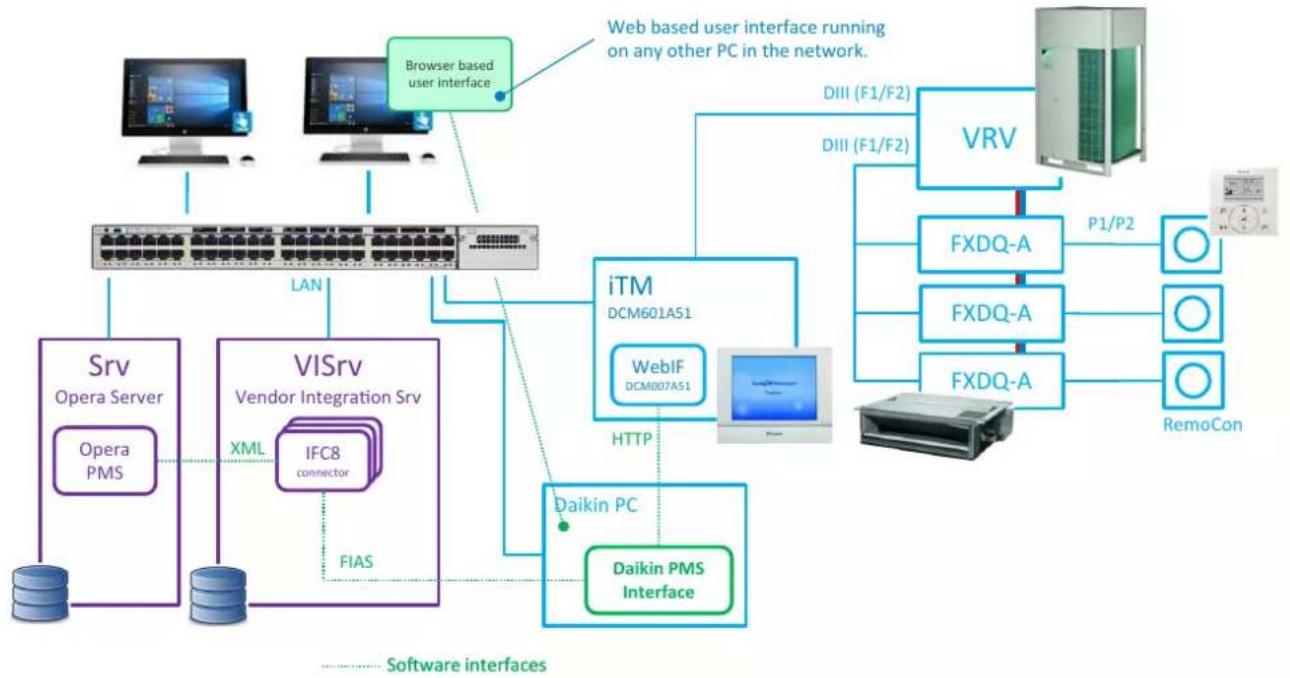
flowchart
graph TD
    A["Opera PMS"] --> B["Srv Opera Server"]
    C["Browser based user interface"] --> D["VISrv Vendor Integration Srv"]
    D --> E["IFC8 connector"]
    E --> F["iTM DCM601A51"]
    F --> G["VRV"]
    G --> H["P1/P2"]
    G --> I["FXDQ-A"]
    G --> J["FXDQ-A"]
    G --> K["FXDQ-A"]
    G --> L["RemoCon"]
    M["Data Tower"] --> N["Data Port"]
    O["Data Tower"] --> P["Data Port"]
    Q["Data Tower"] --> R["Data Port"]
    S["Data Tower"] --> T["Data Port"]
    U["Data Tower"] --> V["Data Port"]
    W["Data Tower"] --> X["Data Port"]
    Y["Data Tower"] --> Z["Data Port"]
    AA["Data Tower"] --> AB["Data Port"]
    AC["Data Tower"] --> AD["Data Port"]
    AE["Data Tower"] --> AF["Data Port"]
    AG["Data Tower"] --> AH["Data Port"]
    AI["Data Tower"] --> AJ["Data Port"]
    AK["Data Tower"] --> AL["Data Port"]
    AM["Data Tower"] --> AN["Data Port"]
    AO["Data Tower"] --> AP["Data Port"]
    AQ["Data Tower"] --> AR["Data Port"]
    AS["Data Tower"] --> AT["Data Port"]
    AU["Data Tower"] --> AV["Data Port"]
    AW["Data Tower"] --> AX["Data Port"]
    AY["Web based user interface running on any other PC in the network."] --> AZ["DIII (F1/F2)"]
    AZ --> BA["DIII (F1/F2)"]
    BA --> BB["iTM DCM601A51"]
    BB --> BC["WebIF DCMID07A51"]
    BC --> BD["HTTP"]
    BD --> BE["Daiikin PC"]
    BE --> BF["Daikin PMS Interface"]
    BG["Software interfaces"] -.-> BH["Data Tower"]
3.1.3 Example: integration on Vendor Integration Server
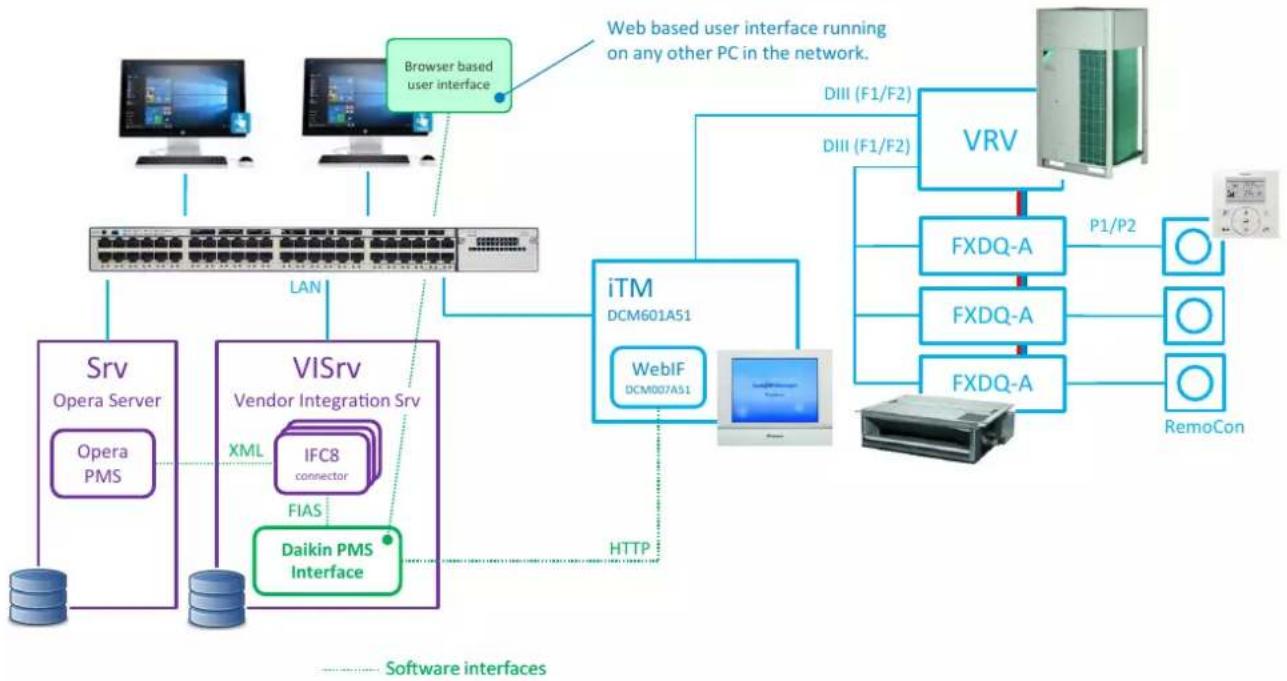
flowchart
graph TD
    A["Opera Server"] --> B["Srv"]
    B --> C["Opera PMS"]
    C --> D["VISrv"]
    D --> E["Vendor Integration Srv"]
    E --> F["IFC8 connector"]
    F --> G["FIAS"]
    G --> H["Daikin PMS Interface"]
    H --> I["HTTP"]
    I --> J["iTM DCM601A51"]
    J --> K["WebIF DCM007A51"]
    K --> L["VRV"]
    L --> M["P1/P2"]
    L --> N["RemoCon"]
    L --> O["FXDQ-A"]
    L --> P["FXDQ-A"]
    L --> Q["FXDQ-A"]
    style A fill:#f9f,stroke:#333
    style B fill:#ccf,stroke:#333
    style C fill:#cfc,stroke:#333
    style D fill:#fcc,stroke:#333
    style E fill:#cff,stroke:#333
    style F fill:#ffc,stroke:#333
    style G fill:#cfc,stroke:#333
    style H fill:#fcc,stroke:#333
    style I fill:#ffc,stroke:#333
    style J fill:#fcc,stroke:#333
    style K fill:#ffc,stroke:#333
    style L fill:#fcc,stroke:#333
    style M fill:#fff,stroke:#333
    style N fill:#fff,stroke:#333
    style O fill:#fff,stroke:#333
    style P fill:#fff,stroke:#333
    style Q fill:#fff,stroke:#333
3.2 Before installation
3.2.1 Installation site requirements
- Maximum 5 iTM controllers (DCM601A51) can be connected.
- Each iTM controller has firmware version v1.23 or higher
- Each iTM controller has the web interface function (DCM007A51) activated
- Each iTM controller has direct or indirect connection to the network.

INFORMATION
Make sure that the iTM that is controlled by the PMS interface is configured as master on the DIII network.

INFORMATION
It is recommended to remove or disable schedules in the iTM. Scheduling can cause conflicts with the PMS interface settings.
3.2.2 To fill in the information sheet
Prerequisite: Print out the information sheet. The information sheet can be found at the end of this document (see "Daikin PMS Interface – Information sheet" on page 18).
1 Have Oracle to set up an IFC8 connector and note down the IP address and port number of this IFC8 connector.
2 Retrieve the IP address of the installation PC (on which the Daikin PMS Interface will be installed) and note it down on the information sheet.

INFORMATION
The Daikin PMS Interface software can be installed either on the Oracle Vendor Integration Server or on a separate PC.
The preferred option is to use a separate PC to prevent interference with the Oracle software.
3 Check if the following ports are available on the installation PC:
- HTTP port number 3000
- Web Socket port number 3456

NOTICE
Make sure the firewall of the installation PC does not block these ports.

INFORMATION
If necessary, run the free tool TCPView from Microsoft on the PC to check if certain port numbers are available.
4 If both ports are free note them on the information sheet. If a port is not free see "3.3.3 Demo mode" on page 7 on how to change these default ports. Contact your IT support or your dealer to support you with these changes.
5 Collect and note down the following information for each iTM controller (DCM601A51):
- Firmware version (minimum v1.23)
- IP address
- Port number
- Web I/F user name
- Web I/F password

INFORMATION
It is recommended to use port number 80 for the iTM web interface and port number 8081 for the iTM Web I/F interface.

INFORMATION
Consult the user manual of the iTM (DCM601A51) to find the required controller information.
6 The 2 fields at the bottom of the information sheet can be used to write down the administration account credentials. These credentials will be created during the first steps of the interface configuration.
3.3 Installation of the Daikin PMS interface software
3.3.1 Compatibility
Oracle PMS compatibility
- Opera v5.0.03.03 e43, v5.0.04.01 e24, v5.0.04.02 e17, v5.0.04.03 e10, v5.0.05.00 and higher
- Oracle Suite 8 keyless version.
PC platform compatibility
- Microsoft Windows 7, 8, 8.1 & 10
- Microsoft Server 2012 & 2016.
- Google Chrome v58 or later (preferred browser)
- Internet Explorer v11
- Mozilla Firefox v54 or later
- Minimum browser resolution: 1024 pixels wide by 600 pixels high.
iTM compatibility
- Compatible with iTM 2 (DCM601A51) only with firmware version v1.23 or higher
- The Web I/F HTTP interface option (DCM007A51) MUST be installed.
Indoor compatibility
- The PMS interface supports "Indoor", "Hydrobox" and "Ventilator" units controlled by the iTM. Depending on the capabilities of an indoor unit certain operation and fan modes will be available to select. The outdoor units connected to the iTM are supported only to read the outdoor temperature.
3.3.2 To install the software
1 Download the latest version of "Daikin PMS Interface.exe" from my.daikin.eu (access only for Daikin Installers).
2 Save the file on the PC on which the interface software will be used. The executable can be started from any directory but it is recommended to create a dedicated directory (e.g. D:\Daikin_PMS_Interface).
3 Start "Daikin PMS Interface.exe" for the first time.
Result: A black command window appears that shows "DEMO" followed by the IP address and port to connect to the application:
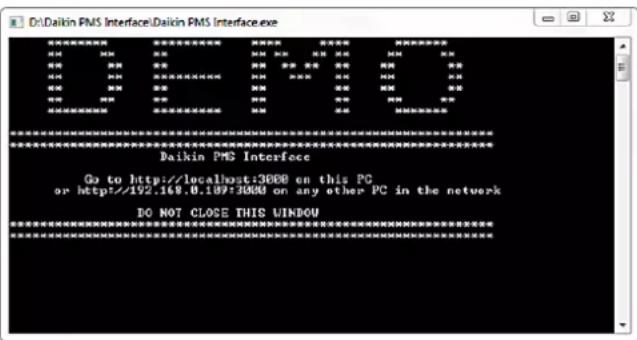
4 Go to page: http://localhost:3000 on the installation PC or http://xxx.xxx.x.xxx:3000 (IP address and port of the installation PC) on any other PC in the network.
Result: The login screen appears. In the demo mode any credentials can be used to login.
Take a moment to add this page to your browser favorites.
3.3.3 Demo mode
Description
By default, the application runs in demo mode. The demo application is a graphical representation of the software. Some functionality does not work properly as the external hardware is missing.
For proper function of the interface, demo mode must be turned off. See the procedure below on how to exit the demo mode.
The behavior of this demo mode is not further detailed as it is not always in line with the user manual due to the absence of real hardware.
To exit the demo mode
1 Stop "Daikin PMS Interface.exe".
2 Go to the directory %AppData%\Daikin.
3 Edit the file "config.json" and change the demo option from "true" to "false" (e.g. {"demo": false, ...}).
4 Save the changes.
5 Restart the "Daikin PMS Interface.exe" application.

INFORMATION
In the same "config.json" file you can change the options "port" and "ws-port" which define the default ports used by the PMS Interface. Contact IT support before changing these options.
To open the application
With a browser (preferable Chrome), go to page:
- http://localhost:3000 on the installation PC
- or http://xxx.xxx.x.xxx:3000 (IP address and port of the installation PC) on any other PC in the network.
3.4 Initial setup
3.4.1 To go through the initial interface configuration
Create an administrator account
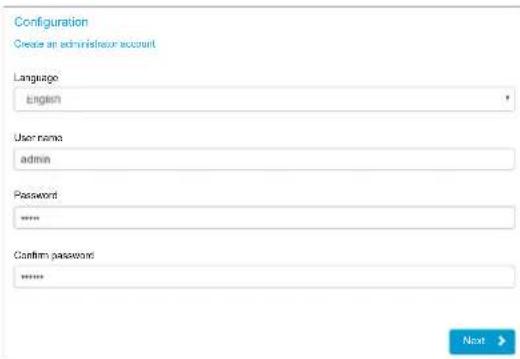
1 Select the language to use with the administrator account.

INFORMATION
The selected language defines default names like the full name for the administrator, profile names and the default room "Bedroom".
2 Enter a User name for this account.
3 Enter a Password for this account.
4 Confirm the Password.
5 Click the "Next" button to proceed to the next step.
Note down these administrator credentials on the information sheet as explained in "3.2.2 To fill in the information sheet" on page 6.
Connect to Daikin controllers
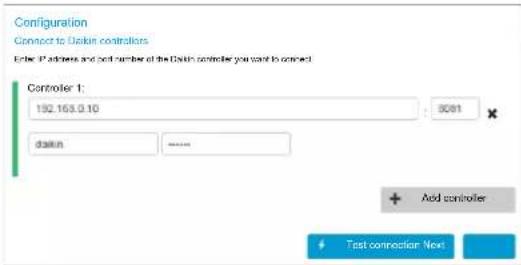
6 Enter IP address and port number of the Daikin controller you want to connect.
7 Enter the iTM Web I/F user name.
8 Enter the iTM Web I/F password.

INFORMATION
The IP address and port of the iTM controller can be found in the user interface of the device (Menu List > System Settings > Network). Refer to the iTM controller operation manual for more information.
9 Click the "Test connection" button.
Result: The connection status bar on the left of the controller details indicates the connection status.
There are 3 possibilities:
- Grey: connection undefined
- Green: connection OK
- Red: connection NOT OK. An error message appears below the controller details.
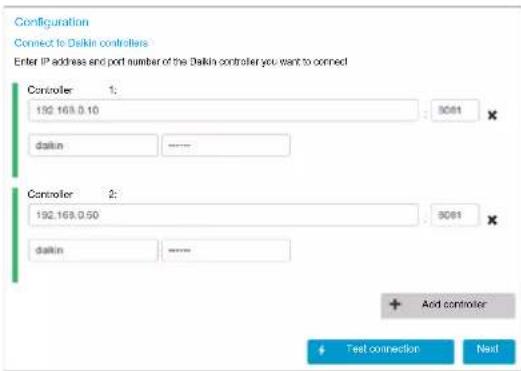
10 If necessary, click "Add controller" to add up to 5 iTM controllers.
Prerequisite: All controllers MUST have a green status bar.
11 Click the "Next" button to proceed to the next step.
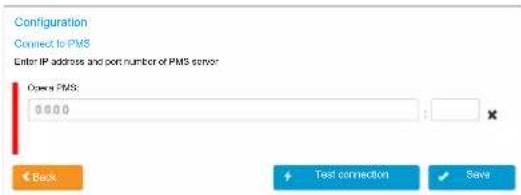
Connect to the PMS server
4 Setup
12 Enter IP address and port number of PMS server (refer to previously filled in information sheet).
13 Click the "Test connection" button.
Result: The connection status bar at the left of the Opera PMS server details indicates the connection status.
There are 2 possibilities:
- Green: connection OK
- Red: connection NOT OK.
Prerequisite: The Opera PMS server MUST have a green status bar.
14 Click the "Save" button to save the above settings.
Result: The Login screen appears and a save confirmation is displayed for a few seconds.
3.4.2 To log in
1 Enter the credentials of the administrator account (see bottom information sheet).
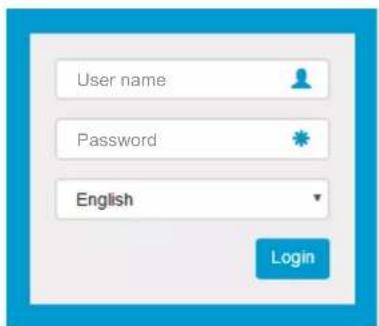
2 Select the language that will be used with this user.
3 Click the "Login" button.
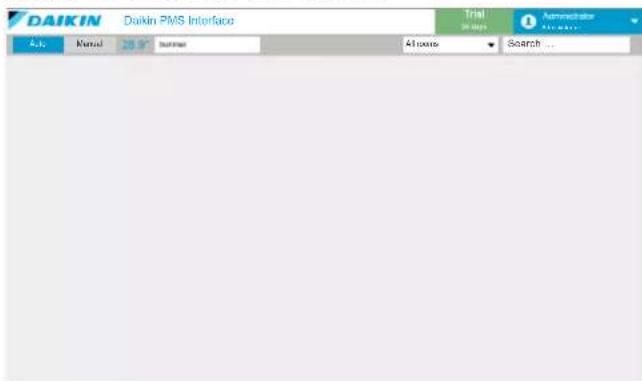
Result: The "Dashboard" page appears:
3.4.3 Connection status
Description
The Daikin PMS Interface depends on the connections with the iTM controller(s) and the Opera PMS server.
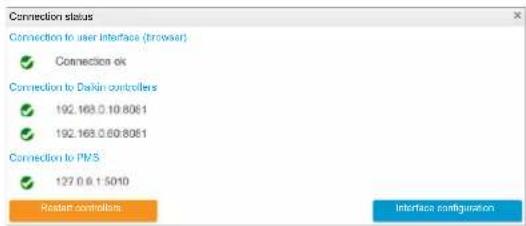
The status of these connections can be verified with the Connection status page.
Connection status page
To go to the connection status page:
1 Choose "Connection status" from the main menu.
Result: The "Connection status" page appears:
Re-configure the interfaces
Only for administrators: click the "Interface configuration" button to re-configure the interfaces.
4 Setup
4.1 Configuration
4.1.1 Profiles
Description
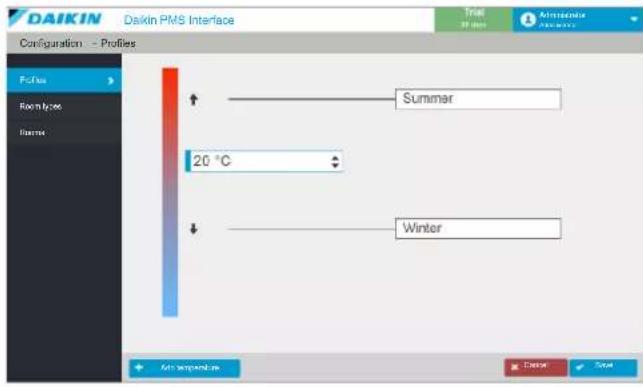
By default, 2 profiles are defined for certain outdoor conditions (temperature ranges). These profiles can be used for e.g. "Winter" and "Summer".

INFORMATION
If only 1 profile is needed: only configure the "Profile 1" and select "Manual" and "Profile 1" on the dashboard.
Profiles are linked to room type settings and can be selected manually or automatically (see "5.1.1 Dashboard overview" on page 13). This means that unit settings can differ according to the outdoor temperature.
When in "Auto" mode, the profile is automatically selected in function of the average temperature at the outdoor unit(s).
By default, 2 profiles are available: Profile 1 and Profile 2.
- Profile 1 settings are used if the outside temperature is higher than the value in the field located in between the 2 profiles.
- Profile 2 settings are used if the outside temperature is lower or equal than the value in the field located in between the 2 profiles.
These profiles apply to all room types and can be renamed by preference. E.g. below "Profile 1" is renamed to "Summer" and "Profile 2" to "Winter".
Profiles page
To go to the profiles page:
1 Choose "Configuration" from the main menu.
Result: The "Profiles" page appears:

INFORMATION
The PMS interface only uses temperatures in degrees Celsius.
To add profiles
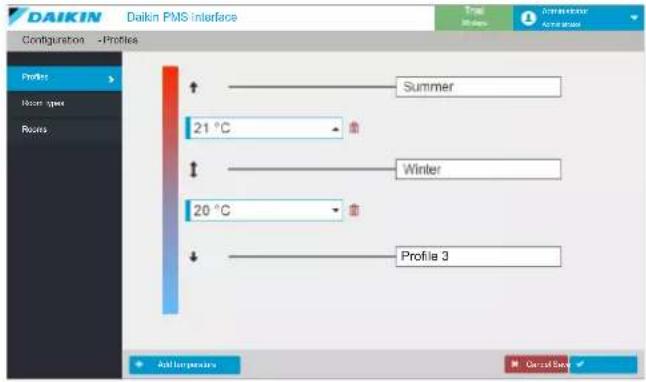
1 Click the "Add temperature" button to add a temperature, and therefore also a profile.
Result: An extra switching temperature is added at the top and a new profile is added at the bottom.

INFORMATION
Up to 4 switching temperature values, resulting in 5 profiles can be defined and configured.
2 Modify the temperatures using the arrows next to the temperatures.
3 Rename, if necessary, the profile name in the text box.

INFORMATION
Profile and room type names are NOT automatically translated in case another language is selected at login.
4 Click the "Save" button to save the profiles or "Cancel" to return to the last saved profile settings.
To delete profiles
1 Click the icon next to a temperature to delete it.
Result: The selected temperature together with the bottom profile are removed.
4.1.2 Room types
Description
Different types of rooms (e.g. Bedroom, Meeting room, ...) can require different comfort settings. The use of room types allows to configure different settings for each type and in a further stage, apply them to rooms.
The default room type is "Bedroom" translated in the language that was selected during the initial setup of the software. This room type cannot be deleted, but it can be renamed.
It is recommended to start with editing the settings of the default room type before adding extra room types. This reduces the total configuration time as it is used as a base during the creation of a new room type.
Room types page
To go to the room type page:
1 Choose "Configuration" from the main menu.
Result: The "Profiles" page appears.
2 Choose "Room types" on the left of the screen.
Result: The "Room types" page appears.
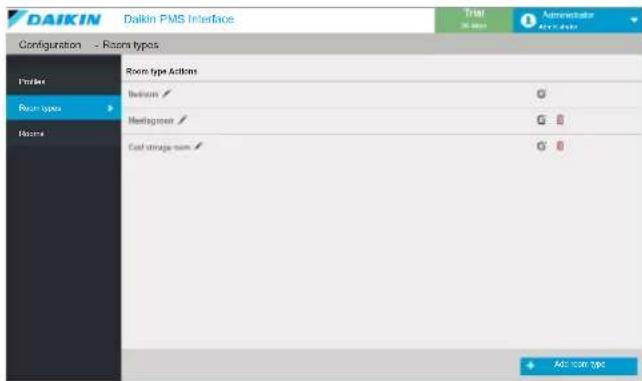
To rename room types
1 Click on the icon next to the room type.
2 Type the new name in the text field.
3 Click on the icon to save the new name.
Result: The room type is renamed.
To edit room type settings
1 Click on the icon next to the room type.
Result: The following screen appears:
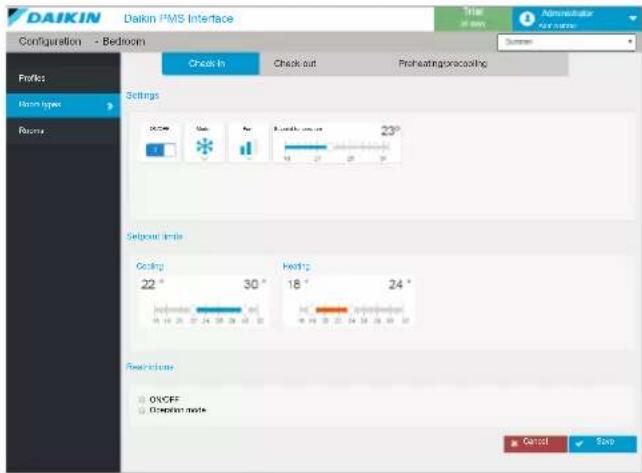
2 Select the profile (upper right corner of the screen) for which the settings must be edited.

3 Configure the settings for the "Check-in" status of the selected room type. See below for more information on the settings.
Result: These settings are applied when a room of this type is checked in and when the selected profile is active.
4 Configure the settings for the "Check-out" status of the selected room type. See below for more information on the settings.
Result: These settings are applied when a room of this type is checked out and when the selected profile is active.
5 Configure the settings for the "Preheating/precooling" status of the selected room type. See below for more information on the settings.
Result: These settings are applied when a room of this type is preheating or precooling and when the selected profile is active.
6 Repeat the above procedure starting from step 2 for all other profiles. Select the profiles in the upper right corner of the screen.

INFORMATION
Scroll down and save the new settings before leaving the page.
Unit settings overview
Settings
| Name Icons Description | ||
| ON/OFF |  | The unit will be "ON". |
 | The unit will be "OFF". | |
| Mode |  | Heating mode |
 | Cooling mode | |
 | Automatic mode | |
 | Dependent mode | |
 | Fan mode | |
| Fan |  | Fan speed |
| Setpoint temperature | 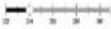 | Desired temperature |
Setpoint limits
Setpoint limits
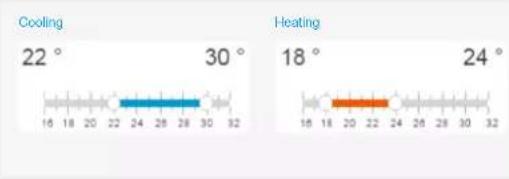
bar
| Condition | Value | | --------- | ----- | | Cooling | 22° | | Heating | 18° | | Cooling | 30° | | Heating | 24° |The setpoint limits prevent the guests from setting temperatures that could overload the unit or that are bad for the environment. Set the upper and lower limits for both cooling mode and heating mode.

INFORMATION
The PMS interface only uses temperatures in degrees Celsius.
Restrictions
Restrictions
ON/OFF
Operation mode
- ON/OFF: when this checkbox is checked, the remote control in the room cannot be used to switch the unit ON or OFF.
- Operation mode: when this checkbox is checked, the remote control in the room cannot be used to change the operation mode.
Start preheating/precooling
Start preheating/precooling
10:24
Change the preheating/precooling start time by selecting the hours or the minutes and then use the up/down cursors, or enter a value.
The start time will be used when preheating/precooling is enabled (see "5.2.2 To enable/disable preheating/precooling" on page 14).
Make sure to situate this time before the check-in time of this room type.

NOTICE
If you change the preheating/precooling schedule time make sure it is identical for a profiles (summer, winter, ...) as this is needed to assure reliable scheduling of the preheating/precooling. The default is set to 12:00 for all seasons.
To add room types
1 Click the "Add room type" button to add a profile.
Result: The following dialog box appears:
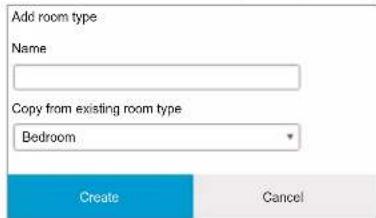
2 Enter a name for the room type (e.g. meeting room, storage room, ...).

INFORMATION
Profile and room type names are NOT automatically translated in case another language is selected at login.
3 Select an existing room type from which to copy the settings.
4 Click the "Create" button to save the room type or "Cancel" to abort.
To delete room types
Be 100% sure before you delete a room type as there is no undo available with the exception of external backup procedures.
1 Click on the 📄 icon to delete a room type.

NOTICE
The room type cannot be deleted if the room type is still allocated to 1 or more rooms.
2 Confirm the deletion of the room type by clicking "Yes" or abort by clicking "No".
4.2 Link rooms and units
Description
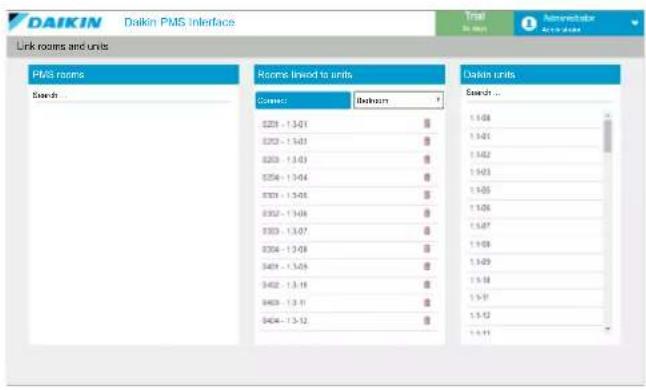
Use this page to create a link between each PMS room and the air conditioning unit in this room.
Profiles page
To go to the linking page:
1 Choose "Link rooms and units" from the main menu.
Result: The linking page appears:

INFORMATION
During first setup, the "PMS rooms" column will be empty because the PMS rooms are not yet imported from the Opera PMS server.
2 Select Refresh PMS database from the menu.
Result: The following dialog box appears:
Refresh PMS database
Do you want to refresh the PMS database?
Yes
No
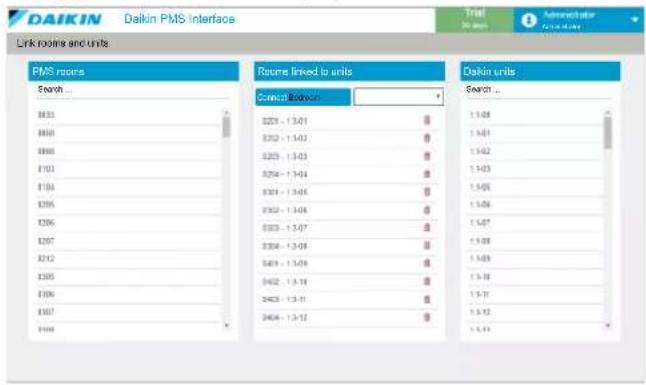
3 Click "Yes".
Result: During the refresh an animation and an informative text are displayed until the left column is populated:

INFORMATION
A refresh of the PMS database is only needed after a long term shut down of the application, or when a new room is missing in the list.

INFORMATION
As a guideline from Oracle at least 2 minutes are needed after making connection to the PMS before we can load or reload the PMS database. As a general rule it takes 2 minutes after login in with an administrator account.

INFORMATION
Database loading depends on the number of rooms but can take up to 2 minutes for a big hotel.

INFORMATION
A search function can be found on top of both lists of rooms and units.
It is possible to search for a part of a word or a number in order to shorten the list.
4.2.1 To link rooms and units
1 Select a hotel room on the left.
2 Select an air conditioning unit on the right.
3 Select a room type.
4 Click "Connect" to assign the air conditioning unit to the hotel room.
Result: The hotel room and air conditioning unit are now connected. This link is shown in a list in the middle column.

NOTICE
After connecting a room to a unit wait until the corresponding room and unit in the left and right column are deselected before selecting the next room and unit.

INFORMATION
Each time a room is linked to an outdoor unit, the "Control OFF" message appears for a short time.
4.2.2 To remove a link
To go to the linking page:
1 Choose "Link rooms and units" from the main menu.
Result: The linking page appears.
2 Click on the icon next to the link in the middle column list.
Result: The link is removed from the middle column list and from the dashboard.
4.3 Rooms
Description
Rooms cannot be added, renamed or removed. However, the room type that is assigned to each room can be modified here. For speed, it is recommended to assign room types in the "4.2 Link rooms and units" on page 10 page.

NOTICE
Check for "Room type" fields that are empty. Select a room type for any field that is empty.
Rooms page
To go to the rooms page:
1 Choose "Configuration" from the main menu.
Result: The "Profiles" page appears.
2 Choose "Rooms" on the left of the screen.
Result: The "Rooms" page appears:
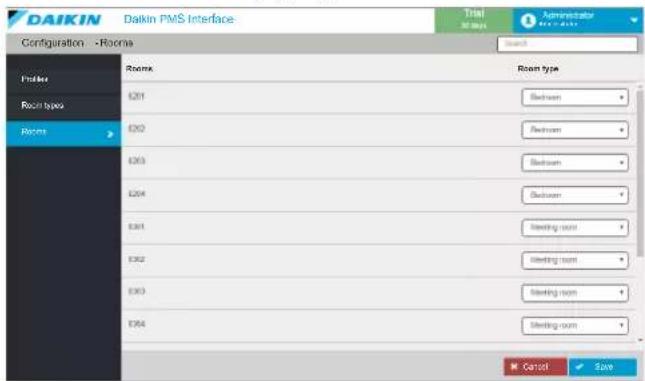
4.3.1 To assign room types
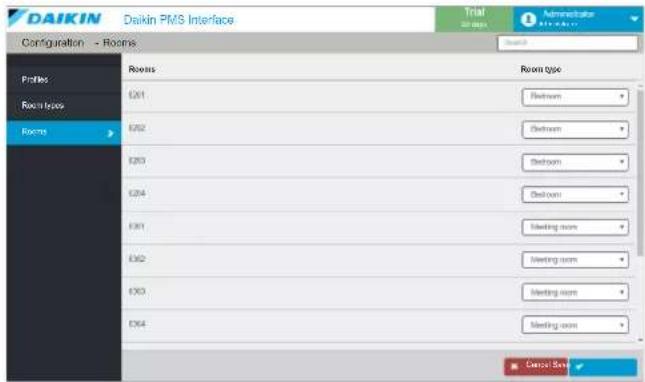
1 Locate the room in the list.

INFORMATION
A search function is available to find a room in the list. It is possible to search for a part of a word/number in order to shorten the list.
2 Select the room type from the dropdown menu.
3 Repeat the previous steps for other rooms if needed.
4 Click the "Save" button to save all modifications or "Cancel" to return to the last saved configuration.
4.4 User management
It is recommended for each user to have its own user account for logging into the interface.
Two account levels are available: administrator role and user role. The administrator role has access to all menu topics while a user role can only see the following topics:
- Preheating/precooling,
- Connection status,
- Logout,
- Stop control.
User management includes adding, removing and editing of user accounts.

INFORMATION
Passwords cannot be changed in a direct way. To change the password of a user, first remove and then re-add the user account to define a new password.
The administrator account cannot be deleted and the role of the administrator cannot be changed.
4.4.1 To add users
To go to the User management page:
1 Choose "User management" from the main menu.
Result: The user management page appears:
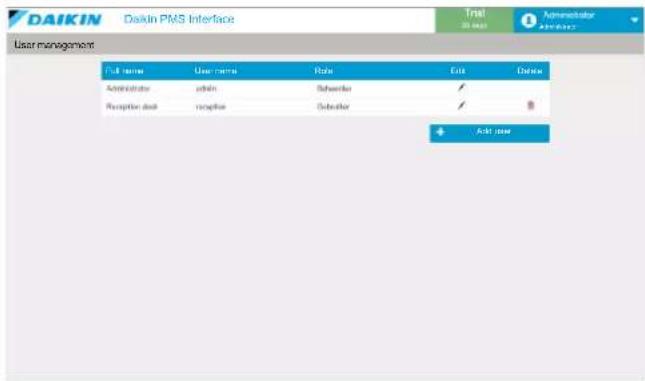
2 Click the "Add user" button to add a user account.
Result: The following dialog box appears:
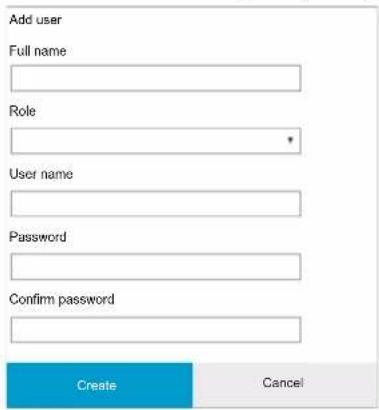
3 Enter the full name.
4 Select the role.
5 Enter the user name, which appears in the login screen.
6 Enter a password to use with this account.
7 Re-enter the password for confirmation.
8 Click the "Create" button to create the user account or "Cancel" to abort.
4.4.2 To edit users
To go to the user management page:
1 Choose "User management" from the main menu.
Result: The user management page appears.
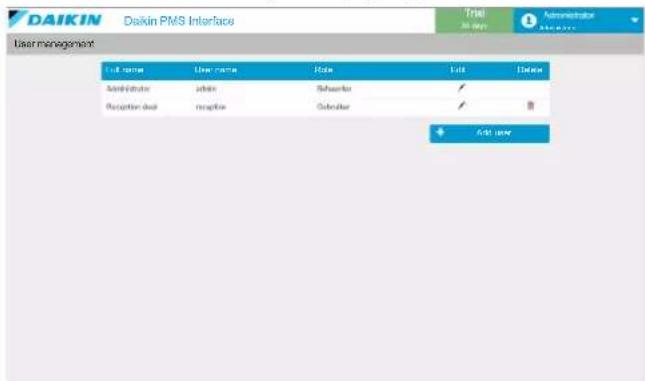
2 Click the icon to edit the user account.
Result: The following dialog box appears:
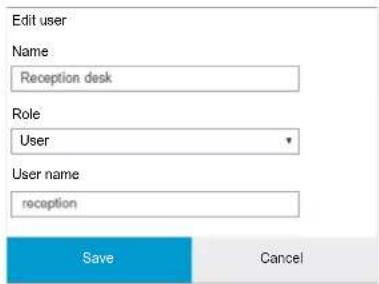
3 Edit one or more of the following fields:
- Name,
- Role,
- User name.
4 Click the "Save" button to save the changes or "Cancel" to abort.

INFORMATION
Passwords cannot be changed in a direct way. To change the password of a user, first remove and then re-add the user account to define a new password.
The administrator account cannot be deleted and the role of the administrator cannot be changed.
4.4.3 To remove a user
To go to the user management page:
1 Choose "User management" from the main menu.
Result: The user management page appears.
2 Click on the 📄 icon next to the user.
Result: The following dialog box appears:
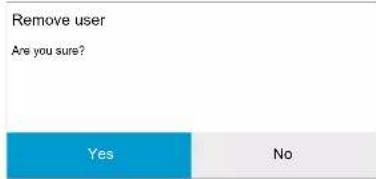
3 Click the "Yes" button to remove the user or "Cancel" to abort.
5 Operation
5.1 Dashboard
5.1.1 Dashboard overview
If necessary, go to the dashboard view by choosing "Dashboard" from the main menu. The dashboard view can also be accessed via clicking the Daikin logo in the top left corner of the screen.
The browser window can be scaled (Ctrl+scroll wheel), however, best fit should normally be achieved at 100% scaling.
On the dashboard, each existing link of a room and unit is represented as a tile.
The dashboard has the following characteristics:
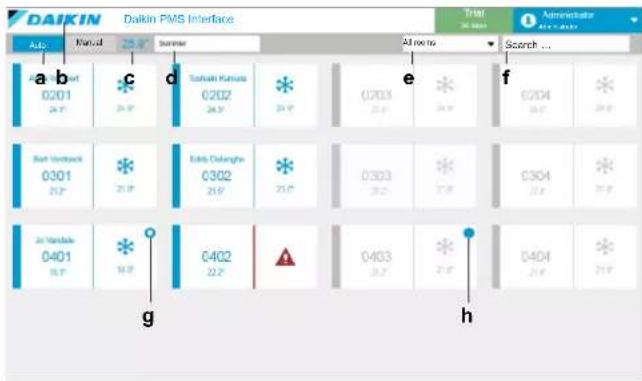
a Automatic or manual profile switching
b Logo/home button
c Average outdoor temperature
d Current profile
e Room type filter
f Search/filter rooms or guest names
g Room selected for "Preheating/precooling"
h Room actually "Preheating/precooling"
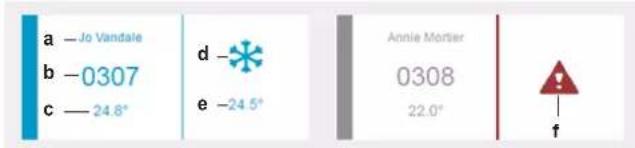
a Guest name
b Room number/name
c Room temperature
d Operation mode
e Setpoint
f Indoor unit error

INFORMATION
The average outdoor temperature is measured by the sensors of the outdoor units.
The value depends on the position of these outdoor units and the position of the sensor on these units (direct sunlight on the sensor gives higher values).
5.1.2 To modify the room settings
Click on a tile to modify the room settings for that room.
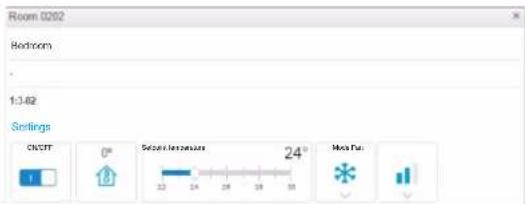
| Name Icons Description | ||
| ON/OFF |  | Unit will be "ON" |
 | Unit will be "OFF" | |
| Indoor temperature |  | Actual indoor temperature |
| Setpoint temperature | 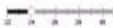 | Desired temperature |
| Mode |  | Heating mode |
 | Cooling mode | |
 | Automatic mode | |
 | Dependent mode | |
 | Fan mode | |
| Fan | Fan speed | |

INFORMATION
The available options for Fan and Operation mode are dependent on the indoor unit capabilities.

INFORMATION
The minimum and maximum temperatures can only be set within the limit settings of the selected profile.

INFORMATION
The PMS interface only uses temperatures in degrees Celsius.
5.2 Preheating and precooling
5.2.1 Preheating and precooling description
Description
The preheating/precooling time is set in the room type configuration. Preheating/precooling should be used before the recommended hotel check-in time.
Different room types can have different preheating/precooling settings. This allows for early and late check-in's.

INFORMATION
Preheating/precooling settings will be removed when the PMS system is sending a "nightly audit" command (normally between 00h00 and 03h00).
Preheating/precooling page
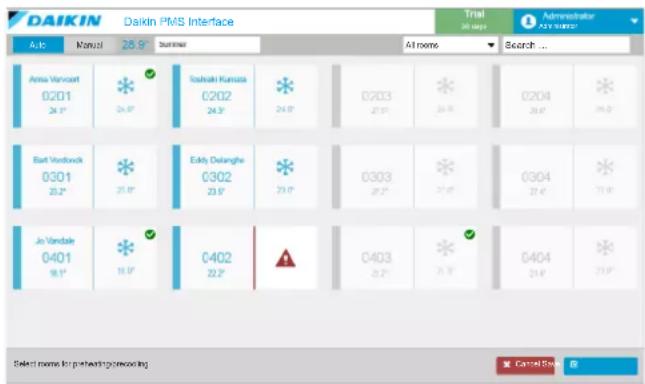
To go to the preheating/precooling page:
1 Choose "Preheating/precooling" from the main menu.
Result: The "Preheating/precooling" page appears.
5.2.2 To enable/disable preheating/precooling
1 Click on one or more room tiles to enable preheating/precooling.
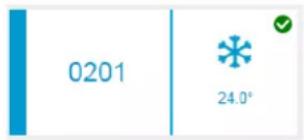
Result: Each selected room is indicated by a checkmark.
2 Click the "Save" button to save the changes or "Cancel" to abort.
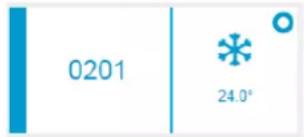
Result: A hollow dot indicates that the room is selected for preheating/precooling. The room will start preheating/precooling when checked out and at the pre-set preheating/precooling start time (see "Unit settings overview" on page 10).
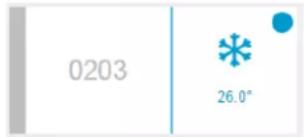
Result: A solid dot indicates that the room is actually preheating/precooling. This can only happen when the room is checked out and the current time is later than the pre-set preheating/precooling start time. The preheating/precooling selection will be removed at check-in.

NOTICE
The preheating/precooling settings that will be applied for preheating/precooling are those that belong to the profile that is selected (manual or automatic) at the starting time of preheating/precooling.
5.3 Stop control
Description
This function prevents the Daikin PMS Interface to control indoor units while the rest of the software remains operational. Room temperature, indoor unit settings made by the customer, and room occupation are still displayed when control is off.
5.3.1 To stop control
1 Choose "Stop control" from the main menu.
Result: The following dialog box appears:
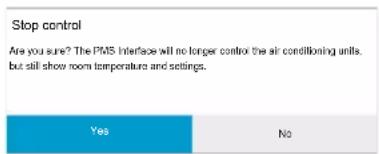
2 Click "Yes".
Result: The Daikin PMS Interface does NOT longer control the indoor units. The message "Control OFF" is shown in the title bar.

INFORMATION
With "Control OFF", the Daikin PMS Interface still is monitoring room occupancy, room temperature, indoor unit operation mode and indoor unit set point.
5.3.2 To start control
1 Choose "Start control" from the main menu.
Result: The Daikin PMS Interface promptly resumes controlling the indoor units.
5.4 Exit application
Description
This function shuts down the Daikin PMS Interface application. It is only available for administrators.
This means that restarting the application from the browser is not possible, in contradiction to the "Stop control" function.
To restart the PMS Interface go to the installation PC and restart the application "Daikin PMS Interface.exe" as explained earlier in this reference guide.
6 Registration and activation
Description
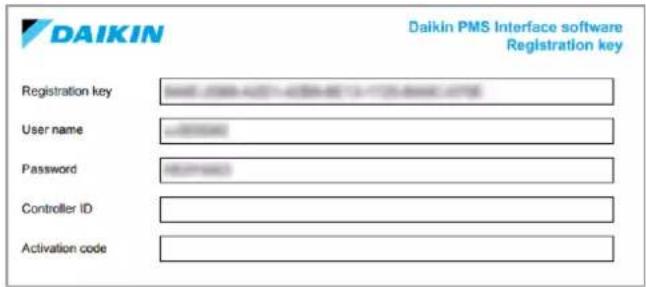
Registration is required to use this software for longer than the trial period of 30 days. Once the software is registered, the message "Trial" is removed from the title bar.
Make sure to have a registration document at hand for each controller that must be registered:
6.1 Auto activation
If the installation PC has access to internet, the following procedure for Auto activation can be chosen:
1 Choose "Registration" from the main menu.
Result: The "Registration" page appears:
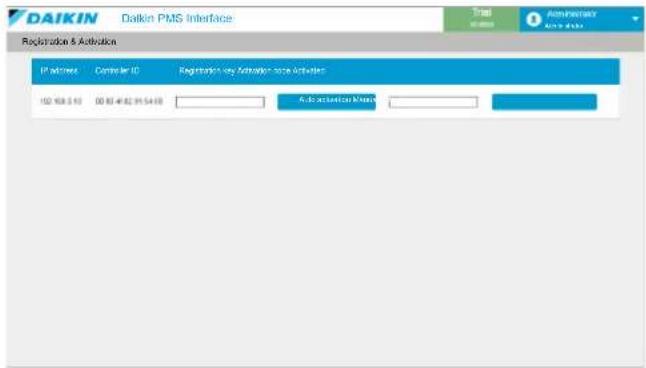
2 Enter the registration code (see registration document).
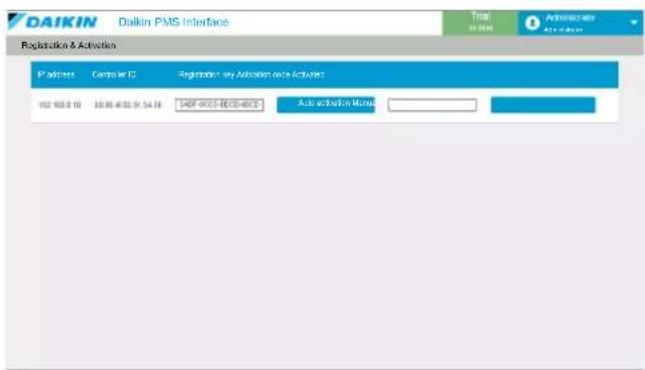
3 Click the "Auto activation" button.
Result: The "Terms of use" dialog box appears:
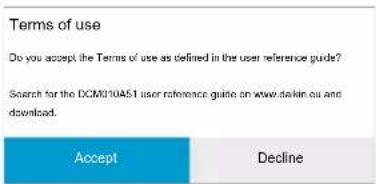
4 Read the terms of use (see "2 Terms of use" on page 2), and click "Accept" or "Decline" ("Accept" is required to go to the next step).
Result: The "Registration account" dialog box appears:
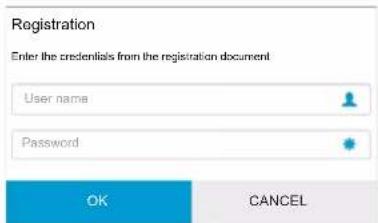
5 Enter the registration User name and Password from the registration document.
6 Click "OK" to confirm or "Cancel" to abort.
Result: The intelligent Touch Controller is successfully activated. The software is now fully functional.
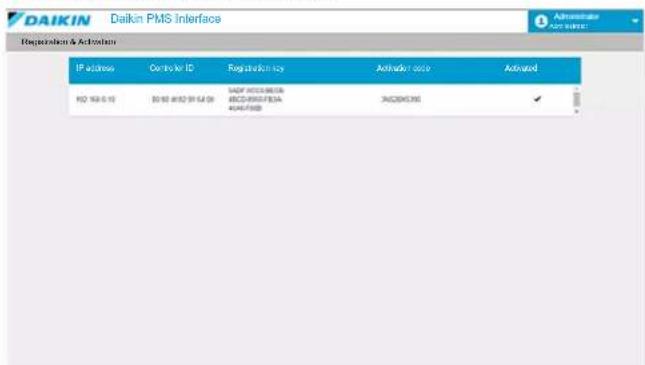
In case more controllers are connected to the Daikin PMS Interface, repeat the above steps for other controllers that are listed on the registration page. Each controller requires a separate registration document.
6.2 Manual activation
If the installation PC has NO access to internet, the following procedure for Manual activation can be chosen:
1 Choose "Registration" from the main menu.
Result: The "Registration" page appears:
6 Registration and activation
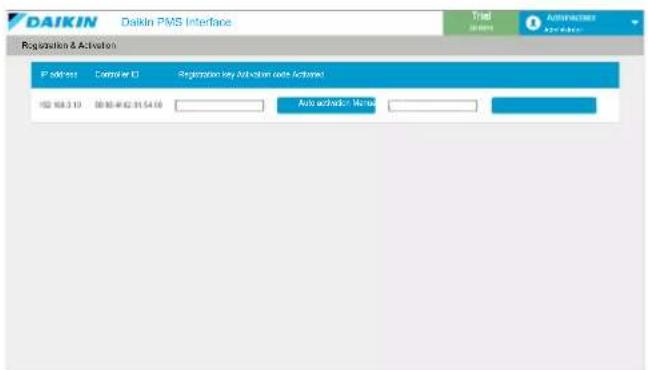
2 Take the registration document and note down the controller ID that is displayed on the registration screen.
3 On another computer, which has internet access, go to registration portal https://sw-registrations.daikin.eu.
Result: The "Login" dialog box appears:
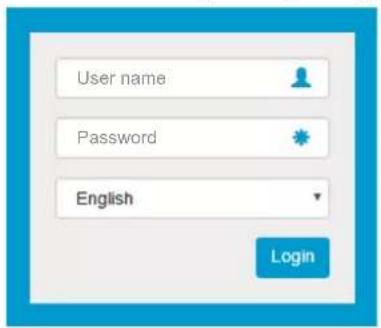
4 Enter the registration User name and Password from the registration document.
5 Click the "Login" button.
Result: The following screen appears, asking for the controller ID:
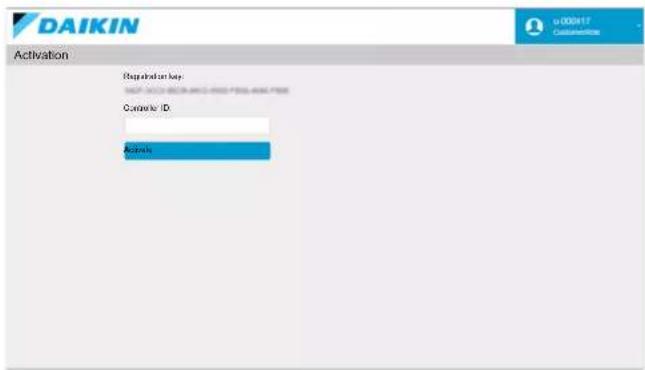
6 Enter the controller ID that has previously been noted down on the registration document.
7 Click the "Activate" button.
Result: A screen appears, showing the registration key, controller ID and an activation code:
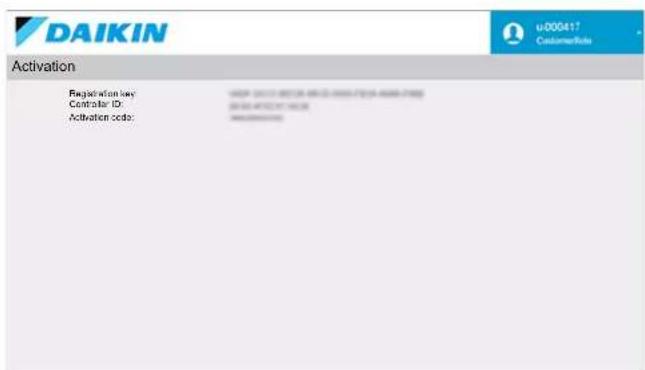
8 Note down the activation code on the registration document.
9 Go back to the installation PC and enter the activation code.
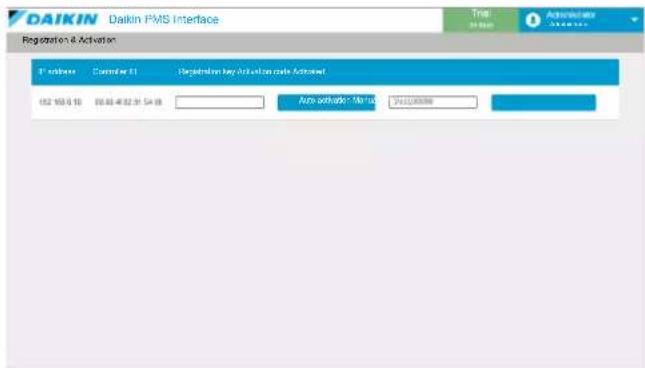
10 Click the "Manual activation" button.
Result: The "Terms of use" dialog box appears:
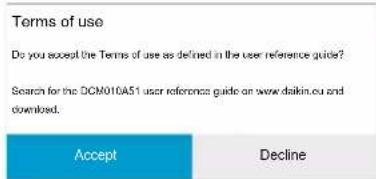
11 Read the terms of use (see "2 Terms of use" on page 2), and click "Accept" or "Decline". "Accept" is required to go to the next step.
Result: The "Registration account" dialog box appears:
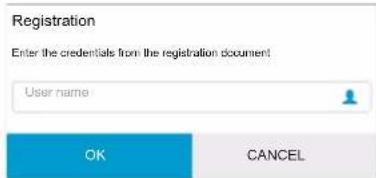
12 Enter the registration User name from the registration document.
13 Click "OK" to confirm or "Cancel" to abort.
Result: The intelligent Touch Controller is successfully activated. The software is now fully functional.
In case more controllers are connected to the Daikin PMS Interface, repeat the above steps for other controllers that are listed on the registration page. Each controller requires a separate registration document.

INFORMATION
The MAC address of the iTM is sometimes needed in order to trace a controller. The MAC address can be found on the product sticker of the iTM.
7 Software upgrade
Description
If a new version of the "Daikin PMS Interface.exe" can be downloaded, the software on the installation PC is upgraded by overwriting the old executable.
This upgrade process does NOT modify or destroy the configuration of the Daikin PMS Interface.
8 System back-up
How to back-up the configuration files
It is recommended to do a daily "live open file" backup to a save place of the configuration files which are located in the "%AppData%\Daikin" directory. Contact your IT consultant to support you in configuring the right backup strategy.
If a "live open file" backup is NOT possible it is recommended to do a manual backup to a save place each time the configuration is changed.
- Stop the "Daikin PMS Interface.exe" software.
- Make a backup of the directory "%AppData%\Daikin".
- Start the "Daikin PMS Interface.exe" software.
When to back-up the configuration files
A configuration is changed if one of the following settings is modified:
- Room to unit connections are added, removed or changed.
- Seasons are added removed or modified.
- The room type of one or more rooms is changed.
- The interface configuration is changed.
- Room setting for check-in, check-out or preheating/precooling are changed.
- Users are added, removed or changed.
- Names of room types or seasons are changed.
- An interface (iTM) is registered.
Daikin PMS Interface – Information sheet
Daikin PMS Interface info
| IP address |
| HTTP port number |
| Web Socket port number |
The Daikin PMS Interface info is defined by the PC on which the Daikin software is running and the available ports numbers on that PC. Use TCPView to find available ports. Default port numbers are 3000 & 3456. See user manual how to change the default ports numbers.
Oracle PMS - IFC info
| PMS IP address |
| PMS Port number |
The Oracle PMS - IFC info is provided by Oracle affiliate which installed and configured the IFC connector for the Daikin PMS Interface on the Vendor Integration Server.
The Daikin Controller info can be retrieved from the intelligent Touch Manager controllers connected to the same network. A maximum of 5 Daikin controllers can be controlled by the Daikin PMS Interface software. The software version of the intelligent Touch Manager controller must be at least v1.23 and the Web I/F option must be activated.
rmware version
Daikin Controller 2 Daikin Controller 1
| Firmware versionFi | |
| IP addressIP address | |
| Port numberPort number | |
| Web I/F user nameWeb I/F user name | |
| Web I/F passwordWeb I/F password |
Daikin Controller 4 Daikin Controller 3
| Firmware versionFirmware version | |
| IP addressIP address | |
| Port numberPort number | |
| Web I/F user nameWeb I/F user name | |
| Web I/F passwordWeb I/F password | |
Daikin Controller 5
| Firmware version |
| IP address |
| Port number |
| Web I/F user name |
| Web I/F password |
Be sure to NEVER lose these initial administrator credentials as this could lead to a full re-commissioning of the hotel. Contact Daikin service if this ever happens.
Administrator credentials
| User name |
| Password |

natural_image
Blank grid paper with no text, numbers, or symbols- User reference guide
- Table of Contents
- About this document 2
- Terms of use 2
- Installation 4
- Setup 8
- Operation 13
- Registration and activation 15
- Software upgrade 17
- System back-up 17
- About this document
- Documentation set
- Terms of use
- Use of the Software
- Account registration
- Copyright
- Trade Name / Trade Marks
- Disclaimer of warranty
- Limited liability
- Indemnity
- Amendments
- Data protection
- Miscellaneous
- Installation
- System overview
- System description
- INFORMATION
- Before installation
- Installation site requirements
- To fill in the information sheet
- NOTICE
- Installation of the Daikin PMS interface software
- Compatibility
- Oracle PMS compatibility
- PC platform compatibility
- iTM compatibility
- Indoor compatibility
- To install the software
- Demo mode
- Description
- To exit the demo mode
- To open the application
- Initial setup
- To go through the initial interface configuration
- Setup
- To log in
- Connection status
- Connection status page
- Re-configure the interfaces
- Configuration
- Profiles
- Profiles page
- To delete profiles
- Room types
- Room types page
- To rename room types
- To edit room type settings
- Unit settings overview
- Restrictions
- Start preheating/precooling
- To add room types
- To delete room types
- Link rooms and units
- To link rooms and units
- To remove a link
- Rooms
- Rooms page
- To assign room types
- User management
- To add users
- To edit users
- To remove a user
- Operation
- Dashboard
- Dashboard overview
- To modify the room settings
- Preheating and precooling
- Preheating and precooling description
- To enable/disable preheating/precooling
- Stop control
- To stop control
- To start control
- Exit application
- Registration and activation
- Auto activation
- Manual activation
- Software upgrade
- System back-up
- How to back-up the configuration files
- When to back-up the configuration files
- Daikin PMS Interface – Information sheet
Brand : DAIKIN
Model : DCM010A51
Category : Interface