
VP400BL - Microwave CDA - Free user manual and instructions
Find the device manual for free VP400BL CDA in PDF.


| Product Type | Built-in Microwave Oven & Combination Grill |
| Brand | CDA |
| Model | VP400BL |
| Microwave Power Output | 900 W |
| Grill Power | 1000 W |
| Microwave Input Power | 1450 W |
| Rated Voltage | 230 V ~ 50 Hz |
| Fuse Rating | 13 A |
| Control Type | Electronic with LED display |
| Cooking Functions | Microwave, Grill, Combi (2 modes), Defrost by weight, Auto menu |
| Additional Features | Speed cooking, Kitchen timer, Child lock |
| Turntable | Glass tray with turntable ring assembly |
| Grill Rack | Included |
| Interior Light | Yes (dim at low power) |
| Safety Features | Child lock, door interlocks, auto shut-off on door open |
| Cleaning Instructions | Use mild detergent, non-abrasive cleaner; do not use steam cleaner |
| Installation Type | Built-in (tall unit without back panel) |
| Ventilation Requirements | Vents must not be covered |
| Compliance | Low Voltage Directive 2014/35/EU, EMC 2014/30/EU, RoHS 2011/65/EU |
| Accessories Included | Glass tray, turntable ring assembly, grill rack, emergency suction door opener |
| Warranty | 2 years labour (parts not specified) |
Frequently Asked Questions - VP400BL CDA
User questions about VP400BL CDA
0 question about this device. Answer the ones you know or ask your own.
Ask a new question about this device
Download the instructions for your Microwave in PDF format for free! Find your manual VP400BL - CDA and take your electronic device back in hand. On this page are published all the documents necessary for the use of your device. VP400BL by CDA.
USER MANUAL VP400BL CDA
Built-in Microwave Oven & Combination Grill
Installation, use and maintenance
Contents
- Contents (this page)
3 Important information,
4 Declarations of Conformity & recycling information
5 to 10 Safety information
11 Setting up your microwave
12 First use of your oven:
- First use
- Setting the clock
13 to 17 Using your Oven:
- (13) Microwave cooking
- (14) Grill and Combi cooking
- (15) Defrosting food by weight
- (15) The kitchen timer
- (16) The Auto menu
- (17) Speed cooking
- (17) The Child-lock function
18 to 19 Care and Maintenance
- (18) Cleaning information
- (19) If your appliance is not working
- (19) Contacting CDA
19 Troubleshooting
20 to 23 Installation
- Installation information
- (23) Specifications
24 Electrical information
25 How to connect an alternative plug
Important
This appliance must only be used for the purpose for which it is intended, i.e. domestic cooking. Any other use could be dangerous and may lead to premature failure of the appliance.
The CDA Group Cannot be held responsible for injuries or losses caused by the incorrect use or installation of this product. Please note that CDA reserves the right to invalidate the guarantee supplied with this product following incorrect installation, misuse of the appliance, or use in a commercial environment.
This appliance is not designed to be used by people (including children) with reduced physical, sensory or mental capacity, or who lack experience or knowledge about it, unless they have had supervision or instructions on how to use the appliance by someone who is responsible for their safety.
Under no circumstances should any external covers be removed for servicing or maintenance except by suitably qualified personnel.
Appliance Information
Please enter the details on the appliance rating plate below for reference in case you need to contact CDA in the event of a fault.
| Appliance model | |
| Serial number |
EU Declarations of Conformity
This appliance has been designed and manufactured to comply with all applicable UK and EU legislation, including:
■ Low voltage Directive, 2014/35/EU
Electromagnetic compatibility Directive, 2014/30/EU
■ RoHS Directive, 2011/65/EU
■ Parts intended to come into contact with food, EEC/89/109.4

IMPORTANT INFORMATION FOR CORRECT DISPOSAL OF THE PRODUCT IN ACCORDANCE WITH EU DIRECTIVE 2012/19/EU.
At the end of its working life, the product must be taken to a special local authority waste collection site, or to a dealer providing appliance recycling services.
Disposing of a household appliance separately avoids possible negative consequences for the environment and health. It also enables the constituent materials to be recovered, saving both energy and resources. As a reminder of the need to dispose of household appliances separately, the product is marked with a crossed-out wheeled dustbin.

natural_image
Symbol of a trash bin crossed with diagonal lines and a horizontal bar below (no text or labels)Important
- Read the user instructions carefully before using the oven for the first time.
- Follow the instructions for first use of the oven.
- Clean the oven regularly.
■ Remove spills as soon as they occur. - Always use oven gloves when removing trays from the oven.
- Do not allow children near the oven when in use.
Children must not play with the appliance. - Cleaning and user maintenance shall not be made by children unless they are older than 8 and supervised.
- Keep the appliance and its cable out of reach of children less than 8 years old.
- Do not allow fat or oils to build up on the grill rack or oven base.
- Do not place any cooking utensils or plates directly on the oven base.
- Always grill with the appliance door closed.
- During use the appliance becomes hot. Care should be taken to avoid touching heating elements inside the oven.
- Do not grill food containing fat without using the grill rack.
-
Do not cover the grill rack or the oven walls with aluminium foil.
-
Do not perform maintenance or cleaning of the oven without first switching off the mains electrical supply. If the oven has been used recently, please allow it to cool.
- Do not use abrasive cleaners or powders that will scratch the surface of the appliance.
- Do not attempt to repair the internal workings of your oven.
- Install or locate this oven only in accordance with the installation instructions provided.
- Accessible surface are liable to get hot during use.
- Keep the mains electrical cable away from heated surfaces, and do not cover any vents on the oven.
- Do not attempt to operate this microwave oven with the door open or ajar. It is important not to alter or tamper with the safety interlocks.
- Do not place anything between the front face and the door or allow food or cleaning residues to accumulate on sealing surfaces.
WARNING: If the door or interlocks are damaged, the oven must not be used until it is repaired by a suitably qualified person.
- Liquids and other foods must not be heated in sealed containers since they are likely to explode.
WARNING: It is hazardous for anyone other than a competent person to carry out any service or repair operation that involves the removal of a cover which gives protection against exposure to microwave energy.
- Only use utensils suitable for use in microwave ovens
- Do not use metal pans or dishes with metal handles - Do not use anything with metal trim.
- Do not use melamine dishes as they contain a material which will absorb microwave energy; this may cause the dishes to crack or char and will slow down the cooking speed.
- Do not cook in a container with a restricted opening, such as a carbonated drinks bottle or salad oil bottle, as they may explode if heated in a microwave oven.
- Do not use conventional meat or sugar thermometers.
- Remove twist-ties from bags before placing bags in the oven.
- The oven should be cleaned regularly and any food deposits should be removed.
- If smoke is emitted, switch off or unplug the appliance from the mains supply and keep the door closed in order to stifle any flames.
- Do not use the oven cavity for storage purposes. Do not store items such as bread, cookies, books etc. inside the oven.
- Eggs in the shell and whole hard-boiled eggs should not be heated in microwave ovens since they may explode, even after microwave heating has ended.
- Do not cook any food surrounded by a membrane, such as egg yolks, potatoes, chicken livers, etc. without first piercing it several times with a fork.
If the mains supply cable is damaged, it must be replaced by the manufacturer, its approved service agent or similarly qualified persons in order to avoid a hazard. - Do not store or use this appliance outdoors.
- Do not use this oven near water, in a wet basement or near a swimming pool.
- Do not let the power cable hang over the edge of a table or worktop.
- Failure to maintain the oven in a clean condition could lead to deterioration of the surfaces that could adversely affect the life of the appliance, and possibly result in a hazardous situation.
-
Microwave heating of beverages can result in delayed eruptive boiling, therefore care must be taken when handling the container.
This appliance is not intended to be operated by means of an external timer or separate remote-control system. -
Always have the glass tray, roller arms, coupling and roller track in place when operating the microwave oven.
- Do not use the oven for any reason other than food preparation, such as for drying clothes, paper, or any other non-food items, or for sterilizing purposes.
- Do not operate the microwave or combination cooking functions when empty. This could damage the oven.
- Do not insert any object into the openings on the case.
- Do not at any time remove parts from the oven such as the feet, coupling, screws, etc.
- Do not cook food directly on the glass turntable. Place food in/on proper cooking utensils before placing in the oven.
- Do not attempt to deep-fry foods in the oven.
- Please remember that a microwave oven only heats the liquid in a container rather than the container itself. Therefore, even though the lid of a container is not hot to the touch when removed from the oven, the food/liquid inside will be releasing the same amount of steam and/or spitting when the lid is removed as in conventional cooking.
-
Always test the temperature of cooked food yourself especially if you are heating or cooking food/liquid for babies. It is advisable never to consume food/liquid straight from the oven but allow it to stand for a few minutes and stir food/liquid to distribute heat evenly.
-
Food containing a mixture of fat and water, e.g. stock, should stand for 30-60 seconds in the oven after it has been turned off. This is to allow the mixture to settle and to minimise the risk of eruptive boiling when a spoon is placed in the food / liquid or a stock cube is added.
- When preparing/cooking food/liquid remember that there are certain foods, e.g. Christmas puddings, jam and mincemeat, which heat up very quickly.
- When heating or cooking foods with a high fat or sugar content do not use plastic containers.
- Cooking utensils may become hot because of heat transferred from the food. This is especially true if plastic wrap has been covering the top and handles of the utensils. Oven gloves may be needed to handle the utensils.
■ To reduce the risk of fire in the oven cavity:
- Do not overcook food.
- Watch the microwave oven carefully if paper, plastic, or other combustible materials are used inside the oven during cooking.
Setting Up Your Oven
Names of Oven Parts and Accessories
Remove the oven and all materials from the carton and oven cavity. Your oven comes with the following accessories:
Glass tray x1
■ Turntable ring assembly x1
■ Instruction manual x1
Emergency suction door opener x 1

Grill rack (only to be used in grill function and be placed on the glass tray)
A. Control panel
B. Turntable shaft
C. Turntable ring assembly
D. Glass tray
E. Observation window
F. Door assembly
G. Safety interlock system
- Never place the glass turntable upside down. The movement of the glass turntable should never be restricted.
- Both the glass turntable and the ring assembly must always be used during operation.
- Food and containers of food must always be placed on the glass turntable for cooking.
First Use of the Microwave
First Use
Before using the oven for the first time, we recommend that you clean it with soapy water, rinse carefully and then heat the appliance on grill at maximum temperature for 15 minutes. A slightly unpleasant smell may be produced as the grease residue left over from the manufacturing process is burnt off.
Note that this appliance has been fitted with a cooling fan to achieve maximum efficiency and to maintain low surface temperatures. The cooling fan will switch on automatically when the oven switches on. It is normal for the cooling fan to continue to run after use, depending on the duration, temperature and type of cooking programme used.
Setting the Clock
When the microwave oven is first connected to the mains electrical supply the display will show ‘0:00’ and it will beep once. The oven will enter standby mode.
- Press the [Kitchen Timer / Clock] twice – the hour indicator will begin to flash.
- Press [+] or [-] to adjust the hour (24 hour clock).
- Press [Kitchen Timer / Clock] to confirm the hour – The minute figures will flash.
- Press [+] or [-] to adjust the minutes.
- Press [Kitchen Timer / Clock] key to finish setting the clock.
Note that the microwave will not function if the clock is not set.
Using Your Oven
Microwave Cooking
- Press the [Microwave] key once – ‘P100’ will be shown in the display.
- Press [Microwave] repeatedly, or press [+] or [-] to select the power – ‘P100’, ‘P80’, ‘P50’, ‘P30’ and ‘P10’ will display in each order.
- Press [Start / 30sec. / Confirm] to confirm the setting.
- Press [+] or [-] to adjust the cooking time (max allowed is 95 minutes).
- Press [Start / 30sec. / Confirm] to start cooking
Note the step durations for the adjustment time are as follows:
| For times between | Time duration step |
| 0 and 1 minute | 5 seconds |
| 1 and 5 minutes | 10 seconds |
| 5 and 10 minutes | 30 seconds |
| 10 and 30 minutes | 1 minute |
| 30 to 95 minutes | 5 minutes |
Microwave Power Chart:
| Microwave | High | Med-High | Medium | Med-Low | Low |
| Display | P100 | P80 | P50 | P30 | P10 |
- When cooking, pressing [Microwave] or [Grill / Combi] will display the power level for 3 seconds.
- When cooking, pressing [Kitchen Timer / Clock] will display the current time for 3 seconds
If the door is opened during cooking, press [Start / +30sec. / Confirm] to continue cooking.
If, after setting a function the [Start / +30sec. / Confirm] key is not pressed, the function will be cancelled.
Grill or Combi. Cooking
- Press the [Grill / Combi] key once – ‘G’ will be displayed. Pressing the key repeatedly will cycle through the options, ‘G’, ‘C-1’ or ‘C-2’ will be displayed depending on the function.
- Pressing the [+] or [-] keys will cycle through the power options. Press [Start / 30 sec / Confirm] to confirm, the required power.
- Press [+] or [-] to set the cooking time (max is 95 minutes).
- Press [Start / 30 sec / Confirm] to start cooking.
Combination power functions
| Program | Display | Microwave Power | Grill Power |
| Grill | G | 0% | 100% |
| Combi. 1 | C-1 | 55% | 45% |
| Combi. 2 | C-2 | 36% | 64% |
Example:
If you want to use the C-1 function (55% microwave, 45% grill) for 109 minutes you would do the following:
- Press the [Grill / Combi] key twice, or until 'C-1' is displayed.
- Press [Start / 30 sec / Confirm] to confirm.
- Press [+] or [-] to adjust the cooking time until the display shows '10:00'.
- Press [Start / 30 sec / Confirm] to start cooking.
Note that if half the grill time passes, the oven will beep twice – this is normal. To achieve the best grill performance, you should turn the food over, close the door and then press the [Start / 30 sec / Confirm] key to continue cooking. If the door is not opened then the oven will continue cooking.
Defrosting Food by Weight
- Press the [Time Defrost] key once, the screen will display 'dEF2'.
- Press [+] or [-] to adjust the defrost time of 5 minutes.
- Press [Microwave] once, the display will show 'P100'.
- Press [Microwave] repeatedly to choose the microwave power until the display shows 'P80'.
- Press the [Start / +30 Sec./ Confirm] key to confirm.
- Press [+] or [-] to adjust the cooking time of 7 minutes.
- Press [Start / +30 Sec./ Confirm] to start cooking.
The Kitchen Timer
- Press the [Kitchen Timer / Clock] key once – The display will show '00:00'.
- Press [+] or [-] to adjust the length of time required (the maximum time is 95 minutes).
- Press the [Start / +30 Sec./ Confirm] key to confirm and start the timer.
When the set time has elapsed, the buzzer will sound 5 times.
The Auto Menu
- In standby, press [+] repeatedly to choose the desired menu item.
- Press the [Start / +30 Sec./ Confirm] key to confirm the menu you have chosen.
- Press [+] or [-] to choose the weight of the food.
- Press [Start / +30 Sec./ Confirm] to start cooking.
The Auto menu chart:
| Menu | Weight | Power |
| Pizza | 200g | C-2 |
| 400g | ||
| Meat | 250g | Microwave 100% |
| 350g | ||
| 450g | ||
| Vegetables | 200g | Microwave 100% |
| 300g | ||
| 400g | ||
| Pasta | 50g (with 450ml cold water) | Microwave 80% |
| 100g (with 800g cold water) | ||
| Potatoes | 200g | Microwave 80% |
| 400g | ||
| 600g | ||
| Fish | 250g | Microwave 80% |
| 350g | ||
| 450g | ||
| Beverages | 1 cup (approx. 120ml) | Microwave 100% |
| 2 cups (approx. 240ml) | ||
| 3 cups (approx. 360ml) | ||
| Pop corn | 50g | Microwave 100% |
| 100g |
Speed Cooking
- In standby mode, press the [Start / +30 Sec./ Confirm] key to cook with 100% power level for 30 seconds. Each subsequent press of the key increases the time by 30 seconds. The maximum cooking time is 95 minutes.
- During the microwave, grill or defrost process, press the [Start / +30 Sec./ Confirm] key to increase the cooking time.
- When operating in ‘Auto Menu’ and ‘Defrost by Weight’ functions, the cooking time cannot be increased.
- In standby mode, press the [-] key to choose the cooking time. After adjusting the time, press the [Start / +30 Sec./ Confirm] key to start microwave cooking with 100% power level for the set time.
Child-Lock Function
To activate the child-lock
In standby mode, press [STOP / Clear] key for 3 seconds to set the child-lock – the display will show the current time (if set), otherwise it will show the following symbol: |__ _ |
To unlock the oven, simple press the [STOP / Clear] key for 3 seconds.
Care and Maintenance
IMPORTANT
There are no user serviceable parts in this appliance. It is dangerous for anyone other than a qualified person to perform maintenance or repair that requires the removal of any cover as these provide protection against exposure to microwave power and extremely high voltages.
Cleaning the oven exterior
As the oven has a stainless steel surface, you should use a non-abrasive cleaner. Any abrasive cleaner (including Cif) will scratch the surface and could erase the control panel markings. Stainless steel can be effectively cleaned by simply using a dilute solution of water and mild detergent and drying to a shine with a clean cloth.
Proprietary stainless steel cleaners are available. We recommend the CDA E-Cloth which has been designed to prolong the finish of your appliance and is available from the CDA Sales team.
Cleaning the inside of the oven cavity
The oven should always be cleaned after use when it has cooled down.
Clean the cavity interior using a mild detergent solution and warm water, then dry with a soft cloth.
IMPORTANT
- Steam cleaners must not be used when cleaning this appliance.
- Once care and maintenance is complete, ensure that all parts are correctly replaced before using the oven.
When correctly installed, your product meets all safety requirements laid down for this type of product. However, special care should be taken around the rear or the underneath of the appliance as these areas are not designed or intended to be touched and may contain sharp or rough edges that could cause injury.
If your appliance is not working:
- Check that it is switched on.
- Check that the mains supply has not been switched off.
- Check that the fuse in the spur has not blown.
In the event of a fault with the appliance, please contact CDA Customer Care and advise of any fault code shown on the display.
Contact CDA Customer Care
Address: Customer Care Department, The CDA Group Ltd, Harby Road, Langar, Nottinghamshire, NG13 9HY
Tel: 01949 862 012
Web: www.cda.co.uk/customer-care/
Troubleshooting
| You observe that | Possible Causes | What should you do? |
| Microwave oven interfering with TV | This is normal due to the microwave energy | Relocate the TV or aerial to improve reception |
| Oven light is dim | In low power microwave cooking the light may dim a little | This is normal |
| Steam condensing on the door / hot air expelled from vents | Normal heat generated from the cooking process | This is normal |
| The oven cannot be started | Power cable not plugged in | Unplug then wait 10 seconds before plugging in again |
| Blown fuse in the plug | Check the fuse in the plug. If the fault persists, unplug the oven and contact CDA Customer Care | |
| Faulty power supply to the socket | Check the socket by plugging in another appliance. If the fault persists, unplug the machine and then contact CDA Customer Care | |
| Microwave oven does not heat | Door not closed properly | Open and closer the door. If the fault persists, contact CDA Customer Care |
Installation
Important
The appliance should be installed in a tall unit (open at the rear) with the appropriate dimensions for recessed installation. (Fig. 1).
☐ Blocking the intake and/or outlet openings can damage the oven.
Place the oven as far away from radios and TVs as possible.
Operation of the microwave oven may cause interference to your radio or TV reception.
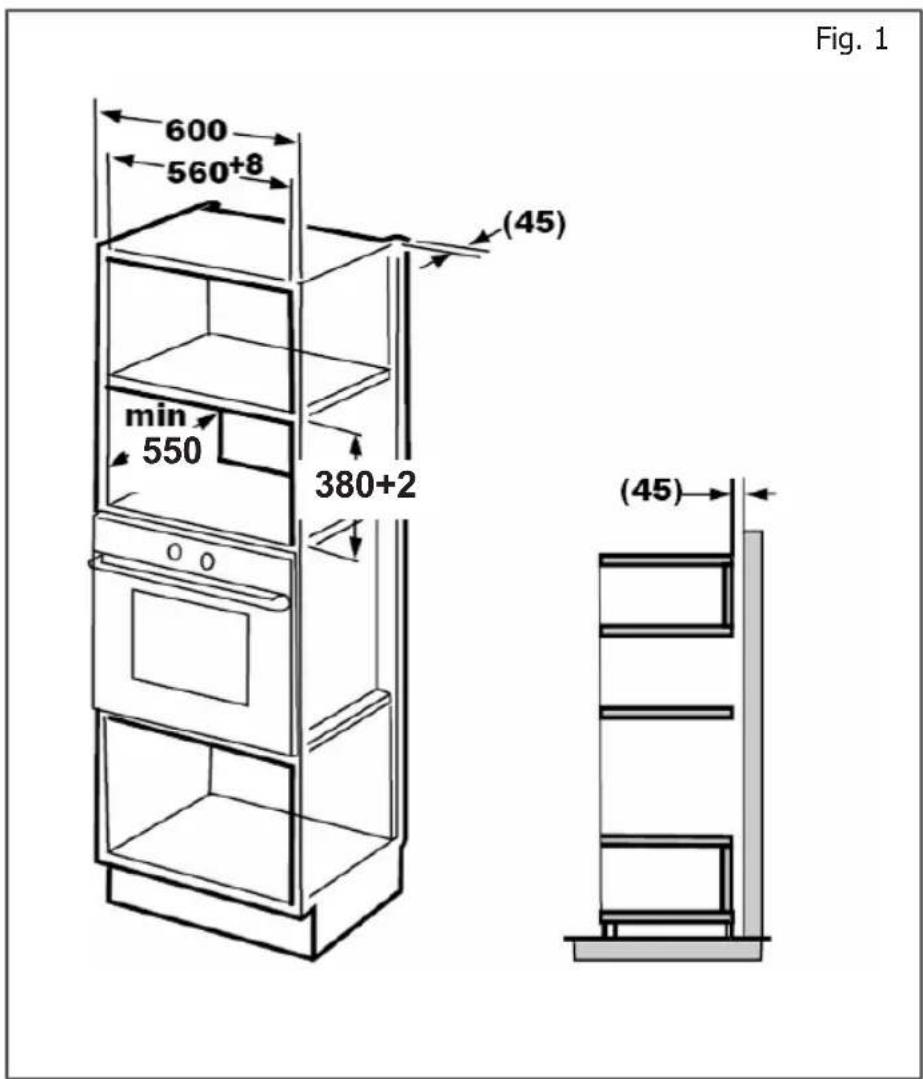
Fitted Units
The unit into which the appliance is to be installed must not have a back panel at the rear of the cabinet.
The minimum installation height above the floor is 850mm.#
■ Ventilation slots and intakes must not be covered.
- Important – Do not trap or kink the mains lead.

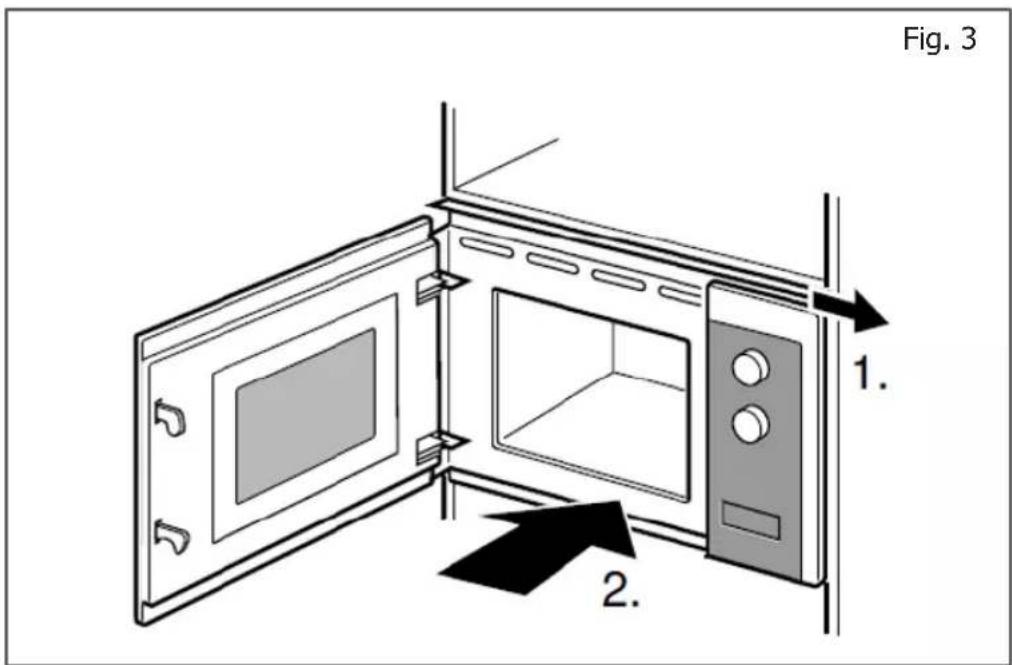

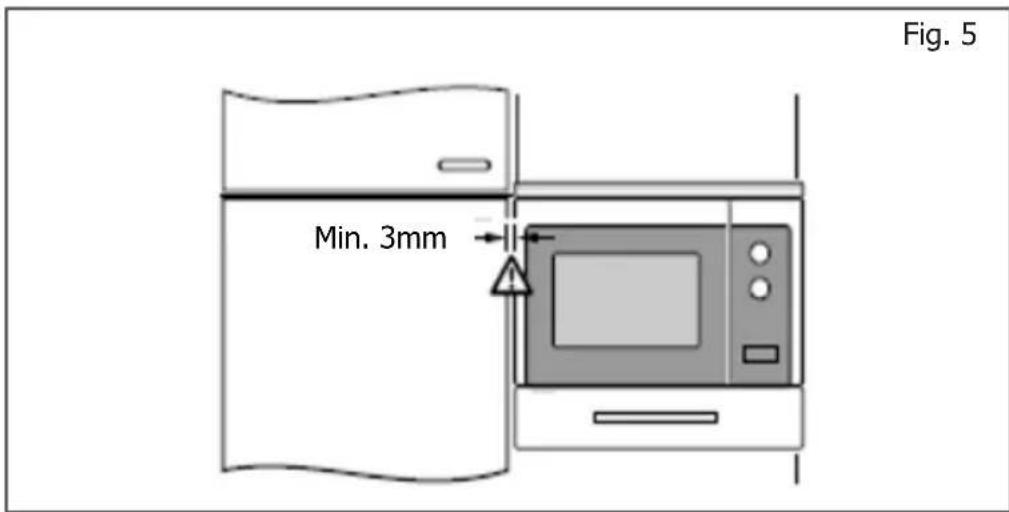
Specifications
| Rated Voltage | 230Vac, 50Hz |
| Microwave input | 1450W |
| Microwave output | 900W |
| Grill power | 1000W |
Electrical Information
WARNING! This appliance must be earthed.
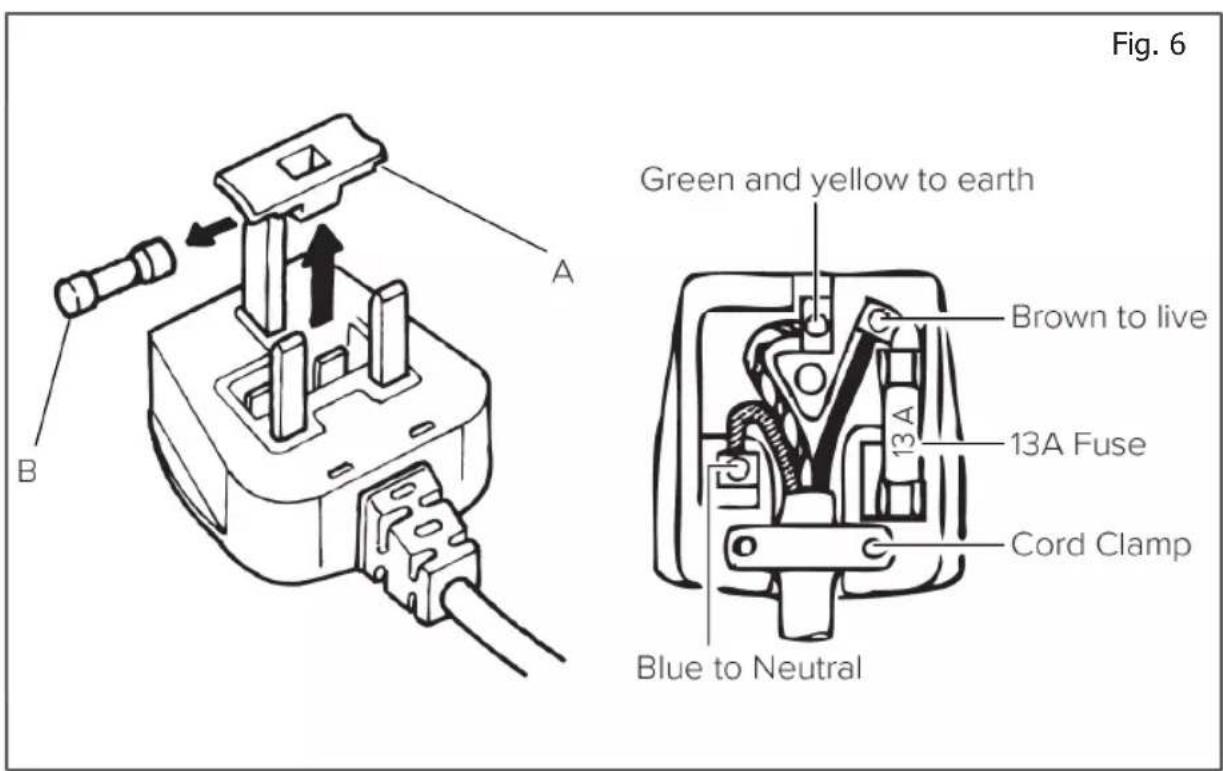
The mains lead of this appliance has been fitted with a BS 1363A 13 Amp fused plug. To change a fuse in this type of plug, follow the steps below:
- Remove the fuse cover and fuse.
- Fit replacement 13A fuse, ASTA approved to BS 1362 type, into the fuse cover.
- Replace fuse cover.
IMPORTANT
Do not use the appliance without the fuse cover in position.
How to Connect an Alternative Plug
If the fitted plug is not suitable for your socket outlet, then it should be cut off and disposed of safely to avoid possible shock hazard. A suitable alternative plug of at least 13 Amp rating to BS 1363 should be used.
As the colours of the wires in the mains lead of this appliance may not correspond with the coloured markings identifying the terminals in your plug, proceed as follows:-
- The wire which is coloured GREEN and YELLOW must be connected to the terminal which is marked with letter (E) or by the Earth symbol ± or coloured GREEN and YELLOW.
- The wire which is coloured BLUE must be connected to the terminal which is marked with the letter (N) or coloured BLACK.
The wire which is coloured BROWN must be connected to the terminal which is marked with the letter (L) or coloured RED.
If in doubt regarding the electrical connection of this appliance, consult a qualified electrician. Do not shorten the supply cable, the appliance may require removing for servicing.
N.B. Ensure that the plug socket is situated in an easily accessible place after installation.
E & O E. All instructions, dimensions and illustrations are provided for guidance only. CDA reserve the right to change specifications without prior notice.
Notes
The CDA Group
Harby Road
Langar
Nottinghamshire
NG13 9HY
Sales Department
Phone: 01949 862010
Email: sales@cda..co.uk
Customer Care
Phone: 01949 862012
Web: www.cda.co.uk/customer-care/

YEAR
PARTS
2 YEAR LABOUR


- Contents
- Important
- Appliance Information
- EU Declarations of Conformity
- IMPORTANT INFORMATION FOR CORRECT DISPOSAL OF THE PRODUCT IN ACCORDANCE WITH EU DIRECTIVE 2012/19/EU.
- WARNING: If the door or interlocks are damaged, the oven must not be used until it is repaired by a suitably qualified person.
- WARNING: It is hazardous for anyone other than a competent person to carry out any service or repair operation that involves the removal of a cover which gives protection against exposure to microwave energy.
- Setting Up Your Oven
- Names of Oven Parts and Accessories
- First Use of the Microwave
- First Use
- Setting the Clock
- Using Your Oven
- Microwave Cooking
- Grill or Combi. Cooking
- Example:
- Defrosting Food by Weight
- The Kitchen Timer
- The Auto Menu
- Speed Cooking
- Child-Lock Function
- Care and Maintenance
- Cleaning the oven exterior
- Cleaning the inside of the oven cavity
- If your appliance is not working:
- Contact CDA Customer Care
- Installation
- Fitted Units
- Electrical Information
- How to Connect an Alternative Plug
- N.B. Ensure that the plug socket is situated in an easily accessible place after installation.
- Notes
Brand : CDA
Model : VP400BL
Category : Microwave