
Rapide Spring VRS31W - Broom VAX - Free user manual and instructions
Find the device manual for free Rapide Spring VRS31W VAX in PDF.


| Product Type | Carpet Washer (Broom) |
| Brand | Vax |
| Model | Rapide Spring VRS31W |
| Voltage | 220-240 V ~ 50 Hz |
| Power Consumption | 700 W |
| Clean Water Tank Capacity | 2.6 litres |
| Dirty Water Tank Capacity | 1.8 litres |
| Power Cord Length | 6 m |
| Weight | 5.5 kg |
| Solution Spray Function | Yes, via button on handle |
| Dry Vacuuming Required Before Wash | Yes |
| Floating Brush Bar | Removable and replaceable |
| Filter Type | Rinseable foam filter |
| Safety Features | Float shut-off in dirty water tank, auto shut-off when full |
| Recommended Cleaning Solution | Vax carpet cleaning solution only |
| Maximum Water Temperature | 40°C |
| Usage Environment | Indoor household use |
| Warranty Support | UK Careline: 0330 026 8455, ROI: 1-800 928 308 |
Frequently Asked Questions - Rapide Spring VRS31W VAX
User questions about Rapide Spring VRS31W VAX
0 question about this device. Answer the ones you know or ask your own.
Ask a new question about this device
Download the instructions for your Broom in PDF format for free! Find your manual Rapide Spring VRS31W - VAX and take your electronic device back in hand. On this page are published all the documents necessary for the use of your device. Rapide Spring VRS31W by VAX.
USER MANUAL Rapide Spring VRS31W VAX
natural_image
Exterior view of a clean vacuum cleaner with blue and gray casing (no text or symbols visible)1. Diagram
VRS31W
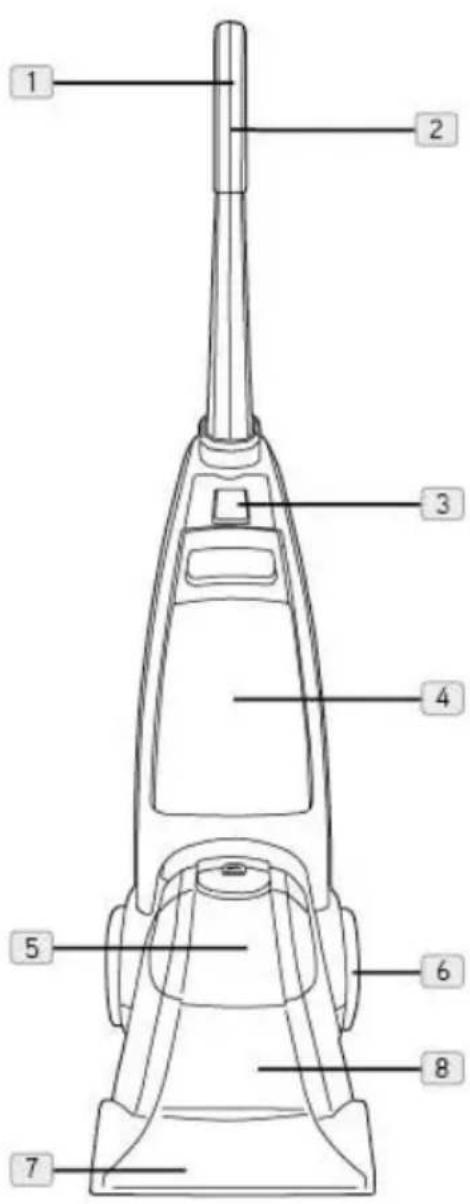
Fig.1/1
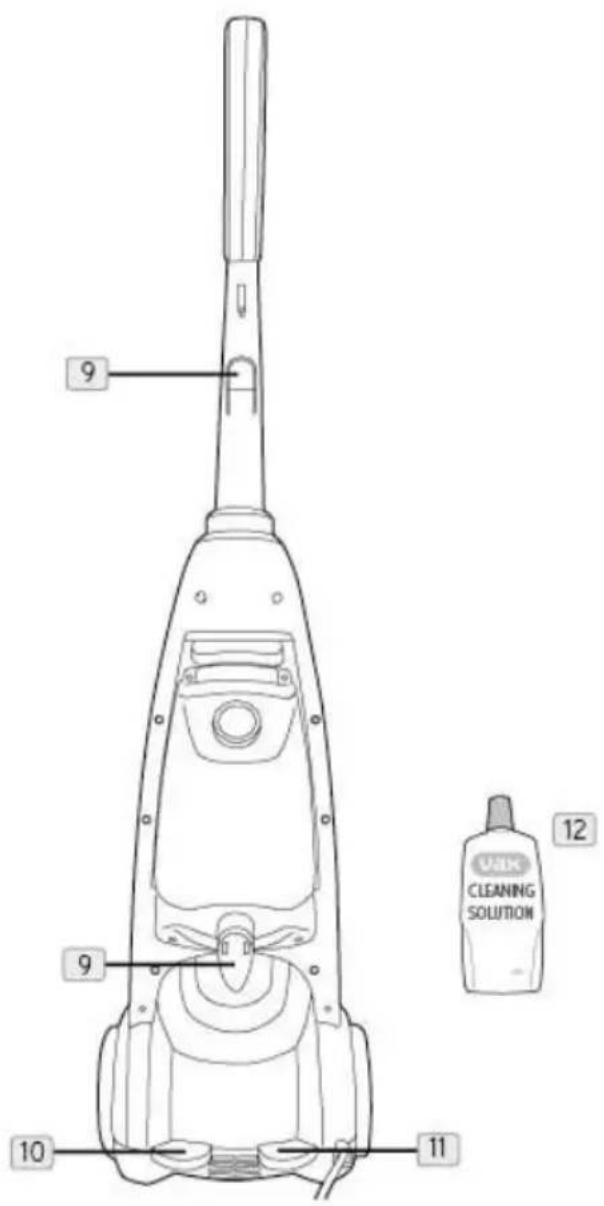
1 Handle
2 Solution spray button
3 Clean water tank release
4 Clean water tank
5 Dirty water tank lid
6 Wheels
7 Suction channel/nozzle
8 Dirty water tank
9 Cord storage hooks
10 On/off switch
11 Unit recline pedal
12 Vax carpet cleaning solution
2. Safety Information
When using the carpet washer, basic safety precautions should always be observed, including the following:
- Do not leave the carpet washer unattended when plugged in. Unplug it from electrical socket when not in use.
- To prevent electric shock do not use outdoors.
- Not to be used as a toy. Children should be supervised to ensure that they do not play with the appliance.
- This appliance is not intended for use by persons (including children) with reduced physical, sensory or mental capabilities, or lack of experience and knowledge, unless they have been given supervision or instruction concerning the use of the appliance by a person responsible for their safety.
- Use only as described in this manual.
- Do not use the carpet washer with a damaged cord or plug. If the cord or plug is damaged, it must be replaced by the manufacturer or a recommended Service Agent to avoid hazard and invalidating the guarantee.
- Do not pull or carry by the cord, use the cord as a handle, allow the cord to come into contact with hot or sharp surfaces or close a door on the cord.
- Do not unplug by pulling on the cord.
- Do not handle the plug or carpet washer with wet hands.
- Do not put any objects into openings or operate with openings blocked, keep them free of anything that may reduce airflow.
-
Keep hair, loose clothing, fingers and all parts of the body away from openings and moving parts.
-
Do not use the carpet washer on any glowing, burning or smoking particles.
- Do not use without the clean water tank and dirty water tank in place.
- Turn off all controls before unplugging.
- Do not use to pick up flammable or combustible liquids such as petrol, or use in areas where they may be present.
- Keep the unit on the floor.
- Do not use an extension cord.
- Do not attempt to remove blockages with sharp objects as they may cause damage.
- Store indoors put away after use to prevent tripping accidents.
- Using improper voltage may result in damage to the motor and possible injury to the user. The correct voltage is listed on the rating label.
- A hazard may occur if the carpet washer runs over the power cord.
- To prevent dirty water from running into motor, do not hold the appliance upside down or lay on its side. Use appliance in normal vacuuming position.
- Use extra care when cleaning on stairs.
- Do not carry appliance while motor is running.
NOTE: Carpets should be dry vacuumed thoroughly before washing.
NOTE: The unit must be unplugged from the electrical socket after use, and before cleaning or maintaining the unit.
IMPORTANT: This unit is not intended for commercial use.
PLEASE KEEP THESE INSTRUCTIONS FOR FURTHER USE.
3. Assembly
Putting your cleaner together Insert middle frame to machine base (Fig 3/1).
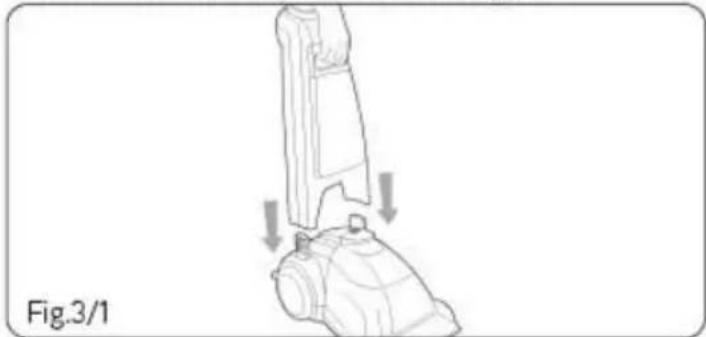
natural_image
Technical line drawing of a mechanical component with downward arrows indicating motion or assembly (no text or symbols)Insert one screw on either side of middle frame to secure (Fig 3/2).
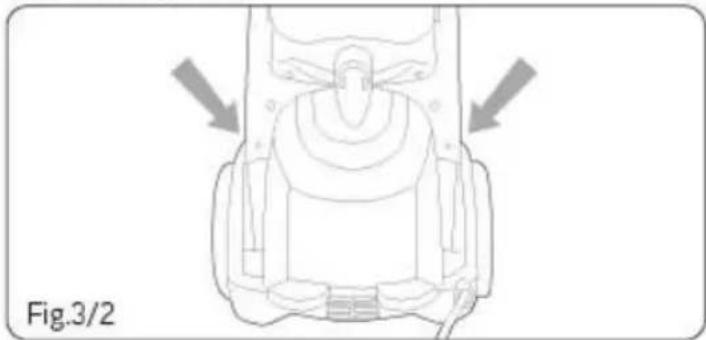
natural_image
Top-down schematic of a vehicle head with two arrows indicating motion or force directions (no text or symbols)Slide the upper handle down onto the unit. The handle will click and lock in place. Run the cord above the upper cord hook and secure with the cord clip (Fig 3/3).
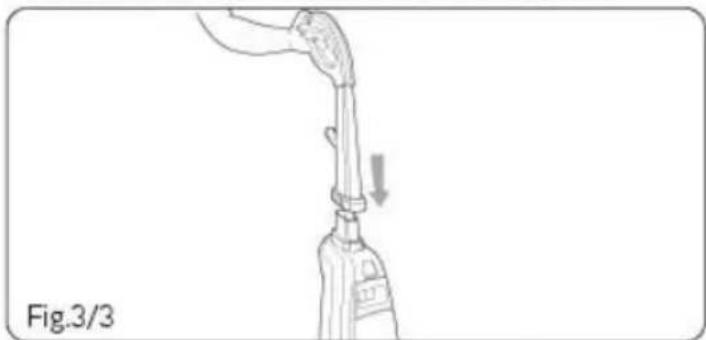
natural_image
Diagram of a mechanical device with a lever and adjustment arrow, labeled Fig.3/3 (no text or symbols on the diagram itself)Insert locking pins into either side of handle (Fig 3/4). Screw locking pins into handle (Fig 3/5).
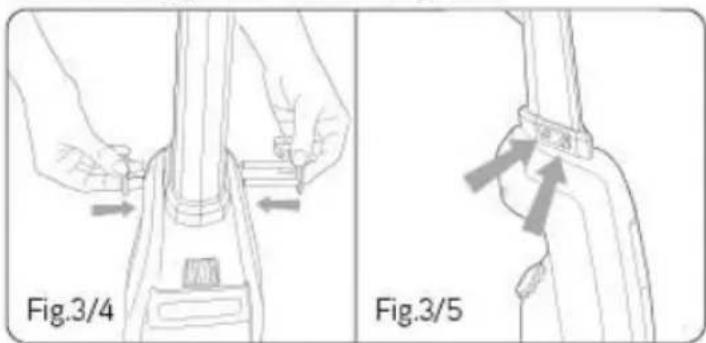
4. Operation
IMPORTANT: Turn off and unplug the carpet washer before performing maintenance and troubleshooting checks.
Hold the clean water tank under the handle and press the release button (Fig 4/1).
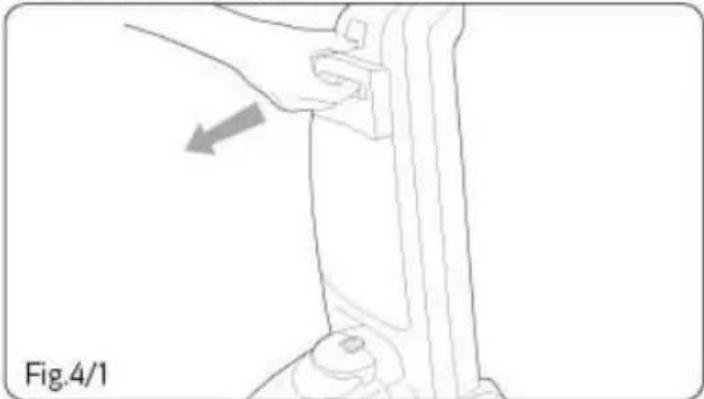
natural_image
Technical line drawing of a mechanical component with an arrow indicating a directional movement (no text or symbols present)Tilt the clean water tank away from the cleaner and remove (Fig 4/2).
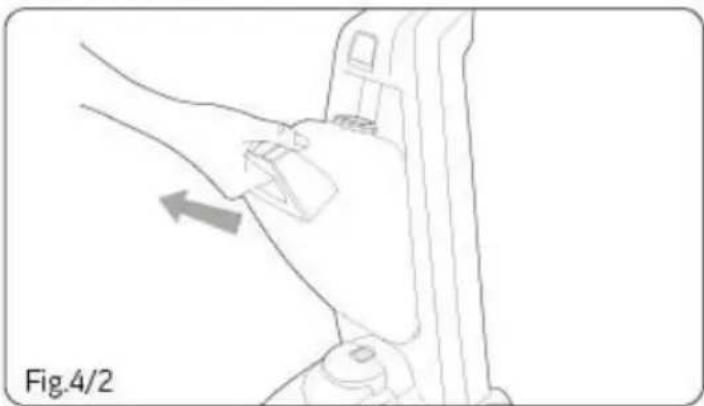
natural_image
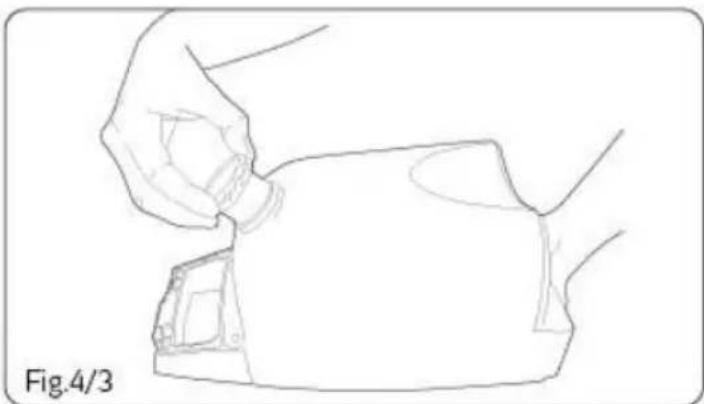
Line drawing of a car seatbelt buckle being adjusted for a hand (no text or symbols)Unscrew the cap from the back of the clean water tank (Fig 4/3).
natural_image
Line drawing of a hand holding a small object, labeled Fig.4/3 (no text or symbols on the diagram itself)Pour required dose of Vax carpet cleaning solution (approx. 25ml per 1L of water.) into the clean water tank.

IMPORTANT: Maximum water temperature 40°C.
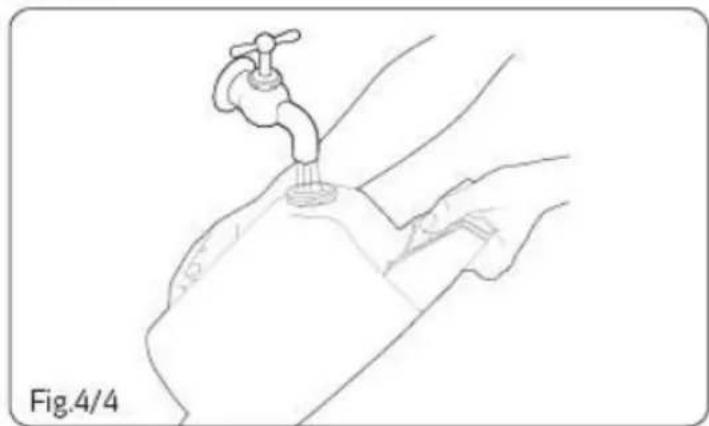
Fill the remaining space in the clean water tank with warm tap water. Replace the measuring cap (Fig 4/4).
NOTE: Use only Vax carpet cleaning solution. Using other solutions may cause excess foaming. This may cause the float to shut off the cleaner prematurely. Using other cleaning solutions will invalidate your guarantee.
natural_image
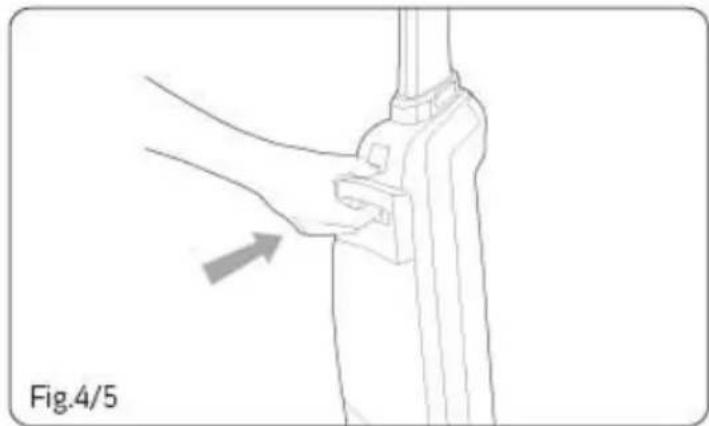
Line drawing of a hand holding a faucet above a surface, labeled Fig.4/4 (no text or symbols on the diagram itself)Place the bottom of the clean water tank into the cleaner and push into place. There will be an audible click when the clean water tank is in the correct position (Fig 4/5).
natural_image
Technical line drawing of a mechanical joint or bracket with an arrow indicating direction (no text or symbols present)Plug the cord into a mains electrical socket.
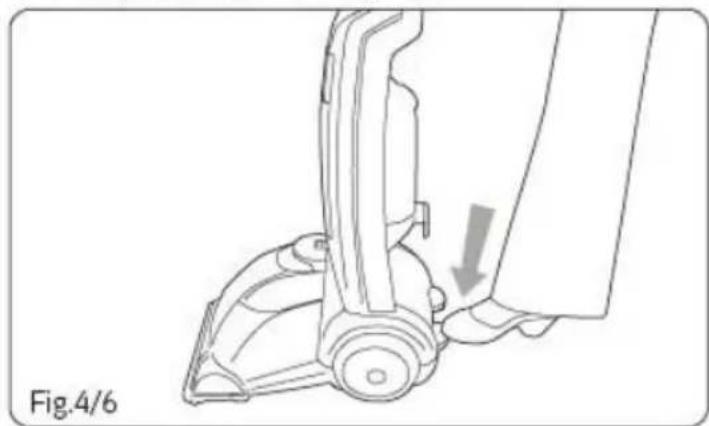
Turn the power switch on (Fig 4/6).
natural_image
Line drawing of a mechanical device with a downward arrow indicating motion (no text or symbols)The switch is located on the back of the cleaner, next to the handle release.
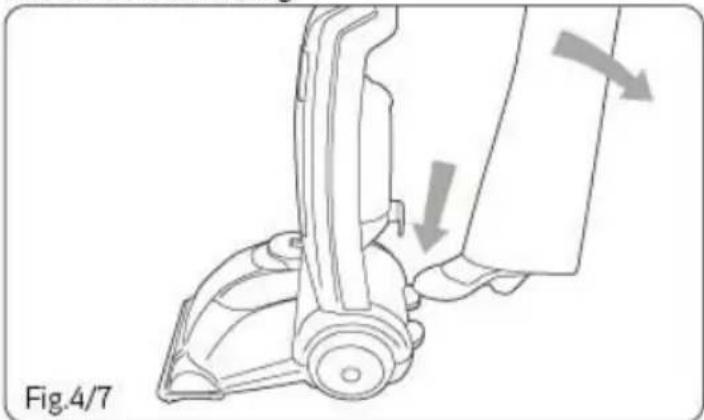
The power switch controls the vacuum motor. Press the unit recline pedal and pull the cleaner back into a reclined position (Fig 4/7).

IMPORTANT: Never leave the cleaner unattended with the power on.
NOTE: Vacuum carpets thoroughly with dry vacuum cleaner before washing.
natural_image
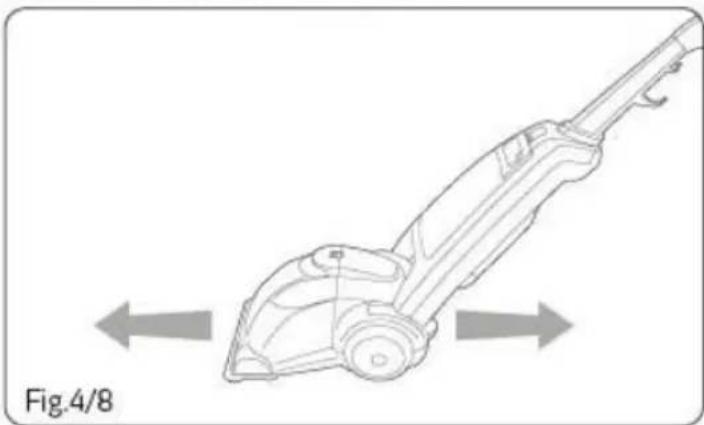
Line drawing of a mechanical device with arrows indicating motion, labeled Fig.4/7 (no text or symbols on the diagram itself)Whilst pressing solution spray button, push carpet washer in a forwards motion. Release button and pull unit backwards in same path to remove dirty water and solution from the carpet. (Fig 4/8).
natural_image
Technical line drawing of a mechanical device with directional arrows indicating motion (no text or symbols)Repeat if necessary, when the dirty water reaches the max fill line on the dirty water tank empty the tank.
Emptying the dirty water tank
NOTE: The float in your Rapide is located towards the back of the dirty water tank lid. It will shut off the suction when the dirty water tank is full. For best results use a smooth steady motion keeping the nozzle flat against the carpet.
Tipping the cleaner and breaking the seal of the nozzle against the carpet will cause the float to rise cutting off suction. Once the float is activated, empty the dirty water tank. If the tank does not appear full turn off the power switch and wait for the float to settle. For best results use only Vax solution.
You will hear a change in motor pitch when the tank is full and needs emptying.

IMPORTANT: Unplug your cleaner before emptying the dirty water tank.
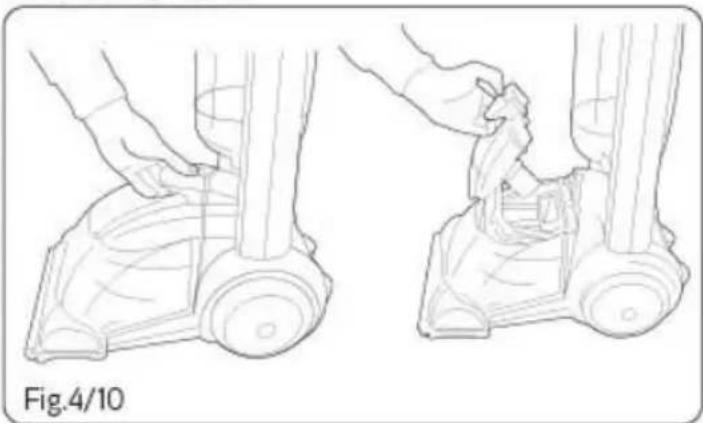
Grasp the top of the dirty water tank handle and press the release latch. Grasp the handle and pull up top of the base, take care to ensure that no dirty water leaks from the front (Fig 4/10).
natural_image
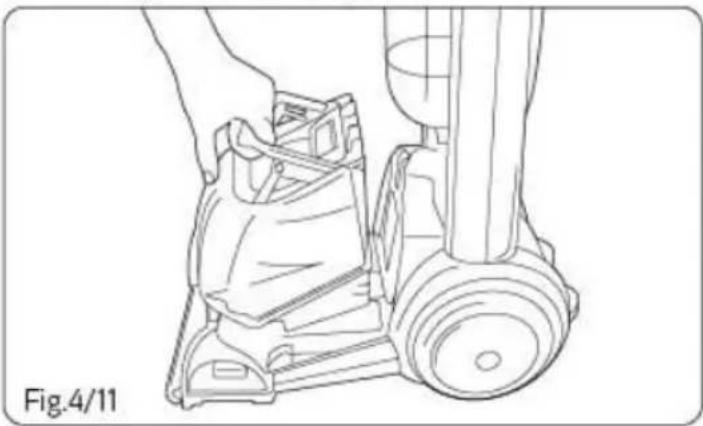
Line drawing of two hands operating a rubber duck base, showing foot positioning and grip mechanism (no text or symbols)Remove dirty water tank (Fig 4/11).
natural_image
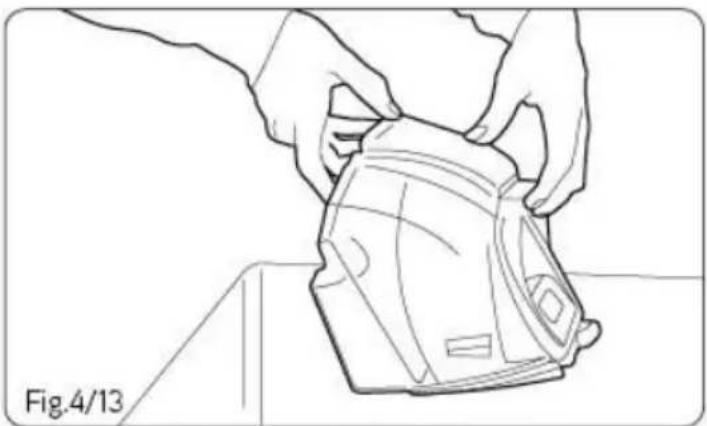
Line drawing of a hand operating a vacuum cleaner in a mechanical assembly (no text or symbols)To empty the water tank hold the handle with one hand and nozzle with the other and empty into the sink (Fig 4/13).
natural_image
Line drawing of hands holding a device, labeled Fig.4/13 (no text or symbols on the device itself)Cleaning the dirty water tank
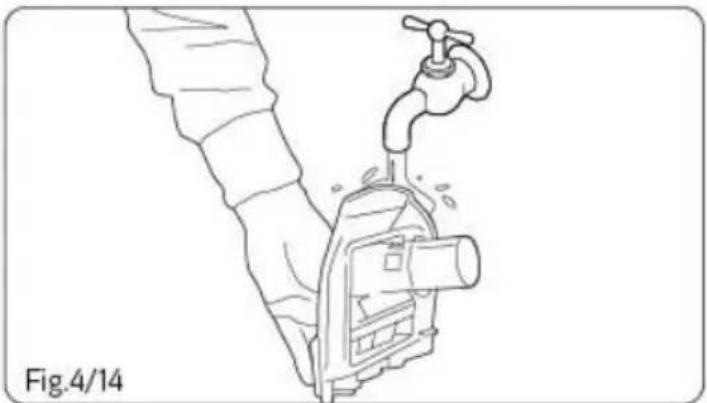
Rinse the dirty water tank and top thoroughly, with warm water (Fig 4/14).
You should allow them to dry fully before replacing them on your cleaner to prevent mildew.
Do not use any chemicals in the cleaning process.
natural_image
Line drawing of a faucet pouring liquid into a water pump (no text or symbols)Replacing the dirty water tank
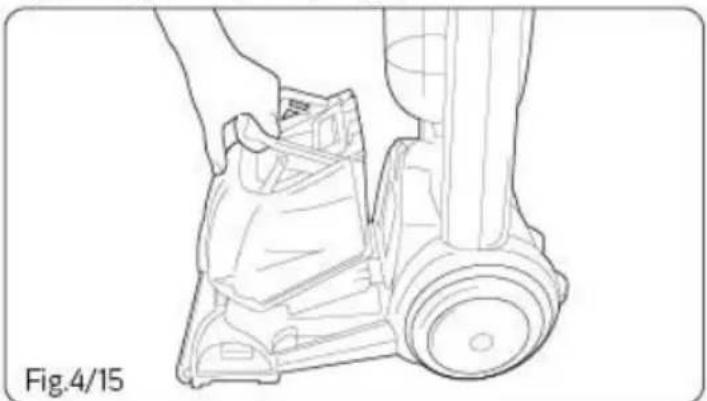
Lift the front of the carpet cleaner base off the carpet with one hand.
Grasp the handle and hook the front of the dirty water tank into the base, making sure that the front of the dirty water tank is resting on the base.
Failure to install the dirty water tank correctly will result in poor dirty water pick up (Fig 4/15).
natural_image
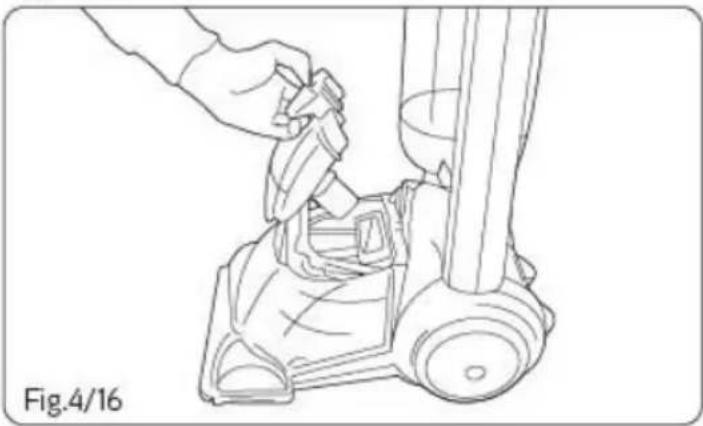
Line drawing of a hand holding a mechanical component, labeled Fig.4/15 (no text or symbols on the diagram itself)While making sure the dirty water tank is resting on the base, place the rear of the tank into the base of the cleaner, push down on the handle until it latches.
Replace top of dirty water tank by pressing it into place (Fig 4/16).
natural_image
Line drawing of a hand using a tool to lift a small mechanical component (no text or symbols)5. Maintenance
Brush removal and replacement
NOTE: The plug must be removed from the electrical socket before cleaning or maintaining the appliance.
Remove the water tank switch off and unplug carpet washer.
Flip the cleaner on its side to expose the nozzle base.
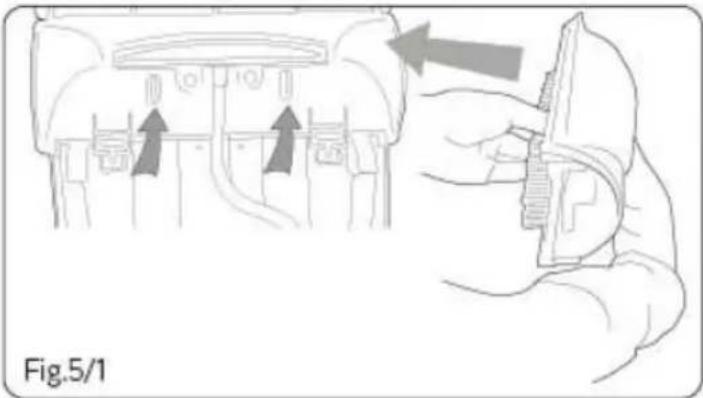
Lift out the floating brushbar by pressing the two latches and pulling it gently (Fig 5/1).
natural_image
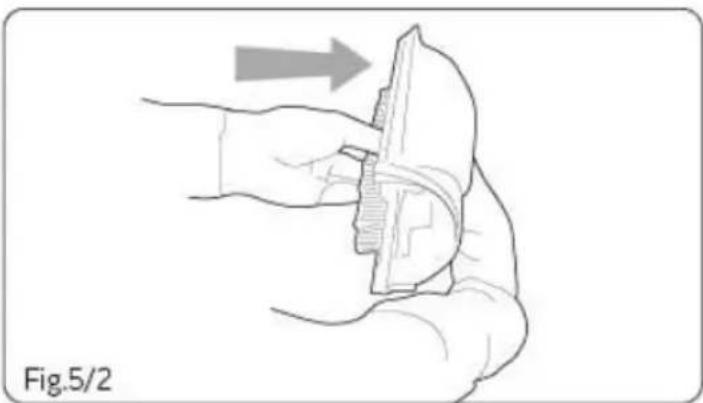
Diagram showing a hand holding a device with arrows indicating movement or force, no text or symbols present.Replace floating brushbar (Fig 5/2).
natural_image
Illustration of a hand holding a tool with an arrow indicating direction (no text or symbols)Cleaning the tank filter
IMPORTANT: Do not use any detergents or boiling water to wash the filters. Vax recommends checking the filters every time the dirty water tank is emptied.
NOTE: All filters must be in place before using your machine.
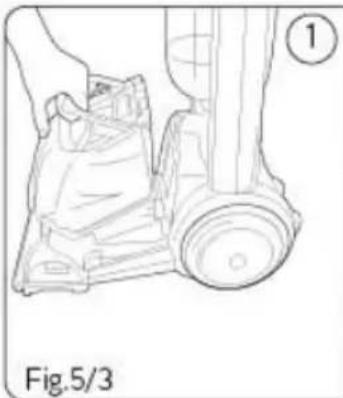
① Remove the dirty water tank from the unit.
② Remove the filter cover from the back of the tank.
natural_image
Line drawing of a hand operating a mechanical device with a circular base and wheels (no text or symbols)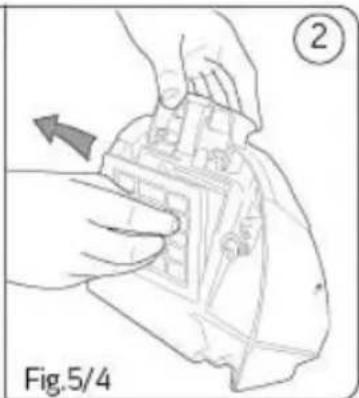
natural_image
Illustration of hands assembling a mechanical component with an arrow indicating direction (no text or symbols)③ Separate the filter from the filter cover.
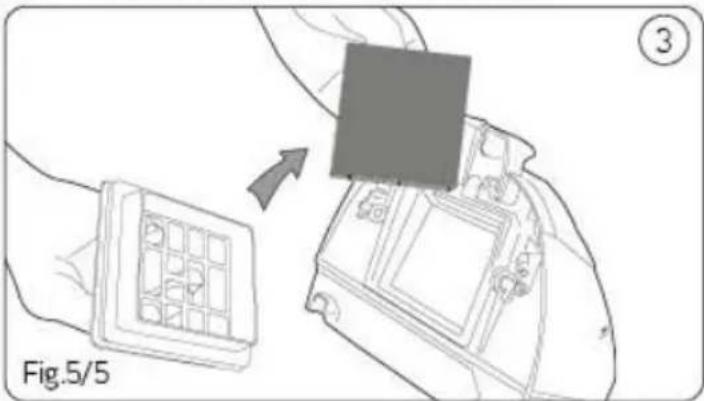
The filter can be rinsed in warm water (max. 40°C).
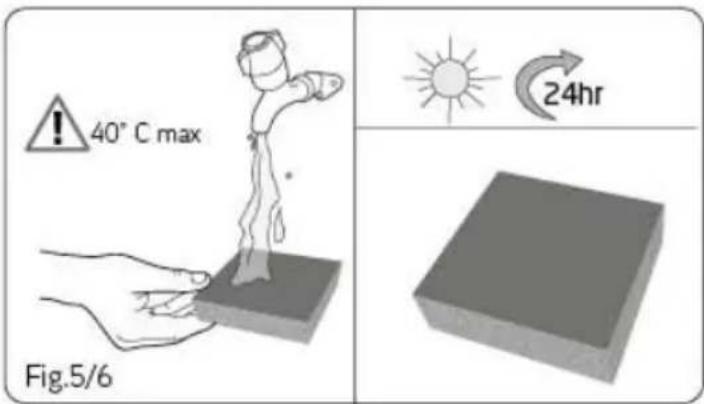
IMPORTANT: Ensure filter is fully dry before replacing.
6. Troubleshooting

CAUTION: To reduce the risk of personal injury, unplug the vacuum cleaner before performing maintenance or troubleshooting checks.
PROBLEM: The cleaner won't run.
| Cause: | Not properly plugged into electrical socket. |
| Solution: | Plug in firmly. |
| Cause: | No electricity in electrical socket. |
| Solution: | Check fuse or breaker. |
| Cause: | On/off switch not turned on. |
| Solution: | Push on/off switch to ‘on’. |
| Cause: | Blown fuse/tripped circuit. |
| Solution: | Reset circuit or replace fuse. |
PROBLEM: Cleaner won't pick up/loss of suction.
| Cause: | Dirty water tank is full. |
| Solution: | Switch off and unplug cleaner. Empty dirty water tank as shown in Section 4. |
| Cause: | Dirty water tank not installed correctly. |
| Solution: | Refer to page 6/7 for fitting information. |
| Cause: | Obstruction in nozzle. |
| Solution: | Remove dirty water tank and clear obstruction. |
PROBLEM: Liquid escaping from the carpet washer.
| Cause: | Dirty water tank is full. |
| Solution: | Switch off and unplug cleaner. Empty dirty water tank as shown in Section 4. |
| Cause: | Dirty water tank not installed correctly. |
| Solution: | Refer to page 6/7 for fitting information. |
| Cause: | Clean water tank not installed correctly. |
| Solution: | Make sure the tank is securely locked in place. |
PROBLEM: Clean solution won't dispense.
| Cause: | Clean water tank not installed correctly. |
| Solution: | Make sure the tank is securely locked in place. |
| Cause: | Clean water tank empty. |
| Solution: | Refill tank. Refer to page 5 for instructions. |
| Cause: | Handle not fitted correctly. |
| Solution: | Ensure handle is fitted correctly. |
7. UK Service & Help
(UK) 0330 026 8455
(ROI) 1-800 928 308
Monday-Friday 8.30am to 6.30pm
Saturday 9.00am to 5.00pm
Any queries or concerns about using your Vax, call the Vax Careline. Please make a note of the model number and serial number of your Vax before calling. For the nearest Vax Service Agent, please call the Vax Careline or visit vax.co.uk
we're here to help
Instead of taking me back to the shop, simply call:
(UK) 0330 026 8455
(ROI) 1-800 928 308
vax.co.uk
vaxireland.ie
This does not affect your statutory rights
8. Technical Specification
Voltage: 220-240V \~50Hz
Wattage: 700 W
Capacity: Clean water tank - 2.6 litres
Dirty water tank - 1.8 litres
Cord length: 6m
Weight: 5.5kg
Subject to technical change without notice.

This page has been left intentionally blank.
This page has been left intentionally blank.

You're home:

@VaxUK
Vax Ltd., 5th Floor 2 Colmore Square, 38 Colmore Circus, Queensway, Birmingham, B4 6BN, UK email: info@vax.co.uk website: vax.co.uk
Version 1.0

EEC Statement of Compliance: Manufacturer/EEC importer: Vax Limited, hereby on our own responsibility, declare that the VRS31W is manufactured in compliance with the following Directives:
Safety: 2006/95/EC Low Voltage Directive. EMC: 2004/108/EC Electromagnetic Compatibility Directive.
Waste electrical products should not be disposed of with household waste. Please recycle where facilities exist. Check with your Local Authority or retailer for recycling advice.
Brand : VAX
Model : Rapide Spring VRS31W
Category : Broom