
DL-EH30SE-W - Toilet PANASONIC - Free user manual and instructions
Find the device manual for free DL-EH30SE-W PANASONIC in PDF.


| Product Type | Electronic Bidet Toilet Seat |
| Brand | Panasonic |
| Model | DL-EH30SE-W |
| Dimensions (W x D x H) | Approx. 48.3 x 53.1 x 14.5 cm |
| Weight | Approx. 4.5 kg |
| Power Supply | AC 100-240V, 50/60Hz |
| Power Consumption | Approx. 820 W (max) |
| Water Heating | Instantaneous heating with temperature control |
| Seat Heating | Adjustable temperature (3 levels) |
| Bidet Function | Front and rear wash with adjustable water pressure and position |
| Dryer | Warm air dryer with adjustable temperature (3 levels) |
| Deodorizer | Built-in activated carbon deodorizer |
| Control Method | Remote control (wireless) or side panel |
| Safety Features | Leak protection, overheat protection, child lock |
| Cleaning and Maintenance | Removable nozzle, self-cleaning function, washable filter |
| Water Inlet | Direct connection to water supply (requires water shut-off valve) |
| Water Pressure | Adjustable (5 levels) |
| Nozzle Position | Adjustable forward/backward |
| Oscillation / Pulse | Yes (oscillating and pulsating wash modes) |
| Seat Sensor | Occupancy sensor for automatic operation |
| Soft Close | Yes (slow-closing seat and lid) |
| Night Light | LED guidance light (optional) |
| Energy Saving | Eco mode, timer settings |
| Spare Parts Availability | Remote, nozzle, filters, seat hinges available |
| Repairability | Modular design; serviceable by qualified technician |
Frequently Asked Questions - DL-EH30SE-W PANASONIC
User questions about DL-EH30SE-W PANASONIC
0 question about this device. Answer the ones you know or ask your own.
Ask a new question about this device
Download the instructions for your Toilet in PDF format for free! Find your manual DL-EH30SE-W - PANASONIC and take your electronic device back in hand. On this page are published all the documents necessary for the use of your device. DL-EH30SE-W by PANASONIC.
USER MANUAL DL-EH30SE-W PANASONIC
Panasonic®
Installation Instructions
Electric Bidet Seat
(Household Use)
Model DL-EH30SE-W
Contents
Page
1 Safety Cautions -2
Cautions Before Installation -3----
Part Names and Accessories -4----
2 Installation Steps -6 ----
Installation of Water Inlet Hose on Shunt Valve Side -6
Installation of electric bidet seat -7----
Installation of Water Inlet Hose on Body Side-8
3 Commissioning -10 ----
Read the Installation Instructions carefully before installing the product in a correct and safe manner. Make sure to read the "Safety Cautions" on Page 2 before installation.
- We shall not be held liable for any incident or damage arising out of any installation other than those described in the Installation Instructions or use of parts other than those specified. The actual product may be different from the illustrations and descriptions.
Safety Cautions
To prevent any personal hazard or property damage, make sure to follow the instructions below.
The hazard or damage caused by misuse can be categorized by the following degrees.

WARNING
indicates a potential hazardous situation where death or severe injury may be suffered if not avoided.

CAUTION
indicates a potential hazardous situation where mild or moderate injury may be suffered if not avoided.

WARNING
- Do not connect any water pipe other than the pipe for tap water.
(Risk of cystitis or dermatitis)
(Risk of water leak due to corrosion or attached foreign objects)
- Do not supply power to the product by any external switch.
(There is a risk that the temperature limiter will return to error)
- Do not damage the power cord and plug.
(Otherwise, electric shock or fire from short circuit may be incurred.)
- Do not plug or unplug the power plug with wet hands.
(Otherwise, electric shock may be incurred.)
- Do not place any burning objects, including cigarette, near the product.
(Risk of electric shock or fire)
● Make the ground connection.
(Risk of electric shock may be incurred in the event of any fault and electrical leakage if not grounded.)
→Please consult a professional for the ground connection.
● Plug the power plug all the way in.
(If it is not plugged completely, electric shock or fire from heating may be incurred. Do not use a damaged plug or a loose wall socket.)
● Comply with relevant electrical regulations when working on any electric circuit.
(Otherwise, fire or electric shock may be incurred.)
● Make sure to perform installation by following the instructions in the Installation Instructions.
(Otherwise, water leak, fire or electric shock may be incurred.)
● Make sure to use supplied or specified parts during installation.
(Otherwise, water leak, fire or electric shock may be incurred.)
- Make sure to follow the range of the wall socket's and connection apparatus' ratings. Only use 220-230 V AC power.
(Risk of fire due to heating)

CAUTION
- Do not apply any pressure to the body connection, for example, falling.
(Otherwise, crack or water leak may be incurred.)
● Install water pipes by following the regulations imposed for your place of residence.
(Otherwise, water leak may be incurred.)
- When moving or installing the bidet, hold the body with both hands.
(If you move it by holding the seat or lid, it may fall off from the body and cause injury.)

Body connection
Cautions Before Installation
Note
- Do not plug the power plug before the bidet body is installed completely. Otherwise, a malfunction may be incurred.
- When the water remaining inside the body is frozen, move the body to a warm place. Perform installation after the frozen water is thawed out. ● Make sure to use the supplied water inlet hose. Otherwise, a water leak may be incurred.
Tips
- As the product has undergone the water passage test, a small amount of water remaining inside may flow out. This is not a malfunction. ● The operating range of water pressure is 49 - 735 kPa {0.5 - 7.5 kgf/cm²} ● Shaking may sometimes result from seat mounts not contacting with the surface of the toilet depending on toilet types.
Required Tools


Tape measure, Phillips screwdriver, Adjustable wrench, Bucket and rag
Part Names and Accessories

⑤ Instructions package (Refer to the List of Parts for details in the next page.)
[Accessories] Check if there is any missing or lost part.

| No. Part name | Qty. Verification | ||
| 1 | Water inlet hose with shunt valve | 1 | □ |
| 2 | Gasket setThin type: black, 2.5 mm thick ×1Thick type: black, 4 mm thick ×1 | 1 | □(Included in the bag for 1) |
| 3 | Quick fastener | 1 | □(Included in the bag for 1) |
| 4 | Top-mounted bolt set | 1 | □ |
| 5 | Instructions packageOperation InstructionsInstallation InstructionsConfirmation card of water release outlet position | 1 | □ |
WARNING
● Do not use any sealing tape when connecting the shunt valve.
(Risk of water leak can result from the sealing tape stuck on a gasket)
● Make sure to use supplied gaskets and quick fastener.
(Risk of serious water leak if these are ignored or other parts are connected during installation)
Installation Steps
![graph TD A["Installation of Water Inlet Hose on Shunt Valve Side"] --> B["Installation of electric bidet seat Page 7"] B --> C["Installation of Water Inlet Hose on Body Side"] C --> D["Page 10Commissioning"]](/content/2026/05/982779/images/f23dc6044a8387b09c1a6b35dca7b4ca337a1b92c415905b42abf9d7a7c60914.jpg)
Installation of Water Inlet Hose on Shunt Valve Side
1. Close the water inlet valve and remove the water inlet pipe.
- Attach the shunt valve on the water inlet hose to the water inlet valve.
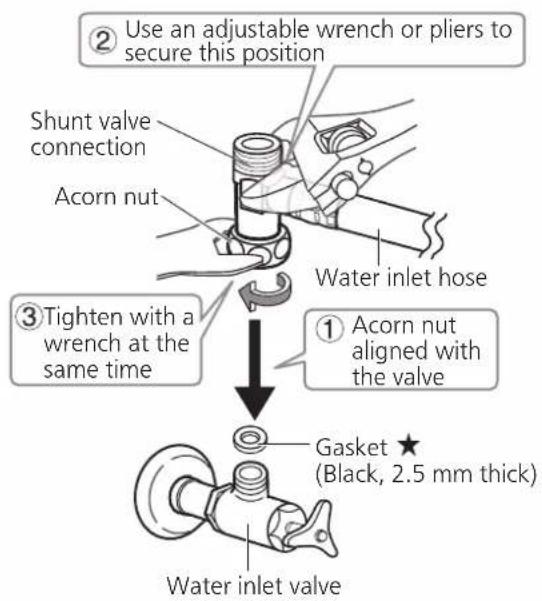
Tips
- Do not secure any part other than those specified with the tool to prevent any water leak due to damage.
- Do not scratch the connection of the shunt valve to prevent any water leak.
- Do not hold the water inlet hose with your hands to prevent injury when turning the acorn nut.
● Re-install the water inlet pipe.
★ Illustrated parts are those ② mentioned on page 4.
Installation of electric bidet seat
1. Remove the installed old seat. Perform the removal operation by following the instructions provided by the purchased toilet.

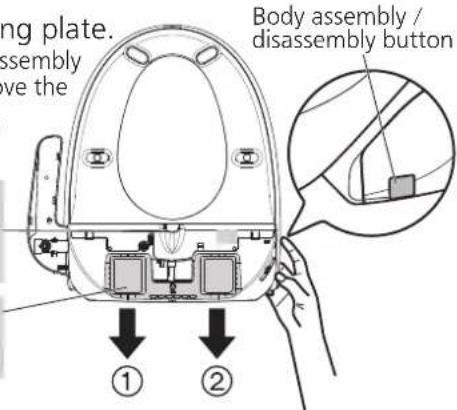
2. Remove the body mounting plate.
Press the body assembly/disassembly button all the way in and remove the body mounting plate. (Pull out along the direction of ①② arrows alternately.)
- Do not press the nozzle compartment. (Otherwise, the nozzle may get stuck.)
- For proper installation, be sure to use the body mounting plate supplied with the product.
3 Install the body mounting plate. Install the body 4
● The spacing for installing the bolts of the body mounting plate can be adjusted between 130 - 215 mm.
- Loosen the bolt and remove the nut. (Fig. 1)


- Fit the metal mounting plate to the top-mounted bolt and screw in the nut. (Fig. 2)
(This nut is applicable to toilet with the bore diameter of 12 - 17 mm. For other bore diameters, consult our after-sales service for installation.)
- For preliminary positioning, secure the top-mounted bolt to the body mounting plate. (Same on both sides)
① With a tape measure, measure the length of A. (Fig. 3)
② Align the center line of the top-mounted bolt with the reference scale line matching A on the body mounting plate for preliminary positioning. (Fig. 4)


- Adjust the position of the body mounting plate and ensure B ≦80 mm. Then, install the body mounting plate to the toilet.(Fig. 5)

- Align the protrusion in the center on the back side of the body with the one in the center of the body mounting plate.
- Lift up the rear part of the body slightly and slide it towards the body mounting plate until a "click" is heard.
- Do not secure the power cord between the body and toilet.
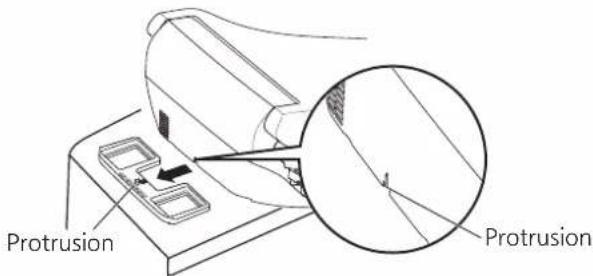
When the rear part of the lid contacts the water tank of the toilet, or the lifted seat falls down easily. →Move the body mounting plate forwards slightly and secure it. Install the body again.

- Make sure to install the body mounting plate with B 80 mm. Otherwise, the body may be tilted or a water leak may occur. - Once the body is installed, lift it up gently to check if it is installed securely. - As this product is designed with a detachable structure to enable the body to be removed from the toilet, it may sometimes feel slightly shaky. This is not a malfunction.
Installation of Water Inlet Hose on Body Side
Caution:
● Serious water leaks may occur if the water inlet hose is installed improperly.
1 Connect to the body
- As illustrated, insert the O-ring side of the water inlet hose straight into the body connection port. (If not inserted straight, the O-ring may be damaged.)
Note
● Make sure to use the water inlet hose supplied with the product. (Risk of water leak)

About the O-ring
Caution
● An O-ring must be fitted to the front end. ● The O-ring must be free of dust. (Risk of water leak)
- As illustrated, insert the quick fastener all the way into the connection correctly until a "click" is heard.

Quick fastener About the quick fastener
Note
- When the claw can't be fit, it indicates that the connection isn't inserted all the way in. Make sure to insert and tighten the quick fastener securely.
Example of incorrect connection
* If the claw is not tightened securely, the quick fastener will become loosened, resulting in a serious water leak.

- Tighten the claw securely. Bend the hole end downwards. Bend the claw end towards the hole end and tighten it. (Until a "click" is heard)

- With the water inlet hose held in your hands, turn the quick fastener gently. The turning operation should be smooth. (If it is not smooth, it indicates the installation is done improperly.)

Caution
- Do not damage (cut or scratch) the water inlet hose. (Risk of water leak)
② Make sure to
- Check if the quick fastener is secured firmly. ● Pull the water inlet hose gently to check if it will not separated from the body.
③ Open the water inlet valve.
- Once all ports are connected and verified, open the water inlet valve.

■ During installation, the body connection can be turned.


Tips
- When the bathroom is confined and it is difficult to install the water inlet hose after the bidet body is installed, you can attach the water inlet hose to the body first, and then install the body to the toilet.
Commissioning
Before Commissioning…… Check if the water inlet valve is opened. (Volume adjustment will be affected if it is not opened.)
Check if there is any water leaked from the connection.
Step
1 Cover with a plastic film or similar device.
(Between the seat and toilet)
2 Check if the power plug is plugged.
(The Power indicator is on.)

3 Press and hold the Electrical Leakage Test button for 2 seconds or longer.
● The electrical leakage detection function is activated and power is cut off. (The Electrical Leakage indicator is on and the Power indicator is off.)

4 Unplug the power plug.
- Check if the Electrical Leakage indicator is off.


5 After 5 seconds, plug the power plug.
● The Power indicator will flash for approximately 10 seconds before remaining on. - Check if the water temperature is set to "Off".


Tips
- When the Electrical Leakage indicator flashes, unplug the power plug immediately and contact your dealer or one of Panasonic-operated service centers.
- If you touch a closed seat (the Occupancy indicator is on and deodorization operate) and unintentionally press the Rear Showering / Front Showering button, water will come out and spray on yourself.
6 Press SPRAY or BIDLET
- The nozzle extends and the warm water tank of the body begins to pump in water. After approximately 1 minute, water will flow out from the nozzle downwards. If no water flows out, check if the main water valve is opened or the water inlet valve isn't opened sufficiently.
About idle running in the warm water tank
- When carrying out Step 6, the warm water tank is running idle if the "High", "Mid" and "Low" Water Temperature indicators all flash. This is not a malfunction. [Do the followings]
- Open the main water valve and water inlet valve. Start commissioning from Step 6 again. (The Water Temperature indicator is off.)
About releasing water
● The water flowing out next to the nozzle (water release outlet) is the one released for pressure adjustment. This is not a malfunction. If the water release outlet is placed on the surface of the toilet, water may not flow into the toilet. At this time, install the body slightly forward. [Page 7]


Occupancy indicator
7 Press STOP
● The nozzle retracts.
8 Press and hold the rear left portion of the seat. (The Occupancy indicator is on.) Meanwhile,

● Deodorization starts. (with motor sound) - The nozzle starts self-cleaning. After approximately 5 - 8 seconds, cleaning water will be sprayed. (If the Occupancy Switch is not enabled, no water will be sprayed.) - Check if cleaning water is sprayed normally with the plastic film.
9 Press STOP
- Once the nozzle retracts, water for nozzle self-cleaning will come out.
10 Remove the plastic film.
11 Press and hold the rear left portion of the seat. (The Occupancy indicator is on.) Meanwhile,

12 Press (SEAT TEMP) and (WATER TEMP) to set the temperature. After 5-12 minutes, sit on the seat to check the seat and water temperature.
- It takes approximately 5-12 minutes for the temperature of the seat and warm water to stabilize. (Depending on ambient temperature and the temperature of tap water.)
After showering stops, droplets will fall from around the nozzle. These are the water resulting from thermal expansion of the warm water tank or water remaining in the nozzle. This is not a malfunction. (Approximately 7-8 minutes after showering)
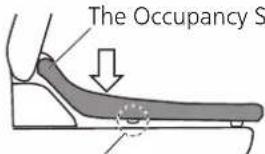
There is a gap
The back mount of the seat and the front leg are floating. It is normal. If this gap is not present, seating detection will not be detected.
Troubleshooting

Caution After Installation
- When the product is likely not to be used for more than 1 week, drain it. (Refer to "When Not Used for A Long Time" in the Operating Instructions.)
Service information
Malaysia
Panasonic Malaysia
Lot 10, Street 13/2, 46200 Petaling Jaya, Selangor Darul Ehsan.
'+603-79537600
E-mail: ccc@my.panasonic.com
© Panasonic Corporation 2022
Printed in China
- PANASONIC®
- INSTALLATION INSTRUCTIONS
- ELECTRIC BIDET SEAT
- (HOUSEHOLD USE)
- MODEL DL-EH30SE-W
- CONTENTS
- SAFETY CAUTIONS
- WARNING
- CAUTION
- CAUTIONS BEFORE INSTALLATION
- NOTE
- TIPS
- REQUIRED TOOLS
- PART NAMES AND ACCESSORIES
- INSTALLATION STEPS
- INSTALLATION OF WATER INLET HOSE ON SHUNT VALVE SIDE
- INSTALLATION OF ELECTRIC BIDET SEAT
- INSTALLATION OF WATER INLET HOSE ON BODY SIDE
- CONNECT TO THE BODY
- EXAMPLE OF INCORRECT CONNECTION
- ② MAKE SURE TO
- ③ OPEN THE WATER INLET VALVE
- COMMISSIONING
- STEP
- ABOUT IDLE RUNNING IN THE WARM WATER TANK
- ABOUT RELEASING WATER
- PRESS STOP
- PRESS AND HOLD THE REAR LEFT PORTION OF THE SEAT. (THE OCCUPANCY INDICATOR IS ON.) MEANWHILE
- REMOVE THE PLASTIC FILM
- PRESS (SEAT TEMP) AND (WATER TEMP) TO SET THE TEMPERATURE. AFTER 5-12 MINUTES, SIT ON THE SEAT TO CHECK THE SEAT AND WATER TEMPERATURE
- TROUBLESHOOTING
- CAUTION AFTER INSTALLATION
- SERVICE INFORMATION
- MALAYSIA
Brand : PANASONIC
Model : DL-EH30SE-W
Category : Toilet