PAC12H - Air Conditioning Climachill - Free user manual and instructions
Find the device manual for free PAC12H Climachill in PDF.


| Product Type | Portable Air Conditioner and Heater |
| Brand | Climachill |
| Model | PAC12H |
| Cooling Capacity | 12,000 BTU/h |
| Heating Capacity | 12,000 BTU/h (heat pump) |
| Power Supply | 220-240 V ~ 50 Hz |
| Power Consumption (Cooling) | Approx. 1100 W |
| Power Consumption (Heating) | Approx. 1100 W |
| Refrigerant | R32 (likely) |
| Functions | Cooling, Heating, Dehumidifying, Fan, Auto, Timer |
| Fan Speeds | 3 (High, Medium, Low) |
| Airflow Direction | Manual tilt flap |
| Exhaust Hose Length | Approx. 1.5 m (extendable) |
| Window Kit Included | Yes (sliding type) |
| Remote Control | Yes (with battery CR2025) |
| Water Drainage | Manual drain plug or continuous drain hose |
| Water Tank Capacity | Internal tank (unspecified) |
| Dimensions (H x W x D) | Approx. 70 x 45 x 38 cm |
| Weight | Approx. 30 kg |
| Noise Level | Approx. 50 dB |
| Safety Features | Overheat protection, water full indicator, auto shut-off |
| Filter | Washable, clean every 2 weeks |
| Warranty | 12 months (original packaging required for returns) |
| Spare Parts Availability | Contact customer service |
| Repairability | Service by qualified technician |
Frequently Asked Questions - PAC12H Climachill
User questions about PAC12H Climachill
0 question about this device. Answer the ones you know or ask your own.
Ask a new question about this device
Download the instructions for your Air Conditioning in PDF format for free! Find your manual PAC12H - Climachill and take your electronic device back in hand. On this page are published all the documents necessary for the use of your device. PAC12H by Climachill.
USER MANUAL PAC12H Climachill
Portable Air Conditioner and Heater With Heat Pump Technology

natural_image
White industrial air conditioner unit with digital display and control panel (no visible text or symbols)PAC12H
12,000btu Cool & Heat Portable Air Conditioner
Please read this manual carefully prior to operating the product.
Please keep ALL packaging for duration of Warranty Period
TABLE OF CONTENTS
IMPORTANT SAFEGUARDS 2
INTRODUCTION / WARRANTY 3
PRODUCT DIAGRAM 4-5
INSTALLATION 6-7
OPERATION 8
WATER DRAINAGE 9
MAINTENANCE/CLEANING 10
TROUBLESHOOTING 11
TECHNICAL SUPPORT / CUSTOMER SERVICE CONTACT 11
IMPORTANT SAFEGUARDS
Before installing and using your portable air conditioner and heater, it is important that you read this owner's manual carefully. Store this manual in a safe place for future reference.
This instruction manual is used for guidance and does not form part of a contract. It reserves the right to make technical changes without prior notice.
- Always place the unit on a level surface.
- The appliance shall be installed in accordance with national wiring regulation.
- The unit must be connected to a correctly grounded power supply. For your safety, this unit is grounded through the power cord plug when connected to a grounded wall outlet. Do not use an adapter plug or extension cord.
- Do not install the unit in an area where gas leakage may occur and/or in an explosive atmosphere.
- Do not apply an insecticide or any type of flammable spray on the unit.
- Confirm drainage piping is connected properly.
- Do not start or stop the unit by inserting or pulling out the power plug.
- Do not operate with wet hands.
- Close supervision is necessary when the unit is used near children. The unit in not intended for use by children.
- Do not insert anything into the air outlet. Do not obstruct air inlet or outlet grills.
- Do not expose skin or eyes directly to cool air for a long period of time.
- If an abnormal odour or smoke comes out of the unit, disconnect the unit immediately and contact a qualified service technician.
- When opening the filter cover, do not touch the metal parts in the unit's interior.
- Do not immerse the unit in water or any type of liquid. Do not use the unit in the immediate surroundings of a bath, shower, or swimming pool, or in any other steamy, wet areas.
- When cleaning the unit, always turn the unit off and unplug the power cord.
- Always inspect the power cord for signs of damage before use. If the power cord is damaged, it must be replaced by the manufacturer or a qualified service technician.
- Do not place a plant or allow a pet in the direct path of the airflow to avoid injury.
- Do not put a stove, etc, where it would be exposed to the direct airflow. It may affect combustion.
- Do not sit on the unit or place anything on it.
- Before storing, the water must be drained from the unit and the filters cleaned.
Warning
The unit creates water which is collected in an internal water tank which has a rubber drain plug, it is very unlikely but if this tank becomes damaged during transport or the rubber bung comes out then it is possible that the unit will leak water when it is operated. Prior to use make sure the drain plug is in place & then during first use periodically check the unit to make sure it isn't leaking water (look at bottom / under the unit) – during first use do not turn the unit on and leave it unattended for a long period of time without checking.
INTRODUCTION
Thank you for purchasing this Portable Air Conditioner and Heater. This unit is designed to improve indoor living and working comfort by providing cooling, dehumidifying, and heating with minimal installation.
Please complete the following information for future reference. Retain this owner's manual with your sales receipt as a permanent record of your purchase.
Date of Purchase: ____
Place of Purchase: ____
Invoice Number: ____
WARRANTY
This product comes with a 12month warranty from date of purchase (as indicated on original sales receipt).
Please note that it is a warranty condition that ALL of the original packaging is kept for the duration of the warranty period, (the main box can be folded flat for storage).
If you need to make a warranty claim and the unit requires returning to us then we are only able to organise collection of the unit if it is in its original packaging (this is an insurance requirement of our courier). Failure to keep the original packaging means we are unable to organise collection of the product from you
PRODUCT DIAGRAM

ACCESSORIES
| ITEM DESCRIPTION QTY | — | |
 | EXHAUST HOSE 1 | |
 | HOSE FUNNELL ATTACHMENT 1 | |
 | HOSE CONNECTOR TO UNIT 1 | |
 | SLIDING WINDOW KIT 1 | |
 | MANUAL 1 | |
 | REMOTE CONTROL 1 | |
 | BATTERY 1 | |
 | DRAIN HOSE 1 | |
After unpacking, please ensure the above listed accessories are included.
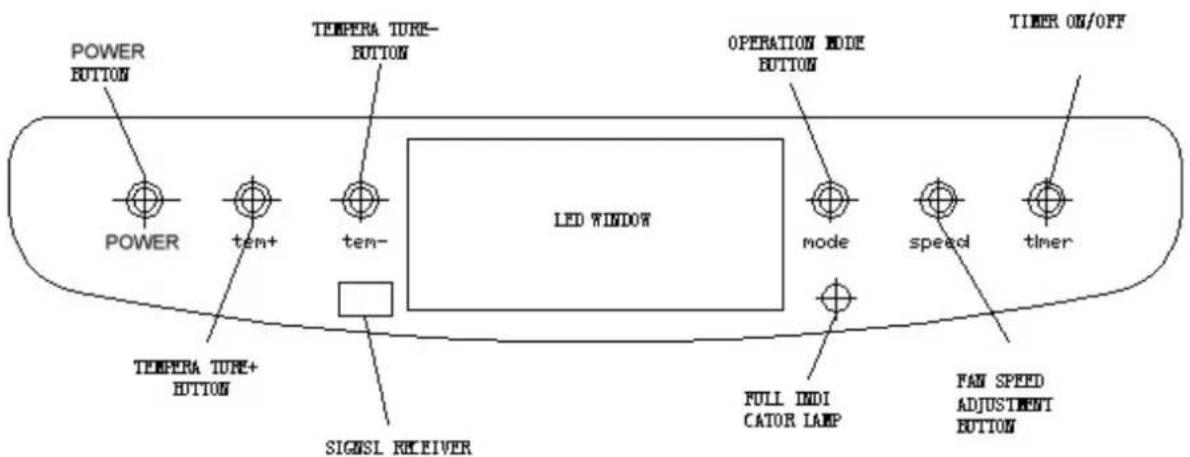
| Button Function | |
| Power Turns the unit on/off | |
| Tem + Increases set temperature | |
| Tem - Decreases set temperature | |
| Mode Changes the mode | |
| Speed Changes the fan speed | |
| Timer Sets timer | |
| Full Lamp Indicates water full | |
LED WINDOW DISPLAY
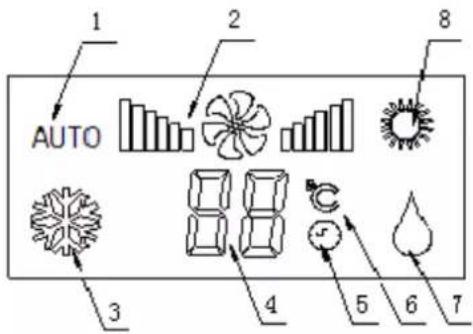
1) Auto Mode Icon
2) Fan Speed
3) Cooling Mode Icon
4) Temperature & Timer Setting
5) Timer On
6) Temperature ℃
7) Dry Mode Icon
8) Heat Mode Icon
REMOTE CONTROL FUNCTIONS
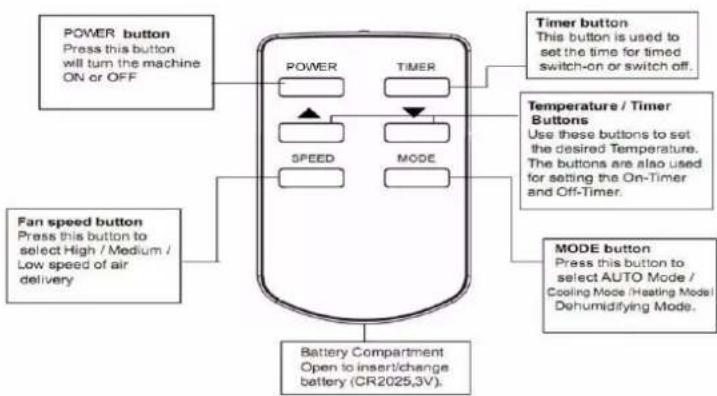
flowchart
graph TD
    A["POWER button\nPress this button will turn the machine ON or OFF"] --> B["Power"]
    C["Fan speed button\nPress this button to select High / Medium / Low speed of air delivery"] --> D["SPEED"]
    E["TIMER button\nThis button is used to set the time for timed switch-on or switch off."] --> F["Speed"]
    G["MODE button\nPress this button to select AUTO Mode / Cooling Mode (Heating Mode) Dehumidifying Mode."] --> H["MODE"]
    I["Battery Compartment Open to insert/change battery (CR2025.3V)."] --> J["Power"]
    K["Timer button\nThis button is used to set the time for timed switch-on or switch off."] --> L["Speed"]
    M["Temperature / Timer Buttons\nUse these buttons to set the desired Temperature. The buttons are also used for setting the On-Timer and Off-Timer."] --> N["Mode"]
INSTALLATION
Exhausting the Air
It is necessary to use the exhaust hose when using the machine. When in Cooling Mode hot air will be expelled out of the exhaust hose When in Heating Mode cold air will be expelled out of the exhaust hose
Setting Up the Exhaust Hose
Take the 3x components, extend the exhaust hose and then twist the accessories onto each end of the hose

natural_image
Technical line drawings of three different types of threaded fasteners or fasteners (no text or symbols)Attaching Exhaust Hose to Unit
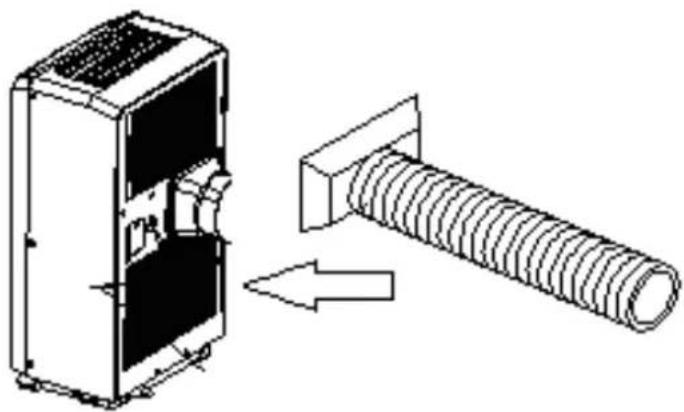
With the hose assembled, insert the square adapter into the opening at the back of the air conditioner
natural_image
Technical illustration of a mechanical component with a threaded bolt and housing, showing internal structure and assembly (no text or symbols)Venting the Exhaust Air
The exhaust hose should be kept as short and straight as possible so as to not restrict airflow of the exhausted air.
There are 3 x options with venting the exhaust air,
1) You can make a hole in the wall and pass the exhaust hose through the hole in the wall (this option doesn't require a window to be slightly open)
2) You can pass the end of the exhaust hose out of a slightly open window (you can pass the funnel attachment out of the window and then close the window onto the attachment to hold it in place
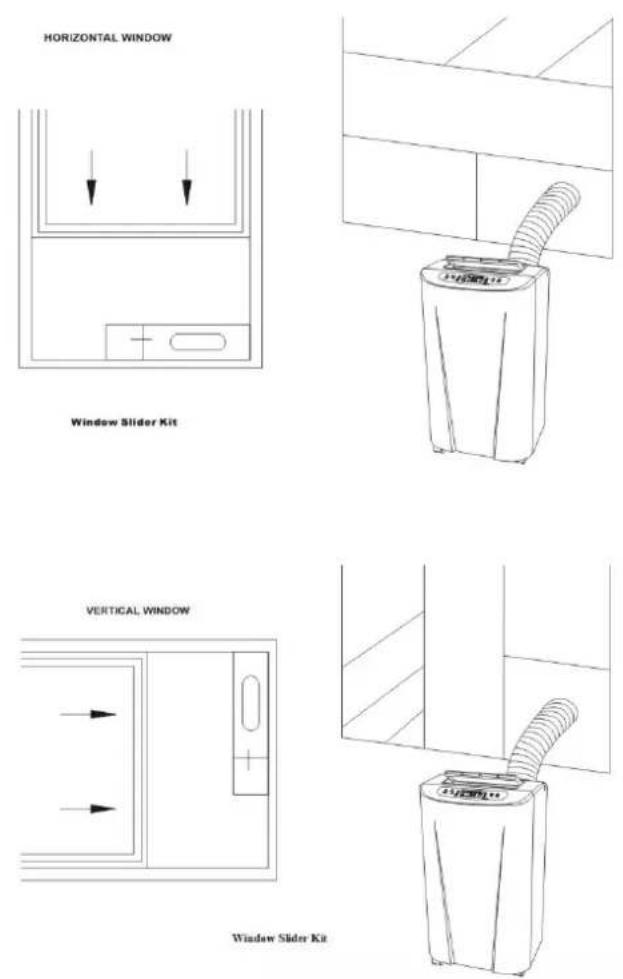
3) You can use the sliding window kit if you have an up/down or a side opening window
Window Kit Installation
The window kit is designed to fit into most standard vertical and horizontal windows. However, it may be necessary to modify some aspects of the installation process for certain window types.
- Open the window or sliding door and adjust the length of the window kit to fit the opening. Mark and cut down a single panel of the window kit if necessary.
- Place the window kit between the window and the window frame as shown in the images to the right. Close the window onto the window kit to form a tight seal.
- Attach the exhaust duct adapter to the window kit. Tabs located on the adapter will lock into place securing the adapter to the window kit.
MANUAL AIRFLOW DIRECTION
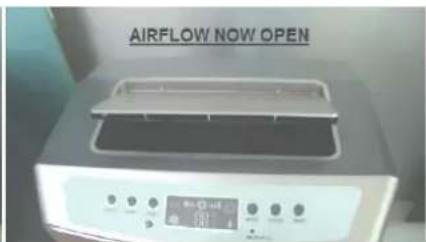
The PAC12H requires you to manually open the Airflow Direction Flap. The Airflow Flap tilts open, gently push down at the back of the airflow flap and it will tilt open until it locks into place, you can leave the Airflow Flap permanently open or once finished you can close it by gently pushing down at the front.


OPERATION
Before Use
- Check that the Exhaust Hose has been mounted properly (see 'Installation' section). If the exhaust Hose is not correctly used, hot air will blow back into the room you are trying cool
- Check that the drain plug at the bottom rear of the unit is securely plugged in, to prevent water leaks (see page 9 – Water Drainage)
- Open Airflow flap (see page 7 – Manual Airflow Direction)
- Check that the local mains power matches that shown on the rating label of the unit
- Check that the location of the unit is suitable (flat, stable surface; away from sources water / heat)
- If the unit has recently been transported, let it stand for 6 hours to allow the compress contents to settle
Cooling Mode
Press the "Mode" button till the "Cool Mode" icon appears.
Press the "▲"or"▼"button to select a desired room temperature. (16 ℃ - 31 ℃)
Press the "Fan Speed" button to select wind speed.
NOTE: During hot days, the unit will cool off the room most efficiently by setting the temperature at the lowest and the fan speed at the highest. Reducing the length of the exhaust hoses, insulating the exhaust hoses, and keeping direct sunlight to a minimum will also improve the cooling efficiency.
Heating Mode
Press the "Mode" button till the "Heat Mode" icon appears.
Press the “▲”or“▼” button to select a desired room temperature. (16 ℃ - 31 ℃)
Press the "Fan Speed" button to select wind speed.
Dry (De-humidifying) Mode
Press the "Mode" button till the "Dry Mode" icon blinks
Set the selected temperature to current room temperature minus 2°C (16°C - 31°C)
Set the fan motor to LOW wind speed.
AUTO Mode
According to the current room temperature the unit will automatically select the mode - cooling, dehumidifying or heating.
When the room temperature is <23^ the unit will enter Heat Mode
When the room temperature is 23^ C – 26^ C the unit will enter Dry Mode
When the room temperature is ≥slant26^ the unit will enter Cooling Mode
Timer Mode
Timer ON setting
When the air-conditioner is OFF, press the "Timer" button and select a desired ON time through the temperature and time setting buttons.
"Preset ON Time" is displayed on the operation panel.
ON time can be regulated at any time in 0-24 hours.
Timer OFF setting
When the air-conditioner ON, press "Timer" button and select a desired OFF time through the temperature and time setting buttons.
"Preset OFF Time" is displayed on the operation panel.
OFF time can be regulated at any time in 0-24 hours.
WATER DRAINAGE
When the unit is in cooling mode, unwanted water is extracted from the air. Most of this water is re-used to cool the unit and make it run more efficiently. When the unit is used in extremely humid environments, water will collect in a water container at the bottom of the unit. When the water container is full, the compressor will stop but the fan will continue to run.
When the water container is full, the unit will display 'E2/E4' by means of the Water Indicator Full lamp being illuminated on the control panel until the tank is emptied. To resume operation, empty the water container according to the following steps:
- Turn the unit off. Try not move the unit when the water container is full (can cause spillage)
- Place a drain pan under the drainage port at the back of the unit (perhaps use a shallow tray)
- Remove the rubber plug from the drain hole & drain water
- Once the water container has been emptied, replace the rubber plug into the drain hole firmly

NOTE: In heating mode, the unit will also create water which needs emptying from the machine.
Continuous Drainage
You can of course set the unit up for continuous drainage thus negating the need to empty water from the machine. To do this remove the rubber bung from the unit and attach the drain hose to the unit, then drain the water into a container (be careful that it doesn't overspill from the container)
Recommendation
To make it easier to empty the water from the machine we recommend raising the unit from the floor, this will allow easier access to the drain port and allow easier drainage. We aim to sell a floor mount for the unit which will allow you to place the unit into the floor mount which will raise the height of the unit and thus raise the height of the drain port – please see www.climachill.co.uk for details.
MAINTENANCE & CLEANING
1) Before cleaning, be sure to disconnect the unit from any electric supply outlet;
2) Do not use gasoline or other chemicals to clean the unit;
3) Do not wash the unit directly;
4) If the conditioner is damaged, please contact the dealer or repair shop.

natural_image
Illustration of a portable air conditioner unit and a server rack unit, both without any text or symbols.Cleaning Air Filter
If the air filter becomes clogged with dust/dirt the unit will not function properly, the air filter should be cleaned once every two weeks.
- Open the air inlet grille and take off air filter.
- Clean the air filter with a brush (brush the dust/dirt off the filter)
- If very dirty use a neutral detergent in lukewarm water and dry in the shade.
- Put air filter back into unit & close the air inlet grille.
Clean the Air-conditioner Surface
First clean the surface with a neutral detergent and wet cloth, and then wipe it with a dry cloth.
END OF SEASON STORAGE
Before storing the machine be sure to drain all of the water from the machine (see water drainage section)
| PROBLEM POSSIBLE CAUSE REMEDY | ||
| Unit does not operate or only runs in fan mode. | Is the unit plugged in? | Securely plug the power cord into the wall outlet. |
| Is the main power supply on? Re-establish the main power supply. | ||
| Is the water container full indicator light on? | Empty the water container. | |
| Is the timer set? Change timer settings. | ||
| Cooling efficiency is not satisfactory. | Is the air inlet or outlet blocked? Clear the blocking. | |
| Is there any other heat source in the room? | Move the heat source. | |
| Are the air filters dirty? Clean the air filters. | ||
| Is the temperature setting suitable? Change the temperature setting. | ||
| Is the fan speed set at low? Increase the fan speed. | ||
| Auto power off in Heating Mode | Heating Protection, when the temperature at the air outlet exceeds 70C, the unit will power off automatically | Restart the unit at lower room temperature |
| Unit is noisy or vibrates. | Is the machine positioned unevenly on a level surface? | Place the unit on a level surface. |
| The unit starts and stops frequently. | Is the voltage from the power source correct? | Use a proper power source. |
| Is the exhaust hose positioned incorrectly? | Position the exhaust hose correctly and keep the exhaust hose straight as possible. | |
ERROR CODES
Diagnostic system indicators appear if any of the following interrupts operation of the unit. The unit may require simple maintenance or repair by a qualified service technician.
E0 – Room Temperature Sensor
Solution = Replace sensor (the unit can also work without replacement)
E2 / E4 – Water Full
Solution = Please empty the water Tank
If any other error codes are displayed please contact the following via email sales@climachill.co.uk
TECHNICAL SUPPORT / CUSTOMER SERVICE CONTACT
If you require Technical Support or Customer Service please contact us in the following way: -
Email: sales@climachill.co.uk
Telephone: 01273 803820
- PAC12H
- 12,000btu Cool & Heat Portable Air Conditioner
- TABLE OF CONTENTS
- IMPORTANT SAFEGUARDS
- Warning
- INTRODUCTION
- WARRANTY
- LED WINDOW DISPLAY
- REMOTE CONTROL FUNCTIONS
- INSTALLATION
- Exhausting the Air
- Setting Up the Exhaust Hose
- Attaching Exhaust Hose to Unit
- Venting the Exhaust Air
- Window Kit Installation
- MANUAL AIRFLOW DIRECTION
- OPERATION
- Before Use
- Cooling Mode
- Heating Mode
- Dry (De-humidifying) Mode
- AUTO Mode
- Timer Mode
- Timer ON setting
- Timer OFF setting
- WATER DRAINAGE
- Continuous Drainage
- Recommendation
- MAINTENANCE & CLEANING
- Cleaning Air Filter
- Clean the Air-conditioner Surface
- END OF SEASON STORAGE
- ERROR CODES
- TECHNICAL SUPPORT / CUSTOMER SERVICE CONTACT
Brand : Climachill
Model : PAC12H
Category : Air Conditioning