KYD26 - Air Conditioning Climachill - Free user manual and instructions
Find the device manual for free KYD26 Climachill in PDF.


| Product Type | Portable Air Conditioner |
| Model | KYD26 |
| Brand | Climachill |
| Cooling Capacity | 9000 BTU (approx. 2.6 kW) |
| Dimensions (HxWxD) | 70 cm x 45 cm x 35 cm |
| Net Weight | 25 kg |
| Power Supply | 220-240 V, 50 Hz |
| Power Consumption (Cooling) | Approx. 900 W |
| Refrigerant | R410A |
| Noise Level | 55 dB (max) |
| Airflow (max) | 400 m³/h |
| Operating Modes | Cooling, Fan, Dehumidify |
| Fan Speeds | 3 (Low, Medium, High) |
| Timer | On/Off Timer (1-24 hours) |
| Remote Control | Included (battery operated) |
| Castors | 4 swivel castors for easy mobility |
| Exhaust Hose Length | 1.5 m (extendable) |
| Window Kit | Included (adjustable) |
| Maintenance | Clean air filter every 2 weeks; replace filter annually |
| Safety Features | Auto shut-off (overheat, full tank), child lock, tip-over protection |
| Spare Parts Available | Filter, remote control, castors, exhaust hose |
| Repairability Index | 7.5/10 (user-replaceable parts, easy access) |
| Warranty | 2 years limited warranty |
Frequently Asked Questions - KYD26 Climachill
User questions about KYD26 Climachill
0 question about this device. Answer the ones you know or ask your own.
Ask a new question about this device
Download the instructions for your Air Conditioning in PDF format for free! Find your manual KYD26 - Climachill and take your electronic device back in hand. On this page are published all the documents necessary for the use of your device. KYD26 by Climachill.
USER MANUAL KYD26 Climachill
natural_image
Exterior view of a modern industrial air purifier unit (no visible text or symbols)Thank you for selecting super quality air conditioner. Please be sure to read this manual carefully before using it. Any question, please contact the professional service for help.
CONTENTS
CONTENTS....1
IMPORTANT SAFEGUARDS....2
FEATURES AND PARTS LIST 4
PANEL CONTROL....5
REMOTE CONTROL 6
OPERATION METHODS....7
INSTALLATION......8
WATER DRAINGE METHODS ....10
MAINTENANCE....11
TROUBLE SHOOTING....12
INSTALLATION ACCESSORIES....13
APPENDIX....14
IMPORTANT SAFEGUARDS
Important Safeguards.
- Read all instructions.
- Disconnect the power plug before dismantling, assembling or before cleaning.
- Avoid touching mobile parts of the appliance.
- Never insert fingers, pencils or any other objects though the guards whenever the power plug is connected, especially while running.
•The appliance is not intended for use by young children or infirm persons unless they have been adequately supervised by a responsible person to ensure that they can use the unit safely.
- Young children should be supervised to ensure that they do not play with the appliance.
- Do not use the appliance for any other purpose than its intended use.
- The appliance must not be used if the guards are not fastened according to instructions.
- When the power cord is damaged, it must be replaced by the manufacturer or its service agent or a similarly qualified person in order to avoid a hazard.
- Do not use your appliance with an extension cord unless it has been checked and tested by a qualified electrician or electrical supplier.
- Return to Hagemeyer or authorised service agent.
- The air conditioning unit must always be stored and transported upright, otherwise you may cause irreparable damage to the compressor; in case of doubt we suggest to wait for at least 24 hours before you start the air-conditioning unit.
- Avoid restarting the air conditioning unit unless 4 minutes have passed since being turned off, or the compressor may get damaged.
- Never use the mains plug as a switch to start and turn off the air conditioning unit. Use the provided ON/OFF switch located on the control panel.
•Always place the portable air conditioner on a dry stable surface.
Energy Saving Tips.
- Do not cover or restrict the airflow from the Outlet or Inlet grills.
- The minimum distance from furniture and wall should be 50cm.
- Keep blinds and /or draperies, on any windows, closed during the sunniest part of the day.
- Keep the filters clean. Under normal conditions, the filters should be cleaned approximately every 30 days. Since the filters remove airborne particles, more frequent cleaning maybe necessary, depending on the indoor air quality.
- Set the fan speed switch to high cool and the thermostat to the coolest position for the initial start-up, then set the Fan switch to Low cool and lower the thermostat to a comfortable setting.
FEATURES AND PARTS LIST
Features:
• No installation is required.
- Easily moved. The handle makes moving more convenient.
• Streamline colorful screen display.
• LED colorful screen display.
- Water-cooled mode is most energy saving and environment protect.
- Low noise and strong wind.
- Unique economic function.
- Auto swing makes wind blow from left to right automatically.
- Three-minute restart delay to protect compressor.
Parts list:
- control panel
- horizontal louver
- vertical louver
- air inlet grille
- castor
- exhaust duct
- handle
- air outlet grille
- power cord and plug
- water injection port
- power and hook
- air filter

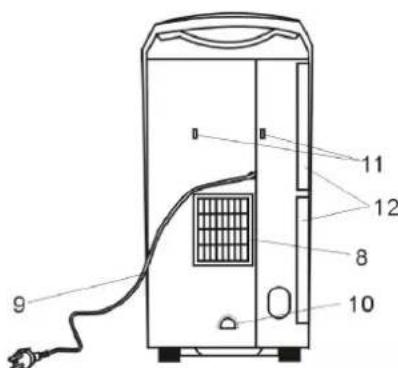
Fig. 2
PANEL CONTROL
CAUTIONS: If the unit is turned off in cool /dry/ heat mode and restarted immediately, then it will wait at least 3 minutes before running again.

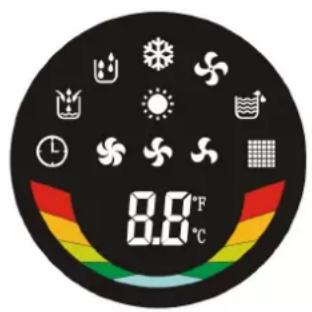
Fig. 3
1. Buttons
Timer: press this button to set the timer
Swing: press this button to make the vertical louver swing automatically. Press once again, the swing will stop.
Speed: press this button for 5 seconds to select high, middle or low fan Speed.
Up/down: press up or down button to set temperature or adjust the time in ▲ ▼imer mode. Press both buttons to vary from Celsius to Fahrenheit.
Mode: press this button to select cool, heat, dry or fan mode (heat mode only in YPC-H models).
Econ: press this button to a set energy saving mode (only in heat and cool mode). This set temperature is 27°C in cool mode and 23°C in heat mode. The fan speed is low. These data can't be changed. The LED display will flash *or accordingly. Press again to cancel it when * or *is flashing.
① Power: press this button to turn on/off the unit.
2. LED display

REMOTE CONTROL
① Power Press this button to turn/off the unit.
Timer Press this button to set the timer.
Swing Press this button to make the vertical louver swing automatically
← ℃ ℉ Vary from Celsius degree to Fahrenheit degree.
* Cool Press this button to choose Cool mode.
Heat Press this button to choose Heat mode.
Dry Press this button to choose Dry mode.
Fan Press this button to choose Fan mode.
Up Press Up or Down button to set temperature Down or adjust the time in Timer mode.
High Press this button to select high fan speed.
Med Press this button to select middle fan speed.
Low Press this button to select low fan speed.
Econ Press this button to a set energy saving mode only in Cool and Heat mode. The set temperature is 27^ in cool mode and 23 °C heat mode The fan speed is low. These data can't be changed.
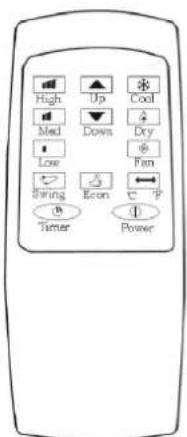
KY remote control
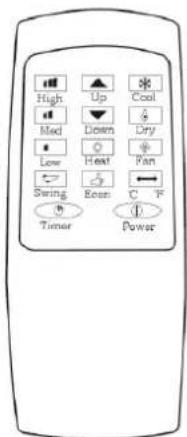
KYD remote control
Fig. 4
NOTE: To vary from Celsius to Fahrenheit by control panel, press both Up and Down button at least 2 seconds.
OPERATION METHODS
Timer set
1. Set timer-off
Press the Timer button when the unit is on. The LED will flash__five Times. During this period press Up or Down button to adjust set time from 0.5h to 24h. It will vary 0.5h each time in 3h and 1h each time hereafter. The set time will flash 5 times after adjusting. When it will display temperature again. Once the set time end, the unit will turn off automatically.
2. Change the set time
When Timer is on, you can check remnant time by pressing Timer button. It will flash 5 times. Press Up or Down button to adjust set time. The set time can also be cancelled if you press the Timer button once again during the flashing time.
3. Set timer-on
Press the Timer button when the unit is off. Same as timer-off set. Once the set time end, the unit will turn on automatically.
Cooling/Heating and Dehumidifying operation
1. Cooling/Heating operation
Press Mode button or /*to choose Cool/heat mode.
Press Up or Down button or ☐ to set a proper room temperature.
The range is 18\~30°C(64-84°F). The temperature will increase or decrease 1°C or 1°F each time.
Press Speed button or 📄 to choose a proper fan speed.
Press Swing button or to adjust the direction of vertical louver.
Adjust horizontal louver by hand.
2. Dehumidifying operation
Press Mode button or to choose Dry mode. The fan speed is Low,
LED displays room temperature. These cannot be adjusted.
NOTE:
-
In cool mode, when the water Injection indicates lights, you can inject some water through the injection port before cooling operation (no longer than High level).
-
You should drain water with the drainpipe in heat and dehumidifying mode. The unit will stop work when water level exceeds the high level.
-
Do not use air exhaust duct when in Dry or Fan modes
-
If your room is directly exposed to the sun, draw the curtains please.
INSTALLATION
1. Selection of Installation Place
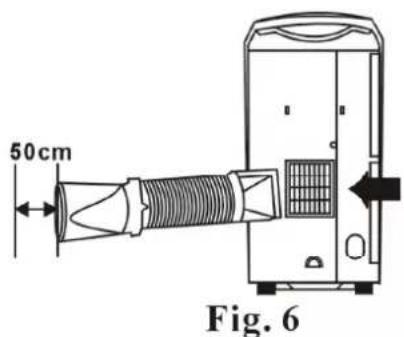
Install the unit on a flat and dry place. Leave at least 50cm space around the unit (when the hose is not connected). (Fig.5)
2.AIR Exhaust Duct Mounting Method
1) Fix the square end of the exhaust dust to the exhaust terminal of the unit.
2) Put the other end (discharge) to the nearest window. Leave at least 50cm place around it.
NOTE:
The length of the air exhaust duct is between 600cm to 1700cm or 1800cm (adapters included). We suggest using the minimum length of the air exhaust dust. That can save energy for you.
This length has been designed especially according to the specifications of the air conditioner .Do not use an extension or exchange of a different hose as that may lead to malfunction.

3. Window Kit Installation
The window kit has been designed to fit most standard vertical and horizontal windows. However, it may be necessary for you to modify some aspects of the installation procedures for certain types of windows. Please refer to the illustrations. (Fig.7 and Fig.8)

Fig. 7

Fig. 8
4. Mounting illustrations
1. mounting in the wall

Fig. 9
2.correct bending

Fig.10
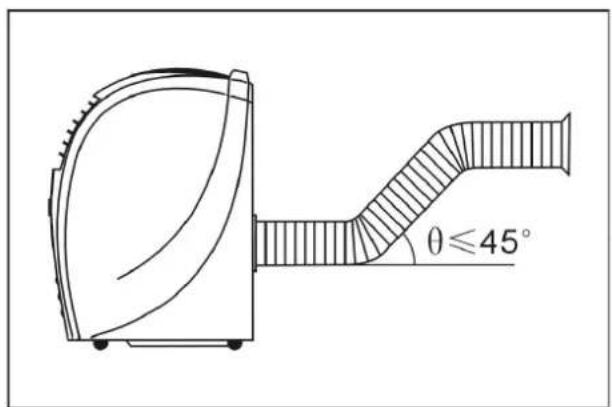
Fig.11
3. wrong bending

natural_image
Diagram of a portable air duct with a curved pipe and a fan-like structure, labeled 'X' (no text or symbols on the diagram itself)Fig.12
WATER DRAINGE METHODS
This product has a self-evaporative system. The condensing water will recycle to cool the condenser. This water-cooled mode can not only improve cooling efficiency and decrease noise, but also save energy for you.
* When in cooling mode, the water from the evaporator will flow into a inside pan. When the water reaches the low level, the water pump will work until the water is under the low level. When the water reaches the high level, the compressor will stop working, and the water pump, lower fan motor and upper fan motor will work on all the time.
* When in heating mode, the water pump won't work.
* When the water is full, the water full indicator will light and the compressor will stop working. The buzzer will buzz 10 times every 5 minutes until the water is below the high level or drained by hand. When the alarm stops and after three-minutes restart delay, the unit will work normally.
* You can drain the water out with a drain pipe. It is included in the accessory. But first you should put some vessel like pan under the hose, then take out the plug on the drain mouth, thus the water will flow into the vessel and won't make the floor wet. (Fig.13) If the drainpipe is shorter than you need, you can purchase a pipe (9mml.D.). Then connect it to the drainpipe with the drainpipe kit we supply.

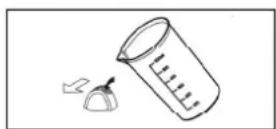
Fig. 13
* Move the unit gently when the water is high. If not, the water may spill from the inside of the unit.
* When the water in the cave is not enough for pumping, the pump will stop working. At the same time, the Water Injection indicator on the control panel will illuminate 📁, you had better inject some water into the water draw carefully. In order to avoid the water flooding from the under pan, you should inject water no more than 1800ml (three cups). This operation helps save 20%-30% energy for you.
MAINTENANCE
Cleaning
Turn off the unit and pull the plug out of the socket before any cleaning.
1. Clean the surface
Clean the surface of the unit with a duster or a half-wet soft cloth. Do not use chemical solvent like benzene, alcohol, gasoline and etc, Or the surface may be damaged or even deformed.
2. Clean the air filter
If the air filter is blocked with a lot of dust, the efficiency will reduce. You'd better clean the filter every two weeks.
1) Pull out the air filter as Fig.14.
2) Wash the air filter by immersing it gently into warm(under 40^ C or 104^ F)water with neutral detergent. Rinse the filter and dry it in a shaded place.
3) Push the air filter back into the original position.


natural_image
Technical line drawing of a mechanical component with internal spring-like structure (no text or symbols)Fig. 14
End of season
- Pull out the plug from the drain mouth and remove the water from the drain pan. You can remove the water entirely by slanting the unit back.
Setting the fan mode, then press the Fan button for 5 seconds until the lower fan works. After that, operate the unit in fan mode for half a day until the pipe is dry. In this way the inside of the unit can be dried and the mildew growth can be suppressed. - Switch off the unit and disconnect the plug from the power supply.
- Tie the cable with sting.
- Remove the air exhaust duct and keep it carefully.
- Wrap the unit with the plastic bag, and keep it in a dry place.
- Take the batteries out of the remote control and keep them well.
TROUBLE SHOOTING
Before contacting professional service, please firstly check it yourself referring to the followings.
| Trouble Check Solution | ||
| The unit doesn't operate at all. | Is power fail?Is plug out?Is power fuse or switch off?Is the set time suitable?Is water full alarm on? | It is normal.Insert the plug into the socket steadily.Change the fuse or switch on.Change the set time.Pour the water. |
| Cooling/Hating efficiency is not good | Is air inlet or outlet blocked?Is there any other heat source in room?Are air filters very dirty?Is the set temperature suitable?Is fan speed set at low? | Clear off the blocks.Move the heat source.Clean the air filter.Change temperature.Select suitable fan speed. |
| Too noisy and vibration | It is the inner liquid (refrigerant) flowing inside.Is it inclined? | It is normal.Place it in a flat place. |
| The unit starts and stops frequently | Is the voltage normal?Is the exhaust tube fixed rightly or is it bended?Have you added extra exhaust tube | Turn off the unit if the voltage is abnormal.Set the exhaust tube correctly.Remove the extra tube. |

Stop running and pull the plug out in case something enumerated below happens. Then contact the professional service for help.
- The fuse and switch often break.
- The power cord superheat or sleeve of the cord is broken.
- There is abnormal odor or smoke comes out of the unit.
Self-diagnosis function
| Check code | Diagnosis of malfunction |
| E2 | Room temperature faults |
| E3 | Faulty coil temperature |
| E5 | Unit faults (Restart the unit) |
Note: When display E4, it means that the coil is defrosted. That is the normal status.
INSTALLATION ACCESSORIES
Description:
Flexible exhaust hose with adapters ……3/set
Stretch from
7000BTU/8000BTU/9000BTU:14" (36cm) up to 59" (150cm)
12000BTU/14000BTU/15000BTU:15" (38cm) up to 59" (150cm)
Window exhaust adapter (flat mouth)……1pc
Adjustable window slider kit ....2/set
From 35 3/8" (90cm) up to 51 1/8" (130cm)
Screw (the length is 3/8")......1pc
Drain pipe 1pc
Plug (square)....1pc
Water cup 1pc

Fig. 15
APPENDIX
1. Fuse Parameter
Type: FSD
Voltage: 250V
Current: 3.15A
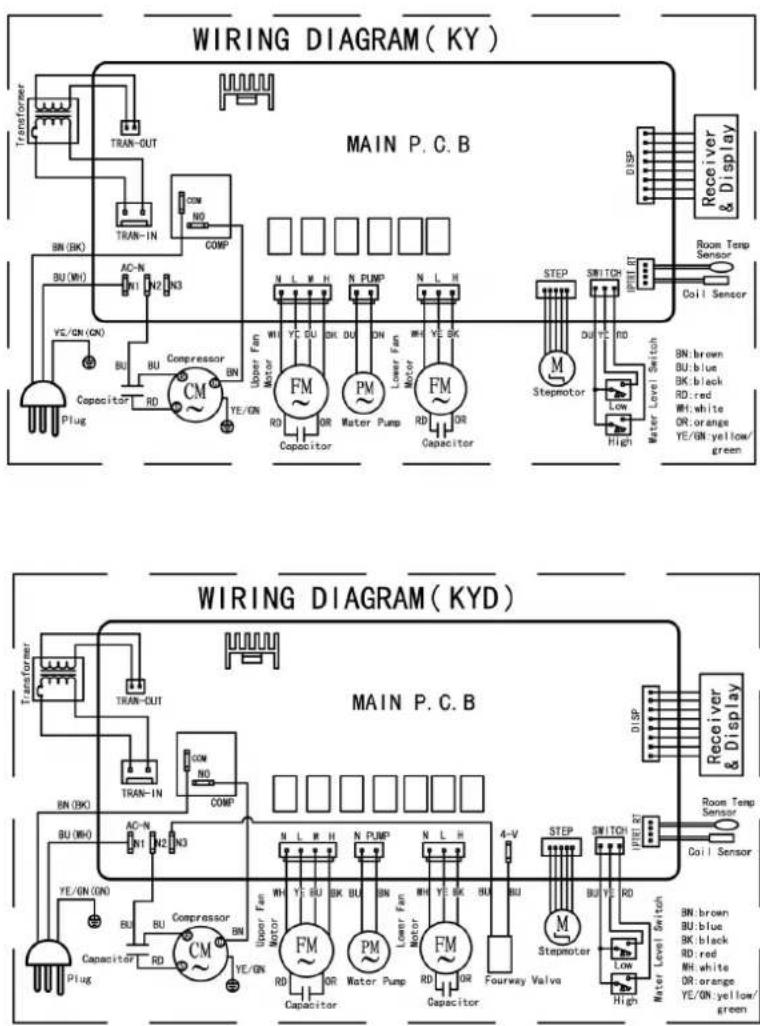
2.Wiring Diagram
flowchart
graph TD
    subgraph MAIN P.C.B
        A["Transformer"] --> B["TRAN-OUT"]
        B --> C["TRAN-IN"]
        C --> D["COM"]
        D --> E["NO"]
        E --> F["COMP"]
        F --> G["BU (BK)"]
        G --> H["AC-N"]
        H --> I["N1 N2 N3"]
        I --> J["BY/ON (ON)"]
        J --> K["Capacitor"]
        K --> L["RD"]
        L --> M["Compressor"]
        M --> N["BN"]
        N --> O["Upper Fan Motor"]
        O --> P["FM"]
        P --> Q["OR"]
        Q --> R["Capacitor"]
        R --> S["DM"]
        S --> T["Motor Pump"]
        T --> U["Up/Down Motor"]
        U --> V["FM"]
        V --> W["OR"]
        W --> X["Capacitor"]
        X --> Y["RD"]
        Y --> Z["Capacitor"]
        Z --> AA["WM"]
        AA --> AB["YC DU"]
        AB --> AC["NH DU"]
        AC --> AD["NPMP"]
        AD --> AE["NH"]
        AE --> AF["Steptomotor"]
        AF --> AG["M"]
        AG --> AH["SWITCH"]
        AH --> AI["IRPI RT"]
        AI --> AJ["Receiver & Display"]
        AK["Room Temp Sensor"] --> AL["Coil Sensor"]
        AM["BN brown"] --> AN["BU blue"]
        AO["BK black"] --> AP["RD red"]
        AQ["MH white"] --> AR["OR orange"]
        AS["YE/GN yellow/green"] --> AT["Water Level Switch"]
Fig.16

Disposal: Do not dispose this product as unsorted municipal waste. Collection of such waste separately for special treatment is necessary.
- CONTENTS
- IMPORTANT SAFEGUARDS
- Important Safeguards.
- Energy Saving Tips.
- FEATURES AND PARTS LIST
- Features:
- Parts list:
- PANEL CONTROL
- Buttons
- LED display
- REMOTE CONTROL
- OPERATION METHODS
- Timer set
- Set timer-off
- Change the set time
- Set timer-on
- Cooling/Heating and Dehumidifying operation
- Cooling/Heating operation
- Dehumidifying operation
- NOTE:
- INSTALLATION
- Selection of Installation Place
- 2.AIR Exhaust Duct Mounting Method
- Window Kit Installation
- Mounting illustrations
- mounting in the wall
- 2.correct bending
- wrong bending
- WATER DRAINGE METHODS
- MAINTENANCE
- Cleaning
- Clean the surface
- Clean the air filter
- End of season
- TROUBLE SHOOTING
- Self-diagnosis function
- INSTALLATION ACCESSORIES
- Description:
- APPENDIX
- Fuse Parameter
- 2.Wiring Diagram
Brand : Climachill
Model : KYD26
Category : Air Conditioning