PD6511 - Hi-Fi System Emerson - Free user manual and instructions
Find the device manual for free PD6511 Emerson in PDF.


| Product Type | Ceiling Fan |
| Model | PD6511 |
| Brand | Emerson |
| Blade Span | 52 inches |
| Number of Blades | 5 |
| Motor Type | AC Motor, Reversible |
| Speeds | 3 Speeds (Low, Medium, High) |
| Control Type | Remote Control Included |
| Light Kit | Integrated LED Light Kit, Dimmable |
| Voltage | 120V AC |
| Weight | 15.4 lbs (7 kg) |
| Mounting | Downrod or Flush Mount |
| Room Size | Medium to Large (up to 400 sq ft) |
| Use Location | Indoor Only |
| Blade Material | Wood Composite with Finish |
| Power Consumption | 30 W (Motor) + 18 W (Light) |
| Airflow | Approx. 5000 CFM (High Speed) |
| Maintenance | Wipe blades with soft cloth; do not use water or cleaners directly on motor |
| Safety | Turn off circuit breaker before installation; use with approved ceiling box |
| Spare Parts | Contact Emerson customer service or authorized dealers for blades, light kit, remote |
| Warranty | Limited Lifetime Motor Warranty; 2 Years on Parts |
Frequently Asked Questions - PD6511 Emerson
User questions about PD6511 Emerson
0 question about this device. Answer the ones you know or ask your own.
Ask a new question about this device
Download the instructions for your Hi-Fi System in PDF format for free! Find your manual PD6511 - Emerson and take your electronic device back in hand. On this page are published all the documents necessary for the use of your device. PD6511 by Emerson.
USER MANUAL PD6511 Emerson
CD Portable Stereo System with Cassette Deck
EMERSON RADIO CORP.
IMPORTANT
Call toll-free 1-800-210-2281 for exciting information and special discounts on Extended Service Plans.
OWNER'S MANUAL PD6511
EMERSON
PART NO. 16-2773
912-01
Printed in China
Visit our web site at "www.emersonradio.com"
WARNING

The lightening flash with arrowhead symbol within the triangle is a warning sign alerting the user of "dangerous voltage" inside the unit.
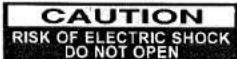
ATTENTION: To reduce the risk of electric shock, do not remove the cover. There are no user serviceable parts inside the unit. Refer all servicing to qualified personnel.

The exclamation point within the triangle is a warning sign alerting the user of important instructions accompanying the product.
CLASS 1 LASER PRODUCT
CLASS 1 LASER PRODUCT APPAREIL À LASER DE CLASSE 1 PRODUCTO LASER DE CLASE 1
CAUTION INVISIBLE LASER RADIATION WHEN OPEN AND INTERLOCKS DEFEATED. AVOID EXPOSURE TO BEAM
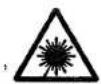
This product contains a low power Laser Device.
PRECAUTIONS
Follow the advice below for safe and appropriate operations.
ON PLACEMENT
- Do not use the unit in places where are extremely hot, cold, dusty, or humid.
- Place the unit on a flat and even surface.
- Do not restrict the air flow of the unit by placing it in a place with poor air flow, by covering it with a cloth, or by placing it on a carpet.
ON SAFETY
- When connecting and disconnecting the AC cord, grip the plug and not the cord itself. Pulling the cord may damage it and create hazard.
- When you are not going to use the unit for a long period of time, disconnect the AC power cord.
ON CONDENSATION
- When left in a heated room where is warm and damp, water droplets or condensation may form inside the CD player.
- When there is condensation inside the unit, the unit may not function normally.
- Let it stand for 1 to 2 hours before turning the power on, or gradually heat the room up and dry the unit before use.
Should any trouble occur, disconnect the AC power cord and refer servicing to qualified personnel.
LOCATION OF CONTROLS

- VOLUME CONTROL
- FUNCTION SWITCH
- CARRYING HANDLE
- CASSETTE PAUSE BUTTON
- CASSETTE STOP/EJECT BUTTON ■ ▲
- CASSETTE F.FWD BUTTON
- CD OPEN BUTTON
- CD DOOR
- CASSETTE REWIND BUTTON ▶
- CASSETTE PLAY BUTTON
- CASSETTE RECORD BUTTON ●
- FM STEREO LED
- DIAL SCALE AND POINTER
- BAND SWITCH
-
CD DISPLAY
-
TUNING CONTROL
- SPEAKERS
- CD PLAY / PAUSE BUTTON ▶
- CD SKIP / SEARCH BUTTON ▶▶
- CD SKIP / SEARCH BUTTON
- CASSETTE DOOR
- CD PROGRAM BUTTON
- CD REPEAT BUTTON
- CD STOP BUTTON ■
- BEAT CUT SWITCH
- PHONES JACK (HEADPHONES)
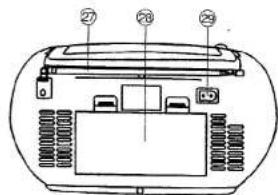
- TELESCOPIC (FM) ANTENNA
- BATTERY COMPARTMENT
- AC SOCKET
POWER SUPPLY
USING HOUSE CURRENT
Before use, check that the setting voltage of your unit matches your local outlet voltage of AC 230V, 50Hz.
CAUTION
To prevent electrical shock, match wide blade of plug to wide slot, fully insert.
USING BATTERIES
Disconnect the AC power cord from the AC inlet of the unit. Battery power is cut automatically by the cord while it is connected.

Battery door

When the volume decrease, or the sound distorts, replace all of the batteries with new ones.
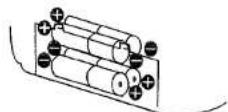
Insert eight UM-2 (size C) batteries.
ADJUSTING THE SOUND
TO ADJUST THE VOLUME

WHEN RECORDING
The VOLUME control may be adjusted with no effect on the recorded signal.
FOR PRIVATE LISTENING
Plug in headphones (ø3.5 mm stereo mini-plug) to the PHONES jack.
When headphones are plugged in, the speakers are automatically disconnected.
-
Set to Tuner
FUNCTION
TUNER

-
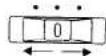
Select a Radio band.
BAND
FM ST. FM AM
-
Tune into a station.
TUNING

FOR BETTER RECEPTION
FM

- Adjust the sound.

AM

NOTE: 1. FM stereo LED indicator lights if receive FM stereo broadcast and the BAND switch set on "FM STEREO".
- When too much noise is heard during FM STEREO reception, set Band switch to FM mono.
AFTER LISTENING
Set the FUNCTION selector to TAPE(POWER OFF).
COMPACT DISC PLAYBACK
- Set to CD
FUNCTION CD

- Open the disc holder by pushing the CD door open button.

-
Insert a disc with the label side facing up.
-
Close the disc holder. The disc will rotate and the total tracks of the disc will show on the display.

- Press the Play/Pause ▶I button. Track number "1" will be shown.
CD Display

TO INTERRUPT PLAYBACK
Press the Play/Pause ▶1 button and the track number flashes.
Press the button again to resume playback. CD Display
CD Display

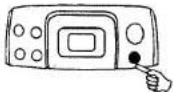
TO STOP PLAYBACK
Press the STOP button and the display shows the total tracks of the disc.
TO SKIP TO THE BEGINNING OF A TRACK
- Press either one of the ◀◀▶◀ skip buttons according to the desired skip direction.
- Playback resumes from the selected track.
- When the ◀ button is pressed once during play, the previous track starts again.
- When the ▶ button is pressed once during play, the next track plays.
SEARCHING FOR A PASSAGE WITHIN A TRACK
- Keep the ◄◀ or ▶▶ button pressed during playback, and release the button as soon as you recognise the desired passage. Then normal CD playback will resume from this point.

REPEAT PLAYBACK
This function allows a single track or all tracks on a disc to be played repeatedly.
TO REPEAT THE SAME TRACK
Press the REPEAT button twice during playback,
the CD display will indicate "REPEAT 1".
"REPEAT 1"

CD display
TO REPEAT THE WHOLE DISC
Press the REPEAT button once until "REPEAT" displays.
"REPEAT"

CD display
TO CANCEL REPEAT PLAYBACK FUNCTION
Press the REPEAT button again until "REPEAT" or "REPEAT 1" disappears from the display.

CD display
PROGRAM PLAYBACK
PROGRAMMED PLAYBACK
Programmed playback enables tracks on a disc to be played in the desired order. Up to 20 tracks can be programmed.
- Press the "PROGRAM" button.
- Press the ▶ or ◀ button to select the desired track number.
- Press "PROGRAM" button again to memorize the track.
- Repeat steps 2 and 3 until all desired tracks are programmed.
- Press the "PLAY/PAUSE" button to start. "PROGRAM" flashes on the CD display.
- Press " STOP " button to stop programmed playback.
- Press "PROGRAM" and "PLAY/PAUSE" buttons to resume programmed playback.
- Open the CD door or turn off the CD player to clear the programmed memory. Note : Programming can only be made when the player is in stop mode.
"PROGRAM"

CD display
TAPE PLAYBACK
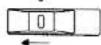
- Set to TAPE
FUNCTION
TAPE
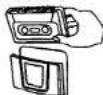
- Insert the cassette.
- Press the ◀ PLAY button.
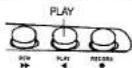
TO STOP PLAYBACK
Press the STOP / EJECT button.
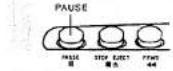
TO INTERRUPT PLAYBACK
Press the PAUSE button.
To resume play, press the PAUSE button again.
TO FAST WIND
Press the REWIND or F.FWD button. Press the STOP/ EJECT button to stop winding at the desired position.
RECORDING
USE ONLY NORMAL ( TYPE I ) TAPE FOR RECORDING.
-
Insert the cassette tape.
-
Press the PAUSE ■ button.


- Press the RECORD ● button.

- Prepare to play the source to be recorded and play it.
Record from CD FUNCTION Record from radio FUNCTION

- Press the PAUSE ■ button.
MAINTENANCE
CLEANING CD
If the CD skips or will not play, the disc may need cleaning. Before playing, wipe the disc from the centre out with a cleaning cloth. After playing, store the disc in its case.

CLEANING THE TAPE HEADS
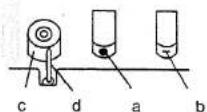
To maintain optimum sound quality, clean the playback/record heads (a), erasure head (b), pinch rollers (c), and capstans (d) regularly (every 10 hours of use). Use a cotton swab lightly moistened with cleaning fluid or denatured alcohol.
TO STOP RECORDING
Press the STOP / EJECT button.
TO INTERRUPT RECORDING
Press the PAUSE button.
To resume recording, press the PAUSE button again.
TO ERASE A RECORDED TAPE
- Set the FUNCTION selector to TAPE.
- Insert a tape with the side you want to erase facing you.
- Press the RECORD button to start erasing.
Note : If whistling noise is heard during recording AM.Slide the beat cut switch (at left side of unit) to the position at which beat noise is reduced.
CLEANING THE CD LENS
If the CD lens is dusty, clean it with a brushblower. Blow several times on the lens and remove the dust with the brush. Finger prints may be removed with a cotton swab moistened with alcohol.

CLEANING THE UNIT
Do not use volatile chemicals on this unit. Clean by lightly wiping with a soft cloth.
IMPORTANT NOTE
If an abnormal display indication or an operating problem occurs, disconnect the AC power cord and remove the batteries. Wait at least 5 seconds, then reconnect the AC power cord or reinstall the batteries.
WARNING
Should the CD door be opened before the reading of the CD completed, a jamming noise may occur. This is resolved by closing the CD door.
PRECAUCIÓN
CAUTION
RISK OF ELECTRIC SHOCK DO NOT OPEN
PRECAUCIÓN

- VOLUMEN
- SELECTOR DE FUNCTIONES
- MANIJA
- CASSETTE PAUSA
- CASSETTE BOTÓN STOP/EJECT ■ ▲
- BOTÓN DE BUSQUEDA
(REBOBINADO) - APERTURA DEL COMPARTIMENTO DE
CD - TAPACD
- BOTON DE BUSQUEDA (AVANCE)
- BOTON PLAY
- BOTÓN DE GRABACION
- INDICATOR FM ESTÉREO
- DÍAL
-
SELECTOR DE BANDAS
-
DISPLAY DEL CD
- CONTROL DE SINTONIA
- ALTAVOCES
- BOTÓN PLAY/PAUSA
- BOTON CD SKIP/SEARCH
20 BOTÓN CD SKIP/SEARCH - COMPARTIMENTO DEL CASSETTE
- BOTÓN PROGRAMACIÓN,CO
- POTÓN PREGRAMOS
- POTÓN PREGAMOS
24 POTÓN STOP CD - BOTON STOP CD ■
- INTERRUPTOR ATENLIADOR DE RUIPO
- TOMA BARA AURICULAR
- TOMATANA ACHNICULAR
- ANTENA TELESCORICA
- ANTENA TELESCOPICA
- TADA DEL COMPARTIM
- TAPA DEL COMPARTIMENTO DE PILAS
- TOMA PARA CABLE DE CORRIENRE
44.1 kHz 4 x over sampling
16 bits linear/c
Lasér semiconductor
790 mm
Sección Radio
- CD Portable Stereo System with Cassette Deck
- IMPORTANT
- OWNER'S MANUAL PD6511
- WARNING
- CLASS 1 LASER PRODUCT
- PRECAUTIONS
- Follow the advice below for safe and appropriate operations.
- ON PLACEMENT
- ON SAFETY
- ON CONDENSATION
- LOCATION OF CONTROLS
- POWER SUPPLY
- USING HOUSE CURRENT
- CAUTION
- USING BATTERIES
- ADJUSTING THE SOUND
- WHEN RECORDING
- FOR PRIVATE LISTENING
- AFTER LISTENING
- COMPACT DISC PLAYBACK
- TO INTERRUPT PLAYBACK
- TO STOP PLAYBACK
- TO SKIP TO THE BEGINNING OF A TRACK
- SEARCHING FOR A PASSAGE WITHIN A TRACK
- REPEAT PLAYBACK
- TO REPEAT THE SAME TRACK
- TO REPEAT THE WHOLE DISC
- TO CANCEL REPEAT PLAYBACK FUNCTION
- PROGRAM PLAYBACK
- PROGRAMMED PLAYBACK
- TAPE PLAYBACK
- TO FAST WIND
- RECORDING
- USE ONLY NORMAL ( TYPE I ) TAPE FOR RECORDING.
- MAINTENANCE
- CLEANING CD
- CLEANING THE TAPE HEADS
- TO STOP RECORDING
- TO INTERRUPT RECORDING
- TO ERASE A RECORDED TAPE
- CLEANING THE CD LENS
- CLEANING THE UNIT
- IMPORTANT NOTE
- PRECAUCIÓN
Brand : Emerson
Model : PD6511
Category : Hi-Fi System