MS9920TT - Audio System Emerson - Free user manual and instructions
Find the device manual for free MS9920TT Emerson in PDF.


| Product Type | Home Audio System with 5-CD Changer and Turntable |
| Brand | Emerson |
| Model | MS9920TT |
| Power Supply | 110V-120V, 60Hz AC |
| CD Changer Capacity | 5 discs (carousel type) |
| Turntable Speeds | 33 and 45 RPM |
| Number of Cassette Decks | Dual (Deck A and Deck B) |
| Tuner Bands | AM and FM |
| Preset Stations | 40 (AM/FM combined) |
| Equalizer Modes | Classic, Pop, Rock, Flat |
| Bass Boost Feature | Yes (B.B.S. button) |
| Headphone Jack | 3.5mm stereo (front panel) |
| Auxiliary Input | RCA jacks (rear panel) |
| Remote Control Included | Yes (requires 2 x AA batteries) |
| FM Antenna Type | Lead wire (rear) |
| Speaker Terminals | Spring clip (left and right) |
| CD Playback Modes | Repeat (One Track, One Disc, All Discs, Program), Intro Scan, Random |
| Cassette Recording Features | ALC (Automatic Level Control), High Speed Dubbing, Continuous Playback |
| Safety Certifications | FCC Class B, Laser Class 1 |
Frequently Asked Questions - MS9920TT Emerson
User questions about MS9920TT Emerson
0 question about this device. Answer the ones you know or ask your own.
Ask a new question about this device
Download the instructions for your Audio System in PDF format for free! Find your manual MS9920TT - Emerson and take your electronic device back in hand. On this page are published all the documents necessary for the use of your device. MS9920TT by Emerson.
USER MANUAL MS9920TT Emerson
HOME AUDIO SYSTEM with 5 CD CHANGER and TURNTABLE
FILE COPY
IMPORTANT
Call toll-free 1-800-210-2281 for exciting information and special discounts on Extended Service Plans.
OWNER'S MANUAL
MS9920TT
MS9920(without Turntable)
Welcome to the world of Emerson sound. The product you have purchased has been carefully engineered and manufactured to give you dependable operation. Read this manual before operating the unit to become more familiar with it and obtain the performance that will bring you continued enjoyment for many years.
WARNING: TO PREVENT FIRE OR SHOCK HAZARD, DO NOT EXPOSE THIS UNIT TO RAIN OR MOISTURE.
For future reference, record the serial number of the unit printed on the rear of the cabinet. Serial Number ____
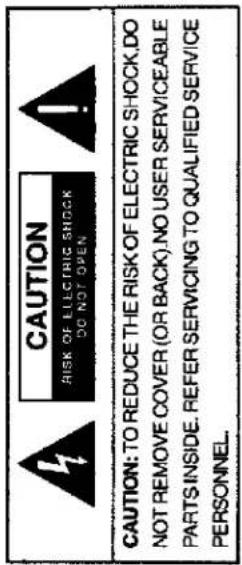

DANGEROUS VOLTAGE
Uninsulated Dangerous Voltage, that may be of sufficient magnitude to constitute a risk of electric shock to persons if present within this product's enclosure.
ATTENTION
The Owner's Manual contains important operating and maintenance instructions. For your safety, it is necessary to refer to the manual.
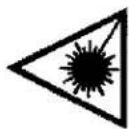
DANGER
Invisible and hazardous laser radiation when open and interlock failed or defeated. Avoid direct exposure to beam.
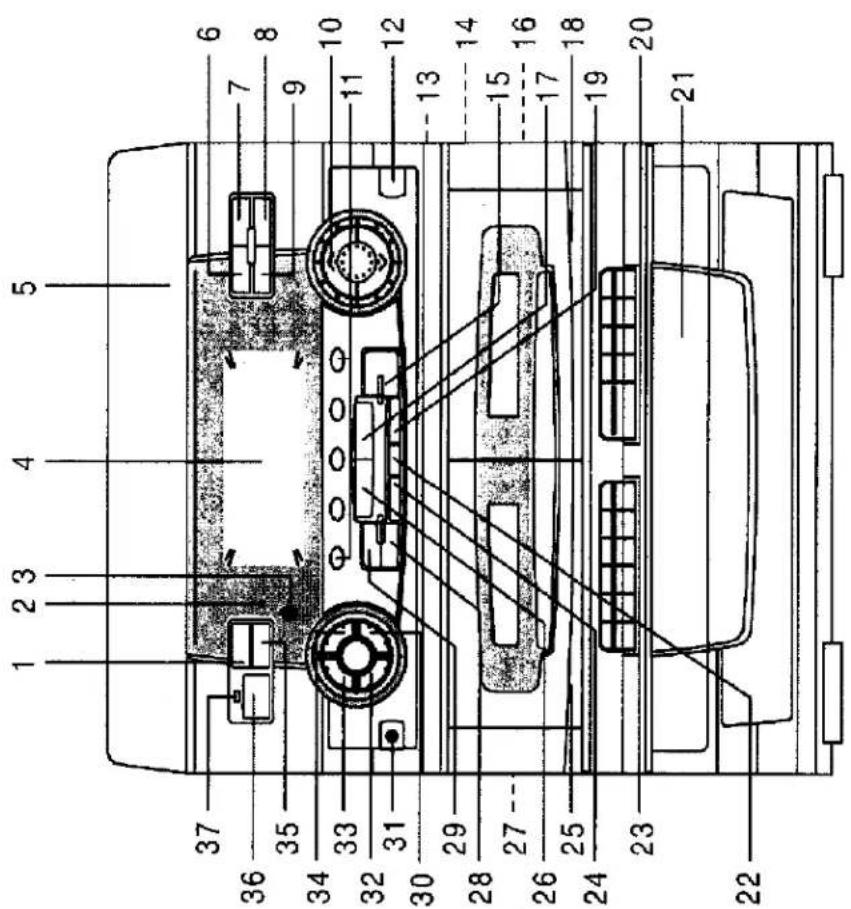
LOCATION OF CONTROLS
IMPORTANT NOTES
Avoid installing the unit in locations described below :
- Operate controls and switches as described in the manual.
- Before turning on the power, make certain that the connecting cords and power cord are properly installed.
- Store your cassette tapes and CDs in a cool area to avoid damage from heat.
- When moving the set, be sure to first disconnect the power cord and remove cords connected to other equipment.
- Places exposed to direct sunlight or close to heat radiating appliances such as electric heaters, on top of other stereo equipment that radiates too much heat, places lacking ventilation or dusty areas, places subject to constant vibration and/or humid or
- moist areas.
- Do not attempt to clean this unit with chemical solvents as this might damage the finish. Use a clean dry cloth.
INFORMATION
This equipment has been tested and found to comply with the limits for a Class B digital device, pursuant to Part 15 of the FCC Rules. These limits are designed to
provide reasonable protection against harmful interference in a residential installation. This equipment generates, uses, and can radiate radio frequency energy and, if not
installed and used in accordance with the instructions, may cause harmful interference to radio communications. However, there is no guarantee that interference will not
occur in a particular installation. If this equipment does cause harmful interference to radio or television reception, which can be determined by turning the equipment
off and on, the user is encouraged to try to correct the interference by one or more of the following measures:
• Reorient or relocate the receiving antenna.
- Increase the separation between the equipment and receiver.
- Connect the equipment into an outlet on a circuit different from that to which the receiver is connected.
- Consult the dealer or an experienced radio/TV technician for help.
This device complies with Part 15 of the FCC Rules. Operation is subject to the following two conditions:
(1) This device may not cause harmful interference, and
(2) This device must accept any interference received, including
interference that may cause undesired operation.
PREPARATION FOR USE
SPEAKER CONNECTION
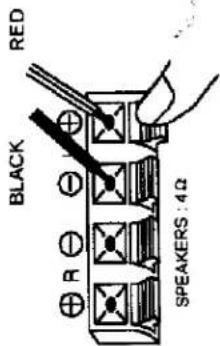
Connect each speaker to the corresponding speaker terminals on the back panel of the main unit. Make sure that the left speaker is connected to the left pair of speaker terminals and the right speaker to the right pair of speaker terminals. Also make sure that the speaker wires are correctly connected: that the red wires are connected to the red terminals and the black wires to the black terminals. Depress the plastic lever to open the terminal, insert the bare end of the speaker wire into the opening and release.
CONNECTING THE AC POWER CORD
After connecting the speakers unwind the AC power cord fully and connect it to any convenient household AC outlet. This system is designed to operate on 110V – 120V, 60Hz AC power only. Connecting this system to any other power supply may cause damage to the unit which is not covered by your warranty.
STEREO HEADPHONE JACK
A stereo headphone jack is provided for private listening. To listen to the unit with headphones (not included) insert the 3.5mm mini-stereo plug from the headphones into the PHONES jack on the front panel. The external speakers are automatically disconnected when headphones are in use.
NOTE:
We recommend that you reduce the volume control to a lower level before putting on the headphones. After putting on the headphones, gradually increase the volume to a comfortable listening level.
| 1. | FM ST.- MONO / HI.-SPEED DUBBING Button. |
| 2. | BBS (Bass Boost) Indicator. |
| 3. | REMOTE SENSOR |
| 4. | MULTI FUNCTION LCD DISPLAY. |
| 5. | TURNTABLE (Model : MS9920TT only) |
| 6. | AUX / PHONO Button |
| 7. | CD / DISC SKIP Button. |
| 8. | TUNER / BAND Button. |
| 9. | TAPE Button. |
| 10. | VOLUME Up ∧ / Down ∨ Button. |
| 11. | CD DISC 1,2,3,4,5 Select Buttons. |
| 12. | OPEN / CLOSE Button. |
| 13. | FM ANTENNA (rear of unit). |
| 14. | SPEAKER Terminals (rear of unit). |
| 15. | PLAY / PAUSE Button. |
| 16. | RESET Button (rear of unit). |
| 17. | TUNING / SKIP / SEARCH ➕️ Button. |
| 18. | Cassette DECK B Compartment. |
| 19. | STOP/MEM. DOWN Button |
| 20. | Cassette DECK B Keys:PLAY / REWIND / F.FWD (Fast Forward) / STOP , EJECT / PAUSE. |
| 21. | 5 CD CHANGER Tray. |
| 22. | MEMORY Button |
| 23. | Cassette DECK A Keys:RECORD /PLAY/ REWIND / F.FWD(Fast Forward)/STOP, EJECT / PAUSE |
| 24. | REPEAT /MEM. UP Button |
| 25. | Cassette DECK A Compartment |
| 26. | TUNING / SKIP / SEARCH ➕◀ Button. |
| 27. | AUX IN Jacks (rear of unit). |
| 28. | INTRO Button. |
| 29. | RANDOM Button. |
| 30. | EQ CLASSIC Button. |
| 31. | PHONES Jack. |
| 32. | EQ ROCK Button. |
| 33. | EQ POP Button. |
| 34. | EQ FLAT Button. |
| 35. | BASS BOOST Button. |
| 36. | POWER Button. |
| 37. | STANDBY Indicator. |
OPERATING INSTRUCTIONS
- Press the "POWER" button to turn the system 'On'.
- Press the "TUNER/BAND" button to select the 'Radio' mode.
- Select the Radio Band (AM/FM) by pressing the "TUNER/BAND" button.
- Press the "TUNING ∧" or "TUNING ∨" buttons to tune to the desired station.
• Adjust the Volume and Equalizer controls as desired.
MANUAL TUNING
- Press the "TUNING ∧" or "TUNING ∨" buttons as many times as required until the frequency of the desired station appears on the display.
AUTOMATIC TUNING
- Hold the "TUNING ∧" or "TUNING ∨" buttons for approximately 2 seconds.
The Tuner will begin scanning up or down automatically and will lock onto the next strong signal.
MEMORIZING PRESET STATIONS
You can store up to 40 of your favorite FM and AM stations randomly. Once a station is preset in the memory, you will have quick and easy access to that station. 1. Press the "TUNER/BAND" button to select the 'Radio' mode. 2. Select the band (AM/FM) by pressing the "TUNER/BAND" button. 3. Select the desired station by pressing the "TUNING ∧" or "TUNING ∨" buttons.
- Press the "MEMORY" button. The memory indicator will flash in the display.
-
Press the "MEM.UP" or "MEM.DOWN" button to select any one of the 40 available preset station memories.
-
Press the "MEMORY" button again to enter the selected radio station into the selected memory location.
-
Repeat the above steps 2-6 to enter all your desired stations into the preset station memories.
PRESET ELECTRONIC EQUALIZER
When the unit is switched 'On' for the first time, the Equalizer will be in the "FLAT" setting (FLAT Indicator 'On'). Press "CLASSIC", "POP", or "ROCK" buttons to change the sound effect to suit your taste. The appropriate EQ Indicator lights to confirm your selection.
BASS BOOST SYSTEM
- The Bass Boost feature intensifies low frequency sound for richer bass reproduction.
- Press the "BASS BOOST" button once to activate Bass Boost. The "B.B.S." indicator will light up.
- To turn 'Off' the "BASS BOOST" system, press the "BASS BOOST" button again. The "B.B.S." indicator will go 'Off'.
NOTE:
Low frequency sound may be distorted if the "BASS BOOST" system is used for music source, in which low frequency sound is already emphasized. In this case, turn the "BASS BOOST" system 'Off'.
NOTES:
Keep the CD disc tray closed when the system is not in use to prevent dirt and dust from entering the CD mechanism.
Never place more than one CD in the same pocket of the CD tray. If two discs are loaded in the same pocket, the CD mechanism may jam and/or the discs themselves may be damaged.
TO BEGIN CD PLAYBACK
After you have loaded up the 5 CDs in the changer:
- Press the "PLAY/PAUSE" button to begin playback. The changer will search for the first available disc in the tray and will begin playback from Track 1 on the first disc. The number of the disc being played flashes on the display. It will continue playing until it has played all of the discs in the tray and then stops automatically.
NOTE: To begin playback from a specific disc, press the "CD/DISC SKIP" button to select the desired disc, and then press the "PLAY/PAUSE" button. Or, press the appropriate disc button (DISC 1, DISC 2, DISC 3, DISC 4, DISC 5.) for the disc you wish to start. Playback will begin on Track 1 of the selected disc. It stops automatically after finished playing all discs.
-
Adjust the "VOLUME" control 'Up' or 'Down' as desired.
-
To temporarily stop playback, press the "PLAY/PAUSE" button again. The "II" indicator appears in the display. The disc continues to spin, but no sound is heard. Press the "PLAY/PAUSE" button once more to cancel pause and resum playback.
-
To stop playback before the end of a disc, press the "STOP" button.
IMPORTANT
If the disc is smudged or scratched it may skip or stop completely. This does not indicate a problem with the player. If this occurs, try playing another disc. If that disc plays properly, you may assume that the first disc is damaged and unplayable.
After you have entered up to 40 stations in the preset memories, you can select any one of the memorized stations quickly and easily by simply pressing the "MEM.UP" or "MEM.DOWN" buttons until the desired memory number and station frequency appear in the display.
ANTENNA INFORMATION
- For best FM reception, the FM lead wire antenna, located on the back of the set, should fully unwound and extended. - The AM bar antenna is inside the cabinet. To improve AM reception, you may have to move or slightly rotate the main unit until you obtain the best reception.
COMPACT DISC PLAYBACK
This system features a carousel type 5-CD CHANGER which can provide you with up to 5 hours of uninterrupted music playback. You may load up to 5 CDs in the changer for continuous playback, or you may program up to 40 tracks among all 5 discs to be played back in the specific order you select.
LOADING THE DISCS
-
Press the "POWER" button to turn the system 'On'.
-
Press the "CD/DISC SKIP" button to select the CD mode.
-
Press the "OPEN/CLOSE" button to open the CD tray. When the tray opens two of the five CD pockets will be accessible to you. Load up to 2 CDs in the pockets making sure that the label side of the discs face up and that the discs are correctly centered in the pockets.
-
Press the "CD/DISC SKIP" button to rotate the CD tray and expose the 3^rd 4^th , and 5^th CD pocket. Insert the rest discs in the open pockets if desired.
-
Press the "OPEN/CLOSE" button to close the CD tray. The CD player will search for the first disc and the display will show the number of tracks and total playing time of that disc.
FORWARD AND BACKWARD SKIP/SEARCH BUTTONS
To skip forward or backward to the beginning of a particular track during playback, press the "▶" or "◀◀" Skip buttons repeatedly until the desired track number appears on the display. Playback will begin on the desired track.
To search for a particular passage on a track during playback, press and hold the "▶◀◀" or "◀◀◀" Search buttons. The player will search rapidly forward or back. Release the button when you reach the desired point on the track and normal speed playback will resume at that point.
REMAINING TIME INDICATION
While the CD is playing, each time you press the "remain" button on the Remote Control, the Display changes as shown below:
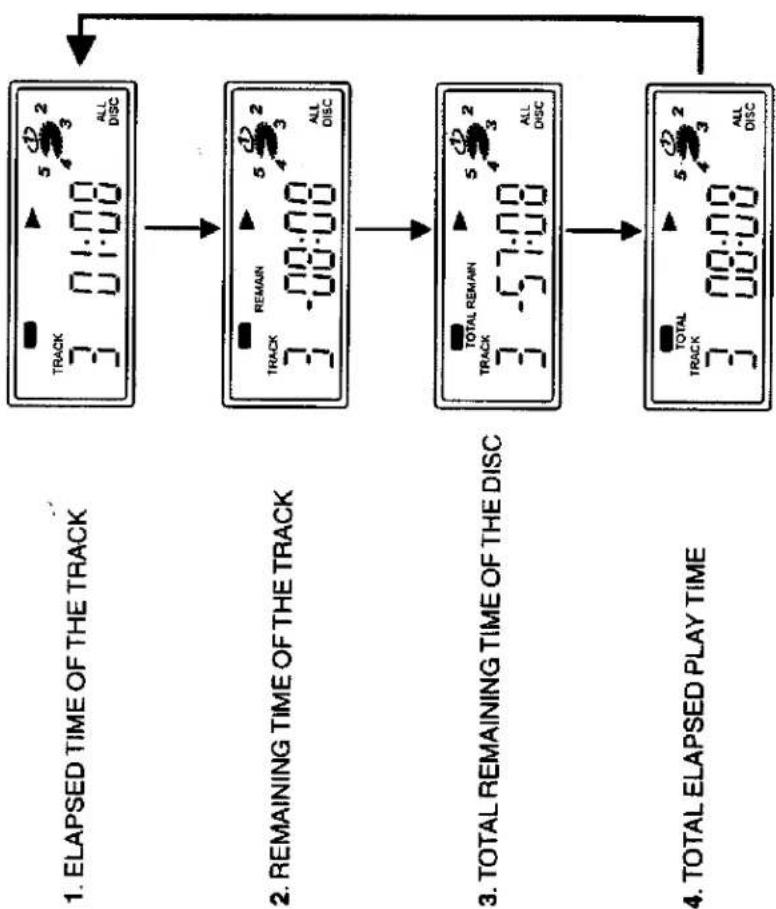
flowchart
graph TD
    A["1. ELAPSED TIME OF THE TRACK"] --> B["2. REMAINING TIME OF THE TRACK"]
    B --> C["3. TOTAL REMAINING TIME OF THE DISC"]
    C --> D["4. TOTAL ELAPSED PLAY TIME"]
PROGRAMMED CD PLAYBACK
You can program the CD changer to play up to a total of 40 tracks on all 5 discs in any desired order.
NOTE: You can not program the CD changer during playback. If a disc is playing press the "STOP" button first and then follow the instructions.
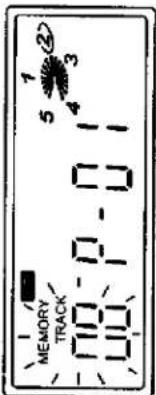
Entering A program
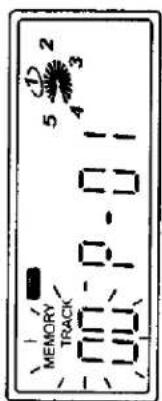
Press the "MEMORY" button once.
The MEMORY and Track Number indicators will flash in the display.
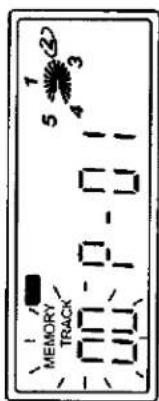
Press the "CD/DISC SKIP" button or one of the five disc buttons to
select the disc which contains the first track you wish to program. Example: Disc 2.
Press the "▶" or "◀◀" Track Skip buttons to select the first track you wish to program. Example: Track 8.
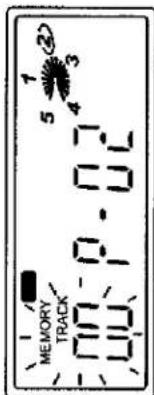
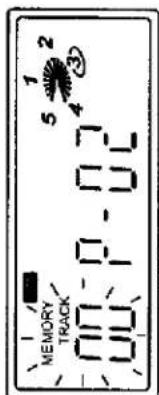
Press the "MEMORY" button again to store the desired disc and track number into memory location Number 1. The display will change from Program Number 01 to Program Number 02.
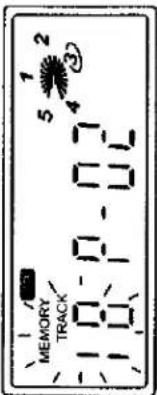
Use the "CD/DISC SKIP" button or one of the five disc buttons to select the disc containing the next track you wish to program. Example: Disc 3. Press the "▶▶" or "◀◀" Track Skip buttons to select the next track you wish to program. Example: Track 18.
Press the "MEMORY" button again to store the desired disc and track into memory location Number 02.
Repeat the above procedure until you have stored up to 40 tracks in the program memory and "FULL" appears in Display.
| 2. | ONE DISC REPEAT |
| Press the "REPEAT" button until the [REPEAT] ONE DISC Indicator appears on the CD display. Press the "CD/DISC SKIP" button to select the disc you wish to play. | |
| Press the 'PLAY/PAUSE' button. The selected disc will begin to play starting with Track 1. When the final track on the disc has been played, it will automatically begin playing again starting with Track 1. | |
| To cancel One Disc Repeat playback, you may press the "REPEAT" button until the [REPEAT] ONE DISC Indicator no longer appears in the Display. | |
| 3. | ALL DISCS REPEAT |
| Press the "REPEAT" button until the [REPEAT] ALL DISC Indicator appears in the Display. | |
| Press the "PLAY/PAUSE" button, the changer will begin playing the first track of the disc which is in the play position. It will continue until it has played all tracks on all discs in the changer. When it has played the last track on the last disc it will begin playing again with the first track on the first disc. This All Discs Repeat will continue indefinitely. | |
| To cancel All Discs Repeat playback, press the "REPEAT" button until the [REPEAT] ALL DISC Indicator no longer appears in the Display. | |
| 4. | REPEAT OFF Press the Repeat Button until the [REPEAT] Indicator disappears and the display shows ALL DISC |
| 5. | PROGRAM REPEAT |
| Load up to 5 CDs in the changer and program up to 40 tracks into the CD Program Memory. Refer to the instructions for "Programmed CD Playback" on Page 11. | |
| Press the "REPEAT" button until the [REPEAT] Indicator appear in the CD Display. |
| After all your desired tracks are programmed you may press the "MEMORY" button to reconfirm that the information has been stored correctly. The display will show you which disc and track number you have entered into program memory Number 1. Each time you push the "MEMORY" button the display will show you which disc number and track number is stored in each successive memory location. |
| PROGRAMMED PLAYBACK |
| After you have stored and confirmed the program information, press the "PLAY/PAUSE" button to begin programmed playback. Playback will start at the first disc and track which you have programmed and will continue until all programmed discs and tracks (up to a total of 40) have been played. |
| NOTE: If you press the "▶▶" or "◀◀" Skip buttons during programmed playback, the player will skip forward or back to the next track and disc which you have programmed, not the next track on the disc which is being played. |
| TO CLEAR THE PROGRAM MEMORY |
| • If the disc is playing, press the "STOP" button to stop the discs. Then press the "STOP" button again to clear the program memory. |
| REPEAT FUNCTION |
| This system has a four-way repeat function which allows you to continuously repeat one track, one disc, all discs, or all of the tracks which you have programmed. |
| 1. ONE TRACK REPEAT |
| • Press the "REPEAT" button until the REPEATONE Indicator appears in the CD Display. |
| • Use the "SKIP" buttons (and the "CD/DISC SKIP" button, if necessary) to select the exact track that you wish to repeat. |
| • Press the "PLAY/PAUSE" button to begin one track repeat. The selected track will begin playing. It will repeat continuously until REPEATONE function is cancelled. |
CASSETTE OPERATION
This Emerson Audio System features a dual cassette mechanism which allows you to play pre-recorded cassette tapes in either Deck A or Deck B. You may also load tapes in both decks for continuous automatic playback of two cassettes. You may make tape recordings directly from the stereo receiver, the CD changer, the Turntable or external source connected to the AUX input jacks, or even from Tape to Tape (Dubbing) at either normal or high speed. The built in ALC (Automatic Level Control) system adjusts the volume for distortion-free recordings. You can change the playback volume control settings during recordings without effecting the volume of the final recording. For best results always use good quality blank tapes for recording. Although blank tapes are available with various recording times we recommend that you do not use tapes longer than C-90 which contain 90 minutes of recording time (45 minutes per side). Longer tapes such as C-120's (60 minutes per side) use thinner material which may eventually stretch and can become tangled in the mechanism. Keep the critical parts of the tape mechanisms clean to insure trouble free operation. Refer to the cleaning instructions in the "CARE AND MAINTENANCE" section of this manual.
CASSETTE PLAYBACK
1.) Press the "POWER" button to turn the system 'On'. 2.) Press the "TAPE" button to select the 'Tape' function. The "Tape" indicator appears in the display. 3.) Press the "STOP/EJECT" button on either Deck A or Deck B to open the cassette door. 4.) Insert the pre-recorded cassette into the slots on the door with the exposed tape facing down and the full reel on the left. Close the cassette door. 5.) Press the "PLAY" button to begin playback of your tape. 6.) Adjust the "VOLUME" and "BASS BOOST" or preset EQ as desired. 7.) Press the "STOP/EJECT" button to stop playback at any time. When the tape ends the Automatic Stop System will release the "PLAY" button and shut off the tape motor. 8.) Press the "STOP/EJECT" button again to open the cassette door and remove your tape.
- Press the "PLAY/PAUSE" button. Playback will begin with the first programmed track and continue until the last programmed track (up to a maximum of 40 tracks). When the last track has been played, playback will begin again with the first programmed track. This sequence will continue indefinitely until Programmed Repeat Playback is cancelled.
- To cancel the Programmed Repeat Playback, press the "STOP" button twice. You may also cancel the Programmed Repeat Playback by pressing the
"REPEAT" button until the Display. REPEAT Indicator no longer appears in the CD
INTRO SCAN
The Intro Scan feature lets you hear a 10 second introduction of each track on a disc. This feature is useful if you are trying to find a particular song but you do not know the title. - Press the "INTRO" button once. The INTRO Indicator appears in the display. The CD player will begin playing Track 1 of the disc in the play position. After 10 seconds it will advance to Track 2, and so on, until it has played the first 10 seconds of every track.
- To cancel Intro Scan and resume normal playback, press the "INTRO" button again. The INTRO Indicator disappears.
RANDOM PLAYBACK
The Random Playback feature is useful when you want to 'mix up the music' instead of playing all the tracks in numerical order. - Press the "RANDOM" button once. The RANDOM Indicator appears in the display.
- Press the "PLAY" button. The changer will randomly select the first disc and track to be played. It will continue randomly selecting discs and tracks until all tracks on all discs have played, and then stop. - To cancel Random Playback, press the "RANDOM" button again. The RANDOM Indicator disappears and normal playback resumes.
NOTE: If you press the "RANDOM" button while a disc is playing, the Random selection will begin at the end of the track being played.
The Turntable will stop automatically when the record finishes. To stop the record before it ends, lift and replace the Tonearm carefully onto the Tonearm Rest. NOTE: Do not turn or stop the turntable manually. Moving or jarring the Turntable without securing the Tonearm clamp could result in damage to the Tonearm.
AUXILIARY INPUT CONNECTION
Sound from other Audio or Video equipment can be reproduced by connecting the audio output of the equipment to the "AUX IN" jacks of this audio system. Connect the left/right Auxiliary output, Line output, or Record output jacks of the external equipment to the left/right "AUX IN" jacks on the back panel of this system. Press the AUX/PHONO function button of the audio system to select Auxiliary input sound.
NOTE:
The "AUX" input signal will automatically mute when the Record Player (Turntable) is operating.
CASSETTE RECORDING
To record from the radio or CD changer:
1.) Press the "POWER" button to turn the system 'On'. 2.) Press the "TUNER" or "CD" button to select the appropriate function. The Tuner or CD indicators will appear in the display. 3.) Press the "STOP/EJECT" button of cassette Deck A to open the door. Insert a blank tape into the slots on the door with the exposed tape facing down and the full reel on the left side. Close the cassette door. 4.) Operate the Tuner or CD changer to select the material you wish to record. (Follow the instructions for "LISTENING TO THE RADIO" or "COMPACT DISC PLAYBACK" if necessary. 5.) When you are ready to begin recording, depress the "RECORD" button on Deck A. (The "PLAY" button will also go down.) The music from the radio or CD will be recorded directly on to the tape.
- Use the "PAUSE" button to stop the tape momentarily to avoid recording unwanted material such as radio commercials. - You can adjust the "VOLUME" and "BASS BOOST" and preset EQ controls during the recording. These controls have no effect on the material being recorded on the tape.
Press either "F.FWD" or "REWIND" button at any time to move the tape rapidly forward or back to any specific point. When you reach the desired point press the "PLAY" button again to resume normal playback at that point. Note: The Automatic Stop System does not function in the Fast Forward or Rewind modes. If you fast forward or rewind to the end or beginning of the tape, the "F.FWD" or "REWIND" buttons will remain engaged and the tape motor continues to run. Be sure to press the "STOP/EJECT" button to cancel Fast Forward or Rewind and shut off the tape motor.
PAUSE BUTTON
Press the "PAUSE" button to momentarily stop the tape movement in Playback or Recording modes. The tape movement stops but the tape motor continues to run. Press the "PAUSE" button again to cancel Pause and resume normal playback. Note: The "PAUSE" button has no effect in the Fast Forward or Rewind modes.
CONTINUOUS PLAYBACK OF TWO CASSETTES
1.) Insert pre-recorded cassettes in both decks with the tape you wish to hear first in Deck B. 2.) Press "PLAY" button of Deck B, then press the "PLAY" button and "PAUSE" buttons of Deck A. 3.) The tape in Deck B will start playing. When the tape in Deck B ends, the "PAUSE" button of Deck A releases automatically and the tape in Deck A begins to play. 4.) When the tape in Deck A ends both mechanisms stop. To play the other sides, turn both tapes over and repeat Steps 1 and 2 above.
PLAYING PHONO RECORDS (MODEL: MS9920TT only)
- Raise the turntable dust cover. - Release the Tonearm Clamp, and remove the stylus protector. - Press the AUX / PHONO button to select the Phono mode. 1. Place a record on the turntable, over the central spindle. 2. Place the 45rpm adaptor over the central spindle when playing 45r records. Set the Speed Selector Switch to 33 or 45 rpm according to the record you are playing. 3. Move the tonearm to the beginning of the record, or to the s of a particular track. Gently lower the Tonearm onto the record start playing. Adjust the Volume, Bass Boost, and Equalizer sett as desired.
ABOUT CASSETTE TAPES
Whenever you record on a cassette any previously recorded material is erased as the new material is recorded. To prevent you from accidentally erasing material which you wish to save, blank cassettes are equipped with erase prevention tabs for each side of the tape. If the erase prevention tab for side A is removed, you cannot accidentally record on side A. The record key cannot be depressed if the erase prevention tab on the cassette has been removed. To prevent accidental erasing on side A of a cassette use a small screw driver or similar tool to break off the erase prevention tab for side A. This prevents the record key from locking.
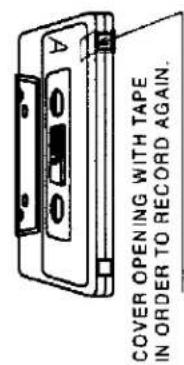
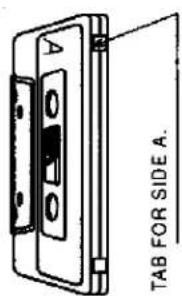
If later you do wish to record on side A of the cassette, cover the tab opening with a piece of cellophane tape. This will allow the record key to function again.
6.) When you have finished recording, press the "STOP/EJECT" button to stop the tape. Press again to open the door and remove the tape. When the tape ends, the "PLAY" and "RECORD" buttons are released automatically and the tape motor stops.
7.) To record on the other side of the tape, turn the cassette over so that the full reel is again on the left side, and press the "RECORD" button again.
To record from the Turntable: Press the Function Selector to the "AUX/PHONO" mode. Select the part of the record for recording Press the Record Key on Tape Deck A to start recording. Press the "STOP/EJECT" Key and place the Tonearm on the rest when finished.
IMPORTANT NOTES: Never try to force the RECORD button. If it will not stay down, this means that one of the erase prevention tabs on the cassette is missing. Refer to "ABOUT CASSETTE TAPES" on Page 19.
TAPE TO TAPE RECORDING (DUBBING) To copy a previously recorded tape:
1.) Press "POWER" button to turn system 'On'. 2.) Press "TAPE" button. The TAPE Indicator appears in the display. 3.) Press the "STOP/EJECT" button on both Decks to open the doors. Insert the pre-recorded tape in Deck B and the blank tape in Deck A with exposed tape facing down and full reels on the left. Close the cassette doors. 4.) Press the "PAUSE" button and the "RECORD" button on Deck A. Then press the "PLAY" button on Deck B. The Deck A "PAUSE" button will release automatically and both tapes will start simultaneously. All the material on the pre-recorded tape in Deck B will be copied onto the blank tape in Deck A. RECORDING HINT: Try to use a blank tape that is the same length or just slightly longer than your pre-recorded tape. This will enable you to fit all the material on the copy without excessive 'blank space'.
HIGH SPEED DUBBING
When copying from tape to tape, you can reduce the recording time by pressing the "HIGH SPEED DUBBING" button to the 'On' position (ON OFF). Both tapes will move at approximately 2 times the normal speed to cut the recording time in half. NOTE: Turn volume down to avoid unpleasant high speed sound.
To reduce the likelihood of these problems occurring, the following precautions should be observed:
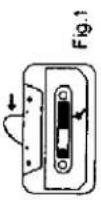
- Check that there are no loose layers of tape visible through the cassette centre window (see Fig. 1). Take up any loose layers, using a pencil or hexagonal barrelled ballpoint pen, before inserting the cassette into the machine (see Fig. 2).
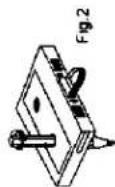
- If the cassette feels "tight" while performing operation shown
in Fig. 2, the tape may be jamming due to "ridges" formed
In the winding of the tape (visible through the centre window).
These may be removed, in most cases, by fast winding of the cassette from one and to the other and back.
cassette from one end to the other and back.
• Use only well-known brands of tape.
- Avoid use of C-120 cassettes.
Furthermore, do not expose cassettes to direct sunlight, dust or oil, and do not touch the tape surfaces.
HEAD CLEANING
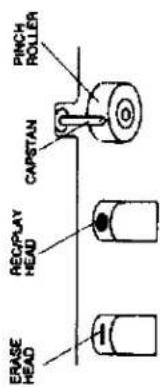
The tape heads, pinch roller and capstan require periodic cleaning. This removes particles of the metal oxide coating that wear off the tape and accumulate on these parts and impair performance. Switch off the power, press the STOP/EJECT Key to open the cassette door, and press the PLAY Key. Clean the tape heads, pinch roller and capstan with a soft cloth or cotton bud dampened in isopropyl alcohol or special tape head cleaner.
COMPACT DISCCARE
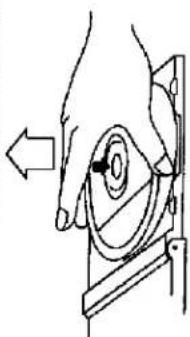
- To remove a disc from its storage case, press down on the centre of the case and lift the disc out, holding it carefully by the edges.
natural_image
Hand operating a mechanical device with an upward arrow indicating motion (no text or symbols present)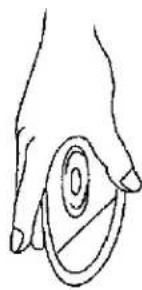
natural_image
Hand holding a circular object with concentric rings (no text or symbols)- Fingerprints and dust should be carefully wiped off the disc's recorded surface with a soft cloth. Unlike conventional records, compact discs have no grooves to collect dust and microscopic debris, so gently wiping with a soft cloth should remove most particles. Wipe in a straight line from the inside to the outside of the disc. Small dust particles and light stains will have absolutely no effect on reproduction quality.
- Never write on or affix labels to the surface of compact discs.
REMOTE CONTROL
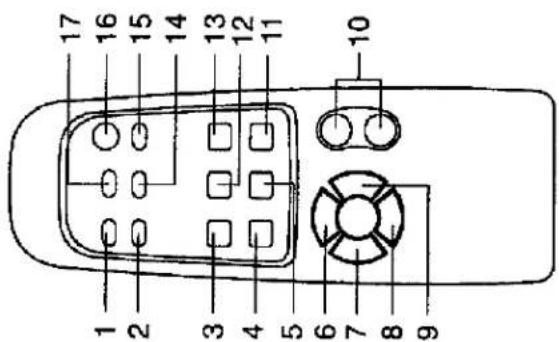
- TAPE Button.
- TUNER / BAND Button.
- MEMORY Button.
- REPEAT / MEMORY UP Button.
- INTRO Button.
- STOP ■ / MEMORY DOWN Button.
- TUNING / CD ◀◀ Button.
- PLAY / PAUSE ▶■ Button.
- TUNING / CD ▶▶ Button.
- VOLUME UP / DOWN Button.
- REMAIN Button.
- OPEN / CLOSE Button.
- RANDOM Button
- CD / DISC SKIP Button.
- MUTE Button.
- POWER Button.
- AUX / PHONO Button.
LOADING THE BATTERIES INTO THE REMOTE CONTROL
- Open the battery compartment cover. - Insert two "AA" (UM3) batteries (not included) as indicated inside the battery compartment. - Close the cover.
CARE AND MAINTENANCE
CASSETTECARE
Two common causes of trouble experienced when using cassettes are:—(a) Tape jamming — Leading to uneven speed in playback, and (b) Tape tangling — Where the tape wraps itself around vital parts of the mechanism.
CARE OF THE CABINETS
- If the cabinets become dusty wipe them with a soft dry dust cloth. Do not use any wax or polish sprays on the cabinets.
- If the front panel becomes dirty or smudged with fingerprints it may be cleaned with a soft cloth slightly dampened with a mild soap and water solution. Never use abrasive cloths or polishes as these will mar the finish of your unit. Caution: Never allow any water or other liquids to get inside the unit while cleaning.
RESET BUTTON
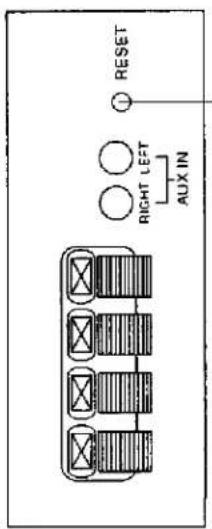
If the unit does not respond to commands from the remote control or from the front panel controls, the internal processor may be "locked" and must be reset. Use a paper clip or similar object to press the "RESET" button which is located inside a pin-hole behind the back panel.
BACK PANEL
Depress the "RESET" button for a few seconds to clear the memory and restore normal operation. Notes: 1) The system must be connected to an AC outlet in order to reset the
internal processor. 2) After clearing the memory you must re-enter all of your favorite stations in the Tuner Preset Memories.
EMERSON RADIO CORP.
LIMITED WARRANTY
What does this warranty cover? Any manufacturing defects in original material, including original parts and workmanship, under normal use and conditions. For how long? For a period of ninety (90) days from the date of original purchase in the U.S.
What will we do? If you need service under this Warranty, and you provide us with the dated proof of purchase, we will provide repair service at no charge for labor and parts at an authorized Depot Repair Facility, or replace the product in our discretion.
How do you make your warranty claim? If it becomes necessary to repair your unit, you can obtain the name and mailing location of a Depot Repair Facility by dialing 1-800-695-0098. You should pack your unit in a well-padded heavy corrugated box, enclose your check or money order payable to the Depot Repair Facility in the amount of \$9.00 to cover the return shipping and handling costs, and enclose a copy of your proof of purchase (warranty service will not be provided without a dated proof of purchase). Finally, you should ship the unit prepaid via UPS or parcel post (insured).
What does your warranty not cover? Your warranty does not cover the
Damage from negligence, misuse, abuse, accident, or failure to follow operating instructions.
Use of product in a commercial application of Rentars. Changes or repairs by anyone other than an authorized Depot Repair Facility. Damage because your unit is improperly connected to the equipment of other manufacturers. Unit on which the serial number has been defaced, modified or removed.
Damage to equipment not properly connected to the product. Cost incurred in shipping your unit to and from an authorized Depot Repair Facility. Ordinary adjustments which you can perform as outlined in the owner's manual. Signal reception problems caused by external antenna or cable systems. Products purchased, used, serviced, or damaged outside of the United States. Damage to compact discs or cassettes.
What other limitations apply to your warranty?
THIS WARRANTY IS NON-TRANSFERABLE AND APPLIES ONLY TO THE ORIGINAL PURCHASER AND DOES NOT EXTEND TO SUBSEQUENT OWNERS OF THE PRODUCT. THIS WARRANTY IS VALID ONLY IN THE UNITED STATES OF AMERICA. ANY APPLICABLE IMPLIED WARRANTIES, INCLUDING THE WARRANTY OF MERCHANTABILITY, ARE LIMITED IN DURATION TO A PERIOD OF THE EXPRESSED WARRANTY AS PROVIDED ABOVE BEGINNING WITH THE DATE OF ORIGINAL PURCHASE AT RETAIL AND NO WARRANTIES, WHETHER EXPRESSED OR IMPLIED, SHALL APPLY TO THE PRODUCT THEREAFTER. WE MAKE NO WARRANTY AS TO THE FITNESS OF THE PRODUCT FOR ANY PARTICULAR PURPOSE OR USE.
THE EXTENT OF OUR LIABILITY UNDER THIS LIMITED WARRANTY IS THE REPAIR OR REPLACEMENT PROVIDED ABOVE AND IN NO EVENT WILL OUR LIABILITY EXCEED THE PURCHASE PRICE PAID BY THE PURCHASER OF THE PRODUCT. UNDER NO CIRCUMSTANCES WILL WE BE LIABLE FOR ANY LOSS, DIRECT, INDIRECT, INCIDENTAL, SPECIAL, OR CONSEQUENTIAL DAMAGE ARISING OUT OF OR IN CONNECTION WITH THE USE OF THIS PRODUCT.
How does state law apply to your warranty?
THIS WARRANTY GIVES YOU SPECIFIC LEGAL RIGHTS, BUT YOU MAY ALSO HAVE OTHER RIGHTS WHICH VARY FROM STATE TO STATE. SOME STATES DO NOT ALLOW LIMITATIONS ON IMPLIED WARRANTIES OR EXCLUSION OR LIMITATION OF INCIDENTAL OR CONSEQUENTIAL DAMAGE, SO THESE RESTRICTIONS MAY NOT APPLY TO YOU.
AU898F
EMERSON RADIO CORP.
EMERSON
PART NO.: 16-2750
904-01
800.898.9020
PRINTED IN CHINA
- HOME AUDIO SYSTEM with 5 CD CHANGER and TURNTABLE
- IMPORTANT
- LOCATION OF CONTROLS
- IMPORTANT NOTES
- Avoid installing the unit in locations described below :
- INFORMATION
- • Reorient or relocate the receiving antenna.
- PREPARATION FOR USE
- SPEAKER CONNECTION
- CONNECTING THE AC POWER CORD
- STEREO HEADPHONE JACK
- NOTE:
- OPERATING INSTRUCTIONS
- MANUAL TUNING
- AUTOMATIC TUNING
- MEMORIZING PRESET STATIONS
- PRESET ELECTRONIC EQUALIZER
- BASS BOOST SYSTEM
- FORWARD AND BACKWARD SKIP/SEARCH BUTTONS
- REMAINING TIME INDICATION
- PROGRAMMED CD PLAYBACK
- Entering A program
- CASSETTE OPERATION
- CASSETTE PLAYBACK
- INTRO SCAN
- RANDOM PLAYBACK
- AUXILIARY INPUT CONNECTION
- CASSETTE RECORDING
- To record from the radio or CD changer:
- PAUSE BUTTON
- CONTINUOUS PLAYBACK OF TWO CASSETTES
- PLAYING PHONO RECORDS (MODEL: MS9920TT only)
- ABOUT CASSETTE TAPES
- HIGH SPEED DUBBING
- COMPACT DISCCARE
- REMOTE CONTROL
- LOADING THE BATTERIES INTO THE REMOTE CONTROL
- CARE AND MAINTENANCE
- CASSETTECARE
- CARE OF THE CABINETS
- RESET BUTTON
- BACK PANEL
- EMERSON RADIO CORP.
- LIMITED WARRANTY
- What does your warranty not cover? Your warranty does not cover the
- What other limitations apply to your warranty?
- How does state law apply to your warranty?
- AU898F
Brand : Emerson
Model : MS9920TT
Category : Audio System