
DC150 - Camera Cobra Digital - Free user manual and instructions
Find the device manual for free DC150 Cobra Digital in PDF.


| Product Type | Digital Camera |
| Brand | Cobra Digital |
| Model | DC150 |
| Sensor Type | CMOS |
| Resolution | 12 Megapixels |
| Optical Zoom | 3x |
| Display | 2.4-inch LCD |
| Storage | SD Card (up to 32GB) |
| Power Source | 2 AA Batteries (not included) |
| Dimensions (approx.) | 90 x 60 x 25 mm |
| Weight (approx.) | 150 g (without batteries) |
| Main Functions | Photo capture, Video recording, Playback, Self-timer, Digital zoom |
| Maintenance | Clean lens with soft, dry cloth; avoid moisture |
| Safety | Do not disassemble; keep away from water and small children |
| Spare Parts / Repairability | AA batteries, SD card, USB cable (sold separately); contact Cobra Digital for service |
| General Information | User manual available for download at notice-facile.com |
Frequently Asked Questions - DC150 Cobra Digital
User questions about DC150 Cobra Digital
0 question about this device. Answer the ones you know or ask your own.
Ask a new question about this device
Download the instructions for your Camera in PDF format for free! Find your manual DC150 - Cobra Digital and take your electronic device back in hand. On this page are published all the documents necessary for the use of your device. DC150 by Cobra Digital.
USER MANUAL DC150 Cobra Digital
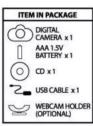
1.3 Mega Pixel (interpolated)


IMPORTANT: This product will not work properly or provide the results you expect unless you take a few moments to read and understand our operating instructions.
| SPECIFICATIONS | |
| 3 in 1 Digital Camera: | Digital Still CameraVideo CapturingConferencing (Web cam) |
| Image Sensor: | CMOS Sensor |
| Resolution: | VGA 640x480 PixelsQVGA 320x240 Pixels |
| Color: | 24 bits |
| Lens: | Fixed Focus=6.2mm F/2.5 |
| Capture Range: | 0.5m~Infinity |
| Memory: | Built-in 8MB SDRAM |
| Capacity: | 60-105 pictures (Compressed VGA)25 pictures (VGA 640x480)240-410 pictures (compressed QVGA)102 pictures (QVGA 320X240) |
| POWER: | 1 AAA Alkaline battery |
| Computer Interface: | USB |
IMPORTANT NOTES:
-
When the battery power is insufficient, the LCD display will keep blinking. Please download all photos from the camera onto your computer immediately as the photos will be lost when battery is low or removed.
-
If you do not use the camera for a long time, please take out the battery.
-
Please follow local regulations when disposing of used batteries.
-
For safety reason, the battery chamber is secured with a screw. Please use a screwdriver to open and close the battery door when changing the battery.
-
When the camera is connected to a computer via the USB cable, it will draw its power from the computer, and not from the battery.
- Before using the PC - Cam function, please download all photos in the camera onto your computer to avoid losing any photos.
SYSTEM REQUIREMENTS
OS: Microsoft win 98SE / 2000 / ME / XP / Mac V9.x / 10.X*
Hard Disk Space : 200MB or above
Memory :32 MB RAM or above
USB interface and CD-ROM
Color Monitor (at least 800x600 24 bits or above)
*Driver can be found from the CD or downloaded at
http://www.kids-camera.com/support.htm
For Windows98, Microsoft® DirectX 8.0 or a higher version is required to be installed before driver installation. If there is no DirectX 8.0 in your PC, please install it first. The DirectX 9.0 is included in the CD supplied under the " DirectX "folder, you can run the dxetup.exe to install it.
GET STARTED!
- Load battery to the correct polarity marked on the battery door.
- Turn the camera on by pressing MODE button.

AT THE BACK OF THE CAMERA
SELECT CAMERA FUNCTIONS
Press the Mode button to cycle through these functions on the LCD display:


* For best results in rooms with fluorescent lighting, use the 60Hz setting in the U.S., Canada, Mexico, and West of Japan; and 50Hz in Europe, Australia, Africa, China, and East of Japan.
TAKE PICTURES
- Press "Mode" button to turn on the camera. The camera is set to take high resolution pictures. The number of images that have been taken will also be shown on the LCD screen.
- Frame your subject by using the camera viewfinder.
- Hold camera steady.
- Press the "Shutter" button. A beeping sound will tell you a picture has been taken, and the number on the LCD screen will go up by one.
- When you choose the "CS" mode, you will take three pictures successively.
Note:
When there is low light, the Auto Exposure and Gain Control need more time to adjust. Hold the camera steady while you wait for the beeping sound. If there is not enough light to take a picture, you will hear a double beep, and no picture will be taken.
WARNING
The Digital Camera stores high voltage electricity inside; never attempt to open or dismantle the Digital Camera to avoid electric shock. Do not dispose the batteries in fire.
CAUTION
Never leave the Digital Camera in a damp or dusty place. Remove all the batteries when storing the Digital Camera. Keep any packing bags away from children. Packing bags cause choking hazard for children when placed over mouth or nose. WARNING: CHOKING HAZARD-Small parts. Not for children under 3 years.
FCC WARNING: This equipment has been tested and found to comply with the limits for a Class B digital device, pursuant to part 15 of the FCC Rules. Only the cable supplied with the camera should be used. Operation with other cables is likely to result in interference to radio and TV reception and could void the user's authorization to operate this equipment. These limits are designed to provide reasonable protection against harmful interference in a residential installation. This equipment
ent generates, uses and can radiate radio frequency energy and, if not installed and used in accordance with the instructions, may cause harmful interference to radio communications. However, there is no guarantee that interference will not occur in particular installation. If this equipment does cause harmful interference to radio or television reception, which can be determined by turning the equipment off and on, the user is encouraged to try to correct the interference of the equipment. The following measures: Reorient or relocate the receiving antenna, increase the separation between the equipment and receivers. Connect the equipment into an outlet on a circuit different from that to which the receiver is connected. Consult the dealer or an experienced radio/TV technician for help.
Jelly Digital
SOFTWARE INSTALLATION
Attention :
Make sure to install all the necessary software in your computer before you connect the camera to your computer.
- Kindly close all opened software applications on your computer before installing the software.
- Insert the CD-ROM into the computer CD-ROM drive.
- The CD user interface screen will automatically launch.
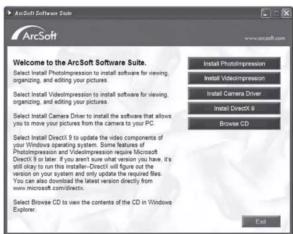
- Click on the install Digital Camera Driver icon to install camera driver first, After finished, click "Yes" to restart the computer.
- If you want to install the application software of Acrosoft Photo Impression 5 included in the CD, click on the Photoimpression and or Videoimpressionicon to install it.
Download Pictures
- Connect the camera to the computer with the USB cable. The computer will automatically update new information to confirm the connection

flowchart
graph TD
    A["MyDSC2"] --> B["MyDSC2 播径 2 KB"]
    A --> C["PC Cam 播径 1 KB"]
    B --> D["Download Picture"]
    C --> E["PC Camera"]
- Open the folder "My DSC2" on desktop and then double click "My DSC2" icon. The download interface will appear on the screen.


- Click the download button; the pictures thumbnail versions of the pictures you've taken will be displayed consecutively.

- Click any thumbnail to select one photo to download, or click the "Select All" button to download all photos. Click on a thumbnail with the right button of the mouse to zoom in and inspect before downloading.
- Selected pictures will have a red frame. Click the "Save Photo" button, specify where you want to save the picture, and name the photo to save.
- After saving your pictures, clear the memory of the camera.
- To delete all photos, press the "Mode" button to the "trash" icon then press the shutter button twice to confirm that 026 you are deleting.
- For a larger 1.3M pixel picture, click the "Edit Image" button, select "Pixel Up" and then restart My DSC2. Repeat procedures 3, 4 and 5 for larger pictures.

Capture Video
- Double-click the PC Cam icon. You will open a PC-camera frame.
- If no image appears, click "Preview" in the "Options" menu to activate the driver.
- To select the resolution, click "Video Capture Pin" in the "Options" menu to activate the driver. The default resolution is QVGA (320 x 240).
Have Fun
With Photo Impression 5 software, you can organize, edit and share your photos easily. Adjust the photo size, change the brightness, balance the color, remove "red eye", edit text, add a frame, and create your own calendar!

Brand : Cobra Digital
Model : DC150
Category : Camera