
TOF600SS - Oven Cookology - Free user manual and instructions
Find the device manual for free TOF600SS Cookology in PDF.


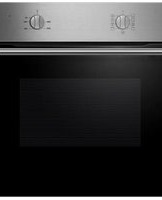
| Product Type | Built-in Electric Oven |
| Brand | Cookology |
| Model | TOF600SS |
| Installation Type | Built-in |
| Power Source | Electric |
| Rated Voltage | 220-240 V~ |
| Rated Frequency | 50-60 Hz |
| Rated Power | 1.9 kW |
| Energy Efficiency Class | A |
| Usable Volume | 72 L |
| Number of Cavities | 1 |
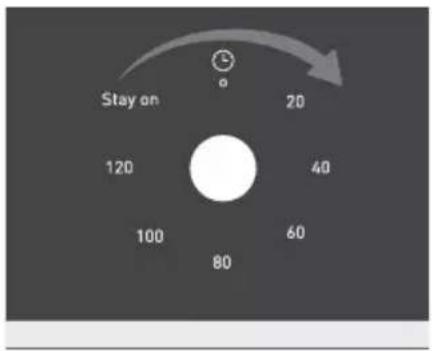
| Temperature Range | 50 °C – 250 °C |
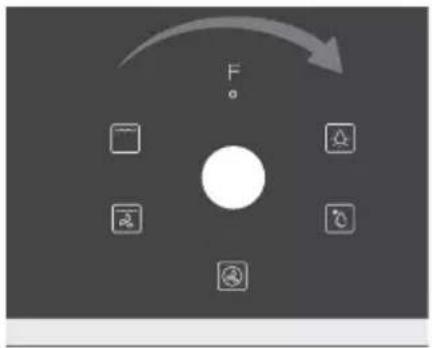
| Heating Modes | Lamp, Defrost, Grill, Grill+Fan, Convection |
| Control Type | Knobs (mode, temperature, timer) |
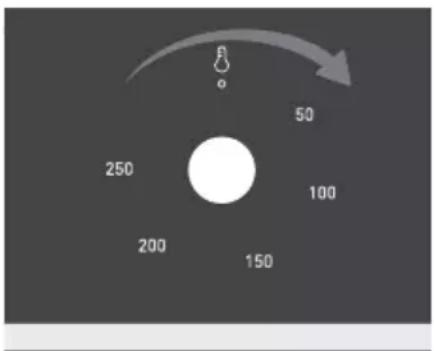
| Timer | Up to 2 hours, with automatic shut-off and bell signal. Also continuous operation (Stay On). |
| Interior Light | Yes, halogen lamp 25 W, 230 V |
| Door Type | Drop-down, removable for cleaning |
| Number of Shelf Positions | 5 |
| Accessories Included | Wire rack, baking tray |
| Safety Features | Child safety (children >8 only with supervision), automatic shut-off after 9h, cooling fan |
| Cleaning & Maintenance | Manual cleaning; door panels removable; avoid harsh abrasives; steam cleaners prohibited |
| Lamp Replacement | Halogen lamp, 25W, 230V, accessible from inside cavity |
| Dimensions (Approx.) | 595 x 595 x 550 mm (WxHxD) – standard built-in |
Frequently Asked Questions - TOF600SS Cookology
User questions about TOF600SS Cookology
0 question about this device. Answer the ones you know or ask your own.
Ask a new question about this device
Download the instructions for your Oven in PDF format for free! Find your manual TOF600SS - Cookology and take your electronic device back in hand. On this page are published all the documents necessary for the use of your device. TOF600SS by Cookology.
USER MANUAL TOF600SS Cookology
Built-in Electric Oven
User Manual
TOF600SS
CONTENTS
3 SAFETY INFORMATION
3 Intended use
3 Warning
4 Causes of Damage
6 INSTALLATION
7 KNOW YOUR APPLIANCE
7 Control Panel
7 Operating Modes
10 Accessories
12 OPERATE YOUR APPLIANCE
12 First use
13 Selecting Modes
16 ENERGY EFFICIENT USE
16 ENVIRONMENT
17 HEALTH
17 MAINTENANCE YOUR APPLIANCE
Cleaning Agent
Appliance Door
23 CURE YOUR APPLIANCE WHEN NEEDED
26 CUSTOMER SERVICE
27 TIPS AND TRICKS
29 ENERGY EFFICIENCY ACCORDING TO EN 60350-1
29 DATASHEET (EU 65/2014 & EU 66/2014)
SAFETY INFORMATION
Intended Use
Thank you for buying Midea Built-in Oven. Before unpacking it, please read these instructions carefully. Only then will you be able to operate your appliance safely and correctly.
We strongly recommend keeping the instruction manual and installation instructions for future reference or for subsequent owners.
This appliance is intended to be installed only in a kitchen. Follow the specific installation instructions.
After unpacking, check the appliance for any damage. Do not connect the appliance if it is damaged. Only a licensed professional may connect appliances without plugs. Damage caused by incorrect connection is not covered by the warranty.
Use this appliance only indoors. It must be used solely for preparing food and drinks. The appliance must be supervised during operation.
This appliance can be used by children aged 8 and above, and by persons with reduced physical, sensory, or mental capabilities, or with a lack of experience or knowledge, provided they are supervised or have been instructed on safe use by a person responsible for their safety and understand the associated risks.
Children must not play with, on, or around the appliance. Children must not clean or perform general maintenance on the appliance unless they are at least 8 years old and are supervised.
Keep children under 8 years old at a safe distance from the appliance and the power cable.
Always insert accessories into the cavity the correct way around.
WARNING
Risk of electric shock!
- Incorrect repairs are dangerous. Repairs may only be carried out and damaged power cables replaced by our trained after-sales technicians. If the appliance is defective, unplug it from the mains or switch off the circuit breaker in the fuse box. Contact after-sales service.
- The insulation on electrical appliance cables may melt if they come into contact with hot parts of the appliance. Never let electrical appliance cables touch hot parts of the appliance.
- Do not use high-pressure cleaners or steam cleaners, as they can cause electric shock.
- A defective appliance can cause electric shock. Never switch on a defective appliance. Unplug it from the mains or switch off the circuit breaker in the fuse box. Contact after-sales service.
Risk of burns!
- The appliance becomes very hot. Never touch the interior surfaces of the appliance or the heating elements.
- Always allow the appliance to cool down.
- Keep children at a safe distance.
- Accessories and ovenware become very hot. Always use oven gloves to remove accessories or ovenware from the cavity.
- Alcoholic vapors may catch fire in the hot cooking compartment. Never prepare food containing large quantities of drinks with high alcohol content. Only use small quantities of drinks with high alcohol content. Open the appliance door with care.
Risk of scalding!
- The accessible parts become hot during operation. Never touch the hot parts. Keep children at a safe distance.
- When you open the appliance door, hot steam can escape. Steam may not be visible, depending on its temperature. When opening, do not stand too close to the appliance. Open the appliance door carefully. Keep children away.
- Water in a hot cavity may create hot steam. Never pour water into the hot cavity.
Risk of injury!
- Scratched glass in the appliance door may develop into a crack. Do not use a glass scraper, sharp or abrasive cleaning aids or detergents.
- The hinges on the appliance door move when opening and closing the door, and you may be trapped. Keep your hands away from the hinges.
Risk of fire!
- Combustible items stored in the cavity may catch fire. Never store combustible items in the cavity. Never open the appliance door if there is smoke inside. Switch off the appliance and unplug it from the mains or switch off the circuit breaker in the fuse box.
- A draught is created when the appliance door is opened. Greaseproof paper may come into contact with the heating element and catch fire. Do not place greaseproof paper loosely over accessories during preheating. Always weight down the greaseproof paper with a dish or a baking tin. Only cover the surface required with greaseproof paper. Greaseproof paper must not protrude over the accessories.
Hazard due to magnetism!
Permanent magnets are used in the control panel or in the control elements. They may affect electronic implants, e.g. heart pacemakers or insulin pumps. Wearers of electronic implants must stay at least 10 cm away from the control panel.
Causes of Damage
- Accessories, foil, greaseproof paper or ovenware on the cavity floor: do not place accessories on the cavity floor. Do not cover the cavity floor with any sort of foil or greaseproof paper. Do not place ovenware on the cavity floor if a temperature of over 50 °C has been set. This will cause heat to accumulate. The enamel will be damaged.
- Aluminum foil: Aluminum foil in the cavity must not come into contact with the door glass. This could cause permanent discoloration of the door glass.
- Silicone pans: Do not use any silicone pans, or any mats, covers or accessories that contain silicone. The oven sensor may be damaged.
- Water in a hot cooking compartment: do not pour water into the cavity when it is hot. This will cause steam. The temperature change can cause damage to the enamel.
- Moisture in the cavity: Over an extended period of time, moisture in the cavity may lead to corrosion. Allow the appliance to dry after use. Do not keep moist food in the closed cavity for extended periods of time. Do not store food in the cavity.
- Cooling with the appliance door open: Following operation at high temperatures, only allow the appliance to cool down with the door closed. Do not trap anything in the appliance door. Even if the door is only left open a crack, the front of nearby furniture may become damaged over time. Only leave the appliance to dry with the door open if a lot of moisture was produced while the oven was operating.
- Fruit juice: when baking particularly juicy fruit pies, do not pack the baking tray too generously. Fruit juice dripping from the baking tray leaves stains that cannot be removed. If possible, use the deeper universal pan.
- Extremely dirty seal: If the seal is very dirty, the appliance door will no longer close properly during operation. The fronts of adjacent units could be damaged. Always keep the seal clean.
- Appliance door as a seat, shelf or worktop: Do not sit on the appliance door or place or hang anything on it. Do not place any cookware or accessories on the appliance door.
- Inserting accessories: depending on the appliance model, accessories can scratch the door panel when closing the appliance door. Always insert the accessories into the cavity as far as they will go.
- Carrying the appliance: do not carry or hold the appliance by the door handle. The door handle cannot support the weight of the appliance and could break.
- If you use the residual heat of the switched off oven to keep food warm, a high moisture content inside the cavity can occur. This may lead to condensation and can cause corrosion damage of your high quality appliance as well as harm your kitchen. Avoid condensation by opening the door or use “Defrost” mode.
INSTALLATION
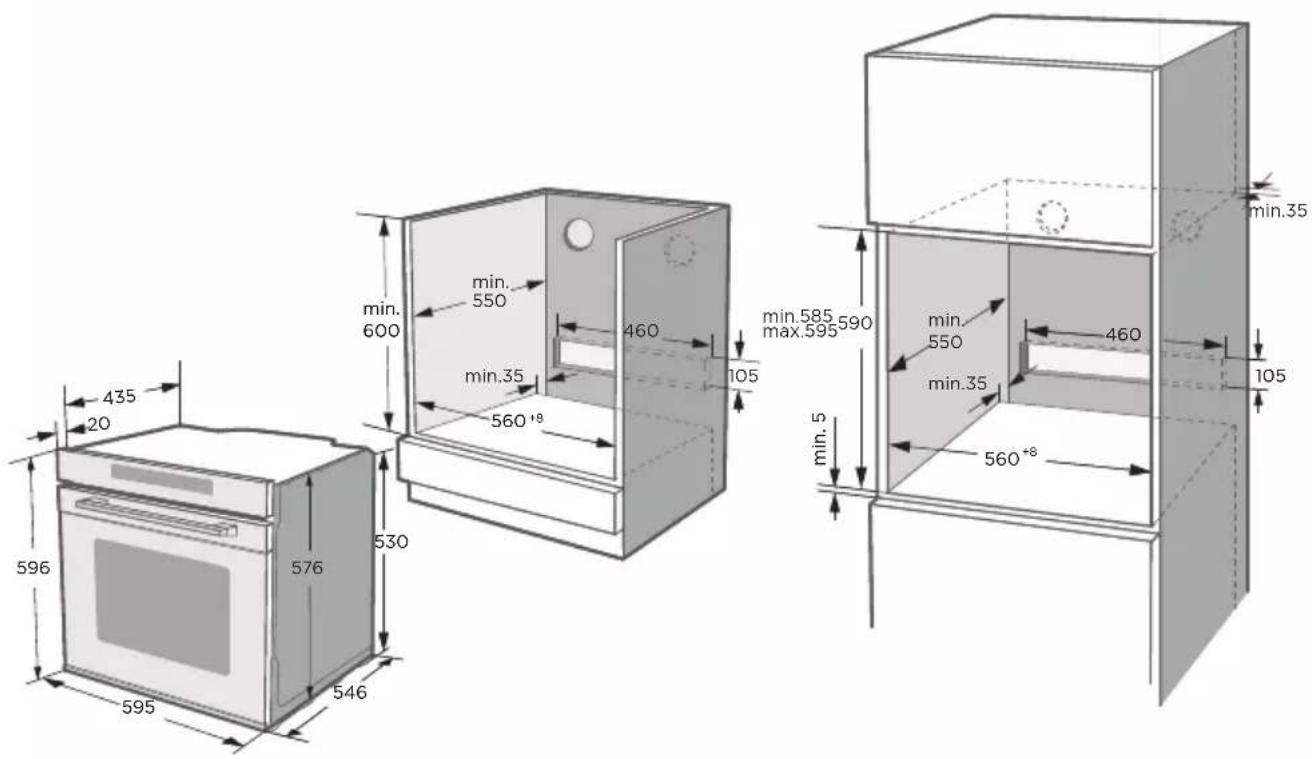
To operate this appliance safely, please be sure that it has been installed to a professional standard respecting the installation instructions. Damages occurring because of incorrect installation are not covered by the warranty.
While doing the installation, please wear protective gloves to prevent yourself from getting cut by sharp edges.
Check the appliance for any damage before installation and do not connect the appliance if there is any.
Before turning on the appliance, please clean up all the packaging materials and adhesive film from the appliance.
The dimensions attached are in mm.
It is necessary to have the plug accessible or incorporate a switch in the fixed wiring, in order to disconnect the appliance from the supply after installation when necessary.
Warning: The appliance must not be installed behind a decorative door in order to avoid overheating.
KNOW YOUR APPLIANCE
IDENTIFYING THE APPLIANCE
In this chapter, we will explain the control panel and accessories. At the same time you will also find out about the various functions of your appliance.
Note: Depending on the appliance model, individual details and colors may differ.
CONTROL PANEL
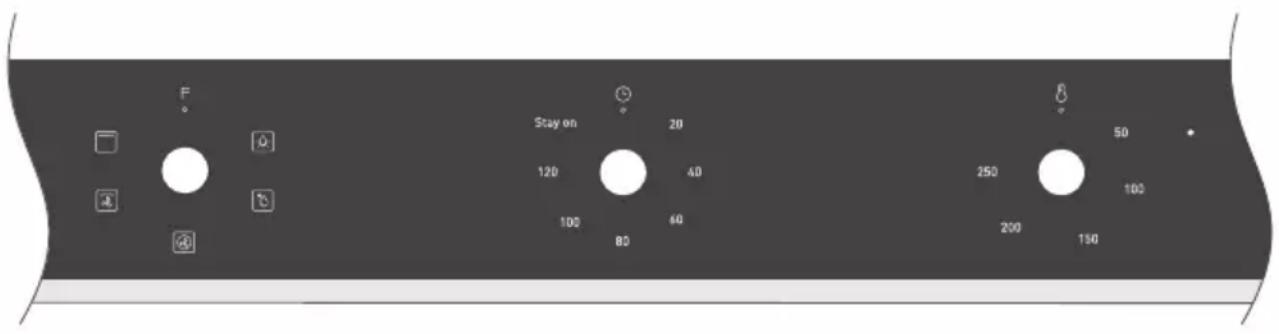
Knobs
Turn these knobs to set operating mode. Each knob is well fitted with the nearby silk-screening icons on the control panel glass so that you can easily operate your appliance with your fingers.
Indicator light
The indicator light lets you know whether the heaters inside the appliance are working. When the appliance is switched on, the indicator will turn on and off intermittently.
Controls
The individual controls are adapted to the various functions of your appliance. You can set your appliance simply and directly. There is no constraint on the order of operating the knobs, giving you full freedom while using the appliance.
→ "Operate Your Appliance" on page 11
Your appliance has various operating modes that make it easier to use.
To help you find the correct type of heating for your dish, we have explained the differences and applications here.
The symbols for each type help you remember them.
Types of heating
| Heating Mode | Temperature Use | ||
 | Lamp / | For lightening the cavity without any heating element switch on. | |
 | Defrost For gently defrosting frozen food. | ||
 | Grill | 50°C~250°C | For grilling small amounts of steaks or sausages.The center area under the heating heating element becomes hot |
 | Grill + Fan | 50°C~250°C | For baking and roasting on one or more levels.(But no more than 3)The fan distributes heat from heating elements evenly around the cavity. |
 | Convection | 50°C~250°C | For baking and roasting on one or more levels. Heat comes from the ring heater surrounding the fan evenly. |
Notes
- To defrost large portions of food, you can remove the side racks and place the container on the cavity floor.
- To warm tableware, it is beneficial to remove the side racks. The heating modes "Hot Air Grilling" and "Fan Heating" with a temperature setting of 50°C are useful. "Hot Air Grilling" should be used if more than half of the cavity floor is covered by the tableware.
- Due to optimal even heat distribution inside the cavity during "Fan Heating", the fan will operate at certain times during the heating process to guarantee the best possible performance.
Caution
- If you open the appliance door during an ongoing operation, the operation will not pause. Please be especially careful of the risk of burns.
- Do not cover the ventilation slots. Otherwise, the appliance may overheat. To make the appliance cool down more quickly after the operation, the cooling fan may continue to run for a period afterwards.
Lighting
When you switch the appliance on to any mode, the lamp will be always on until the operation has finished. You can use the main mode: "Lamp" during different operations, i.e. cleaning, preparing the cooking process, pause heating modes during opening the door.
Cooling fan
The cooling fan switches on and off as required. The hot air escapes above the door.
ACCESSORIES
Your appliance is accompanied by a range of accessories. Here, you can find an overview of the accessories included and information on how to use them correctly.
Accessories included
Your appliance is equipped with the following accessories:
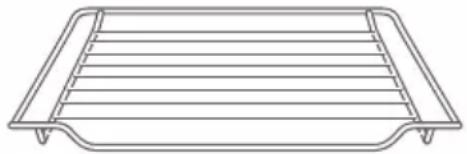
Wire Rack Baking Tray
For ovenware, cake tins and ovenproof dishes. For roasts and grilled food
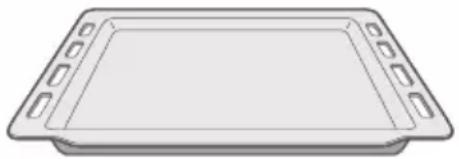
For tray bakes and small baked products.
You can use the tray to place liquid or cooking food with juice.
Only use original accessories. They are specially adapted for your appliance.
You can buy accessories from the after-sales service, from specialist retailers or online.
Note
The accessories may deform when they become hot. This does not affect their function. Once they have cooled down again, they regain their original shape.
Inserting accessories
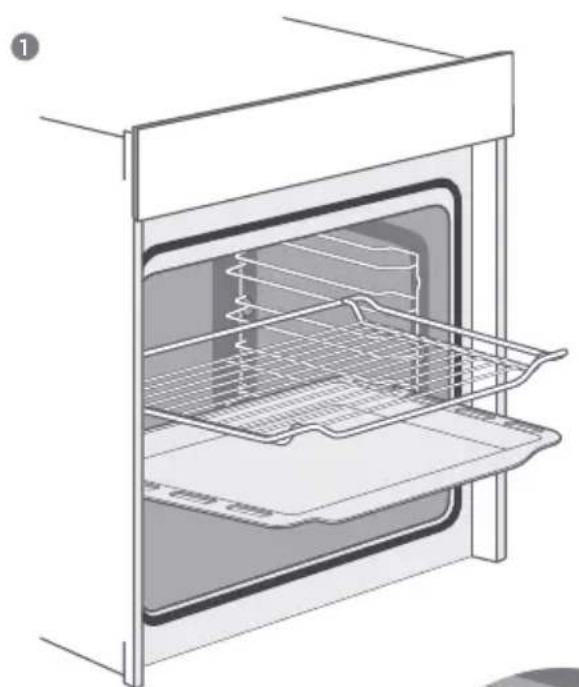
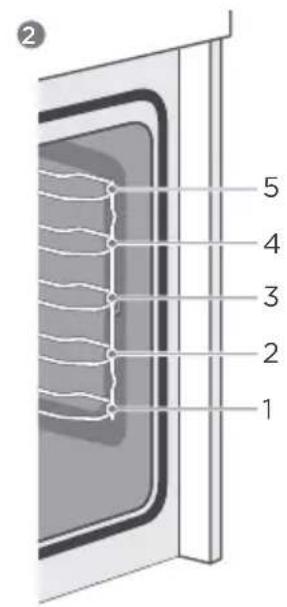
The cavity has five shelf positions. The shelf positions are counted from the bottom up. The accessories can be pulled out approximately halfway without tipping.
Notes
- Ensure that you always insert the accessories into the cavity the right way round.
- Always insert the accessories fully into the cavity so that they do not touch the appliance door.
Locking function
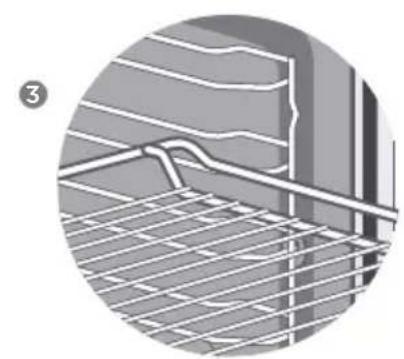
Accessories can be pulled out approximately halfway until they lock in place. The locking function prevents accessories from tilting due to the weight of the food and the accessories themselves while they are being pulled out. Accessories should be inserted into the cavity correctly for the tilt protection. When inserting the wire rack, ensure the wire rack is facing the right direction as shown in pictures 1 and 3.
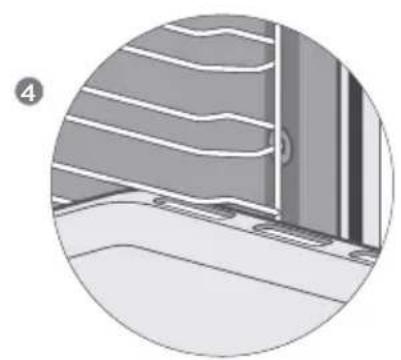
When inserting the baking tray, ensure the baking tray is facing the right direction as shown in pictures 1 and 4.
Optional accessories
You can buy optional accessories from the after-sales service, from specialist retailers or online. Please see your sales brochures for more details. When purchasing, please always quote the exact order number of the optional accessory.
OPERATE YOUR APPLIANCE
First use
Before using the appliance to prepare food for the first time, you must clean the cavity and accessories.
- Remove all stickers, surface protection foils and transport protection parts.
- Remove all accessories and the side-racks from the cavity.
- Clean the accessories and the side-racks thoroughly using soapy water and a dish cloth or soft brush.
- Ensure that the cavity does not contain any leftover packaging, such as polystyrene pellets or wooden pieces which may cause risk of fire.
- Wipe the smooth surfaces in the cavity and the door with a soft, wet cloth.
- To remove the new-appliance smell, heat up the appliance when empty and with the oven door closed.
- Keep the kitchen highly ventilated while the appliance is heating up for the first time. Keep children and pets out of the kitchen during this time. Close the door to the adjacent rooms.
- Adjust the settings as indicated. You can find out how to set the heating type and the temperature in the next section.
| Settings | |
| Heating Mode |  |
| Temperature | 250°C |
| Time | 1h |
After the appliance has cooled down:
- Clean the smooth surfaces and the door with soapy water and a dish cloth.
- Dry all surfaces.
- Install the side-racks.
Selecting Modes
The default operating mode is switching off. If you would like to select a cooking operating mode, you can do so using the left mode-control knob. There is a pointer on the knob; turn this knob to make the pointer point to the mode you would like to choose.
Temperature Setting
If you would like to select a temperature for cooking, the way to operate is similar to the way to select the operating mode. You can do so using the right temperature-control knob. There is a pointer on the knob; turn this knob to make the pointer point to the temperature you would like to choose.
Switching On
As you have now finished setting the operating mode and temperature, if you would like to turn the appliance on, you can do so using the time-control knob. There is a pointer on the knob; turn this knob to make the pointer point to the cooking time you would like to choose. The maximum cooking time is 2 hours.
Note
For this appliance, finishing the setting of cooking time means the appliance starts operating.
From the second you turn the knob away from the original position, the appliance will start to work.
If you turn the time-control knob anti-clockwise, the gear that the knob will arrive at is STAY ON, which means the oven will work continuously without timer controlling. Only use this when the appliance is well supervised by a person responsible for safety who is well aware of how to use the appliance safely and has understood the associated hazards.
After the appliance starts to operate, the time-control knob will slightly and continuously turn anti-clockwise (except in STAY ON mode). When the cooking has finished, the pointer will turn back to the original position and you will hear a clear tinkle of a bell to notify you.
Indicator
While the appliance starts to cook food or drink, the indicator will be switched on to notify you. During the period of cooking, the indicator will be on and off intermittently. This depends on whether the heating elements are working or not.
Changing
During the period of appliance operation, knobs on the control panel can be turned again to meet your needs or to make changes.
Turning the mode-control knob from the present mode to another one while the appliance is operating means to get the mode changed while food is being cooked. By this time, if you turn the knob to LAMP or DEFROST, the heating elements will be switched off. If you turn the knob back to the original position, the appliance will be switched off but the timer will still count.
Turning the temperature-control knob from its current setting to another while the appliance is operating changes the cooking temperature while food is being cooked. If you turn the knob back to the original position, the heating elements will be switched off. The lamp and timer will remain on, and whether the cooking fan operates depends on the temperature inside the appliance.
Turning the time-control knob from its current setting to another while the appliance is operating changes the remaining cooking time while food is being cooked. If you turn the knob back to the original position, the appliance is officially switched off. The indicator light will also switch off to notify you of this.
Caution!
After the appliance is switched off, it becomes very hot, especially inside the cavity. Never touch the interior surfaces of the appliance or the heating elements. Use oven gloves to remove accessories or ovenware from the cavity, and allow the appliance to cool down. Keep children at a safe distance to avoid the risk of burns.
Note
Changing modes, temperature, or remaining cooking time may have negative effects on the cooking result. We strongly recommend that you do not do so unless you are very experienced in cooking.
ENERGY EFFICIENT USE
- Remove all accessories that are not necessary during the cooking and baking process.
- Do not open the door during the cooking and baking process.
- If you open the door during cooking or baking, switch the mode to "Lamp" (without changing the temperature setting).
- Decrease the temperature setting in non-fan-assisted modes to 50°C 5 to 10 minutes before the end of the cooking and baking time. This allows you to use the cavity heat to complete the process.
- Use "Fan Heating" whenever possible. You can reduce the temperature by 20°C to 30°C.
- You can cook and bake using "Fan Heating" on more than one level at the same time.
- If it is not possible to cook and bake different dishes at the same time, you can heat them one after the other to use the preheat status of the oven.
- Do not preheat the empty oven if it is not required. If necessary, put the food into the oven immediately after reaching the temperature indicated by the indicator light switching off the first time.
- Do not use reflective foil, like aluminum foil, to cover the cavity floor.
- Use the timer and/or a temperature probe whenever possible.
- Use dark, matte finish and lightweight baking molds and containers. Try not to use heavy accessories with shiny surfaces, such as stainless steel or aluminum.
ENVIRONMENT
The packaging is designed to protect your new appliance against damage during transport. The materials used are carefully selected and should be recycled. Recycling reduces the use of raw materials and waste. Electrical and electronic appliances often contain valuable materials. Please do not dispose of it with your household waste.
HEALTH
Acrylamide occurs mainly by heating starchy food (i.e., potatoes, French fries, bread) to very high temperatures over long times.
Tips
- Use short cooking times.
- Cook food to a golden yellow surface color, do not burn it to dark brown colors.
- Bigger portions have less acrylamide.
- Use "Fan Heating" mode if possible.
- French fries: Use more than 450g per tray, place them evenly spread and turn them from time to time. Use the product information if available to get the best cooking result.
MAINTENANCE OF YOUR APPLIANCE
Cleaning Agent
With good care and cleaning, your appliance will retain its appearance and remain fully functioning for a long time to come. We will explain here how you should correctly care for and clean your appliance.
To ensure that the different surfaces are not damaged by using the wrong cleaning agent, observe the information in the table. Depending on the appliance model, not all of the areas listed may be on/in your appliance.
Caution!
Risk of surface damage
Do not use:
- Harsh or abrasive cleaning agents.
- Cleaning agents with a high alcohol content.
- Hard scouring pads or cleaning sponges.
- High-pressure cleaners or steam cleaners.
- Special cleaners for cleaning the appliance while it is hot.
Wash new sponge cloths thoroughly before use.
Tip
Highly recommended cleaning and care products can be purchased through the after-sales service.
Observe the respective manufacturer's instructions.
| CleaningArea Appliance exterior | |
| Appliance exteriorStainless steel front | Hot soapy water:Clean with a dish cloth and then dry with a soft cloth.Remove flecks of limescale, grease, starch and albumin (e.g. egg white) immediately.Corrosion can form under such flecks.Special stainless steel cleaning products suitable for hot surfaces are available from our after-sales service or from specialist retailers.Apply a very thin layer of the cleaning product with a soft cloth. |
| Plastic | Hot soapy water:Clean with a dish cloth and then dry with a soft cloth. Do not use glass cleaner or a glass scraper. |
| Painted surfaces | Hot soapy water:Clean with a dish cloth and then dry with a soft cloth. |
| Control panel | Hot soapy water:Clean with a dish cloth and then dry with a soft cloth. Do not use glass cleaner or a glass scraper. |
| Door panels | Hot soapy water:Clean with a dish cloth and then dry with a soft cloth.Do not use a glass scraper or a stainless steel scouring pad. |
| Door handle | Hot soapy water:Clean with a dish cloth and then dry with a soft cloth.If descaler comes into contact with the door handle, wipe it off immediately. Otherwise, any stains will not be able to be removed. |
| Enamel surfaces and self-cleaning surfaces | Observe the instructions for the surfaces of the cooking compartment that follow the table. |
| Glass cover for the interior lighting | Hot soapy water:Clean with a dish cloth and then dry with a soft cloth.If the cooking compartment is heavily soiled, use oven cleaner. |
| Door sealDo not remove | Hot soapy water:Clean with a dish cloth. Do not scour. |
| Stainless steel door cover | Stainless steel cleaner:Observe the manufacturer's instructions.Do not use stainless steel care products.Remove the door cover for cleaning. |
| Accessories | Hot soapy water:Soak and clean with a dish cloth or brush.If there are heavy deposits of dirt, use a stainless steel scouring pad. |
| Rails | Hot soapy water:Soak and clean with a dish cloth or brush. |
| Pull-out system | Hot soapy water:Clean with a dish cloth or a brush.Do not remove the lubricant while the pull-out rails are pulled out. It is best to clean them when they are pushed in.Do not clean in the dishwasher. |
| Meat thermometer | Hot soapy water:Clean with a dish cloth or a brush. Do not clean in the dishwasher. |
Notes
- Slight differences in color on the front of the appliance are caused by the use of different materials, such as glass, plastic and metal.
- Shadows on the door panels, which look like streaks, are caused by reflections made by the interior lighting.
- Enamel is baked on at very high temperatures. This can cause some slight color variation. This is normal and does not affect operation. The edges of thin trays cannot be completely enameled. As a result, these edges can be rough. This does not impair the anti-corrosion protection.
- Always keep the appliance clean and remove dirt immediately so that stubborn deposits of dirt do not build up.
Tips
- Clean the cooking compartment after each use. This will ensure that dirt cannot be baked on.
- Always remove flecks of lime scale, grease, starch and albumin (e.g. egg white) immediately.
- Remove flecks of food with sugar content immediately, if possible, when the fleck is still warm.
- Use suitable ovenware for roasting, e.g. a roasting dish.
APPLIANCE DOOR
With good care and cleaning, your appliance will retain its appearance and remain fully functional for a long time to come. This will tell you how to remove the appliance door and clean it.
For cleaning purposes and to remove the door panels, you can detach the appliance door. The appliance door hinges each have a locking lever.
When the locking levers are closed, the appliance door is secured in place. It cannot be detached. When the locking levers are open in order to detach the appliance door, the hinges are locked. They cannot snap shut.
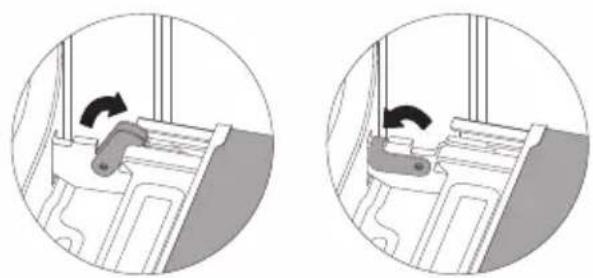
Warning - Risk of injury!
- If the hinges are not locked, they can snap shut with great force. Ensure that the locking levers are always fully closed or, when detaching the appliance door, fully open.
- The hinges on the appliance door move when opening and closing the door, and you may be trapped. Keep your hands away from the hinges.
Removing the appliance door
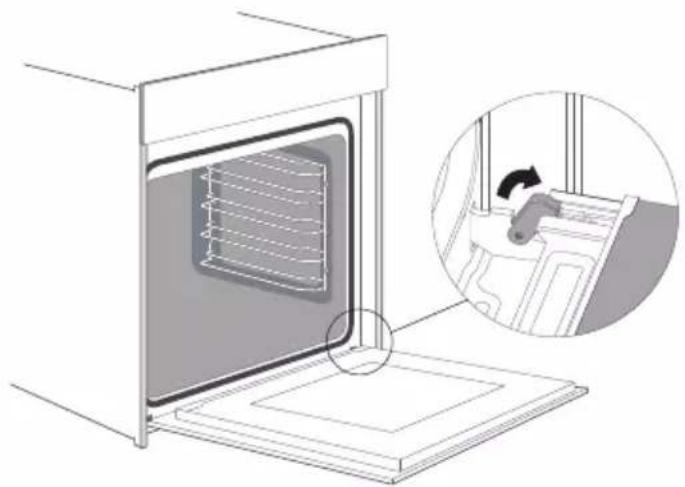
- Open the appliance door fully.
- Fold open the two locking levers on the left and right.
- Close the appliance door as far as the limit stop.
- With both hands, grip the door on the left- and right-hand side, and pull it out upwards.
Fitting the appliance door
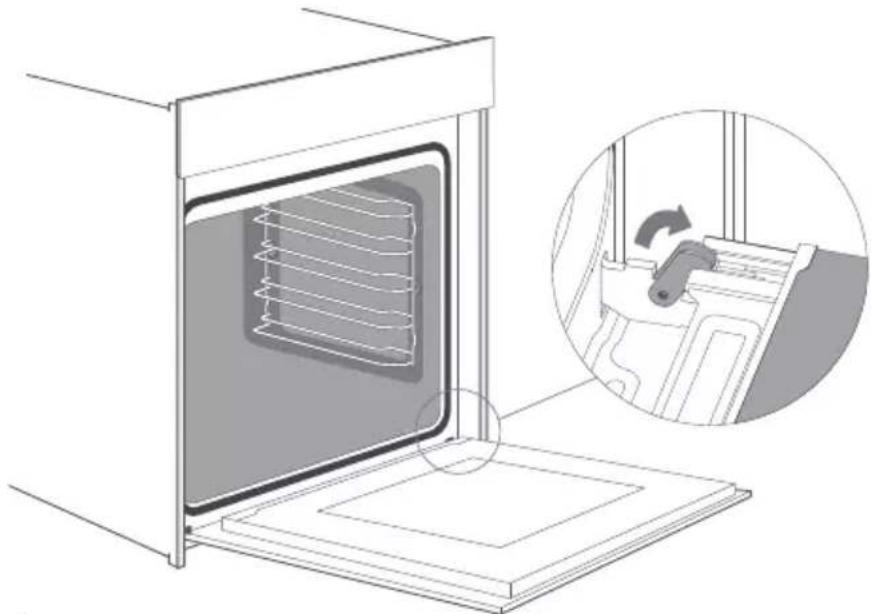
Reattach the appliance door in the opposite sequence to removal.
- When attaching the appliance door, ensure that both hinges are placed right onto the installing holes of the front panel of the cavity.
Ensure that the hinges are inserted into the correct position. You must be able to insert them easily and without resistance. If you can feel any resistance, check that the hinges are inserted into the holes right.
- Open the appliance door fully. While opening the appliance door, you can make another check if the hinges are onto the right position. If you make the fitting wrong, you will not be able to make the appliance door fully opened.
Fold both locking levers closed again.
- Close the cooking compartment door. By the same time, we warmly recommend you to check one more time, if the door is onto the right position and if the ventilation slots are not half-sealed.
Removing the door cover
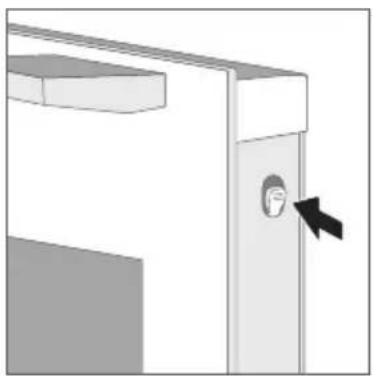
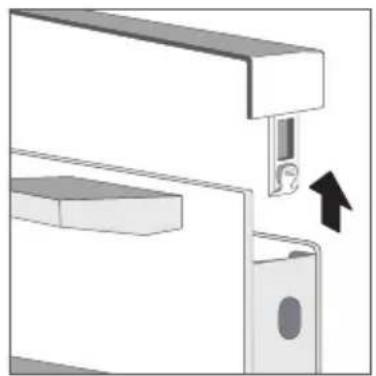
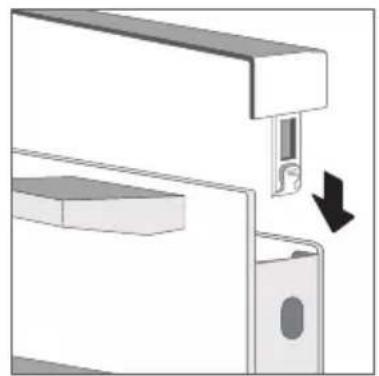
The plastic inlay in the door cover may become discolored. To carry out thorough cleaning, you can remove the cover.
Remove the appliance door as instructed above.
- Press on the right and left sides of the cover.
- Remove the cover.
- After removing the door cover, the remaining parts of the appliance door can be easily taken off so that you can proceed with cleaning. When the cleaning of the appliance door is finished, put the cover back in place and press on it until it clicks audibly into place.
- Refit the appliance door and close it.
Changing the power cord
Position A shows the terminal box position on the back of the outer back case, and it is closed.
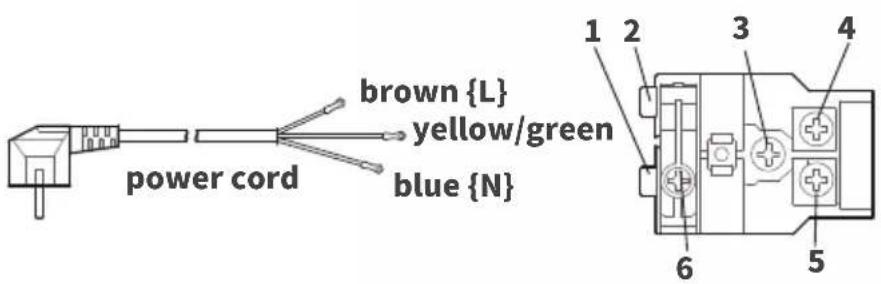
Steps: a. Cut off the power, use a small flat screwdriver to open the two snaps 1 and 2.
b. Use a Phillips screwdriver to remove screws 3, 4, 5, and 6.
c. Replace with a new power cord, fix the yellow/green wire on 3, the brown wire on 4, and the blue wire on 5.
d. Tighten screw 6, close the terminal box cover, and finish the replacement.
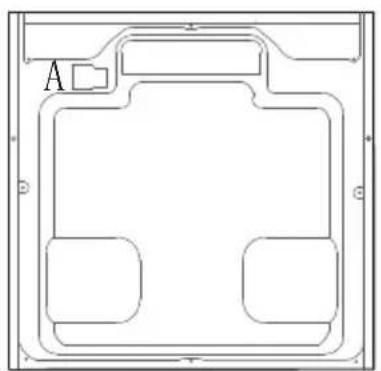
Terminal box, back outer
Caution!
While the appliance door is well installed, the door cover can also be taken off at this time.
- Removing the door cover means setting the inner glass of the appliance door free; the glass can be easily moved and cause damage or injury.
- Removing the door cover and inner glass reduces the overall weight of the appliance door. The hinges can then be moved more easily when closing the door, and you may become trapped. Keep your hands away from the hinges.
Because of the two points above, we strongly recommend that you do not remove the door cover unless the appliance door has been removed. Damage caused by incorrect operation is not covered under warranty.
CURE YOUR APPLIANCE WHEN NEEDED
If a fault occurs, before calling the after-sales service, please ensure that it is not due to incorrect operation. Refer to the fault table and attempt to correct the fault yourself. You can often easily rectify technical faults on the appliance yourself.
If a dish does not turn out exactly as you wanted, you can find many tips and instructions for preparation at the end of the operating manual.
| Fault Possible Cause Notes/remedy | ||
| The appliance does not work. | Faulty fuse. | Check the circuit breaker in the fuse box. |
| Power cut | Check whether the kitchen light or other kitchen appliances are working. | |
| Knobs have fallen out of the support in the control panel. | Knobs have been accidentally disengaged. | Knobs can be removed.Simply place knobs back in their support in the control panel and push them in so that they engage and can be turned as usual. |
| Knobs can no longer be turned easily. | There is dirt under knobs | Knobs can be removed.To disengage knobs, simply remove them from the support.Alternatively, press on the outer edge of knobs so that they tip and can be picked up easily.Carefully clean the knobs using a cloth and soapy water.Dry with a soft cloth.Do not use any sharp or abrasive materials.Do not soak or clean in the dishwasher.Do not remove knobs too often so that the support remains stable |
| Fan does not work all the time in the mode: “Fan Heating” | This is a normal operation due to the best possible heat distribution and best possible performance of the oven. |
| After a cooking process a noise can be heard and a air flow in the near of the control panel can be observed. | The cooling fan is still working, to prevent high moisture conditions in the cavity and cool down the oven for your convenience. The cooling fan will switch off automatically. |
| The food is not sufficient cooked in the time given by the recipe . | A temperature different from the recipe is used. Double check the temperatures. The ingredient quantities are different to the recipe. Double check the recipe. |
| Uneven browning | The temperature setting is too high, or the shelf level could be optimized. Double check the recipe and settings. The surface finish and or color and or material of the baking ware were not the best choice for the selected oven function. When use radiant heat, such as “Top & Bottom Heating” mode, use matt finished, dark colored and light weighted oven ware. |
| The lamp doesn’t turn on The lamp needs to be replaced. | |
Warning - Risk of electric shock!
Incorrect repairs are dangerous. Repairs may only be carried out and damaged power cables replaced by one of our trained after-sales technicians. If the appliance is defective, unplug the appliance from the mains or switch off the circuit breaker in the fuse box. Contact the after-sales service.
Maximum operating time
The maximum operating time of this appliance is 9 hours, to prevent you from forgetting to switch off the power.
Replacing the lamp on the corner of the cavity
If the cavity lamp fails, it must be replaced. Heat-resistant, 25 watt, 230 V halogen lamps are available from the after-sales service or specialist retailers.
When handling the halogen lamp, use a dry cloth. This will increase the service life of the lamp.
WARNING
Risk of electric shock!
When replacing the lamp, the lamp socket contacts are live. Before replacing the lamp, unplug the appliance from the mains or switch off the circuit breaker in the fuse box.
Risk of burns!
The appliance becomes very hot. Never touch the interior surfaces of the appliance or the heating elements. Always allow the appliance to cool down. Keep children at a safe distance.
- Place a towel in the cold cavity to prevent damage.
- Turn the glass cover anti-clockwise to remove it.
- Pull out the lamp - do not turn it.
- Screw the glass cover back in.
- Remove the towel and switch on the circuit breaker to see if lamp switches on.
Insert the new lamp, making sure that the pins are in the correct position. Push the lamp in firmly.
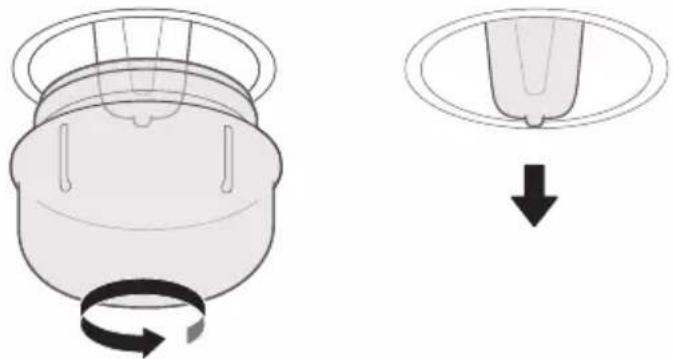
Glass cover
If the glass cover of the halogen lamp is damaged, it must be replaced. You can obtain a new glass cover from the after-sales service. Please specify the E number and FD number of your appliance.
CUSTOMER SERVICE
Our after-sales service is there for you if your appliance needs to be repaired. We will always find an appropriate solution. Please contact the dealer where you by this appliance. When calling us, please give the model number and S/N so that we can provide you with the correct advice. The rating plate bearing these numbers can be found when you open the appliance door.
Model: TOF600SS
Rated voltage: 220-240V~
Rated frequency: 50Hz-60Hz
Electric power: 1.9 kW
To save time, you can make a note of the model of your appliance and the telephone number of the after-sales service in the space below, should it be required.
MAINTENANCE CARD
| Model number | Purchasing date |
| Serial number | Purchasing store |
Warning
This appliance shall be installed in accordance with the regulations in force and only used in a well-ventilated space. Read the instructions before installing or using this appliance.
Note
Please note that a visit from an after-sales service engineer is not free of charge, even during the warranty period.
Rely on the professionalism of the manufacturer. You can therefore be sure that the repair is carried out by trained service technicians who carry original spare parts for your appliances.
Above, thank you again for buying Midea Built-in Oven, and we wish that our appliance will bring you delicious food and happy life.
TIPS AND TRICKS
| You want to cook your own recipe | Try to use settings of similar recipes first and optimize the cooking process due to the result. |
| Is the cake baked ready? | Put a wooden stick inside the cake about 10 minutes before the given baking time is reached. If there is no raw dough at the stick after pulling out, the cake is ready. |
| The cake loses massive volume during cooling down after baking | Try to lower the temperature setting by 10°C and double check the food preparing instructions regarding the mechanical handling of the dough. |
| The height of the cake is in the middle much higher than at the outer ring | Do not grease the outer ring of the spring form |
| The cake is too brown at the top | Use a lower shelf level and or use a lower set temperature (this may lead to a longer cooking time) |
| The cake is too dry | Use a 10°C higher set temperature (this may lead to a shorter cooking time) |
| The food is good looking but the humidity inside is too high | Use a 10°C lower set temperature (this may lead to a longer cooking time) and double check the recipe |
| The browning is uneven | Use a 10°C lower set temperature (this may lead to a longer cooking time). Use the “Top & Bottom Heating” mode on one level. |
| The cake is less browned on the bottom | Choose a level down |
| Baking on more than one level at the same time: One shelf is darker than the other. | Use a fan assisted mode for baking at more than one level and take out the trays individually when ready. It is not necessary that all trays are ready at the same time. |
| Condensing water during baking | Steam is part of baking and cooking and moves normally out of the oven together with the cooling air flow. This steam may condensate at different surfaces at the oven or near to the oven and build water droplets. This is a physical process and cannot be avoid completely. |
| Which kind of baking ware can be used? | Every heat resistant baking ware can be used. It is recommended not to use aluminum in direct contact with food, especially when it is sour.Please ensure a good fitting between container and lid. |
| How to use the grill function? | Preheat the oven for 5 minutes and place the food in the level given by this manual.Close the oven door when you use any grilling mode. Do not use the oven when the door is open, except for load / remove / check the food. |
| How to keep clean the oven during grilling ? | Use the tray filled with 2 liter of water in at level 1. Nearly all fluids drip down from the food placed on the rack will captured by the tray. |
| The heating element in all grilling modes are switching on and off over the time. | It is a normal operation and depends on the temperature setting. |
| How to calculate the oven settings, when the weight of a roast is not given by a recipe? | Choose the settings next to the roast weight and change the time slightly.Use a meat probe if possible to detect the temperature inside the meat.Place the head of the meat probe carefully in the meat, due to the manufacturer instructions.Make sure, that the head of the probe is placed in the middle of the biggest part of the meat, but not in the near of a bone or hole. |
| What happens if a fluid is poured to a food in the oven during the baking or cooking process? | The fluid will boil and steam will arise as a normal physical process.Please be careful, because the steam is hot. See also “Condensing water during baking” for more information. If the fluid contains alcohol, the boiling process will be quicker and can lead to flames in the cavity. Make sure, that the oven door is closed during such kind of processes. Please control the baking or cooking process carefully. Open the door very gentle and only if necessary. |
ENERGY EFFICIENCY ACCORDING TO EN 60350-1
Please note the following information:
- The measurement is carried out in the "ECO" mode to determine the data regarding the forced air mode and the label-class
- The measurement is carried out in the "Top & Bottom Heating" mode to determine the data regarding the conventional mode.
- During the measurement, only the necessary accessory is in the cavity. All other parts have to be removed.
- The oven is installed as described in the installation guide and placed in the middle of the cabinet.
- It is necessary for the measurement to close the door like in the household, even when the cable disturbs the sealing function of the gasket during the measurement. To make sure that there are no negative effects regarding the disturbed sealing due to the energy data, it is necessary to close the door carefully during the measurement. It may be required to use a tool to guarantee the sealing of the gasket like in the household, where no cable disturbs the sealing function.
- The determination of the cavity volume is carried out for the usage "Defrost" as described on page 14. To ensure an efficient use of the oven, all accessories including side-racks are removed.
DATASHEET (EU 65/2014 & EU 66/2014)
| TOF600SS | |
| No of Cavities | 1 |
| Heat Source | Electric |
| Usable Volume | 72L |
| ECelectric, cavity (Forced Air) | 0.75kWh/cycle |
| EEICavity | 81 |
| Energy Efficiency Class (A+++ to D) | A |
Note
All oven modes described on Page 7 are main functions of the oven.


- CONTENTS
- SAFETY INFORMATION
- INTENDED USE
- WARNING
- RISK OF ELECTRIC SHOCK
- RISK OF BURNS
- RISK OF SCALDING
- RISK OF INJURY
- RISK OF FIRE
- HAZARD DUE TO MAGNETISM
- CAUSES OF DAMAGE
- INSTALLATION
- KNOW YOUR APPLIANCE
- IDENTIFYING THE APPLIANCE
- CONTROL PANEL
- KNOBS
- INDICATOR LIGHT
- CONTROLS
- NOTES
- CAUTION
- LIGHTING
- COOLING FAN
- ACCESSORIES
- ACCESSORIES INCLUDED
- NOTE
- INSERTING ACCESSORIES
- LOCKING FUNCTION
- OPTIONAL ACCESSORIES
- OPERATE YOUR APPLIANCE
- FIRST USE
- BEFORE USING THE APPLIANCE TO PREPARE FOOD FOR THE FIRST TIME, YOU MUST CLEAN THE CAVITY AND ACCESSORIES
- AFTER THE APPLIANCE HAS COOLED DOWN
- SELECTING MODES
- TEMPERATURE SETTING
- SWITCHING ON
- INDICATOR
- CHANGING
- ENERGY EFFICIENT USE
- ENVIRONMENT
- HEALTH
- TIPS
- MAINTENANCE OF YOUR APPLIANCE
- CLEANING AGENT
- RISK OF SURFACE DAMAGE
- DO NOT USE
- WASH NEW SPONGE CLOTHS THOROUGHLY BEFORE USE
- TIP
- APPLIANCE DOOR
- WARNING - RISK OF INJURY
- REMOVING THE APPLIANCE DOOR
- FITTING THE APPLIANCE DOOR
- REMOVING THE DOOR COVER
- CHANGING THE POWER CORD
- CURE YOUR APPLIANCE WHEN NEEDED
- WARNING - RISK OF ELECTRIC SHOCK
- MAXIMUM OPERATING TIME
- REPLACING THE LAMP ON THE CORNER OF THE CAVITY
- GLASS COVER
- CUSTOMER SERVICE
- ENERGY EFFICIENCY ACCORDING TO EN
- PLEASE NOTE THE FOLLOWING INFORMATION
Brand : Cookology
Model : TOF600SS
Category : Oven