
LPCB40 - Dash cam BOSS - Free user manual and instructions
Find the device manual for free LPCB40 BOSS in PDF.


| Product Type | Dash Cam |
| Brand | BOSS |
| Model | LPCB40 |
| Video Resolution | 1080p Full HD |
| Viewing Angle | 140° wide angle |
| Loop Recording | Supported (adjustable duration) |
| G-Sensor | Built-in for impact detection |
| Parking Mode | Motion detection and time-lapse |
| Night Vision | Infrared LEDs or low-light enhancement |
| Display | 2.0 inch LCD screen |
| Storage | MicroSD card (up to 32 GB, Class 10 recommended) |
| Power Supply | 12V/24V vehicle cigarette lighter adapter |
| Battery | Built-in rechargeable battery (200 mAh) |
| Dimensions | Approx. 6.5 x 5.0 x 3.5 cm |
| Weight | Approx. 60 g |
| Mounting | Suction cup or adhesive mount |
| Audio Recording | Built-in microphone |
| Video Format | MOV or AVI |
| Date & Time Stamp | Embedded in video |
Frequently Asked Questions - LPCB40 BOSS
User questions about LPCB40 BOSS
0 question about this device. Answer the ones you know or ask your own.
Ask a new question about this device
Download the instructions for your Dash cam in PDF format for free! Find your manual LPCB40 - BOSS and take your electronic device back in hand. On this page are published all the documents necessary for the use of your device. LPCB40 by BOSS.
USER MANUAL LPCB40 BOSS
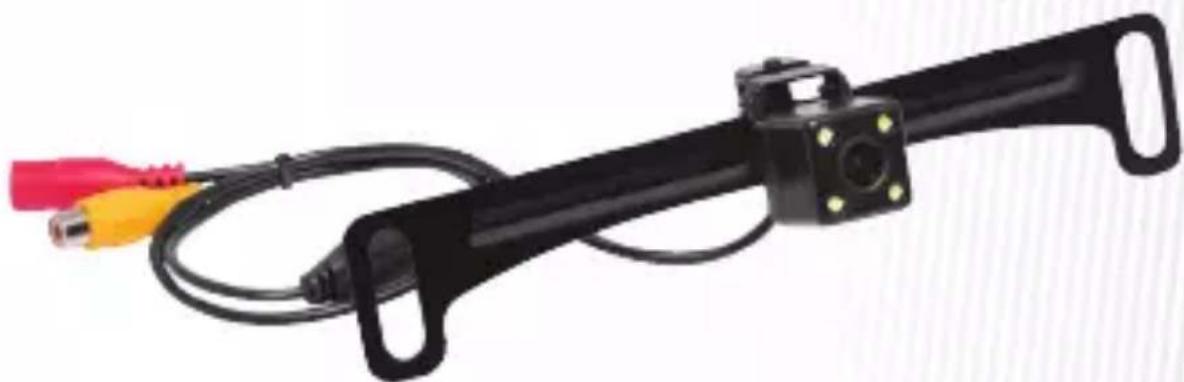
FEATURING HIDDEN MOUNTING BRACKET
natural_image
Black handheld device with attached cable and red connectors (no visible text or symbols)Introduction
This camera is designed for use as a front view or rear-facing backup camera, and mounted neatly behind your license plate. When installed with any of our camera-capable head units, the camera view can be automatically triggered when shifting into reverse or manually triggered by selecting the camera button from the head unit home screen.
Package Contents
• 1x Camera with power and video sockets
• 1x Power cable with power plug
• 1x Video cable with two yellow RCA plugs
- User manual
Important
Please read and understand all instructions before you use your product. Failure to follow the instructions could result in injury and/or damage that could potentially void the warranty.
Important safety precautions
- Use of the camera must not replace other safe driving habits. Precise control and looking around before backing up is necessary.
- Always remember that the area displayed by the camera is limited, and certain obstacles may not be detected or not reliably detected.
Installation precautions
- WARNING: Always consult a professional installer.
- Improper wiring and mounting of the camera can cause damage, injury or accident. Have installation performed by a professional only. Contact our technical support for any installation questions.
- Disconnect the negative terminal of the vehicle battery prior to wiring.
- When making modifications to your car due to the installation, make sure the safety and structural integrity of the car is not impaired.
- Hide wires under car floor mat or through car headliner. Make sure wires are not squeezed or damaged by sharp edges. Use rubber bushings for penetrations.
Wiring
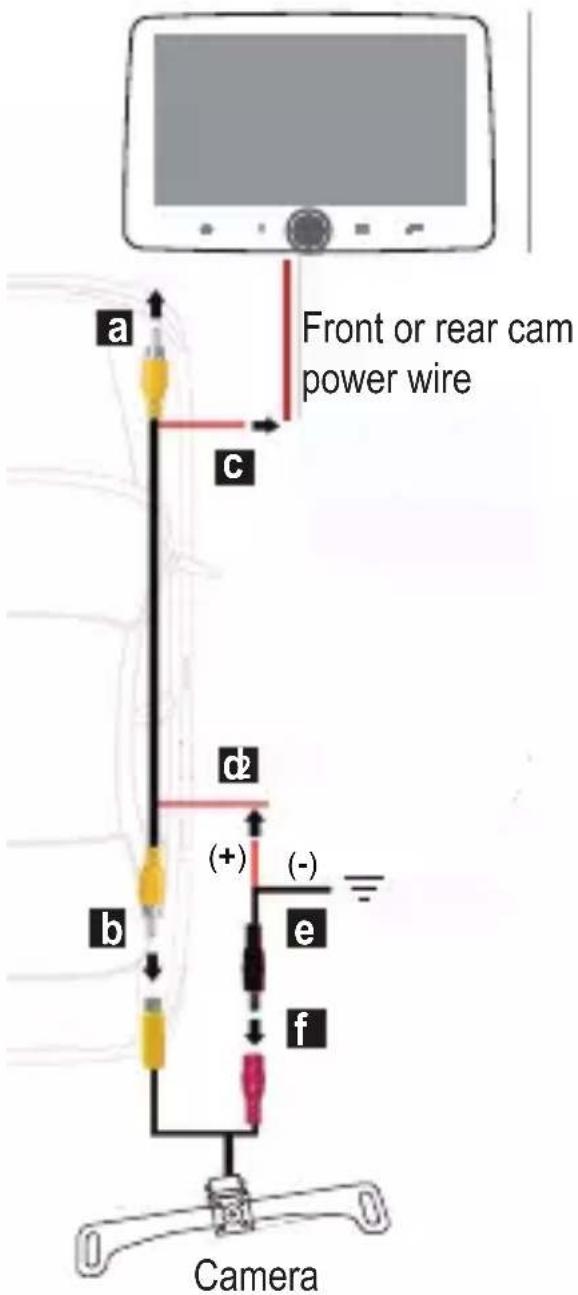
- Follow two steps described below to install this product as a front camera or a rear camera.
- The rear camera view automatically turns on when reversing. Ensure you connect the "Reverse Input" wire on your head unit to the vehicle's reverse light for reverse trigger. Front camera view is not accessible when reversing.
-
Both rear and front camera view can be selected via Home screen options on your head unit.
-
Connect the video cables.
a Connect one yellow RCA plug of the video cable to your head unit.
Front camera: to "Front Camera Input" RCA socket.
Rear camera: to "Rear Camera Input" RCA socket.
b Connect the other yellow RCA plug of the video cable to the yellow RCA socket on the camera.
- Connect the power cables.
C Connect the red split wire of the video cable to your head unit.
Front camera: to "Front Camera Power Output" wire.
Rear camera: to "Rear Camera Power Output" wire.
d Connect the other red split wire of the video cable to the red wire of the power cable.
e Connect the black (ground) wire of the power cable to the car chassis.
f Connect the black plug of the power cable to the red socket on the camera.
Mounting
The camera is designed for mounting behind the license plate of your car through the screw holes on the license plate. No drilling hole is required.
-
Remove the license plate lamp. Through the opening of the license plate lamp, run the camera's cable from the outside into the inside of the car.
-
Remove the license plate screws. Align the camera frame with two top screw holes on the license plate, and secure the camera frame with two license plate screws. Make sure the camera is correctly oriented to avoid reverse image.
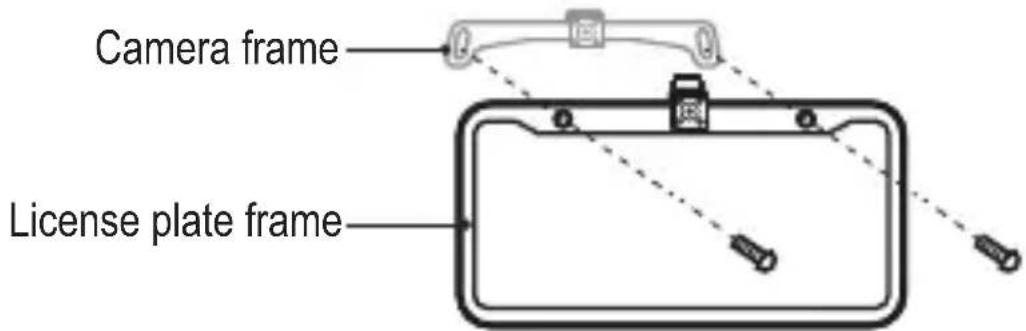
- Verify the camera angle is properly positioned. If needed, loosen the screws and adjust the camera angle then re-tighten the screws.
Troubleshooting
| Problem Solution | |
| No image Ensure | the camera's power cable is securely plugged.Ensure there is correct and secure wiring between the camera and your head unit.Ensure the reverse input wire on your head unit is connected to the vehicle's reverse light.Ensure correct camera settings on your head unit. |
| Image blurry Check for water drops or dust on the camera lens.Clean it with a damp, fiber-free cloth. | |
| Image shaking Ensure the camera is tightly mounted. | |
| Image slanted Adjust the camera frame position. |
Image Setting
- To remove the on-screen parking guidelines, cut open the white wire loop which splits from the camera's cable. Otherwise, keep the white wire loop uncut.
- If the camera image appears reverse, cut open the blue wire loop which splits from the camera's cable. Otherwise, keep the blue wire loop uncut.
- Make sure to unplug the power cable from the camera and plug it again to enable the new setting (after cutting off the white or blue wire loop).
Specifications
Power supply 12 VDC
Viewing angle 170^
TV system....NTSC
Video output 1.0 vp-p, 75 Ω
S/N ratio.....≤45 dB
Ingress protection rating....IP67 (waterproof)
Operating conditions....-22 to +140°F (-30 to +60°C) max. 95% RH
White balance....Auto
Illumination ....min. 0.1 lux
Automatic gain control (AGC)......Auto
Resolution (TV lines) 480
Electronic shutter speed....1/60 (NTSC)
Effective pixels....648 x 488
Dimensions (L x W x H)....7.756" x 0.88" x 0.88"
197 x 22 x 22 mm
Cable length ....197"/5m (video cable); 39"/1m (power cable); 20"/0.5m (camera's cable)
Specifications are subject to change without notice.
BOSS Audio Systems
3451 Lunar Court · Oxnard, CA 93030
www.bossaudio.com
805-751-4853 Customer Service
Tech Support: www.bossaudio.com/support



Brand : BOSS
Model : LPCB40
Category : Dash cam