CM465BS - Coffee maker Caple - Free user manual and instructions
Find the device manual for free CM465BS Caple in PDF.


| Brand | Caple |
| Model | CM465BS (also CM465, CM465SS, CM465GM) |
| Product Type | Built-in Bean-to-Cup Coffee Machine |
| Functions | Espresso, Small Cup, Medium Cup, Large Cup, Mug, Cappuccino, Hot Water, Pre-ground Coffee |
| Bean Container Capacity | Approximately 250 g |
| Water Tank Capacity | Removable, approximately 1.8 L |
| Pump Pressure | 15 bar |
| Grind Adjustment | Stepless, adjustable while grinding |
| Milk Frother | Separate milk container with adjustable froth |
| Control Panel | Touch keys with LCD display |
| Programmable Settings | Coffee strength (5 levels), cup size, milk quantity, hot water quantity, auto shut-off, auto start, clock |
| Descaling Program | Automatic with indicator and test strip included |
| Cleaning | Removable brewing unit, drip tray, waste container; milk container parts dishwasher safe |
| Safety Features | Automatic shut-off, hot surface warning |
| Installation Type | Built-in over oven or column unit (requires 10A earthed socket) |
| Power Supply | 220-240 V, 50/60 Hz, 10 A |
| Warranty | Standard warranty (see enclosed card) |
Frequently Asked Questions - CM465BS Caple
User questions about CM465BS Caple
0 question about this device. Answer the ones you know or ask your own.
Ask a new question about this device
Download the instructions for your Coffee maker in PDF format for free! Find your manual CM465BS - Caple and take your electronic device back in hand. On this page are published all the documents necessary for the use of your device. CM465BS by Caple.
USER MANUAL CM465BS Caple
Sense Coffee Machine
Instruction manual
CM465, CM465SS, CM465GM & CM465BS
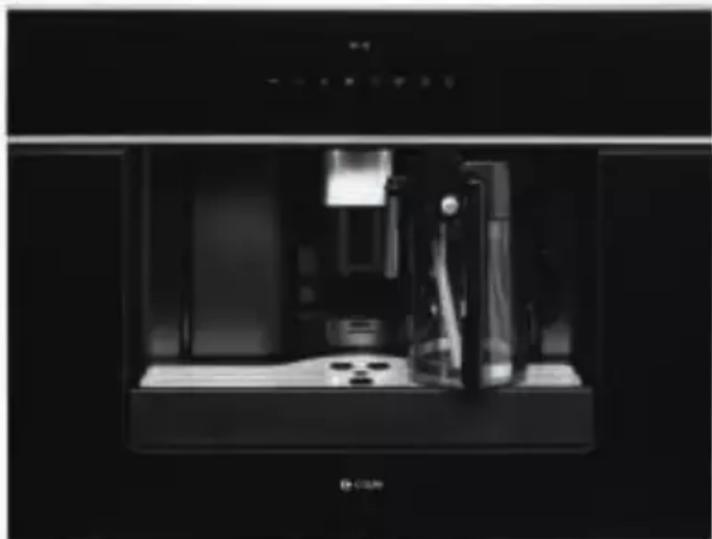
natural_image
Interior view of a modern kitchen appliance with a mounted machine (no visible text or symbols)CONTENTS
| Introduction | 3 | |||||
| Product | Overview | 9 | ||||
| Control | Panel | 10 | ||||
| Preparation | 11 | |||||
| Operation | 13 | |||||
| Using | Menu | Options | 23 | |||
| Water | Hardness | 24 | ||||
| Setting The Coffee Temperature 25 | ||||||
| Setting | The | Switch-Off | Time | 25 | ||
| Carrying | Out | The | Descaling | 26 | ||
| Statistics | 28 | |||||
| Resetting | Settings | 28 | ||||
| Setting | The | Clock | 29 | |||
| Cleaning | 31 | |||||
| Messages | 36 | |||||
| Troubleshooting | 38 | |||||
| Installation | Instructions | 40 | ||||
| Caple | Contact | Details | 44 | |||
INTRODUCTION
This coffee machine will make delicious cups of coffee, espresso and cappuccino. You can customise the settings of the machine to suit your personal preferences and tastes.
Coffee has been used in the factory to test the appliance and it is therefore completely normal that there are traces of coffee in the mill. This appliance is however guaranteed to be new. First read the user instructions carefully and completely before starting to use the appliance, and keep them carefully for future reference.
PREVENTATIVE MAINTENANCE
Your coffee machine requires preventative maintenance. To guarantee that the coffee machine works well and reliably, we recommend having the machine serviced once every 2 to 3 years (after a maximum 8,000 cups).
Servicing of your coffee machine is chargeable, and can be booked via email service@caple.co.uk or telephone 0117 938 7420.
WARNING:
- Designated use: this appliance is designed and made to prepare coffee and milk based beverages and hot water. Any other use is considered improper and thus dangerous. The manufacturer is not liable for damage deriving from improper use of the appliance.
- The surface of the heating element remains hot after use and the outside of the appliance may retain the heat for several minutes depending on use.
- CAUTION: To prevent damage to the appliance do not use alkaline cleaning agents when cleaning, use a soft cloth and a mild detergent
- Appliances with removable cord: avoid splashes of water on the power cord connector or socket at the back of the appliance.
- Clean all the components thoroughly, taking particular care with parts in contact with the coffee and milk.
- WARNING: Models with glass surfaces: do not use the appliance if the surface is cracked.
- The appliance and its accessible parts become hot during use. Care should be taken to avoid touching heating elements.
- The appliance is not intended for use by persons (including children) with reduced physical, sensory or mental capabilities, or lack of experience and knowledge, unless they have been given supervision or instruction concerning use of the appliance by a person responsible for their safety.
- Children should be supervised to ensure that they do not play with the appliance.
- Cleaning and user maintenance shall not be made by children without supervision.
- Never clean by immersing the appliance in water.
- This appliance is intended to be used in household and similar applications such as:
- Staff kitchen areas in shops, offices and other working environments.
- Farm Houses.
- By clients in hotels, motels and other residential type environments.
- Bed and breakfast type environments.
- If the plug or power cable is damaged, it must be replaced by customer services only to avoid all risk.
- This appliance can be used by children aged from 8 years and above if they have been given supervision or instruction concerning use of the appliance in a safe way and if they understand the hazard involved. Cleaning and user maintenance shall not be made by children unless they are older than 8 and supervised. Keep the appliance and its cord out of the reach of children aged less than 8 years.
- Appliances can be used by persons with reduced physical, sensory or mental capabilities or lack of experience and knowledge if they have been given supervision or instruction concerning use of the appliance in a safe way and understand the hazards involved.
- Children shall not play with the appliance.
- When not in use and before cleaning, always unplug the appliance.
- This appliance is intended for domestic use only (around 3000 cups a year). Any other use is considered improper and in that case no guarantee will be given.
-
Use it with care to avoid scalds from the water and steam jets or through incorrect use.
-
Do not lean or hang on the machine when it has come out of the cabinet and do not place heavy or unstable objects on the machine.
- Surfaces marked with this symbol become hot during use.
- This appliance can be installed over a built-in oven if the latter is fitted with a cooling fan at the rear (maximum microwave power: 3kW).
- The manufacturer is not liable for damage caused by improper, incorrect or unreasonable use of the appliance.
- When using the appliance, do not touch the hot surfaces. Use the knobs or handles.
- In case of failures, make sure the appliance is not connected to the mains power supply. Turn the main power switch on the right side (behind the front panel) to 0. Refer to our service department for repairs.
- Only ask for original spare parts to be used. Failure to respect the above could reduce the safety of the appliance.
- Do not put objects containing liquids, inflammable or corrosive materials on the machine.
- Use the accessories holder to contain coffee accessories (for example coffee beans).
- Never touch the appliance with damp hands.
-
Unplug directly from the plug only.
-
Never pull the power cable as you could damage it.
- To disconnect the appliance completely, place the main switch on the side of the appliance in the 0 (off) position.
- Your appliance is produced in accordance with all applicable local and international standards and regulations.
- Maintenance and repair work must be made only by authorised Caple service technicians. Installation and repair work that is carried out by unauthorised technicians may endanger you.
- It is dangerous to alter or modify the specifications of the appliance in any way.
- Prior to installation, ensure that the local distribution conditions (electricity voltage and frequency) and the requirements of the appliance are compatible.
The requirements for this appliance are stated on the rating label.
ENVIRONMENTAL PROTECTION
Waste electrical products should not be disposed of with household waste.
Please recycle where facilities exist. Check with your Local Authority or retailer for recycling advice.
This appliance is marked according to the European directive on Waste Electrical and Electronic Equipment (WEEE). By ensuring this product is disposed of correctly, you will help prevent potential negative consequences for the environment and human health, which could otherwise be caused by inappropriate waste handling of this product. The symbol on the product indicates that this product may not be treated as household waste. Instead, it shall be handed over to the applicable collection point for the recycling of electrical and electronic equipment. Disposal must be carried out in accordance with local environmental regulations for waste disposal.
For more detailed information about treatment, recovery and recycling of this product, please contact your local council, your household waste disposal service or the retailer where you purchased the product.
CE DECLARATIONS OF CONFORMITY CE
This appliance has been manufactured to the strictest standards and complies with all applicable legislation, Low Voltage Directive (LVD) and Electromagnetic Compatibility (EMC).
This appliance also conforms to all applicable UK & EU legislation relating to Materials and articles intending to come into contact with food.
UKCA DECLARATIONS OF CONFORMITY UK CA
This appliance has been manufactured to the strictest standards and complies with all applicable legislation.
WARRANTY
Your new appliance is covered by warranty. The warranty card is enclosed - if it is missing, you must provide the following information to your retailer in order to receive a replacement: date of purchase, model and serial number (placed on the inside of the appliance storage drawer). Registration can also be completed online by visiting www.caple.co.uk.
Ensure you keep your warranty card safe, you may need to show it to Caple Service together withproof of purchase. If you fail to show your warranty card you will incur all repair charges. Spare parts are only available from Caple Service and spare parts authorised centres.
PRODUCT OVERVIEW
A. Main switch
(Aa) - On / Off button
B. Handles
C. Nozzle
D. Water tank (removable)
E. Cup tray
F. Drip tray grill (removable)
G. Service door
H. Height adjustable coffee dispenser
I. Control panel
J. Coffee bean holder cover
K. Ground coffee chute cover
L. Brewing unit
M. Power cable
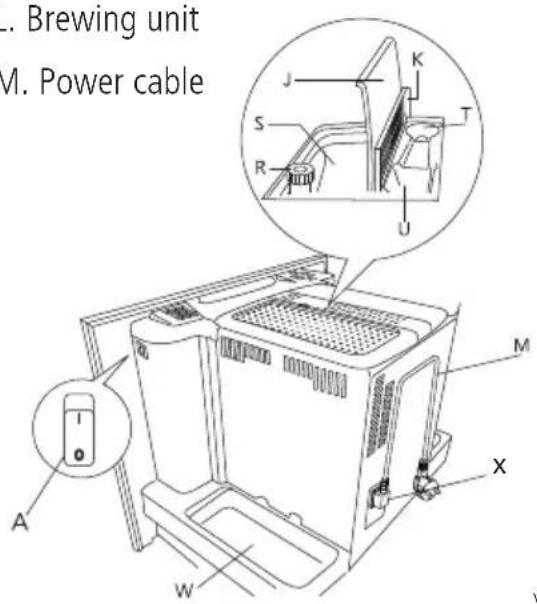
N. Milk container:
N1. Cover (removable)
N2. Slider CAFFELATTE/CAPPUCCINO (removable)
N3. CLEAN button
N4. Milk dispenser pipe (removable)
N5. Suction pipe (removable)
O. Hot water nozzle (removable)
P. Measuring spoon for preground coffee
Q. Waste coffee container (can be taken out)
R. Knob for setting the grind level
S. Coffee bean container
T. Place for the measuring spoon
U. Filling chute for preground coffee
V. Coffee guide
W. Place for accessories (left and right)
X. IEC Connector
Y. LED
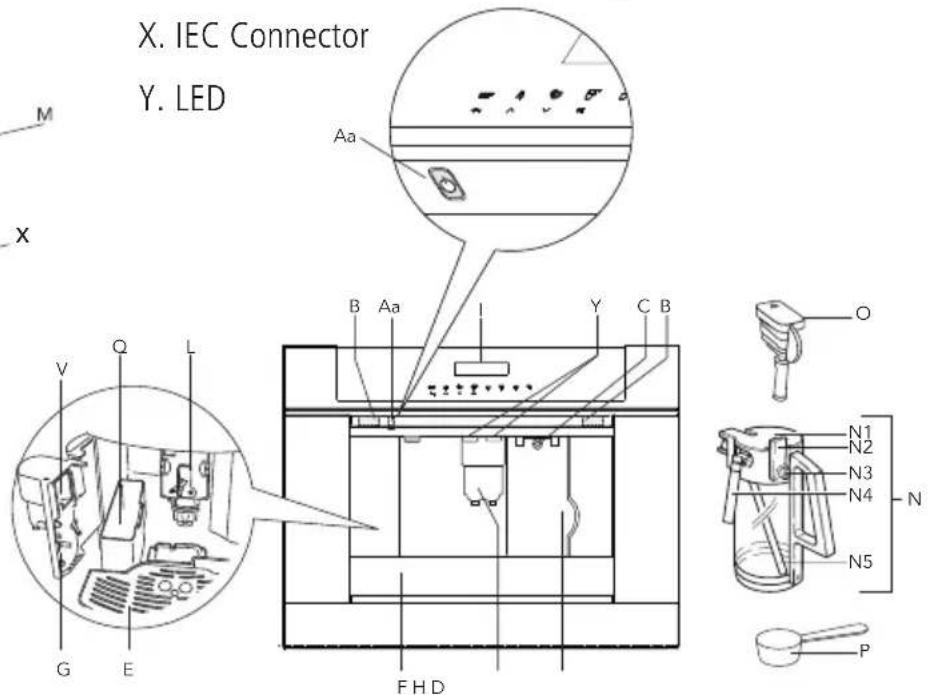
CONTROL PANEL
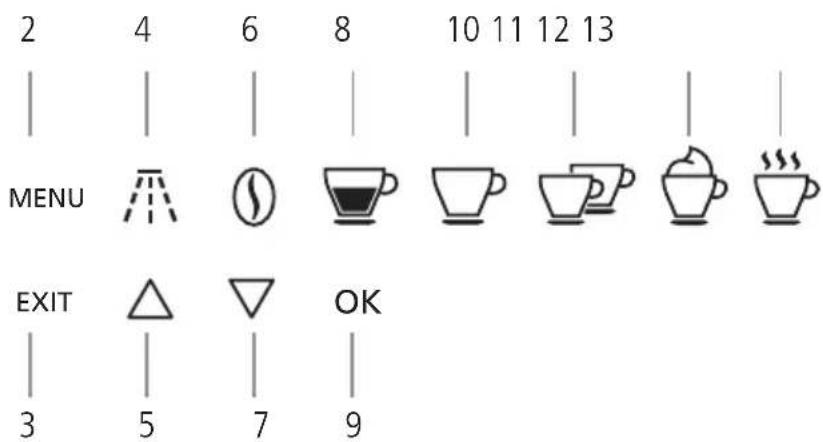
- 'MENU' to activate or deactivate menu
- 'RETURN' to exit the selected mode
- 'Rinse'
- 'SCROLL' to scroll forwards through the menu and display
- 'COFFEE STRENGTH' to select strength or preground
- 'SCROLL' to scroll backwards through the menu and display
- Touch key to select the type/quantity of coffee (espresso, smallcup, medium cup, large cup, mug)
- 'OK' to confirm the selected function
- Touch key 'One cup of coffee'
- Touch key 'Two cups of coffee'
- Touch key 'Cappuccino'
- Touch key 'Hot water deliver'
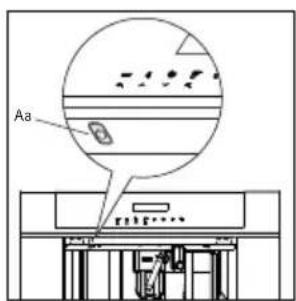
Fig.1
The first time you switch on the appliance with the main switch (see 'A' on the 'Product overview' section) and every time that it is plugged in, the appliance executes a "SELF-DIAGNOSIS" action. Then the appliance switches off.
To turn it on, press the On/off button (Aa/see fig. 1) on the left side underneath the control panel.
Coffee has been used to factory test the appliance and it is therefore completely normal for there to be traces of coffee in the mill.
Customise water hardness as soon as possible following the instructions in the "Setting water hardness" section.
- Connect the appliance to the mains supply.
- Switch on the appliance with the main switch (see 'A' on 'Product overview').
- Start the appliance with the on/off button (see 'Aa').
- Set the required language.
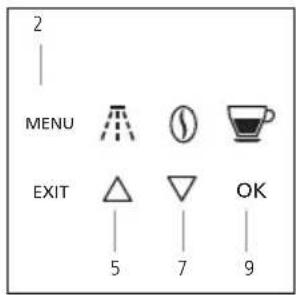
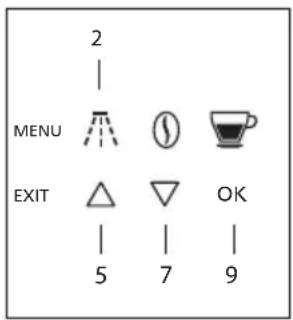
Choose the required language using the 'scroll' touch keys (5 and 7). When the message "PRESS OK TO CHOOSE ENGLISH" is displayed, press and hold the touch key 'Ok' (9). If you set the wrong language, follow the instructions in the "Setting the language" section. If your language is not available, select one from those displayed. The instructions refer to the English version. Then follow the instructions displayed:
- After 5 seconds, the appliance displays "ENGLISH INSTALLED".
Extract the water tank, rinse and fill with fresh water without exceeding the MAX line.
Replace and push as far as it will go.
- Place a cup under the hot water spout (If the hot water spout is not inserted, the appliance displays "INSERT WATER SPOUT".
The appliance displays: "HOT WATER PRESS OK".
Press the touch key 'OK' (9) and after a few seconds a little water comes out of the spout.
- The machine now displays "TURNING OFF...PLEASE WAIT" and goes off.
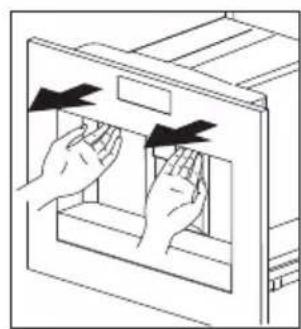
- Extract the appliance by pulling it out using the handles. Open the lid and fill the container with coffee beans, then close the lid and push the appliance in. The coffee maker is now ready for normal use.
Only fill the water tank with cold water. Never use other liquids such as mineral water or milk.
WARNING:
To prevent malfunctions, never fill with ground coffee, frozen or caramelised coffee beans or anything else that could damage the appliance.
TIPS:
When using the appliance for the first time, you need to make 4-5 cups of coffee and 4-5 cappuccinos before the appliance gives satisfactory results.
Each time you turn the coffee maker on by the main switch (A), it performs a "SELF DIAGNOSIS" cycle and then goes off. To turn it on again, press the On/off button (Aa).
natural_image
Two identical rectangular panels showing a coffee machine with cups inside, no text or symbols present.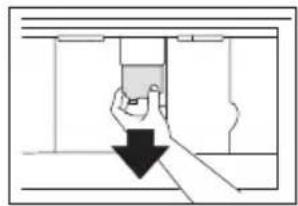
natural_image
Simple line drawing of a hand holding a small object through a doorway, with a black arrow pointing downward (no text or symbols)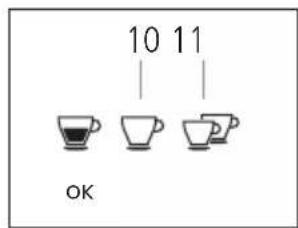
natural_image
Illustration of a hand inserting a device into a file, with a circular arrow indicating rotation (no text or symbols present)PREPARING COFFEE (USING COFFEE BEANS)
The appliance is preset to make coffee with a normal taste. You can also choose coffee with an extra mild, mild, standard, strong or extra-strong taste. There is also a pre-ground coffee option.
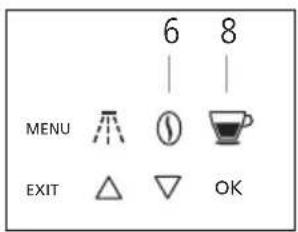
To choose the required taste, continually press the touch key 'Coffee strength' (6) until the required coffee taste is displayed.
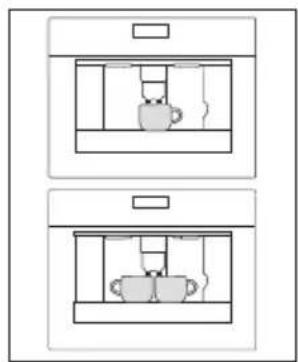
- Place 1 cup under the spouts to make 1 coffee or 2 cups for 2 coffees.
- Lower the spouts as near as possible to the cup for a creamier coffee.
- Press the 'type of coffee' touch key (8) to select the type of coffee:
ESPRESSO CUP
SMALL CUP
MEDIUM CUP
LARGE CUP
MUG
- Press the 'deliver one cup of coffee' touch key (10) if you want to make one coffee and the 'two cup of coffee' touch key (11) if you want to make two coffees.
The appliance now grinds the beans and starts delivering the coffee into the cup.
Once the set amount of coffee has been delivered, the machine stops delivery automatically and expels the exhausted waste coffee into the waste coffee container.
After a few seconds, the appliance is ready for use again.
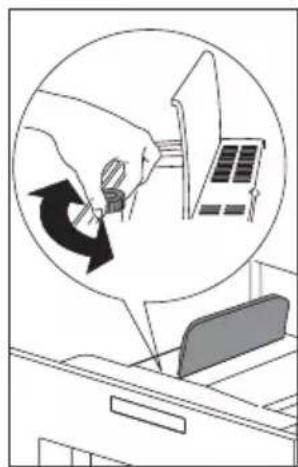
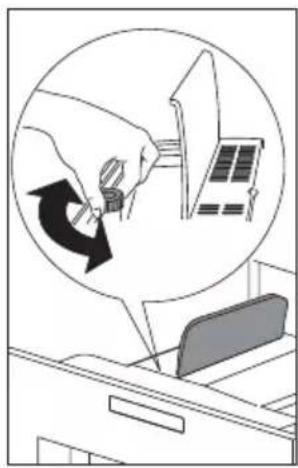
To turn the appliance off, press the 'On-off' button (Aa / see page 5). Before going off, the appliance performs an automatic rinse cycle. Take care to avoid scalds.If the coffee only comes out in drips or not at all, the knob for setting the grind level must be turned by one position clockwise (see "Setting the grind level"). Turn one click at a time until the coffee is delivered satisfactorily.
If the coffee comes out too fast and the cream does not meet your taste, turn the knob by one position anti-clockwise). Make sure that you do not turn the knob for setting the grind level too far, as coffee may come out in drips when dispensing 2 cups.
TIPS TO MAKE HOTTER COFFEE:
3 minutes after your last made coffee, you can preheat the brewing unit by using the menu setting "RINSING (see Rinsing). Run off the water into the underlying drip tray or alternatively use this water to fill (and then empty) the cup to be used for the coffee.
Do not use cups that are too thick, as they will absorb too much heat.
You can stop the coffee from dispensing by pressing the 'deliver one cup of coffee' touch key (10) or 'Two cup of coffee' touch key (11) again, or by selecting "ESPRESSO CUP" with the 'Type/quantity of coffee' touch key (8).
After the coffee has finished dispensing (the progress bar reaches 100%), you can increase the amount of coffee by pressing and holding the 'One cup of coffee' touch key until the desired amount of coffee is reached.
When the display shows the message "FILL TANK!", you must fill the tank, otherwise the appliance cannot make any coffee. It is normal that there is some water left in the water tank when the message is displayed.
Every 14 single coffees (or 7 doubles) the appliance displays "EMPTY WASTE COFFEE CONTAINER". This means that the waste coffee container is full and must be emptied and cleaned.
natural_image
Diagram of a mechanical device with an arrow indicating rotational motion (no text or symbols)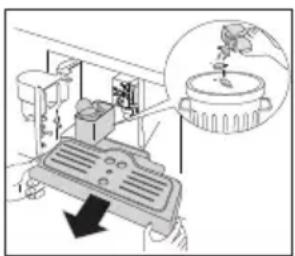
natural_image
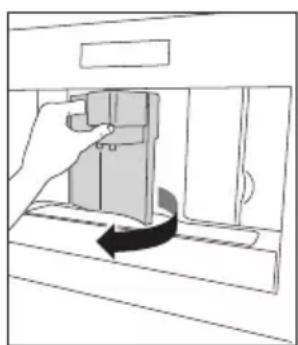
Diagram of a mechanical device with an inset showing a component (no text or symbols present)The appliance counts the number of coffees made. As long as the waste coffee container is not cleaned, this message remains in place and the coffee machine cannot make any coffee. To clean, open the service door at the front by pulling the coffee spout, remove the drip tray, empty it and clean it.
IMPORTANT
Always completely extract the drip tray, to avoid it falling when removing the grounds container. Empty the grounds container and clean thoroughly, making sure all residues deposited on the bottom are removed.
Every time you pull the drip tray out, the waste coffee container must also be emptied, even if it is not completely full. If this process is not carried out, the waste coffee container may overfill when coffee is made and the machine may get blocked.
Never remove the water tank when the appliance is dispensing coffee. Otherwise, the appliance will not be able to make the coffee. If the appliance malfunctions, do not contact Caple service straight away, first look at the troubleshooting guide. If this does not help, contact Caple customer service.
CHANGING THE QUANTITY OF COFFEE:
The appliance is factory preset to automatically deliver the following quantities of coffee:
ESPRESSO CUP;
SMALL CUP;
MEDIUM CUP;
LARGE CUP;
MUG.
TO CHANGE THESE QUANTITIES, PROCEED AS FOLLOWS:
- Press the touch key 'MENU' (2) and press the 'Scroll' touch keys (5 and 7) until the menu option "PROGRAM COFFEE" appears. Confirm the menu option with the touch key 'OK' (9).
- Select the cup size you want to change with the scrolling touch keys (5 and 7). When the desired cup size is displayed, confirm it with the touch key 'OK' (9).
- A bar appears on the display, which can be made bigger or smaller; this represents the cup filling quantity. A different quantity can be selected using the scrolling touch keys (5 and 7) in 10 steps. A full bar indicates that the maximum cup filling quantity of 220ml is selected.
- Select the desired cup filling quantity and confirm it with the touch key 'OK' (9) to programme this setting. If you don't press the touch key 'OK' (9), the appliance automatically returns to the coffee mode after 120 seconds without saving. After programming the display automatically jumps back to the menu option for setting the filling quantity. To go back to the coffee mode immediately, press the touch key 'MENU' (2) twice or wait about 120 seconds until the appliance automatically returns to the coffee mode.
SETTING THE GRIND LEVEL
natural_image
Illustration of a hand using a tool to rotate a circular arrow into a file folder (no text or symbols)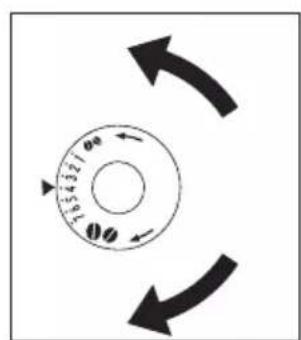
natural_image
Illustration of hands inserting or removing a device into a rack (no text or symbols)If coffee is dispensed too quickly or too slowly (in drips), you can change the grind level.
Only change the grind level during the milling process. Otherwise, the coffee machine may be damaged.
- Turn anti-clockwise to obtain finer ground coffee, slower delivery and a creamier appearance.
- Turn clockwise for coarser ground coffee and faster delivery (not a drop at a time).
The adjustment will be evident after at least 2 cups of coffee are made.
PREPARING ESPRESSO COFFEE USING GROUND COFFEE
- Press the 'Coffee strength' touch key (6) and select "PRE-GROUND".
- Extract the machine by pulling it outwards using the handles.
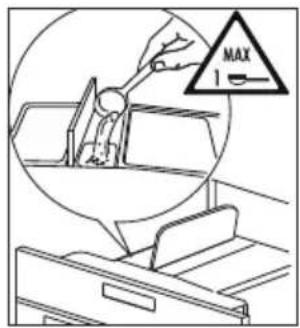
- Lift the central lid, place one measure of preground coffee in the funnel push the appliance back and proceed as described in the section "Making coffee using coffee beans". You can make just one coffee at a time by pressing the 'One cup deliver' touch key (10).
- After using the machine with pre-ground coffee, to go back to making coffee using beans, deactivate the pre-ground coffee function by pressing the 'Coffee strength' touch key (6).
natural_image
Line drawing of a hand operating a tool inside a circular frame, with no visible text or symbolsNOTES:
-
Never introduce pre-ground coffee when the machine is off as it could spread through the inside of the appliance.
-
Never add more than 1 measure, otherwise the appliance will not make the coffee.
-
Use the measure provided only.
-
Introduce only pre-ground coffee for espresso coffee machines into the funnel.
-
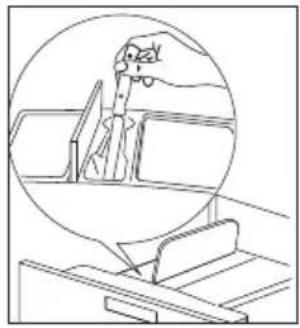
If more than one measure of pre-ground coffee is used and the funnel clogs, push the coffee down with a knife then remove and clean the brewing unit and machine as described in the "Cleaning the brewing unit" section.
natural_image
Diagram of a door handle mechanism with directional arrows indicating movement (no text or symbols)PREPARING HOT WATER
Hot water can be used to warm up cups and to make hot drinks, such as tea or packet soups.
WARNING:
Escaping hot water can lead to scalds. Only activate the hot water nozzle when there is a receptacle underneath it.
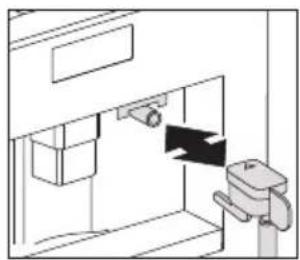
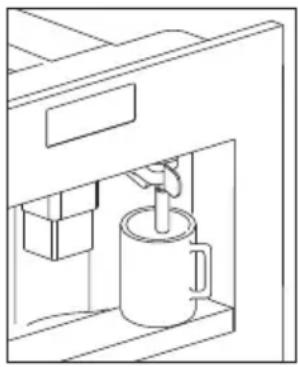
- Put the hot water nozzle in place.
- Place a container underneath the hot water nozzle.
-
Press the 'Hot water' touch key (13). The display shows "HOT WATER PRESS OK".
-
Press the touch key 'OK' (9). Hot water is dispensed; the display shows "HOT WATER". Once the programmed amount of hot water is dispensed, dispensing stops automatically.
For a few seconds the display shows "PLEASE WAIT". After that the appliance is ready to make coffee again and the last selected coffee setting appears on the display.
CHANGING THE QUANTITY OF HOT WATER
natural_image
Line drawing of a coffee maker with a mug inside a container (no text or symbols)The machine is set by default to automatically delivery 150ml of hot water. To change these quantities, proceed as follows:
- Place a container underneath the water spout.
- Press the touch key 'MENU'(2) to enter the menu
- Press the Scroll touch keys (5 and 7) until "PROGRAM HOT WATER" is displayed.
- Press the touch key 'OK' (9) to confirm.
- Select the required quantity of water by pressing scroll touch keys (5 and 7). The progress bar shows the quantity of water selected.
- Press the touch key 'OK' (9) to confirm (or the 'Return' touch key (3) to cancel the operation.
- Press the 'Return' touch key (3) to exit the menu.
- The appliance is now reprogrammed with the new settings and is ready.
MAKING CAPPUCCINO
natural_image
Simple line drawing of a pot with a handle and arrow indicating direction (no text or symbols)The machine is set by default to automatically delivery a standard cappuccino.
- Select the taste of the coffee you want to use to make the cappuccino by pressing the 'Coffee strength' touch key (6).
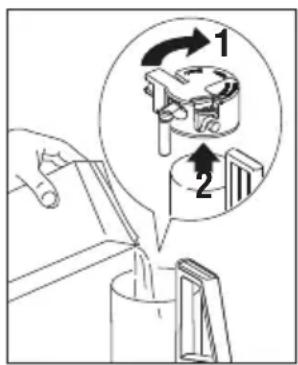
- Remove the lid of the milk container.
- Fill the container with about 100ml of milk for each cappuccino to be prepared. Never exceed the MAX level (corresponding to about 750ml) marked on the container. You should ideally use skimmed or semi skimmed milk at refrigerator temperature (about 5°C).
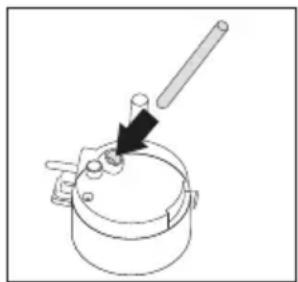
- Make sure the intake tube is correctly inserted in the rubber washer. Then replace the milk container lid.
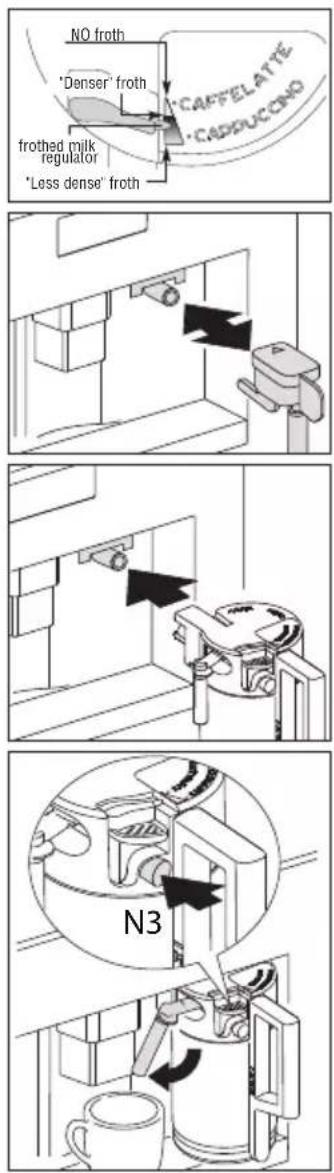
- Position the frothed milk regulator (N2) between the words CAPPUCCINO and CAFFELATTE printed on the milk container lid.
- The quantity of froth can be adjusted by moving the regulator towards the word CAFFELATTE for a denser froth. Moving it towards the word CAPPUCCINO obtains a less dense froth.
- Remove the hot water spout and attach the milk container to the nozzle.
- Position the milk spout and then place a sufficiently large cup under the coffee and milk spouts.
- Press the 'Cappuccino deliver' touch key (12). "CAPPUCCINO" is displayed and after a few seconds, frothed milk flows out of the milk spout into the cup below (delivery stops automatically).
- The appliance delivers coffee.
- The cappuccino is now ready. Sweeten to taste and, if desired, sprinkle the froth with a little cocoa powder.
NOTES:
-
While making cappuccino, the flow of frothed milk or coffee can be interrupted by pressing the 'Cappuccino deliver' touch key (12).
-
If the milk in the container finishes while delivering frothed milk, remove the container and add milk. Then re-attach it and press the 'Cappuccino deliver' touch key (12) to request cappuccino again.
-
To ensure the complete cleanliness and hygiene of the milk frother, always clean the circuits in the milk container lid after making cappuccino. "PRESS CLEAN!" flashes on the display.
Place a recipient under the milk spout.
Press the CLEAN button on the lid (N3) and hold down for at least 5 seconds to start the cleaning function.
The appliance displays the message "CLEANING" above a progressive bar. You should not release the CLEAN button until the bar is complete indicating that cleaning is concluded.
When the CLEAN button is released, the function stops. After cleaning, remove the milk container and place in the refrigerator. The milk should not be left out of the refrigerator for more than 15 minutes.
- To change the quantity of coffee or frothed milk the appliance delivers automatically into the cup, proceed as described in the section "Changing the quantity of coffee and milk for cappuccino".
CHANGING THE QUANTITY OF MILK AND COFFEE FOR CAPPUCCINO
The appliance is set by default to automatically deliver a standard cappuccino. To change these quantities, proceed as follows:
CHANGING THE QUANTITY OF MILK
- Fill the container with milk up to the maximum level indicated on the container.
- Press the touch key 'MENU' (2) to enter the menu.
- Press the 'Scroll' touch keys (5 and 7) until "PROGRAM CAPPUCCINO" is displayed.
- Press the touch key 'OK' (9) to confirm. "PROGRAM MILK" is displayed.
- Press the touch key 'OK' (9) again.
- Select the quantity of milk required by pressing the 'Scroll' touch keys (5 and 7). The progress bar shows the quantity of milk selected.
- Press the touch key 'OK' (9) to confirm or the 'Return' touch key (3) to cancel the operation).
- Press the 'Return' touch key (3) twice to exit the menu.
CHANGING THE QUANTITY OF COFFEE
- Press the touch key 'MENU' (2) to enter the menu.
- Press the 'Scroll' touch keys (5 and 7) until "PROGRAM CAPPUCCINO" is displayed.
- Press the touch key 'OK' (9) to confirm.
- Press the 'Scroll' touch keys (5 and 7) until "COFFEE FOR CAPPUCC." is displayed.
- Press the touch key 'OK' (9) again.
- Select the quantity of coffee required by pressing the Scroll touch keys (5 and 7). The progress bar shows the quantity of coffee selected.
- Press the touch key 'OK' (9) to confirm or the 'Return' touch key (3) to cancel the operation.
- Press the 'Return' touch key (3) twice to exit the menu.
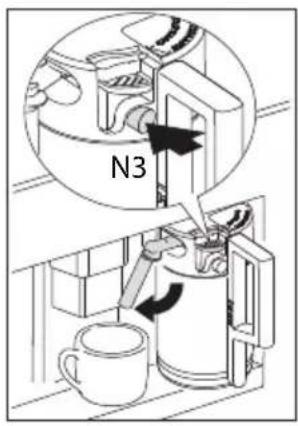
CLEANING THE NOZZLES
Clean the nozzles on the milk container every time after heating milk or making cappuccino. Otherwise, remains of milk may set hard.
- Place a container under the milk dispenser pipe and press on the CLEAN button (N3) on the milk container for at least 5 seconds. The display shows "CLEANING!"
WARNING:
Risk of scalding from steam and hot water escaping from the milk dispenser pipe
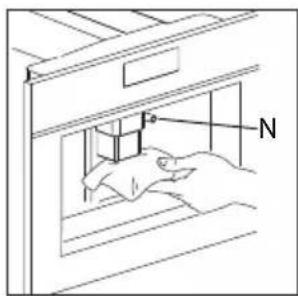
-
Remove the milk container and clean the nozzles on the appliance with a damp cloth.
-
Put the hot water nozzle back in.
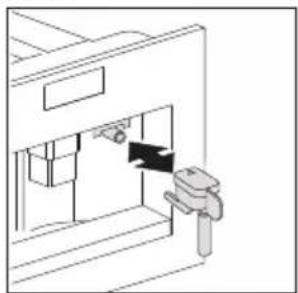
natural_image
Line drawing of a door with a handle and internal components (no text or symbols)After you have finished cleaning, remove the milk container and place it in the fridge, as the milk should not stay out of the fridge for longer than 15 minutes. See "Cleaning the nozzles and the milk container" for information on cleaning the milk container.
The menu options are used to change and save the appliance's factory settings, start programmes and look up information.
They are:
Language
Temperature
Descale
Auto shut off time
Water hardness
Reset to default
Set clock
Coffee programme
Statistics
Start time (auto)
Cappuccino programme
Buzzer
Auto start
Hot water
Contrast
If you don't press OK after you change a setting, the appliance automatically returns to the coffee mode after 120 seconds without saving the entries.
To go back to the coffee mode, press the 'Return' touch key.
SETTING THE LANGUAGE
You can choose between several languages.
A different language can be selected as follows:
- Press the touch key 'MENU' and press the scroll touch keys until the menu option "CHOOSE LANGUAGE" appears. Confirm the menu option with the touch keys 'OK'.
- The language set appears on the display. Press the scroll touch keys until the desired language appears. When the desired language is displayed, confirm with the touch keys 'OK'.
WATER HARDNESS
A “PLEASE DESCALE!” message is displayed after the appliance has been operated for a factory set period of time, calculated on the basis of the maximum quantity of lime scale which may be contained in the water used. If necessary, this period of operation can be extended, making descaling less frequent, by programming the appliance based on the actual lime content in the water used. Proceed as follows:
- Remove the "Total Hardness Test" strip that comes included in the instruction manual set. Dip it fully in the water for a few seconds. Remove it and wait 30 seconds until its colour changes and a number of red dots are formed. For example, if there are 3 red dots on the test strip, you must set the water hardness level to 3.
If you no longer have a water hardness test, this information can be obtained from the local water hardness board. - Press the touch key 'MENU' and press the scroll touch keys until the menu option "WATER HARDNESS" appears. Confirm the menu option with the touch key 'OK'.
- The display shows the current setting. Press the scroll touch keys until the established hardness level is displayed. Confirm the selection with the touch key 'OK'. The appliance is now programmed to provide the descaling warning when necessary, based on the actual hardness of the water.
You can choose between three temperature levels. The coffee temperature levels are defined as follows:
TEMPERATURE LOW
TEMPERATURE MEDIUM
TEMPERATURE HIGH
The factory setting is TEMPERATURE HIGH.
You can change this as follows:
- Press the touch key 'MENU' and press the scroll touch keys until the menu option "TEMPERATURE" appears. Confirm the menu option with the touch key 'OK'.
- The display shows the current setting. Select another temperature with the scroll touch keys. When the desired temperature is displayed, confirm it with the touch key 'OK'.
SETTING THE SWITCH-OFF TIME
The appliance is set by default to go off automatically 30 minutes after the last coffee has been made. To change this interval (max. 120 min), proceed as follows:
AUTO SHUTOFF TIME 1/2 hour
AUTO SHUTOFF TIME 1 hour
AUTO SHUTOFF TIME 2 hour
You can change this as follows:
- Press the touch key 'MENU' and press the scroll touch keys until the menu option "AUTO SHUTOFF TIME" appears. Confirm the menu option with the touch key 'OK'.
- Select another switch-off time with the scroll touch keys. When the desired switch-off time is displayed, confirm it with the touch key 'OK'.
CARRYING OUT THE DESCALING PROGRAMME
When the display shows "PLEASE DESCALE!", the appliance must be descaled.
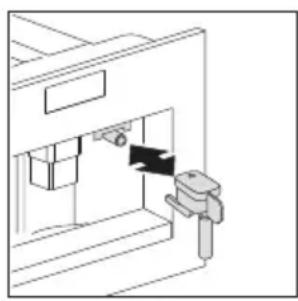
natural_image
Pure technical line drawing of a mechanical assembly without any text, numbers, or symbols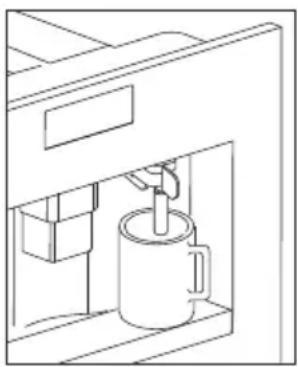
natural_image
Line drawing of a coffee maker with a cup inside, no text or symbols present- Insert the hot water nozzle.
- Press the touch key 'MENU' and press the scroll touch keys until the menu option "DESCALE" appears. Confirm the menu option with the touch key 'OK'.
- The display shows "PLEASE CONFIRM". Confirm with the touch key 'OK'. The descaling programme starts.
The top line of the display alternates between "ADD DESCALER" and "PLEASE CONFIRM". - Empty the tank of water, pour the contents of the descaler pack into the tank respecting the instructions given on the descaler pack, then add water. For subsequent descaling operations, descaling solutions can be purchased from www.caple.co.uk.
Make sure that any splashes from the descaling product do not come into contact with surfaces that are sensitive to acids, such as marble, limestone and ceramic.
-
Put a container with a capacity of at least 2 litres underneath the hot water nozzle.
-
Press the touch key 'OK' (9). The display shows "DESCALING". The descaling liquid runs out of the hot water nozzle. The descaling programme automatically goes through a series of rinses and pauses to remove limescale deposits from the inside of the coffee machine. After about 30 minutes the water tank is empty and the top line of the display alternates between "DESCALE COMPLETE" and "PLEASE CONFIRM".
-
Press the touch key 'OK' (9). The display shows "RINSING, FILL TANK". The appliance is now ready for a rinsing process with clean water.
-
Empty the container under the hot water nozzle and put it back under the hot water nozzle.
- Take out the water tank and fill it with clean water.
- Put the water tank back in place. The display shows: "RINSING".
- Press the touch key 'OK' (9). A rinsing process takes place with cleanwater and the rinsing water runs out of the hot water nozzle. After a few minutes the water tank is empty and the display shows "RINSING COMPLETE PLEASE CONFIRM".
- Press the touch key 'OK' (9). The display shows "DESCALE COMPLETE" and then "FILL TANK!"
- Take out the water tank, fill it with clean water and put it back in place. The appliance is now ready for use again and is back to the last coffee mode selected.
NOTE:
If the descaling cycle is interrupted before completion, the appliance continues to display the descale message and the programme must be started again from the beginning. Failure to descale the appliance invalidates the guarantee.
RINSING
If 2/3 minutes have passed, since you last made coffee, you should first rinse the system to preheat the brewing unit. Select the rinsing function from the appropriate menu. Let the water run into the drip tray underneath. You can also use this water to warm up the cup that you are using for the coffee. In this case simply let the hot water run into the cup (and then empty it).
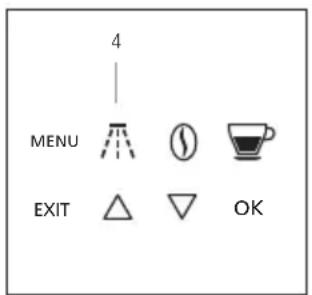
- Press the touch key 'RINSE' (4).
- The appliance performs an automatic rinse cycle (a little hot water runs out of the spouts and is collected in the drip tray beneath).
STATISTICS
You can look up the following information values:
Total number of coffees made with the appliance up to that point
Number of descaling procedures carried out
Number of cappuccinos made
Numbers of litres of water
2 cups of coffee dispensed at the same time are counted as 2 cups.
Proceed as follows to look up the values:
- Press the touch key 'MENU' and press the scroll touch keys until the menu option "STATISTICS" appears. Confirm the menu option with the touch key 'OK'.
- The number of cups dispensed so far appears on the display, e.g. "TOT. COFFEES 135".
- Repeatedly press the scroll touch key to show the number of descaling procedures carried out, e.g. "TOT. DESCALES 5", "TOT. WATER" and then number of cappuccino's, e.g. "TOT. CAPPUCCINO 135".
RESETTING THE APPLIANCE TO FACTORY SETTINGS
This function resets previously changed values to the factory settings. The following settings or saved data are affected:
The factory default values can be reset as follows:
Coffee, water and
cappuccino quantity
Water hardnessCoffee temperature
Switch-off time
Switch-on time
Contrast
- Press the touch key 'MENU' and press the scroll touch keys until the menu option "RESET TO DEFAULT" appears. Confirm the menu option with the touch key 'OK'.
- The display shows "PLEASE CONFIRM".
-
Confirm the menu option with the touch key 'OK'.
-
Press the touch key 'MENU' to enter the menu and then the scroll touch keys until "SET CLOCK" is displayed.
- Press the touch key 'OK'.
- Use the scroll touch keys to set the hour, then press the OK icon to confirm.
- Use the scroll touch keys to set the minutes, then press the touch key 'OK' to confirm.
- Press the touch key 'RETURN' to exit the menu.
SETTING AUTO-START TIME
This function programmes the time the machine will come on automatically.
- Make sure the clock on the appliance has been set.
- Press the touch key 'MENU' to enter the menu and then the scroll touch keys until "START TIME" is displayed.
- Press the touch key 'OK'.
- Use the scroll touch keys to set the auto-start time, then press the touch key 'OK' to confirm.
- Use the scroll touch key to set the minutes, then press the touch key 'OK' to confirm.
AUTO-START
- Press the scroll touch keys to activate the auto-start function until "AUTO START" is displayed, press 'OK', display shows "PLEASE CONFIRM".
- Press the touch key 'OK' to confirm. The 'clock' symbol appears on the display.
- Press the touch key 'RETURN' to exit the menu.
- To deactivate the automatic start-up function, press the touch key 'MENU', then press the scroll touch keys until the appliance displays the message "AUTO START". Press the touch key 'OK'. "PLEASE CONFIRM" will appear on the display. Press the touch key 'RETURN' to deactivate and the 'clock' symbol will disappear.
NOTE:
This function does not automatically make coffee. It turns on the machine, runs the diagnostic check and readys the machine automatically to make coffee.
BUZZER
This activates or deactivates the buzzer emitted by the machine each time an icon is pressed or an accessory is inserted/removed.
NOTE:
The buzzer is active by default.
- Press the touch key 'MENU' to enter the menu and then the scroll touch keys until "BUZZER" is displayed.
- Press the touch key 'OK'. "BUZZER PLEASE CONFIRM" is displayed.
- Press the touch key 'RETURN' to disable or the touch key 'OK to enable the buzzer.
- Press the touch key 'RETURN' to exit the menu.
ADJUSTING CONTRAST
To increase or reduce the contrast of the display, proceed as follows:
- Press the touch key 'MENU' to enter the menu and then the scroll touch keys until "CONTRAST" is displayed.
- Press the touch key touch key 'OK'.
- Press the scroll touch keys until the required display contrast is reached. The progressive bar indicates the level of contrast selected.
- Press the touch key 'OK' to confirm.
- Press the touch key 'RETURN' once to exit the function or twice to exit the menu.
Before performing any cleaning operations, the machine must be turned off by pressing the main switch and unplugged from the mains power supply. Never immerse the coffee maker in water.
CLEANING THE COFFEE MACHINE
Do not use solvents or abrasive detergents to clean the coffee maker. A soft damp cloth will suffice. Never wash any of the components of the coffee maker in the dishwasher.
The following parts of the machine must be cleaned regularly:
Waste coffee container
Drip tray
Water tank
Coffee spoutsPre-ground coffee funnel
Inside of the machine, accessible after opening the service door
Brewing unit
natural_image
Line drawing of a hand inserting a device into a door, showing motion direction (no text or symbols)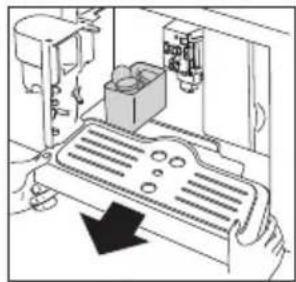
natural_image
Diagram of a mechanical device with a component and directional arrow (no text or symbols)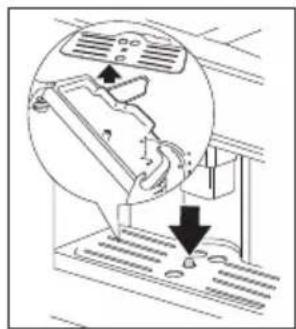
natural_image
Diagram of a mechanical device with an inset showing airflow or force direction (no text or symbols)CLEANING THE WASTE COFFEE CONTAINER
When "EMPTY WASTE COFFEE CONTAINER" is displayed, the waste coffee container must be emptied and cleaned. To clean:
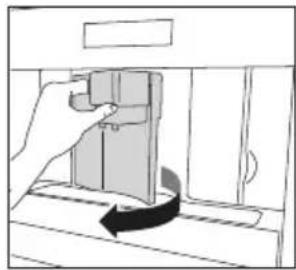
Open the service door on the front of the appliance, extract the drip tray and clean.
Clean the waste coffee container thoroughly.
IMPORTANT
When extracting the drip tray, the waste coffee container must always be emptied.
CLEANING THE DRIP TRAY
IMPORTANT
If the drip tray is not emptied the water might overflow. This could damage the machine. The drip tray is fitted with a level indicator (red) showing the level of water it contains. Before the indicator protrudes from the cup tray, the drip tray must be emptied and cleaned.
natural_image
Diagram of a hand pressing a mechanical component with an arrow indicating motion (no text or symbols present)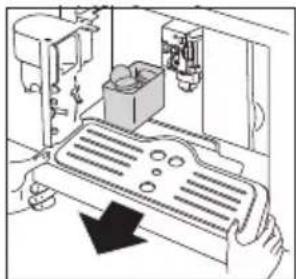
natural_image
Diagram of a mechanical device with a black arrow indicating direction (no text or symbols present)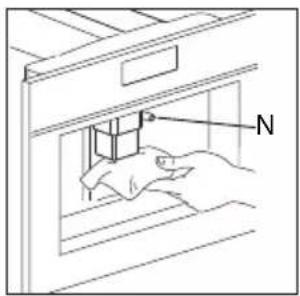
natural_image
Line drawing of a hand holding a small object above a window (no text or symbols)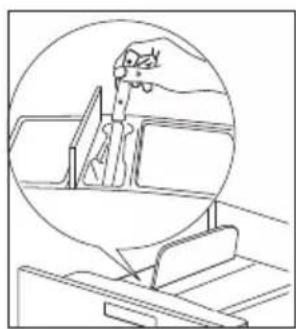
natural_image
Line drawing of a mechanical assembly with a hand operating a tool, enclosed in a circular frame (no text or symbols)TO REMOVE THE DRIP TRAY:
- Open the service door.
- Remove the drip tray and the waste coffee container.
- Clean the drip tray and waste coffee container.
- Replace the drip tray and waste coffee container.
- Close the service door.
CLEANING THE WATER TANK
- Clean the water tank regularly (about once a month) with a damp cloth and a little mild washing up liquid.
- Remove all traces of washing up liquid.
CLEANING THE SPOUTS
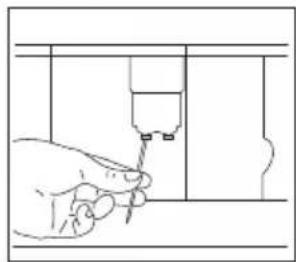
- Clean the nozzles periodically using a sponge.
- Check regularly that the holes in the coffee spout are not blocked. If necessary, remove coffee deposits with a toothpick.
Milk residues left on the nozzle and in the container may impact the correct operation of the appliance.
Each time you use the coffee maker, they must therefore be removed by cleaning the nozzle with a sponge.
CLEANING THE PRE-GROUND COFFEE FUNNEL
Check regularly (about once a month) that the pre-ground coffee funnel is not blocked.
natural_image
Line drawing of a hand holding a tool near an industrial machine (no text or symbols)CLEANING THE INSIDE OF THE COFFEE MAKER
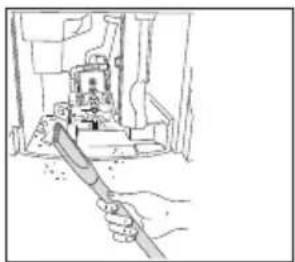
Check regularly (about once a week) that the inside of the appliance is not dirty. If necessary, remove coffee deposits with a sponge.
Remove the residues with a vacuum cleaner.
CLEANING THE BREWING UNIT
The brewing unit must be cleaned regularly to avoid the build-up of coffee encrustations which could cause malfunction.
The brewing unit can only be taken out when the appliance is switched off by pressing the on/off button under the control panel. Otherwise, the coffee machine may be seriously damaged.
Proceed as follows:
natural_image
Diagram of a hand operating a mechanical device with directional arrows indicating motion (no text or symbols present)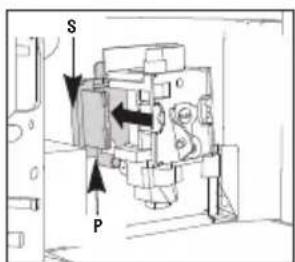
natural_image
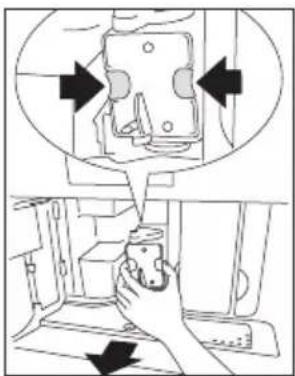
Illustration of two hands holding a mechanical device with arrows indicating direction (no text or symbols)- Turn the appliance off by pressing the on/off button (do not switch off the main switch or unplug) and wait for the display to go off.
- Open the service door.
- Remove the drip tray and the waste coffee container.
- Press the two red release buttons inwards and at the same time pull the brewing unit outwards.
Clean the brewing unit under running tap water without using detergent. Never clean the brewing unit in the dishwasher.
Do not use washing up liquid to clean the brewing unit. It would remove the lubricant applied to the inside of the piston.
- Soak the brewing unit in water for about 5 minutes, then rinse.
- After cleaning, replace the brewing unit by sliding it onto the internal support (S) and pin (P) at the bottom, then push the PUSH symbol fully in until it clicks into place.
NOTE:
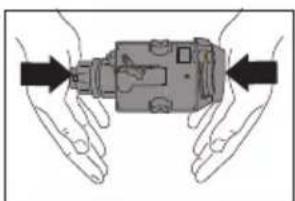
If the brewing unit is difficult to insert, you must first adapt it to the right dimensions by pressing it forcefully from the bottom and top.
natural_image
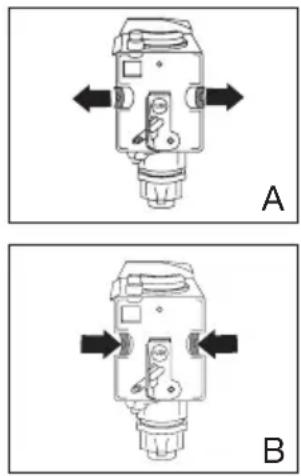
Technical line drawing of a mechanical component with directional arrows, labeled A and B (no text or symbols on the diagram itself)- Once inserted, make sure the two coloured buttons have snapped back out, otherwise the service door cannot be closed.
The two coloured buttons are correctly snapped out (A).
The two coloured buttons are not snapped out (B).
-
Replace the drip tray and waste coffee container.
-
Close the service door.
NOTES:
If the brewing unit is not put in place correctly, the service door cannot be closed.
If it is difficult to insert the brewing unit, it must be made into the right height (before inserting) by pressing the brewing unit firmly together from top and bottom.
If it is still difficult to insert the brewing unit:
Leave it out of the appliance, place the drip tray, close the service door, switch the main switch on the back of the appliance to 'off' and then to 'on' again.
Wait for all the lights to go off, then open the door, remove the drip tray and replace the brewing unit.
Replace the drip tray, together with the grounds container.
Close the service door.

CLEANING THE MILK CONTAINER
Always clean the tubes inside the milk container when you prepare milk. If there is still milk in the container, do not leave it out of the refrigerator for longer than strictly necessary. Clean the container each time you prepare milk as described in the section "Making cappuccino".
All components can be washed in a dishwasher, placing them in the top basket of the dishwasher.
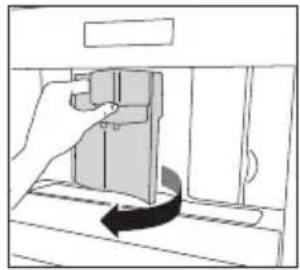
- Turn the milk container lid clockwise then remove it.
- Remove the milk spout (S) and intake tube (M).
- Remove the frothed milk regulator (F) by pulling it outwards.
- Wash all the components thoroughly with hot water and mild washing-up liquid. Make sure there are no milk residues left inside the holes (H) and the groove (G) on the fi ne end of the frothed milk regulator (F).
- Check that the intake tube and spout are not clogged with milk residues.
- Replace the frothed milk regulator, milk spout and intake tube.
- Replace the milk container lid.
CLEANING THE NOZZLES
Clean the nozzles on the milk container every time after heating milk or making cappuccino. Otherwise, remains of milk may set hard.
Place a container under the milk dispenser pipe and press on the CLEAN button (N3) on the milk container for at least 5 seconds. The display shows "CLEANING!"
WARNING
Risk of scalding from steam and hot water escaping from the milk dispenser pipe.
| MESSAGE MEANING WHAT TO DO | ||
| FILL TANK! | The water tank is empty or not properly in place. | Fill the water tank and insert it according to the instructions. |
| The water tank is dirty or limescale deposits have built up inside it. | Rinse out or descale the water tank. | |
| GROUND TOO FINE ADJUST MILL + PRESS 'OK' | Coffee comes out too slowly. | Turn the knob for the grind level setting clockwise by one position (see “Setting the grind level”). |
| The coffee machine cannot make any coffee. | Place a container underneath the hot water nozzle and press the 'hot water' touch key (13). | |
| EMPTY WASTE COFFEE CONTAINER | The waste coffee container is full. | Empty, clean and replace the waste coffee container. |
| INSERT WASTE COFFEE CONTAINER | The waste coffee container was not replaced after cleaning. | Open the service door and insert the waste coffee container. |
| ADD PRE-GROUND COFFEE | No ground coffee was put into the fllling chute after selecting the preground coffee function. | Add ground coffee as described in “Preparing espresso coffee using ground coffee”. |
| FILL BEAN CONTAINER | There are no more coffee beans in the coffee bean container. | Fill the coffee bean container. |
| If the mill mechanism starts sounding very loud, this can mean that a small stone from the coffee beans has blocked the mill mechanism. | Consult customer services. | |
| PLEASE DESCALE! | Shows that the coffee machine is encrusted with limescale. | The descaling programme must be carried out as soon as possible (see "Carrying out the descaling programme". |
| CLOSE DOOR! The service door is open. | Close the service door. If the service door cannot be closed, make sure that the brewing unit is correctly inserted(see "Cleaning the brewing unit"). | |
| INSERT BREWING UNIT! | Someone probably forgot to put the brewing unit back in the coffee machine after cleaning it. | Insert the brewing unit, (see "Cleaning the brewing unit". |
| GENERAL ALARM! The inside of the machine is very dirty. | Carefully clean the inside of the machine (see "Cleaning the coffee machine". If the coffee machine still shows this message once it has been cleaned, please consult customer services. | |
TROUBLESHOOTING
If the appliance does not work properly, this does not always mean that it is defective. If the coffee machine does not work and a message is displayed, refer to the problem solving information in the 'Messages' section. If no message is displayed, try to find a solution first by checking the points mentioned in the table below, or contact our Caple service department.
| FAULT CAUSE SOLUTION | ||
| Coffee is not hot. | The cups were not preheated. | Preheat the cups by rinsing them out with warm water (see "Tips to make hotter coffee"). |
| The brewing unit is too cold. | Warm up the brewing unit with the rinsing programme before making coffee (see "Rinsing"). | |
| The coffee does not have enough cream. | The coffee is too coarsely ground. | Turn the knob for the grind level setting one position anticlockwise (see "Setting the grind level"). |
| The coffee blend is not suitable. | Use a coffee blend suited to fully automated coffee machines. | |
| Coffee comes out too slowly. | The coffee is ground too fine. | Turn the knob for the grind level setting one position clockwise (see "Setting the grind level"). |
| Coffee comes out too quickly. | The coffee is too coarsely ground. | Turn the knob for the grind level setting one position anticlockwise (see "Setting the grind level"). |
| Coffee only comes out of one of the spouts on the coffee dispenser. | The holes on the spouts are blocked. | Remove the dry coffee residues with a needle (see "Cleaning the coffee machine"). |
| The machine does not switch on when the on/ stand by button is pressed | The main switch on the right side of the appliance is not switched on or the mains plug is not plugged in. | Check that the main switch is in the 'ON' position and that the power lead is plugged in the socket properly. |
| The brewing unit cannot be taken out for cleaning. | The coffee machine is switched on. The brewing unit can only be removed when the machine is switched off. | Switch the appliance off and remove the brewing unit (see "Cleaning the brewing unit").IMPORTANT:The brewing unit can only be taken out when the appliance is switched off. If you try to take out the brewing unit whilst the coffee machine is switched on, this could be seriously damaged. |
| Water comes out of the spouts instead of coffee. | Too much preground coffee was inserted. | Remove the brewing unit and carefully clean the inside of the machine (see "Cleaning the coffee machine" and "Cleaning the brewing unit"). Repeat the process using a maximum of 2 level measuring spoons of ground coffee. |
| Ground coffee was used (instead of coffee beans) and the machine will not dispense any coffee. | Preground coffee was inserted whilst the machine was switched off. | Remove the brewing unit and carefully clean the inside of the machine (see "Cleaning the coffee machine" and "Cleaning the brewing unit"). Repeat the process with the machine switched on. |
| Coffee does not come out of the spouts on the coffee dispenser but out of the service door at the side. | The holes on the coffee dispenser are blocked with dried on coffee. | Remove the dried on coffee with a needle (see "Cleaning the coffee machine"). |
| The swing drawer on the inside of the service hatch is blocked and will not move. | Carefully clean the swing drawer, particularly in the area around the hinges so that these continue to move. | |
| Milk is frothed up too much or too little. | Wrong setting of the slider on the lid of the milk container. | You can set the amount of froth on the milk to any level using the slider on the lid: 'CAPPUCCINO' (very frothy milk) or 'CAFFELATTE' (not so frothy milk). |
| If the milk is not frothy enough, the milk container may not be correctly in place. | Put the milk container correctly in place. | |
If the above table has not solved the problem please contact Caple Service by phone on 0117 938 7420 or by email service@caple.co.uk
INSTALLATION INSTRUCTIONS
WARNINGS:
After removing the packaging, make sure the product is complete and undamaged. If in doubt, do not use the appliance and contact your retailer.
Installation must be carried out by qualified personnel and in compliance with current regulations.
Packing elements (plastic bags, polystyrene etc.) must not be left within reach of children as they may represent a hazard.
Never install the appliance in environments where the temperature may reach 0^ C or lower (the appliance may be damaged if the water freezes).
Make sure the mains voltage corresponds to the voltage indicated on the appliance rating plate. Connect the appliance to an efficiently earthed socket with a minimum current rating of 10A.
The manufacturer may not be considered liable for possible incidents caused by the failure to adequately earth the mains.
Make sure the socket used is freely accessible at all times, enabling the appliance to be unplugged when necessary.
Never touch the plug with damp hands.
Never pull the power cable as you could damage it.
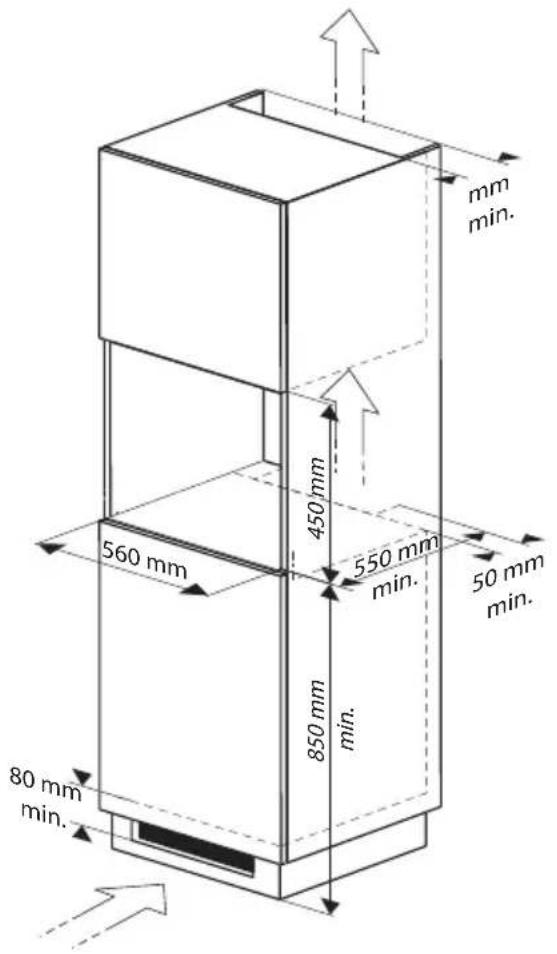
This appliance can be installed over a built-in oven if the latter is fitted with a cooling fan at the rear (maximum power: 3KW).
Do not use multiple plug adapters or extension leads.
The power cable on this appliance must not be replaced by the user as this operation requires the use of special tools. If the cable is damaged or requires replacing, contact an authorised service centre only to avoid all risks.
You should personalise water hardness as soon as possible following the instructions.
BUILDING IN
Please check the minimum dimensions necessary for the proper installation of the appliance. The coffee machine must be installed in a column unit, which must in turn be fixed to the wall.
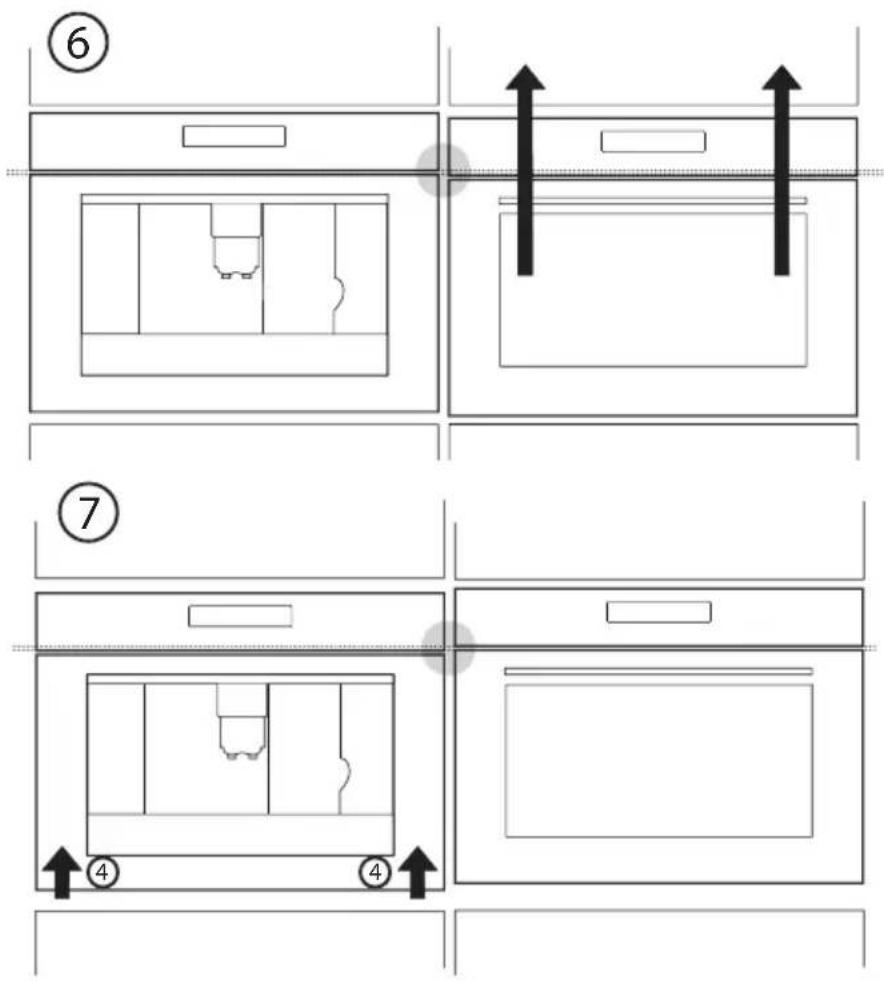
Position the appliance on the rail, making sure the pins are correctly inserted in the housing, then fix it with the screws supplied.
If the height of the appliance requires adjusting, use the spacer disks provided.(4)

caple
Caple Service
Fourth Way
Avonmouth
T: 0117 938 1900
Bristol
E: service@caple.co.uk
BS11 8DW
www.caple.co.uk
- Sense Coffee Machine
- Instruction manual
- CM465, CM465SS, CM465GM & CM465BS
- INTRODUCTION
- PREVENTATIVE MAINTENANCE
- WARNING:
- ENVIRONMENTAL PROTECTION
- CE DECLARATIONS OF CONFORMITY CE
- UKCA DECLARATIONS OF CONFORMITY UK CA
- WARRANTY
- PRODUCT OVERVIEW
- CONTROL PANEL
- Only fill the water tank with cold water. Never use other liquids such as mineral water or milk.
- TIPS:
- PREPARING COFFEE (USING COFFEE BEANS)
- TIPS TO MAKE HOTTER COFFEE:
- IMPORTANT
- CHANGING THE QUANTITY OF COFFEE:
- TO CHANGE THESE QUANTITIES, PROCEED AS FOLLOWS:
- SETTING THE GRIND LEVEL
- Only change the grind level during the milling process. Otherwise, the coffee machine may be damaged.
- PREPARING ESPRESSO COFFEE USING GROUND COFFEE
- NOTES:
- PREPARING HOT WATER
- CHANGING THE QUANTITY OF HOT WATER
- MAKING CAPPUCCINO
- CHANGING THE QUANTITY OF MILK AND COFFEE FOR CAPPUCCINO
- CHANGING THE QUANTITY OF MILK
- CHANGING THE QUANTITY OF COFFEE
- CLEANING THE NOZZLES
- SETTING THE LANGUAGE
- WATER HARDNESS
- SETTING THE SWITCH-OFF TIME
- CARRYING OUT THE DESCALING PROGRAMME
- Make sure that any splashes from the descaling product do not come into contact with surfaces that are sensitive to acids, such as marble, limestone and ceramic.
- NOTE:
- RINSING
- STATISTICS
- RESETTING THE APPLIANCE TO FACTORY SETTINGS
- SETTING AUTO-START TIME
- AUTO-START
- BUZZER
- ADJUSTING CONTRAST
- CLEANING THE COFFEE MACHINE
- CLEANING THE WASTE COFFEE CONTAINER
- CLEANING THE DRIP TRAY
- TO REMOVE THE DRIP TRAY:
- CLEANING THE WATER TANK
- CLEANING THE SPOUTS
- Milk residues left on the nozzle and in the container may impact the correct operation of the appliance.
- CLEANING THE PRE-GROUND COFFEE FUNNEL
- CLEANING THE INSIDE OF THE COFFEE MAKER
- CLEANING THE BREWING UNIT
- CLEANING THE MILK CONTAINER
- All components can be washed in a dishwasher, placing them in the top basket of the dishwasher.
- WARNING
- TROUBLESHOOTING
- INSTALLATION INSTRUCTIONS
- WARNINGS:
- BUILDING IN
- caple
Brand : Caple
Model : CM465BS
Category : Coffee maker