
VTX-D800U - TV Tuner for Computer SONY - Free user manual and instructions
Find the device manual for free VTX-D800U SONY in PDF.


| Product Type | TV Tuner for Computer |
| Brand | Sony |
| Model | VTX-D800U |
| Interface | USB 2.0 |
| TV Standard | DVB-T (Terrestrial) |
| Video Resolution | Up to 1080i |
| Power Source | USB Bus Powered |
| Dimensions (approx.) | 80 x 25 x 12 mm |
| Weight (approx.) | 30 g |
| Operating System | Windows XP/Vista/7 |
| Antenna Input | F-type connector |
| Remote Control | Included |
| Software | Sony TV Tuner Software (included) |
| Recording | Schedule recording, timeshift |
| EPG | Electronic Program Guide |
| Teletext | Supported |
| Maintenance | Keep away from moisture, clean with dry cloth |
| Safety | Use only supplied accessories, avoid water |
| Spare Parts / Repairability | Contact authorized Sony service center |
Frequently Asked Questions - VTX-D800U SONY
User questions about VTX-D800U SONY
0 question about this device. Answer the ones you know or ask your own.
Ask a new question about this device
Download the instructions for your TV Tuner for Computer in PDF format for free! Find your manual VTX-D800U - SONY and take your electronic device back in hand. On this page are published all the documents necessary for the use of your device. VTX-D800U by SONY.
USER MANUAL VTX-D800U SONY
GB
Operating Guide
DVB®
Digital Video
Broadcasting

SMARTLINK
Should you experience a problem with this receiver, please refer to the trouble shooting section on page 21. If you are unable to rectify the problem, contact the Sony UK helpline on 0870 241 3624.
Please ensure you have the following information available before calling the helpline:
Date of purchase
Serial number
Model number
Post code
Detailed fault description
Signal strength and signal quality
Note: You can check the signal strength and signal quality using the menu system of this receiver.
Page 9 explains how to display the main menu on screen, and page 14 explains how to obtain the signal strength display.
The serial number and the model number are located on the rear of the receiver.
NOTICE FOR CUSTOMERS IN THE UNITED KINGDOM
A moulded plug complying with BS1363 is fitted to this equipment for your safety and convenience. Should the fuse in the plug supplied need to be replaced, a 5 AMP fuse approved by ASTA or BSI to BS 1362 (i.e. marked with or) must be used. When an alternative type of plug is used it should be fitted with a 5 AMP FUSE, otherwise the circuit should be protected by a 5 AMP FUSE at the distribution board. If the plug supplied with this equipment has a detachable fuse cover, be sure to attach the fuse cover after you change the fuse. Never use the plug without the fuse cover. If you should lose the fuse cover, please contact your nearest Sony service centre.
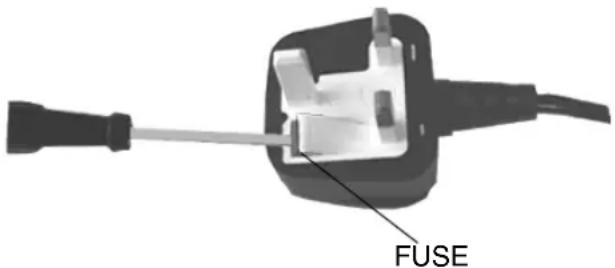
How to replace the Fuse
Open the fuse compartment with a flat blade screwdriver, and replace the fuse.
IMPORTANT
If the plug supplied is not suitable for the socket outlet in your home, it should be cut off and an appropriate plug fitted in accordance with the following instructions:
The wires in this mains lead are coloured in accordance with the following code:
Blue Neutral
Brown Live
As the colours of the wires in the mains lead of this apparatus may not correspond with the coloured markings identifying the terminals in your plug, proceed as follows:
The wire which is coloured blue must be connected to the terminal which is marked with the letter N or coloured black. The wire which is coloured brown must be connected to the terminal which is marked with the letter L or coloured red. Do not connect either wire to the earth terminal in the plug which is marked by the letter E or by the safety earth symbol or coloured green or green and yellow.
WARNING
- To prevent shock hazard, do not insert the plug cut off from the mains lead into a socket outlet. This plug cannot be used and should be destroyed.
- To prevent fire or shock hazard, do not expose the unit to rain or moisture.
- Dangerously high voltages are present inside the unit. Do not open the unit. Always refer servicing to qualified personnel only.
Note: The mains lead must only be changed at a qualified service centre.
This receiver can be operated in the upright position with the supplied stand attached, or in the horizontal position. Please follow the precautions below to ensure the safety of your receiver is not compromised in any way.
∅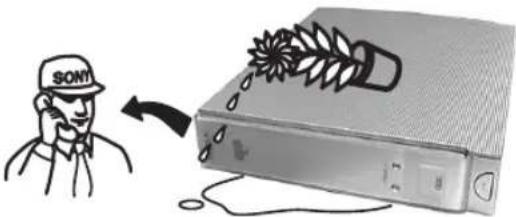 Never push objects of any kind into the receiver as this could result in a fire or electric shock. Never spill liquid of any kind onto the receiver. If any liquid or solid object does get into the receiver, switch off immediately and have it checked by qualified personnel. Never push objects of any kind into the receiver as this could result in a fire or electric shock. Never spill liquid of any kind onto the receiver. If any liquid or solid object does get into the receiver, switch off immediately and have it checked by qualified personnel. | ∅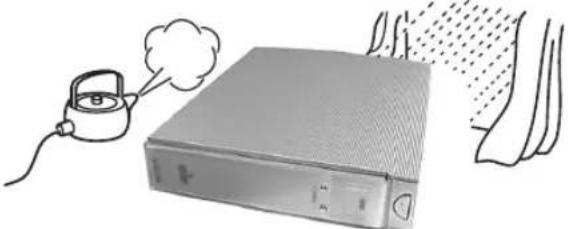 To prevent fire or shock hazard, do not expose the receiver to rain or moisture. To prevent fire or shock hazard, do not expose the receiver to rain or moisture. |
∅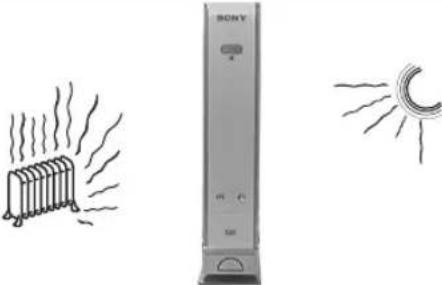 Never place the receiver in hot, humid or excessively dusty places. Do not install the receiver where it may be exposed to mechanical vibrations or electromagnetic radiation. Never place the receiver in hot, humid or excessively dusty places. Do not install the receiver where it may be exposed to mechanical vibrations or electromagnetic radiation. | ∅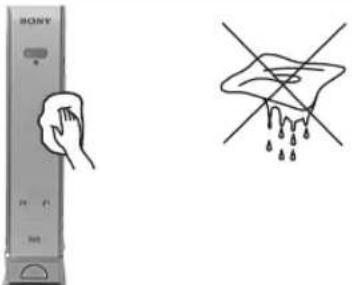 Clean the receiver with a soft, lightly dampened cloth. Do not use any type of abrasive pad, alkaline cleaner, scouring powder or solvent such as alcohol or benzine. Clean the receiver with a soft, lightly dampened cloth. Do not use any type of abrasive pad, alkaline cleaner, scouring powder or solvent such as alcohol or benzine. |
∅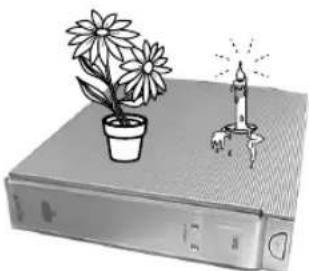 Do not place any objects on top of the receiver. To prevent fire, keep inflammable objects or naked flames (e.g. candles) away from the receiver. Do not place any objects on top of the receiver. To prevent fire, keep inflammable objects or naked flames (e.g. candles) away from the receiver. | cm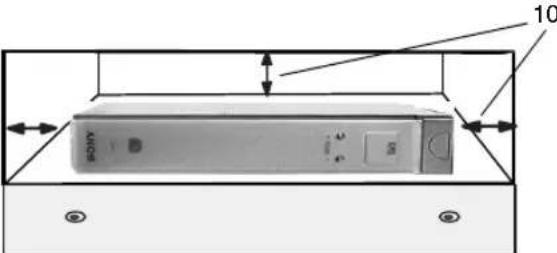 Do not cover the ventilation openings of the receiver with newspapers or curtains etc. For ventilation, leave a space of at least 10cm all around the receiver. Do not cover the ventilation openings of the receiver with newspapers or curtains etc. For ventilation, leave a space of at least 10cm all around the receiver. |
∅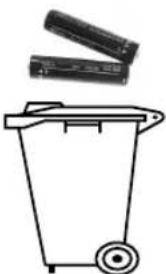 Remember to dispose of batteries in an environmentally friendly manner. Do not dispose in domestic waste containers. Remember to dispose of batteries in an environmentally friendly manner. Do not dispose in domestic waste containers. |
Safety information 1
Mains plug safety 1
Receiver safety 2
Overview of the remote control 4
Accessories supplied----5
Receiver overview and connections 6
Front and Rear views- 6
Fixing the stand (for vertical use) 6
Getting started 7
Connecting your TV and VCR- 7
Connecting a Hi-Fi etc. 7
Inserting batteries into the remote control 7
Automatic tuning procedure 8
Using the menu system 9
Favourite list 9
Settings 10
Language 10
Country 10
Subtitles 10
Picture 10
Parental Control 11
Tuning 12
Autotune- 12
Manual Tune- 12
Programme Sort 13
Programme Skip 13
Technical information 14
Feature pages- 14
Other Features 15
The EPG 15
Programme information 17
Digital text- 18
Notes on connecting SMARTLINK and other equipment- - - - - - - - - - - - - 19
Additional information 20
Using the remote control to operate other manufacturers TVs- - - - - - - - - - - - - 20
Specifications 21
Trouble shooting 21
Digital TV Channel List- 22
Index 23
NOTE: Periodically Sony will issue upgrades for the software installed in your receiver. For more information about this, refer to page 14.
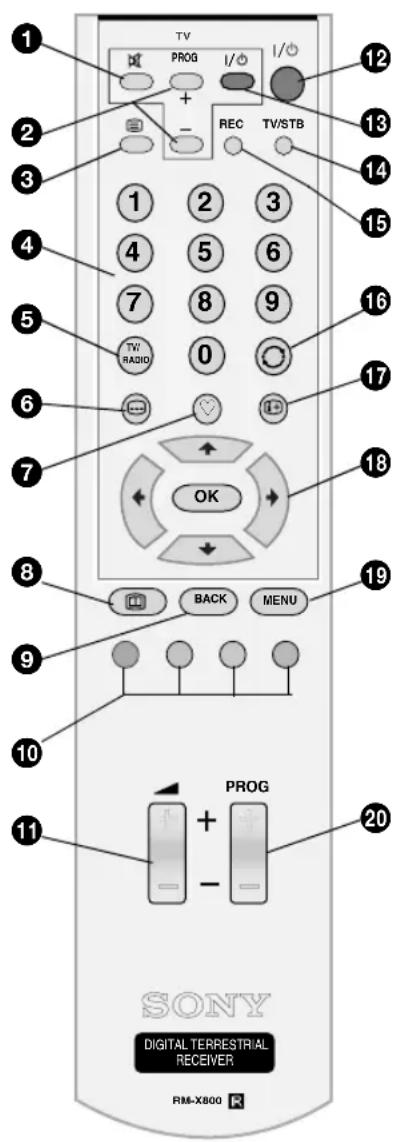
①Mute button ☐
Press to mute the sound on your TV. Press again to restore.
Note: This button will only work once you have configured the remote control to operate your brand of TV (refer to page 20).
② TV PROG +/- buttons
Press to select the next or previous TV programme. Note: This button will only work once you have configured the remote control to operate your brand of TV (refer to page 20).
③Text button
Press to display digital text (refer to page 18).
④Buttons 0 - 9
Press to enter a channel number, your PIN number or numeric entry in a menu. Note: For channel numbers 10 and above, enter the remaining digits within 2 seconds.
⑤TV/RADIO button
Press to switch between TV and Radio channels.
⑥ SUBTITLE button
Press to turn subtitles On or Off.
⑦Favourite button
Press to display your Favourite Programme lists (refer to page 9).
⑧ EPG button
Press to display the Electronic Programme Guide (refer to page 15).
⑨BACK button
Press this button to cancel a selection or to go back one step in a menu.
⑩Coloured buttons
These buttons are used to select the coloured options available in some menu displays.
⑪Volume +/- button
Press to increase/decrease the TV volume level.
Note: These buttons only work once you have configured the remote control to operate your brand of TV (refer to page 20).
12 Standby button I/
Press to switch off your receiver temporarily. Press again to resume normal operation.
13 TV standby button I/
Press to switch off your TV temporarily. Press again to resume normal operation. Note: This button will only work once you have configured the remote control to operate your brand of TV (refer to page 20).
⑭TV/STB button
Press to switch between the digital signal from your receiver and conventional analogue signals from your TV.
⑮REC button
Press to set your VCR to record a programme you are watching. Note: This operation will only work if you have a SMARTLINK VCR and a SMARTLINK compatible TV connected to the receiver.
16JUMP button
Press to jump back to the previous channel you were watching. In EPG, this button enables you to view the scheduled programmes 24 hours in advance (refer to page 15).
⑰INFO button ⓘ+
Press this button to display relevant information about the programme on view.
18Control pad
Use the ↑, ↓, ←, → and OK buttons to navigate through the menu system and store any changes you make. In TV mode, press the OK button to display a list of the channels available.
19MENU button
Press to enter the main menu.
20PROG +/- button
Press to select the next or previous programme stored on your receiver.
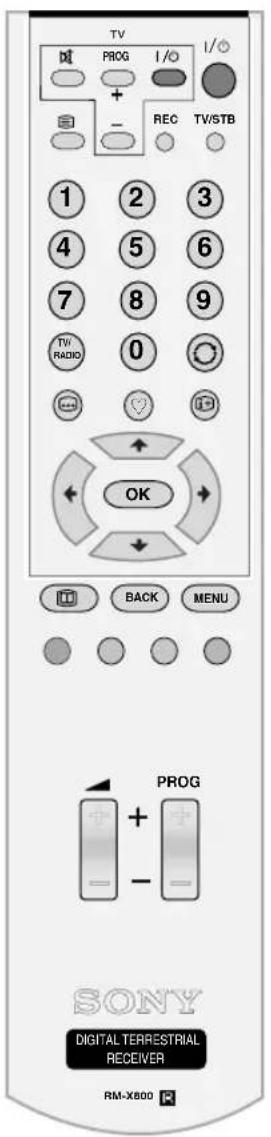
Remote control
natural_image
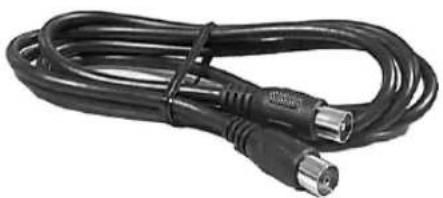
Coiled black cable with metallic connectors (no text or symbols visible)RF Loopthrough cable

Batteries
natural_image
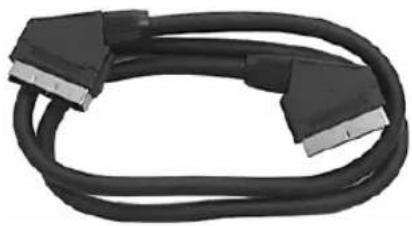
Coiled black cable with two connectors, no visible text or symbolsFully wired Scart lead
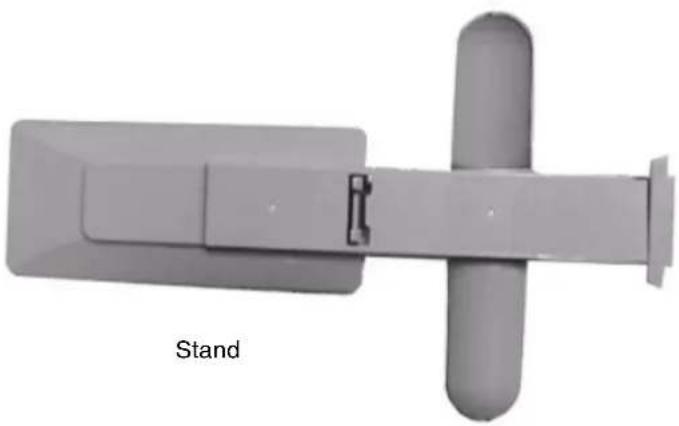
natural_image
3D model of a stand device with no visible text or symbols on the device itselfRear view Front view
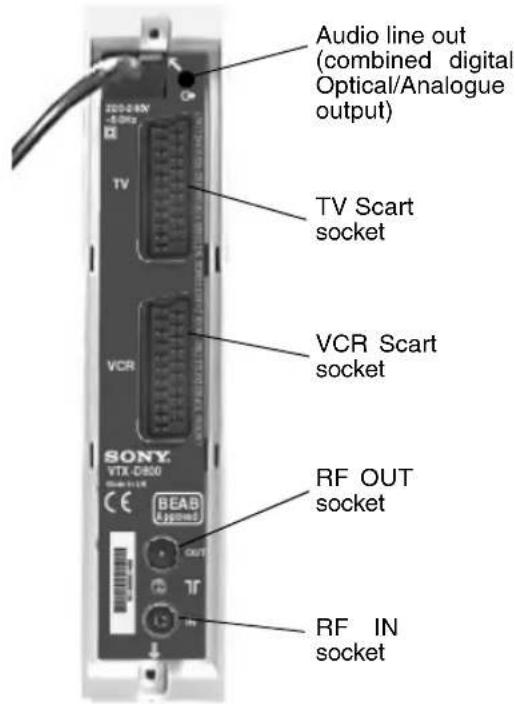
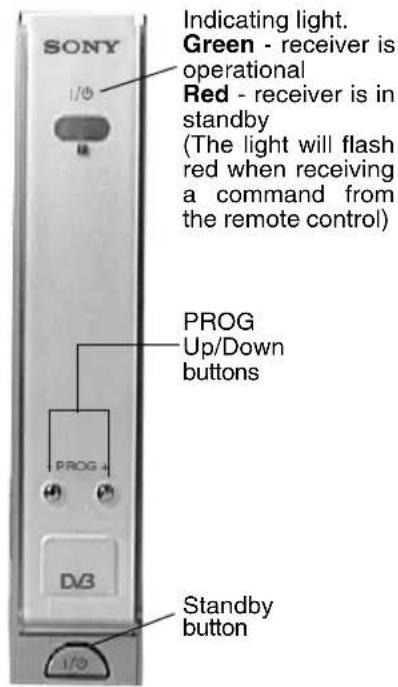
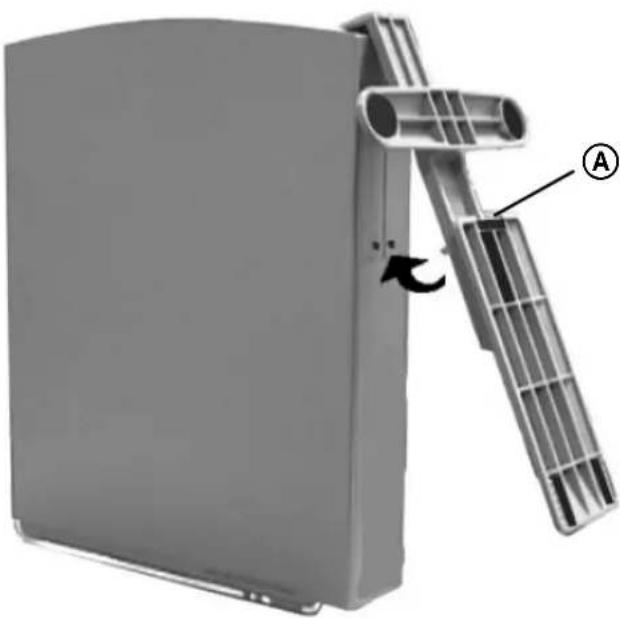
Fixing the stand (for vertical use)
natural_image
3D rendering of a mechanical device with a labeled component (A) and directional arrow, no readable text or symbols beyond the label.Clip the stand over the rear of the receiver as shown, then push down into the fixing holes to secure.
Note: To remove the stand, press clip Ⓐ downwards, then pull away from receiver.
Connecting your TV and VCR
Note: Before connecting your TV and VCR, ensure all equipment is disconnected from the mains supply.
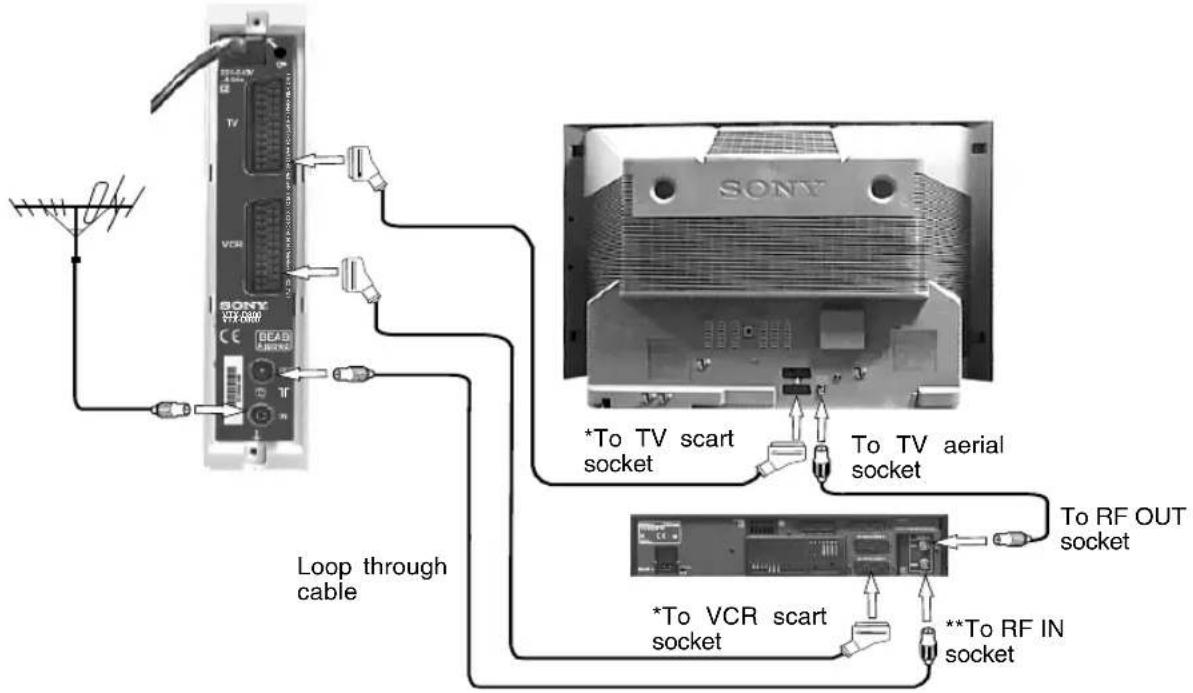
Connecting a Hi-Fi etc.
* When connecting SMARTLINK equipment, please refer to page 19.
** If you do not have a VCR, connect the loop through cable directly to your TV aerial socket.
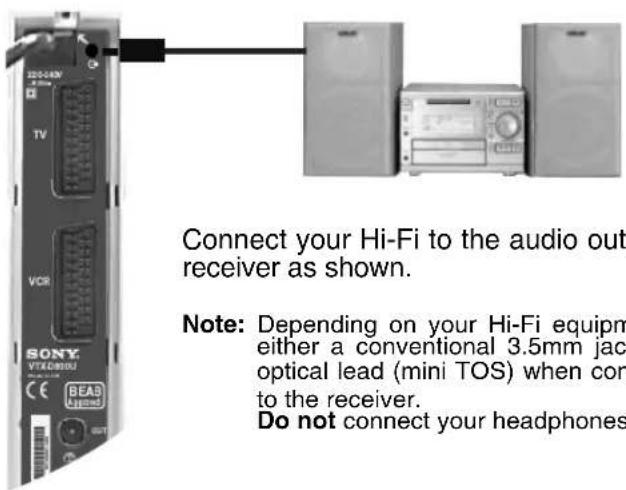
Connect your Hi-Fi to the audio output socket of the receiver as shown.
Note: Depending on your Hi-Fi equipment, you can use either a conventional 3.5mm jack plug lead or an optical lead (mini TOS) when connecting your Hi-Fi to the receiver.
Do not connect your headphones to this socket.
Inserting batteries into the remote control
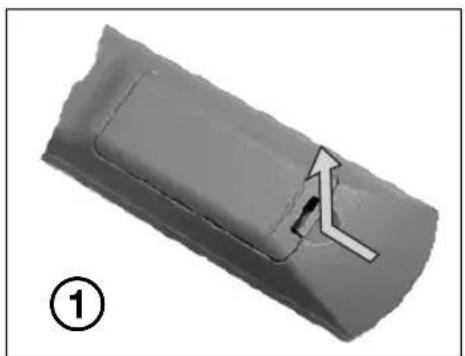
natural_image
3D rendered object with a white arrow pointing to a small feature, labeled (1) in the corner (no text or symbols on the object itself)Push and lift up the release clip to remove the battery cover.
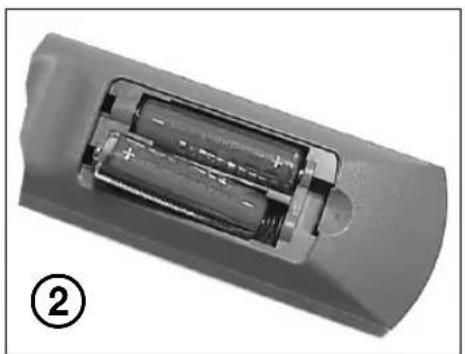
natural_image
Close-up of a cylindrical battery with two internal compartments, labeled with number ② (no text or symbols on the diagram itself)Insert the supplied batteries as indicated inside the battery compartment.
Automatic tuning procedure
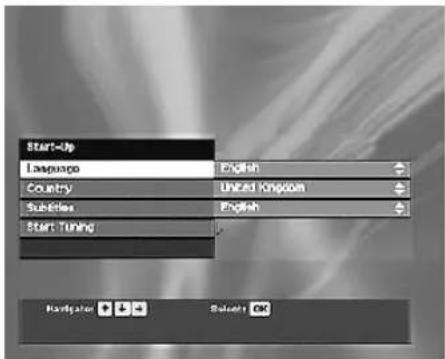
1 Having connected your receiver as shown on page 7, connect all the equipment to the mains supply and switch on your TV. When the indicating light on the receiver turns red, press the I/⏻ button on the remote control. The Start-Up menu will be displayed
2 Press the ➤ button on the remote control to highlight 'English'. Press the ♠ or ↓ buttons to highlight your required language, then press the OK button to confirm your choice. All menus will now appear in your chosen language.
3 Repeat procedure to select the country in which you are using the receiver, and also the subtitle language you desire. Press the OK button to confirm each choice.
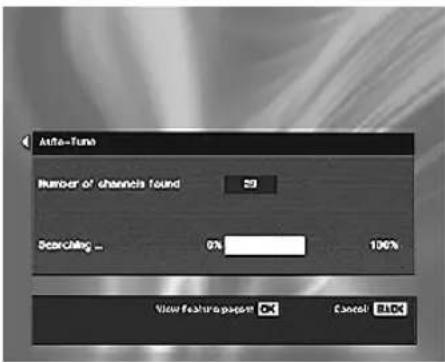
4 Press the ↑ or ↓ buttons to highlight 'Start Tuning', then press the OK button to begin the autotune procedure. A display appears showing a tuning progress bar and the number of channels found.
As the autotune procedure may take some time, a series of feature pages are displayed which describe some of the features available to you. If you do not wish to view these pages, press the BACK button.
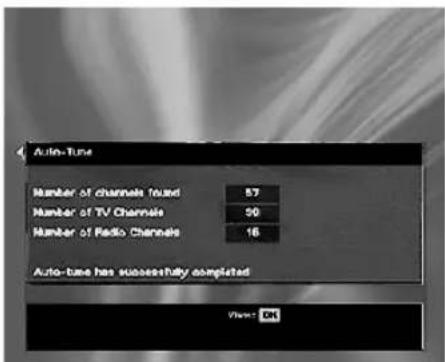
5 When autotune has ended, a completion menu appears indicating the number of TV and Radio channels that have been captured and stored.
Notes: If you are watching the information screens, a display appears to inform you autotune has ended. Press the BACK button to display the completion menu.
The total of Radio and TV channels shown in the display may be less than the actual number of channels found. This is because the receiver may have found some data only channels.
6 Press the OK button to remove the display and view the first channel captured.
7 To select other channels, press the PROG+/- button on the numbered buttons on your remote control.
If no channels are found
1 If no channels have been captured and stored a message appears on screen to inform you.
2 Check your aerial cable is connected, then press the OK button to repeat the autotune procedure.
3 If you are still unable to receive signals, please have your aerial checked by an aerial installation company.
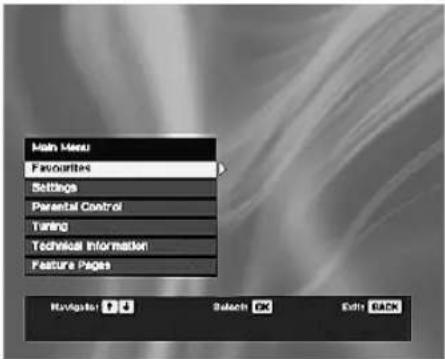
All the menus of this receiver are accessed from the main menu using the remote control.
Favourites List
1 Press the MENU button to display the main menu.
2 Use the following buttons to operate the menu:
- Press the ↑ or ↓ button to highlight the required option.
- Press the OK button to enter the option
- Press the ↑, ↓, ← and → buttons to alter settings.
- Press the OK button to store each change you make, or press the BACK button to cancel.
3 Press the BACK button to go back one step or press the MENU button to return to normal operation.
This menu allows you to store your favourite channels into one of four TV or four Radio lists.
1 With 'Favourites' highlighted in the main menu press the OK button.
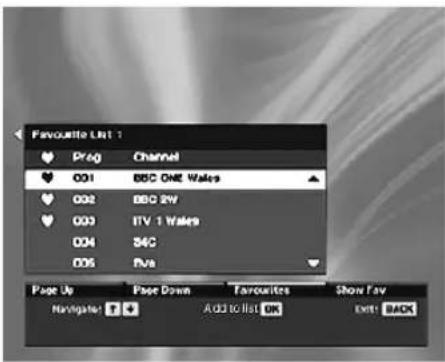
The Favourite page display appears on screen. This display shows all the TV or Radio channels available to you, with the name of the current Favourite list shown at the top of the display e.g. Favourite List 1.
2 Press the TV/RADIO button to display either your favourite TV or favourite Radio channels at any time.
To add or delete a favourite channel
1 Press the or buttons or enter a channel number to highlight a channel you want to add or delete as a favourite, then press the OK button. If you do not wish to choose from one of the five channels in the display, press the Red or Green button to view the previous or next five channels available.
Note: A favourite channel is identified by a ♥next to the programme number. To view the list showing only your favourite channels press the Blue button.
To view a different favourite list
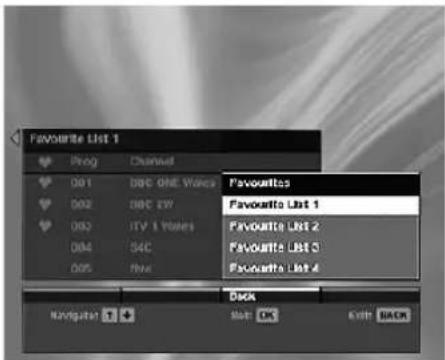
1 Press the Yellow button on the remote control to display the favourite list menu.
2 Press the ↑ or ↓ buttons to highlight the favourite list you want to view, then press the OK button to confirm.
3 To add a channel to this new list, press the ↑ or ↓ button to highlight the channel you wish to add and press the OK button.
4 When you have stored all your favourite channels, press MENU button to return to normal operation.
To watch or listen to a Favourite channel
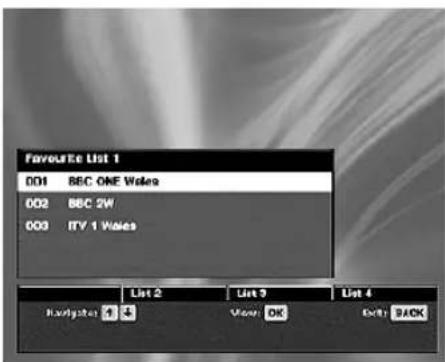
1 Whilst in normal operation press the button on the remote control. A Favourite list display appears.
2 Each favourite list is represented by a coloured button. Press the coloured button on the remote control that represents your desired list.
3 Press the ↑ or ↓ button to highlight the channel you wish to view or listen to, then press the OK button.
Note: If you wish, the channel on view in the background can be added to the favourite list. Simply press the coloured button indicated in the display to add it to the list.
Settings
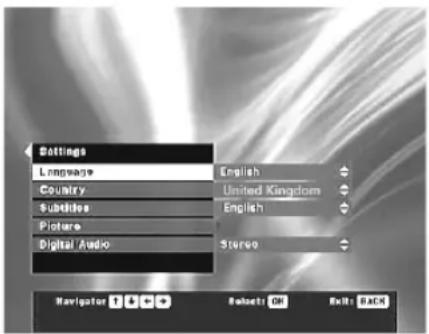
The settings menu allows you to customise the way the picture is displayed and to select the language for subtitles etc. Highlight 'Settings' in the main menu, then press the OK button to display the Settings menu. Press the ↑ or ↓ button to highlight the required option and press the OK button to select. The following table explains each option and how to change their settings. When you have completed your settings, press the BACK button repeatedly to return to the main menu.
| Option How to use | |
| LanguageThis option allows you to set the language the menus appear in. | Press the ↑ or ↓ button to highlight the required language. Press OK to confirm. |
| CountryThis option allows you to set the receiver to the country you are in. This setting determines the order that channels are stored during tuning. | Press the ↑ or ↓ button to highlight the required country. Press OK to confirm. |
| SubtitlesThis option allows you to select which language any digital subtitles appear in when they are available. | Press the ↑ or ↓ button to highlight the required language. Press OK to confirm. |
| PictureWhen this option is selected, the following choices are available:-Display Mode: Choose from 16:9 format or 4:3 format. Set to the size that matches your TV.Display Format: Choose between Normal or Letterbox format.Note: When 'Display Mode' is set to 16:9, this option will be fixed to Normal.Scart Control/WSS: Choose between On, SCART Off, WSS Off and Off.On: The picture from the receiver automatically appears on your TV. The WSS (Wide Screen Switching) option will be 'On' in this mode. This sets the TV screen format to follow the broadcasters transmitted setting.SCART Off: The picture from the receiver will not appear automatically on your TV. To view the picture you will have to set the TV to the AV input to which your receiver is connected. In this setting the WSS will remain 'On'.WSS Off: The picture from the receiver automatically appears on your TV, but the screen format will depend on the TV setting.Off: The picture from the receiver will not appear automatically on your TV, and WSS will be 'Off'. To view the picture, set the TV to the AV input to which your receiver is connected.TV Output: If SMARTLINK is set to 'Off', choose the type of output you wish the receiver to send to your TV. Choose from RGB, PAL or Y/C.If SMARTLINK is set to 'On', the receiver selects the best quality output available on your SMARTLINK TV according to the output type selected.Auto: Allows SMARTLINK to select the best quality picture .RGB: Allows SMARTLINK to choose between RGB or PAL.PAL: Sets the output to PAL.Y/C: Allows SMARTLINK to choose between Y/C and PAL.Video Output: With SMARTLINK 'Off', this will always be set to PAL.If SMARTLINK is set to 'On', the receiver selects the best quality output available on your SMARTLINK VCR according to the output type selected.Auto: Allows SMARTLINK to select the best quality picture.PAL: Sets the output to PAL.SMARTLINK: Choose between On or Off. When set to 'On', the SMARTLINK function is enabled. (refer to 'TV Output' and 'Video Output' settings). | Press the ↑ or ↓ button to highlight your required choice. Press OK to select.Press the ↑ or ↓ button to change to the desired setting. Press OK to confirm. |
| Digital AudioThis option allows you to choose the type of audio output from the 'Audio line out' socket on the rear of the receiver. | Press the ↑ or ↓ button to highlight 'Dolby Digital' or 'Stereo'. Press OK to confirm. |
| Note: If your receiver is connected to SMARTLINK equipment, and the SMARTLINK option is set to 'On' some of the settings you have made may be overridden (refer to page 19). | |
Parental Control
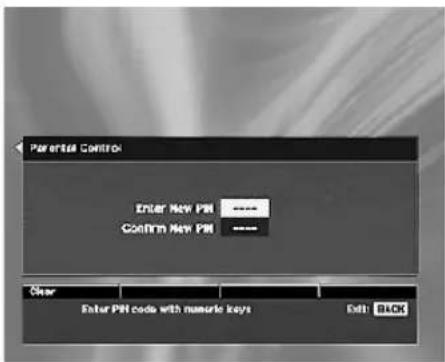
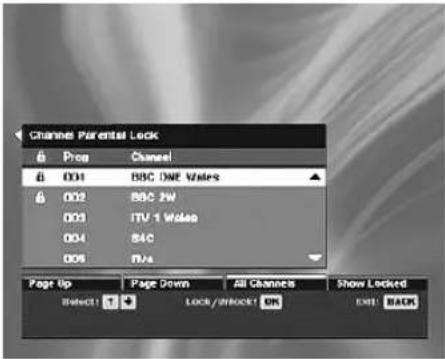
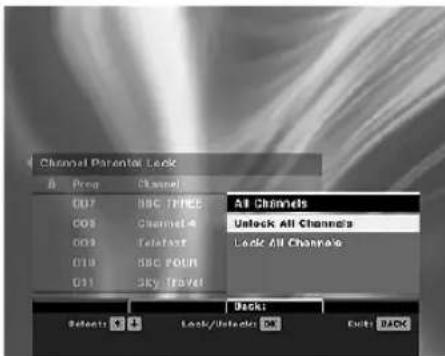
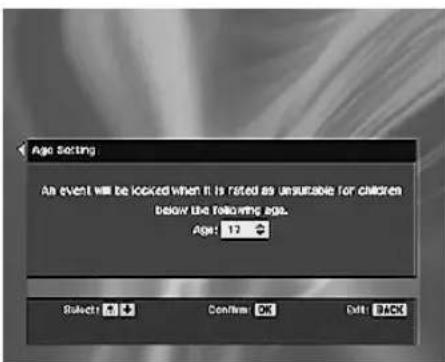
The Parental Control menu allows you to lock certain channels you consider unsuitable and to set an age limit so that any programme classed above that age by the broadcaster is restricted. Before you can lock channels or set an age limit, you must set up your own PIN (Personal Identification Number).
You will be requested to enter the PIN before you can view channels that have been locked or given an age limit.
Note: If you do not want to make use of these functions, please follow 'Set PIN' procedure and set the PIN to 0000.
Set PIN
1 Enter the Parental Control menu from the main menu. 'Set PIN' will be highlighted. Press the OK button to select. A display will now ask you to enter your existing PIN. The New PIN display appears on screen as shown.
2 Use the buttons 0 - 9 to enter a 4 digit number of your choice.
3 Enter the number again to confirm, then press BACK to return to Parental Control menu.
Lock Channels
1 Highlight 'Lock Channels' in the Parental Control menu and press the OK button to select. Enter your PIN as requested. The Parental Lock display appears.
2 Press the ↑ or ↓ button or enter a channel number to highlight a channel you wish to lock, then press the OK button to confirm.
If you do not wish to choose from one of the five channels in the display, press the Red or Green button to view the previous or next five channels available (if more than five are available).
Note: A locked channel can be identified by the symbol next to the programme number.
To lock or unlock all channels
1 Highlight 'Lock Channels' in the Parental Control menu and press the OK button to select. Press the Yellow button to display a Pop Up menu.
2 Press the or button to choose between 'Lock all channels' or 'Unlock all channels'. Press the OK button to confirm.
3 Press BACK button to return to Parental Control menu.
Set Age Limit
1 Highlight 'Set Age Limit' in the Parental Control menu and press the OK button to select. Enter your PIN as requested. The Age Setting display appears.
2 Use the ↑ or ↓ button to enter the age limit desired (between 4 and 17). Press the OK button to confirm.
Note: To operate correctly, this feature relies on the broadcaster sending the correct age classification for each programme. If in doubt, do not rely on this feature to prevent viewing of unsuitable channels, but lock each channel individually.
When you have completed all settings, press the BACK button repeatedly to return to the main menu.
Note: If you enter an incorrect PIN three times, you will be denied access to the Parental Control features. Wait 10 minutes then enter the correct PIN number.
Tuning
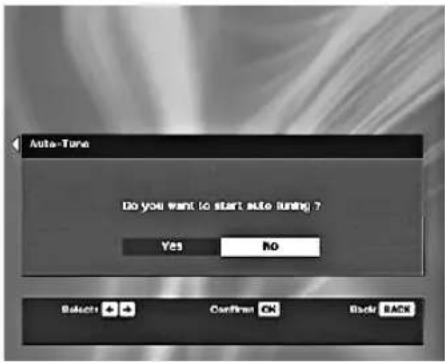
The Tuning menu allows you to tune your receiver automatically or manually and also change the order of the programmes on display. During these procedures you may be requested to enter your PIN. Refer to page 11 for information.
Auto Tune
This tuning method captures and stores all available channels.
1 With 'Tuning' highlighted in the main menu, press the OK button. Enter your PIN if requested and the Tuning display appears with 'Auto Tune' highlighted. Press the OK button to select. The Auto-Tune prompt display appears.
2 Press the ◆ button to select 'Yes', then press the OK button to begin autotune procedure. A display appears showing a tuning progress bar and the number of services found.
3 When autotune has ended, a completion menu appears indicating the number of TV and Radio channels that have been captured and stored.
4 Press the OK button to remove the display and view the first channel captured.
Manual Tune
This tuning method allows you to capture and store individual services.
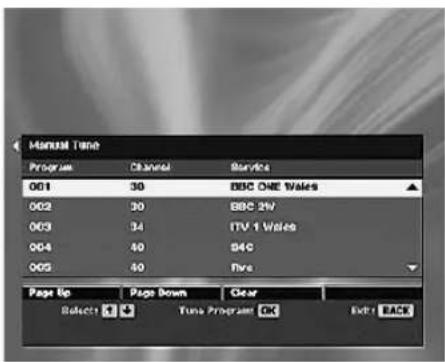
1 With 'Tuning' highlighted in the main menu, press the OK button. Enter your PIN if requested and the Tuning display appears with 'Auto Tune' highlighted. Press the ↑ or ↓ button to highlight 'Manual Tune', then press the OK button to select. The Manual Tune display appears showing a list of all the channels previously captured and stored.
2 Press the Red button to display the previous five channels or the Green button to display the next five channels.
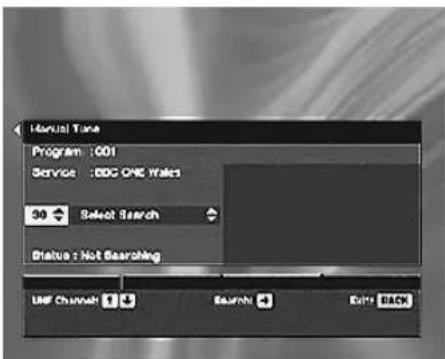
3 Press the or button or enter a channel number to select the programme number of your choice, then press the OK button. The Tuning screen is displayed. Press the button to highlight 'Select Search' then press the or button to begin searching.
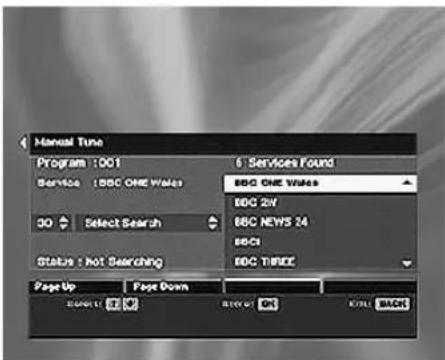
4 When a service is found the display now shows a list of captured channels. Press the ↑ or ↓ button to highlight the channel you wish to store, then press the OK button.
5 If the channel you want is not in the displayed list, press the ◀ button to highlight 'Select Search', then press the ↑ or ↓ button to continue searching.
6 Once you have stored your desired channel, press BACK button repeatedly to return to the main menu.
Note: After tuning, your receiver will continually monitor broadcast information to check for new channels. Should a new channel become available, it is detected and automatically added to your programme list. Normally it will then be available to view. However, if you notice a new channel that you are unable to view, please tune it in manually using the 'Manual Tune' procedure as explained above.
Tuning
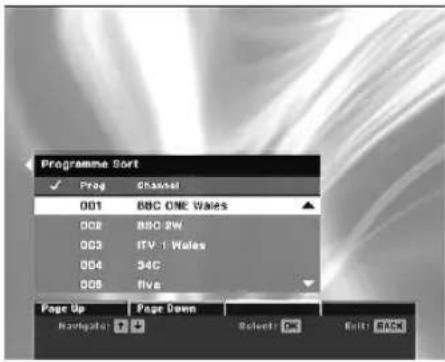
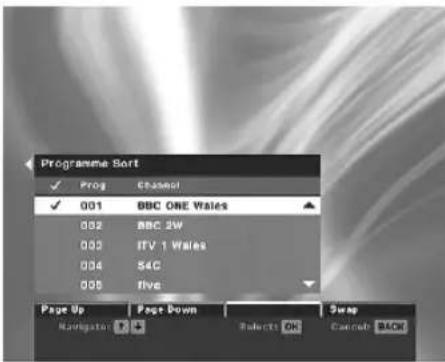
Programme Sort
This option allows you to change the channel order in the on-screen programme list.
1 With 'Tuning' highlighted in the main menu, press the OK button. The Tuning display appears with 'Auto Tune' highlighted.
2 Press the ↑ or ↓ button to highlight 'Programme Sort', then press the OK button. The on-screen programme list is displayed.
3 Press the ↑ or ↓ button to highlight the channel you wish to move, then press the OK button.
A tick' appears alongside the channel you have selected and a Swap' option appears under the blue bar in the display.
4 Press the ↑ or ↓ button to highlight the programme number you wish your selected channel to appear on.
5 Press the BLUE button. Your selected channel appears on the programme number selected in step 4.
6 Repeat this procedure to move other channels.
7 Once you have moved all channels as desired, press BACK button repeatedly to return to the main menu.
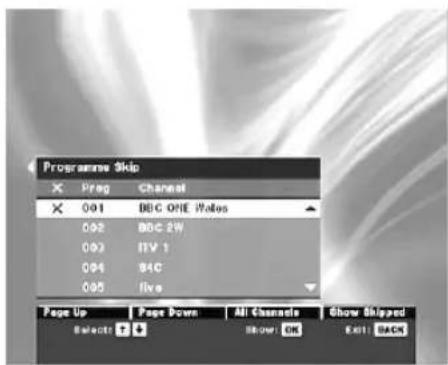
Programme Skip
This option allows you to skip programmes so they do not appear in the channel listing.
1 With 'Tuning' highlighted in the main menu, press the OK button. The Tuning display appears with 'Auto Tune' highlighted.
2 Press the ↑ or ↓ button to highlight 'Programme Skip', then press the OK button. The on-screen programme list is displayed.
3 Press the ↑ or ↓ button to highlight the programme number that contains the channel you wish to skip, then press the OK button. An 'X' appears alongside the selected channel.
Continue to highlight and select other channels that you wish to Skip.
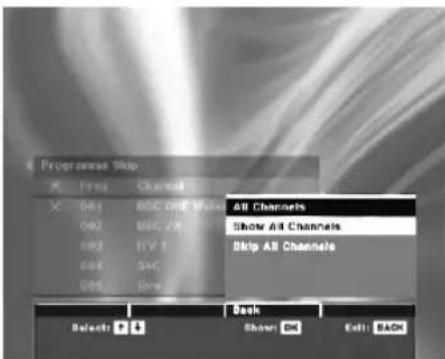
Whilst the 'Programme Skip' display is on screen you can choose from two other Skip related options.
All Channels:
Press the YELLOW button to select this option.
A display appears giving you the choice to 'Show All Channels' (returns all previously skipped channels to the list), or to 'Skip All Channels'.
Press the ↑ or ↓ button to highlight your choice and press the OK button to confirm.
Show Skipped:
Press the BLUE button to select this option.
A list is displayed showing all the channels you have chosen to Skip.
Note: If you press the BLUE button again the original 'Programme Skip' display is returned.
4 Once all your Skip choices are complete, press the BACK button repeatedly to return to the main menu.
Technical Information
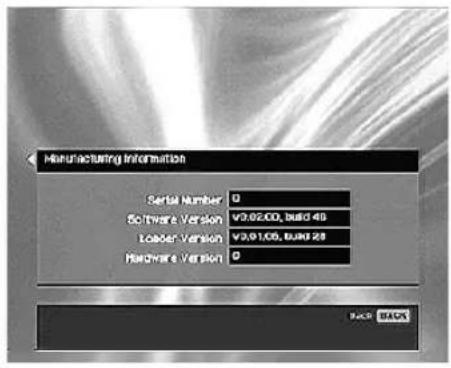
Manufacturer Information
This is an information screen only and tells you the current version of software installed in your receiver.
1 Enter the Technical Information menu from the main menu. 'Manufacturer Information' will be highlighted. Press the OK button to select. The Manufacturer Information display appears.
2 After viewing the information displayed press the BACK button repeatedly to return to the main menu.
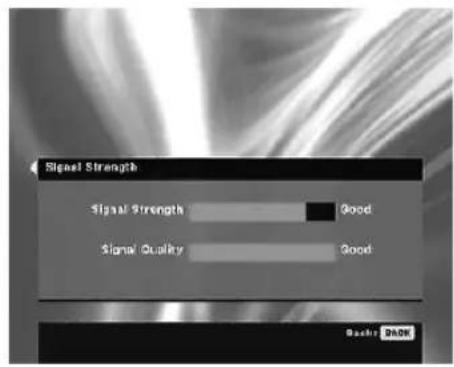
Signal Strength
This is an information screen only and shows the signal strength of the broadcast you are watching.
1 Enter the Technical Information menu, highlight 'Signal Strength' and press the OK button to select. The Signal Strength display appears.
2 After viewing the information displayed press the BACK button repeatedly to return to the main menu.
Software Upgrade
Periodically Sony will issue upgrades for the software that was initially installed in your receiver. These upgrades will automatically be received and enabled. If desired, you can disable this option as follows:
1 Enter the Technical Information menu, highlight 'Software Upgrade' and press the OK button.
2 Press the ↑ or ↓ button to highlight 'Off' and press the OK button to confirm.
Note: Sony recommend that you always leave this option set to 'On'. Upgrades will only occur when the receiver is switched on and is out of Standby.
Feature Pages
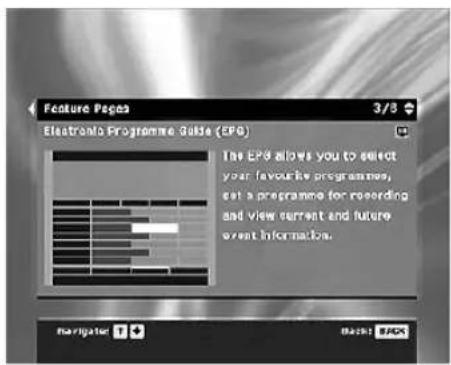
This option gives you an on-screen description of some of the features available on this receiver.
1 With 'Feature Pages' highlighted in the main menu, press the OK button to display a 'Welcome' screen. Press the ↑ or ↓ button to view each feature. The example shown is the EPG.
2 When you wish to return to the main menu press the BACK button.
The EPG
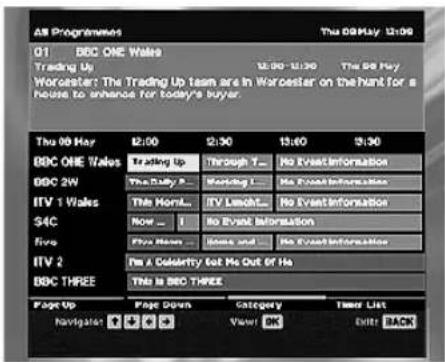
The EPG (Electronic Programme Guide) provides a quick and easy way to:
a) View a complete list of all available channels
b) View a channel list related to a chosen category
c) Set a programme to be recorded
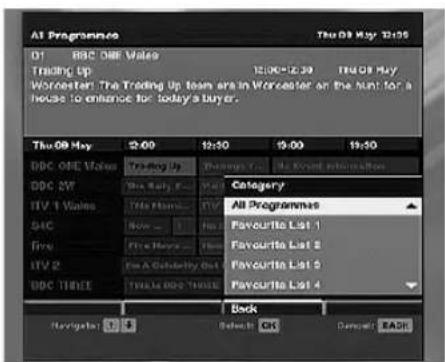
1 Press the button to display the EPG. This display consists of an information box and a seven channel programme list covering a two hour period.
2 Press the ↑, ↓, ← and → buttons or enter a channel number to move around the list. If you press the → button after highlighting the last programme on the right, the schedule for the next two hours is displayed (depending on availability from the broadcaster).
3 As each programme is highlighted, a brief description of the programme appears in the information box. Press the Red button to display the previous seven channels or the Green button to display the next seven channels.
4 When the programme you wish to view is highlighted, press the OK button to obtain a preview in the background. Press OK once more to exit the EPG and view the programme.
Note: If you press the button on the remote control when the EPG is on display, you have the option to view the programme schedule 24 hours in advance (when available). Press the Blue button to view the next 24 hour schedule. Press the Yellow button when you wish to return to the previous days schedule. Press the button to return to normal EPG operation.
The Category pop-up list
This feature allows you to search for channels related to a particular topic. For example, if you select 'News' from the pop-up list, then only channels related to News will be shown in the EPG.
1 With the EPG on display, press the Yellow button. The category pop-up list appears.
2 Press the ↑ or ↓ buttons to highlight the category you want, then press the OK button. The chosen category is displayed in a title bar at the top of the EPG display and only programmes related to that category will be shown in the list.
Some examples of category types are as follows: All Programmes: This gives a complete channel list. Favourite List 1: Displays the favourite channels you have stored in the Favourite list 1 folder.
Films: Displays movies available for viewing. News: Displays all news channels. Entertainment: Displays all entertainment channels. Sports: Displays all sports channels. Kids: Displays all children's channels. Music: Displays all music channels.
3 Press the , , and buttons to highlight the programme you wish to view, then press the OK button to exit the category menu and view the selected programme. Note: The category of each programme is determined by the broadcaster.
Continued ----
The EPG
To select a programme for recording or timed display
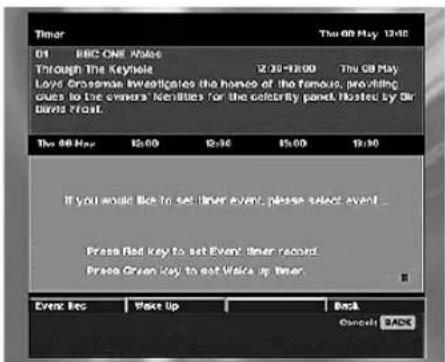
1 With the EPG on display, press the ↑, ↓, ← and → buttons to highlight a future programme, then press the OK button. The timer screen appears.
2 Press the Red button and your VCR will automatically begin recording when the programme starts (if your VCR has SMARTLINK or synchro record facility), or press the Green button if you wish the programme to appear on screen when it starts.
Notes: If you do not have a SMARTLINK VCR, press the Red button to continue, then if necessary, set your VCR to synchro record mode, or set the VCR timer recording function to correspond with the start and stop times of the selected programme.
You may be asked to enter your PIN during this procedure.
As a precaution the receiver will extend the stop time you set by 5 minutes when recording.
Once a programme is stored for recording, a solid coloured bar in the display indicates the time allocated for the recording. This reminds you that you cannot record another programme during this period of time.
3 Press the button to return to normal operation.
To record a programme using the Manual Timer
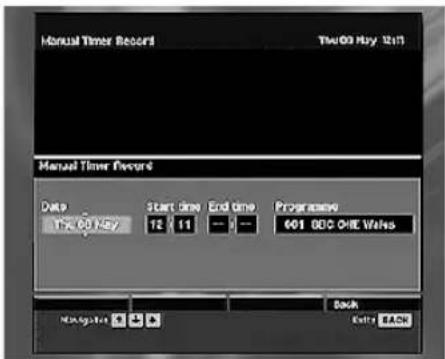
1 With the EPG on display, press the Blue button to display the Timer list menu, then press the Red button to display the 'Manual Timer Setup' menu. If you do not have a SMARTLINK VCR, a message will appear to remind you to set your VCR timer.
2 Press the ↑ or ↓ button to select the correct date, then press the → button to highlight the start time.
3 Repeat this procedure to set the start time, end time and the channel number, then press the OK button to store your settings.
Note: You may be asked to enter your PIN during this procedure.
4 Press the Red button and repeat steps 2 - 3 if you wish to store more programmes for recording.
5 Press the button to return to normal operation.
6 If you do not have a SMARTLINK VCR, set the VCR to synchro record mode, or set the VCR timer recording function to correspond with the start and stop times of the selected programme you have stored for recording.
![Timer List 01 BBC ONE Wales Manual Timer Event: 12/26-13/26 The 08 May B more Timer event[9] can be stored. BBC ONE Wales Manual Timer Event 12:25-13:26 The 08 May BBC ONE Wales Manual Timer Event 7:00-7:00 The 08 May Delete Manual Red Back Navigator 01 Cancel BACK](/content/2026/05/982159/images/964a5e288e03baca74f3f81a60cdc29c6d86d0eab1509d1b27315291f651d885.jpg)
To cancel a recording
1 With the EPG on screen, press the Blue button to display the Timer list.
2 Press the ↑ or ↓ button to highlight the programme you wish to delete.
3 Press the Yellow button to delete then press OK button to confirm.
4 Press the button to return to normal operation.
Programme information
The programme information display provides a quick and easy way to:
a) View descriptions of the programmes being broadcast now and next on the current channel
b) View descriptions of the programmes being broadcast now and next on the other channels
c) Preview another channel in the background or change to that channel
d) Select a different audio track, audio mode or subtitle language for the current channel
To display the programme information
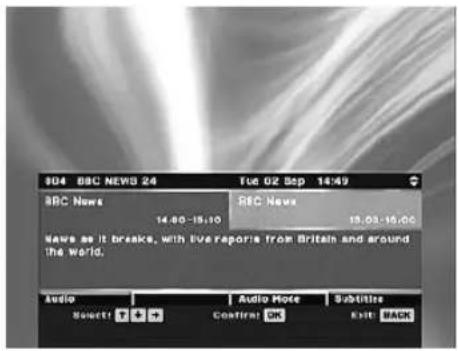
1 Press the button to display the programme information screen. The display consists of an information box showing a description of the current programme and the name of the next programme on that channel.
2 Press the ↑ or ↓ buttons or enter a channel number to display programme information on other channels. Press the OK button if you wish to obtain a preview of the chosen channel.
3 Press the or buttons to toggle the display between a description of the current programme and the next programme on a channel. When viewing information for the currently displayed channel, press the OK button to exit the information display and view the programme.
To select an alternative audio track, audio mode or subtitle language
1 Press the button to display the programme information screen.
2 A programme will sometimes have more than one audio track, audio mode or subtitle language available (this depends on the broadcaster's information).
Press the Red, Yellow, or Blue button to select the option you wish to change.
Note: In audio mode you can select Stereo, Left or Right (for dual language broadcasts). If you choose Left or Right, the selected language will be output from both speakers of your TV.
3 Press the ↑ or ↓ button to change the present setting of the selected option. Press the OK button to confirm or press the BACK button if you wish to cancel.
4 Press the button to remove the information display.
Digital Text
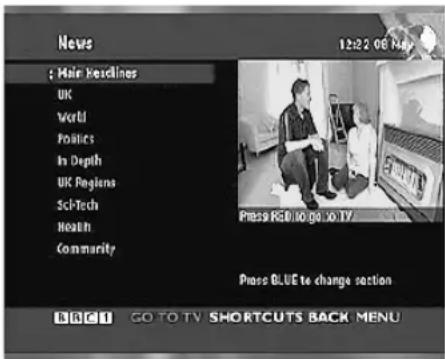
Viewing a digital text service
Many digital TV channels broadcast information via their text service. This digital service includes high quality digital text and graphics along with advanced navigation options. Additionally, this receiver has access to dedicated text channels transmitted by the broadcasters. The appearance, content and navigation methods of all digital text services are decided by the broadcaster.
Selecting digital text from dedicated channels
| 1 | Select a dedicated channel that is broadcasting digital text. If you do not know the number of a dedicated digital text channel, you can use the ‘Electronic Programme Guide’ to find one (please refer to page 15). |
| 2 | Once the text page is displayed (this may take some time), follow the on-screen instructions to obtain your required selection.Note: On some pages the TV programme may also be displayed on the text screen. On-screen instructions will inform you how to change the displayed programme. |
| 3 | If you are instructed to press ‘OK’ or ‘Select’ when viewing the text pages, press the OK button. |
| 4 | When you have finished viewing the text service, follow the on screen instructions, or press the PROG +/- button to exit. |
Selecting digital text from other channels
| Digital text services may also be available on other digital channels. This is sometimes indicated by a small symbol on your TV screen, superimposed on the programme you are watching. | |
| 1 | Press the ☐ or Red button or the button indicated on screen by the broadcaster. |
| 2 | Once the text information is displayed, you may be instructed to use the numbered or coloured buttons on your remote control to display the various pages of text information. If you are instructed to press ‘OK’ or ‘Select’ when viewing the text pages, press the OK button. |
| 3 | Once the text information is displayed, you can access required information by using the ↑, ↓, ←, or ➤ buttons, the coloured buttons and/or the numbered buttons on the remote control. |
| 4 | When you have finished viewing the text service, follow the on screen instructions, or press the PROG +/- button to exit. |
PLEASE NOTE: This product includes new SMARTLINK functions for control of a digital receiver in a SMARTLINK system. These functions may not work with existing Sony SMARTLINK products, but are designed to work with future Sony SMARTLINK products.
TV connection for SMARTLINK
If your TV is SMARTLINK compatible, ensure that the cable from the TV scart socket of the receiver is connected to the scart socket that supports SMARTLINK on your TV. This will ensure that you have access to the SMARTLINK features. One of these features may enable the receiver to bring the TV out of its standby mode automatically when you switch the receiver on.
The best signal quality is achieved using the RGB mode of this receiver. However, this may not be available on the SMARTLINK compatible scart of your TV.
Note: When the TV is put into standby mode, the receiver may also go into standby.
VCR connection for SMARTLINK
If your VCR is SMARTLINK compatible, ensure that the cable from the VCR scart socket of the receiver is connected to the scart socket that supports SMARTLINK on your VCR. This will ensure that you have access to the SMARTLINK features and will enable the receiver to inform the VCR when to start and stop recording timed events and to download the programme title to the VCR.
VCR connection for Synchro record
If your VCR supports synchro recording, ensure that the cable from the VCR scart socket of the receiver is connected to the scart socket that supports synchro recording on your VCR. When you have set a timer event, put your VCR into the synchro recording mode (refer to your VCR manual).
Receiver/VCR connection
When the VCR is turned On or is in Playback (dependant on the VCR), the receiver will automatically switch the signals through to the TV. This will also be done when the receiver is in the standby mode.
Note: To return to a programme from the receiver, press the I/⏻ button on the remote control to switch off the receiver, then press the I/⏻ button once more to resume normal operation.
Hi-Fi
This receiver can be connected to your Hi-Fi using either a digital optical lead or a stereo/analogue lead. These can be connected to the 3.5mm socket on the rear of the receiver (see page 7).
Please note that the digital optical output is PCM audio only.
Notes: Not all scart cables are compatible with SMARTLINK.
Please ensure that you use a fully wired scart cable as supplied.
SMARTLINK operation may sometimes be referred to as MEGALOGIC, NexTView, T-V Link, EASYLINK/cinemaLink, or Q-Link. Please refer to your TV/VCR manuals for further information.
In some cases the SMARTLINK functionality may not work as described. This may be due to compatibility issues between equipment connected in your system. In this case it is recommended that you do not use SMARTLINK. For further information contact the Sony UK Helpline (see the inside front cover of this manual).
If you wish to use SMARTLINK equipment, please ensure that the SMARTLINK option is set to 'On' in the Picture settings. (refer to page 10)
Using the remote control to operate other manufacturers' TVs
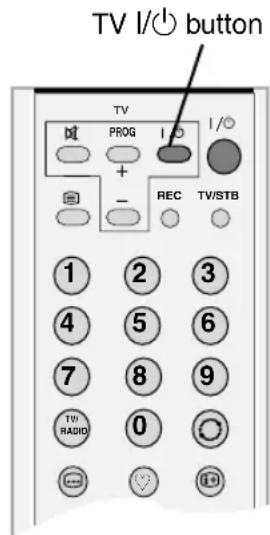
The remote control supplied with your receiver can be programmed to operate TVs made by other manufacturers. The following instructions guide you through the set up procedure. If however, your TV is not listed below, then it is not supported by this remote control.
1 Find the 3 digit code for your brand of TV from the list below.
2 Whilst holding down the TV I/⏻ button on the remote control, enter the three digit code using the numbered buttons.
3 Press the OK button to store, then release the TV I/O button.
4 Turn on your TV and check that the remote control operates the main functions. If not, repeat steps 2 - 3 and enter the next 3 digit code allocated to your brand of TV.
Notes: The brand code you set may be lost if weak batteries are not replaced immediately. Should this happen, use the above procedure to re-enter the code. Even if your TV is listed in the table below, in some instances you may not be able to operate all of the available TV fuctions.
| Brand | Code | Brand | Code |
| Aiwa | 036, 055 | Mitsubishi | 045 |
| Akai | 059, 060, 062, 063, 064, 065, 066, 067, 068 | Mivar | 029, 106 |
| Beijing | 022 | NEC | 020, 053, 058, 063, 094, 097 |
| Blaupunkt | 071 | Noblex | 022 |
| CGE | 046, 106 | Nokia | 031, 059, 097 |
| Daewoo | 017, 037, 069 | Onwa | 023, 024, 025 |
| Ferguson | 027, 061, 073 | Panasonic | 011, 098, 099 |
| Finlux | 030 | Peony | 034, 038, 039 |
| Funai | 032, 054, 056, 057, 120 | Philco | 010, 017, 021, 115 |
| Goldstar | 018, 063, 068, 075 | Philips | 046, 078, 097, 100 |
| Gradiente | 015, 020 | Pioneer | 052, 119 |
| Grundig | 019, 071, 072, 076, 106 | Saba | 061 |
| Hitachi | 010, 047. 058, 064, 075, 077, 078, 079, 080, 082 | Samsung | 012, 033, 034, 035, 059, 063, 064, 067, 121 |
| ITT | 028, 059, 107, 083 | Sanyo | 013, 016, 049, 050, 059, 063, 067, 118 |
| Jinxing | 038 | Sears | 013 |
| JVC | 007, 023, 024, 025, 042, 058, 060, 065, 073 | Sharp | 006, 051, 058 |
| Konka | 040, 037, 088, 093, 095 | Sony | 001, 002, 003 |
| LG | 018, 063, 068, 075, 121 | TCL | 041 |
| Loewe | 084 | Thomson | 026, 061 |
| Magnavox | 046, 081 | Toshiba | 008, 014, 048, 058, 062, 072, 104, 118 |
| Matsui | 058, 059, 060, 061, 062, 063, 064, 071, 076, 086, 087, 089, 090, 091, 092, 096 | Zenith | 009 |
| Matsushita | 043, 044 |
Specifications
| Transmission standards DVB-T | |
| Channel coverage UHF channels B21 - B69 | |
| TV scart 21 pin Euro connector (CENELEC standard) with SMARTLINK support | |
| VCR scart 21 pin Euro connector (CENELEC standard) with SMARTLINK support and synchro record | |
| Audio output socket | Digital optical output (PCM using a mini TOS lead) or analogue line-out (2V RMS), 3.5mm jack socket |
| Supply voltage 220 ~ 240V AC, 50Hz | |
| Power consumption 10W (Maximum) | |
| Operating temperature | -10 to +40°C |
| Dimensions (W x H x D) 215 x 48 x 240mm | |
| Weight 1.5 Kg Approx. | |
| Accessories supplied | 1 Remote control RM-X800, 1 RF Loopthrough cable, 2 AA size batteries, 1 Receiver stand,1 fully wired Scart lead |
Design and specifications are subject to change without notice
Troubleshooting
| Problem Possible cause | Solution | |
| The indicating light on the front panel is not illuminated | • Mains cable not connected | • Plug mains cable into power socket |
| The indicating light is Red | • The receiver is in standby mode | • Press the I/➊ button on the remote control to cancel standby mode |
| Remote control not working | • Batteries low | • Replace both batteries |
| You cannot find a channel you have previously watched | • The channel only broadcasts for part of the day | • Check the programme listings |
| No picture | • Scart plug loose• Your TV might be unable to switch automatically into the AV mode | • Check scart plugs are firmly connected• Set the TV to AV mode e.g AV1 or EXT1 etc. (refer to your TV manual) |
| Picture freeze | • Receiver malfunction | • Press and hold down the I/➊ button on the front panel for 5 seconds then release and wait until indicating light turns red. Press the I/➊ button on the remote control to resume normal operation |
| Picture and sound break up | • Signal strength low (see page 14) | • Check aerial installation |
| No sound | • Volume set too low on the TV• TV in Mute mode• Scart plug loose | • Increase volume setting of your TV• Cancel Mute mode• Check scart plug connection |
Attention:
Picture distortion may occur if this unit is positioned in close proximity to any equipment emitting electromagnetic radiation.
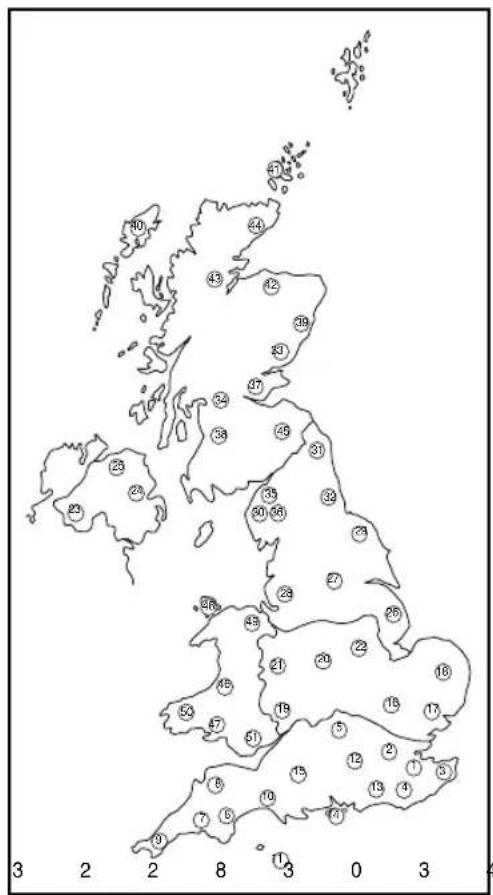
Only the main transmitters are listed. For further details or updates refer to the web site www.BBC.co.uk/reception/TV_transmitters/
| MAIN TRANSMITTERS | BBC | ITV&C4 | SDN | MuxB | MuxC | MuxD |
London & South East
| 1 | Bluebell Hill 59 24 27 45 42 39 |
| 2 | Crystal Palace 25 22 32 28 34 29 |
| 3 | D o v e r 6 8 6 1 5 5 5 8 5 7 6 0 |
| 4 | Heathfield 34 29 48 47 54 51 |
| 5 | Oxford 34 68 51 52 48 29 |
South-West
| 6 | Beacon Hill | 52 61 58 54 56 64 |
| 7 | Caradon Hill 34 31 48 | 21 24 27 |
| 8 | Huntshaw Cross | 54 58 61 64 53 57 |
| 9 | Redruth | 39 42 45 49 43 50 |
| 10 | Stockland Hill | 22 28 25 32 30 34 |
Channel Islands
| 11 Fremont Point | No Digital Transmission |
South
| 12 | Hannington | 50 43 40 46 44 41 |
| 13 | Midhurst | 56 65 62 59 64 60 |
| 14 | Rowridge | 23 52 30 32 26 33 |
West
| 15 | Mendip | 59 | 55 | 62 | 65 | 56 | 67 |
East
| 16 | Sandy Heath | 42 45 43 67 40 46 |
| 17 | Sudbury | 49 68 48 39 54 50 |
| 18 | Tacolneston | 63 60 53 58 61 64 |
Midlands (West)
| 19 | Ridge Hill | 53 57 60 63 42 45 |
| 19 | Sutton Coldfield | 41 44 47 51 52 55 |
| 21 | The Wrekin | 21 31 24 27 53 57 |
Midlands (East)
| 22 | Waltham | 49 | 23 | 26 | 33 | 45 | 42 |
Northern Ireland
| 23 | Brougher Mountain | 30 34 23 26 29 33 |
| 24 | Divis | 29 33 23 26 48 34 |
| 25 | Limavady | 67 58 53 57 60 63 |
North
| 26 Belmont | 30 48 68 66 60 57 |
| 27 Emley Moor | 52 40 43 46 50 49 |
North-West
| 28 | Winter Hill | 56 | 66 | 68 | 67 | 60 | 63 |
North-East
| 29 | Bilsdale | 34 21 31 24 27 42 |
| 30 | Caldbeck | 25 23 26 39 45 42 |
| 31 | Chatton | 40 50 43 46 47 51 |
| 32 | Pontop Pike 48 55 59 62 65 53 |
Scotland
| 33 | Angus | 68 66 59 62 56 65 |
| 34 | Black Hill | 41 47 44 51 55 65 |
| 35 | Sandale | No Digital Transmission |
| 36 | Caldbeck | No Digital Transmission |
| 37 | Craigkelly | 33 29 23 26 42 39 |
| 38 | D a r | v e l |
| 39 | Durris | 30 34 52 51 41 44 |
| 40 | Eitshal | 34 30 22 25 28 32 |
| 41 | Keelylang Hill | 48 52 41 44 47 51 |
| 42 | Knock More | 34 30 53 57 60 56 |
| 43 | Rosemarkie | 47 51 41 44 46 50 |
| 44 | Rumster Forest | 28 22 25 32 62 59 |
| 45 | Selkirk | 53 57 60 63 66 56 |
Wales
| 46 | Blaenplwyf | 28 22 25 32 29 33 | |
| 47 | C a r | m e l | |
| 48 | Llanddona | 50 54 58 61 64 46 | |
| 49 | Moel-y-Parc | 54 58 61 64 30 34 | |
| 50 | Presely | 47 51 39 42 45 49 | |
| 51 | Wenvoe | 30 34 40 50 43 46 |
2 2 2 5 3 2 2 8 3 0 3 4
5 5 6 5 5 9 6 2 6 8 6 6
A
Accessories supplied 5
C
Connecting a Hi-Fi.... 7
Connecting your TV and VCR ..... 7
Country, setting 10
D
Digital text.... 18
Selecting.... 18
Viewing.... 18
Digital TV channel list 22
E
EPG
Category list.... 15
Recording a programme...... 16
To cancel a recording.... 16
F
Favourites list
Adding channels.... 9
Deleting channels 9
To view a different list ...... 9
Viewing a favourite channel...... 9
Feature pages.... 14
|
Information display
Alternative audio tracks...... 17
Alternative subtitle language ..... 17
To display information...... 17
L
Language, setting.... 10
M
Menu system, using...... 9
N
Notes on other equipment
Hi-Fi 19
SMARTLINK 19
VCRs.... 19
P
Parental control
Setting age limit.... 11
Setting your PIN 11
To lock channels 11
Picture, setting 10
Programme Sort.... 13
R
Receiver
Front view 6
Rear view.... 6
Remote control
Inserting batteries 7
Overview 4
Using with other makes of TV .... 20
S
Safety information.... 1, 2
Signal strength display 14
SMARTLINK 19
Software upgrade 14
Specifications 21
Stand, fixing 6
Stand, removing 6
Subtitles, setting 10
T
Troubleshooting.... 21
Tuning
Automatic tuning.... 8, 12
Manual tuning.... 12
W
WSS (Wide Screen Switching)...... 10
Your SONY Guarantee
Dear Customer,
We thank you for having bought this Sony product and hope you will be happy with it. In the event that your Sony product needs guarantee service, please contact the dealer from whom it was purchased or a member of our authorised service network in the European Economic Area ("EEA") which are available in the telephone directory and our product catalogues. In order to avoid any unnecessary inconvenience on your part, we suggest reading the instruction manual carefully before contacting the dealer or our authorized service network.
Your Guarantee.
By this consumer guarantee, Sony guarantees the product to be free from defects in materials and workmanship for a period of 1 (ONE) YEAR from the time of its original purchase.
If during this period of guarantee the product proves defective due to improper materials or workmanship, the Sony National Sales Companies, Authorized Service Stations or Authorized Service Dealers in the EEA will without charge for labour or parts, repair or (at Sony's discretion) replace the product or its defective parts upon the terms and conditions set out below. Sony reserves the right (at its sole discretion) to replace spare parts of defective products or to replace low cost products with either new or refurbished spare parts or products.
Conditions.
-
This guarantee will be granted only when the original invoice or sales receipt (indicating the date of purchase, product type and dealer's name) is presented together with the defective product. Sony reserves the right to refuse free-of-charge guarantee service if the above document cannot be presented or if the information contained in it is incomplete or illegible.
-
This guarantee will not reimburse nor cover the damage
resulting from adaptations or adjustments which may be made to the product, without the prior written consent of Sony, in order to conform to the national or local technical or safety standards in force in any country other than the ones for which the product was originally designed and manufactured.
-
This guarantee will not apply if the type or serial number on the product has been altered, deleted, removed or made illegible.
-
This guarantee covers none of the following:
a. Periodic maintenance and repair or replacement of parts due to normal wear and tear;
b. Any adaptation or changes to upgrade the product from its normal purpose as described in the instruction manual, without the prior written consent of Sony;
c. Transport costs, home service, transport cost and all risks of transport relating directly or indirectly to the guarantee of the product;
d. Damage resulting from:
- Misuse, including but not limited to (a) failure to use the product for its normal purpose or in accordance with Sony's instructions on the proper use and maintenance, and (b) installation or use of the product in a manner inconsistent with the technical or safety standards in force in the country where it is used and (c) improper or incorrect installation of software;
- Repair done by non-authorized Service Stations or Dealers, or the customer himself;
- Accidents, lightning, water, fire, improper ventilation or any cause beyond the control of Sony;
-
Defects of the system into which this product is incorporated.
-
This guarantee does not affect the consumer's statutory rights under applicable national laws in force, nor the consumer's rights against the dealer arising from their sales/purchase contract.
For further information, please contact Sony Customer Information Centre at the following address or telephone number:
Sony United Kingdom Ltd.
Pipérs Way
Thatcham
Berks RG19 4LZ
0870 511 1999
http://www.sony.net
Model Name and serial number
Purchase date
Dealer and stamp Name and address
of customer
- Operating Guide
- NOTICE FOR CUSTOMERS IN THE UNITED KINGDOM
- How to replace the Fuse
- IMPORTANT
- WARNING
- Safety information 1
- Overview of the remote control 4
- Accessories supplied----5
- Receiver overview and connections 6
- Getting started 7
- Using the menu system 9
- Other Features 15
- Notes on connecting SMARTLINK and other equipment- - - - - - - - - - - - - 19
- Additional information 20
- Digital TV Channel List- 22
- Index 23
- ①Mute button ☐
- ② TV PROG +/- buttons
- ③Text button
- ④Buttons 0 - 9
- ⑤TV/RADIO button
- ⑥ SUBTITLE button
- ⑦Favourite button
- ⑧ EPG button
- ⑨BACK button
- ⑩Coloured buttons
- ⑪Volume +/- button
- Standby button I/
- TV standby button I/
- ⑭TV/STB button
- ⑮REC button
- 16JUMP button
- ⑰INFO button ⓘ+
- 18Control pad
- 19MENU button
- 20PROG +/- button
- Connecting your TV and VCR
- Automatic tuning procedure
- If no channels are found
- To add or delete a favourite channel
- To view a different favourite list
- To watch or listen to a Favourite channel
- Settings
- Parental Control
- Set PIN
- Lock Channels
- To lock or unlock all channels
- Set Age Limit
- Tuning
- Auto Tune
- Manual Tune
- Programme Sort
- Programme Skip
- All Channels:
- Show Skipped:
- Technical Information
- Manufacturer Information
- Signal Strength
- Software Upgrade
- Feature Pages
- The EPG
- The Category pop-up list
- To select a programme for recording or timed display
- To record a programme using the Manual Timer
- To cancel a recording
- Programme information
- To display the programme information
- To select an alternative audio track, audio mode or subtitle language
- Digital Text
- Viewing a digital text service
- TV connection for SMARTLINK
- VCR connection for SMARTLINK
- VCR connection for Synchro record
- Receiver/VCR connection
- Hi-Fi
- Using the remote control to operate other manufacturers' TVs
- Attention:
- A
- C
- D
- E
- F
- |
- L
- M
- N
- P
- R
- S
- T
- W
- Your SONY Guarantee
- Dear Customer,
- Your Guarantee.
- Conditions.
Brand : SONY
Model : VTX-D800U
Category : TV Tuner for Computer