
BS566A - Steam cleaner BUSH - Free user manual and instructions
Find the device manual for free BS566A BUSH in PDF.


| Product Type | Steam Cleaner |
| Brand | Bush |
| Model | BS566A |
| Power Consumption | 1500 W |
| Voltage | 220-240 V ~ 50/60 Hz |
| Water Tank Capacity | 300 ml |
| Heating Time | 30 seconds |
| Steam Pressure | 3 bar |
| Cable Length | 3 m |
| Weight | 1.2 kg |
| Dimensions (H x W x D) | 30 x 15 x 20 cm |
| Material | Plastic (PP/ABS) |
| Safety Features | Overheat protection, pressure safety valve |
| Accessories Included | Measuring cup, detail nozzle, brush attachment |
| Maintenance | Descale every 10 uses; clean nozzle with pin |
| Repairability | Contact Bush customer support for spare parts |
| Warranty | 2 years (manufacturer warranty) |
Frequently Asked Questions - BS566A BUSH
User questions about BS566A BUSH
0 question about this device. Answer the ones you know or ask your own.
Ask a new question about this device
Download the instructions for your Steam cleaner in PDF format for free! Find your manual BS566A - BUSH and take your electronic device back in hand. On this page are published all the documents necessary for the use of your device. BS566A by BUSH.
USER MANUAL BS566A BUSH
natural_image
3D rendered image of a light blue spray gun with handle and side ports (no text or symbols visible)Steam cleaner
INSTRUCTIONS FOR USE


natural_image
Line drawing of a mechanical device with a knob and directional arrow (no text or symbols)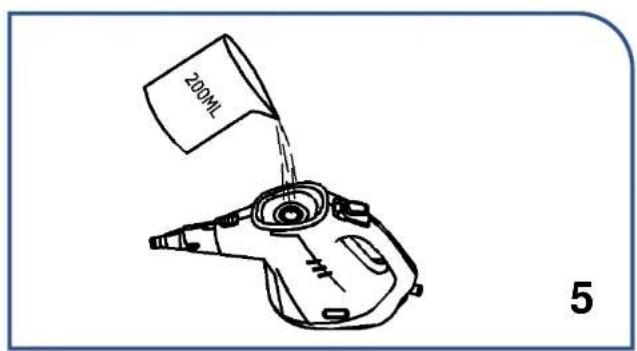

natural_image
Line drawing of a mechanical device with a valve and adjustment knob (no text or symbols)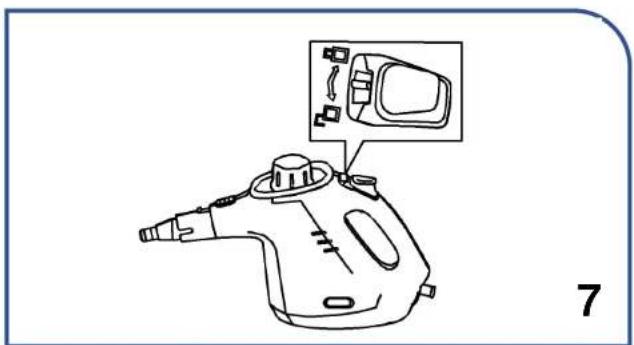
natural_image
Line drawing of a steam gun with a close-up inset showing internal components (no text or symbols)
natural_image
Line drawing of a hand holding a small electrical outlet connected to a device (no text or symbols present)
natural_image
Technical line drawing of a mechanical assembly with a threaded component and base plate (no text or symbols)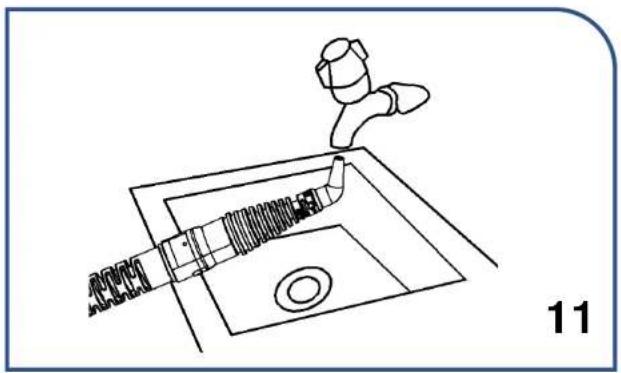
natural_image
Line drawing of a faucet with a pipe inserted into a sink, labeled '11' (no text or symbols on the diagram itself)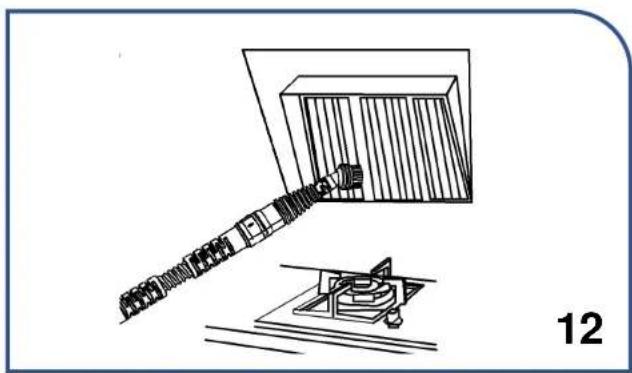
natural_image
Diagram showing a mechanical assembly with a bracket and a base, labeled '12' (no text or symbols on the diagram itself)
natural_image
Diagram of a cleaning tool applying paint to a window frame, labeled with number 13 (no text or symbols on the diagram itself)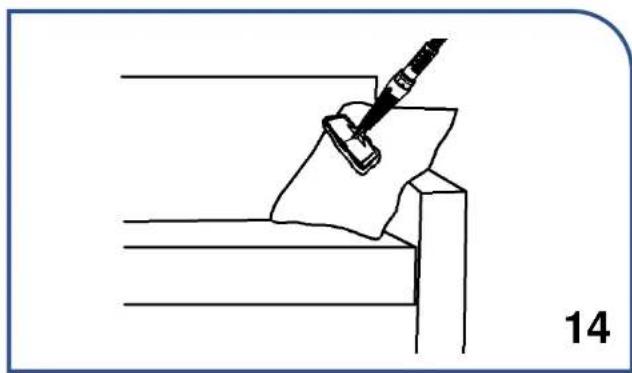
natural_image
Simple line drawing of a tool pressing down on a surface, labeled with number 14 (no text or symbols in the diagram itself)
natural_image
Illustration of a hand holding a device next to an electrical outlet, with no visible text or symbols.
natural_image
Line drawing of a hairdryer performing a manual lift on a sink (no text or symbols)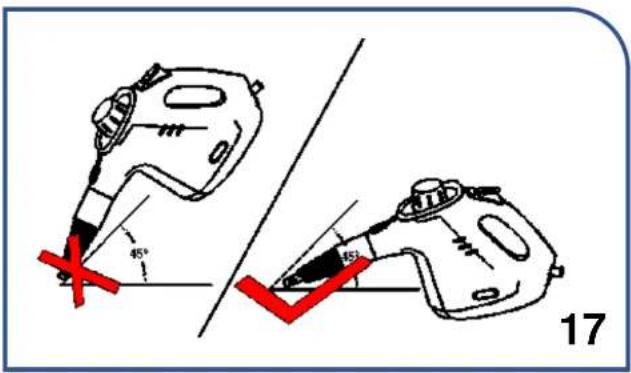
INSTRUCTIONS FOR SAFE USE
This appliance should only be used for domestic cleaning, as described in this user guide. Please ensure that this guide is fully understood before operating the appliance.
Do not leave the appliance plugged in. Always switch off and remove the plug from the socket after use, or before cleaning the appliance or any maintenance task.
This appliance can be used by persons with reduced physical, sensory or mental capabilities or lack of experience and knowledge if they have been given supervision or instruction concerning use of the appliance in a safe way and understand the hazards involved. Children shall not play with the appliance.
Keep the appliance out of reach of children when it is energized or cooling down.
The appliance is not to be used if it has been dropped, if there are visible signs of damage or if it is leaking.
If the power cord is damaged stop using the appliance immediately. To avoid a safety hazard, an authorised service engineer must replace the power cord.
This appliance must be earthed.
The appliance shall not be left unattended while it is connected to the supply mains. Do not use your appliance out of doors.
Use only attachments, consumables or spares recommended or supplied.
Do not use the appliance to clean or direct steam towards animals, people or plants. Liquid or steam must not be directed towards equipment containing electrical components, such as the interior of ovens.
Always unplug the cleaner, switch off and press the steam release trigger to release any remaining steam pressure before filling the water container. Do not fill over the
MAX mark.
The filling aperture must not be opened during use.
Dangerof Scalding.
Surfaces are liable to get very hot during use. Avoid contact with steam.
Do not stand on or wrap the cord around arms or legs when using your appliance.
Do not position the appliance above you when cleaning the stairs.
When using the cleaning tools ensure to always steady the appliance with your other hand. This will ensure that the appliance does not fall while in use.
Do not handle the plug or appliance with wet hands.
Do not run over the power cord when using your appliance or remove the plug by pulling on the power cord.
Do not continue to use your appliance if it appears faulty.
maintenance service: To ensure the continued safe and efficient operation of this appliance we recommend that any servicing or repairs are only carried out by an authorised service engineer.
Do not immerse the appliance in water or other liquids.
Do not use detergents or liquids other than water inside the appliance.
The Environment
The symbol on this appliance indicates that this appliance may not be treated as household waste. Instead it must be handed over to the applicable collection point for the recycling of electrical and electronic equipment. Disposal must be carried out in accordance with local environmental regulations for waste disposal. For more detailed information about treatment, recovery and recycling of this appliance, please contact your local city office, your household and waste disposal service or the shop where you purchased the appliance.


GETTING TO KNOW YOUR CLEANER
A. Safety Cap
L. Copper Round Brush
B. Steam Trigger Lock
M. Small Round Brush
C. Steam Release Trigger
N. Multi-Purpose Nozzle
D. Handle
O. Large Scraper
E. Cleaner Main Body
P. Textile Pad
F. Steam Ready Light
Q. The plastic cup
G. Steam Outlet
R. Funnel
H. Disassembly switch
I. Extension Hose
J. Tapered Tube
K. Curved Nozzle
ASSEMBLING YOUR CLEANER
Standard nozzle
Connect the conical tube [J] to the steam outlet [G], press the disassembly switch [H], align the slot on the conical tube [J] with the buckle of the disassembly switch [H] and insert it in the direction indicated by the arrow until locked in place. [1 a]
Extension Pipe
Connect the extension hose [I] to the steam outlet [G], press the disassembly switch [H], align the groove of the extension hose [I] with the disassembly switch [H], insert
in the direction of the arrow until locked in place [2 a]
Once tapered tubes or extension hoses are attached, they can be used directly for steam applications, or you can attach accessories for use.
You can choose from a variety of accessories depending on what tasks you are performing.
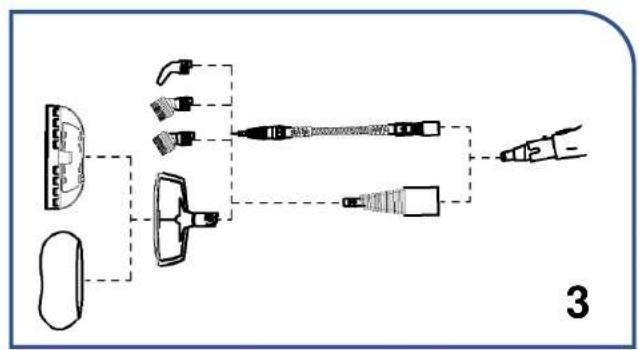
To install accessories, install conical tube or extension hose to steam outlet, install accessories to conical tube or extension hose, turn clockwise to lock position. [3]
To remove the cone or extension hose, turn off the product and allow it to cool, press the disassembly switch and gently pull out of the washer in the direction indicated by the arrow. [1 b & 2 b]
USING YOUR CLEANER
You can start using a steam cleaner for cleaning and hygiene.
-
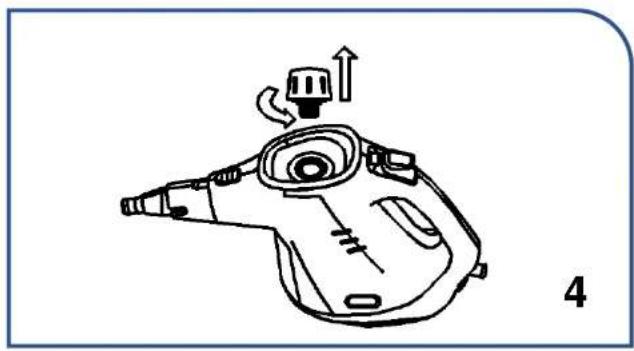
Remove the safety cap by turning anti-clockwise. [4]
-
Fill the boiler with 200ml ordinary tap water or desalinated brine. [5]
-
Re-fit the safety cap to the boiler turning clockwise, ensuring it is shut tightly. [6]
-
Attach the accessory most suited for the surface and task to be performed. [3]
-
Insert the power cable into the appropriate grounded power socket. The steam preparation lamp glows red. After heating, the indicator light is off, and the product can output steam.
-
To deliver steam, release the trigger safety lock [7] and push steam release trigger [8]. Ensure the trigger safety lock is in the locked position when your product is not in use. [7]
NOTE: In order to significantly reduce mineral build-up and to prolong the life of your steam cleaner, it is highly recommended to use distilled or demineralised water.
IMPORTANT: Always unplug the cleaner and press the steam release trigger to release any remaining steam pressure before adding water. [15]
ACCESSORIES
According to your cleaning needs, you can choose accessories reasonably.
Tapered tubes make the steam stronger.
Extension hoses allow for more flexible operation.
Note: all accessories should only be used for tapered or extension hoses and should not be attached directly to the product.
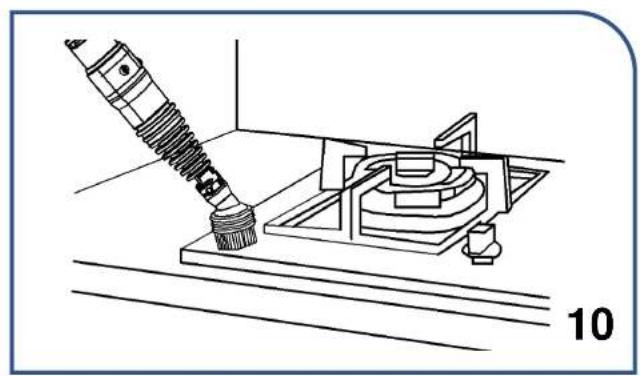
Copper Round Brush: Ideal for removal of very stubborn stains. [10]
Curved Nozzle: Ideal for cleaning hard to reach areas such as taps etc. [11]
Small Round Brush: Ideal for use on stubborn grease and grime. [12]
Multi-Purpose Nozzle: this is used along with the Large scraper, Textile pad. [9]
-
Large scraper: insert the multi-purpose nozzle into the large scraper, which is ideal for use on windows and mirrors for a for a smear clean free finish. [13]
-
Textile pad: fit the textile pad over the multi-purpose nozzle, ideal for cleaning fabric and soft furnishings.[14]
IMPORTANT: As the accessories become very hot during use, you must be very careful when removing them or replacing them. Either use an oven glove to handle them or wait until they cooled down.
Always ensure that the product is disconnected from the mains power before changing the accessories.
CLEANER MAINTENANCE
Before each use, inspect the seal on the steam nozzle, if the seal is missing or damaged do not use the appliance and contact the authorized service.
IMPORTANT: ALWAYS ENSURE THE CLEANER HAS FULLY COOLED DOWN BEFORE PERFORMING ANY MAINTENANCE TASKS.
Empty the water tank
- Unplug the power cord and ensure that the machine is cooled.
- Hold the steam release trigger down to release any remaining steam pressure. [15]
- Remove the safety cap turning anti-clockwise. [4]
- Lift the cleaner and empty any remaining water. [16]
Removing and cleaning the textile pad
- Unplug the cleaner from the mains power and ensure the unit has cooled.
- Remove the textile pad from multi-purpose nozzle.
- Wash the textile pad by hand or machine with a mild detergent at max temperature 30^ C.
IMPORTANT: Do not use bleach or fabric softener when washing the textile pad.
TROUBLESHOOTING
Should you have a problem with the product, complete this simple user checklist.
The steam cleaner will not powered.
- Check the unit is plugged in.
- Check the power cord.
The product is not producing steam.
- Check the unit is plug in.
- There may be no water in the water tank.
• The water is not at the correct temperature.
When the indicator is off, heating is complete.
The washer takes a long time to warm up.
- If you live in a hard water area the water tank may have become blocked. The unit will have to be descaled.
CLEANING FAQs
When will the steam feature be ready? When the indicator is off, the heating is complete.
Can I use Steam Capsule Express on all floor surfaces? On all hard floors like marble, ceramic, stone, linoleum, sealed hardwood floors and parquet.
Will the steam cleaner emit steam automatically? No, to generate steam you should press the steam trigger button under the handle
Can I put detergents or other chemicals inside the tank? No, you would damage the product.
What if in the city where I live the water is very hard? Use filtered water, distilled or demineralized water.
How long will one tank of water last before needing to be refilled? Up to 7 minutes if you press the trigger continuously.
Water added too fast, overflow out how to do? Press the steam switch and the water will drop.
Brand : BUSH
Model : BS566A
Category : Steam cleaner