TDC32 - Webcam GFM - Free user manual and instructions
Find the device manual for free TDC32 GFM in PDF.


| Product Type | Webcam |
| Brand | GFM |
| Model | TDC32 |
| Resolution | 1920 x 1080 (Full HD) |
| Frame Rate | 30 fps |
| Lens | Fixed focus, wide angle 70° |
| Microphone | Built-in omnidirectional |
| Connection | USB 2.0 (plug and play) |
| Cable Length | 1.5 meters |
| Mounting | Clip-on for monitor or tripod mount |
| Dimensions | 10 x 5 x 5 cm |
| Weight | 100 g |
| Power Supply | USB powered (5V) |
| Compatibility | Windows 7/8/10, macOS 10.6+, Linux |
| Privacy Cover | Built-in physical shutter |
| Maintenance | Clean with dry soft cloth |
| Safety Instructions | Keep away from liquids and extreme temperatures |
| Spare Parts | USB cable can be replaced; no other spare parts |
| Reparability | Non-repairable by user; contact support |
| Package Contents | Webcam, user manual |
Frequently Asked Questions - TDC32 GFM
User questions about TDC32 GFM
0 question about this device. Answer the ones you know or ask your own.
Ask a new question about this device
Download the instructions for your Webcam in PDF format for free! Find your manual TDC32 - GFM and take your electronic device back in hand. On this page are published all the documents necessary for the use of your device. TDC32 by GFM.
USER MANUAL TDC32 GFM
3 in 1 Digital Camera
1. Specification
3 in 1 Digital Camera: Digital Still Camera
Video Capturing
Conferencing (Web cam)
Image Sensor: CMOS Sensor
Resolution: VGA 640 x 480 Pixels
QVGA 320 x 240 Pixels
Color: 24 bits
Lens: Fixed Focus=6.2mm F/2.5
Capture Range: 0.5m\~infinity
Memory: Built-in 8MB SDRAM
Capacity: 60-105 pictures (Compressed VGA)
25 pictures (VGA 640 x 480)
240-410 pictures (compressed QVGA)
102 pictures (QVGA 320 X 240)
POWER: 1 AAA Alkaline battery
Computer Interface: USB
Note: The quantity of compressed picture is various and depends on the scene complexity.
2. System Requirement
OS: Microsoft 2000/ME/XP/Vista
Mac V9.x/X.x*
Hard Disk Space: 500MB or above
Memory: 32MB RAM or above
USB interface and CD-ROM
Color Monitor (at least 800 x 600 24 bits or above)
*(go to gfmproducts.com to download the MAC OS driver)
Instruction Manual

TDC32
3 in 1 Digital Camera
- Specification
3 in 1 Digital Camera:
Digital Still Camera
Video Capturing
Conferencing (Web cam)
Image Sensor:
CMOS Sensor
| Resolution: | VGA 640 x 480 PixelsQVGA 320 x 240 Pixels |
| Color: | 24 bits |
| Lens: | Fixed Focus=6.2mm F/2.5 |
| Capture Range: | 0.5m~infinity |
| Memory: | Built-in 8MB SDRAM |
| Capacity: | 60-105 pictures (Compressed VGA) |
| 25 pictures (VGA 640 x 480) | |
| 240-410 pictures (compressed QVG | |
| 102 pictures (QVGA 320 X 240) | |
| POWER: | 1 AAA Alkaline battery |
| Computer Interface: | USB |
Note: The quantity of compressed picture is various and depends on the scene complexity.
- System Requirement
OS: Microsoft Win98SE/2000/ME/XP
Mac V9.x/X.x*
Hard Disk Space: 200MB or above
Memory: 32MB RAM or above
USB interface and CD-ROM
Color Monitor (at least 800 x 600 24 bits or above)
*(go to gfmproducts.com to download the MAC OS driver)
• Functional Parts of the Camera

- Get started
-
Load battery to the correct polarity marked on the battery door.
-
Turn the camera on by pressing MODE button.
Precaution:
While the camera is connected to the USB cable, it is unnecessary to use the battery since the camera uses the power supplied from computer USB interface. Before using the PC-Cam function, please download all photos in the camera onto your computer to avoid any photos missing.
Warning:
- If you don't use the camera for a long time, please take out the battery. Photos will be lost after the battery is taken out.
- Please follow local regulations when disposing of used batteries
- If the camera is not used in 30 seconds. It will enter standby mode automatically to save battery energy. You may press mode button to restart the camera operations again.
- Software installation 2
Attention:
Make sure you install all the necessary software in your computer before you connect the camera to a computer.
- Close all opened software applications on your computer before installing the software.
- Insert the CD-ROM into the computer CD-ROM drive
- The CD user interface screen will automatically launch.

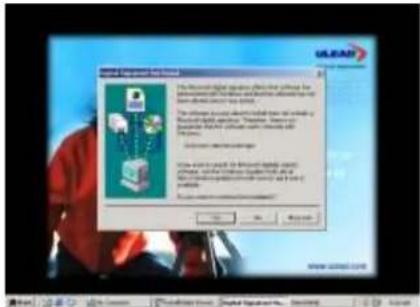
- Click on the Install Digital Camera Driver icon to install camera driver first.
- If you want to install the application software of Ulead photo Express included in
the CD, click on the Install Photo Express 4 SE icon to install it.
Important:
For Windows98, Microsoft® DirectX 8.0 or a higher version is required to be installed before driver installation. If there is not DirectX 8.0 in your PC, please install it first. The DirectX 8.0 is included in the CD supplied under the "DirectX" folder, your can run the dxsetup.exe to install it.
If the XP warning dialogue box pops up during driver installation, please click "Yes" button to continue.
• Camera function operation
If the MODE button is pressed repeatedly, the camera LCD display will show the following symbols:

• Take pictures
- Press "mode" button to turn on the camera, the camera is automatically set to
take high-resolution pictures. The number of images that have been taken will be shown on the LCD screen
- Canter your subject by using camera viewfinder.
- Press the "Shutter" button, and the snapshot is finished with a distinct beeping sound as well as the number on the LCD display will increase by one.
- When "CS" mode is chosen, you can capture 3 photos successively.
ATTENTION:
When the lighting is not sufficient, the Auto exposure and Gain control need more time to settle, you have to hold the camera steadily and wait longer for the beeping sound. If the environment is too dark to take pictures, you will hear 2 beeps sound and no picture can be taken.
- Download Picture
- Connect the camera to the computer with a USB cable. The computer will automatically update new information to confirm the connection.
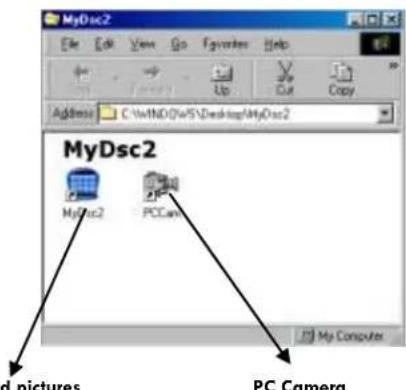
- Open the folder "My DSC2" on desktop and then double click "My DSC2" icon. The download interface will be displayed on the screen.

natural_image
Blue and gray stylized button or icon with grid layout (no text or symbols)Download Transfer Save Select all Edit image
- Click the Edit image button, and then select the pixel up if you want interpolate the photo to 1.3M pixels.

- Click the download button; the pictures thumbnails that you've taken will be displayed on the interface in order.
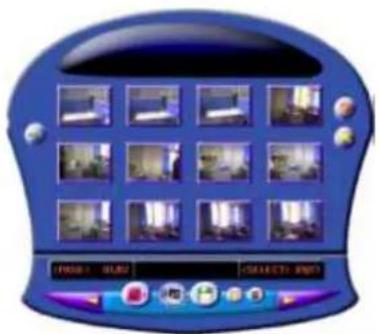
- Click any thumbnail with the right button of the mouse and it will zoom in on it. Click a thumbnail to select it or click the "select all" button to select all thumbnails.
- After selected the pictures you want to save, the picture will be highlighted in red, click the "save photo" button and select the path and name to save.
- Having saved all the intended pictures, you can clear the memory of the camera and start taking pictures again.
- PC Camera
- Double click the PC Cam icon; you will open a PC-camera frame.
- If no image is shown, you may click "Preview" in the "options" menu to activate the driver.
- You can click the "video capture pin" in the "options" menu to select the resolution; the default is QVGA (320 x 240).
IMPORTANT! 7
- When the battery power is low, the LCD display will blink constantly which indicates it's time to change the battery.
- Please download pictures to your computer before taking out the battery, or your photos will be lost.
● After downloading the pictures, please remove the battery because the battery loses its power gradually if it is still in use.
This form describes the protection You will have under this Limited Warranty. 8
LIMITED WARRANTY PERIOD:
This Limited Warranty begins on the date of purchase of the Covered Product and continues for a period of six months.
WHAT IS COVERED:
Meijer will pay the cost of labor and repair or replacement parts in the event Your Covered Product fails to operate as a result of a mechanical or electrical failure caused by defects in workmanship and/or materials. A mechanical or electrical failure caused by a direct result of a power surge is also covered. Parts will be replaced with those of like kind and quality, and may be new or remanufactured. If the Covered Product cannot be repaired, if the cost of the repair exceeds the original purchase price or if parts are not available due to the age of the Covered Product or discontinued by the manufacturer, the Covered Product will be replaced with a product of similar features.
WHERE YOU ARE COVERED:
Coverage under this Limited Warranty is limited to the United States of America, including the District of Columbia. It does not include any Canadian or U.S. Territories
including Guam, Puerto Rico, or U.S. Virgin Islands.
WHAT IS NOT COVERED:
● PRODUCTS NOT ORIGINALLY COVERED BY A MANUFACTURER'S WARRANTY;
- ITEMS THAT ARE STILL COVERED BY THE MANUFACTURER'S WARRANTY, REGARDLESS OF WHETHER THE MANUFACTURER HONORS SUCH WARRANTY;
● PERIODIC CHECKUPS AND/OR PREVENTIVE MAINTENANCE AS DIRECTED BY THE MANUFACTURER EXCEPT AS PROVIDED HEREIN;
● INHERENT PRODUCT DEFECTS THAT ARE THE RESPONSIBILITY OF THE MANUFACTURER OR PARTS FAILURE DUE TO A MANUFACTURER'S RECALL;
- ANY AND ALL PRE-EXISTING CONDITIONS THAT OCCUR PRIOR TO THE EFFECTIVE DATE OF THIS LIMITED WARRANTY AND/OR ANY COSTS TO REPAIR ANY PRODUCT SOLD "AS-IS" INCLUDING BUT NOT LIMITED TO FLOOR MODELS, DEMONSTRATION MODELS, ETC;
- PARTS OR REPAIRS DUE TO NORMAL WEAR AND TEAR AND ITEMS NORMALLY DESIGNED TO BE PERIODICALLY REPLACED BY THE PURCHASER DURING THE COVERED PRODUCT'S LIFE, INCLUDING BUT NOT LIMITED TO BATTERIES, LIGHT BULBS ETC;
- DAMAGE FROM ACCIDENT, ABUSE, MISUSE, MISHANDLING, INTRODUCTION OF FOREIGN OBJECTS INTO THE COVERED PRODUCT, UNAUTHORIZED MODIFICATIONS OR ALTERATIONS TO A COVERED PRODUCT, FAILURE TO FOLLOW THE MANUFACTURER'S INSTRUCTIONS, AND EXTERNAL CAUSES INCLUDING THIRD PARTY ACTIONS, FIRE, THEFT, INSECTS, ANIMALS, EXPOSURE TO WEATHER CONDITIONS, WINDSTORM, SAND, DIRT, HAIL, EARTHQUAKE, FLOOD, WATER, ACTS OF GOD OR CONSEQUENTIAL LOSS OF ANY NATURE;
- LOSS OR DAMAGE CAUSED BY WAR, INVASION OR ACT OF FOREIGN ENEMY, HOSTILITIES, CIVIL WAR, REBELLION, RIOT, STRIKE, LABOR DISTURBANCE, LOCKOUT, OR CIVIL COMMOTION;
- INCIDENTAL, CONSEQUENTIAL OR SECONDARY DAMAGES OR DELAY IN RENDERING SERVICE UNDER THIS LIMITED WARRANTY, OR LOSS OF USE DURING THE PERIOD THAT THE COVERED PRODUCT IS AT AN AUTHORIZED SERVICE CENTER OR OTHERWISE AWAITING PARTS;
● ANY PRODUCT USED IN A COMMERCIAL SETTING OR RENTAL BASIS;
● FAILURES THAT OCCUR OUTSIDE OF THE 50 STATES OF THE UNITED STATES OF AMERICA, INCLUDING THE DISTRICT OF COLUMBIA;
● NONFUNCTIONAL OR AESTHETIC PARTS INCLUDING BUT NOT LIMITED TO PLASTIC PARTS, KNOBS, ROLLERS, BASKETS, SCRATCHES, PEELING AND DENTS;
● UNAUTHORIZED REPAIRS AND/OR PARTS;
● COST OF INSTALLATION, SET-UP, DIAGNOSTIC CHARGES, REMOVAL OR REINSTALLATION OF THE COVERED PRODUCT, EXCEPT AS PROVIDED HEREIN;
- ACCESSORIES USED IN CONJUNCTION WITH A COVERED PRODUCT;
● ANY LOSS OTHER THAN A COVERED BREAKDOWN OF THE COVERED PRODUCT;
● SERVICE WHERE NO PROBLEM CAN BE FOUND; - BREAKDOWNS WHICH ARE NOT REPORTED WITHIN THE TERM OF THIS LIMITED WARRANTY;
● IMPROPER INSTALLATION OF COMPONENTS OR PERIPHERALS; - CORRUPTION OF ANY RECORDING MEDIA INCLUDING ANY PROGRAM, DATA OR SETUP INFORMATION RESIDENT ON ANY HARD DRIVES AND INTERNAL OR EXTERNAL REMOVABLE STORAGE DEVICES, AS A RESULT OF THE MALFUNCTIONING OR DAMAGE OF AN OPERATING PART, OR AS A RESULT OF ANY REPAIRS OR REPLACEMENT UNDER THIS LIMITED WARRANTY;
● DAMAGE TO CLOTHING; - COLOR RADING OF PICTURE FOR ANY TELEVISION;
● BURNED-IN PHOSPHOR (INCLUDING IMAGE GHOSTING), PIXEL BURNOUT NOT IN ACCORDANCE WITH THE MANUFACTURER'S SPECIFICATIONS.
WHAT TO DO WHEN YOUR PRODUCT FAILS TO OPERATE:
- Call the 24-hour customer service toll-free number at (866) 845-9436.
Many oversights, which are not covered under this Limited Warranty, can be due to simple circumstances such as the Covered Product not being switched on, being unplugged, or a fuse blown at the junction box. For a Covered Product that uses batteries as the primary power supply, or a remote control unit, please check that the batteries do not need replacing or recharging.
SERVICE DELIVERABLES:
There is no deductible required to obtain service for Your Covered Product.
OTHER PROVISIONS:
Limit of Liability:
The limit of liability under this limited warranty is the least of the cost of (1) the purchase price of the Covered Product excluding tax and delivery costs or (2) authorized repairs not to exceed the purchase price of the Covered Product or (3) replacement of the Covered Product with similar features or (4) reimbursement for authorized repairs or replacement. Upon replacement, there is no longer any obligation for the replaced product under this Limited Warranty.
Limitations of Implied Warranty:
All Implied Warranties which may arise under state law, including all Implied Warranties of Merchantability or Fitness for a particular purpose, are limited to the duration of this Warranty and do not cover incidental or consequential damages. Some states do not allow limitations on how long an Implied Warranty lasts or the exclusion of incidental or consequential damages, so the above limitations or exclusions may not apply to You. This Warranty gives You specific legal rights, and You may also
have the other rights which vary from state to state.
Transferability and Renewals:
This Limited Warranty is not transferable or renewable.
Subrogation:
If We pay for a loss, We may require You to assign Us Your rights of recovery against others. We will not pay for a loss if You impair these rights to recover. Your rights to recover from others may not be waived.
Arbitration:
In the event of a disagreement between You and Us concerning costs, either of us may make a written demand for arbitration. This must be done within sixty (60) days after the day You filed Your claim. Each of us will select an arbitrator. The two arbitrators will select an umpire. Each of us will pay the expenses of the arbitrator We select. The expenses of the umpire will be shared equally. Unless both of us agree otherwise, arbitration will take place in the country and state in which You live. Local rules apply. A majority decision will be binding.
Dist. by Wholesale Merchandisers, Inc.,
2929 Walker, N. W.,
Grand Rapids, MI 49544
Made in China
13
FCC part 15.21
Warning: Changes or modifications to this unit not expressly approved by the party responsible for compliance could void the user's authority to operate the equipment.
FCC part 15.105
NOTE: This equipment has been tested and found to comply with the limits for a Class B digital device, pursuant to Part 15 of the FCC Rules. These limits are designed to provide reasonable protection against harmful interference in a residential installation. This equipment generates, uses, and can radiate radio frequency energy and, if not installed and used in accordance with the instructions, may cause harmful interference to radio communications. However, there is no guarantee that interference will not occur in a particular installation. If this equipment does cause harmful interference to radio or
television reception, which can be determined by turning the equipment off and on, the user is encouraged to try to correct the interference by one or more of the following measures:
● Reorient or relocate the receiving antenna.
- Increase the separation between the equipment and receiver.
- Connect the equipment into an outlet on a circuit different from that to which the receiver is connected.
- Consult the dealer or an experienced radio TV technician for help.
3. Functional Parts of the Camera

4. Get started
- Load battery to the correct polarity marked on the battery door.
- Turn the camera on by pressing MODE button.
Precaution:
While the camera is connected to the USB cable, it is unnecessary to use the battery since the camera uses the power supplied from computer USB interface.
Before using the PC-Cam function, please download all photos in the camera onto your computer to avoid any photos missing.
Warning:
- If you don't use the camera for a long time, please take out the battery. Photos will be lost after the battery is taken out.
- Please follow local regulations when disposing of used batteries
- If the camera is not used in 30 seconds. It will enter standby mode automatically to save battery energy. You may press mode button to restart the camera operations again.
5. Software installation
Attention:
Make sure you install all the necessary software in your computer before you connect the camera to a computer.
- Close all opened software applications on your computer before installing the software.
- Insert the CD-ROM into the computer CD-ROM drive
- The CD user interface screen will automatically launch.
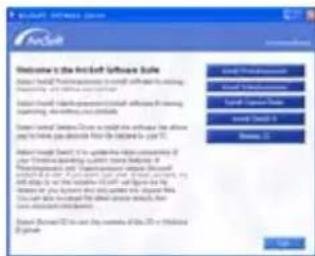
- Click on the Install Digital Camera Driver icon to install camera driver first.
- If you want to install the application software of Arcsoft Photo Impression and video impression included in the CD, click on the Install Photo Impression or install video impression icon to install it.
Note: 1. Please install DirectX9 before the installation of video impression.
- If the setup screen doesn't appear after loaded the CD, then you can manually start it by double-clicking the "My Computer" Icon on your desktop, then double click the icon for the CD-ROM drive.
6. Camera function operation
If the MODE button is pressed repeatedly, the camera LCD display will show the following symbols:

7. Take pictures
- Press "mode" button to turn on the camera, the camera is automatically set to take high-resolution pictures. The number of images that have been taken will be shown on the LCD screen
- Center your subject by using the camera viewfinder.
- Press the "Shutter" button, and the snapshot is finished with a distinct beeping sound .as well as, the number on the LCD display will increase by one.
ATTENTION:
When the lighting is not sufficient, the Auto exposure and Gain control need more time to settle, you have to hold the camera steadily and wait longer for the beeping sound. If the environment is too dark to take pictures, you will hear 2 beeps sound and no picture can be taken.
8. Download Picture
- Connect the camera to the computer with a USB cable. The computer will automatically update new information to confirm the connection.

Download pictures
PC Camera
- Open the folder "My DSC2" on desktop and then double click "My DSC2" icon. The download interface will be displayed on the screen.

Download
Transfer
Save
Select all
Edit i
- Click the download button; the pictures thumbnails that you've taken will be displayed on the interface in order.

-
Click any thumbnail with the right button of the mouse and it will zoom in on it. Or click the left button of the mouse and it will zoom out.
-
After selected the pictures you want to save, the picture will be highlighted in red, click the "save photo" button, and select the path and name to save.
-
Having saved all of the intended pictures, you can clear the memory of the camera and start taking pictures again.
9. PC Camera
- Double click the PC Cam icon; you will open a PC-camera frame.
- If no image is shown, you may click "Preview" in the "options" menu to activate the driver.
- You can click the "video capture pin" in the "options" menu to select the resolution; the default is QVGA (320x240).
IMPORTANT!
- When the battery power is low, the LCD display will blink constantly which indicates it's time to change the battery.
- Please download pictures to your computer before taking out the battery, or your photos will be lost.
- After downloading the pictures, please remove the battery because the battery loses its power gradually if it is still in use.
GFM Guarantee
If you are not totally satisfied with this GFM product, you may return it to any Meijer store for a full refund within 6 months (180 days) of purchase when accompanied by a receipt.
For customer support please call (866) 845-9436 or go to www.gfmproducts.com
Dist. by Wholesale Merchandisers, Inc., 2929 Walker, NW,
Grand Rapids, MI 49544
Made in China
FCC part 15.21
Warning: Changes or modifications to this unit not expressly approved by the party responsible for compliance could void the user's authority to operate the equipment.
FCC part 15.105
NOTE: This equipment has been tested and found to comply with the limits for a Class B digital device, pursuant to Part 15 of the FCC Rules. These limits are designed to provide reasonable protection against harmful interference in a residential installation. This equipment generates, uses, and can radiate radio frequency energy and, if not installed and used in accordance with the instructions, may cause harmful interference to radio communications. However, there is no guarantee that interference will not occur in a particular installation. If this equipment does cause harmful interference to radio or television reception, which can be determined by turning the equipment off and on, the user is encouraged to try
to correct the interference by one or more of the following measures:
● Reorient or relocate the receiving antenna.
- Increase the separation between the equipment and receiver.
- Connect the equipment into an outlet on a circuit different from that to which the receiver is connected.
- Consult the dealer or an experienced radio TV technician for help.
- in 1 Digital Camera
- Specification
- System Requirement
- Instruction Manual
- TDC32
- - Specification
- - System Requirement
- • Functional Parts of the Camera
- - Get started
- Precaution:
- Warning:
- - Software installation 2
- Attention:
- Important:
- • Camera function operation
- • Take pictures
- - Download Picture
- - PC Camera
- IMPORTANT! 7
- LIMITED WARRANTY PERIOD:
- WHAT IS COVERED:
- WHERE YOU ARE COVERED:
- WHAT IS NOT COVERED:
- WHAT TO DO WHEN YOUR PRODUCT FAILS TO OPERATE:
- SERVICE DELIVERABLES:
- OTHER PROVISIONS:
- Limit of Liability:
- Limitations of Implied Warranty:
- Transferability and Renewals:
- Subrogation:
- Arbitration:
- Dist. by Wholesale Merchandisers, Inc.,
- FCC part 15.21
- FCC part 15.105
- Functional Parts of the Camera
- Get started
- Software installation
- Camera function operation
- Take pictures
- Download Picture
- PC Camera
- IMPORTANT!
- GFM Guarantee
Brand : GFM
Model : TDC32
Category : Webcam