EPC-13C - Slow cooker SPT - Free user manual and instructions
Find the device manual for free EPC-13C SPT in PDF.


| Brand | SPT |
| Model | EPC-13C |
| Product Type | Slow Cooker |
| Capacity | 3 Quarts |
| Power Consumption | 240 Watts |
| Voltage | 120 V / 60 Hz |
| Dimensions (L x W x H) | 10.5 x 10.5 x 8.5 inches |
| Weight | 5.5 lbs |
| Inner Pot Material | Removable Stoneware |
| Lid Material | Tempered Glass |
| Heat Settings | Low, High, Warm |
| Control Type | Manual Dial |
| Cool-Touch Handles | Yes |
| Dishwasher Safe Parts | Stoneware Pot and Glass Lid |
| Automatic Shut-Off | Yes, after timer or overheat |
| Safety Features | Overheat Protection, Cool-Touch Exterior |
| Replacement Parts Available | Yes (pot, lid, gasket) |
| Warranty | 1 Year Limited |
| Color | Black / Stainless Steel Trim |
| Certifications | ETL, UL Listed |
Frequently Asked Questions - EPC-13C SPT
User questions about EPC-13C SPT
0 question about this device. Answer the ones you know or ask your own.
Ask a new question about this device
Download the instructions for your Slow cooker in PDF format for free! Find your manual EPC-13C - SPT and take your electronic device back in hand. On this page are published all the documents necessary for the use of your device. EPC-13C by SPT.
USER MANUAL EPC-13C SPT
natural_image
Black and white photo of a rice cooker with digital control panel and side-mounted buttons (no visible text or symbols on body)INSTRUCTIONS MANUAL
Thank you for purchasing our electric pressure cooker. Please read this instruction manual carefully before use and keep it in a convenient place for future reference.
(Pictures in this booklet are for reference only. Please refer to the actual product.)
TABLE OF CONTENTS
Important Safeguards Page 2
Electric Pressure Cooker Working Principle Page 3
Specification Page 3
Parts Name Page 3
Control Panel Page 4
Cooking Preparation Page 5
Operating Instructions Page 5-7
Care & Maintenance Page 8
Error Codes & Troubleshooting Page 8
Suggested Cooking Times and Tips
Warranty Info
Page 9
Page 10
PRODUCT FEATURES
• Multifunctional with pre-set programs.
• Environmental friendly, time and energy efficient
• Combines benefits of typical pressure cooker, rice cooker and thermal cooker
• Preserves nutrients and vitamins while eliminating harmful micro-organisms.
• Stainless steel inner pot
- Quick-Release button
IMPORTANT SAFEGUARDS
PLEASE READ THE INSTRUCTIONS BELOW BEFORE USING THE APPLIANCE FOR THE FIRST TIME.
When using electrical appliances, basic safety precautions should always be observed, including the following:
- Do not place near flammable material, always use in a well-ventilated area.
- Do not damage the sealing ring or use other types of rubber ring to replace the sealing ring. If the ring shows signs of wear, please contact Sunpentown for replacement.
- Do not twist the steel ring of lid by hand or other tool. If the steel ring falls off the lid, replace with a new lid.
- Always check the pressure release devices for clogging before use.
- Keep this appliance out of the reach of children. Close supervision is necessary when used near children.
- Do not use place near a got gas or electric burner or in a heated oven.
- This appliance cooks with pressure. Improper use may result in scalding or injury. Be sure unit is properly closed before operating.
- Do not operate this appliance if the cord or plug is damaged; if the appliance is not working properly, has been dropped or damaged, left outdoors or submerged in water. Contact Sunpentown Customer Service.
- Never attempt to open the lid or force the lid open while the unit is operating. If the lid is difficult to rotate, this indicates the cooker is still pressurized. Do not force it to open - this can result in a serious accident.
- Never cover or block the pressure valve with anything. An explosion may occur.
- While in operation, do not cover the appliance or place near flammable materials, such as curtains, draperies, walls and fabric-upholstered furniture.
- Always unplug and let cool before cleaning and removing parts.
- Never use without the removable cooking pot in place.
- Please use wooden and plastic spoon, in order to protect the removable cooking pot.
- Do not let cord hang over edge of table or counter or touch hot surfaces.
- Keep hands and face away from pressure regulator knob when releasing pressure. Do not touch hot surfaces. Use handles or knobs.
- Use only with the provided removable inner pot.
- To avoid pressure leakage, do not use with incompatible inner pot or sealing ring.
- Do not place hands or face over the exhaust valve or float valve to avoid scalding.
- Do not operate the appliance after it malfunctions. Servicing or repair should only be completed by the manufacturer or qualified experts. Never attempt to dissemble and repair the cooker yourself.
- While cooking, the lid and outer stainless steel surface may be hot. Handle with care and carry the cooker by the side handles. Be very cautious when moving any appliance containing hot food or liquids.
- After cooking, use extreme caution when removing the lid. Serious burns can result from residual steam. Lift the lid facing away from you and allow the drops of water to trickle back into the cooker.
- Using attachments not recommended or sold by the manufacturer may cause danger.
- Do not operate any appliance with a damaged cord or plug.
- Never immerse the plug, power cable or housing in water or any other liquid. Only the removable cooking pot is dishwasher safe.
- Never deep fry or pressure fry in the cooker. It is dangerous and may cause serious damage.
- This appliance is not intended for use by persons (including children) with reduced physical, sensory or mental capabilities, or lack of experience and knowledge, unless they have been given supervision or instruction concerning use of the appliance by a person responsible for their safety.
- This product is not intended for commercial use. Household and indoor use only.
ELECTRIC PRESSURE COOKER WORKING PRINCIPLE
Pressure cooking is cooking in a sealed vessel that does not permit steam to escape below a preset pressure. The boiling point of water is increased when pressure increases, this pressure build-up in the cooker allows the liquid inside to rise to a higher temperature before boiling.
The heating process is controlled by a built-in micro-processor based on the readings of the pressure and temperature sensors. This process forms what is called “closed loop control system”. The user simply sets the cooking duration and the electric pressure cooker does the rest.
SPECIFICATION
| Power Supply | Rating Power | Capacity | Working Pressure | Limit Pressure | Holding Temperature | Delay Timer |
| 120V 10 | 00W 6.5 q | quarts 0-70Kpa | 90Kpa 140-1 | 76°F 0.5-2 4 | Hours |
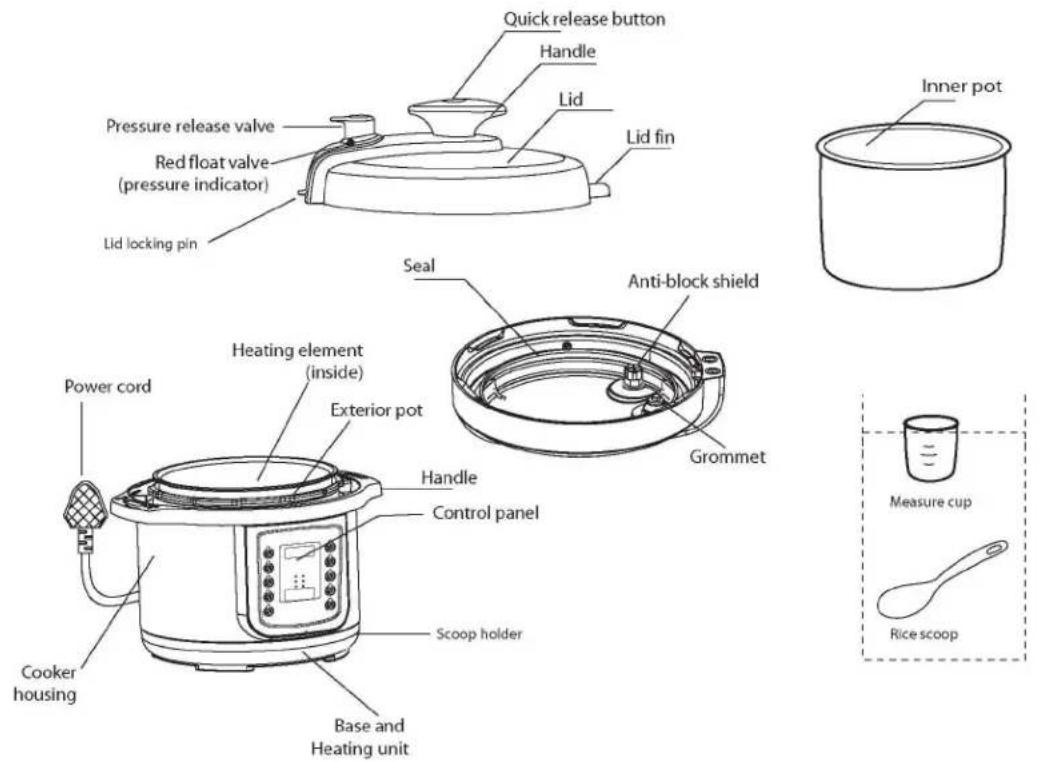
PARTS NAME
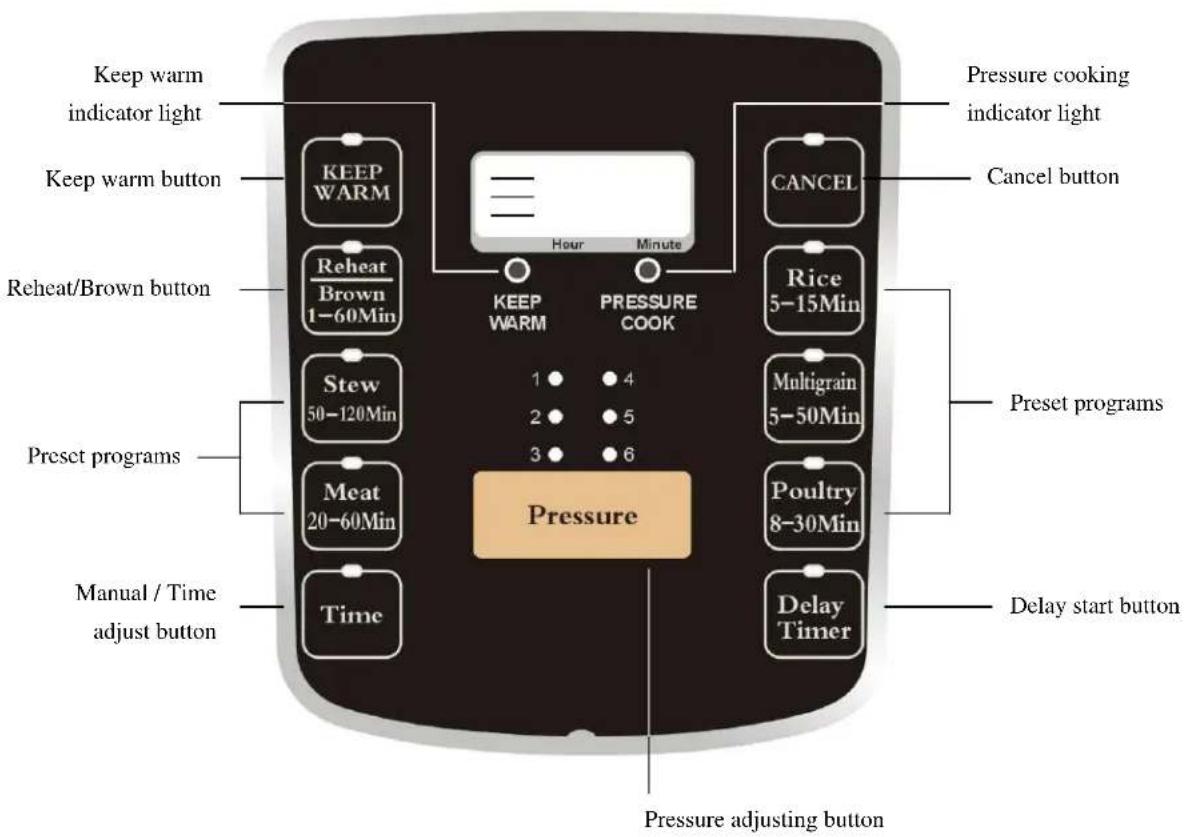
CONTROL PANEL
COOKING PREPARATION
Read the safety precautions before operating this cooker. Before using the appliance for the first time, follow these steps:
- Remove packaging materials and literature. Remove lid and inner pot – check and remove any paper or plastic bags.
- Opening the lid: hold the lid handle and rotate about 30 degrees clockwise. Lift and remove lid.
- Wash all removable parts with mild detergent and warm water. Rinse and dry all parts thoroughly. Wipe the housing with a clean damp cloth. Never submerge the outer pot in water or any other liquid. Only the removable stainless steel pot is dishwasher safe.
- Make sure all parts on the lid are properly assembled.
- Make sure the sealing ring is properly installed.
OPERATING INSTRUCTIONS
WARNING:
Do not hold or touch the pressure regulator valve. Hot steam/liquid may be ejected. Keep hands and face away from steam vents. Use pot holders when removing the inner pot or touching any hot items, and never force the lid open. The lid will only open once the pressure is released. Remove the lid by lifting it away from you to avoid being burned by the steam.
SAFETY NOTES:
- Fill the unit between 1/5 and 4/5 full with food and water. When cooking foods that expand during cooking, such as dried vegetable, beans and grains, do not fill the unit over 3/5 full: overfilling may cause a risk of clogging the pressure limit valve and developing excess pressure.
- The following foods should not be cooked under pressure: applesauce, cranberries, pearl barley, oatmeal, split peas, noodle or pasta. These foods tend to foam, froth and sputter – which may block the pressure valve.
• The maximum for rice cooking is 12 cups (raw rice). - Never put anything into the stationary pot and heating plate.
PRESSURE COOKING
- Before every use, make sure the gasket and pressure regulating valve are clean and in place.
- Attach power cord to unit first, then connect to wall outlet. Once power is connected, unit will beep once and LCD displays 00:00.
-
Make sure the bottom of the removable cooking pot is dry before placing into unit. Rotate the cooking pot slightly to ensure good contact with the heating plate.
-
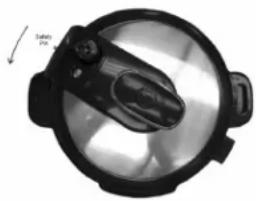
Place the lid on the cooker. With the safety pin at about 10 o'clock position and turn counterclockwise until lid locks into place.
-
Press the desired cooking mode. Each mode has a default pressure cooking time, but can be adjusted within the stated time frame by pressing the Time button (set time will increase with each press to the maximum allotted time, then return to the minimum). Or you can press
natural_image
Close-up of a mechanical component with a circular head and central knob, showing no visible text or symbols.TIME button and manually set desired cooking time by continuing pressing the Time button (each press is 1 minute increment).
- Change pressure setting (if desired) by pressing the Pressure button. (1 = lowest / 6 = highest)
| Pressure Cooking Modes | Rice Multigrain | Poultry Meat Stew Manual (TIME) | ||||
| Adjustable Time (min) 5-15 | 5-50 | 8-30 | 20-60 | 50-120 | 1M-6H | |
| Default Time (min) | 8 | 15 | 20 | 35 | 60 | |
| Default Pressure Setting | 3 | 6 | 6 | 6 | 6 | |
-
After selection is made and time is set, the LCD will flash 3 times. A horizontal bar to the left of the cooking time will start flashing with alternating position. This indicates the cooker has started operating and is in the preheat cycle. The preheat cycle can range between 10 to 40 minutes depending on the food content, quantity and temperature. This preheating period does not affect your set cooking time - this is when the unit is heating up the content and building pressure.
-
Once full pressure is reached, the PRESSURE COOK indicator will light up and the three horizontal bars will remain lit on the LCD. Pressure cooking begins now and the timer will start to count down (LCD displays the remaining pressure cooking time). NEVER ATTEMPT TO OPEN THE LID WHILE PRESSURE COOKING.
-
When the pressure cooking cycle finishes, the cooker will beep once. If Keep Warm function was selected, unit will automatically enter keep warm mode. The LCD will now count up in minutes to indicate the time duration after cooking (how long cooked food has been kept in pot). No horizontal bars on the LCD.
-
After cooking is done, there are two options for releasing the pressure:
A. Natural release: allow the pressure to drop naturally. This will take several minutes, during which the food inside will continue cooking. Some food will benefit from this extra cooking time. You do not need to do anything for natural release – sound of air escaping will be heard and the floating valve will eventually drop.
B. Quick release: release the pressure immediately by pressing the Quick Release button on the handle. CAUTION: Keen hands and face away from the pressure release valve, the steam coming out will be hot and may contain droplets of hot liquid that may scald.
- Once pressure is released, remove the lid by turning it clockwise, lifting and tilting away from you to avoid scalding by remaining steam or hot water condensation.
WARNING: Be sure pressure is completely released before opening the lid. NEVER TRY TO FORCE THE LID OPEN. THIS CAN RESULT IN SERIOUS ACCIDENT.
WARNING: AFTER COOKING, THE INNER POT WILL BE HOT, USE POTHOLDERS OR ALLOW TO COOL BEFORE REMOVING.
TIME (MANUAL) BUTTON
• Changes the pressure cooking time or heating time.
- If a preset function is not selected, use this key to manually set pressure cooking time (1M to 6H).
KEEP WARM FUNCTION
Press to have unit automatically enter Keep Warm cycle after cooking. This selection can be made anytime during the preheat cycle, cooking cycle or after cooking.
- Keep Warm function can be used with or without the lid.
- When Keep Warm function starts, the time will count up in minutes for up to 24 hours.
- Cooker will maintain an inner temperature between 140°F to 176°F.
- Do not keep food in Keep Warm state for too long as it may affect the texture or taste of the food.
REHEAT/BROWN FUNCTION
- This function is used for reheating food or meat browning (without pressure) - the time shown in the LCD panel is the actual cooking/heating time.
- Use with or without the lid. If the lid is used, be sure pressure regulator valve is pointed to the EXHAUST position.
- Default time is 10 minutes, can be adjusted between 1 to 60 minutes by pressing the TIME button.
- Heating automatically starts after 3 seconds. The time will begin to count down in minutes to indicate the remaining heating/cooking time.
• Temperature is maintained between 302 to 320°F.
CAUTION: if lid is used and pressure regulator valve is not pointed to EXHAUST, unit will automatically shut off once pressure is build-up. This is a safety feature. If this occurs, please wait until pressure inside is released before opening the lid.
DELAY TIMER
Allows you to delay the start of cooking up to 24 hours, in 30 minute increments.
- Set the desired cooking function, cooking time and pressure level. Immediately followed by pressing the Delay Timer button (within 3 seconds) to set the time to be delayed; or you can set the delay timer first then set the function, cooking time and pressure level.
- Time set is the delayed time before the unit starts operation.
- After 3 seconds of last key press, LCD will display set time and the colon will start to flash. Unit will now begin countdown.
- Press the Keep Warm button if you wish the unit to automatically switch to keep warm when done.
- To cancel delay timer, press the Cancel button at any time.
- Cannot be used with Keep Warm mode.
CAUTION: Do not leave perishable foods such as meat, poultry, seafood, cheese and dairy products at room temperature for extended period of time.
CARE & MAINTENANCE
- Unplug the power cord and be sure unit is cool enough to be handled.
- Clean the cooker after each use.
- Wipe the exterior housing with clean cloth. Do not immerse body in water or pour water into it.
- Remove lid and take out the inner pot. Wash both under running water and detergent. Rinse with clear water and wipe dry. Only the stainless steel inner pot is dishwasher safe.
- On the underside of the lid, remove and clean: inner cover, sealing ring, pressure limit valve, anti-block cover and float valve. Dry completely.
- If the inside of the stationary pot is dirty, use a sponge or soft non-metal brush and wipe clean. Be careful not to damage the inside coating.
ERROR CODES & TROUBLESHOOTING
| Error Code Definition | |
| E1 Pressure switch malfunction | |
| E3 Short circuit of sensor | |
| E4 Circuit open of sensor | |
| E5 Overheating | |
Before you call for service, check the suggestions below. If problem persists, please contact our Customer Service team at 1-800-330-0388 or service@sunpentown.com for assistance.
| Symptom | Reasons Solutions | |
| Lid does not lock | The sealing ring is not properly installed Reinstall the sealing ring | |
| The float is seized by the push rod Push therob with hands | ||
| Cannot open the lid after air exhaust | The float is still up | Press the float down |
| Air escapes from the rim of the lid | No sealing ring installed | Install the sealing ring |
| Food residue on sealing ring | Clean sealing ring | |
| Sealing ring worn out | Replace sealing ring | |
| Lid not locked properly | Rotate lid fully | |
| Air escapes from the float valve | Food stuck on the sealing ring of the float valve | Clean the sealing ring |
| The sealing ring on the float valve is worn out | Replace the sealing ring | |
| During the preheating cycle, it is normal for some air to escape | ||
| The float will not rise | Not enough food and water | Check recipe for proper quantity |
| Pressure valve is positioned at EXHAUST | Turn valve to SEAL position | |
SUGGESTED COOKING TIMES AND TIPS
- You can easily adapt your favorite recipes with the cooker. The amount of liquid needed will be much less than traditional cooking methods. In general, pressure cooking time will be 1/3 to 12 less than traditional cooking method and reduce the amount of liquid by at least half.
• More nutrients are preserved with pressure cooking than traditional cooking as less liquid is used. - When cooking meat and poultry, add at least 1 cup of liquid for pressure cooking up to 45 minutes and 1 12 cups if longer.
- If food is almost but not completely cooked (after pressure release), use Reheat function to complete cooking.
- Remember pressure cooking requires 10 to 40 minutes of preheating for pressure to build.
| Food Type Suggest Cooking Time Suggest Release Method | ||
| Artichokes (4 pcs, medium sized) 7 to 9 minutes Quick release | ||
| Beans – black (1 cup, soaked overnight) 20 to 25 minutes Natural release | ||
| Beans – garbanzo (1 cup, soaked) 35 to 40 minutes Natural release | ||
| Beans – lentil (1 cup) 8 to 10 minutes Natural release | ||
| Beef – pot roast (3 lbs) 90 to 99 minutes Natural release | ||
| Beef – ribs | 40 to 50 minutes Natural release | |
| Beef – stew | 8 to 10 minutes Natural release | |
| Beets | 24 to 26 minutes Quick release | |
| Broccoli/Cauliflower | 2 to 3 minutes Quick release | |
| Chicken – whole (up to 4 lbs) | 24 to 28 minutes Quick release | |
| Chicken – boneless breast (3 lbs) | 5 to 6 minutes Quick release | |
| Chicken - chicken leg with bone | 9 to 12 minutes Quick release | |
| Lamb – shanks (4) | 20 to 24 minutes Natural release | |
| Pork – chops (1 inch thick), brown first | 9 to 11 minutes (brown first) | Quick release |
| Pork – spare ribs | 20 to 26 minutes | Quick release |
| Potatoes (quartered) | 5 to 8 minutes Quick release | |
| Quinoa(1.5 cups, add 2.25 cups liquid) | 2 minutes | Allow natural release for 10 minutes then quick release |
| Rice – brown(1 cup, add 3.25 cups liquid) | 10 minutes | Allow natural release for 10 minutes then quick release |
| Rice – white(1 cup, add 1.5 cups liquid) | 3 minutes | Allow natural release for 7 minutes then quick release |
| Veal – cubes/stew | 9 to 10 minutes Natural release |
SPT®
Your Guarantee
If this product is found to be faulty as a result of faulty materials or workmanship within one year from date of purchase, it will be repaired free of charge.
This guarantee is subject to the following terms:
- Sunpentown must be notified of the fault.
- Proof of purchase must be presented to Sunpentown's nominated representative.
• The warranty will be void if the product if modified, misused or repaired by an unauthorized person. - The warranty after repair will not be extended beyond the original one-year period.
- All replacement parts will be new or reconditioned.
- Parts, which are replaced, become the property of Sunpentown.
• The warranty applies for the use of the product in the USA only.
What is NOT COVERED:
- Warranty does not include freight charges.
- Incidental or consequential damage caused by possible defects with this product.
• Damage to product caused by improper power supply voltage, accident, fire, floods or acts of nature.
• Failure of product resulting from unauthorized modifications to the product. - Improper installation or failure to perform the necessary maintenance.
This GUARANTEE is in addition to your Statutory Rights
SUNPENTOWN INTERNATIONAL INC.
14625 Clark Ave. City of Industry, CA 91745
Tel: 800-330-0388
service@sunpentown.com
www.sunpentown.com
- INSTRUCTIONS MANUAL
- TABLE OF CONTENTS
- PRODUCT FEATURES
- IMPORTANT SAFEGUARDS
- PLEASE READ THE INSTRUCTIONS BELOW BEFORE USING THE APPLIANCE FOR THE FIRST TIME.
- ELECTRIC PRESSURE COOKER WORKING PRINCIPLE
- SPECIFICATION
- PARTS NAME
- CONTROL PANEL
- COOKING PREPARATION
- OPERATING INSTRUCTIONS
- WARNING:
- SAFETY NOTES:
- PRESSURE COOKING
- TIME (MANUAL) BUTTON
- KEEP WARM FUNCTION
- REHEAT/BROWN FUNCTION
- DELAY TIMER
- CARE & MAINTENANCE
- SUGGESTED COOKING TIMES AND TIPS
- SPT®
- Your Guarantee
- If this product is found to be faulty as a result of faulty materials or workmanship within one year from date of purchase, it will be repaired free of charge.
- What is NOT COVERED:
Brand : SPT
Model : EPC-13C
Category : Slow cooker