
Bruma - Dehumidifier Becken - Free user manual and instructions
Find the device manual for free Bruma Becken in PDF.


| Product Type | Dehumidifier |
| Brand | Becken |
| Model | Bruma |
| Dimensions (W x D x H) | 25 x 25 x 50 cm |
| Weight | 8.5 kg |
| Power Supply | 220-240 V, 50/60 Hz |
| Power Consumption | 280 W |
| Noise Level | 42 dB |
| Tank Capacity | 2.5 L |
| Dehumidification Capacity (30°C, 80% RH) | 20 L/24h |
| Operating Temperature Range | 5°C - 35°C |
| Main Functions | Continuous drainage, auto defrost, humidistat, timer, turbo mode |
| Maintenance | Clean air filter every 2 weeks |
| Safety Features | Auto shut-off when tank full, overheat protection |
| Spare Parts Available | Air filter, continuous drainage hose |
| Repairability Index | 7.5 / 10 |
| Certifications | CE, RoHS |
| Warranty | 2 years |
Frequently Asked Questions - Bruma Becken
User questions about Bruma Becken
0 question about this device. Answer the ones you know or ask your own.
Ask a new question about this device
Download the instructions for your Dehumidifier in PDF format for free! Find your manual Bruma - Becken and take your electronic device back in hand. On this page are published all the documents necessary for the use of your device. Bruma by Becken.
USER MANUAL Bruma Becken
bruma
Digital Dehumidifier
Instructions' Manual
— Deshumidificador Digital
Manual de Instrucciones
Desumidificador Digital
Manual de Instruções
Dear client,
We thank you for purchasing this product.
This appliance was submitted to several laboratorial tests, which certify its quality. To simplify the use of this appliance, this instruction manual has been provided. The instructions must ensure a quick and safe use.
Please read carefully the instructions and safety measures described in this manual.
We wish our clients great satisfaction in using their new appliance.
EN
Index
- Safety Instructions 04
1.1. Power Energy 05
1.2. Power Cord and Other Cables 05
1.3. Humidity and Water 05
1.4. Cleaning 05
1.5. General Precautions 05
- Utilization and Functioning 07
2.1.Product Description 07
2.2. Control Panel 08
2.3. Other Features 10
2.4. Electrical Information 12
2.5. Positioning the Unit 12
2.6. When Using the Unit 13
2.7. Removing the Collected Water 13
-
Maintenance 15
-
Troubleshooting 16
-
Aftermarket 16
-
Environment Conservation 17
1. Safety Instructions
 | ATTENTION |  |
| Risk of Electric ShockDo Not Open | ||
| Attention: to avoid the risk of electric shock, do not remove the cover. The interior does not contain any parts that may be repaired by the user. Ask for assistance to qualified personnel. | ||
Important Warnings
Before using your appliance, read carefully this instruction manual and keep it in a safe place, as you may need it for future consultations.
Before you start your appliance, and to ensure a correct use, do not use it if:
- It has fallen on the ground;
- You notice any evidence of damage;
- Any anomaly occurs during its operation;
To avoid hazards and deterioration of your appliance by an incorrect use, it is advisable to read the instructions carefully and attentively.
Your appliance must not be used to other ends than the ones foreseen in the instructions manual. Your safety is only guaranteed in a household use and not for commercial use. The incorrect use will not be covered and automatically cancels the right to warranty.
Assistance
Be sure that, in case of malfunction, you take your appliance to a qualified technician for assistance.
This appliance can be used by children from 8 years old and above and persons with reduced physical, sensory or mental capabilities or lack of experience and knowledge if they have been given instruction concerning use of the appliance in a safe way and understand the hazards involved. Children shall not play with the appliance. Cleaning and maintenance shall not be made by children without supervision.
These instructions are also available on www.suporteworten.pt
1.1. Power Energy
Make sure the voltage of the electric network is compatible with the one of the appliance. If it does not match, consult the vendor or Customer Support Service.
1.2. Power Cord and Other Cables
Do not roll up or pull the cord to disconnect the appliance, and do not use to twine the appliance. Keep the cord far from warm surfaces.
Never use the appliance if it has a damaged cable or socket, or if it is not working properly. In case of damage of the power cord, do not use your appliance. Take it to technical assistance for its replacement.
1.3. Humidity and Water
Do not use your appliance in humid places. Do not let your appliance to catch water under any circumstance, as it may be dangerous. TO AVOID FIRE HAZARD OR ELECTRIC SHOCK DO NOT EXPOSE YOUR APPLIANCE TO HUMIDITY OR WATER. Do not place your appliance under water (for example for washing).
1.4. Cleaning
Before cleaning, be sure to switch off the appliance and remove the plug from the mains power supply.
Always allow the unit to cool down before cleaning.
To clean the product enclosure use only water and a mild detergent. Do not use bleach or abrasives.
1.5. General Precautions
- Please follow the instructions of the user manual, which helps properly installing and operating this product and enjoying its advanced features. Please keep the instructions for future reference.
- Read all instructions before using the product.
- Check if the voltage indicated on the appliance corresponds to the local mains voltage before you connect the appliance.
- Do not use the appliance if the mains cord, the plug or other parts are damaged.
- If the supply cord is damaged, it must be replaced by the manufacturer, its service agent or similarly qualified persons in order to avoid a hazard.
-
Never connect this appliance to a timer switch in order to avoid a hazardous situation.
• Children should be supervised to ensure that they do not play with the appliance.
• The appliance shall be installed in accordance with the national wiring regulations.
• The appliance with electric heater should have at least 1 meter space to the combustible materials. -
Contact the authorized service technician for repair or maintenance of this unit.
- The design and specifications are subject to change without prior notice for product improvement. Consult with the sales agency or manufacturer for details.
- Inside this manual will find many helpful hints on how to use and maintain your dehumidifier properly. Just a little preventive care on your part can save you a great deal of time and money over the life of your dehumidifier. You will find many answers to common problems in the chart of troubleshooting tips. If you review your troubleshooting chart first, you may not need to call for service at all.
- To prevent injury to the user or other people and property damage, the following instructions must be followed. Incorrect operation due to ignoring of instructions may cause harm or damage. The seriousness is classified by the following indications:
⚠ WARNING: This symbol indicates the possibility of death or serious injury.
⚠️ CAUTION: This symbol indicates the possibility of injury or damage to property.
Meanings of symbols used in this manual are as shown below:
☑: Never do this.
①: Always do this
WARNING:
- ☑: Do not exceed the rating of the power outlet or connection device, otherwise, it may cause electric shock or fire due to excess heat generation.
- ☒: Do not operate or stop the unit by switching on or off the power as it may cause electric shock or fire due to heat generation.
- ☒: Do not damage or use an unspecified power cord as it may cause electric shock or fire.
- ☒: Do not modify the power cord length or share the outlet with other appliances as it may cause electric shock or fire due to heat generation.
- ☒: Do not insert or pull out plug with wet hands as it may cause electric shock.
- ☒: Do not place the unit near a heat source as plastic parts may melt and cause a fire.
- ①: Disconnect the power if strange sounds, smell, or smoke comes from it as it may cause fire and electric shock.
- ☒: You should never try to take apart or repair the unit by yourself as it may cause failure of machine or electric shock.
- ①: Before cleaning, turn off the power and unplug the unit as it may cause electrical shock or injury.
- ☒: Do not use the machine near flammable gas or combustibles, such as gasoline, benzene, thinner, etc., as it may cause an explosion or fire.
- ☒: Do not drink or use the water drained from the unit as it contains contaminants and could make you sick.
- ☑: Do not take the water bucket out during operation as it may cause bucket full protect of the unit and cause electric shock.
CAUTION
- ☑: Do not use the unit in small spaces as the lack of ventilation can cause overheating and fire.
- ☒: Do not put in places where water may splash onto the unit as water may enter the unit and degrade the insulation. It may cause an electric shock or fire.
- ①: Place the unit on a level, sturdy section of the floor as if the unit falls over, it may cause water to spill and damage your belongings, or cause electrical shock or fire.
- ☒: Do not cover the intake or exhaust openings with cloths or towels as a lack of air flow can lead to overheating and fire.
- : Care should be taken when using the unit in a room with the following persons: Infants, children, elderly people and people not sensitive to humidity.
- ☒: Do not use in areas where chemicals are handled as this will cause the unit deterioration due to chemicals and solvents dissolved in the air.
- ☒: Never insert your finger or other foreign objects into the grills or openings. Take special care to warn children of these dangers as it may cause electric shock or failure of appliance.
- ☒: Do not place heavy object on the power cord and take care so that the cord is not compressed as there is danger of fire or electric shock.
- ☑: Do not climb up on or sit on the unit as you may be injured if you fall or if the unit falls over.
- ①: Always insert the filters securely. Clean the filter once every two weeks. Operating the appliance without filters may cause failure.
- ①: If water enters the unit, turn the unit off and disconnect the power. Contact a qualified service technician as it may cause failure of the appliance or accident.
- ☒: Do not place flower vases or other water container on top of the unit as water may spill inside the unit, causing insulation failure and electrical shock or fire.
2. Utilization and Functioning
2.1. Product Description
Identification of the Parts
Front View
- Control panel.
- Handle.
- Air outlet grill.
- Water bucket.
- Water level window.
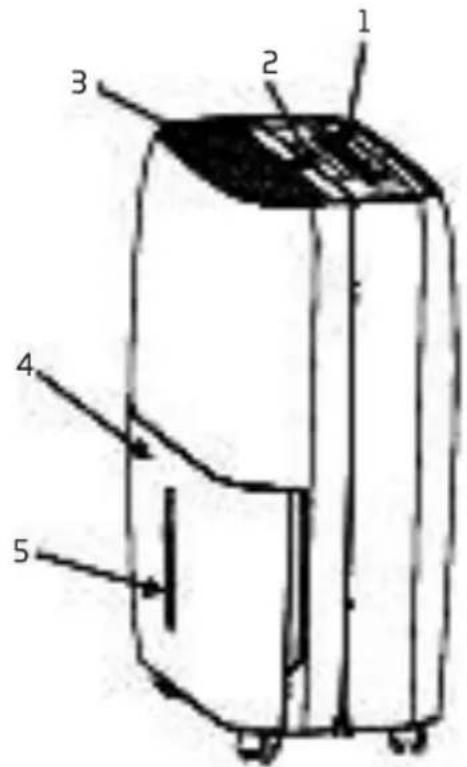
Back View
- Drain hose outlet.
- Caster.
- Power cord and plug.
- Air intake grill.
- Air filter (behind the grill).
Note: All the pictures in the manual are for explanation purposes only. The actual shape of the unit you purchased may be slightly different, but the operations and functions are the same.

2.2. Control Panel
Note: The control panel of the unit you purchased may be slightly different according to the models. Some models can be controlled by a remote control. Some models have no remote control function. See the following picture. Please refer to the Remote Control instructions for the remote operation.

When you press the button to change the operation modes, the unit will make a beep sound to indicate that it is changing modes.
-
Power Pad: Press to turn the dehumidifier on and off.
-
Mode Pad: Press to select the desired operation mode from Dehumidifying, Dryer, Continuous dehumidifying and Smart dehumidifying. Note: Dryer and Smart dehumidifying modes are optional.
3-4. ⊕/⊖Down/Up controls:
Humidity Set Control Pads: The humidity level can be set within a range of 35% RH [Relative Humidity] to 85% RH [Relative Humidity] in 5% increments.
For drier air, press the ⊙ pad and set to a lower percent value [%].
For damper air, press the ⊕ pad and set a higher percent value [%].
Timer Set Control Pads: Use the Up/Down pads to set the Auto start and Auto stop time from 0.0 to 24.
-
Timer Pad: Press to initiate the Auto start and Auto stop feature, combining with the ⊕ and ⊖ key pads.
-
Turbo Pad: Control the fan speed. Press to select either High or Normal fan speed. Set the fan control to High for maximum moisture removal. When the humidity has been reduced and quiet operation is preferred, set the fan control to Normal.
-
Ion Pad [optional]: Press to activate the ionizer. Anions are automatically generated by ionization. The anions deactivate the airborne chemical vapors and dust particles. Press it again to stop the function.
-
Display: Shows the set % humidity level from 35% to 85% or auto start/stop time [0-24] while setting, then shows the actual (± 5% accuracy) room % humidity level in a range of 30% RH (Relative Humidity) to 90%RH (Relative Humidity).
Error Codes and Protection Codes:
AS - Humidity sensor error - Unplug the unit and plug it back in. If the error repeats, call for service.
ES - Temperature sensor error - Unplug the unit and plug it back in. If the error repeats, call for service.
P1 - Unit is defrosting - Allow the unit time to automatically defrost. The protection will clear after the unit self defrosts.
P2 - Bucket is full or bucket is not in the right position - Empty the bucket and replace it in the right position.
E3 - Unit malfunction - Unplug the unit and plug it back in. If the error repeats, call for service.
2.3. Other Features
Bucket Full Light:
Lights up when the bucket is ready to be emptied, or when the bucket is removed or not replaced in the proper position.
Auto Shut Off:
The dehumidifier shuts off when the bucket is full, or when the bucket is removed or not replaced in the proper position. When the setting humidity is reached, the unit will be shut off automatically. For some models, the fan motor will continue operating.
Auto Defrost:
When frost builds up on the evaporator coils, the compressor will cycle off and the fan will continue to run until the frost disappears. Note: When Auto defrosting operation, the unit may make a sound of refrigerant flowing. This is normal.
Wait 3 minutes before Resuming Operation:
After the unit has stopped, it cannot be restart operation in the first 3 minutes. This is to protect the unit. Operation will automatically start after 3 minutes.
Smart Dehumidifying Mode [optional]:
At smart dehumidifying mode, the unit will automatically control room humidity in a comfortable range 45%-55% according to the room temperature. The humidity setting function will be invalid.
Auto-Restart:
If the unit breaks off unexpectedly due to the power cut, it will restart with the previous function setting automatically when the power resumes.
Setting the Timer:
- When the unit is on, first press the Timer button and the Timer Off indicator lights up. It indicates the Auto Stop program is initiated. Press it again and the Timer On indicator will light up. It indicates the Auto Start is initiated.
- When the unit is off, first press the Timer button and the Timer On indicator will light up. It indicates the Auto Start program is initiated. Press it again and the Time Off indicator lights up. It indicates the Auto Stop is initiated.
-
Press or hold the UP or DOWN pad to change the Auto time by 0.5 hour increments, up to 10 hours, then at 1 hour increments up to 24 hours. The control will count down the time remaining until start.
-
The selected time will register in 5 seconds and the system will automatically revert back to display the previous humidity setting.
- When the Auto start & Auto stop times are set, within the same program sequence, the Timer On/Off indicator light up identifying that both On and Off times are now programmed.
- Turning the unit On or Off at any time or adjusting the timer setting to 0.0 will cancel the Auto Start/Stop function.
- When the LED display window displays the code of P2, the Auto Start/Stop function will also be cancelled.
Dryer Mode (optional):
The unit can make the MAX dehumidification function when it is under the Dryer mode. The fan speed is fixed at high fan speed. The humidity level is automatically controlled according to the actual room humidity. The unit will quit dryer mode after a maximum of 10 hours operation.
Note:
- The Dryer mode must be operated in a close room, do not open the door and window.
• To make the best effective dehumidification, please first dehydrate the wet clothes. - Make sure to direct airflow at the wet clothes (see the picture).
- For thick and heavy wet clothes you may not get the best effective dehumidification.
CAUTION
- Do not cover the air outlet of the unit with clothes as it may cause excessive heat, fire or failure of unit.
- Do not place the wet clothes on the top of the unit and do not make the water drop into the unit as it may cause electric shock, creeping or failure of unit.

2.4. Electrical Information
- The manufacturer¥s nameplate is located on the rear panel of the unit and contains electrical and other technical data specific to this unit.
- Be sure the unit is properly grounded. To minimize shock and fire hazards, proper grounding is important. The power cord is equipped with a three-prong grounding plug for protection against shock hazards.
- Your unit must be used in a properly grounded wall receptacle. If the wall receptacle you intend to use is not adequately grounded or protected by a time delay fuse or circuit breaker, have a qualified electrician install the proper receptacle.
- Ensure the receptacle is accessible after the unit installation.
- Do not use extension cords or an adapter plugs with this unit. However, if it is necessary to use an extension cord, use an approved Dehumidifier extension cord only (available at most local hardware stores).
- To avoid the possibility of personal injury, always disconnect the power supply of the unit and before installing and/or servicing.
2.5. Positioning the Unit
A dehumidifier operating in a basement will have little or no effect in drying an adjacent enclosed storage area, such as a closet, unless there is adequate circulation of air in and out of the area.
- Do not use this appliance outdoors.
- This dehumidifier is intended for indoor residential applications only. This dehumidifier should not be used for commercial or industrial applications.
- Place the dehumidifier on a smooth, level floor strong enough to support the unit with a full bucket of water.
- Allow at least 20cm of air space on all sides of the unit for good air circulation.
- Place the unit in an area where the temperature will not fall below 5/C (41/F). The coils can become covered with frost at temperatures below 5/C (41/F), which may reduce the performance.
- Place the unit away from the clothes dryer, heater or radiator.
- Use the unit to prevent moisture damage anywhere books or valuables are stored.
- Use the dehumidifier in a basement to help prevent moisture damage.
- The dehumidifier must be operated in an enclosed area to be most effective.
- Close all doors, windows and other outside openings to the room.
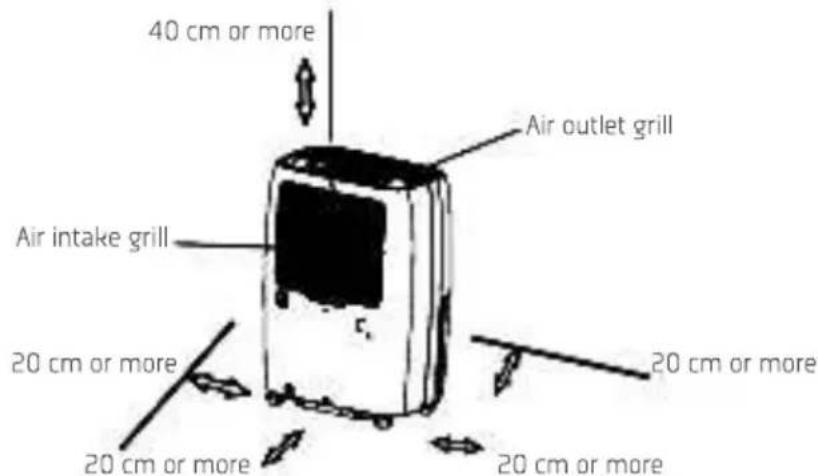
Casters (at four points on the bottom of unit):
- Casters can move freely.
- Do not force casters to move over carpet, nor move the unit with water in the bucket (the unit may tip over and spill water).
2.6. When Using the Unit
- When first using the dehumidifier, operate the unit continuously for 24 hours.
- This unit is designed to operate with a working environment between 5/C/41/F and 35/C/95/F.
- If the unit has been switched off and needs to be switched on again quickly, allow approximately three minutes for the correct operation to resume.
- Do not connect the dehumidifier to a multiple socket outlet, which is also being used for other electrical appliances.
- Select a suitable location, making sure you have easy access to an electrical outlet.
- Plug the unit into an electrical socket-outlet with earth connection.
- Make sure the water bucket is correctly fitted otherwise the unit will not operate properly.
Note: When the water in the bucket reaches to a certain level, please be careful when moving the appliance to avoid it from falling down.
2.7. Removing the Collected Water
There are two ways to remove collected water:
1. Use the Bucket
- When the unit is off, if the bucket is full, the unit will beep 8 times, the Full indicator will flash and the digital display shows P2.
-
When the unit is on, if the bucket is full, the compressor turns off and the fan turns off after 30 seconds for drying the water of the condenser, then the unit will beep 8 times, the Full indicator will flash and the digital display shows P2.
-
Pull out the bucket.

natural_image
Simple line drawing of a portable refrigerator with no text or symbols- Hold both sides of the bucket with even strength, and pull it out from the unit.
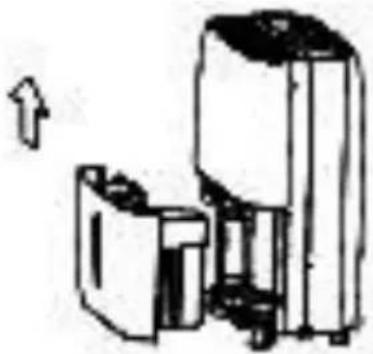
- Slowly pull out the bucket. Grip the left and right handles securely and carefully pull out straight so water does not spill. Do not put the tank on the floor because the bottom of the bucket is uneven. Otherwise, the bucket will fall and cause the water to spill. - Throw away the water and replace the bucket. The bucket must be in place and securely seated for the dehumidifier to operate.
natural_image
Simple line drawing of a mechanical device with an arrow indicating upward motion (no text or symbols)- Pour the water out.
Notes:
- When you remove the bucket, do not touch any parts inside of the unit. Doing so may damage the product.
- Be sure to push the bucket gently all the way into the unit. Banging the bucket against anything or failing to push it in securely may cause the unit not to operate.
- When you remove the bucket, if there is some water in the unit you must dry it.
2. Continuous Draining
Water can be automatically emptied into a floor drain by attaching the unit with a water hose (not included).
- Remove the rubber plug from the back drain hose outlet. Attach a drain hose (ID=13.5mm) and lead it to the floor drain or a suitable drainage facility (see the following picture).

natural_image
Simple line drawing of a rectangular device with internal grid and support structure (no text or symbols)Remove the rubber plug
Attach the hose to the drain hose outlet.
• Make sure the hose is secure so there are no leaks.
- Direct the hose toward the drain, making sure that there are no kinks that will stop the water from flowing.
- Place the end of the hose into the drain and make sure the end of the hose is level or down to let the water flow smoothly. Never let it up.
- Select the desired humidity setting and fan speed on the unit for continuous draining to start.
Note: When the continuous drain feature is not being used, remove the drain hose from the outlet.
3. Maintenance
Turn the dehumidifier off and remove the plug from the wall outlet before cleaning or maintenance.
1. Clean the Grill and Case
- Use water and a mild detergent. Do not use bleach or abrasives.
- Do not splash water directly onto the main unit. Doing so may cause an electrical shock, cause the insulation to deteriorate, or cause the unit to rust.
• The air intake and outlet grills get soiled easily, so use a vacuum attachment or brush to clean.
2. Clean the Bucket
Every few weeks, clean the bucket to prevent growth of mold, mildew and bacteria. Partially fill the bucket with clean water and add a little mild detergent. Swish it around in the bucket, empty and rinse. Note: Do not use a dishwasher to clean the bucket. After clean, the bucket must be in place and securely seated for the dehumidifier to operate.
3. Clean the Air Filter
The air filter behind the front grill should be checked and cleaned at least every 30 days or more often if necessary. Note: Do not rinse or put the filter in an automatic dishwasher.
To remove:
Grip the tab on the filter and pull it upward, then pull it out as shown in the following picture. Clean the filter with warm, soapy water. Rinse and let the filter dry before replacing it. Do not clean the filter in a dishwasher.

natural_image
Line drawing of a portable air conditioner unit with cooling fins and wheels (no text or symbols)To attach:
Insert the air filter into the unit from underside to upside. See the following picture.

natural_image
Line drawing of an air conditioning unit and its corresponding solar panel array (no text or symbols)Caution: Do not operate the dehumidifier without a filter because dirt and lint will clog it and reduce its performance.
4. When not using the unit for long time periods
- After turning off the unit, wait one day before emptying the bucket.
- Clean the main unit, water bucket and air filter.
- Cover the unit with a plastic bag.
- Store the unit upright in a dry, well-ventilated place.
4. Troubleshooting
| Problem | Solution |
| The appliance does not start. | Make sure the dehumidifier's plug is pushed completely into the outlet.Check the house fuse/circuit breaker box.Dehumidifier has reached its preset level or bucket is full.Water bucket is not in the proper position. |
| The dehumidifier does not dry the air as it should. | Do not allow enough time to remove the moisture.Make sure there are no curtains, blinds or furniture blocking the front or back of the dehumidifier.The humidity control may not be set low enough.Check that all doors, windows and other openings are securely closed.Room temperature is too low, below 5/C [41/F].There is a kerosene heater or something giving off water vapor in the room. |
| The unit makes a loud noise when operating. | The air filter is clogged.The unit is tilted instead of upright as it should be.The floor surface is not level. |
| Frost appears on the coils. | This is normal. The dehumidifier has Auto defrost feature. |
| There is water on the floor. | Hose to connector or hose connection may be loose.Intend to use the bucket to collect water, but the back drain plug is removed. |
| ES, AS, P1 or P2 appear in the display. | These are error codes and protection codes. See the Control Panel section. |
5. Aftermarket
Becken has designed this appliance in order to guarantee the maximum reliability. However, if a problem occurs, by following the procedures suggested in this section you may be able to determine its cause.
Do not attempt to open the appliance – there is a risk of electrical shock.
If you are not able to solve the problem, please contact your seller or manufacturer. All users must be familiarized with this section. Knowing what could go wrong can help you avoid the occurrence of problems.
WARNING: any attempt of fixing the appliance without contacting the manufacturer will nullify the warranty.
In case the problem persists, take your appliance to an aftermarket section of any Worten, Modelo or Continente store in order to solve the problem.
Worten Equipamentos para o Lar ensures for a period of 2 years, counting from the date of purchase of this appliance, a warranty against any found manufacturing defect. The warranty supposes a correct use and maintenance of the appliance, namely according to the instructions expressed in this manual. In case otherwise identified, the malfunctions will not be under the warranty.
The repairing of electrical appliances must only be made by qualified technicians, as otherwise there may occur future complications on the appliances.
To avoid unnecessary risks, in case there are any malfunctions on the wires or on another type of components, repairing must be made on the specialized locations of technical assistance, as appropriate tools are needed.
6. Environment Conservation
Aiming to protect the environment, we try to reduce to a maximum the volume of the packages which are confined to three easy separation materials: cardboard, paper and plastic.
The appliance is made of recyclable material, once disassembled by a specialized company. Follow the local legislation concerning recycling of all materials.

natural_image
Symbol of a trash bin crossed with no text or numbers, representing waste sorting or disposal (no text present)2.2. Panel de Control
natural_image
Simple line drawing of a refrigerator with a door and wheels (no text or symbols)natural_image
Simple line drawing of a mechanical device with an arrow indicating upward motion (no text or symbols)- Tire el agua.
Notas:
natural_image
Diagram of a portable air conditioner unit with cooling fins and a lever mechanism (no text or labels)natural_image
Line drawing of a portable air conditioner unit with cooling fan and wheels (no text or symbols)Para montar:
natural_image
Line drawing of a portable air conditioner unit with cooling fan and wheels (no text or symbols)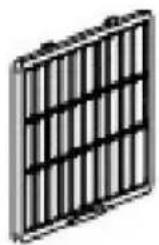
natural_image
Symbol of a trash bin with no text or numbers presentCaro(a) cliente,
2.2. Painel de Controlo
natural_image
Simple line drawing of a mechanical device with an arrow indicating upward motion (no text or symbols)Notas:
natural_image
Line drawing of a portable air conditioner unit with cooling fins and a lever mechanism (no text or symbols)natural_image
Line drawing of a portable air conditioner unit with cooling fan and wheels (no text or symbols)Para montar:
natural_image
Illustration of an air conditioning unit and its corresponding solar panel (no text or symbols)natural_image
Symbolic illustration of a trash bin crossed with two crossed arms, no text or numbers present


Imported, produced and distributed by:
- bruma
- Index
- Safety Instructions
- Important Warnings
- Assistance
- Power Energy
- Power Cord and Other Cables
- Humidity and Water
- Cleaning
- General Precautions
- WARNING:
- CAUTION
- Utilization and Functioning
- Product Description
- Identification of the Parts
- Front View
- Back View
- Control Panel
- Error Codes and Protection Codes:
- Other Features
- Bucket Full Light:
- Auto Shut Off:
- Auto Defrost:
- Wait 3 minutes before Resuming Operation:
- Smart Dehumidifying Mode [optional]:
- Auto-Restart:
- Setting the Timer:
- Dryer Mode (optional):
- Note:
- Electrical Information
- Positioning the Unit
- Casters (at four points on the bottom of unit):
- When Using the Unit
- Removing the Collected Water
- Use the Bucket
- Notes:
- Continuous Draining
- Maintenance
- Clean the Grill and Case
- Clean the Bucket
- Clean the Air Filter
- To remove:
- To attach:
- When not using the unit for long time periods
- Troubleshooting
- Aftermarket
- Environment Conservation
- Panel de Control
- Notas:
- Para montar:
- Painel de Controlo
Brand : Becken
Model : Bruma
Category : Dehumidifier