
BMCCPD3000 - Safe Suncast - Free user manual and instructions
Find the device manual for free BMCCPD3000 Suncast in PDF.


| Product Type | Home safe |
| Model | BMCCPD3000 |
| Brand | Suncast |
| External Dimensions (H x W x D) | 12.5 x 15.5 x 16.5 inches |
| Internal Dimensions | 10.5 x 13.5 x 14.5 inches |
| Weight | 35 lbs |
| Material | Heavy-duty steel |
| Locking Mechanism | Electronic keypad with backup key |
| Power Supply | 4 AA batteries (not included) |
| Battery Life | Approximately 6 months under normal use |
| Number of User Codes | Up to 8 |
| Security Features | Tamper alarm, pry-resistant hinges, dual locking bolts |
| Color | Black or white (depending on version) |
| Interior | Carpeted floor for scratch protection |
| Mounting Options | Pre-drilled holes for floor mounting |
| Cable Entry | Yes, for charging devices inside |
| Maintenance | Wipe with soft dry cloth; avoid solvents |
| Cleaning | Use mild soap and water if necessary |
| Warranty | 1 year limited warranty |
| Spare Parts Availability | Key replacement and battery compartment available |
| Repairability | Electronic keypad replaceable; contact support |
| User Manual | Available for free download in PDF |
Frequently Asked Questions - BMCCPD3000 Suncast
User questions about BMCCPD3000 Suncast
0 question about this device. Answer the ones you know or ask your own.
Ask a new question about this device
Download the instructions for your Safe in PDF format for free! Find your manual BMCCPD3000 - Suncast and take your electronic device back in hand. On this page are published all the documents necessary for the use of your device. BMCCPD3000 by Suncast.
USER MANUAL BMCCPD3000 Suncast

To learn about other Suncast products, please call 1-855-477-1260 or 1-630-879-2050.
Product Feedback? Go To: Suncastcommercial.com/feedback OR email us at: feedback@suncastcommercial.com
ITEM NUMBER: BMCCPD3000
PARTS

TOOLS NEEDED
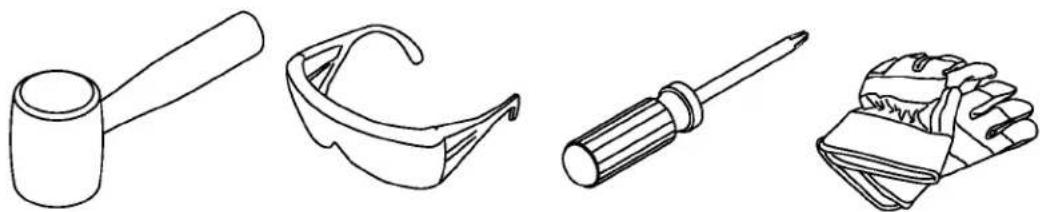
natural_image
Line drawings of four different tools: a mallet, a safety helmet, a screwdriver, and a glove (no text or symbols)
BEFORE YOU BEGIN
- Read instructions thoroughly prior to assembly. This kit contains parts that can be damaged if assembled incorrectly or in the wrong sequence.
- Please follow instructions. Suncast is not responsible for replacing parts lost or damaged due to incorrect assembly.
- Check for all parts before you begin assembly. Using the provided parts check list, verify that you have all the parts required to construct your cabinets.
- Assistance is required during parts of the assembly.

CAUTION
- Not intended for storage of flammable or caustic chemicals.
• Not intended for usage by children.
• To avoid risk of suffocation, do not allow children to play inside container.
• This product may become susceptible to impact damage in freezing temperatures. - Do not store near excessive heat.
- Exercise caution when moving fully loaded product. This product is not intended for transporting heavy objects. Use as a stationary storage device only.
- Do not sit or stand on top.
- Do not store items on top.
• Max load 50lbs. per shelf - Mounting to wall studs is required
- Mount flush and level to wall.
CARE AND CLEANING
Exposure to the elements (such as dust, plant and animal life, moisture and sunlight) encourages moss, algae, and mold to grow on outdoor items. To maintain the look of your product, we recommend cleaning it each year with mild soap and water. DO NOT use bleach, ammonia, or other caustic cleaners, and DO NOT use stiff bristle brushes. Failure to perform annual cleaning could result in permanent staining of the plastic. This is not a manufacturing defect and is not covered under warranty.
ASSEMBLY

All tabs should be engaged before locking panels together in steps 1 and 2


Align slots on left side panel (C) with tabs on back panel (A). Lower side panel and lock in place by sliding panel towards bottom of back panel. Repeat with right panel (B).
Align and engage slots on bottom panel (D) with tabs on side panels (C) and (B). Push down until you hear a "snap" to lock in place.

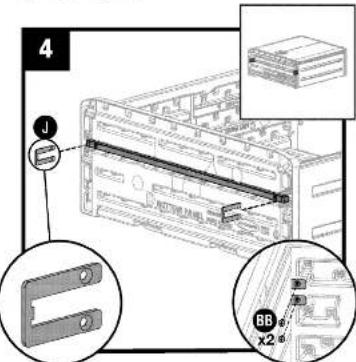
Attach support tube (I) to bottom panel (D) using two screws (AA). Large hole of support tube must face out.
Note: Countersink on bracket must face inside of cabinet on both sides. See inset for proper part orientation.
Insert bracket (J) through slot on bottom panel and attach using two screws (BB). Repeat on other side.

Attach Hanging Bracket (L) to back panel using four screws (EE). Attach (L) to side panels using four screws (EE). Mount cabinet to the wall as shown in the following steps, before assembling lid.
MOUNTING CABINET TO WALL
Mounting to wall studs is required.
natural_image
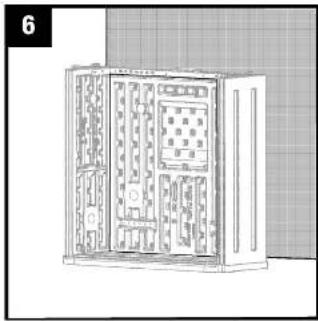
Line drawing of an electrical cabinet with internal compartments and wiring (no text or symbols)Place cabinet in desired location. Determine desired height and mark with a horizontal line. Line up bottom of cabinet with this horizontal line. Note: Top will be attached after wall mounting.
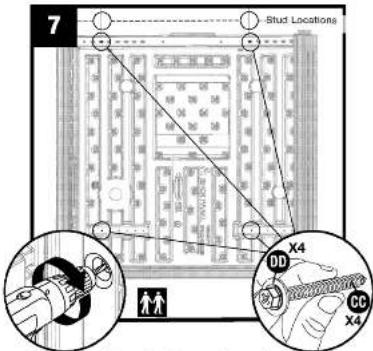
Find wall stud locations. Draw a long vertical line on the wall that extends past top of cabinet. Position cabinet horizontally on wall and determine which starter holes you will be using. Use corresponding starter holes on the bottom. Using a 3/16" drill bit drill through appropriate starter holes into studs. Start with screw located on the top left. Level cabinet prior to inserting screw in top right location. Continue with remaining holes on bottom. Attach using 4 screws (CC) and 4 washers (DD).


Make sure all tabs are engaged before locking panels together.
Align slots on top panel (E) with tabs on side panels (C/B). Lower top panel and lock in place by sliding panel towards back of unit. Top will overhang front slightly.

Attach top panel (E) to top of bracket (L) using four screws (EE).
SHELF INSTALLATION

Attach support tube (I) to shelf (F) using two screws (AA). Large hole of support tube must face out.
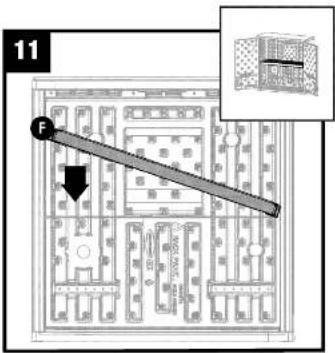
Insert shelf (F) on angle. Move to a level position while holding in hands.
SHELF INSTALLATION CONTINUED
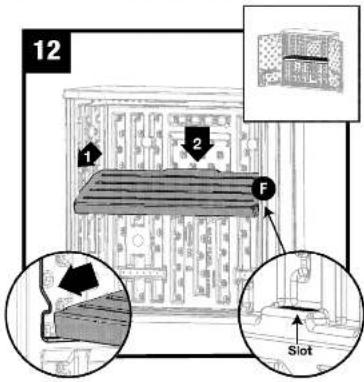
Tab on shelf must engage with slot on inside panel. Push side panels inward to engage.
Tilt shelf (F) forward and place front corners of shelf into indented area on side panel. Push down on back of shelf to snap into position.
DOOR ASSEMBLY CONTINUED

With left door (H) in the open position, place door into hinge receptacle on bottom left of cabinet. Insert hinge pin under top panel and slide to the left into hinge receptacle. Repeat with right door (G).
DOOR ASSEMBLY

Pace door on a flat hard surface. Lower (K) into left door. Insert on an angle. Hole for lock must be facing inside of cabinet. Push down: hard on center of handle to snap in pace. Repeat with right door

With doors closed, attach a 5/16" lock (not provided).
Warranty
SUNCAST COMMERCIAL® ONE Year Limited Warranty
Your SUNCAST COMMERCIAL ^® item has a ONE YEAR LIMITED WARRANTY against product failure resulting from defects in manufacturing or materials. The warranty period starts on the delivery date. Incidental and consequential damages are not covered.
Warranty Claims
To file a warranty claim contact the manufacturer, SUNCAST® CORPORATION, 701 North Kirk Road, Batavia, Illinois, 60510. Call toll free (855) 477-1260 or visit www.suncastcommercial.com. SUNCAST® will replace only the parts that failed under the terms of the warranty. In some cases, the replacement parts may not be identical, but they shall be of equal or greater performance than the original part. We require proof of purchase. We require evidence of the failure. Warranty excludes shipping and handling charges.
WARRANTY LIMITATIONS
THIS WARRANTY COVERS ONLY DEFECTS THAT AFFECT THE FORM, FIT OR FUNCTION OF THE UNIT. It excludes natural aging of the unit, discoloration, ordinary wear and tear, ordinary weathering, sunlight fading, or rust. It excludes staining caused by mold, mildew or tree sap and damage caused by animals including insects, vermin or household pets. The warranty does not cover damage caused by Acts of Nature including but not limited to: wind in excess of 50 mph; tornado; hurricane; microburst; hail; flood; blizzard; extreme heat; pollution or fire events.
The following actions void the warranty: improper assembly; use above intended and reasonable capacity; misuse; abuse; failure to perform ordinary maintenance. Modification of the original product voids all warranties. Suncast assumes no liability for any modified product or consequences resulting from failure of a modified product.
Suncast is not responsible for: loss of use of the unit; labor for repair, inspection fees or disposal costs.
THIS WARRANTY IS NONTRANSFERABLE. IT EXCLUDES FLOOR MODELS, CLEARANCE AND OPEN BOX UNITS.
THE MANUFACTURER'S LIABILITY HEREUNDER IS LIMITED SOLELY TO THE REPLACEMENT OF THE DEFECTIVE PRODUCT OR PART AND THE MANUFACTURER SHALL IN NO EVENT BE LIABLE FOR ANY INCIDENTAL OR CONSEQUENTIAL DAMAGES WHICH MAY RESULT FROM ANY DEFECT IN MATERIAL OR WORKMANSHIP OR FROM THE BREACH OF ANY EXPRESS OR IMPLIED WARRANTY.
This warranty gives you specific legal rights, and you may also have other rights which vary from state to state. Some states do not allow the exclusion or limitation of incidental or consequential damages; the limitation or exclusion may not apply to you.

- BEFORE YOU BEGIN
- CAUTION
- CARE AND CLEANING
- ASSEMBLY
- MOUNTING CABINET TO WALL
- Warranty
- SUNCAST COMMERCIAL® ONE Year Limited Warranty
- Warranty Claims
- WARRANTY LIMITATIONS
- THIS WARRANTY IS NONTRANSFERABLE. IT EXCLUDES FLOOR MODELS, CLEARANCE AND OPEN BOX UNITS.
- THE MANUFACTURER'S LIABILITY HEREUNDER IS LIMITED SOLELY TO THE REPLACEMENT OF THE DEFECTIVE PRODUCT OR PART AND THE MANUFACTURER SHALL IN NO EVENT BE LIABLE FOR ANY INCIDENTAL OR CONSEQUENTIAL DAMAGES WHICH MAY RESULT FROM ANY DEFECT IN MATERIAL OR WORKMANSHIP OR FROM THE BREACH OF ANY EXPRESS OR IMPLIED WARRANTY.
Brand : Suncast
Model : BMCCPD3000
Category : Safe