
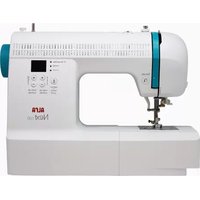
Next 820+ - Sewing machine ALFA - Free user manual and instructions
Find the device manual for free Next 820+ ALFA in PDF.


| Product Type | Sewing Machine |
| Brand | Alfa |
| Model | Next 820+ |
| Dimensions (L x W x H) | 40 x 18 x 30 cm |
| Weight | 7 kg |
| Power Supply | 230V ~ 50Hz, 90W |
| Stitch Types | 20 built-in stitches |
| Buttonhole Type | 1-step automatic buttonhole |
| Maximum Sewing Speed | 800 stitches per minute |
| Needle System | 130/705H (15x1) |
| Thread Tension Control | Adjustable dial with numbered settings |
| Bobbin Type | Top drop-in, transparent |
| Lighting | Built-in LED lamp |
| Free Arm | Yes, for sleeves and cuffs |
| Feed Dogs | Drop feed (lowerable) |
| Stitch Length and Width | Adjustable length up to 4 mm, width up to 5 mm |
| Reverse Sewing | Yes, with lever |
| Accessories Included | Presser feet set, needles, bobbins, seam ripper, screwdriver, oil |
| Warranty | 2 years |
Frequently Asked Questions - Next 820+ ALFA
User questions about Next 820+ ALFA
0 question about this device. Answer the ones you know or ask your own.
Ask a new question about this device
Download the instructions for your Sewing machine in PDF format for free! Find your manual Next 820+ - ALFA and take your electronic device back in hand. On this page are published all the documents necessary for the use of your device. Next 820+ by ALFA.
USER MANUAL Next 820+ ALFA
natural_image
Line drawing of a sewing machine (no text or symbols present)720+

natural_image
Line drawing of a sewing machine (no text or symbols present)Next 820+

natural_image
Line drawing of a sewing machine (no text or symbols present)Next 840+

INSTRUCTIONS DE SÉCURITÉ IMPORTANTES
IMPORTANT SAFETY INSTRUCTIONS
When using an electrical appliance, basic safety should always be followed, including the following: Read all instructions before using this sewing machine.
DANGER - To reduce the risk of electric shock:
- An appliance should never be left unattended when plugged in.
- Always unplug this appliance from the electric outlet immediately after using and before cleaning.
WARNING - To reduce the risk of burns, fire, electric shock, or injury to persons:
- Read the instruction carefully before you use the machine.
- Keep the instructions at a suitable place close to the machine and hand it over if you give the machine to a third party.
- Use the machine only in dry locations.
- Never leave the machine unattended with children or elderly people due to they may not be able to estimate the risk.
- This appliance can be used by children aged from 8 years and above and persons with reduced physical, sensory or mental capabilities or lack of experience and knowledge if they have been given supervision or instruction concerning use of the appliance in a safe way and understand the hazards involved.
- Children shall not play with the appliance.
- Cleaning and user maintenance shall not be made by children without supervision.
- Always switch off the machine if you carry out preparation for work (change the needle, feed the yarn through the machine, change the footer, etc.).
- Always unplug the machine if you carry out maintenance (oiling, cleaning).
- Always unplug the machine if you leave it unattended, to avoid injury by inadvertently switch on the machine.
-
Don't use the machine if it's wet or in humid environment.
-
Never pull at the cord, always unplug the machine by gripping the plug.
- If the LED lamp is damaged or broken, it must be replaced by the manufacturer or its service agent or a similarly qualified person, in order to avoid a hazard.
- Never place anything on the pedal.
- Never use the machine if the air vents are blocked keep the air vents of the machine and the foot controller free from dust, fusel and leftovers.
- The machine must only be used with designated foot controller, in order to avoid a hazard. If the foot controller is damaged or broken, it must be replaced by the manufacturer or its service agent or a similarly qualified person.
- The power cord of the foot controller can not be replaced. If the power cord is damaged the foot controller must be disposed.
- The sound pressure level at normal operation is smaller than 75dB(A).
- Do not dispose of electrical appliances as unsorted municipal waste, use separate collection facilities.
- Contact your local government for information regarding the collection systems available.
- If electrical appliances are disposed of in landfills or dumps, hazardous substances can leak into the groundwater and get into the food chain, damaging your health and well-being.
- When replacing old appliances with new ones, the retailer is legally obligated to take back your old appliance for disposal at least for free of charge.
- The appliance is not to be used by persons (including children) with reduced physical, sensory or mental capabilities, or lack of experience and knowledge, unless they have been given supervision or instruction. (For outside Europe)
- Children being supervised not to play with the appliance. (For outside Europe)
SAVE THESE INSTRUCTIONS
This sewing machine is intended for household use only.
Be sure to use the sewing machine in the temperature range from 5°C to 40°C.
If the temperature is excessively low, the machine can fail to operate normally.
INSTRUÇÕES IMPORTANTES SOBRE SEGURANÇA
As the owner of a new sewing machine, you will enjoy precision quality stitching on all types of fabrics, from multiple layers of denim to delicate silks.
Your sewing machine offers the ultimate in simplicity and ease of operation. For your safety and to fully enjoy the many advantages and ease of operation of your sewing machine, we recommend that you read all the important safeguards and use and care instructions in this instruction book.
May we suggest that before you start to use your sewing machine, you discover the many features and advantages by going through this instruction book, step by step, while seated at your sewing machine.
PT Parabéns!
Details of the Machine....3/5
Accessories 7
Fitting the snap-in sewing table....9
Connecting machine to power source 11
Two-step presser foot lifter....13
Adjusting presser foot pressure....15
Attaching the presser foot holder....17
Winding the bobbin....19
Inserting the bobbin....21
Inserting the needle....23
Threading the upper thread....25
Automatic needle threader (optional) 27
Thread tension....29
Bringing up the lower thread....31
Reverse sewing/ Remove the work/ Cutting the thread .....33
Matching needle/ fabric/ thread 35
Straight stitching 39
Zigzag stitching....41
Blind hem/ lingerie stitch....43
Overlock stitches....45
Sewing on buttons....47
How to sew buttonholes 49
Zippers and piping 51
Sewing with hemmer foot 53
3-step zig-zag 55
Stitch selection 57
Smocking stitch 59
Sewing with the cording foot....61
Darning 63
Practical stitches....65
Quilting 67
Gathering....69
Patchwork....71
Applique....73
Monogramming and embroidering with embroidery hoop ^* .....75/77
The walking foot accessory 79
Maintenance 81
Trouble shooting guide 83
PT Índice
Details of the machine
- Thread tension dial
- Presser foot pressure (not on all models)
- Thread take-up lever
- Thread cutting
- Presser foot
- Needle plate
- Sewing table/ Accessories box
- Bobbin winder stopper
- Stitch length dial (not on all models)
- Stitch width dial (not on all models)
- Stitch display
- Reverse sewing lever
- Automatic needle threader (optional)

EN Details of the machine
- Spool pin
- Bobbin winder spindle
- Hole for second spool pin
- Hand wheel
- Pattern selector dial
- Power switch
- Main plug socket
- Bobbin thread guide
- Upper thread guide
- Handle
- Presser foot lifter
Standard accessories (1)
a. All purpose foot
b. Zipper foot
c. Buttonhole foot
d. Button sewing foot
e. L-screwdriver
f. Seam ripper/ brush
g. Oil bottle
h. Second spool pin
i. Spool holder (large&small)
j. Edge/ quilting guide
k. Pack of needles (3x)
I. Bobbin (3x)
m. Spool pin felt
n. Darning plate

Acessórios
Keep the snap-in sewing table horizontal, and push it in the direction of the arrow. (1)
The inside of the snap-in sewing table can be utilized as an accessory box.
To open, flip cover down as shown. (2)
EN Connecting machine to power source
Connect the machine to a power source as illustrated. (1)
Attention:
Unplug power cord when machine is not in use.
Foot control
Foot control regulates the sewing speed. (2)
Attention:
Consult a qualified electrician if in doubt as to connect machine to power source. Unplug power cord when machine is not in use.
Sewing light
Press main switch (A) for power and light on. ("|")
natural_image
Line drawing of a sewing machine needle stitching a fabric, showing the needle being inserted (no text or symbols present)EN Two-step presser foot lifter
When sewing several layers or thick fabrics, the presser foot can be raised a second stage for easy positioning of the work. (A)
natural_image
Line drawing of a mechanical component with motion indicators (no text or symbols)FR Réglage de la pression du pied-de-biche
EN Adjust presser foot pressure
The presser foot pressure of the machine has been pre-set and requires no particular readjustment according to the type of fabric (light-or-heavy weight).
However, if you need to adjust the presser foot pressure, turn the presser adjusting screw with a coin.
For sewing very thin fabric, loosen the pressure by turning the screw counter clockwise, and for heavy fabric, tighten by turning it clockwise.
EN Attaching the presser foot holder
Raise the presser foot bar (a). (1) Attach the presser foot holder (b) as illustrated.
Attaching the presser foot
Lower the presser foot holder (b) until the cut-out (c) is directly above the pin (d). (2) Raise the lever (e)
Lower the presser foot holder (b) and the presser foot (f) will engage automatically.
Removing the presser foot
Raise the presser foot. (3) Raise the lever (e) and the foot disengages.
Attaching the edge/ quilting guide
Attach the edge/ quilting guide (g) in the slot as illustrated. Adjust according to need for hems, pleats, etc. (4)
Attention:
Turn power switch to off ("O") when carrying out any of the above operations!
EN Winding the bobbin
- Place thread and spool holder onto spool pin. (1)
- For smaller spools of thread place spool holder with small side next to spool. (2)
- Wind thread clockwise around bobbin winder tension discs. (3)
- Thread bobbin as illustrated and place on spindle. (4)
- Push bobbin to right. (5)
- Hold thread end. (6)
- Step on foot control pedal. (7)
- Cut thread. (8)
- Press bobbin to left (9) and remove.
Please Note:
When the bobbin winder spindle is in "bobbin winding" position, the machine will not sew and the hand wheel will not turn. To start sewing, push the bobbin winder spindle to the left (sewing position).
PT Como enrolar o bobinador de canelas
natural_image
Illustration of a sewing machine needle stitching fabric, showing hand positioning and downward arrow (no text or symbols)
natural_image
Mechanical diagram showing a pulley and rotor assembly (no text or labels)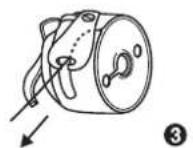
natural_image
Technical line drawing of a mechanical device with a hand operating the button (no text or symbols present)5

When inserting or removing the bobbin, the needle must be fully raised.
- Open the hinged cover.
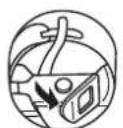
- Hold the bobbin case with one hand. Insert the bobbin so that the thread runs in a clockwise direction (arrow).
- Put the thread under the tension spring.
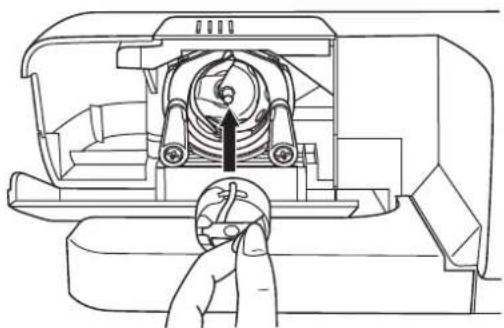
- Hold the bobbin case by the hinged latch.
- Insert it into the shuttle.
Attention: Turn power switch to off ("O").
EN Inserting the needle
Change the needle regularly, especially if it is showing signs of wear and causing problems.
Insert the needle following the illustrated instructions.
A. Loosen the needle clamp screw and tighten again after inserting the new needle. (1)
B. The flat side of the shaft should be towards the back.
C/D. Insert the needle as far up as it will go.
Attention:
Turn power switch to off ("O").
Needles must be in perfect condition. (2)
Problems can occur with:
A. Bent needles
B. Damaged points
C. Blunt needles
natural_image
Diagram of a medical or surgical procedure showing a tool interacting with a curved surface, with an arrow indicating direction (no text or symbols present)
natural_image
Two mechanical components with arrows indicating direction, no text or symbols present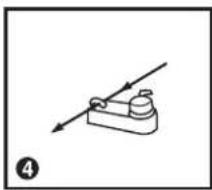
natural_image
Simple line drawing of a mechanical device with an arrow indicating direction (no text or symbols)
natural_image
Simple line drawing of a mechanical component or tool with directional arrows (no text or symbols)

natural_image
Mechanical diagram showing a bolt and lever mechanism with directional arrows (no text or labels)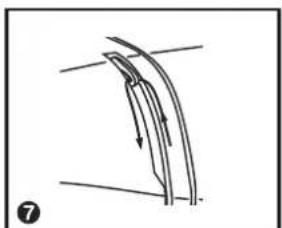
natural_image
Diagram of curved and straight lines with directional arrows, no text or symbols present
natural_image
Simple line drawing of a mechanical or electrical component with no visible text, numbers, or symbols.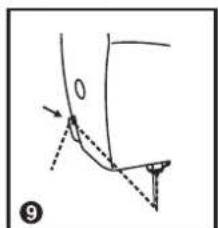
EN Threading the upper thread
This is a simple operation but it is important to carry out correctly as by not doing so several sewing problems could result.
- Start by raising the needle to its highest point (1), and also raise the presser foot to release the tension discs. (2)
Note: For safety, it is strongly suggested you turn off the power before threading. - Lift up the spool pin. Place the spool of thread on the holder with the thread coming off the spool as shown. For small thread spools, place small side of spool holder next to spool. (3)
- Draw thread from spool through the upper thread guide. (4)
- Guide thread around thread guide (5) pulling thread through pre-tension spring as illustrated.
- Thread tension module by leading thread down right channel and up left channel (6). During this process it is helpful to hold the thread between the spool and thread guide. (4)
- At the top of this movement pass thread from right to left through the slotted eye of the take-up lever and then downwards again. (7)
- Now pass thread behind the thin wire needle clamp guide (8) and then down to the needle which should be threaded from front to back.
- Pull about 6-8 inches of thread to the rear beyond the needle eye. Trim thread to length with built in thread cutter. (9)
Note:
If your sewing machine is equipped with the factory installed optional automatic needle threader, instructions for use can be found on page 27.
PT Enfiamento do fio superior
* The automatic needle threader is a factory installed option.
If your machine has this option use the following instructions:
- Raise the needle to its highest position.
- Press lever (A) right down.
- The threader automatically swings to the threading position (B).
- Take the thread round the hook (C).
- Take the thread in front of the needle round the hook (D) from bottom to top.
- Release lever (A).
- Pull the thread through the needle eye.
Attention: Turn power switch to off ("O")!
Lower thread tension (1)
To test the bobbin thread tension, remove the bobbin case and bobbin and hold it by suspending it by the thread. Jerk it once or twice. If the tension is correct, the thread will unwind by about an inch or two.
If the tension is too tight, it does not unwind at all. If the tension is too loose, it will drop too much. To adjust, turn the small screw on the side of the bobbin case.
Upper thread tension (2)
Basic thread tension setting: "4"
To increase the tension, turn the dial to the next number up.
To reduce the tension, turn the dial to the next number down.
A. Normal thread tension
B. Upper thread tension too loose
C. Upper thread tension too tight
Note:
The bobbin thread tension does not normally have to be adjusted.
PT Tensão do fio
EN Bringing up the lower thread
Hold the upper thread with the left hand. Turn the handwheel forwards until the needle is raised. (1)
Pull on the upper thread to bring the lower thread up through the stitch plate hole.
Lay both threads to the back under the presser foot. (2)
natural_image
Technical illustration of a sewing machine needle stitching fabric, showing a hand pouring liquid into the part (no text or symbols present)
natural_image
Technical line drawing of a sewing machine needle and base (no text or symbols)

natural_image
Line drawing of a sewing machine needle stitching on a printed base (no text or symbols)FR Point d'arrêt
At the end of seam, press down the reverse sewing lever. Sew a few reverse stitches.
Release the lever and the machine will sew forwards again. (1/A)
Removing the work
Turn the handwheel towards to bring the thread take up lever to its highest position, raise the presser foot and remove work towards the back. (2)
Cutting the thread
Hold the threads behind the presser foot with both hands, guide them to the slit (B) and press down. (3)
PT Ponto de remate
Matching needle/ fabric/ thread
NEEDLE, FABRIC, THREAD SELECTION GUIDE
| NEEDLE SIZE | FABRICS | THREAD |
| 9-11(65-75) | Lightweight fabrics-thin cottons, voile, serge, silk, muslin, Qiana, interlocks, cotton knits, tricot, jerseys, crepes, woven polyester, shirt & blouse fabrics. | Light-duty thread in cotton, nylon or polyester. |
| 12(80) | Medium weight fabrics-cotton, satin, kettleclote, sailcloth, double knits, lightweight woollens. | Most threads sold are medium size and suitable for these fabrics and needle sizes. Use polyester threads on synthetic materials and cotton on natural woven fabrics for best results. Always use the same thread on top and bottom. |
| 14(90) | Medium weight fabrics-cotton duck, woolen, heavier knits, terrycloth, denims. | |
| 16(100) | Heavyweight fabrics-canvas, woolens, outdoor tent and quilted fabrics, denims, upholstery material (light to medium). |
IMPORTANT: Match needle size to thread size and weight of fabric
NEEDLE, FABRIC SELECTION
| NEEDLES | EXPLANATION | TYPE OF FABRIC |
| HAx115x1 | Standard sharp needles. Sizes range thin to large.9 (65) to 16(100) | Natural woven fabrics-wool, cotton, silk, etc. Qiana.Not recommended for double knits. |
| 15x1/705H(SUK) | Semi-ball point needle, scarfed. 9(65) to 16(100) | Natural and synthetic woven fabrics, polyester blends.Knits-polyesters, interlocks, tricot, single and double knits.Can be used instead of 15x1 for sewing all fabrics. |
| 15x1/705H(SUK) | Full ball point needle. 9(65) to 16(100) | Sweater knits, Lycra, swimsuit fabric, elastic. |
| 130 PCL | Leather needles. 12(80) to 16(100) | Leather, vinyl, upholstery.(Leaves smaller hole than standard large needle.) |
Note:
- When sewing with twin needles, the stitch width dial should be set at less than "3".
- European needles show sizes 65, 70, 80 etc. American and Japanese needles show size 9, 11, 12 etc.
- Replace needle often (approximately every other garment) and / or at first thread breakage or skipped stitches.


Point droit
Turn the stitch selection dial so that the pointer is set to the straight stitch position.
Generally speaking, the thicker the fabric, thread and needle, the longer the stitch should be.

Ponto recto
Turn the stitch selection dial to "→" or ">".
Function of zigzag dial
The maximum zigzag stitch width for zigzag stitching is "5", however, the width can be reduced on any patterns. The width increases as you move zigzag dial from "0" to "5". (1)
Function of stitch length dial while zigzaging
The density of zigzag stitches increase as the setting of stitch length dial approaches "0".
Neat zigzag stitches are usually achieved at "2.5" or below. (2)
Satin stitch
When the stitch length is set between "0" - "1", the stitches are very close together producing the "satin stitch" which is used for making buttonholes and decorative stitches.
Fine fabric
When sewing on very fine fabric, place a piece of thin paper under the fabric. It is easy to tear the paper and remove the paper after you have finish your seam.
natural_image
Mechanical sewing machine needle stitching fabric (no text or symbols visible)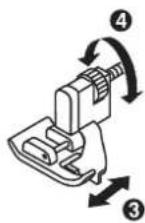

natural_image
Illustration showing a hand holding a ruler and then folding a blank sheet (no text or symbols)
Couture invisible/ point de lingerie
* The blind hem foot is an optional accessory not supplied with your machine.
For hems, curtains, trousers, skirts, etc.
Blind hem for stretch fabrics.
A...Blind hem/ lingerie for firm fabrics.
Change presser foot to Blind hem foot.
Note:
It takes practice to sew blind hems.
Always make a sewing test first.
Fold the fabric as illustrated with the wrong side uppermost. (1)
Place the fabric under the foot. Turn the handwheel forwards by hand until the needle swings fully to the left. It should just pierce the fold of the fabric. If it does not, adjust the stitch width accordingly. (2)
Adjust the guide (3) by turning the knob (4) so that the guide just rests against the fold.
Sew slowly, by pressing the foot control lightly guiding the fabric along the edge of the guide.
natural_image
Technical line drawing of a sewing machine needle stitching fabric (no text or symbols)
Points de surfilage
* The overcasting foot is an optional accessory not supplied with your machine.
Seams, neatening, visible hems.
Turn stitch length dial to "S1" or "S2", The stitch width can be adjusted to suit the fabric.
Stretch overlock (1):
For fine knits, jerseys, neck edges, ribbing.
Standard overlock (2):
For fine knits, jerseys, neck edges, ribbing.
Double overlock stitch (3):
For fine knits, handknits, seams.
All overlock stitches are suitable for sewing and neatening edges and visible seams in one operation.
When neatening, the needle should just go over the edge of the fabric.
Attention:
Use new needles or ball point needles or stretch needle!

Pontos de arrematado
natural_image
Technical line drawing of a mechanical assembly with no visible text or symbols②

natural_image
Technical line drawing of a mechanical clamp or clamp assembly (no text or symbols)③
EN Sewing on buttons
Install the darning plate. (1)
Position the work under the foot. Place the button on the marked position and lower the foot. Set the pattern selector knob on " " and sew a few securing stitches. Select the zig-zag stitch width according to the distance between the two holes of the button. Turn the handwheel to check if the needle goes into the right and the left hole of the button without any obstruction (adjust the stitch width according to the button). Slowly sew on the button with about 10 stithces. Select pattern " " and sew a few securing stitches.
If a shank is required, place a darning needle on top of the button and sew. (3) For buttons with 4 holes, sew through the front two holes first (2), push work forward and then sew through the back two holes as described. (3)
PT Coser botões
Coloque a placa de cerzir. (1)
natural_image
Technical drawing of a circular component with a central hole and an exploded view of its internal structure (no text or symbols)

FR Boutonnières
Préparation:
How to sew buttonholes
Preparation:
Remove the zigzag foot and attach the buttonhole foot. Adjust the stitch length dial between "0.5" - "1".
The density of the stitch depends on thickness of the fabric.
Note: Always test sew a buttonhole.
To prepare the fabric:
Measure the diameter of the button and add 0.3 cm (1/8") for the bartacks. If you have a very thick button, add more to the diameter measurement. Mark the position and length of the buttonhole on the fabric.
Position the fabric so that the needle is on the mark that is furthest from you.
Pull the buttonhole foot towards you as far as it will go. Lower the foot.
a. Turn the pattern selector dial to "☐". Sew at moderate speed until you reach the end mark.
b. Turn the pattern selector dial to "☐" and sew 5-6 bartack stitches.
c. Turn the pattern selector dial to "|J|" and sew the left side of the buttonhole to the mark at the end which is further from you.
d. Turn the pattern selector dial to "☐," and sew bar tack stitches.
Remove the fabric from under the foot. Draw the upper thread through the backside of the fabric and knot upper and lower threads. Cut the center of the buttonhole with the seam ripper, being careful not to cut the stitches on either side.
Tips:
- Slightly reduce upper thread tension to produce better results.
- Use backing material for fine and stretchy fabrics.
- It is advisable to use a gimp cord for stretch or knit fabrics. The zigzag should sew over the gimp. (e)

natural_image
Technical line drawing of a mechanical assembly with no visible text or symbols1

natural_image
Technical line drawing of a mechanical device with no visible text or symbols
natural_image
Technical line drawing of a sewing machine needle and fabric (no text or symbols)②
EN Zippers and piping
Set the machine as illustrated.
Set stitch length control between "1" - "4" (according to thickness of fabric).
The zipper foot can be inserted right or left, depending on which side of the foot you are going to sew. (1)
To sew past the zipper pull, lower the needle into the fabric, raise the presser foot and push the zipper pull behind the presser foot. Lower the foot and continue to sew.
It is also possible to sew in a length of cord, into a bias strip to form a "welt". (2)
PT Fechos eclair e orlas
Ajuste a máquina tal como se mostra na figura.
natural_image
Line drawing of a sewing machine needle stitching fabric (no text or symbols)1
natural_image
Line drawing of a sewing machine needle stitching fabric (no text or symbols)②

EN Sewing with the hemmer foot
* The hemmer foot is an optional accessory not supplied with your machine.
For hems in fine or sheer fabrics.
Set the machine as illustrated.
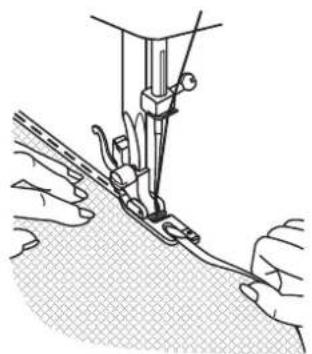
Neaten the edge of the fabric. At the beginning of the hem, turn under the edge twice by about 3 mm (1/8") and sew 4-5 stitches to secure. Pull the thread slightly towards the back. Insert the needle into the fabric, raise the presser foot and guide the fold into the scroll on the foot. (1)
Gently pull the fabric edge towards you and lower the presser foot. Begin sewing, guiding the fabric into the scroll by holding it upright and slightly to the left. (2)
natural_image
Pure geometric diagram with a rectangle, diagonal lines, and a vertical line on a grid background (no text or symbols)1

②
FR Zig-Zag en 3 pas
Sewing on lace and elastic, darning, mending, reinforcing edges.
Set the machine as illustrated.
Place patch in position.
The stitch length can be shortened to produce very close stitches. (1)
When mending tears, it is advisable to use a piece of backing fabric to reinforce. The stitch density can be varied by adjusting the stitch length. First sew over the center and then overlap on both sides. Depending on the type of fabric and damage, sew between 3 and 5 rows. (2)

Ziquezague de 3 passos
Para coser laços e elásticos, cerzir, remendar, reforçar bordas.
Triple straight stitch: (1)
For hardwearing seams.
Turn the stitch length dial to "S1" or "S2".
The machine sews two stitches forwards and one stitch backwards. This gives triple reinforcement.

Selector de pontos
Ponto triplo recto: (1)
For hardwearing seams, hems and decorative seams.
Turn the stitch length dial to "S1" or "S2".
Adjust the stitch width dial to between "3" and "5".
Triple zig-zag is suitable for firm fabrics like denim, corduroy, etc.
Ziquezague triplo: (2)
natural_image
Line drawing of a hand holding a string with a woven spring (no text or symbols)②

Seams, hems, T-shirts, underwear, etc.
Set the machine as illustrated.
This stitch can be used for all types of jersey as well as for woven fabrics. (1)
Sew at 1cm (1/4") from the fabric edge and trim the surplus fabric. (2)
PT Ponto de ninho de abelha
Costuras, bainhas, camisolas, roupa interior, etc.
Ajuste a máquina tal como se mostra na figura.
natural_image
Line drawing of hands holding a small mechanical component with an arrow indicating direction (no text or symbols)1
natural_image
Technical line drawing of a sewing machine needle stitching fabric (no text or symbols)②
EN Sewing with the cording foot
* The cording foot is an optional accessory not supplied with your machine.
Decorative effects, cushions, tablecloths, etc.
Set the machine as illustrated.
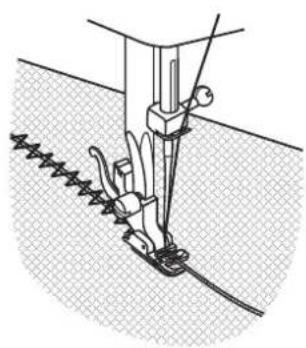
Various stitches are suitable for sewing on cord, e.g. Zig-zag, Triple zig-zag, decorative stitches.
Insert the cord between the spring covering the cord groove and the foot. The cord should run in the groove. One, two or three cords can be sewn on. The stitch width is adjusted according to the number of cords and the stitch selected. (1/2)
natural_image
Diagram showing a sewing machine needle and its base, with no text or symbols present.②
3
FR Repriser
* The darning/ embroidery foot is an optional accessory not supplied with your machine.
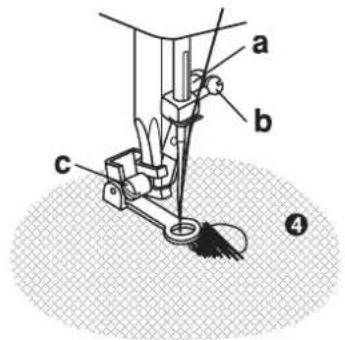
Set the machine as illustrated.
Install the darning plate. (1)
Remove the presser foot holder. (2)
Attach the darning/ embroidery foot to the presser foot bar. The lever (a) should be behind the needle clamp screw (b). Press the darning/ embroidery foot on firmly from behind with your index finger and tighten the screw (c). (3)
First sew round the edge of the hole (to secure the threads). (4) First row: Always work from left to right. Turn work by 1/4 and oversew.
A darning ring is recommended for easier sewing and better results.
PT Cerzir

Points utiles
Set the machine as illustrated.
Turn the stitch length dial to suit the fabric.
Shell hem (1)
For decorative edges.
Suitable for edges on sheer, fine and stretch fabrics. The larger stitch should go just over the edge of the fabric to create the shell effect.
Rampart (2)
For flat joining seams, sewing on elastic, visible hems.
This stitch can be used for firm, thicker fabrics.

Pontos úteis
Ajuste a máquina tal como se mostra na figura.
FR Pour matelasser
* The darning/ embroidery foot is an optional accessory not supplied with this machine.
Set pattern selector as illustrated.
Insert the edge/ quilting guide in presser foot holder and set the space as you desired.
Move the fabric over and sew successive rows with the guide riding along on the previous row of stitching.
PT Para acolchoar
natural_image
Diagram of a wavy fabric or mesh structure with a dashed line indicating a horizontal gap (no text or symbols)
Froncement
* The gathering foot is an optional accessory not supplied with this machine.
Set the machine as illustrated.
- Attach the gathering foot.
- Sew a single row or multiple rows of straight stitches. Pull the lower thread to gather more of the material.
- If more gathering in required, loosen the upper thread (to about 2) so that the lower thread lies on the under side of the material.
- Pull the lower thread to gather more of the material.
PT Franzido
natural_image
Technical line drawing of a sewing machine needle stitching fabric strips (no text or symbols)
Patchwork
These stitches are used to join two pieces of fabric while leaving a space between their edges.
- Fold over the edges of the two pieces of fabric for the hem and baste the edges to a thin piece of paper leaving a small space between them.
- Set the pattern selector on "☒". Turn the stitch length dial to "S1".
- Stitch along the edge, pulling both threads slightly when beginning to sew. * Use thicker than normal threads for sewing.
- After sewing, remove the basting and the paper. Finish by tying knots on the reverse side at the beginning and the end of the seams.
PT Patchwork
FR Applications
- Turn pattern selector dial to small zig zag width.
- Cut out the applique design and baste it to the fabric.
- Sew slowly around the edge of the design.
- Trim excess material outside the stitching. Make sure not to cut any stitches.
- Remove the basting thread.
- Tie top and bottom thread under the applique to avoid unraveling.
PT Aplicações
- Set the machine as illustrated above.
- Remove the presser foot and the presser foot holder.
- Attach the darning plate.
- Lower presser foot lever before starting to sew.
- Adjust the stitch width according to the size of lettering or design.
Preparation for Monogramming and Embroidering
- Draw the desired lettering or design on the right side of the fabric.
- Stretch the fabric between embroidery hoop as firmly as possible.
- Place the fabric under the needle. Make sure the presser foot bar is down in its lowest position.
- Turn the balance wheel towards you to bring up the lower thread through the fabric. Sew a few securing stitches at the starting point.
- Hold the hoop with thumb and forefingers of both hands while pressing the material with the middle and third fingers and supporting the outside of hoop with smaller finger.
* Embroidery hoop not included with machine.
PT Como criar monogramas e como bordar com o bastidor de bordado\*
-
Sew, moving the hoop slowly along the lettering at a constant speed.
-
Secure with a few straight stitches at the end of the last letter.
Embroidering
-
Stitch the outline of the design by moving the embroidery hoop.
-
Fill in the design working from the outline of the design to the inside and from the inside to the edge of the outline until the design is completely filled in. Keep the stitching close together.
* A long stitch is made by moving the hoop rapidly and a short stitch is made by moving it slowly.
- Secure with a few straight stitches at the end of the design.
PT Como criar monogramas e como bordar com o bastidor de bordado\*
EN The walking foot accessory
* The walking foot accessory is optional. It is not included with this machine.
Always try to sew first without the walking foot accessory which should be used only when necessary.
It is easier to guide the fabric and you have a better view of the seam when using the standard, regular foot on your machine. Your sewing machine offers excellent stitch quality on a wide range of fabrics from delicate chiffons to multiple layers of denim.
The "Walking foot" accessory equalizes the feeding of the upper and lower layers of fabric and improves the matching of plaids, stripes and patterns. This foot helps to prevent uneven feeding of very difficult fabrics.
1. Lift the presser foot bar.
2. Remove the "foot holder" by opening counter clockwise the presser bar attaching screw. (3)
3. Attach the "walking foot" to the machine in the following way.
i) The fork arm should fit into the needle screw and clamp. (2)
ii) Slide the plastic "attaching head" from your left to right so that it is fitted into the "presser foot bar".
iii) Lower the "presser foot bar".
iv) Replace and tighten clockwise the "presser bar attaching screw"
-
Make sure both the "needle screw" and the "presser bar attaching screw" are tightly secured.
-
Draw the bobbin thread up and place both the bobbin thread and the needle thread behind the walking foot attachment.
a. Fork arm
b. Attaching head
c. Needle bar
d. Needle screw & clamp
e. Needle
natural_image
Line drawing of a sewing machine on a base, showing foot and sleeve positioning (no text or symbols)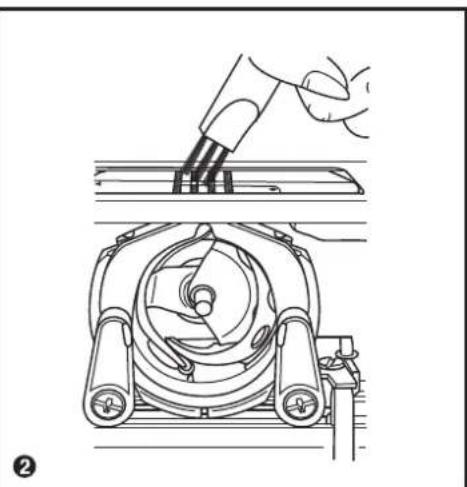
natural_image
Technical line drawing of a mechanical device with a hand operating a tool (no text or symbols present)
FR Entretien
Attention:
Disconnect the machine from the electricity supply by removing the plug from the mains socket. When cleaning the machine, it must always be disconnected from the electricity supply.
Remove the needle plate (1):
Turn the handwheel until the needle is fully raised. Open the hinged front cover and unscrew the needle plate screws with the screw driver.
Cleaning the feed dog (2):
Remove the bobbin case and use the brush supplied to clean the whole area.
Cleaning and lubricating the hook (3):
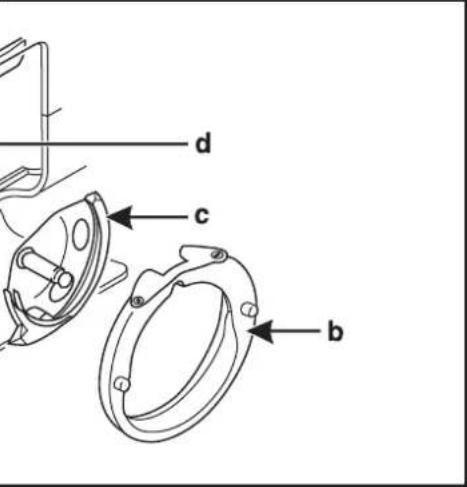
Remove the bobbin case. Snap the two hook retaining arms (a) outwards. Remove the hook race cover (b) and the hook (c) and clean with a soft cloth. Lubricate at the point (d) (1-2 drops) with sewing machine oil. Turn the handwheel until the hook race (e) is in the left position. Replace the hook (c). Replace the hook race cover and snap back the two hook retaining arms. Insert the bobbin case and bobbin and replace the stitch plate.
Important:
Fabric fluff and threads must be removed regularly.
Your machine should be serviced at regular intervals at one of our service agencies.

Manutenção
Atenção:

Trouble shooting guide
| Problem | Cause | Correction |
| Upper thread breaks | 1.The machine is not threaded correctly.2.The thread tension is too tight.3.The thread is too thick for the needle.4.The needle is not inserted correctly.5.The thread is round wound the spool holder pin.6.The needle is damaged. | 1.Rethread the machine.2.Reduce the thread tension (lower number).3.Select a larger needle.4.Remove and reinsert the needle (flat side towards the back).5.Remove the reel and wind thread onto reel.6.Replace the needle. |
| Lower thread breaks | 1.The bobbin case is not inserted correctly.2.The bobbin case is threaded wrongly.3.The lower thread tension is too tight. | 1.Remove and reinsert the bobbin case and pull on the thread.The thread should pull easily.2.Check both bobbin and bobbin case.3.Loosen lower thread tension as described. |
| Skipped stitches | 1.The needle is not inserted correctly.2.The needle is damaged.3.The wrong size needle has been used.4.The foot is not attached correctly. | 1.Remove and reinsert needle(flat side towards the back).2.Insert a new needle.3.Choose a needle to suit the thread and fabric.4.Check and attach correctly. |
| Needle breaks | 1.The needle is damaged.2.The needle is not correctly inserted.3.Wrong needle size for the fabric.4.The wrong foot is attached. | 1.Insert a new needle.2.Insert the needle correctly (flat side towards the back).3.Choose a needle to suit the thread and fabric.4.Select the correct foot. |
| Loose stitches | 1.The machine is not correctly threaded.2.The bobbin case is not correctly threaded.3.Needle/fabric/thread combination is wrong.4.Thread tension wrong. | 1.Check the threading.2.Thread the bobbin case as illustrated.3.The needle size must suit the fabric and thread.4.Correct the thread tension. |
| Seams gather or pucker | 1.The needle is too thick for the fabric.2.The stitch length is wrongly adjusted.3.The thread tension is too tight. | 1.Select a finer needle.2.Readjust the stitch length.3.Loosen the thread tension. |
| Uneven stitches, uneven feed | 1.Poor quality thread.2.The bobbin case is wrongly threaded.3.Fabric has been pulled. | 1.Select a better quality thread.2.Remove bobbin case and retread and insert correctly.3.Do not pull on the fabric while sewing, let it be taken up by the machine. |
| The machine is noisy | 1.The machine must be lubricated.2.Fluff or oil have collected on the hook or needle bar.3.Poor quality oil has been used.4.The needle is damaged. | 1.Lubricate as described.2.Clean the hook and feed dog as described.3.Only use good quality sewing machine oil.4.Replace the needle. |
| The machine jams | Thread is caught in the hook. | Remove the upper thread and bobbin case, turn the handwheel backwards and forwards by hand and remove the thread remarks. |

You can participate in the conservation of the environment!
Do not forget to obey local legislation: Take electronic equipment to a relevant waste collection centre.

- INSTRUCTIONS DE SÉCURITÉ IMPORTANTES
- IMPORTANT SAFETY INSTRUCTIONS
- DANGER - To reduce the risk of electric shock:
- WARNING - To reduce the risk of burns, fire, electric shock, or injury to persons:
- SAVE THESE INSTRUCTIONS
- INSTRUÇÕES IMPORTANTES SOBRE SEGURANÇA
- PT Parabéns!
- PT Índice
- Details of the machine
- EN Details of the machine
- Standard accessories (1)
- Acessórios
- EN Connecting machine to power source
- Attention:
- Foot control
- Sewing light
- EN Two-step presser foot lifter
- FR Réglage de la pression du pied-de-biche
- EN Adjust presser foot pressure
- EN Attaching the presser foot holder
- Attaching the presser foot
- Removing the presser foot
- Attaching the edge/ quilting guide
- EN Winding the bobbin
- Please Note:
- PT Como enrolar o bobinador de canelas
- EN Inserting the needle
- EN Threading the upper thread
- Note:
- PT Enfiamento do fio superior
- Lower thread tension (1)
- Upper thread tension (2)
- PT Tensão do fio
- EN Bringing up the lower thread
- FR Point d'arrêt
- Removing the work
- Cutting the thread
- PT Ponto de remate
- Matching needle/ fabric/ thread
- Point droit
- Ponto recto
- Function of zigzag dial
- Function of stitch length dial while zigzaging
- Satin stitch
- Fine fabric
- Couture invisible/ point de lingerie
- Points de surfilage
- Pontos de arrematado
- EN Sewing on buttons
- PT Coser botões
- FR Boutonnières
- Préparation:
- How to sew buttonholes
- Preparation:
- To prepare the fabric:
- Tips:
- EN Zippers and piping
- PT Fechos eclair e orlas
- EN Sewing with the hemmer foot
- FR Zig-Zag en 3 pas
- Ziquezague de 3 passos
- Triple straight stitch: (1)
- Selector de pontos
- Ponto triplo recto: (1)
- Ziquezague triplo: (2)
- PT Ponto de ninho de abelha
- EN Sewing with the cording foot
- FR Repriser
- PT Cerzir
- Points utiles
- Shell hem (1)
- Rampart (2)
- Pontos úteis
- FR Pour matelasser
- PT Para acolchoar
- Froncement
- PT Franzido
- Patchwork
- PT Patchwork
- FR Applications
- PT Aplicações
- Preparation for Monogramming and Embroidering
- PT Como criar monogramas e como bordar com o bastidor de bordado\*
- Embroidering
- EN The walking foot accessory
- FR Entretien
- Remove the needle plate (1):
- Cleaning the feed dog (2):
- Cleaning and lubricating the hook (3):
- Important:
- Manutenção
- Atenção:
Brand : ALFA
Model : Next 820+
Category : Sewing machine