
MRICE15SS - Ice Maker MORPHY RICHARDS - Free user manual and instructions
Find the device manual for free MRICE15SS MORPHY RICHARDS in PDF.


| Product Type | Ice Maker |
| Model | MRICE15SS |
| Colour | Stainless Steel |
| Rated Voltage | 220-240 V ~ 50 Hz |
| Rated Power | 145 W |
| Water Tank Capacity | 2.8 L |
| Ice Cubes Per Cycle | 9 |
| Ice Storage Capacity | 1.8 kg |
| Ice Production (24h) | Up to 15 kg |
| Cycle Time | 7-15 minutes |
| Ice Size Selection | Small or Large (selectable) |
| Refrigerant | R600a (25 g) - flammable |
| Product Dimensions (L x W x H) | 400 x 246 x 430 mm |
| Net Weight | 11 kg |
| Clearance for Ventilation | 15 cm on all sides |
| Ambient Temperature Range | 10°C to 32°C |
| Water Temperature Range | 8°C to 25°C (recommended) |
| Power Cord | 1.8 m (approx.) with earthed plug |
| Cleaning Frequency | At least once per week |
| Warranty | Refer to warranty card; contact Customer Care |
Frequently Asked Questions - MRICE15SS MORPHY RICHARDS
User questions about MRICE15SS MORPHY RICHARDS
0 question about this device. Answer the ones you know or ask your own.
Ask a new question about this device
Download the instructions for your Ice Maker in PDF format for free! Find your manual MRICE15SS - MORPHY RICHARDS and take your electronic device back in hand. On this page are published all the documents necessary for the use of your device. MRICE15SS by MORPHY RICHARDS.
USER MANUAL MRICE15SS MORPHY RICHARDS
smart ideas for your home
Ice Maker
INSTRUCTION MANUAL
Model: MRICE15SS
Read these instructions carefully before using this appliance for the first time.
STORE THESE INSTRUCTIONS CAREFULLY

natural_image
Line drawing of a modern kitchen appliance with control panel and ventilation slots (no text or symbols)For product hints and tips plus more join us at
www.morphyrichards.com.au

facebook.com/MorphyRichardsAUS instagram.com/morphyrichardsau
WARNING: To reduce the risk of fire, electric shock, injury to persons or damage to property, follow basic precautions including the following:
- WARNING: Misuse of appliance could cause personal injury as it contains flammable materials.
- WARNING: Keep ventilation openings, in the appliance enclosure or in the built-in structure, clear of obstruction.
- WARNING: Do not use mechanical devices or other means to accelerate the defrosting process, other than those recommended by the manufacturer.
- WARNING: Do not damage the refrigerant circuit.
- WARNING: Do not use electrical appliances inside the food storage compartments of the appliance, unless they are of the type recommended by the manufacturer.
- WARNING: When positioning the appliance, ensure the mains cord is not trapped or damaged.
- WARNING: Do not locate multiple portable socket-outlets or portable power supplies at the rear of the appliance.
- WARNING: Fill with potable water only.
- If the mains cord is damaged, it must be replaced by the manufacturer or its service agent or a similarly qualified person in order to avoid a hazard.
- Do not remove any safety, warning, or product information labels from your ice maker.
- Keep the appliance and its cord out of the reach of children.
-
This appliance is not intended for use by persons with reduced physical, sensory or mental capabilities or lack of experience and knowledge unless they have been given supervision or instruction concerning use of the appliance by a person responsible for their safety.
-
Children should be supervised to ensure that they do not play with this appliance.
- In the absence of supervision, the cleaning and maintenance work should not be done by a child.
- Do not leave the appliance unattended while in use.
- Use of accessories not recommended or sold by the original manufacturer may cause risks of fire, electric shock or personal injury.
- This appliance must be used in accordance with the instructions and must not be used for other purposes.
-
This appliance is intended to be used in household and similar applications such as:
-
staff kitchen areas in shops, offices and other working environments;
- farm houses and by clients in hotels, motels and other residential type environments;
- bed and breakfast type environments;
- catering and similar non-retail applications.
Location
- Always locate your appliance away from the edge of a worktop and ensure that the appliance is used on a firm, flat surface.
- For indoor use only. Do not use the appliance outdoors, or near water.
- Do not place the appliance on or near heat sources such as gas or electric stoves, ovens, or burners.
Mains Cord
- The mains cord should reach from the socket to the base unit without straining the connections.
-
Do not let the mains cord hang over the edge of a worktop where a child could reach it.
-
Do not let the cord run across an open space e.g. between a low socket and table.
- Do not let the cord run across a cooker or toaster or other hot area which might damage the cord.
Other Safety Considerations
- WARNING: To protect against fire, electric shock and personal injury, do not immerse cord, plugs, or appliance in water or other liquid.
- WARNING: Extreme caution must be used when moving the appliance when containing hot food, water, or other hot liquids.
- Unplug from the socket when not in use, before putting on or taking off attachments, and before cleaning to avoid damaging the refrigerating system. Pull on the plug, not the cord.
- Do not operate any appliance with a damaged cord or plug, or after an appliance has malfunctioned, or has been dropped or damaged in any way.
- Keep the appliance and the cord away from heat, direct sunlight, moisture and sharp edges.
- To disconnect, turn any control to “OFF”, wait five minutes and then remove the plug from the wall outlet.
- Do not plug or unplug product with wet hands.
- Do not attempt to disassemble, repair, modify, or replace any part of your product.
- Check that the voltage on the appliance rating plate corresponds with your house electricity supply which must be A.C.
- Avoid the use of an extension cord because it may overheat and cause a risk of fire. However, if it is necessary to use an extension cord:
1) Use only extension cord with grounding plug.
2) The marked rating of an extension cord must be equal to or greater than the rating of this appliance.
- WARNING: This appliance must be earthed. Plug the ice maker into an exclusive grounded power outlet. No other appliance should be plugged into the same outlet.
Product Use
- Do not use with water that is microbiologically unsafe or of unknown quality.
- Do not clean your ice maker with any flammable fluids. The fumes may cause illness, fire hazard or explosion.
- Do not overturn the ice maker. If the ice maker is overturned accidentally, stand it steadily for 2 hours before operating again.
- If the ice maker is brought in from storage in colder seasons, do not use for a few hours, allowing the unit to warm up to room temperature before operating.
- Never put flammable, explosive and corrosive articles into the ice maker.
- Never use the ice maker when there is flammable gas leakage.
- Never store or use gas and other flammable articles near the ice maker to avoid any fire.
- Do not touch the evaporator when using the ice maker or making ice to avoid potential frostbite.
- Please dispose of the ice maker according to local regulations as it uses flammable blowing gas and refrigerant.
READ CAREFULLY AND KEEP FOR FUTURE REFERENCE
INTRODUCTION
Thank you for purchasing a Morphy Richards Ice Maker. Produce bullet ice at a moment's notice for a quick chilled drink or up to 15kg in a 24hr period.
Please take some time to familiarise yourself with your new Ice Maker. This manual explains what you need to do before first use as well as explaining some hints and tips to keep your ice maker operating correctly.
SPECIFICATIONS
| Model: MRICE15SS | |
| Colour: Stainless Steel | |
| Rated Voltage: 220-240V~50Hz | |
| Rated Power: 145W | |
| Water Tank Capacity: 2.8L | |
| Ice Cubes Per Cycle: 9 | |
| Ice Bin Storage Capacity: 1.8kg | |
| Refrigerant/Refrigerant Amount: R600a/25g | |
| Foaming Agent: C | _5H_10 |
| Product Dimensions (L x W x H): 400 x 246 x 430mm | |
| Net Weight: 11kg |
PRODUCT OVERVIEW
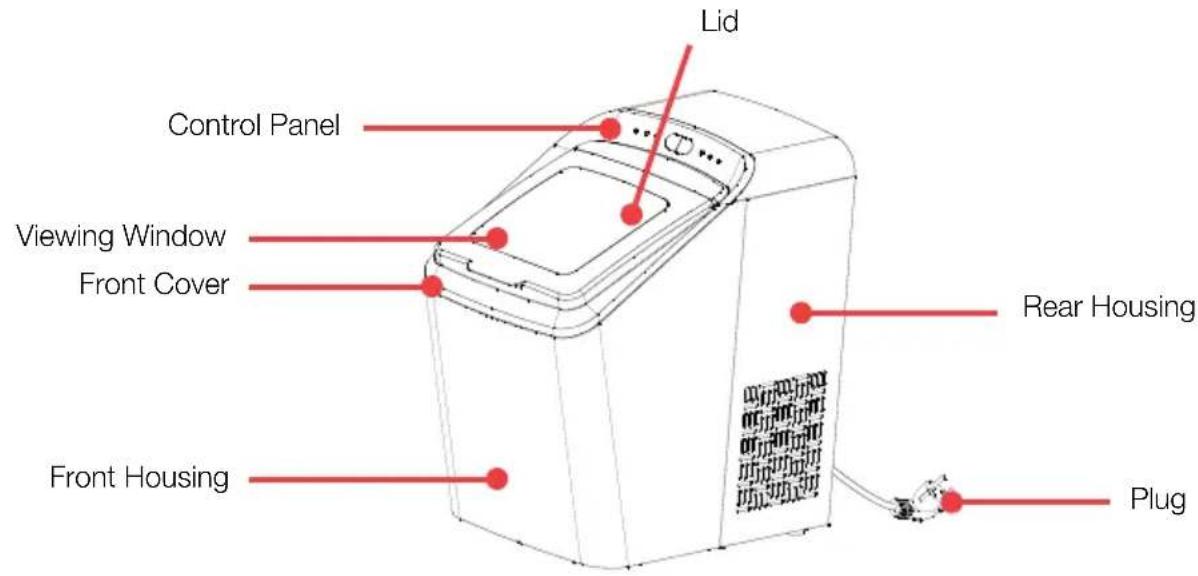


CONTROL PANEL
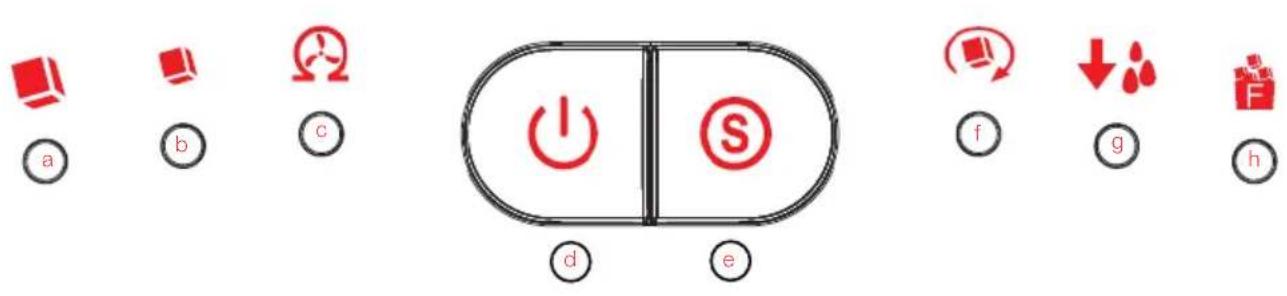
a Ice Size Selector - Large
b Ice Size Selector - Small
© Clean
d Start/Stop Button
e Ice Size Selector
f Ice Making In Progress
g Out Of Water
h Ice Basket Is Full
BEFORE FIRST USE
Before first use, please take a few minutes to read this instruction book and find a place to keep it handy for future reference. Please pay particular attention to the safety instructions.
- Unpack the appliance, then check and make sure that all the accessories including ice basket and ice scoop etc. are included.
- Please ensure the ice maker is level and stable to avoid malfunction.
- The incline angle of the ice maker cabinet should not exceed 45^ during transportation or use. Do not turn the ice maker upside down. Doing so could cause the compressor or refrigerating system to operate incorrectly. Please allow time for the fluids in the compressor to settle after the ice maker is moved or transported. Before using the ice maker for the first time, please wait for 2 hours after the unit has been leveled and positioned in the proper place.
- The appliance must be placed on a dry and level surface with sufficient ventilation, far from heat sources such as ovens, heaters and corrosive gases. Leave a 15cm clearance on all sides of the ice maker for proper ventilation.
-
Do not fill the water reservoir with hot water, as this may damage the ice maker. It is recommended to fill the reservoir with room temperature water or cooler.
-
Ensure the drain tube plug at the bottom of water reservoir is closed.
- Plug the ice maker into the wall outlet. The Ice Making In Progress indicator (f) will blink.
NOTE: The ice maker should not be turned on for 30 minutes, if it has been moved.
-
Open the lid (refer to the diagram on page 7) and remove the ice basket.
-
Do not fill above the MAX water level mark.
-
Replace the ice basket and close the lid.
-
Press the Ice Size Selector button (e) to select the ice size, (b) for small ice and (a) for larger sized ice.
-
Press the Start/Stop button (d) and the Ice making In Progress indicator lights solidly.
-
The ice making cycle will last approximately 7-15 minutes, depending on the ambient and water temperature.
-
The ice making cycle starts with water being pumped into the ice tray situated below the evaporator. Over the next 7-15 minutes ice forms on the evaporator. Once this has completed, the ice tray will tilt backwards and the remaining water in the ice tray is drained back into the water reservoir. The ice cubes are then dropped from the evaporator and pushed forward into the ice basket by the ice export. The ice tray will automatically move back into position under the evaporator and start the next cycle.
-
The Ice Basket Is Full indicator (h) will light up when the ice basket is full and the ice maker will stop automatically. Gently remove the ice from the ice basket with the ice scoop. After approximately 5 seconds, the ice maker will restart the ice making function automatically.
-
The Out Of Water indicator (g) will light up when the water reservoir is empty and the ice making cycle will stop automatically. Remove the ice basket and add water to the water reservoir. Press the Start/Stop button (d) to restart the ice making cycle.
-
Once the desired amount of ice has been dispensed, press the Start/Stop button (d) and unplug the unit from the wall outlet.
-
Open the lid and transfer the ice to a freezer.
NOTE: The ice will last in the ice maker for up to an 18 hour period, depending on the ambient temperature.
USING YOUR ICE MAKER
- Allow the ice maker to warm up to room temperature.
- It is recommended to replace the water weekly. Please empty the water reservoir, if the ice maker is not used for a long time.
CLEANING AND MAINTENANCE
To keep your ice tasting fresh and your ice maker looking in great condition, it is recommended to clean the ice maker at least once per week.
- Stop the ice making cycle by pressing the Start/Stop button (d). Wait five minutes and unplug.
- If residual water is found in the ice tray, gently push the ice tray back so that all water drains into the water reservoir.
- Move the appliance forward 55-60mm away from the working table and remove the drain tube plug to drain excess water (see Fig.1, Fig.2 and Fig.3).
- Check and make sure the drain tube plug is closed securely. Fill the water reservoir with clean water, press the Ice Size Selector button (e) until the Appliance Needs Cleaning indicator (c) flashes. Press the Start/Stop button (d) and the pump will run water for approximately 6 minutes. The Ice maker will go into standby mode after running for 6 minutes. Finally, remove the drain tube plug and empty the water out.
- Remove the ice basket.
- Clean the ice maker interior with a soft cloth soaked with warm water and vinegar. Then rinse with clean water and drain any remaining water.
- Replace the drain tube plug securely in position. Wash the ice basket and ice scoop in warm soapy water. Rinse and dry.
- Clean the exterior of the ice maker with a soft damp cloth. Use a mild dishwashing detergent, if necessary.
NOTE: Do not use organic solvent, boiled water, detergent, strong acid and strong alkali etc. for cleaning.
Please empty the water reservoir and dry it for storage if the ice maker is not used for a long time.
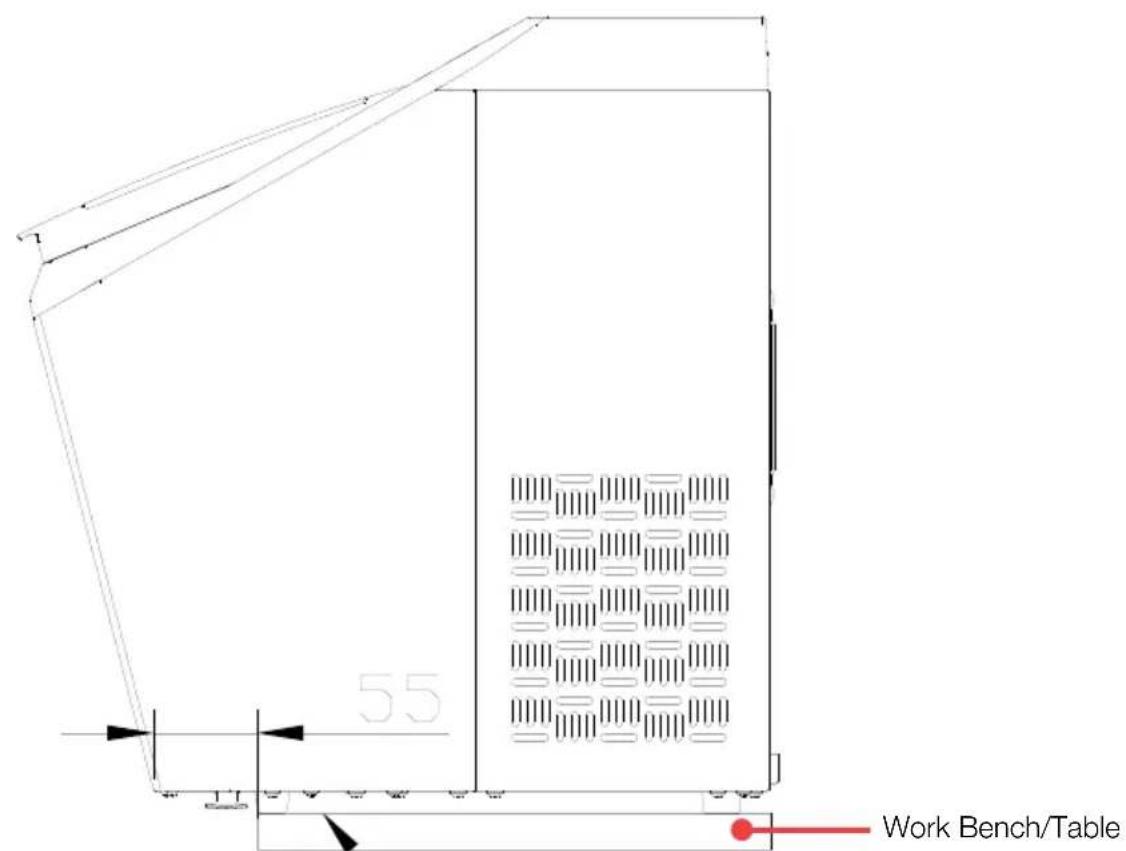
Fig. 1

Fig. 2 Fig. 3

| Problem Possible Causes Solution | ||
Indicator light on. | Low water level or lack of water.The water screen at the bottom of water reservoir is blocked.Pump malfunction. | Stop making ice. Refill water and press Start/Stop button to restart the ice making cycle.Follow cleaning steps on page 10.Call the Customer Care team for advice. |
Indicator light on. | Ice basket is full and the infrared light is blocked by the ice.Emitting tube & receiving tube not working. | Remove ice from ice basket.Wipe up the foreign objects on emitting tube & receiving tube and restart the ice maker.Call the Customer Care team if the emitting tube & receiving tube still can not work after wiping up the foreign objects on them and restarting the ice maker. |
Indicator blinks. | The ice export is blocked. Remove ice, if the ice export is blocked, otherwise, call Customer Service for assistance. | |
| The ice maker stops working. | The ice tray is not in the correct position. | Remove the ice in the ice tray and press the Start/Stop button to restart the appliance.Call Customer Care team if the appliance still does not work after restart. |
The ice basket is full but the indicator does not illuminate. | The “ice full” condition can not be detected as the infrared light module is interfered by excessive sunlight. | Unplug the appliance and move it to a place which is not exposed to excessive sunlight. Then plug the appliance in and try it again. |
| The ice gets stuck together. | The water temperature in the reservoir is too low. | Fill the water reservoir with water ranging between 8°C and 25°C. |
| The ice making cycle seems normal but no ice is produced. | The ambient temperature or water temperature is too high. | Start the ice making cycle in an environment with an ambient temperature less than 32°C and fill the water reservoir with some cold water. |
| Refrigerating system leaks | Call Customer Care team | |
| Refrigerating system blocks | Call Customer Care team | |
| Poor ice making. | Poor heat dissipation.The water temperature is too high.The ambient temperature is too high. | Leave an 8-inch (20cm) clearance on all sides of the ice maker for proper ventilation.Fill the water reservoir with water ranging between 8°C and 28°C.Operate the ice maker in an environment with an ambient temperature between 10°C and 32°C. |
| Water pump does not work or produces noise. | 1. Water pump is damaged.2. The appliance has not been cleaned for a long time, which has resulted in a substance build up in the water inlet of the water pump, so the water is not moving smoothly. There is air in the water pipe, so there will be noise produced when the water is pumped. | 1. Call Customer Care team2. The appliance should be cleaned every one to weeks with a mild detergent. |
MAINTENANCE
If the unit fails to operate efficiently, is broken or other problems arise, unplug and do not operate.
Ask for advice by calling your local after sales service agent or the Customer Care Centre on 1300 556 816 (AU) / 0800 666 2824 (NZ).
WARNING! - It is hazardous for anyone other than an Authorised Service Person to service this appliance. In Queensland, the authorised Service Person MUST hold a Gas Work Authorisation for hydrocarbon refrigerants, to carry out Servicing or repairs where the gas system is being opened or charged.
This appliance contains R600a refrigerant which is flammable.
WARRANTY
Please refer to the warranty card in the box for warranty information. For any troubleshooting advice, please contact the relative Customer Care Centre below.
Glen Dimplex Australia Pty Ltd Glen Dimplex New Zealand Ltd
8 Lakeview Drive, 38 Harris Road, East Tamaki,
Scoresby 3179, Victoria Auckland 2013
Australia
New
Zealand
Ph: 1300 556 816
Ph: 0800 666 2824
NOTES

natural_image
Symbol of a trash bin crossed with no visible text or labelsRecycling: Do not dispose of electrical appliances as unsorted municipal waste. Use separate collection facilities. Contact your local government for information regarding the collection systems available. If electrical appliances are disposed of in landfills or dumps, hazardous substances can leak into the ground water, polluting the food chain and damaging health and wellbeing.
morphy richards
Glen Dimplex Australia Pty Ltd
8 Lakeview Drive
Scoresby VIC 3179
Phone: 1300 556 816
Email: sales@glendimplex.com.au
Web: www.morphyrichards.com.au
Brand : MORPHY RICHARDS
Model : MRICE15SS
Category : Ice Maker