
PGA550CAB - Musical instrument Pyle - Free user manual and instructions
Find the device manual for free PGA550CAB Pyle in PDF.


| Product Type | Acoustic Guitar with Accessory Kit |
| Model | PGA550CAB |
| Brand | Pyle USA |
| String Configuration | 6-string, steel strings |
| Standard Tuning | E, A, D, G, B, E (from thickest to thinnest) |
| Bridge Type | Surface mounted pin style bridge |
| Recommended Humidity Range | 40% - 50% relative humidity |
| Storage Recommendation | Store in case with hygrometer when not in use |
| String Change Interval | At least once a month for average players |
| Included Accessories | Accessory kit (details not specified, but includes basic accessories) |
| Body Style | Flat-top acoustic |
| Neck Material | Wood (typical for acoustic guitars) |
| Fretboard Material | Wood (typical for acoustic guitars) |
| Overall Length | Approximately 40 inches (1016 mm) |
| Weight | Approximately 4.5 lbs (2.0 kg) |
| Power Supply | None (acoustic instrument, no electronics) |
| Maintenance | Regular cleaning, humidity control, monthly string changes |
| Repairability | User-replaceable strings and tuning pegs; professional repair for structural issues |
| Warranty Note | Damage from temperature/humidity variations not covered |
| Contact Support | Phone: (1) 718-535-1800, Email: support@pyleusa.com |
Frequently Asked Questions - PGA550CAB Pyle
User questions about PGA550CAB Pyle
0 question about this device. Answer the ones you know or ask your own.
Ask a new question about this device
Download the instructions for your Musical instrument in PDF format for free! Find your manual PGA550CAB - Pyle and take your electronic device back in hand. On this page are published all the documents necessary for the use of your device. PGA550CAB by Pyle.
USER MANUAL PGA550CAB Pyle
natural_image
Black acoustic guitar with musical notes on a textured orange background (no text or symbols)PYLE® GUITAR

natural_image
Abstract spiral logo with a central 'P' and concentric arcs (no text or symbols)Guitar with Accessory Kit
Instructions Manual
Please take a few moments to read through this booklet.
In it you will find answers to many of your questions and other invaluable information about tuning and changing strings.
Protection from Temperature and Humidity
The most important thing you can do to ensure the structural integrity of your instrument over time, is to maintain the moisture content of the wood consistently at the appropriate level.
It is 100% certain that an acoustic guitar will be exposed to varied and multiple environmental/climatic conditions from the time it leaves the maker's hands until it reaches its ultimate owner. The environment where you live may be a complete polar opposite from that of the climate where the instrument was produced. It is of paramount importance to evaluate, measure and stabilize the moisture content in the wood as soon as possible after bringing an instrument into a new environment.
In the winter, the forced air systems used to heat most homes can drive temperatures up and humidity levels dangerously low for guitars. Extremely low levels of humidity will result in low moisture content in the wood and ultimately, damage to the guitar. A good measure of protection against drying out your guitar is to use a room humidifier to maintain the ideal relative humidity of between 40% and 50%.
When the instrument is not in use, we recommend that you keep it in its case with a hygrometer to monitor the humidity level. Do not leave the guitar out of the case for long periods near a heating vent, radiator or in direct sunlight near a window. Do not leave your guitar in the trunk or the cabin of a car for long periods and keep it away from excessive heat and cold.
Please Note: Damage caused to the guitar as the result of exposure to variations in temperature and/or humidity will not be covered under the PyleUSA warranty.
Tuning 6-string Guitars
Something as simple as how you wind the strings onto the tuning machine posts when changing your strings, will determine tuning stability and even string tension. It's also a good idea to stretch your strings just a little as you tune to make sure that each string is seated well and snugged down on the tuning machine post. This will save you some tuning frustration down the road. Just grab the string in the middle, lightly tug it up and down to remove slack, and then retune.
There are a couple of different methods for tuning a guitar, depending on whether your guitar is acoustic, or an acoustic with a pickup and onboard tuner. If your guitar does not have an onboard tuner and you don't own an electronic chromatic tuner with a reference tone, you may want to purchase one. It will dramatically simplify tuning your acoustic or electric guitar.
Always tune from below pitch, up to the correct pitch instead of down from a higher pitch. This will help eliminate string slack from the tuning machine and decrease the possibility of slippage and tuning changes as you play.
If using the onboard tuner on your guitar, simply plug in, activate the tuner, turn the volume up and starting from the thickest (bottom) string to the thinnest (top), tune the strings to: E, A, D, G, B, E.
If you do not have an onboard or an electronic tuner, use a guitar pitch pipe, an A-440 tuning fork or some other pitch reference, and begin by:
- Tuning the second string, "A" to pitch.
- Then, depress the second, or "A" string at the 5th fret, to produce a "D", and tune the "D" string to that same pitch.
- Next, depress the "D" string at the 5th fret, to produce a "G", and tune the "G" string until the pitches match.
- Next, depress the "G" string at the 4th fret, to produce a "B", and tune the "B" string until the pitches match.
- Next, depress the "B" string at the 5th fret, to produce an "E" and tune the thinnest string to a matching "E".
- Finally, go back and play the thickest "E" string and tune it until the pitch at the 5th fret, an "A", matches the "A" on the adjacent string.
Changing Strings
A fresh new set of strings can breathe renewed life into your instrument. That is why many "tone-conscious" touring professionals change their strings before every performance. While there is no set rule on how often to change strings, we have found that most players do not change them nearly as often as they should.
Body oils, acids and salts from sweaty hands and humidity all interact with the metals in guitar strings and cause a corrosion and breakdown of the materials. Don't wait until your strings break and fall off from old age before you change them. Worn, oxidized, pitted and dirty strings will not hold pitch, and simply sound bad. If you are an average player, playing several times a week, we suggest that you change the strings at least once a month.
When changing strings, we recommend that you remove and replace each string one at a time, instead of all at once. This will prevent sudden and potentially damaging changes in neck tension. Each new string should be tuned up to correct pitch before the next one is removed.
When tuning a brand new string, always bring it up to pitch slowly. Otherwise, the rapid stretching may cause the string to break.
Re-Stringing Your Guitar
The procedure for re-stringing flat-top acoustic guitars and basses is quite similar in the way that the strings are wound onto the tuning machines.
There are differences though, in how the strings are attached to the bridges of acoustic flat-top and classical guitars.
Please Note: When changing strings, change them one at a time.
Do not remove all of the strings at the same time, as doing so will release all of the tension at once from the neck and body, which may potentially cause distortion and damage to the instrument.
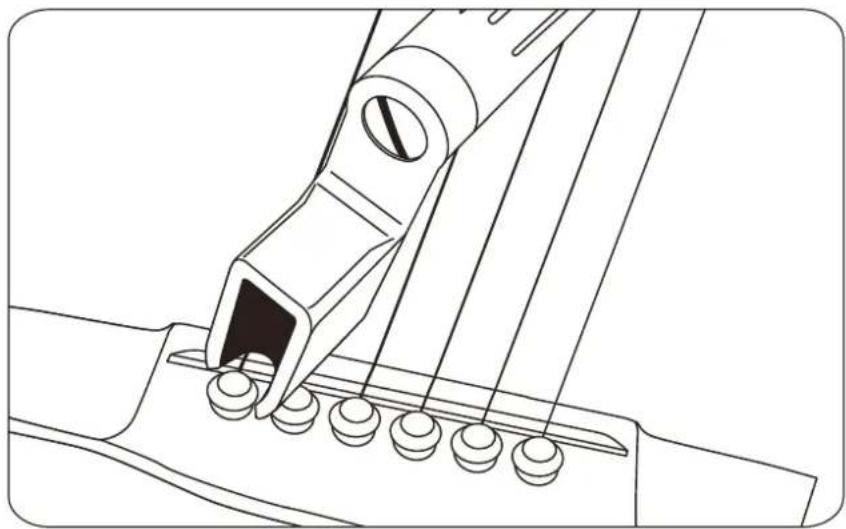
natural_image
Technical line drawing of a mechanical assembly with no visible text or symbolsillustration 4
Stringing Flat-Top, Steel String Acoustic Guitars:
Flat-top acoustics have a surface mounted pin style bridge with holes and bridge pins to hold the strings in place. To re-string a flattop, remove the bridge pin and the old string. If the bridge pin is difficult to remove, you may want to purchase a combination string winder/bridge pin puller from your local Dealer, (Figure 4).
Feed the ball end of the new string into the corresponding hole in the bridge, and then reinsert the bridge pin snugly to keep the string in place.
Make sure that the bridge pin is positioned with the grooved side riding over the string, (Figure 5). Do not hammer the bridge pin in. A firm twisting push with the thumb should secure it in place.

natural_image
Line drawing of a hand holding a microphone above six identical test tubes (no text or symbols)illustration 5
Next, pull the string up over the nut towards the headstock and bend it around the tuning machine post toward the tuning machine button, (Figure 6) Thread the string through the hole in the post and begin winding the button to remove the slack in the string. Continue winding to form a neat coil.
Finally, tune the string to the appropriate pitch. Pull up gently at the center point of the string to stretch it. Retune, and repeat, until unwanted slack is eliminated and the tuning of the strings is stabilized this will prevent slipping and save you tuning frustrations down the road.

natural_image
Illustration of a hand pressing a button on a mechanical component with a bolt and nut (no text or symbols)illustration 6

natural_image
Abstract black-and-white graphic with concentric curved lines and a central 'P' shape (no text or symbols)Questions? Issues?
We are here to help!
Phone: (1) 718-535-1800
Email: support@pyleusa.com
Brand : Pyle
Model : PGA550CAB
Category : Musical instrument