BPR980 - Mini dumper Baumr-AG - Free user manual and instructions
Find the device manual for free BPR980 Baumr-AG in PDF.


| Product Type | Mini Dumper |
| Brand | Baumr-AG |
| Model | BPR980 |
| Engine Type | 4-stroke, single cylinder |
| Displacement | 196 cc |
| Fuel Type | Unleaded gasoline |
| Starting System | Recoil start |
| Dump Capacity | 180 kg (397 lb) |
| Max Load | 200 kg (441 lb) |
| Unladen Weight | 105 kg (231 lb) |
| Overall Dimensions (L x W x H) | 1350 x 780 x 1100 mm |
| Wheel Type | Pneumatic tires, 2 wheels |
| Max Speed | 5 km/h (3.1 mph) |
| Gradeability | 20% (11°) |
| Brake Type | Mechanical drum brake |
| Safety Features | Operator presence control, tip-over guard |
| Maintenance | Change engine oil every 50 hours; air filter cleaning every 25 hours |
| Spare Parts Availability | Available through authorized dealers or online |
Frequently Asked Questions - BPR980 Baumr-AG
User questions about BPR980 Baumr-AG
0 question about this device. Answer the ones you know or ask your own.
Ask a new question about this device
Download the instructions for your Mini dumper in PDF format for free! Find your manual BPR980 - Baumr-AG and take your electronic device back in hand. On this page are published all the documents necessary for the use of your device. BPR980 by Baumr-AG.
USER MANUAL BPR980 Baumr-AG
[Revision 1.0 September 2022]
READ THIS MANUAL CAREFULLY BEFORE USE – FAILURE TO DO SO MAY RESULT IN INJURY, PROPERTY DAMAGE AND MAY VOID WARRANTY. • KEEP THIS MANUAL FOR FUTURE REFERENCE. • Products covered by this manual may vary in appearance, assembly, inclusions, specifications, description, and packaging.
The product is NOT supplied with engine oil, although traces of oil from the manufacturing process may be present. It is essential to add adequate engine oil of the correct type to the engine before use. Failure to add engine oil will void the product warranty.
Safety
Safety messages are designed to alert you to possible dangers or hazards that could cause death, injury or equipment or property damage if not understood or followed. Safety messages have the following symbols:

You WILL be KILLED or SERIOUSLY INJURED if you do not follow instructions.
It is vital that you read and understand this user manual before using the product, including safety warnings, and any assembly and operating instructions. Keep the manual for future reference.
Safety precautions and recommendations detailed here must be fully understood and followed to reduce the risk of injury, fire, explosion, electrical hazard, and/or property damage.
Safety information presented here is generic in nature – some advice may not be applicable to every product. The term "equipment" refers to the product, be it electrical mains powered, battery powered or combustion engine powered.
- Before Use - If you are not familiar with the safe operation/handling of the equipment or are in any way unsure of any aspect of suitability or correct use for your application, you should complete training conducted by a person or organization qualified in safe use and operation of this equipment, including fuel/electrical handling and safety.
- Do NOT operate the equipment in flammable or explosive environments, such as in the presence of flammable liquids, gases, or dust. The equipment may create sparks or heat that may ignite flammable substances.
- Keep clear of moving parts.
- Equipment may be a potential source of electric shock or injury if misused.
- Do NOT operate the equipment if it is damaged, malfunctioning or is in an excessively worn state.
- Do NOT allow others to use the equipment unless they have read this manual and are adequately trained.
- Keep packaging away from children - risk of suffocation! Operators must use the equipment correctly. When using the equipment, consider conditions and pay due care to persons and property.
General Work Area Safety
• Work areas should be clean and well it.
- Do not operate the equipment if bystanders, animals etc are within operating range of the equipment or the general work area.
- If devices are provided for connecting dust extraction / collection facilities, ensure these are connected and used properly. Dust collection can reduce dust-related hazards.

You CAN be KILLED or SERIOUSLY INJURED if you do not follow instructions.
General Personal Safety
- Wear appropriate protective equipment when operating, servicing, or when in the operating area of the equipment to help protect from eye and ear injury, poisoning, burns, cutting and crush injuries. Protective equipment such as safety goggles, respirators, non-slip safety footwear, hard hat, hearing protection etc should be used for appropriate equipment / conditions. Other people nearby should also wear appropriate personal protective equipment. Do not wear loose clothing or jewellery, which can be caught in moving parts. Keep hair and clothing away from the equipment.
- Stay alert and use common sense when operating the equipment. Do not overreach. Always maintain secure footing and balance.
- Do not use the equipment if tired or under the influence of drugs, alcohol, or medication.
- This equipment is not intended for use by persons with reduced physical, sensory, or mental capabilities.
General Fuel Safety
- Petrol/fuel/gasoline is extremely flammable – keep clear of naked flames or other ignition sources.
- Do not spill fuel. If you spill fuel, wipe it off the equipment immediately – if fuel gets on your clothing, change clothing.
- Do NOT smoke near fuel or when refuelling.
- Always shut off the engine before refuelling.
- Do NOT refuel a hot engine.
- Open the fuel cap carefully to allow any pressure build-up in the tank to release slowly.
• Always refuel in well ventilated areas. - Always check for fuel leakage. If fuel leakage is found, do not start, or run the engine until all leaks are fixed.
General Carbon-Monoxide Safety
- Using a combustion engine indoors CAN KILL IN MINUTES. Engine exhaust contains carbon-monoxide – a poison you cannot smell or see.
- Use combustion engines OUTSIDE only, and far away from windows, doors, and vents.

You CAN be INJURED if you do not follow instructions or equipment damage may occur.
General Equipment Use and Care
- The equipment is designed for domestic use only.
- Handle the equipment safely and carefully.
- Before use, inspect the equipment for misalignment or binding of moving parts, loose components, damage, or any other condition that may affect its operation. If damaged, have the equipment repaired by an authorised service centre or technician before use.
- Prevent unintentional starting of the equipment - ensure equipment and power switches are in the OFF position before connecting or moving equipment. Do not carry equipment with hands or fingers touching any controls. Remove any tools or other items that are not a part of the equipment from it before starting or switching on.
- Do not force the equipment. Use the correct equipment for your application. Equipment will perform better and be safer when used within its design and usage parameters.
- Use the equipment and accessories etc. in accordance with these instructions, considering working conditions and the work to be performed. Using the equipment for operations different from those intended could result in hazardous situations.
- Always keep equipment components (engines, hoses, handles, controls, frames, housings, guards etc) and accessories (cutting tools, nozzles, bits etc) properly maintained. Keep the equipment clean and, where applicable, properly lubricated.
- Store the equipment out of reach of children or untrained persons. To avoid burns or fire hazards, let the equipment cool completely before transporting or storing. Never place or store the equipment near flammable materials, combustible gases, or liquids etc.
- The equipment is not weather-proof, and should not be stored in direct sunlight, at high ambient temperatures or locations that are damp or humid.
- Do not clean equipment with solvents, flammable liquids, or harsh abrasives.
- For specific equipment safety use and care, see Equipment Safety.
General Electrical Safety
- Inspect electrical equipment, extension cords, power bars, and electrical fittings for damage or wear before each use. Repair or replace damaged equipment immediately.
- Ensure all power sources conform to equipment voltage requirements and are disconnected before connecting or disconnecting equipment.
- When wiring electrically powered equipment, follow all electrical and safety codes.
- Wherever possible, use a residual current device (RCD).
- High voltage / high current power lines may be present. Use extreme caution to avoid contact or interference with power lines. Electrical shock can be fatal.
General Electrical Safety
- Electrically grounded equipment must have an approved cord and plug and be connected to a grounded electrical outlet.
- Do NOT bypass the ON/OFF switch and operate equipment by connecting and disconnecting the electrical cord.
- Do NOT use equipment that has exposed wiring, damaged switches, covers or guards.
- Do NOT use electrical equipment in wet conditions or in damp locations.
- Do NOT use electrical cords to lift, move or carry equipment.
- Do NOT coil or knot electrical cords, and ensure electrical cords are not trip hazards.
General Service Information
- The equipment must be serviced or repaired at authorised service centres by qualified personnel only.
- Replacement parts must be original equipment manufacturer (OEM) to ensure equipment safety is maintained.
- Do NOT attempt any maintenance or repair work not described in this manual.
- After use, the equipment and components may still be hot – allow the equipment to cool and disconnect spark plugs and/or electrical power sources and/or batteries from it before adjusting, changing accessories, or performing repair or maintenance.
- Do NOT adjust while the equipment is running.
- Perform service-related activities in suitable conditions, such as a workshop.
- Replace worn, damaged or missing warning/safety labels immediately.
Understand Your Machine
- Read this manual and labels affixed to the machine to understand its limitations and potential hazards.
- Be thoroughly familiar with the controls and their proper operation. Know how to stop the machine and disengage the controls quickly.
- Make sure to read and understand all the instructions and safety precautions as outlined in the Engine Manufacturer's manual packed separately with your unit. Do not attempt to operate the machine until you fully understand how to properly operate and maintain the engine and know how to avoid accidental injuries and/or property damage.
- If the unit is to be used by someone other than original purchaser, or is to be loaned, rented, or sold, always provide this manual and any needed safety training before operation. The user can prevent and is responsible for accidents or injuries that may occur to themselves, to other people, or to property.
- Do not force the machine beyond its limits. Use the correct machine for your application.
Personal Safety
- Do not permit children to operate this machine at any time.
- Keep children, pets, and other people not using the unit away from the work area. Be alert and shut off the unit if anyone enters work area. Keep children under the watchful care of a responsible adult.
- Do not operate the machine while under the influence of drugs, alcohol, or any medication that could affect your ability to use it properly.
- Dress properly: Wear long, heavy pants, work boots, and work gloves. Do not wear loose clothing, short pants, or jewellery of any kind. Secure long hair so it is above shoulder level. Keep your hair, clothing, and gloves away from moving parts. Loose clothes, jewellery, or long hair can be caught in moving parts.
- Protect eyes, face, and head from objects that may be thrown from the unit. Always wear safety goggles or safety glasses with side shields when operating.
- Wear appropriate hearing protection.
• Always keep hands and feet away from all moving parts during operation. Moving parts can cut or crush body parts.
• Always keep hands and feet away from all pinch points. - Do not touch parts that might be hot from operation. Allow parts to cool before attempting to maintain, adjust, or service.
- Stay alert, watch what you are doing, and use common sense when operating the machine.
- Do not overreach. Do not operate the machine while barefoot or when wearing sandals or similar lightweight footwear. Wear protective footwear that will protect your feet and improve your footing on slippery surfaces. Keep proper footing and balance at all times. This enables better control of the machine in unexpected situations.
Inspect Your Machine
- Check your machine before starting it. Keep guards in place and in working order. Make sure all nuts, bolts, etc., are securely tightened.
- Never operate the machine when it is in need of repair or is in poor mechanical condition. Replace damaged, missing, or failed parts before using it. Check for fuel leaks. Keep the machine in safe working condition.
- Do not use the machine if the engine's switch does not turn off the engine when running. Any gasoline powered machine that can't be controlled with the engine switch is dangerous and must be replaced.
- Regularly check to see that keys and adjusting wrenches are removed from the machine area before starting it. A wrench or a key that is left attached to a rotating part of the machine may result in personal injury.
- Avoid accidental starting. Be sure the engine's switch is off before transporting the machine or performing any maintenance or service on the unit. Transporting or performing maintenance or service on a machine with its switch on invites accidents.
- If the machine should start to vibrate abnormally, stop the engine (motor) and check immediately for the cause. Vibration is generally a warning sign of trouble.
Engine Safety
- This machine is equipped with an internal combustion engine. Do not use on, or near, forest-covered, or brush-covered land unless the exhaust system is equipped with a spark arrester meeting applicable local, state, or federal laws.
- In some states, a spark arrester is required by law. A spark arrester, if used, must be maintained in effective working order by the operator.
- Never start or run the engine inside a closed area. The exhaust fumes are dangerous, containing carbon monoxide, an odorless and deadly gas. Operate this unit only in a well-ventilated outdoor area.
- Do not tamper with the engine to get it to run at higher speeds. The maximum engine speed is pre-set by the manufacturer and is within safety limits. See engine manual.
- Keep a Class B fire extinguisher on hand when operating this machine in dry areas as a precautionary measure.
Fuel Safety
- Fuel is highly flammable, and its vapours can explode if ignited. Take precautions when using to reduce the chance of serious personal injury.
- When refilling or draining the fuel tank, use an approved fuel storage container while in a clean, well-ventilated outdoor area. While adding fuel or operating the unit, do not smoke, and stay away from sparks, open flames, or other sources of ignition near the area of operation. Never fill the fuel tank indoors.
- To avoid sparking or arcing, keep grounded conductive objects – such as tools – away from exposed, live electrical parts and connections. These events could ignite fumes or vapours.
- Always stop the engine and allow it to cool before filling the fuel tank. Never remove the cap of the fuel tank or add fuel while the engine is running or when the engine is hot. Do not operate the machine with known leaks in the fuel system.
- Loosen the fuel tank cap slowly to relieve any pressure in the tank.
- Never overfill the fuel tank. Because engine heat can cause fuel to expand, never fill the tank to more than 12 mm below the bottom of the filler neck. This will provide space for fuel expansion.
- Replace all fuel tank and container caps securely and wipe up spilled fuel. Never operate the unit without the fuel cap securely in place.
- Avoid creating a source of ignition for spilled fuel. If fuel is spilled, do not attempt to start the engine. Instead, move the machine away from the area of spillage and avoid creating any source of ignition until fuel vapours have dissipated.
- When fuel is spilled on yourself or your clothes, wash your skin and change clothes immediately.
- Store fuel in containers specifically designed and approved for fuel storage.
- Store fuel in a cool, well-ventilated area, safely away from sparks, open flames, or other sources of ignition.
- Never store fuel – or a machine with fuel in the tank – inside a building where fumes may reach a spark, open flame, or any other source of ignition (such as a water heater, furnace, or clothes dryer). Allow the engine to cool before storing in any enclosure.
Specific Safety Rules
- Thoroughly inspect the area to be worked. Keep the working area clean and free of debris to prevent tripping. Operate on flat, level ground.
- Never place any part of your body where it would be in danger if movement should occur during assembly, installation, operation, maintenance, repair, or relocation.
- Keep all bystanders, children, and pets at least 23m away. If you are approached, stop the unit immediately.
- Do not mount anything on the hopper and never carry passengers.
- Never park the machine in a place with unstable ground that could give way, particularly when it is full.
- Disengage clutch lever before starting the engine.
- Start the engine carefully according to instructions and with feet away from the moving parts.
- Never leave the operating position when the engine is running.
- Always hold the unit with both hands when operating. Keep a firm grip on the handlebars. Be aware that the machine may unexpectedly bounce upward or jump forward if the machine should strike buried obstacles such as large rocks or roots.
- Walk, never run with the machine.
- Do not overload the machine capacity. Always drive at a safe speed and adjust the speed to the slope of the land, the surface conditions of the road, and the weight of the load.
- Use extreme caution when in reverse or pulling the machine towards you.
• Exercise extreme caution when operating on or crossing gravel drives, walks, or roads. Stay alert for hidden hazards or traffic. - On soft ground, drive at the first forward/ reverse gear. Do not rapidly accelerate, turn sharply or stop.
- Pay the utmost attention when working on frozen ground, as the machine may tend to skid.
- Do not operate the machine in confined areas where there may be a risk of crushing the operator between the machine and another object.
- Never operate the machine on slopes where angle is over 20^ .
- When operating on a slope, whether moving forward or in reverse, always make certain that the weight is evenly balanced. Always operate the machine straight up or down slopes, never drive sideways or across the slope. Do not shift gears on slopes.
- When dumping the contents of the hopper, the centre of gravity will change continuously, and the ground conditions will be essential for the stability of the machine. Use extra caution and control when dumping the hopper on unstable ground, such as wet clay or soil.
Safety Symbols
The product may have safety warning labels attached to it, explained below. Understand the symbols on your product and their meanings. If any stickers become unreadable, unattached etc., replace them.
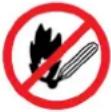 Flammable Material HazardFlammable liquids, gases, or substances etc may present.Avoid ignition sources and open flames. Danger of fire. Flammable Material HazardFlammable liquids, gases, or substances etc may present.Avoid ignition sources and open flames. Danger of fire. |  Read User ManualRead and fully understand product safety warnings, operation, procedures etc before using the product. Read User ManualRead and fully understand product safety warnings, operation, procedures etc before using the product. |  Use Hand ProtectionWear appropriate hand protection and take due care as the product or use of the product may present hand hazards. Use Hand ProtectionWear appropriate hand protection and take due care as the product or use of the product may present hand hazards. |  Exhaust FumesCarbon-Monoxide HazardDo not use the product in confined areas or without adequate ventilation. Carbon-monoxide poisoning can be fatal. Exhaust FumesCarbon-Monoxide HazardDo not use the product in confined areas or without adequate ventilation. Carbon-monoxide poisoning can be fatal. |
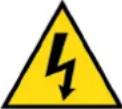 Electrocution / Electrical Shock HazardHigh voltage or high current electricity may be present or required by the product. Take due care when handling electrical products, cables, plugs and leads. Electrical shock can be fatal. Electrocution / Electrical Shock HazardHigh voltage or high current electricity may be present or required by the product. Take due care when handling electrical products, cables, plugs and leads. Electrical shock can be fatal. |  Toxic Fumes / Dust HazardUsing the product or by-products from use may produce fumes, smoke or particles that could be harmful if inhaled. Wear appropriate breathing protection and have adequate ventilation. Toxic Fumes / Dust HazardUsing the product or by-products from use may produce fumes, smoke or particles that could be harmful if inhaled. Wear appropriate breathing protection and have adequate ventilation. |  Explosive Material HazardCombustible liquids, gases, or substances etc may be present.Avoid ignition sources and open flames. Danger of explosion. Explosive Material HazardCombustible liquids, gases, or substances etc may be present.Avoid ignition sources and open flames. Danger of explosion. |  Cutting / Amputation HazardThe product may have blades, edges or mechanical devices that can cause severe cut injury to fingers, limbs etc. Take due care when handling and using the product. Cutting / Amputation HazardThe product may have blades, edges or mechanical devices that can cause severe cut injury to fingers, limbs etc. Take due care when handling and using the product. |
 Crush HazardThe product may have blades, edges or mechanical devices that can cause severe crush injury to fingers, limbs etc. Take due care when handling and using the product. Crush HazardThe product may have blades, edges or mechanical devices that can cause severe crush injury to fingers, limbs etc. Take due care when handling and using the product. |  Single Operator OnlyThe product must be operated by a single person only. More than one person operating the product may introduce additional hazards. Single Operator OnlyThe product must be operated by a single person only. More than one person operating the product may introduce additional hazards. |  Use Face ProtectionWear appropriate full-face protection and take due care as the product or use of the product may present face and eye hazards. Use Face ProtectionWear appropriate full-face protection and take due care as the product or use of the product may present face and eye hazards. |  Use Foot ProtectionWear appropriate foot protection and take due care as the product or use of the product may present foot hazards. Use Foot ProtectionWear appropriate foot protection and take due care as the product or use of the product may present foot hazards. |
 Use Eye / Ear / Head ProtectionWear appropriate eye and / or ear and / or head protection and take due care as the product or use of the product may present eye, hearing, and head hazards. Use Eye / Ear / Head ProtectionWear appropriate eye and / or ear and / or head protection and take due care as the product or use of the product may present eye, hearing, and head hazards. |  Running HazardDo not run on or near the product as doing so may present a fall hazard. Running HazardDo not run on or near the product as doing so may present a fall hazard. |  Diving HazardDo not dive into the product as doing so may present a neck / head injury hazard. Diving HazardDo not dive into the product as doing so may present a neck / head injury hazard. |  Adult Supervision RequiredAlways supervise children and other users of a product to prevent drowning or injury. Adult Supervision RequiredAlways supervise children and other users of a product to prevent drowning or injury. |
 Skin Penetration / Puncture HazardThe product may produce pressure, emit liquids or objects that can cause severe injury to fingers, limbs, blood etc. Take due care when handling and using the product. Skin Penetration / Puncture HazardThe product may produce pressure, emit liquids or objects that can cause severe injury to fingers, limbs, blood etc. Take due care when handling and using the product. |  Hot Surface HazardBe aware that the product may produce high temperatures and hot surfaces that can cause burn injuries. Hot Surface HazardBe aware that the product may produce high temperatures and hot surfaces that can cause burn injuries. |  Flying Debris HazardBe aware that the product or use of the product may present hazards produced by flying debris. Wear appropriate clothing and protective devices. Flying Debris HazardBe aware that the product or use of the product may present hazards produced by flying debris. Wear appropriate clothing and protective devices. | 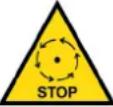 Moving Parts HazardBe aware that the product contains or uses mechanical devices that move or rotate. Always wait for moving parts to stop fully before handling the product, adjusting, maintenance etc. Moving Parts HazardBe aware that the product contains or uses mechanical devices that move or rotate. Always wait for moving parts to stop fully before handling the product, adjusting, maintenance etc. |
 Carbon-Monoxide HazardDo not use the product in confined areas or without adequate ventilation. Carbon-monoxide poisoning can be fatal. Carbon-Monoxide HazardDo not use the product in confined areas or without adequate ventilation. Carbon-monoxide poisoning can be fatal. | 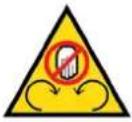 Pull HazardBe aware that the product contains or uses mechanical devices that can pull in objects and can cause severe injury to fingers, limbs etc. Take due care when handling and using the product. Pull HazardBe aware that the product contains or uses mechanical devices that can pull in objects and can cause severe injury to fingers, limbs etc. Take due care when handling and using the product. | 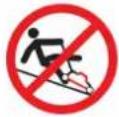 Slope / Fall Injury HazardBe aware that using the product on sloping surfaces or in slippery conditions may present additional dangers from falls and contact with blades, moving parts, hot surfaces etc. Slope / Fall Injury HazardBe aware that using the product on sloping surfaces or in slippery conditions may present additional dangers from falls and contact with blades, moving parts, hot surfaces etc. |  "Slam Dunk" WarningDo NOT attempt "slam dunk" manoeuvres as this may result in severe injury due to falling, product breakage or collapse etc. "Slam Dunk" WarningDo NOT attempt "slam dunk" manoeuvres as this may result in severe injury due to falling, product breakage or collapse etc. |
 Electrocution / Electrical Shock Hazard - OutdoorHigh voltage or high current electricity may be present or required by the product. Do NOT use in rain, damp, or wet conditions. Electrical shock can be fatal. Electrocution / Electrical Shock Hazard - OutdoorHigh voltage or high current electricity may be present or required by the product. Do NOT use in rain, damp, or wet conditions. Electrical shock can be fatal. | 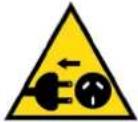 Electrocution / Electrical Shock Hazard - DisconnectHigh voltage or high current electricity may be present or required by the product. Always disconnect the product from the electrical supply before handling the product, adjusting, maintenance etc. Electrocution / Electrical Shock Hazard - DisconnectHigh voltage or high current electricity may be present or required by the product. Always disconnect the product from the electrical supply before handling the product, adjusting, maintenance etc. |  Power Line Electrocution HazardHigh voltage / high current power lines may be present. Use extreme caution to avoid contact or interference with power lines.Electrical shock can be fatal. Power Line Electrocution HazardHigh voltage / high current power lines may be present. Use extreme caution to avoid contact or interference with power lines.Electrical shock can be fatal. | 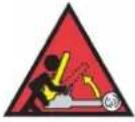 "Kick-Back" HazardHigh level of "kick-back" hazard that can cause the machine to suddenly rotate towards operator.Kick-back injury can be fatal. "Kick-Back" HazardHigh level of "kick-back" hazard that can cause the machine to suddenly rotate towards operator.Kick-back injury can be fatal. |
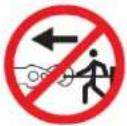 Winch Operator Position HazardDo NOT stand between winch and load. Do NOT use winch to move people. Winch Operator Position HazardDo NOT stand between winch and load. Do NOT use winch to move people. | 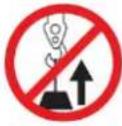 Winch Lift HazardDo NOT LIFT load vertically. Use machine to PULL only. Winch Lift HazardDo NOT LIFT load vertically. Use machine to PULL only. | 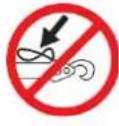 Cable HazardEnsure that load bearing cable is not kinked or knotted. Cable HazardEnsure that load bearing cable is not kinked or knotted. | 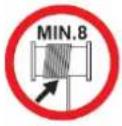 Winch Cable HazardEnsure that there is a minimum number of cable coils on winching mechanism. Winch Cable HazardEnsure that there is a minimum number of cable coils on winching mechanism. |
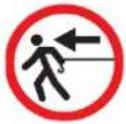 Winch Hook HazardCarry hook to load – do NOT throw or run. Winch Hook HazardCarry hook to load – do NOT throw or run. |  Flash / Blinding HazardWear appropriate eye protection for welding. Direct exposure to weld arcs may cause permanent eye injury. Flash / Blinding HazardWear appropriate eye protection for welding. Direct exposure to weld arcs may cause permanent eye injury. |  Laser HazardLaser may be in use – do NOT look directly at laser or allow others to. Laser HazardLaser may be in use – do NOT look directly at laser or allow others to. |
Table of Contents
Safety 2
Safety Symbols....5
Unpacking the Container 8
Contents Supplied....9
Assembly of Optional Accessories....10
Plow Blade (Optional)....10
Engine Oil....13
Features and Controls....14
Operation....18
Adding Oil to the Engine....18
Adding Fuel to the Engine 19
Starting the Engine....19
Operating....20
Idle Speed....21
Stop Engine 21
Maintenance....22
Preventive Maintenance....22
Adjusting the Clutch....22
Adjusting the Steering 23
Replacing the Drive Belt....24
Lubrication 26
Hydraulic Oil 27
Tightening the Tracks....28
Replacing the Tracks....30
Engine Maintenance....33
Storage 34
Hydraulic Scheme....35
Troubleshooting ....36
Specifications ....37
Unpacking the Container
- Use the screwdriver and hammer to open all the side locks.
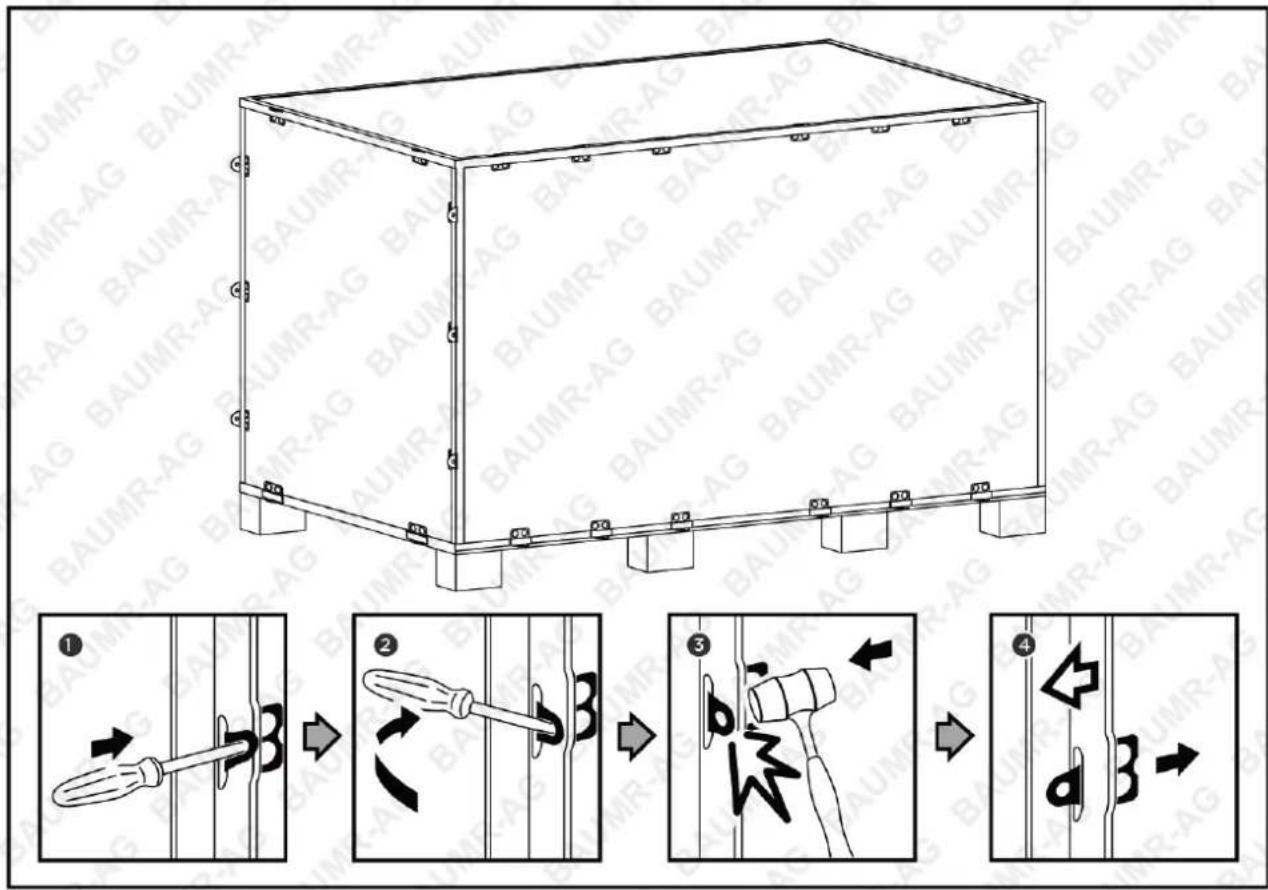
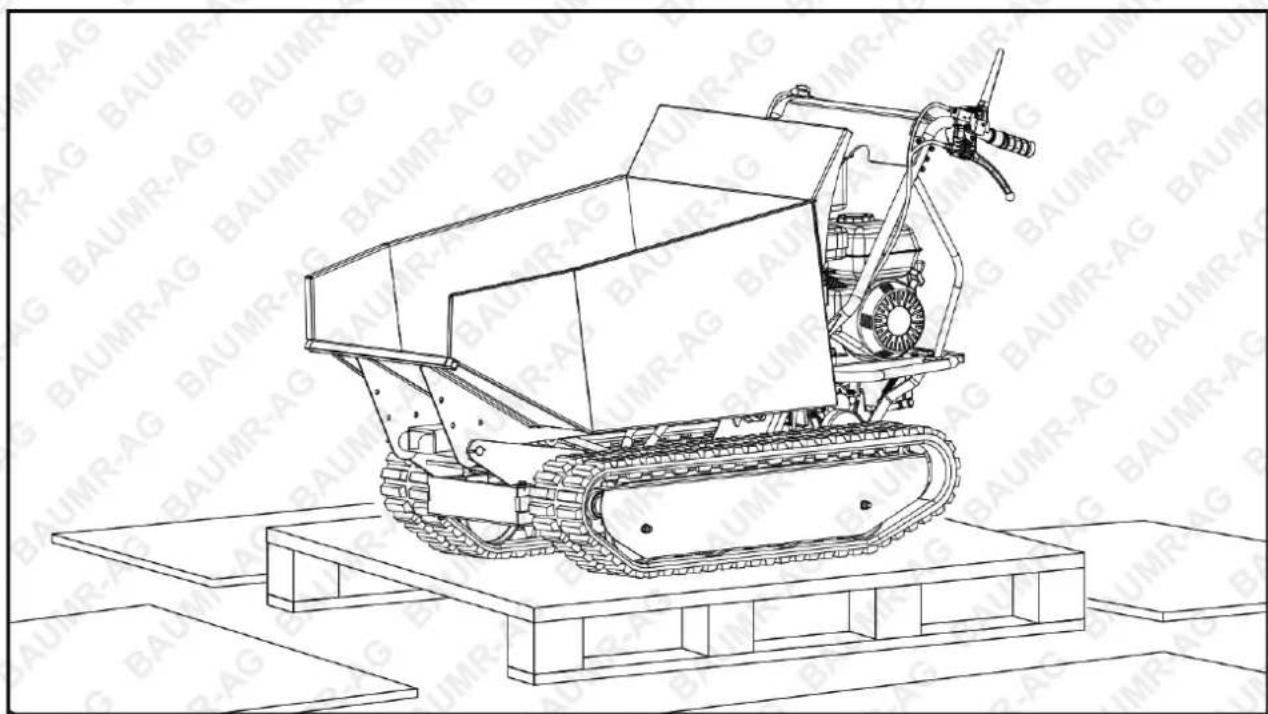
- Remove all the plywood plates and remove all the loose parts on the bottom pallets.
natural_image
Technical line drawing of a tracked robotic vehicle on a platform, no text or symbols presentContents Supplied
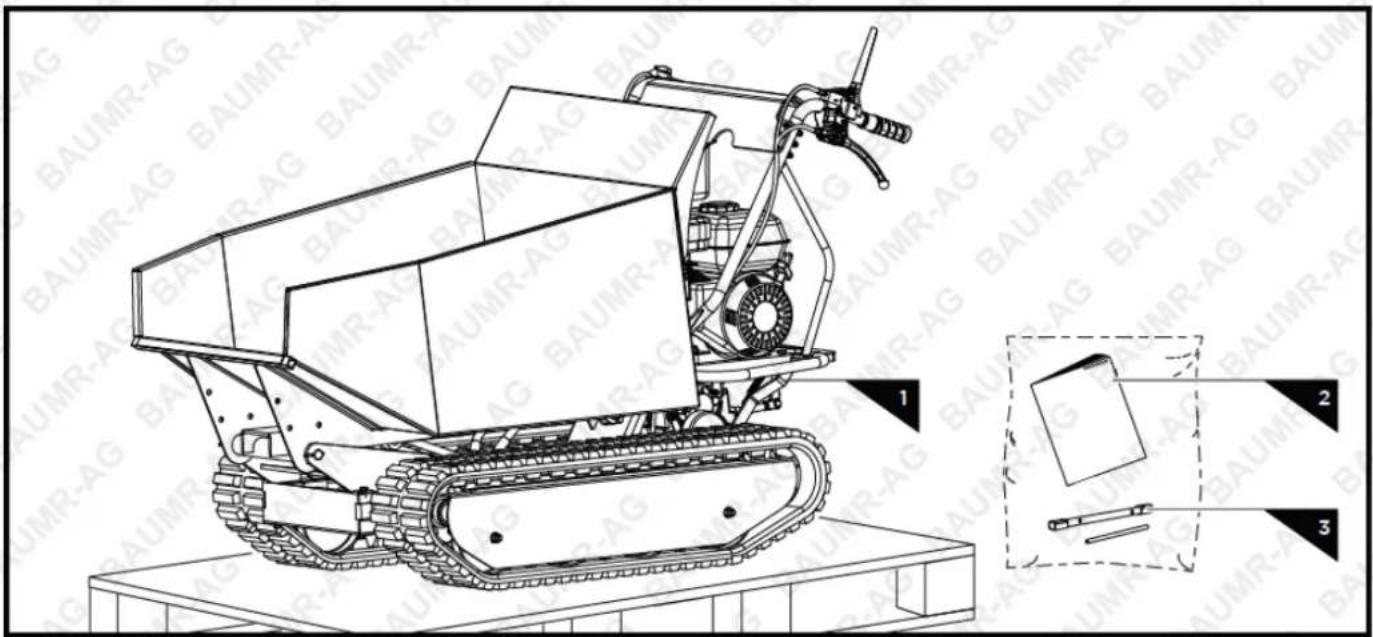
The mini tracked dumper comes partially assembled and is shipped in carefully packed package. After all the parts have been removed from the package, you should have:
natural_image
Technical line drawing of a tracked robotic vehicle with visible components and assembly details (no text or symbols)| No. | Name |
| 1 | Machine |
| 2 | Engine manual (might not be available in some models) |
| 3 | Tools for Spark Plug Assembly |
Assembly of Optional Accessories
This mini tracked dumper was completely assembled at the factory. To assemble the optional plow blade, follow the below instructions.
Plow Blade (Optional)
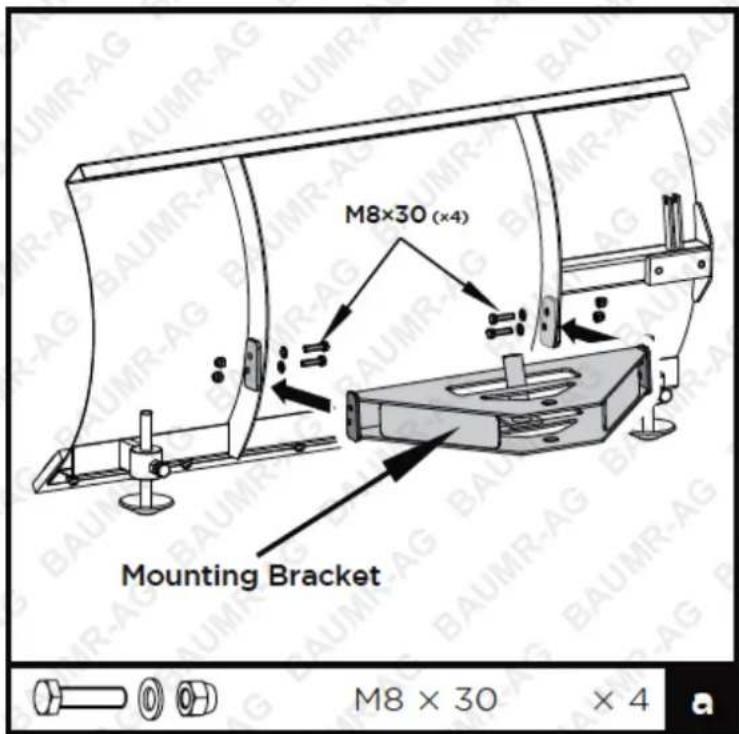
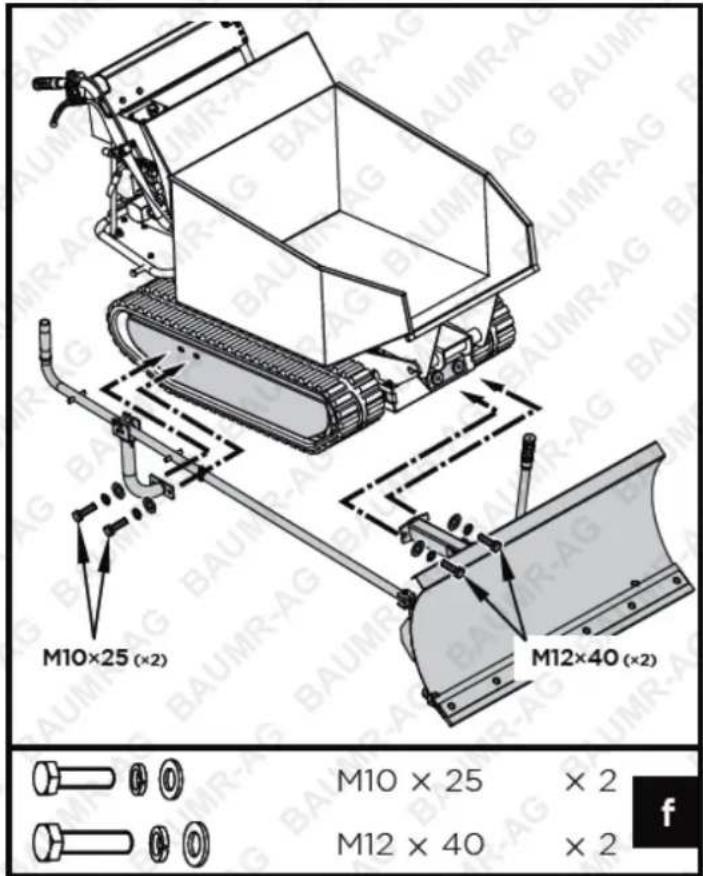
- Mount the mounting bracket to the blade using M8×30 hex bolts, washers, and nuts.
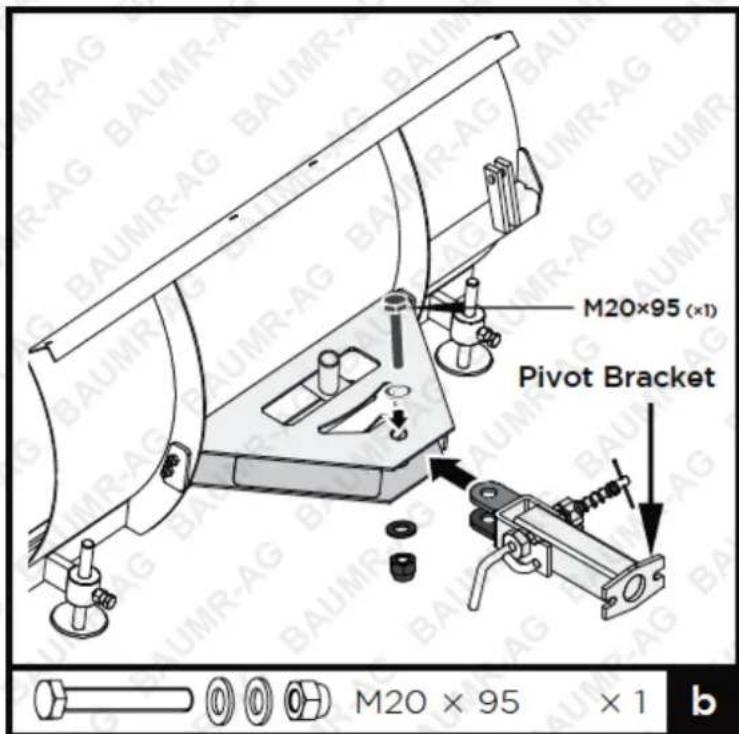
- Position the pivot bracket inside the mounting bracket and align with mounting bracket holes. Secure with M20×95 hex bolt, washers, and nut.
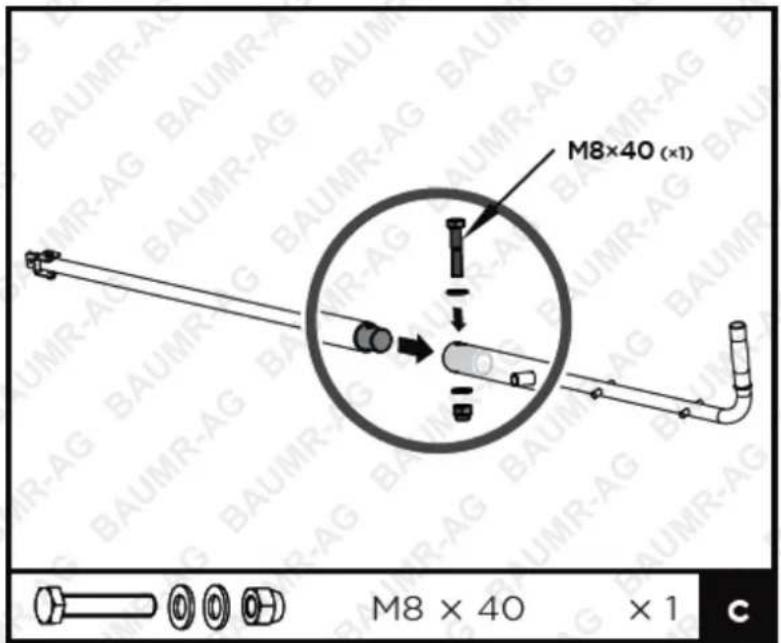
- Insert the shorter control lever into the longer lever. Align holes and fasten with M8×40 hex bolt, washers and nut.
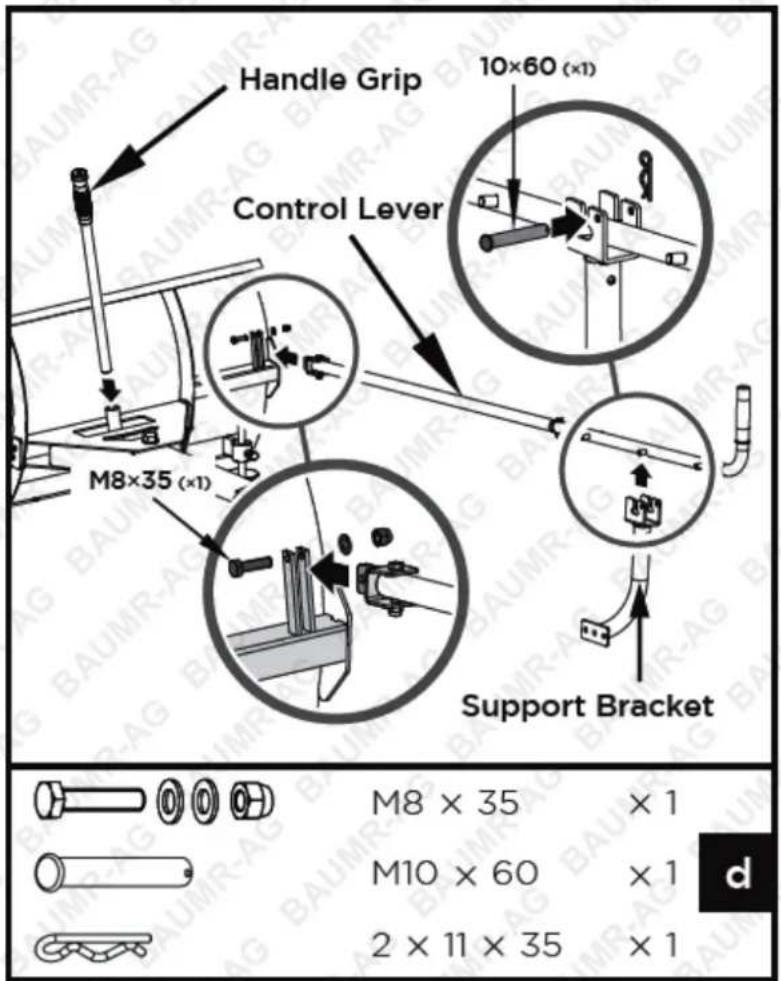
- Attach control lever to the guide tube. Line up holes and fasten with M8×35 bolt, washers, and nut.
- Insert the handle grip into the holder.
- Secure the support bracket into the control lever with pin 10×60 and bridge clip.
- Install the mounting bracket base with two M10×30 bolts and washers.
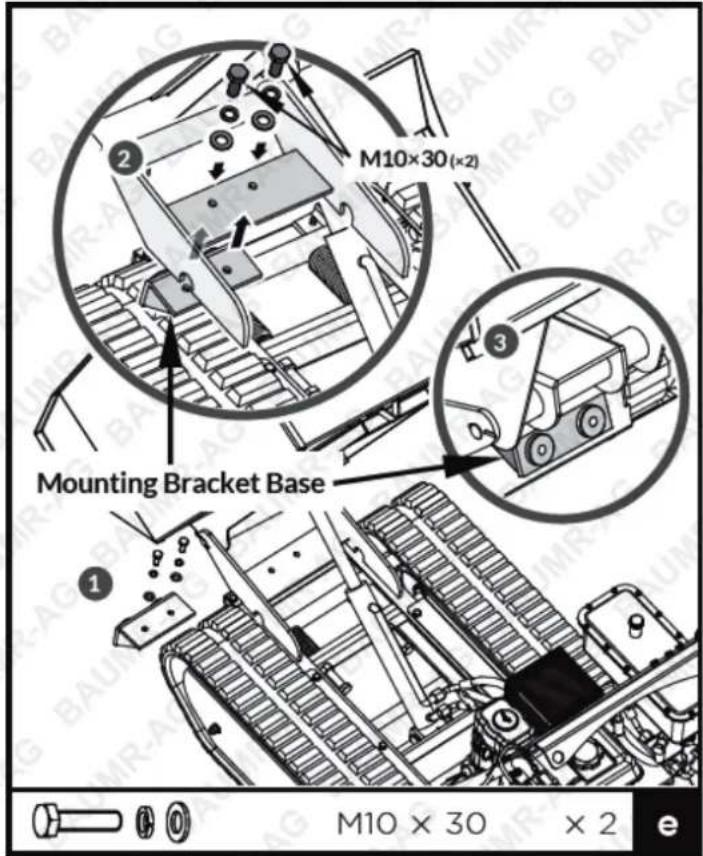
- Install the already assembled plow blade to the trackbarrow as shown.
Engine Oil

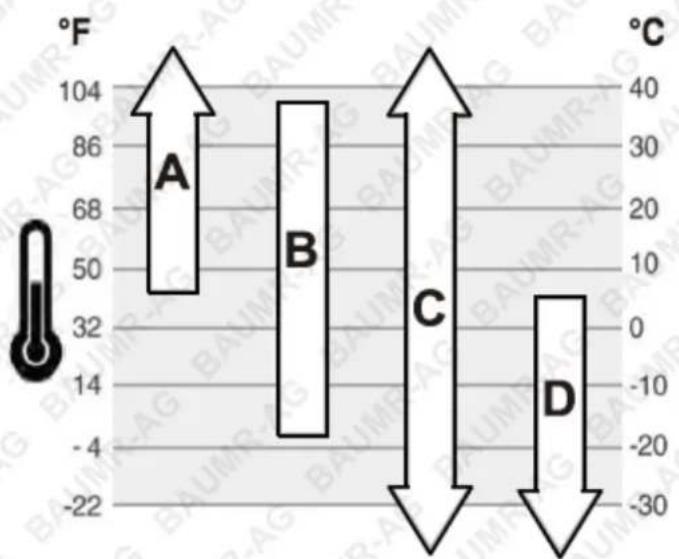
OIL HAS BEEN DRAINED FOR SHIPPING. Failure to fill engine sump with oil before starting engine will result in permanent damage and void engine warranty.
Add oil according to Engine Manual packed separately with your tiller.
bar
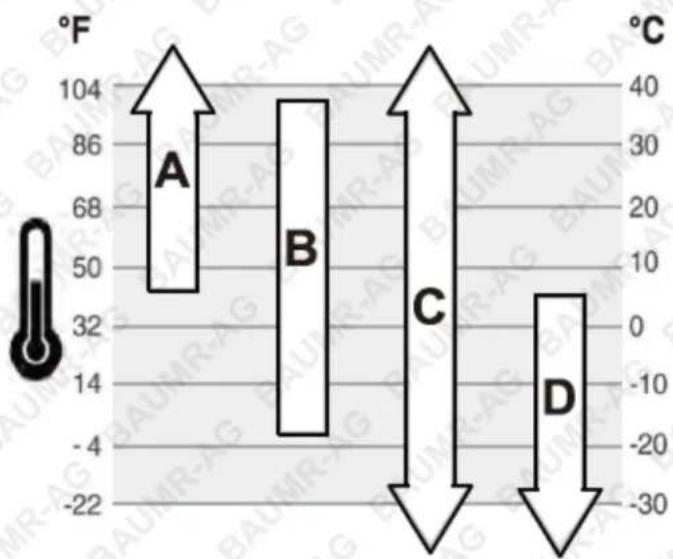
| Label | Value | |---|---| | A | 104 | | B | 86 | | C | 50 | | D | -22 || A | SAE 30 - Below 40 °F (4 °C) the use of SAE 30 will result in hard starting. |
| B | 10W-30 - Above 80 °F (27 °C) the use of 10W-30 may cause increased oil consumption. Check oil level more frequently. |
| C | Synthetic 5W-30 |
| D | 5W-30 |
Features and Controls
Gear Selection Lever
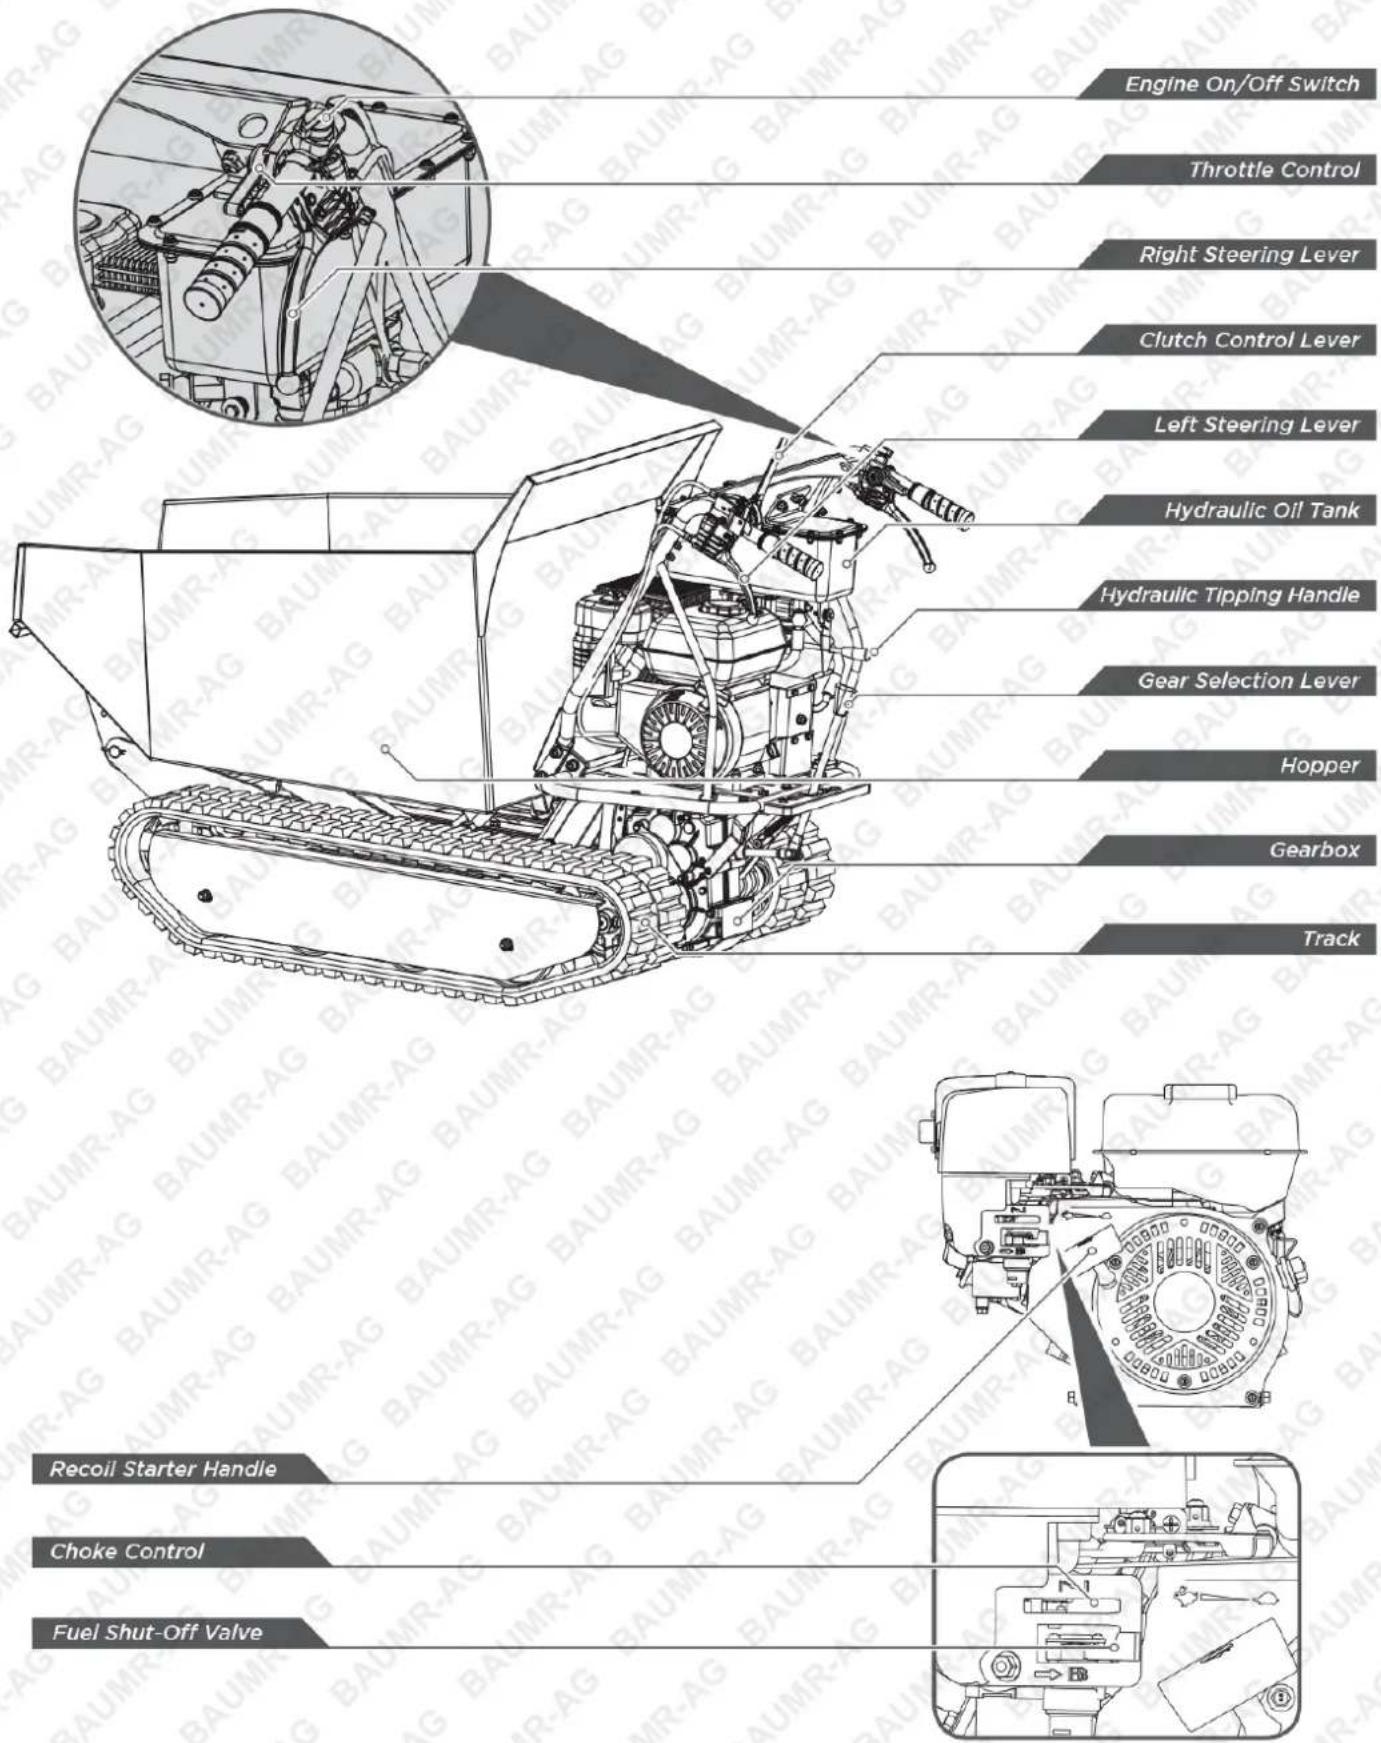
The gear selection lever has 4 positions: 3 forward speeds and 1 reverse. To change speeds, move the speed shift lever to the desired position. The lever locks in a notch at each speed selection.

Slower speeds are for heavier loads, while faster speeds are for transporting light loads or an empty hopper. It is recommended that you use a slower speed until you are familiar with the operation of the mini tracked dumper.
If the engine slows down under a load or the tracks slip, shift the machine into a lower gear.
If the front of the machine rides up, shift the machine into a lower gear. If the front continues to ride up, lift up on the handles.
Left/Right Steering Lever
Operate the lever to turn left/right.

Operate the steering levers only at a reduced speed.

flowchart
graph TD
    A["Start"] --> B["RUN"]
    B --> C{STOP}
    C --> D["Feedback Loop Icon"]
    D --> E["End"]
Hydraulic Tipping Handle
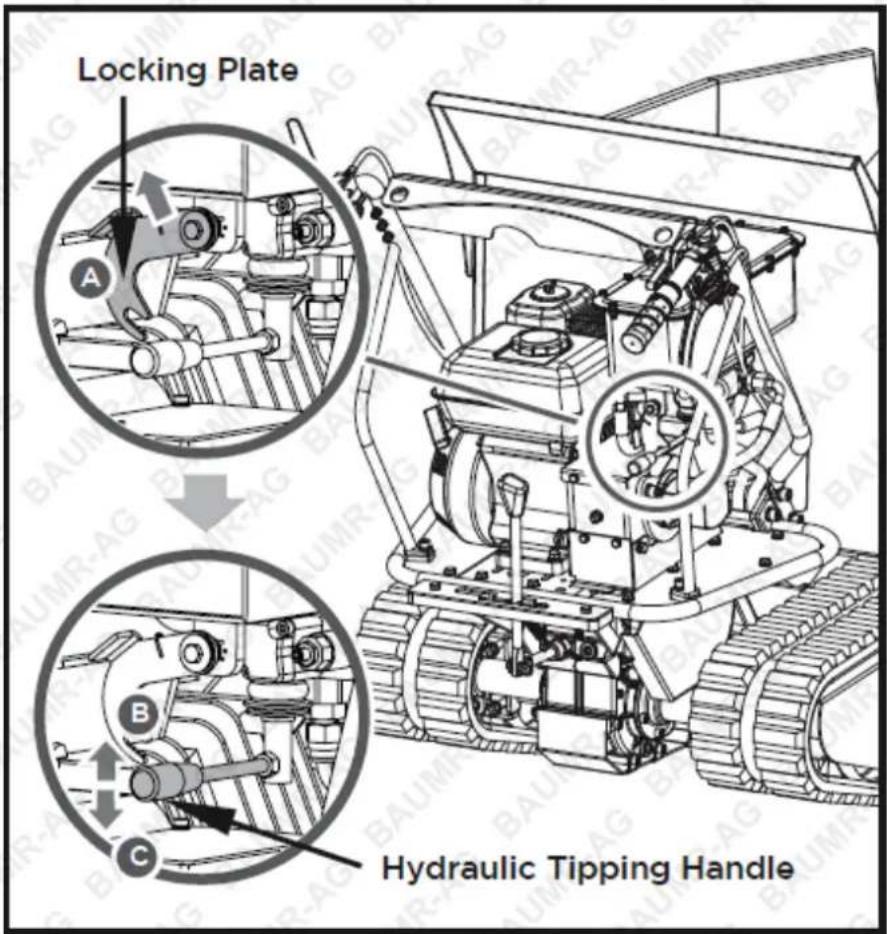
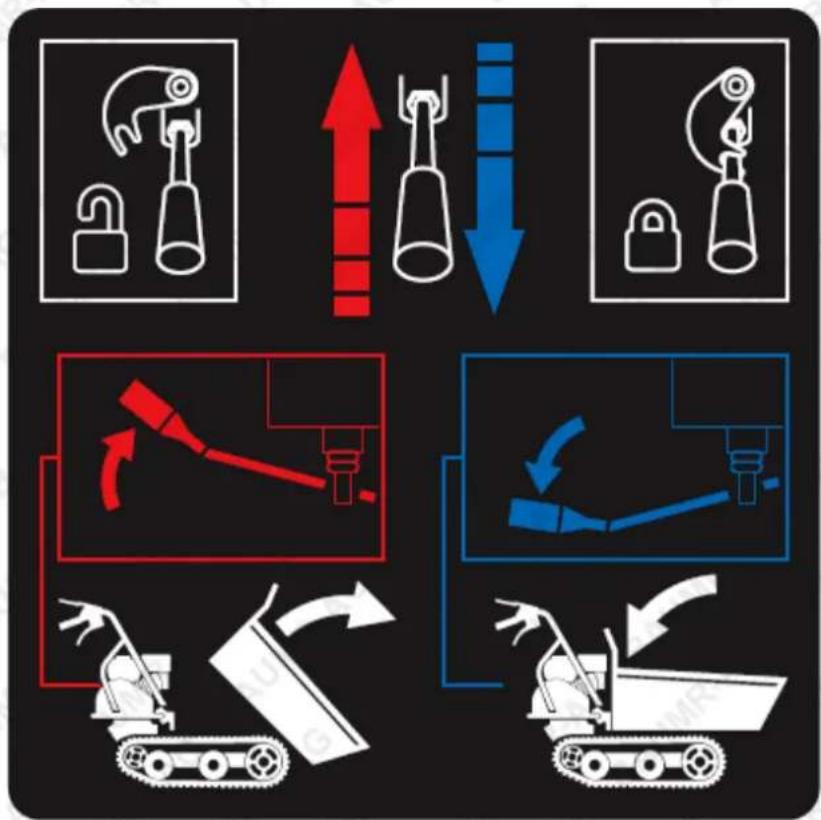
Using your left hand, pull the locking plate up to release the tipping handle, and hold in position.
To raise the hopper, pull the tipping handle upwards until the hopper has reached the desired position. To stop raising the hopper, simply release the tipping handle and return the locking plate to its original position.
To lower the hopper, first pull the locking plate up with your left hand to release the tipping handle, and then pull the tipping handle down with the right hand. When the hopper is lowered to the original position, release the tipping handle back to its original position and lock securely with the locking plate.
flowchart
graph TD
    A["Lock/lock"] --> B["Valve"]
    B --> C["Drain"]
    C --> D["Truck"]
    style A fill:#f9f,stroke:#333
    style B fill:#ccf,stroke:#333
    style C fill:#cfc,stroke:#333
    style D fill:#fcc,stroke:#333
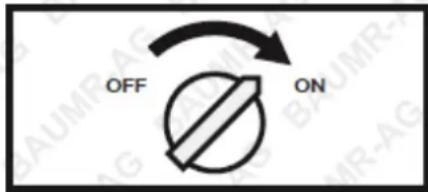
Engine On/Off Switch
The engine switch has two positions.
• OFF - engine will not start or run.
• ON - engine will start and run.
Recoil Starter Handle
The Recoil Starter Handle is used to start the engine.
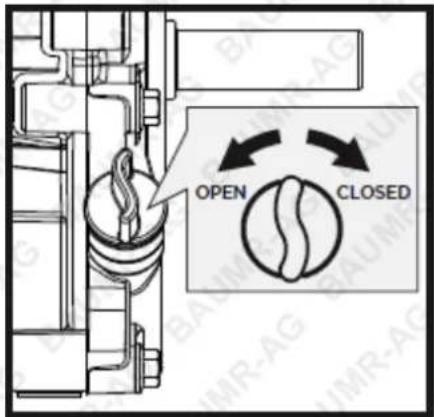
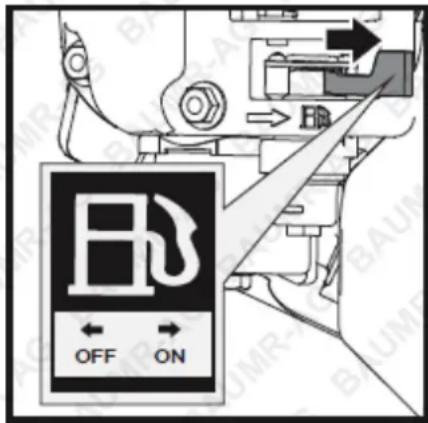
Fuel Shut-Off Valve
The fuel shut – off has two positions.
- CLOSED (EB) - use this position to service, transport, or store the unit.
• OPEN (ED) - use this position to run the unit.
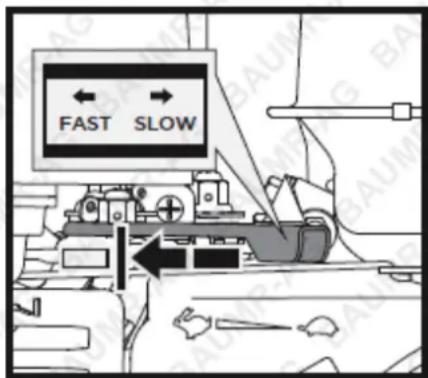
Throttle Control
The throttle control regulates the speed of the engine, and moves between FAST , SLOW , and STOP positions.
The throttle control will shut off the engine when it is moved to the STOP position.
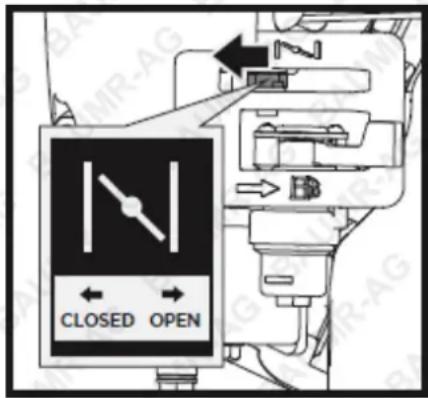
Choke Control
The choke control is used to choke the carburettor and assist in starting the engine. The choke control slides between the CHOKE CLOSED | and CHOKE OPEN | positions.

Never use choke to stop engine.
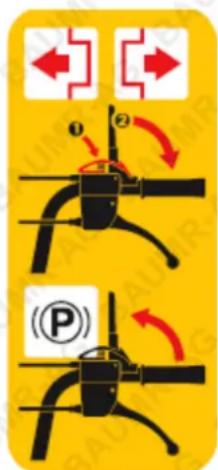
Clutch Control Lever
Squeeze the control lever, clutch engaged. Release the lever, clutch disengaged.
Operation
Adding Oil to the Engine

No oil in the engine originally, but a bottle of engine oil is in scope of delivery. Don't start the engine before adding oil.
- Make sure the mini tracked dumper is on a flat, level surface.
- Remove the oil fill cap/dipstick to add oil.
- Using a funnel, add oil up to the FULL mark on the dipstick. (See engine manual for oil capacity, oil recommendation, and location of fill cap.)

DO NOT OVERFILL. Check engine oil level daily and add as needed.
bar
| Label | Temperature (°F) | Temperature (°C) | |---|---|---| | A | 32 | 40 | | B | -4 | 10 | | C | 104 | -10 | | D | -22 | -30 || A | SAE 30 - Below 40 °F (4 °C) the use of SAE 30 will result in hard starting. |
| B | 10W-30 - Above 80 °F (27 °C) the use of 10W-30 may cause increased oil consumption. Check oil level more frequently. |
| C | Synthetic 5W-30 |
| D | 5W-30 |
Adding Fuel to the Engine

WARNING! Gasoline is highly flammable and explosive. You can be burned or seriously injured when handling fuel. Use extreme care when handling gasoline.
Fill the fuel tank outdoors, never indoors. Gasoline vapors can ignite if they collect inside an enclosure. Explosion can result.
- The engine must be off and allowed to cool at least two minutes before adding fuel.
- Remove the fuel filler cap and fill the tank. (See engine manual for fuel capacity, fuel recommendation, and location of fuel cap).

IMPORTANT: DO NOT OVERFILL! This equipment and/or its engine may include evaporative emissions control system components, required to meet EPA and/or CARB regulations, that will only function properly when the fuel tank has been filled to the recommended level. Overfilling may cause permanent damage to evaporative emission control system components. Filling to the recommended level ensures a vapor gap required to allow for fuel expansion. Pay close attention while filling the fuel tank to ensure that the recommended fuel level inside the tank is not exceeded. Use a portable gasoline container with an appropriately sized dispensing spout when filling the tank. Do not use a funnel or other device that obstructs the view of the tank filling process.
- Reinstall the fuel cap and tighten. Always clean up spilled fuel.
Starting the Engine
- Move the engine switch to the ON position.
- Open the fuel shutoff valve.
- Move the choke lever to the CLOSED position. If the engine is hot, closing the choke is not necessary.
- Move the throttle lever slightly to the FAST speed.
- Pull the recoil starter until the engine starts. Return the recoil to the home position after each pull. Repeat the steps as needed. Once engine has started, set the throttle to the FAST position before you operate the unit.

WARNING! Rapid retraction of the starter cord (kickback) will pull your hand and arm toward the engine faster than you can let go. Broken bones, fractures, bruises, or sprains could result.
Operating
• After the engine warms up, move the throttle lever to accelerate engine speed.
- Engage the required gear and slowly squeeze the clutch control lever. If the gear does not engage immediately, slowly release the clutch lever and try again. In this way the mini tracked dumper will start moving.
- The mini tracked dumper has the steering levers on the handlebars, which makes steering very easy. To turn right or left, simply pull the corresponding right or left steering lever.
- The sensitivity of the steering increases in proportion to the speed of the machine and the load. With an empty machine, a light pressure on the lever is all that is needed to turn. When the machine is fully loaded, more pressure is required.
- The mini tracked dumper has a maximum capacity of 498kg (1100lbs.). However, it is advisable to assess the load and adjust it according to the ground on which the machine will be used.
- It is therefore advisable to cover such stretches using low gear and taking extra care. In such situations, the machine should be kept in low gear for the whole stretch.
- Avoid sharp turns and frequent changes of direction while driving on rough, hard terrains full of sharp, uneven points with a high degree of friction.
- Even though the unit has rubber tracks, remember to be careful when working in adverse weather conditions (ice, heavy rain and snow) or on types of ground that could make the mini tracked dumper unstable.
- Please note that as this is a tracked vehicle, it is subject to a considerable pitching movement when passing over bumps, holes, and steps.
- When the clutch control lever is released, the machine will stop and brake automatically.
- If the machine is stopped on a steep slope, a wedge should be placed against one of the tracks.
Idle Speed
Set the throttle control lever to the SLOW position to reduce stress on the engine when work is not being performed. Lowering the engine speed will help extend the life of the engine, as well as conserve fuel and reduce noise level.
Stop Engine
To stop the engine in an emergency, simply turn the engine switch to the OFF position. Under normal conditions, use the following procedure:
- Move the throttle lever to the SLOW position.
- Let the engine idle for one or two minutes.
- Turn the engine switch to the OFF position.
- Turn the fuel valve lever to the OFF Position.

Sudden stopping at a high speed under a heavy load is not recommended. Engine damage may result. Do not move the choke control to CLOSE to stop the engine. Backfire or engine damage cur.
Maintenance
Maintaining your mini tracked dumper will ensure long life to the machine and its components.
Preventive Maintenance
- Turn off the engine and disengage all command levers. The engine must be cool.
- Keep the engine's throttle lever in its SLOW position and remove the spark plug wire from the spark plug and secure.
- Inspect the general condition of the mini tracked dumper. Check for loose screws, misalignment or binding of moving parts, cracked or broken parts, and any other condition that may affect its safe operation.
- Use a soft brush, vacuum, or compressed air to remove all contaminants from the machine. Then use high quality light oil to lubricate all moving parts.
- Replace the spark plug wire.

Never use a “pressure washer” to clean your unit. Water can penetrate tight areas of the machine and its transmission case and cause damage to spindles, gears, bearings, or the The use of pressure washers will result in shortened life and reduce serviceability.
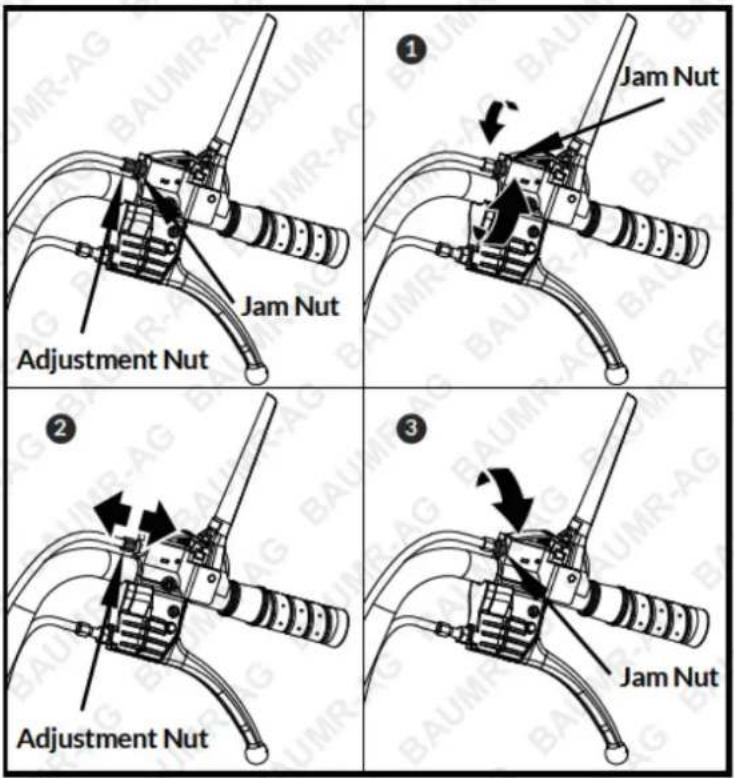
Adjusting the Clutch
When the clutch begins to show wear, the handle reach will become wider, making it more difficult to reach. Follow these steps to return the clutch lever back to its original position.
- Loosen the jam nut by turning it counter clockwise with 10 mm wrench.
- Tighten or loosen the cable by turning the cable adjustment nut clockwise or counter clockwise with 10 mm wrench until you have reached your required tightness.
- Once tightness is set, return the jam nut against the handle to hold the cable in place.
Adjusting the Steering
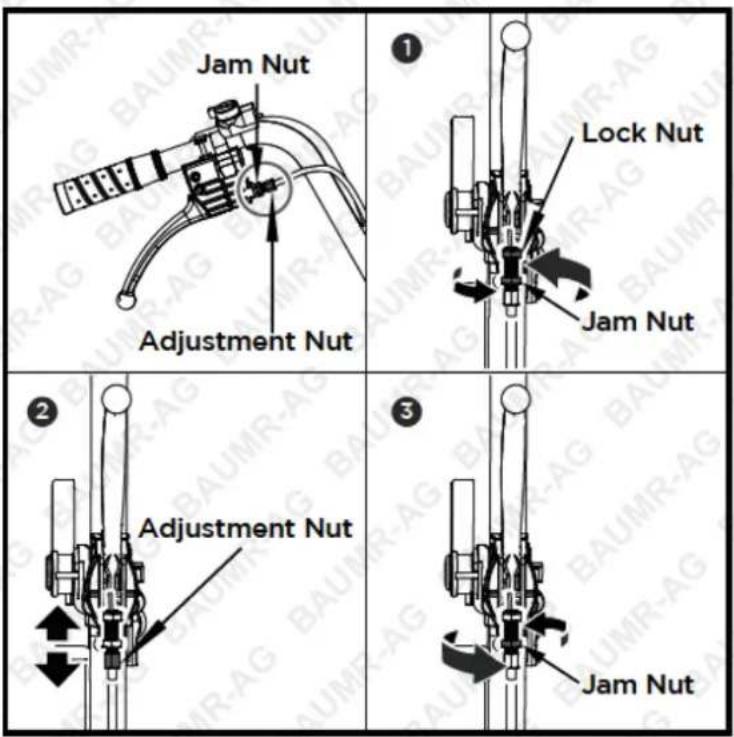
If steering becomes difficult to engage, follow these steps to adjust the cable tension.
- Loosen the jam nut by turning it anti-clockwise with 10mm wrench.
- Tighten or loosen the cable by turning the cable adjustment nut clockwise or anti-clockwise with 10mm wrench until you have reached your required tightness.
- Once tightness is set, return the jam nut against the handle to hold the cable in place.
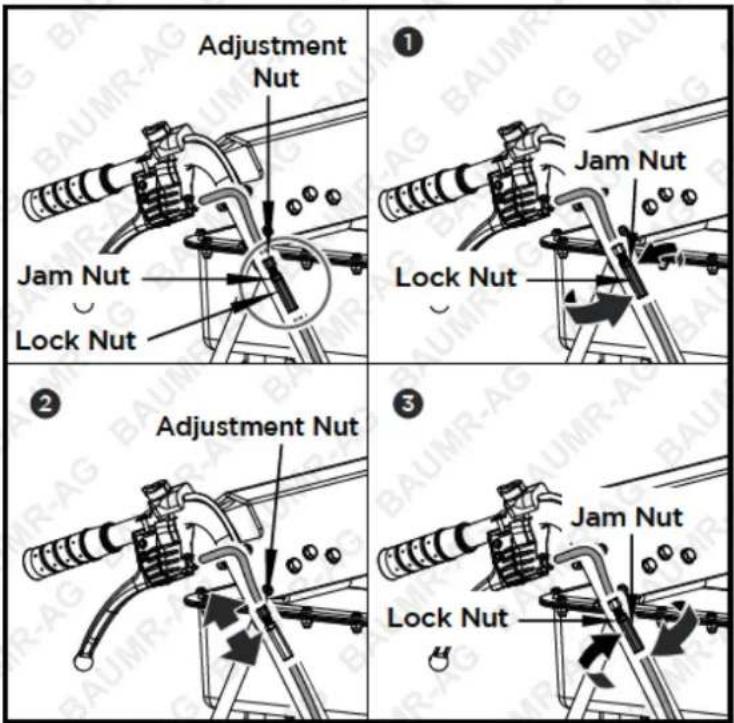
If the above adjustment does not create enough cable tension, follow the steps below:
- Loosen the jam nut by turning it anti-clockwise with 12mm wrench.
- Tighten or loosen the cable by turning the cable adjustment nut clockwise or anti-clockwise with 10mm wrench until you have reached your required tightness.
- Once tightness is set, return the jam nut against the handle to hold the cable in place.
Replacing the Drive Belt
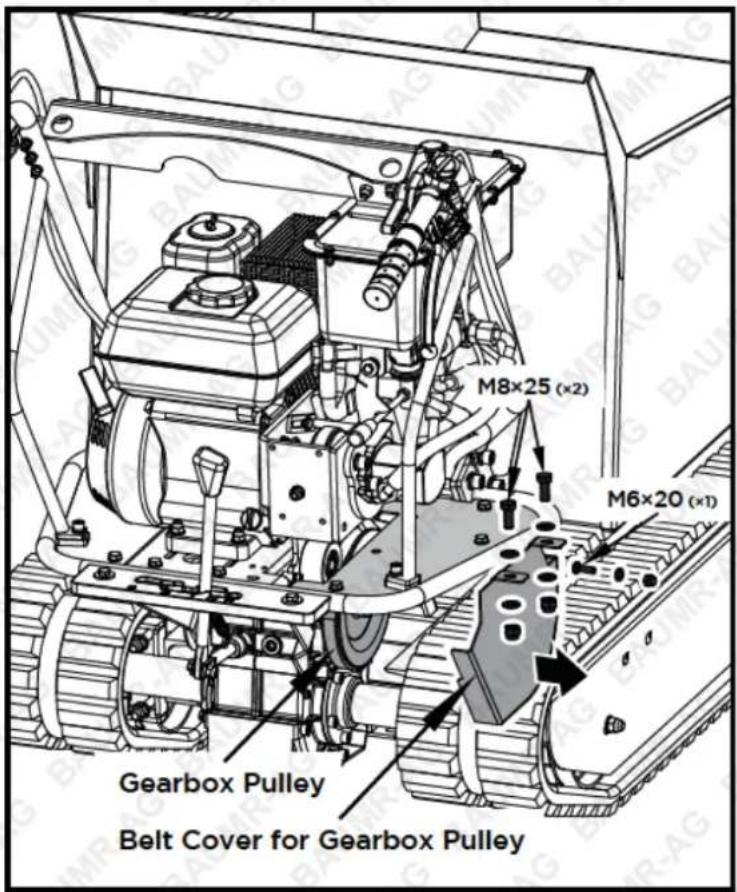
- Remove the three belt covers, as shown.
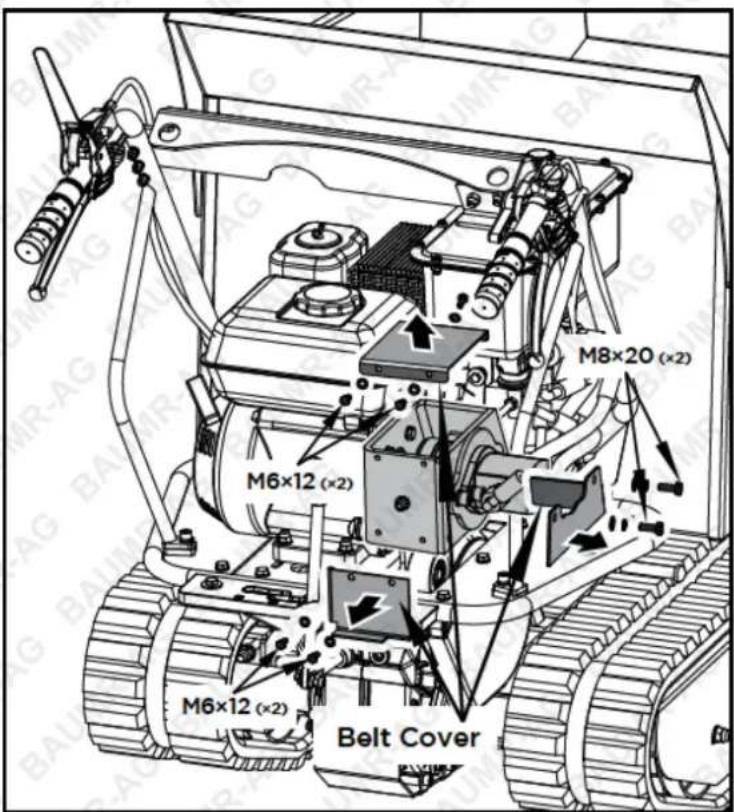
- Remove the belt cover for the gearbox pulley.
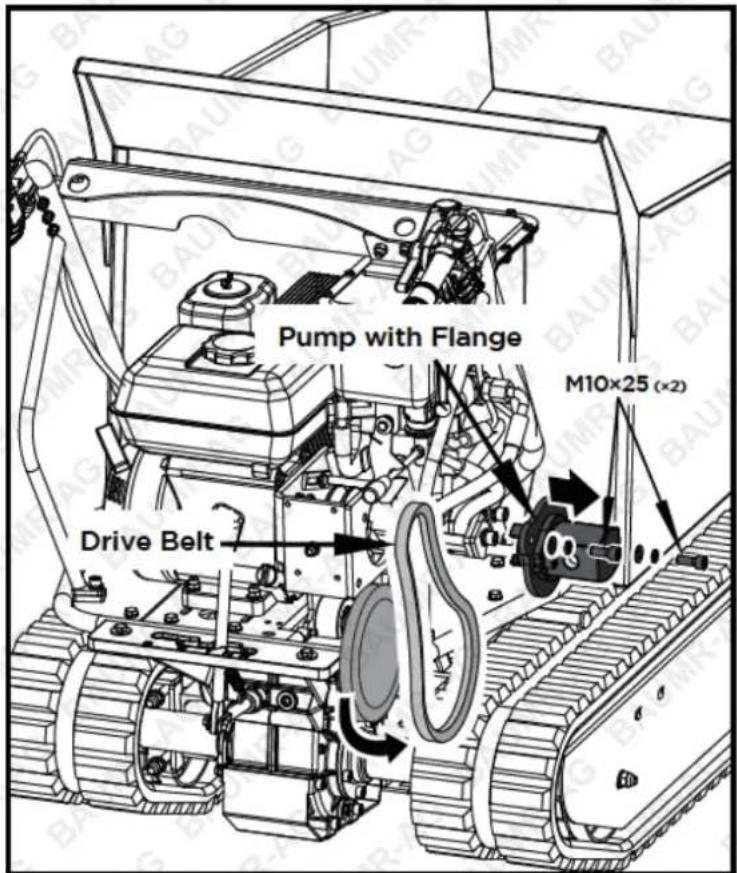
- Disassemble the two M10×25 bolts, spring washers and flat washers, remove the pump with flange. Turn the gearbox pulley and pull out the belt.
Lubrication
General Lubrication
Lightly lubricate all moving parts of the machine at end of the season or every 25 operating hours.
Gearbox Lubrication
- The gearbox is pre-lubricated and sealed at the factory. Unless there is evidence of leakage or service has been performed on the gearbox, no additional lubricate should be required until 50 hours use.
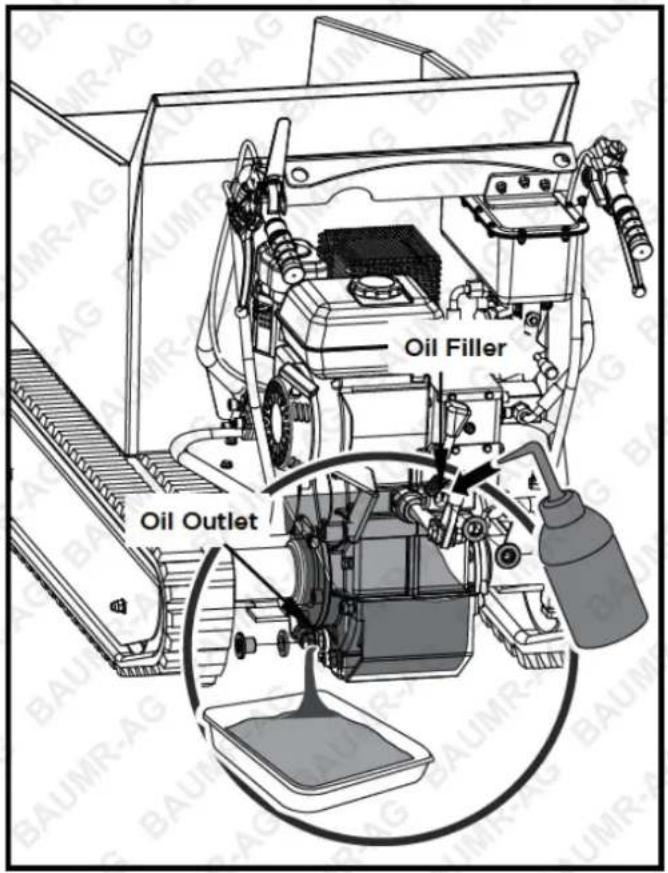
• After first 50 hours use, change all the gear oil. Capacity is 1.5L. - For future use, check the oil level after every 50 hours of use. If you remove the oil level plug and no oil flows out, please add oil and then screw the oil level plug.
• Gear oil GL-5 or GL-6, SAE80W-90 is recommended. Do not use synthetic oil. - When replacing gear oil, the engine must be stopped and still warm. Unscrew the filter cap and the drain plug. When oil is drained, replace the drain plug, fill up with fresh oil, and then replace the filter cap.
Hydraulic Oil
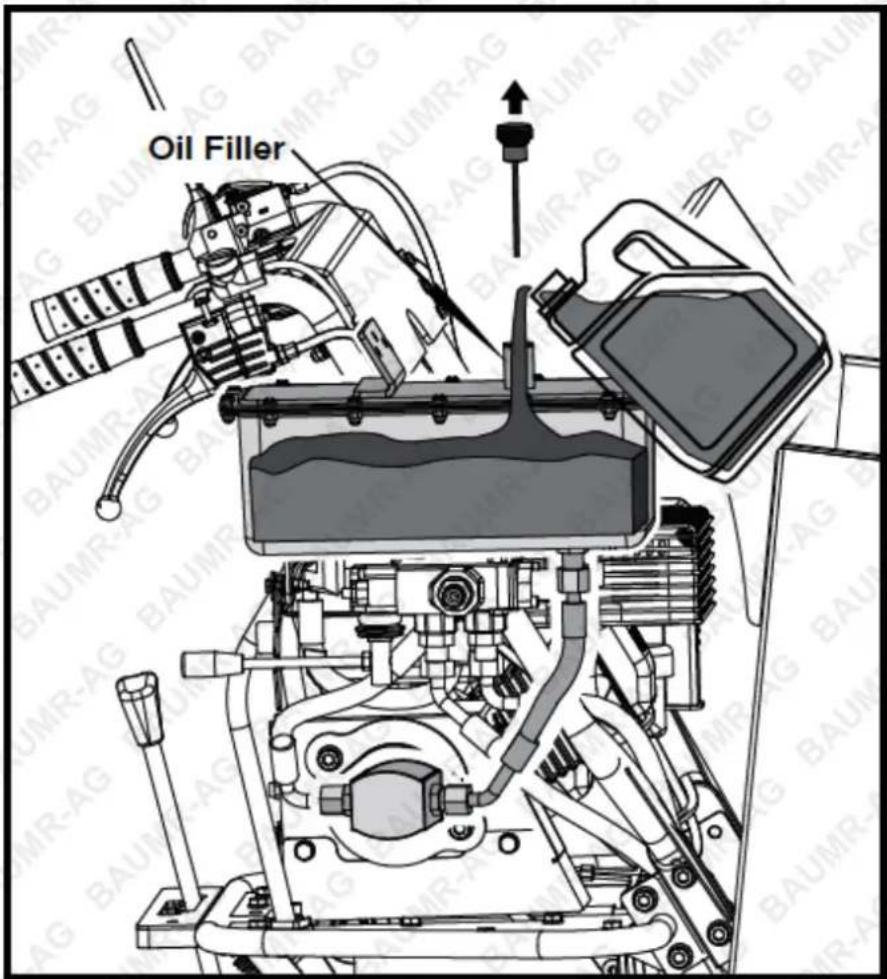
- Unscrew the locking nut to drain the oil into the pan.
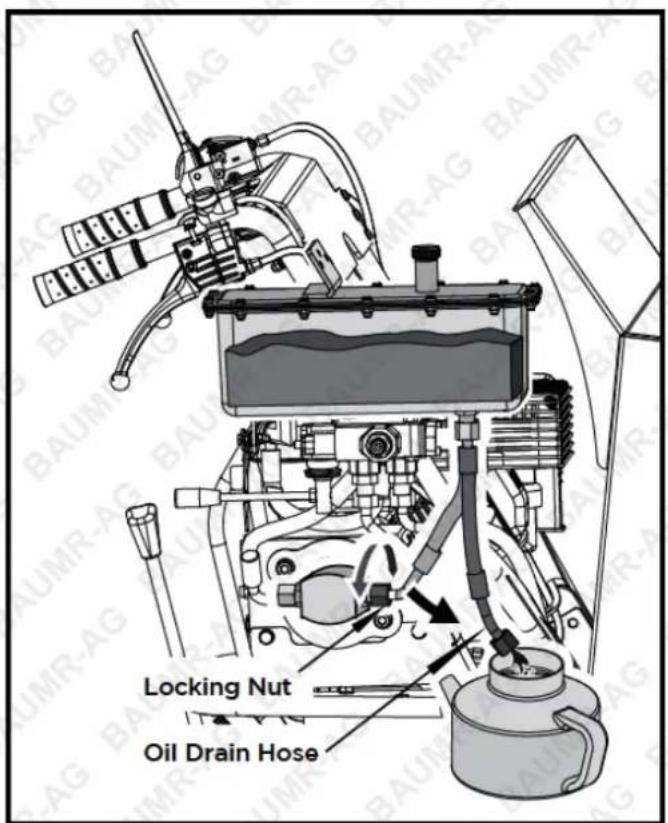
- Remove the oil dipstick and add the oil. The recommended hydraulic oil is 10W AW32, ASLE H-150, or ISO 32. Tank Capacity is 3L.
Tightening the Tracks
With use, tracks tend to loosen. When operating with loose tracks, they tend to slip over the driving wheel causing it to jump its housing, thus damaging wear to the housing. To check track tightness, proceed as follows.
- Set the machine on a flat surface with compact ground, or on asphalt or pavement.
- Lift the machine and set it on blocks or supports rated for the weight of the machine so that the tracks are approximately 10 cm off the ground.
- Measure the track midline vs. the horizontal line. The reading must not be more than 10-15mm.
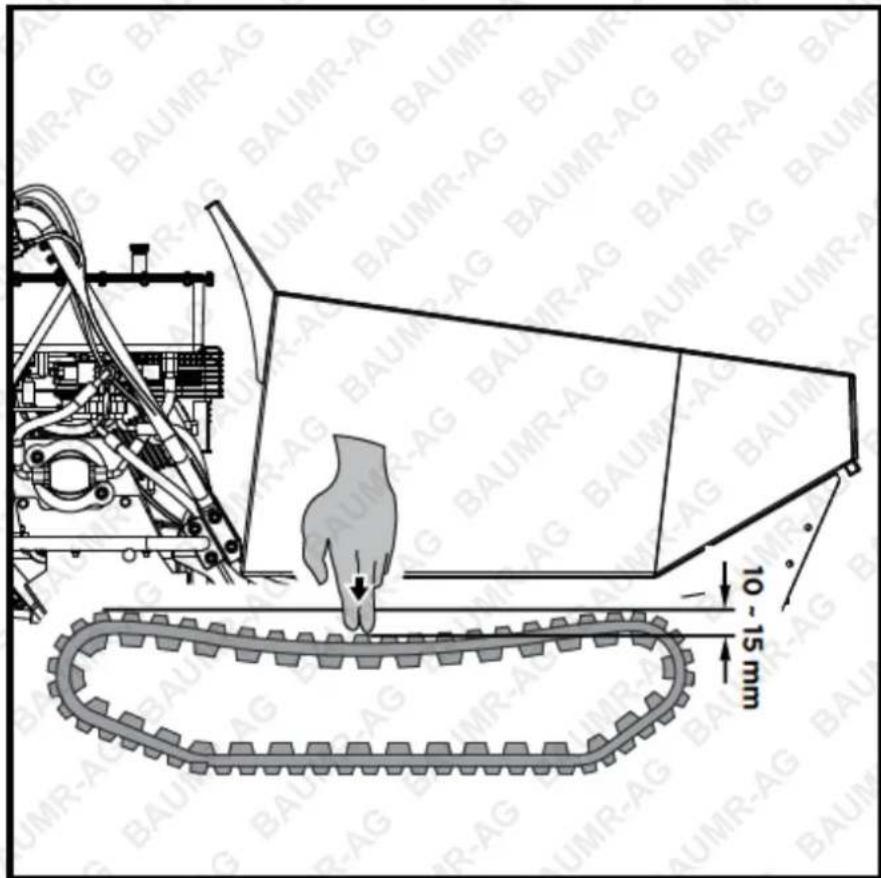
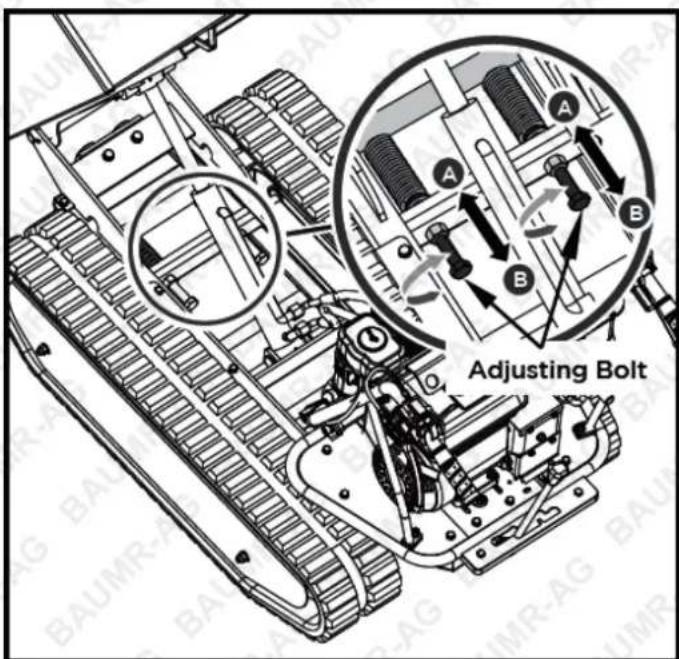
If the distance is greater, proceed as follows.
- Use the tipping handle to tip the hopper and set it on blocks or supports rated for the weight of the box.
- Loosen locknut A.
- Tighten bolt B until the correct tightness is restored.
- Secure bolt B by tightening locknut A thoroughly.
- Return the hopper to its original position.

CAUTION: Do not over-tighten your track. The adjustment of the track and the brakes are linked.
The braking power will lessen the more the track is tightened. If the adjustment bolt has no more adjustment left, the tracks may have to be replaced.
Replacing the Tracks
Check the condition of the tracks periodically. If any track is cracked or frayed, it should be replaced as soon as convenient.
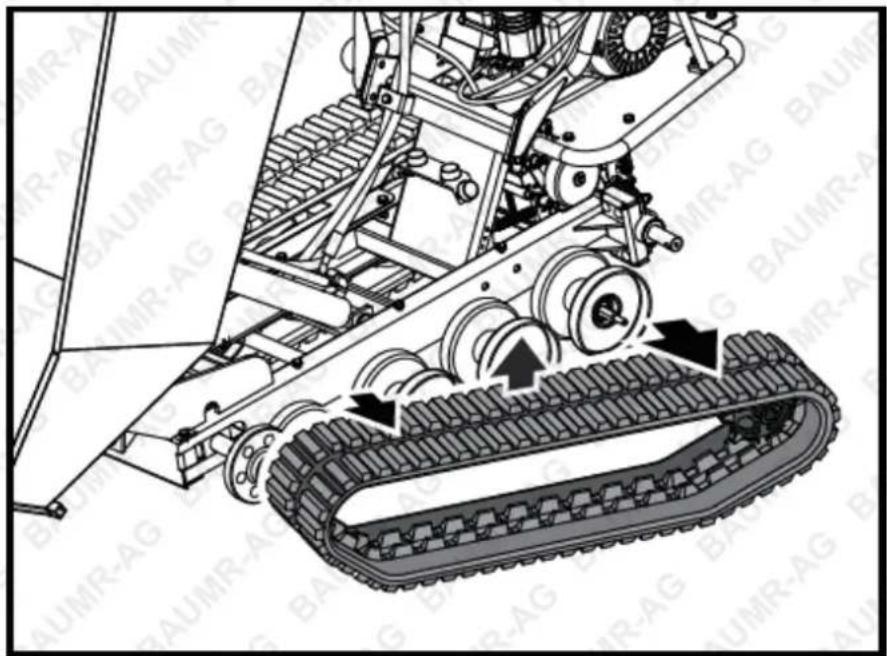
- Lift up the hopper and insert a support rod for safety purposes.
- Lift the machine and set it on blocks or supports rated for the weight of the machine so that the tracks are approximately 10cm off the ground.

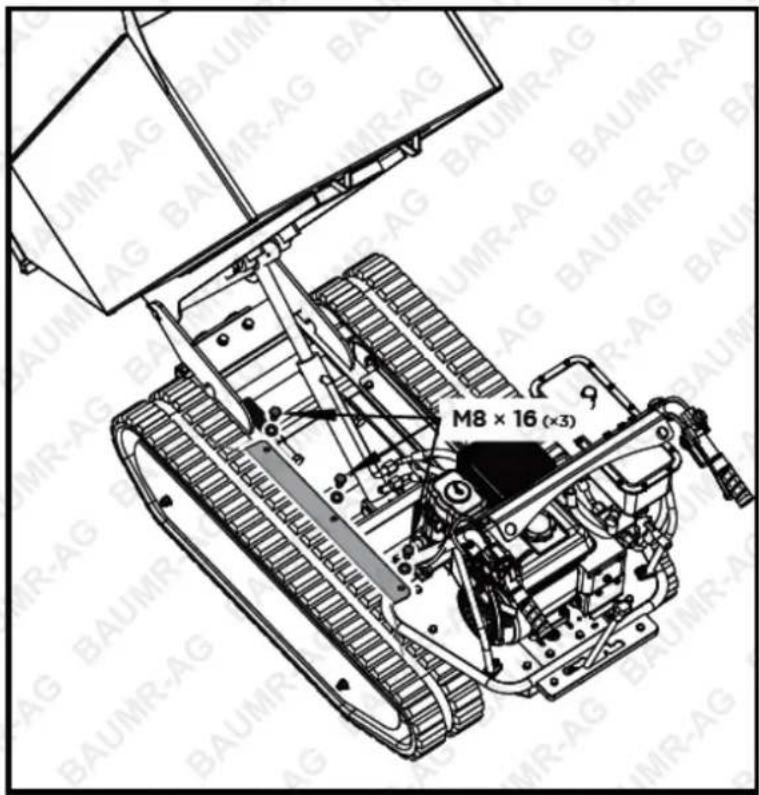
- Remove the three M8×16 bolts and washers that fix the track protection guard.
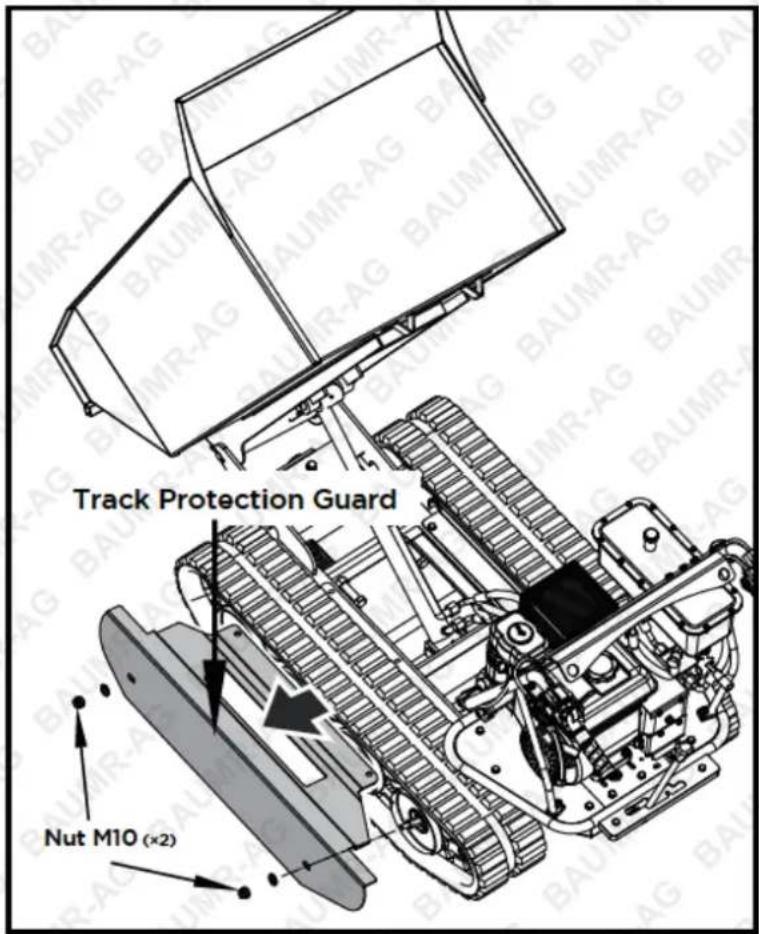
- Remove the two M10 nuts and washers from the side of track protection guard.
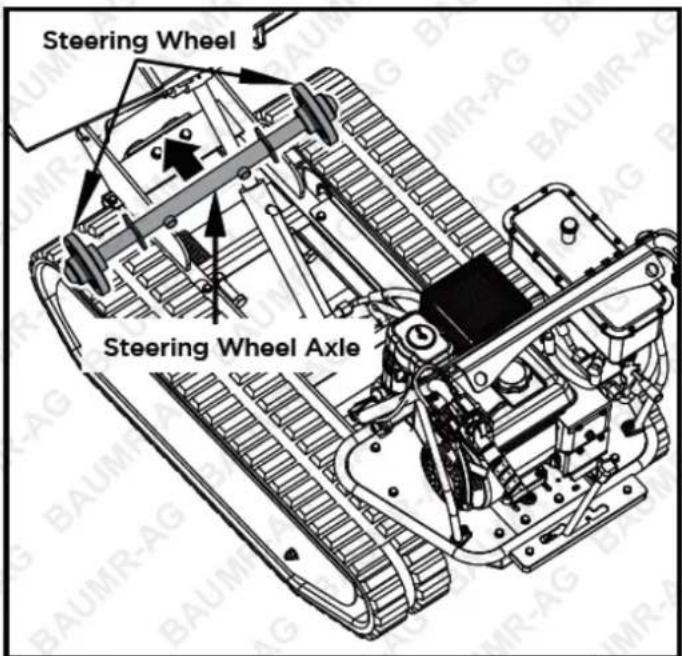
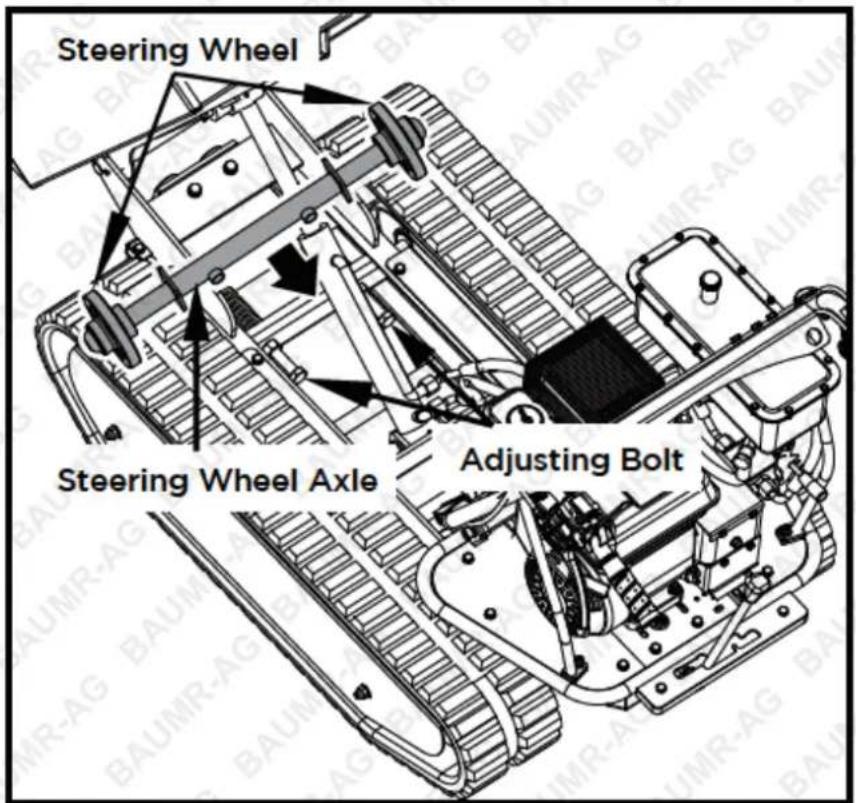
- Loosen the adjusting bolts and pull the steering wheel axle toward the engine, then track will be loosened.
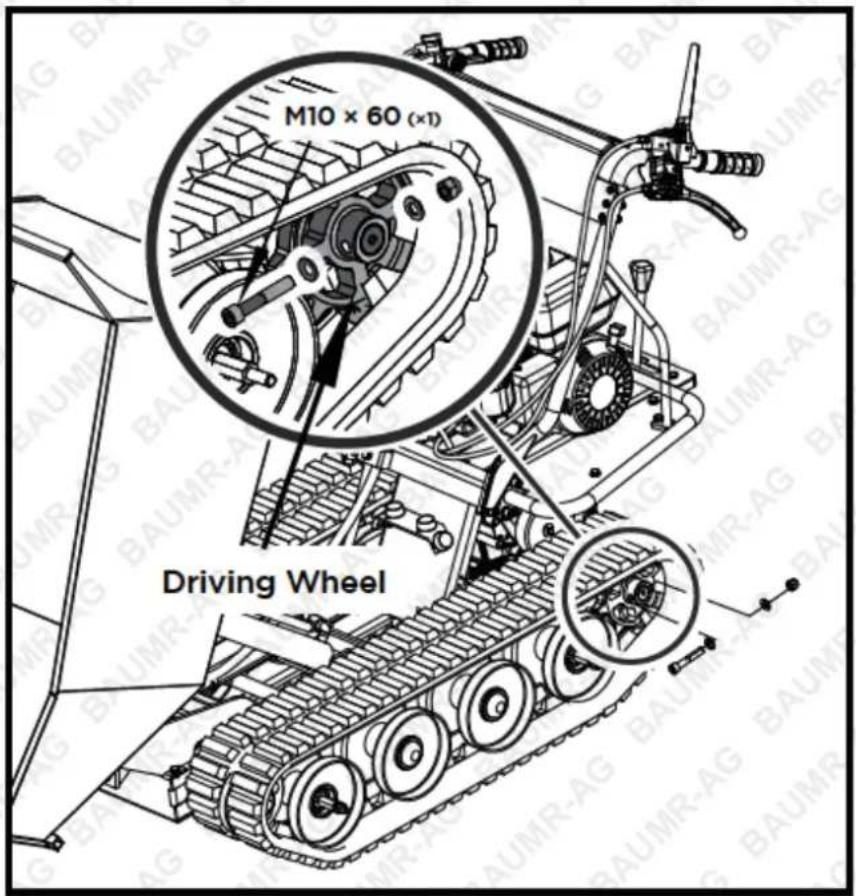
- Remove the M10×60 bolt, washers, and nut from the driving wheel.
- Pull out the whole track with driving wheel.
natural_image
Mechanical assembly diagram showing a tracked vehicle with conveyor belts and mechanical components (no text or symbols)
When removing or installing the tracks, be careful not to get your fingers caught between the track and pulley.
Engine Maintenance
Refer to the Engine Manual included in your unit for the information on engine maintenance. Your engine manual provides detailed information and a maintenance schedule for performing the tasks.
Storage
If the mini tracked dumper will not be used for a period longer than 30 days, follow the steps below to prepare your unit for storage.
- Drain the fuel tank completely. Stored fuel containing ethanol or MTBE can start to go stale in 30 days. Stale fuel has high gum content and can clog the carburettor and restrict fuel flow.
- Start the engine and run until it stops. This helps prevent gum deposits from forming inside the carburettor and possible engine damage.
- While the engine is still warm, drain the oil from the engine. Refill with fresh oil of the grade recommended in the Engine Manual.
- Use a clean cloth to clean off the outside of the machine and to keep the air vents free of obstructions.

Do not use strong detergents or petroleum-based cleaners when cleaning plastic parts. Chemicals can damage plastics.
- Inspect for any loose or damaged parts. Repair or replace damaged parts and tighten loose screws, nuts or bolts.
- Store your unit on flat ground in a clean, dry building that has good ventilation.

Do not store the machine with fuel in a non-ventilated area where fuel fumes may reach flame, sparks, pilot lights or any ignition sources.
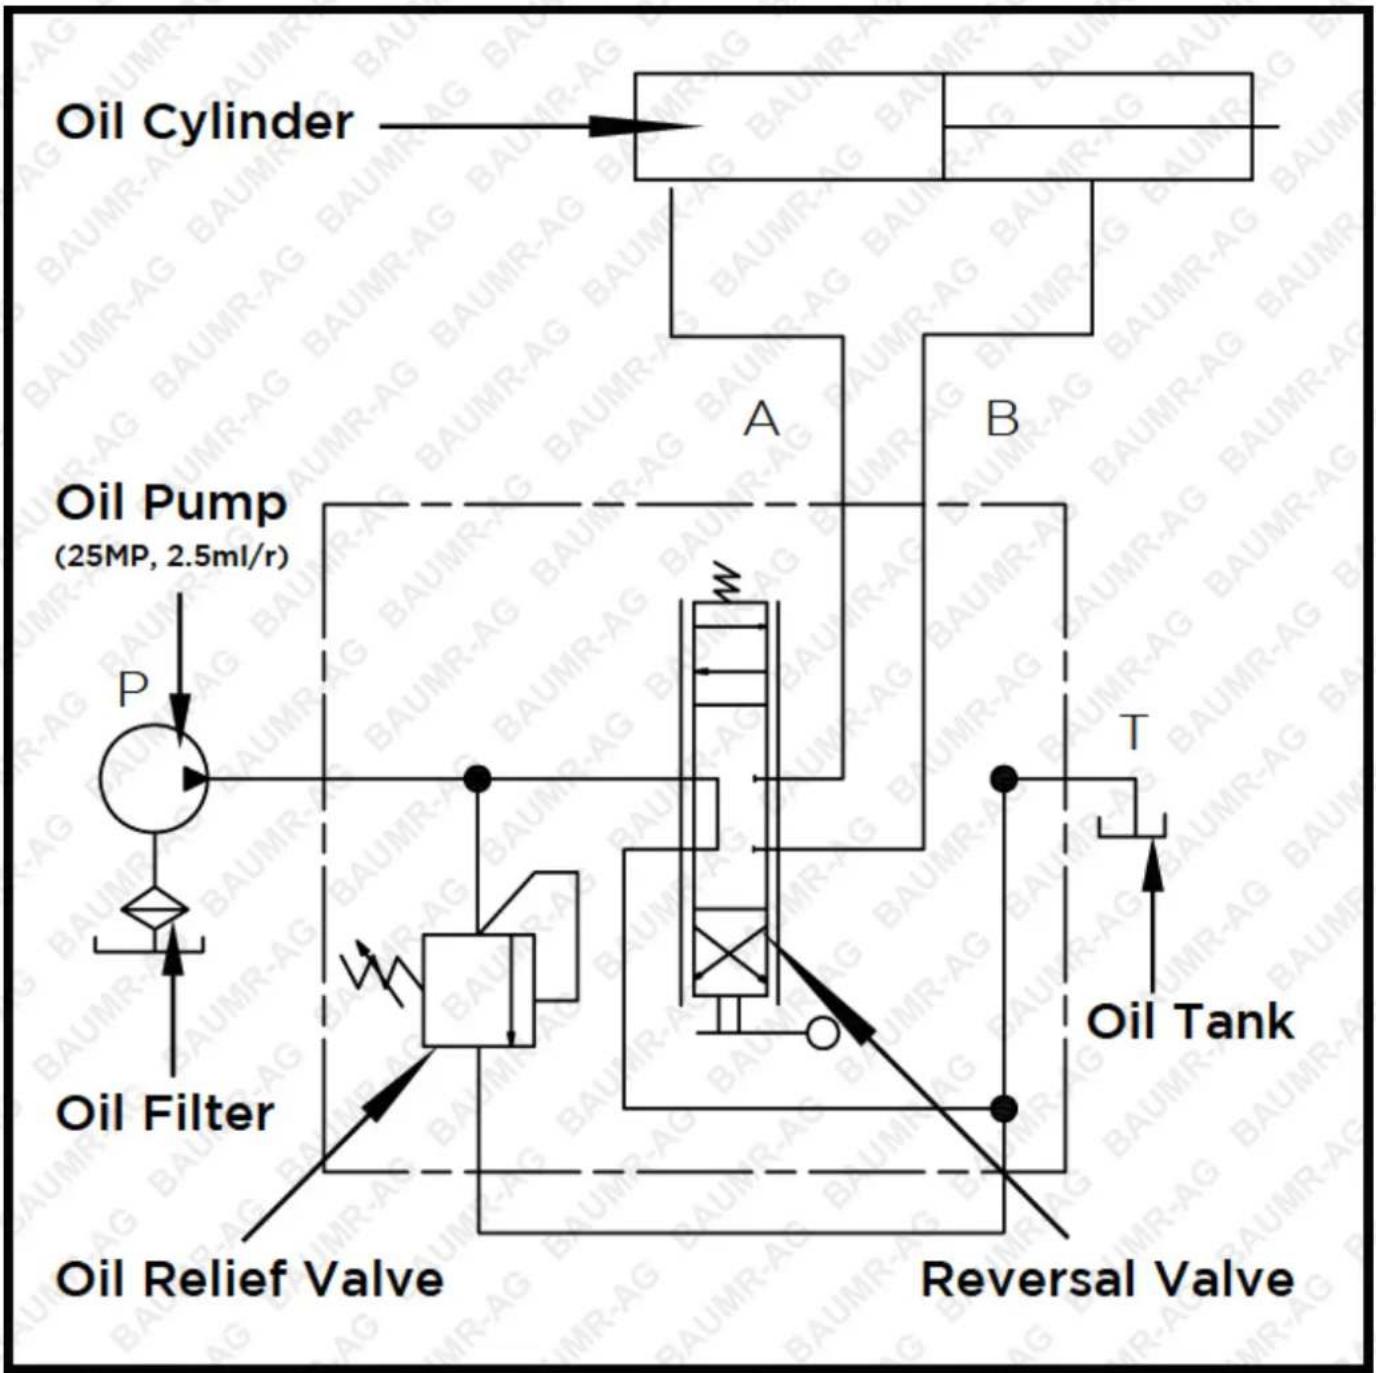
Hydraulic Scheme
flowchart
graph TD
    A["Oil Cylinder"] --> B["Oil Pump (25MP, 2.5ml/r)"]
    B --> C["P"]
    B --> D["Oil Filter"]
    C --> E["Reversal Valve"]
    D --> F["Oil Relief Valve"]
    E --> G["Reversal Valve"]
    F --> H["Oil Tank"]
    style A fill:#f9f,stroke:#333
    style B fill:#ccf,stroke:#333
    style C fill:#cfc,stroke:#333
    style D fill:#fcc,stroke:#333
    style E fill:#cff,stroke:#333
    style F fill:#ffc,stroke:#333
    style G fill:#fcc,stroke:#333
    style H fill:#ffc,stroke:#333
Troubleshooting
Problem Cause Remedy
| Engine fails to start | Spark plug wire is disconnected | Attach spark plug wire securely to spark plug |
| Out of fuel or stale fuel Fill with clean, fresh gasoline | ||
| Engine and/or Fuel valve is not in ON position | Engine and Fuel valve must be in ON position | |
| Choke lever is not in CLOSE position | Choke level must be in CLOSE position for a cold start | |
| Blocked fuel line Clean fuel line | ||
| Fouled spark plug Clean, adjust gap, or replace | ||
| Engine flooding | Wait a few minutes to restart, but do not prime | |
| Belt tension lever is engaged Disengage the belt tension lever | ||
| Engine runs erratically | Spark plug wire is loose | Connect and tighten spark plug Wire |
| Unit running with Choke lever in CLOSE position | Move choke lever to OPEN position | |
| Blocked fuel line or stale fuel | Clean fuel line. Fill tank with clean, fresh gasoline | |
| Vent plugged Clear vent | ||
| Water or dirt in fuel system Drain fuel tank. Refill with fresh fuel | ||
| Dirty air cleaner Clean or replace air cleaner | ||
| Improper carburettor adjustment Refer to engine manual | ||
| Engine overheats | Engine oil level low Fill crankcase with proper oil | |
| Dirty air cleaner Clean air cleaner | ||
| Air flow restricted Remove housing and clean | ||
| Carburettor not adjusted properly | Refer to engine manual | |
| One of the two tracks is blocked | Foreign bodies have worked their way between the track and the frame | Remove the foreign body |
| Machine does not move while engine is running | Gear is not properly selected | Ensure gear lever is not in-between two different gears |
| Driving tracks not tight enough | Tighten driving tracks | |
Specifications
| Suitable Oil Types | SAE 30 / 10W-30 / Synthetic 5W-30 / 5W-30 |
| Engine | Briggs & Stratton CR950 (208cc, 6.5HP OHV 4-Stroke) |
| Emissions Compliance | Euro V |
| Transmission | 3 speed forward and 1 reverse |
| Load Capacity | 500kg |
| Bucket Dimensions | 95 x 68 x 47cm |
| Track Width | 2 x 180mm |
| Max Climb Angle (loaded to capacity) | 20° |
| Motion | Track drive / skid steering |
| Forward Max Speed | 3.5km/h |
| Reverse Max Speed | 1km/h |
| Ground Clearance | 70mm |

Some experts believe that the incorrect or prolonged use of almost any product may cause serious injury or death. To help reduce your risk of serious injury or death, refer to the information below. For more information, see www.datastreamserver.com/safety
- Consult all documentation, packaging, and product labelling before use. Note that some products feature documentation available online. It is recommended to print and retain the documentation.
■ Before each use, check the product for loose/broken/damaged/missing parts, wear, or leaks (if applicable). Never use a product with loose/broken/damaged/missing parts, wear, or leaks.
■ Products must be inspected and serviced (if applicable) by a qualified technician every 6 months. This is based on average residential use by persons of average size and strength, and on a property of average metropolitan size. Use beyond these recommendations may require more frequent inspections/servicing.
■ Ensure that all users of the product have completed a suitable industry recognised training course before being allowed access to the product.
The product has been supplied by a general merchandise retailer that may not be familiar with your specific application or description of application. Be sure to attain third-party approval from a qualified specialist for your application before use, regardless of any assurances from the retailer or its representatives.
This product is not intended for use where fail-safe operation is required. As with any product (for example, automobile, computer, toaster), there is the possibility of technical issues that may require the repair or replacement of parts, or the product itself. If the possibility of such failure and the associated time it may take to rectify could in any way inconvenience the user, business, or employee, or financially affect the user, business, or employee, then the product is not suitable for your requirements. This product is not intended for use where incorrect operation or a failure of any kind, including but not limited to, a condition requiring product return, replacement, parts replacement, or service by a technician may cause financial loss, loss of employee time or an inconvenience requiring compensation.
If this product has been purchased in error when considering the information presented here, contact the retailer directly for details of their returns policy, if required.

edisons
.com.au
©2022 Baumr-AG. All rights reserved. No part of this document, including descriptive content, concepts, ideas, diagrams, or images may be reproduced or transmitted in any form or by any means, electronic or mechanical, including photocopying, scanning, or recording, or any information storage and retrieval system, without express permission or consent from the publisher.
- Safety
- General Work Area Safety
- General Personal Safety
- General Fuel Safety
- General Carbon-Monoxide Safety
- General Equipment Use and Care
- General Electrical Safety
- General Service Information
- Understand Your Machine
- Personal Safety
- Inspect Your Machine
- Engine Safety
- Fuel Safety
- Specific Safety Rules
- Safety Symbols
- Table of Contents
- Safety 2
- Unpacking the Container 8
- Contents Supplied....9
- Assembly of Optional Accessories....10
- Features and Controls....14
- Operation....18
- Maintenance....22
- Storage 34
- Hydraulic Scheme....35
- Troubleshooting ....36
- Specifications ....37
- Unpacking the Container
- Contents Supplied
- Assembly of Optional Accessories
- Plow Blade (Optional)
- Engine Oil
- Gear Selection Lever
- Left/Right Steering Lever
- Hydraulic Tipping Handle
- Engine On/Off Switch
- Recoil Starter Handle
- Fuel Shut-Off Valve
- Throttle Control
- Choke Control
- Clutch Control Lever
- Operation
- Adding Oil to the Engine
- Adding Fuel to the Engine
- Starting the Engine
- Operating
- Idle Speed
- Stop Engine
- Maintenance
- Preventive Maintenance
- Adjusting the Clutch
- Adjusting the Steering
- Replacing the Drive Belt
- Lubrication
- General Lubrication
- Gearbox Lubrication
- Hydraulic Oil
- Tightening the Tracks
- Replacing the Tracks
- Engine Maintenance
- Storage
- Hydraulic Scheme
- Troubleshooting
- Some experts believe that the incorrect or prolonged use of almost any product may cause serious injury or death. To help reduce your risk of serious injury or death, refer to the information below. For more information, see www.datastreamserver.com/safety
- edisons
Brand : Baumr-AG
Model : BPR980
Category : Mini dumper