
UE1205CB - Network card / adapter StarTech.com - Free user manual and instructions
Find the device manual for free UE1205CB StarTech.com in PDF.


| Product Type | Fast Ethernet PC Card (CardBus) |
| Model | UE1205CB |
| Standards | IEEE 802.3 (10BaseT), IEEE 802.3u (100BaseTX) |
| Bus Interface | 32-bit CardBus (PCMCIA Type II) |
| Data Transfer Rate | 10/100 Mbps (auto-negotiation) |
| Duplex Support | Full and half-duplex |
| Power Consumption | +3.3V DC; 107 mA (10Mbps), 104 mA (100Mbps) |
| LED Indicators | Link 10 (green), Link 100 (green), Act (orange) |
| Operating Temperature | 0°C to 60°C (32°F to 140°F) |
| Storage Temperature | -20°C to 70°C (-4°F to 158°F) |
| Operating Humidity | 10% to 90% (non-condensing) |
| Emissions Compliance | FCC Part 15 Class B, CE Class B |
| Dimensions (approx.) | 85.6 x 54.0 x 3.3 mm (3.37 x 2.13 x 0.13 in) |
| Weight (approx.) | 20 g (0.7 oz) |
| System Requirements | 486+ notebook, open Type II slot, PCMCIA 2.1, Windows 95/98/Me/2000/XP/NT, etc. |
| Warranty | Lifetime |
| Plug and Play | Yes |
| Auto-Negotiation | Yes |
| Bus Mastering | 32-bit bus-mastering |
| Package Contents | CardBus PC card, driver disk |
Frequently Asked Questions - UE1205CB StarTech.com
User questions about UE1205CB StarTech.com
0 question about this device. Answer the ones you know or ask your own.
Ask a new question about this device
Download the instructions for your Network card / adapter in PDF format for free! Find your manual UE1205CB - StarTech.com and take your electronic device back in hand. On this page are published all the documents necessary for the use of your device. UE1205CB by StarTech.com.
USER MANUAL UE1205CB StarTech.com
Fast Ethernet PC Card
CardBus 10/100 Fast Ethernet PC Card

UE1205CB
Instruction Guide
StarTech.com

FCC COMPLIANCE STATEMENT
This equipment has been tested and found to comply with the limits for a Class B digital device, pursuant to part 15 of the FCC Rules. These limits are designed to provide reasonable protection against harmful interference in a residential installation. This equipment generates, uses and can radiate radio frequency energy and, if not installed and used in accordance with the instructions, may cause harmful interference to radio communications. However, there is no guarantee that interference will not occur in a particular installation. If this equipment does cause harmful interference to radio or television reception, which can be determined by turning the equipment off and on, the user is encouraged to try to correct the interference by one or more of the following measures:
- Reorient or relocate the receiving antenna.
- Increase the separation between the equipment and receiver.
- Connect the equipment into an outlet on a circuit different from that to which the receiver is connected.
- Consult the dealer or an experienced radio/TV technician for help.
Technical Support
The following technical resources are available for this StarTech.com product:
On-line help:
We are constantly adding new information to the Tech Support section of our web site. To access this page, click the Tech support link on our homepage, www.startech.com. In the tech support section there are a number of options that can provide assistance with this card.
Knowledge Base - This tool allows you to search for answers to common issues using key words that describe the product and your issue.
FAQ - This tool provides quick answers to the top questions asked by our customers.
Downloads - This selection takes you to our driver download page where you can find the latest drivers for this product.
Call StarTech.com tech support for help: 1-519-455-4931
Support hours: Monday to Friday 9:00AM to 5:00PM EST (except holidays)
Warranty Information
This product is backed by a lifetime warranty. In addition StarTech.com warrants its products against defects in materials and workmanship for the periods noted below, following the initial date of purchase. During this period, the products may be returned for repair, or replacement with equivalent products at our discretion. The warranty covers parts and labor costs only. StarTech.com does not warrant its products from defects or damages arising from misuse, abuse, alteration, or normal wear and tear.
Limitation of Liability
In no event shall the liability to StarTech.com Ltd. (or its officers, directors, employees or agents) for any damages (whether direct or indirect, special, punitive incidental, consequential, or otherwise), loss of profits, loss of business, or any pecuniary loss, arising out of related to the use of the product exceed the actual price paid for the product.
Some states do not allow the exclusion or limitation of incidental or consequential damages. If such laws apply, the limitations or exclusions contained in this statement may not apply to you.
6
- A dialog box will occur prompting you to adjust the driver's settings. Choose the "Memory Address", "IRQ Number", and "Connection Type" for the card. Click OK. The installation procedure will begin.
- When the Network window reappears, click Bindings. Choose your bindings. Do the same for Protocols and Services. Click OK.
- Click Close and reboot your computer. After NT restarts, be sure to log in.
Monitoring Your PC Card
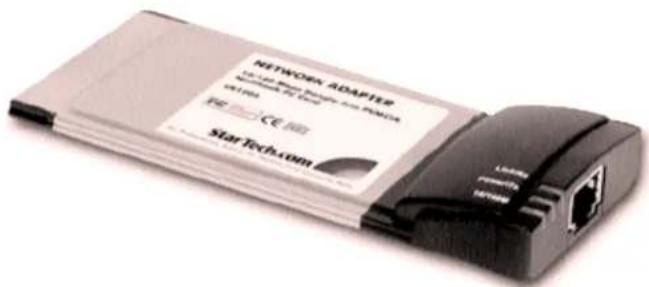
The three LEDs on the front of the card are your best indication of what the card is doing.
| LED | Colour | Status |
| Link 10 | Green | Card is in 10 Mbps mode |
| Link 100 | Green | Card is in 100 Mbps mode |
| Act | Orange | Network activity |
Specifications
| Standards IEEE 803.2 and 802.3u | |
| Power | +3.3V DC10M: 107mA max100M 104mA max |
| LEDs Link 10, Link 100, Act | |
| Operating Temperature | 52°F to 140°F (0°C to 60°C) |
| Storage Temperature -4°F to 158°F (-20°C to 70°C) | |
| Operating Humidity 10% to 90% (non condensing) | |
| Emission FCC (Part 15 Class B), 1998 CE Mark (Class B) | |
Table of Contents
Introduction 2
Installation ....3
Installing the Drivers ....3
Monitoring Your PC Card ....6
Specifications ....6
Technical Support 7
Warranty Information ....7
Introduction
Thank you for purchasing a StarTech.com CardBus 10/100 Fast Ethernet PC Card. This 32-bit card connects your notebook computer to your Ethernet LAN and experience super-fast transfer speeds of up to 100Mbps. Full duplex support means that the card can simultaneously transmit and receive information at these high speeds. The card is a snap to install and set up and is fully Plug and Play compatible in a wide range of operating environments.
Features
- Complies with 10BaseT Ethernet and 100BaseTX Fast Ethernet standards
- Capable of full- and half-duplex communications
- Complies with Plug and Play specifications
• 32-bit bus-mastering data transfer
• Auto-negotiation function determines the optimal transmission rate - Backed by StarTech.com's lifetime warranty
Before You Begin
To ensure a quick and easy card installation, please read through this section carefully before attempting to install the card.
System Requirements
- An IBM compatible notebook computer with a 486 or higher processor
• An open Type II PC Card socket - PCMCIA release 2.1 compliant Card Services and Socket Services (usually already installed on notebook computers. Check your notebook's user guide for details)
- One of the following operating environments: Windows 95/98/Me/2000/XP, Microsoft Windows NT 3.5x/NT 4.0, Microsoft Windows for Workgroups 3.11, Novell NetWare 3.x/4.x, Microsoft LAN Manager, Packet Driver Applications, Windows 3.1, Lantastic 6.0
Contents
This package should contain:
- 1 x CardBus PC card
- 1 x driver disk
- Select "Search for a suitable driver for my device (recommended)" and click Next.
- Select "Floppy disk drives" and insert the driver disk into your floppy drive. Click Next.
- Once the appropriate driver has been found, click Next.
- You may see a "Digital Signature Not Found" window. Click Yes to continue.
- When installation is complete, click Finish.
Windows XP
- Windows XP will automatically detect the new hardware. At the Found New Hardware Wizard window, insert the driver disk into the floppy disk drive and click Next start to search floppy drive A for network driver.
- Click Continue Anyway. Windows XP will begin installing the driver.
- Click Finish.
Window NT 3.5
- From Control Panel, choose Network Setup.
- Click Add Adapter.
- Select "
Requires disk from manufacturer". - Insert the driver diskette into your floppy drive and type "A:\".
- Select "CardBus Fast Ethernet Attached Port PC Card" from the list.
- Set "Memory Address", "IRQ Number", and "Connection Type" to the desired settings from the lists of free resources available. Click OK.
- Click OK to exit network setup.
- Reboot your computer.
Windows NT4.0
- From Control Panel choose Network Setup.
- Click Adapters.
- Click Add, followed by Have Disk. Insert the driver disk into your floppy drive. When asked to supply the path to the disk, type "A:\" and click OK.
4
- Click OK to restart the computer.
- Go to the Network tab again and set up your Clients, Protocols, and Services.
- Restart your computer again.
Windows 95 OSR2
- Windows will automatically detect the new hardware device. Click Next.
- Click Other Locations.
- Insert the driver disk into your floppy drive. Type "A:\". The installation procedure will now begin. You may be required to insert your Windows 95 disk(s).
- When installation is complete, go to the Control Panel and click the Network tab. Set up your Clients, Protocols, and Services, then restart your computer.
Windows 98
- Windows 98 will automatically detect the new hardware device and prompt you to insert the device driver. Insert the driver disk into your floppy drive and click Next.
- Select "Search for the best driver for your device (Recommended)" and click Next.
- Select "Floppy disk drives" and click Next.
- Click Next to begin the installation. You may be required to insert your Windows 98 CD.
- Click Finish when the installation is complete and reboot your computer.
Windows Me
- Windows Me will automatically detect the new hardware device. Select "Specify the location of the driver (Advanced)" and click Next.
- Choose "Specify a location" and click Browse. Select your floppy drive and click Next.
- Click Next when Windows has found the driver. The installation procedure will begin.
- Click Finish when the installation has completed and reboot your computer.
Windows 2000
- Windows will automatically detect the new hardware device. Click Next.
3
Installation
This section will guide you through the installation of your notebook card and the related software. Please read through the instructions carefully and complete each step in the order listed.
Installing the Card
- Locate the PC slot on your notebook. Consult your notebook's user manual if you require assistance.
- Slide the card gently into the slot until it is well seated.
- Attach the card to your Ethernet hub/switch using a Category 5 UTP patch cable (not included).
NOTE: StarTech.com carries a wide range of Ethernet cables in various colors and lengths. For more information on these products, as well as tips and ideas for setting up and running your network, visit http://www.startech.com and click on the Networking Tab near the top of the screen.
Installing the Drivers
The following instructions are intended to help you install the necessary software drivers that accompany your PC card. Depending on how your computer is set up, the installation procedure might not be exactly as described. If you encounter difficulties while trying to install your drivers, please contact our Technical Support department.
NOTE: The following are installation instructions for Windows OS. If you are using Netware, Packet Driver, or any other supported environment, consult the driver installation instructions available in text form on the driver disk.
Windows 95 (Native)
NOTE! If you are unsure what version of Windows 95 you are running, go to Control Panel and select the General tab. If your system is listed as Microsoft Windows 95 4.00.950 or 4.00.950A, you are running Windows 95 Native. If your system is listed as 4.00.950B, you are running OSR2 Windows.
- Go to Control Panel and click the Network tab.
- Click Add.
- Double-click Adapter.
- Double-click Have Disk. Insert the driver disk into your floppy drive.
- Type "A:\" and click OK.
- Select "CardBus Fast Ethernet 10/100 Adapter manual load" and click OK.
- The Network window will reopen. Click OK. The installation procedure will begin. You may be required to insert your Windows 95 disk(s).
- Fast Ethernet PC Card
- FCC COMPLIANCE STATEMENT
- Technical Support
- On-line help:
- Warranty Information
- Limitation of Liability
- Monitoring Your PC Card
- Specifications
- Table of Contents
- Introduction
- Features
- Before You Begin
- System Requirements
- Contents
- Windows XP
- Window NT 3.5
- Windows NT4.0
- Windows 95 OSR2
- Windows 98
- Windows Me
- Windows 2000
- Installation
- Installing the Card
- Installing the Drivers
- Windows 95 (Native)
Brand : StarTech.com
Model : UE1205CB
Category : Network card / adapter