
PLCMHD80 - Television Pyle - Free user manual and instructions
Find the device manual for free PLCMHD80 Pyle in PDF.


| Product Type | Television |
| Brand | Pyle |
| Model | PLCMHD80 |
| Display Technology | LED |
| Screen Size | 32 inches |
| Resolution | 1366 x 768 (HD) |
| Dimensions (W x H x D) | 73 x 44 x 8 cm |
| Weight | 5.5 kg |
| Power Supply | AC 100-240V, 50/60Hz |
| Power Consumption | 60W |
| Connectivity | 2x HDMI, 1x USB, 1x VGA, 1x Antenna, 1x Audio Out |
| Built-in Speakers | 2 x 8W |
| Smart Features | Not smart (non-smart TV) |
| VESA Mount | 200 x 200 mm |
| Cleaning Instruction | Use a soft, dry cloth; avoid liquid cleaners |
| Safety Features | Overload protection, ventilation slots |
| Included Accessories | Remote control, stand, screws, user manual |
| Repairability | Contact Pyle customer service for repairs |
Frequently Asked Questions - PLCMHD80 Pyle
User questions about PLCMHD80 Pyle
0 question about this device. Answer the ones you know or ask your own.
Ask a new question about this device
Download the instructions for your Television in PDF format for free! Find your manual PLCMHD80 - Pyle and take your electronic device back in hand. On this page are published all the documents necessary for the use of your device. PLCMHD80 by Pyle.
USER MANUAL PLCMHD80 Pyle
natural_image
Exterior view of a Mercedes-Benz sedan parked on a beach with mountainous background (no signage)PLCMHD80
To insure best use of the unit, please read the user's manual carefully
CAUTION
- Do not use any damaged or leaking battery, if using a battery to power.
- Do not expose this product to direct sunlight, heat or extreme humid conditions.
- Keep the unit away from strong/direct light while using this product so as to obtain the clearest and the most colorful picture. Please use sun shade for outdoor use.
- Please avoid heavy impacts or dropping the unit, handle with care.
- Do not use chemical solutions to clean this unit, Please simply wipe with a clean soft cloth.
- Do not attempt to take apart or repair the unit by yourself, to avoid damage the product.
Features
HD 1080p Picture
Universal Multi-Function Video Monitor
Field Monitor: Acts as a Sub-Monitor for a Bigger Picture
7-inch Hi-Res Display Screen
Lightweight, Compact & Portable
Input Interface: HDMI, AV, USB, OSD Controller, Headphone Jack (3.5mm)
Front Panel Button Control Center
(4) Custom Settings Function Buttons
Built-in Speaker
Digital Zoom Ability
Works with DSLR Cameras, Video Cameras, Digital Cameras, etc.
Brightness, Contrast, Saturation, Sharpness, Color Temp, Tint Adjustable
Screen Modes: Screen Marker, Center Marker, Picture Freeze, Mirror Flip
Includes Wall Power Adapter (*Rechargeable Battery Not Included)
What's in the Box:
Field Monitor
Detachable (Long) Leather Sunshade
Detachable (Short) Sunshade
Shoe Mount Camera Clip
HDMI Cable & Cable Clamp
Wall Power Adapter
CONTENTS
- Product description 3
- Operation instruction 7
- Technical parameters 11
- Trouble shooting 11
1. Product description
1. 1 Front view:
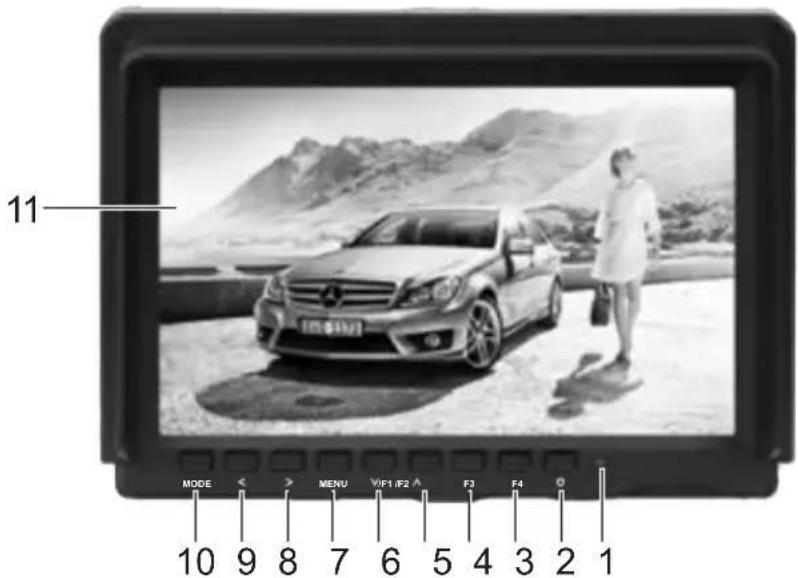
-
Power indicator light: when power on/standby, it turns red; when signal in, it turns green.
-
⏻: Power on/off
-
F4:custom button, enter secondary menu item f(self-defined button), then self-define the function that user need
-
F3: custom button same as F4 operation
-
^/F2: Multi button. in OSD Menu for up adjustment, it can be custom button when not in OSD, See F4.
-
v/F1: Multi button. in OSD Menu for down adjustment, it can be custom button when not in OSD, See F4.
-
MENU: Menu button
-
: Volume up, in OSD menu to increase the value of analog in the menu.
-
<: Volume down, in OSD menu to decrease the value of analog in the menu.
-
MODE: Signal Switch Button.
-
LCD Display.
1.2 Rear view:
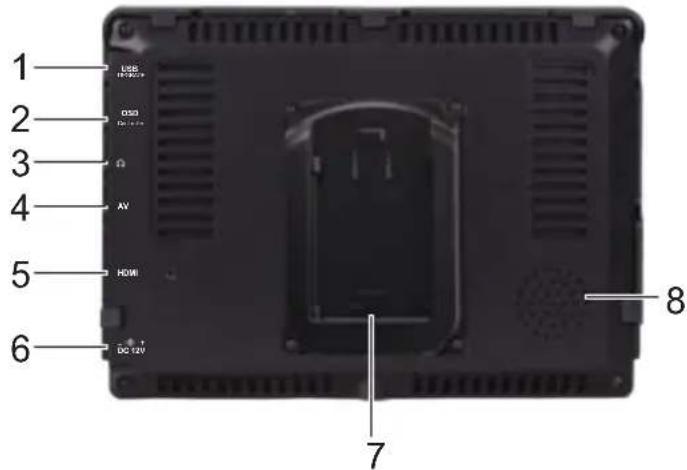
- USB Update Port.
- OSD Controller input, Can insert OSD Controller into this port, to have a remote operation on the parameters of the monitor.
- Earphone insert.
- AV: AV signal input, to input the AV signal into the monitor through the assorted port.
- HDMI: HDMI (High Definition Multimedia Interface) signal input.
- DC 12V :DC power input interface, pole of the power should match the image.
- Battery Plate (Only compatible with Canon LP-06).
- Built-in Speaker
1.4 HDMI Lock
- HDMI locking plate
- Locking screw

natural_image
Black rectangular object with a small circular component, labeled with numbers 1 and 2 (no text or symbols on the object itself)To use HDMI locking plate to lock the plug of HDMI cable, then put the locking plate close to the monitor, and finally bolt the locking screw to lock the plate with the monitor. As the picture below (arrow direction)

natural_image
Close-up of a black electronic device with ventilation grille and cable connector (no visible text or symbols)1.5 Sunshade

natural_image
Two black plastic clip components with triangular and rectangular features, no text or symbols visible① Sunshade 2 Sunshade Frame
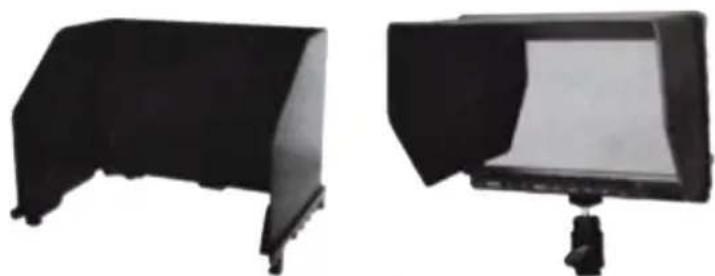
natural_image
Two black rectangular objects with different angles, one open and one tilted (no text or symbols visible)③ Complete Shape 4 Sunshade Application
First to open the sunshade ^1 , and match the sticker on the sunshade inside to the marked part of the sunshade frame, press the side of the sunshade frame, ^3 smooth and press 3 sides on the sunshade, ^4 to lock the sunshade with the monitor tight.
1.6 Battery Plate
Use the battery plate and install on the back of the monitor, you can assemble the corresponding battery to power the monitor.
The Battery Plate included is pictured below:

natural_image
Black plastic enclosure with arched top and side slots (no text or symbols visible)LP-E6
- LP-E6 battery plate for batter of canon DV:
Canon LP-E6
Remark: Different battery clips are compatible with, and attach to the back of the display monitor. This system only includes the clip listed above, but you may be able to purchase different and compatible battery clips from your camera's retailer. The system includes a wall power adapter.
2. Operation instruction
Before setting the menu functions, please make sure the device is connected correctly, Power on the unit, switch the dial to the ON position. According to the input signal, make sure to adjust the display's input to display the proper display on the LCD screen.
2.1 Button instructions:
: Power on/off
MODE: Signal Switch Button
MENU: Menu button
F3. F4: Custom button, enter the OSD menu of the F secondary menu, operate“>” on the unit to select, then using “v/F1” or “^/F2” to select, Press “MENU” button to custom Settings.
v/F1: Multi button, In OSD Menu for down adjustment, it can be custom button when not in OSD. See F4.
^/F2: Multi button. in OSD Menu for up adjustment, it can be custom button when not in OSD, See F4.
: Volume up, in OSD menu to increase the value of analog in the menu.
<: Volume down, in OSD menu to decrease the value of analog in the menu.
2.2 Menu instructions

image color (including 2 page menu, use "v/F1" or "^/F12" to enter).


- Pic. Mode: Standard, dynamic, downy, user
When select"user", it could according to the practical situation to adjust the image of brightness, contrast, saturation, sharpness. - Brightness: To adjust the image's brightness.
- Contrast: To adjust the brightest and darkest ratio of the image, please note the sense of picture when adjust, proportion too large or small, will make the picture lose the color of showy.
- Saturation: To adjust color concentration.
- Sharpness: Also called “Resolution”, an indicator for the image plane definition and image edge sharpness, if sharpness is higher, the details contrast on the image is more higher, the image is more clearly.
• Color Temp: 6500, 9300, User
When select “user”, adjust the R/G/B to meet the different user's requirement on the different Color Temp. - Tint: On NTSC video mode, the image color tint different is adjusted by tint.

Setting (including 2 page menu, use "v/F1" or "^/F12" to enter). Menu of Page one
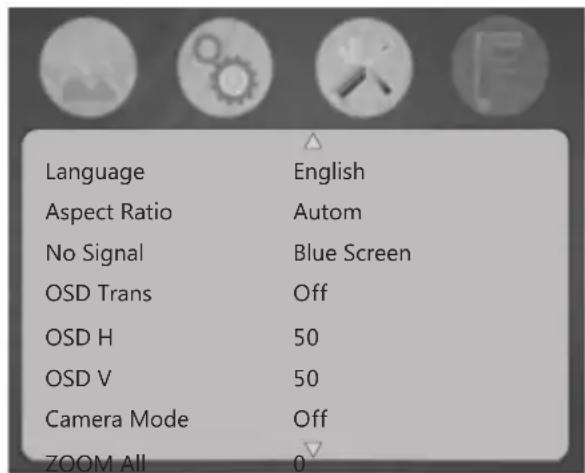
• Language: language for OSD: Chinese / English.
- Aspect Ratio: To change the display to ratio panoramic view, automatic, just scan, zoom 1, zoom 2, 16: 9, 4:3.
- NO Signal: Color options of screen background when no signal: black screen, white screen, red screen, green screen, blue screen.
- OSD Trans.: To adjust the level of transparent.
- OSD H: To adjust the OSD position in horizontal.
- OSD V: To adjust the OSD position in vertical.
- Camera Mode: the monitor video has real-time images. NO black screen, NO delay, perfect without distortion.
- ZOOM ALL: press“<” or “>” button, to adjust the image to Zoom in or Zoom out.
Menu of page two
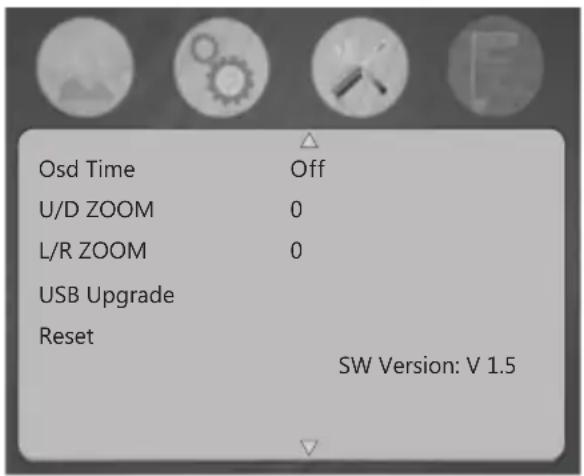
- OSD Time: To adjust the clock.
- U/D ZOOM: Press“<” or “>” button, to adjust the proportion of the image up and down to Zoom in or Zoom out.
- L/R ZOOM: Press“<” or “>” button, to adjust the proportion of the image left and right to Zoom in or Zoom out.
- USB Upgrade: When the need for the native data application software upgrade, copy the file to the U disk, again through the USB cable to connect with upgrade USB port, press “>” key to confirm, After the upgrade, monitor will automatically restart.
- Reset: Press“>”, Back to original setting.

- Center Marker: To set centre mark (cross mark) display.
- Safe frame: To adjust screen marker (off, 96%, 93&, 90%, 85%, 80%, 2.35:1).
- Image Freeze: the current picture still (capture function).
- Image Flip: The U/N, L/R of the image around flip.
- Check field: Color, balck and white/monochrome switching, to switch image color, black and white, monochrome (red, green, blue).
- P2P: The display mode that made the resolution of the image consistent with display of the physical resolution.
- Focus Assist: as viewfinder to peaking focus assist image (under HDMI input).

Shortcut button setting
| F1 | Check Field |
| F2 | Focus Assist |
| F3 | Center Marker |
| F4 | Safe frame |
- F1: Optional F1, then press “>”button, can select (center marker, safe frame, monochrome display, check field, display ratio, image flip, pixel to pixel, Image Freeze, camera mode), use “v/F1” or “^/F2” button to select one of optional as definition function, Press “MENU” button to confirm and exit or press “MENU” again return to setting.
• F2: custom button, see F1
• F3: custom button, see F1
• F4: custom button, see F1
3. Technical parameters
| Panel size | IPS LCD 7.0 inch |
| Panel type | IPS LCD |
| Resolution | 1280X800XRCB=3072000 Pixels |
| Backlight | LED |
| Dot pitch | 0.11775(W) x0.11775 (H) |
| Display ratio | 16:10 |
| Brightness | 400 cd/m2 |
| Contrast ratio | 800:1 |
| Response time | 25ms |
| Viewing angle | 89°/89° (L/R) 89°/89° (U/D) |
| Input signal | Video/Audio/HDMI |
| Video color system | PAL-4.43 / NTSC-3.58 |
| HDMI support format | 480i/480p/576i/576p720p(60/59.94/50/30/29/25/24/23.98)1080i (60/59.94/50)1080p (60/59.94/50/30/29.97/25/24/24fps/23.98/23.98fps |
| Headphone output | stereo 3.5mm |
| Input voltage | DC: 7.4~35V |
| Power consumption | ≤ 5W |
| Unit size(mm) | 176(L)x130(W)x17(H)mm |
| Unit weight | 400g |
| Installation method | 1/4 inch bracket screw holes, can be easily connected to the not shoe mount, tripod fixed installation |
| Working temperature | -20~50°C |
| Storage temperature | -30~60°C |
4. Trouble shooting
4.1 Only black and white or monochrome picture:
- Please check saturation, brightness & contrast adjustment.
- Please check monitor "color" from the menu "monochrome" is in black and white or monochrome image or other condition.
4.2 NO Image after put on the power
- Check signal cable contact are in good condition, a monitor is synchronized with the input signal, and can press the "MODE" give it a try.
- Check signal cable connecting, and make sure use the standard adapet connect the monitor, if power supply by battery, please check the battery whether whether fully charged.
4.3 No sound
- Volume control did not open, can press the volume button, and try increasing the volume.
- Check the AUDIO input and ensure there have AUDIO signal.
- Remark: if there are still other problems, please contact with our related deals. It there are changes without prior notice.
- PLCMHD80
- To insure best use of the unit, please read the user's manual carefully
- CAUTION
- Features
- What's in the Box:
- CONTENTS
- Product description
- 1 Front view:
- Rear view:
- HDMI Lock
- Sunshade
- Battery Plate
- Operation instruction
- Button instructions:
- Menu instructions
- Setting (including 2 page menu, use "v/F1" or "^/F12" to enter). Menu of Page one
- Menu of page two
- Shortcut button setting
- Technical parameters
- Trouble shooting
- Only black and white or monochrome picture:
- NO Image after put on the power
- No sound
Brand : Pyle
Model : PLCMHD80
Category : Television