
V9150 - Battery charger Cotech - Free user manual and instructions
Find the device manual for free V9150 Cotech in PDF.


| Product Type | Battery Charger |
| Brand | Cotech |
| Model | V9150 |
| Input Voltage | 100-240 V AC, 50/60 Hz |
| Output Voltage | 12 V DC |
| Output Current | 6 A |
| Battery Compatibility | Lead-acid (Flooded, AGM, Gel) |
| Charging Stages | 4-stage (Bulk, Absorption, Float, Pulse) |
| Protection Features | Reverse polarity, short circuit, overcharge, overheat |
| Display Type | LED indicators |
| Dimensions (L x W x H) | 200 x 100 x 50 mm |
| Weight | 0.8 kg |
| Cable Length (input) | 1.5 m |
| Cooling | Fan |
| Operating Temperature | 0°C to 40°C |
| Storage Temperature | -20°C to 60°C |
| Certifications | CE, RoHS |
| Included Accessories | Battery clamps, user manual |
| Warranty | 2 years |
| Maintenance | Keep dry, clean contacts |
| Safety | Use in well-ventilated area |
| Repair | No user-serviceable parts |
Frequently Asked Questions - V9150 Cotech
User questions about V9150 Cotech
0 question about this device. Answer the ones you know or ask your own.
Ask a new question about this device
Download the instructions for your Battery charger in PDF format for free! Find your manual V9150 - Cotech and take your electronic device back in hand. On this page are published all the documents necessary for the use of your device. V9150 by Cotech.
USER MANUAL V9150 Cotech
Please read the entire instruction manual before use and save it for future reference. We reserve the right for any errors in text or images and for making any necessary technical changes to this document. If you should have any questions concerning technical problems please contact our Customer Services.
Product Description
Battery charger for the quick-charging of Ni-MH and Ni-Cd batteries.
- Charges 1 to 4 batteries. (AAA/R03 and AA/R6)
- Charge status display.
- Charges from either 12 V cigarette lighter outlet or 230 V AC/DC adaptor.
- Charging current automatically adapts to the size of battery.
- Microprocessor controlled charging.
- Negative delta-V cut off function.
• Temperature regulation to prevent the batteries from overheating. - LED indicator.
Safety
- Read the instruction manual carefully before use.
- The battery charger is only intended for rechargeable Ni-MH and Ni-Cd batteries. Attempts to recharge batteries other than those listed may result in damage to both the charger and property.
- Never expose the charger to moisture or rain. The charger is only intended for use indoors or in a car.
- Always disconnect the charger from the power supply before cleaning or when it is not in use.
- Never use the charger if it has been damaged. If the charger is broken, take it to your local retailer.
- Never dismantle the charger. Incorrect assembly could lead to personal injury and damage to the charger or property.
• The charger is intended to be used on a level surface.
• The charger should not be used by children. - Remove the batteries from the charger before recycling.
Use
Note!
The batteries can leak or explode resulting in personal injury if they are inserted into the charger the wrong way, exposed to fire, short-circuit or are mixed together in the charger with non-rechargeable or the wrong type of batteries.
Charging
- Insert 1 to 4 x R6/AA or R03/AAA batteries into the battery compartment.
- Make sure that the polarity is correct, as shown on the bottom of the compartment. When charging R03/AAA batteries, first fold down the converter in the upper edge of the compartment and then insert the batteries. The charger automatically adjusts to the correct charging current for the type of battery. Never charge R6/AA and R03/AAA batteries in the same charger at the same time.
- Indoor use: Connect the included adaptor's connector to the socket on top of the charger. Plug the adaptor into a 230 V wall socket. Note! Only use the supplied charger cable.
- Car use: Plug the included car adaptor's connector into the socket on the end of the charger and the cigarette lighter plug into the car's lighter socket.
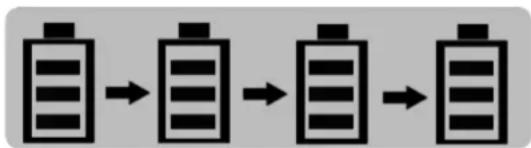
- Each battery has its own status indicator light below it; these emit a red light during charging. The display shows the status of the battery.

flowchart
graph LR
    A["Stage 1: Battery"] --> B["Stage 2: Battery"]
    B --> C["Stage 3: Battery"]
    C --> D["Stage 4: Battery"]
When the batteries are fully charged the status indicator will emit a green light and the charger switches over to maintenance charging. The batteries are now ready for use.
flowchart
graph LR
    A[" "] --> B[" "]
    B --> C[" "]
    C --> D[" "]
Note! Always disconnect the charger from the power source and remove the batteries when the charger is not in use.
- To charge more batteries, repeat the process from step 1.
Discharging
- Insert 1 to 4 x R6/AA or R03/AAA batteries into the battery compartment.
- Make sure that the polarity is correct, as shown on the bottom of the compartment.
When charging R03/AAA batteries, first fold down the converter in the upper edge of the compartment and then insert the batteries. The charger automatically adjusts to the correct charging current for the type of battery. Never charge R6/AA and R03/AAA batteries in the same charger at the same time.
- Indoor use: Connect the included adaptor's connector to the socket on top of the charger. Plug the adaptor into a 230 V wall socket. Note! Only use the supplied charger cable.
- Car use: Plug the included car adaptor's connector into the socket on top of the charger and the cigarette lighter plug into the car's lighter socket.
- Press the DISCHARGING button on the front of the charger. The status indicator of the respective battery flashes green and the display status changes to discharging. When the batteries are fully discharged the status light will go out. When all of the batteries are discharged the charger switches to charging the batteries.
- To discharge more batteries, repeat the process from step 1.
Automatic recognition of incorrect batteries
When charging commences the charger automatically senses the battery status. The display will indicate if the battery is incorrect or inserted incorrectly and the charging stops automatically.
Charging Times
| Battery size Ch | Charging current Ni-MH/Ni-Cd | |
| AA 2 A | 1300 mAh 40 minutes | |
| 1500 mAh 45 minutes | ||
| 1800 mAh 50 minutes | ||
| 2000 mAh 55 minutes | ||
| 2100 mAh 58 minutes | ||
| 2200 mAh 61 minutes | ||
| 2300 mAh 64 minutes | ||
| AAA 0,85 A | 2500 mAh 70 minutes | |
| 2700 mAh 76 minutes | ||
| 550 mAh 40 minutes | ||
| 750 mAh 52 minutes | ||
| 800 mAh 55 minutes | ||
| 900 mAh 64 minutes | ||
| 1000 mAh 70 minutes | ||
* Charging times can vary depending on the make, capacity and condition of the battery.
Care and Maintenance
Use a soft, dry cloth to clean the device. Never use detergents or strong solvents.
Disposal
Follow local ordinances when disposing of this product. If you are unsure about how to dispose of this product contact your municipality.
Specifications
Power 12 V DC (via car adaptor) or 230 V AC,
50 Hz via AC/DC adaptor
Size 125 x 75 x 30 mm
Batteriladdare
ART.NR 18-5104 MODELL V9150-UK
36-5104 V9150
flowchart
graph LR
    A["Initial Battery"] --> B["Charging Step 1"]
    B --> C["Charging Step 2"]
    C --> D["Charging Step 3"]
    D --> E["Final Charge"]
flowchart
graph LR
    A["Stage 1: Battery"] --> B["Stage 2: Battery"]
    B --> C["Stage 3: Battery"]
    C --> D["Stage 4: Battery"]
flowchart
graph LR
    A["Stage 1: Battery"] --> B["Stage 2: Battery"]
    B --> C["Stage 3: Battery"]
    C --> D["Stage 4: Battery"]
flowchart
graph LR
    A["Battery icon"] --> B["Battery icon"]
    B --> C["Battery icon"]
    C --> D["Battery icon"]

Brand : Cotech
Model : V9150
Category : Battery charger