
Freedom Par Tri-6 - Effects machine Chauvet - Free user manual and instructions
Find the device manual for free Freedom Par Tri-6 Chauvet in PDF.


| Product Type | Battery-Powered LED Par Light |
| Brand | Chauvet |
| Model | Freedom Par Tri-6 |
| Light Source | 6 x 3W Tri-Color LEDs (RGB) |
| Beam Angle | 25° |
| Dimensions (L x W x H) | 8.5 x 8.5 x 11.8 in (21.6 x 21.6 x 30 cm) |
| Weight | 5.5 lb (2.5 kg) |
| Power Supply | Internal rechargeable battery, 100-240V AC adapter |
| Battery Life | Up to 6 hours (full RGB output) |
| Battery Type | Lithium-ion, replaceable |
| Control Modes | DMX, Master/Slave, Standalone, IR Remote |
| DMX Channels | 3, 4, 6, or 8 channels |
| Wireless DMX | Built-in D-Fi transceiver (compatible with WC-DMX) |
| IR Remote | Included (IR-6) |
| Dimmer | 0-100% electronic dimming |
| Strobe | Variable speed (0-20 Hz) |
| Color Mixing | RGB color mixing with preset colors and color macros |
| Housing | Die-cast aluminum, black finish |
| Mounting | Floor stand, truss mount (clamp not included) |
| IP Rating | IP20 (indoor use only) |
| Cooling | Passive convection (no fan) |
| Accessories Included | AC adapter, IR remote, power cord, gel frame holder |
| Maintenance | Clean with a dry cloth; no user-serviceable parts except battery |
| Safety | Do not expose to rain or moisture; disconnect when not in use |
| Warranty | 2-year limited warranty |
Frequently Asked Questions - Freedom Par Tri-6 Chauvet
User questions about Freedom Par Tri-6 Chauvet
0 question about this device. Answer the ones you know or ask your own.
Ask a new question about this device
Download the instructions for your Effects machine in PDF format for free! Find your manual Freedom Par Tri-6 - Chauvet and take your electronic device back in hand. On this page are published all the documents necessary for the use of your device. Freedom Par Tri-6 by Chauvet.
USER MANUAL Freedom Par Tri-6 Chauvet
CHAU VET.3 It's Green Thinking.
TABLE OF CONTENTS
1. Before You Begin....3
What Is Included....3
Unpacking Instructions .... 3
Claims 3
Text Conventions....3
Symbols....3
Disclaimer....3
Product at a Glance....4
2. Introduction......5
Overview....5
Description....5
Dimensions....6
3. Setup 7
AC Power 7
Fuse Replacement....7
Fuse Replacement Diagram 7
Power Linking 8
Battery Run Time....8
Mounting....9
Orientation 9
Rigging 9
4. Operation....10
Control Panel Operation 10
Menu Map 10
DMX Linking 11
Starting Address....11
Master/Slave Mode 11
DMX Personalities....11
D-Fi™ 2.4 GHz (DMX Mode Manual Sync) 12
D-Fi™ 2.4 GHz (DMX Mode Auto Sync)....13
DMX Channel Assignments and Values 14
Configuration (Standalone)....17
Sound-Active Mode....17
Sound Sensitivity....17
Auto Programs 17
Program Speed....17
Selecting the Dimmer Speed Mode....17
Static Colors....17
Custom Color Mixing....17
Infrared Mode....18
IRC-6 Operations....18
5. Technical Information.... 19
Product Maintenance....19
6. Technical Specifications .... 20
Returns......21
Contact Us....22
1. BEFORE YOU BEGIN
What Is
Included
- Freedom™ Par Tri-6
-
Power Cord
• IRC-6 (Infrared Remote Control) -
Warranty Card
- Quick Reference Guide
Unpacking Instructions
Carefully unpack the Freedom™ Par Tri-6 and check that all the parts are in the package, and are in good condition.
Claims
If the box, or any of the contents, appear damaged from shipping, save all the packaging and file a claim with the carrier immediately. Failure to report damage to the carrier immediately, or failure to save all the packaging, can invalidate a claim.
For other issues, such as missing components or parts, damage not related to shipping, or concealed damage, file a claim with Chauvet within 7 days of delivery. See Contact Us.
| Text Conventions | Convention | Meaning |
| 1—512 | A range of values | |
| 50/60 | A set of values of which only one can be chosen | |
| Settings | A menu option not to be modified | |
| Menu > Settings | A sequence of menu options to be followed | |
| A key to be pressed on the product's control panel | ||
| ON | A value to be entered or selected |
Symbols


Disclaimer
The information and specifications contained in this User Manual are subject to change without notice. Chauvet assumes no responsibility or liability for any errors or omissions, and reserves the right to revise or recreate this manual at any time. The latest version of this manual can be downloaded from http://www.chauvetlighting.com/product-manuals-literature/.
© Copyright 2014 Chauvet. All rights reserved.
Electronically published by Chauvet in the United States of America.
| Author Date Editor Date | |||
| A. Leon | 11/19/2014 | M. Trouard | 12/16/14 |
| Product at a Glance | Use on Dimmer | X | Auto Program | P |
| Outdoor Use | X | Auto-Ranging Power Supply | P | |
| Sound-Activated | P | Replaceable Fuse | P | |
| DMX | P | User-Serviceable | X | |
| Master/Slave | P |
Safety Notes These notes include important information about the mounting, usage, and maintenance of this product; read before using the product.

• Always connect the product to a grounded circuit to avoid the risk of electrocution.
• Always disconnect the product from the power source before cleaning or replacing the fuse.
- Avoid direct eye exposure to the light source while the product is on.
• Make sure the power cord is not crimped or damaged.
• Never disconnect the product from power by pulling or tugging on the cord.
• If mounting the product overhead, always secure to a fastening device using a safety cable.
• Make sure there are no flammable materials close to the product when operating.
- Do not touch the product's housing when operating because it may be very hot.

• Always make sure that the voltage of the outlet to which you are connecting the product is within the range stated on the decal or rear panel of the product.
- The product is for indoor use only! (IP20) To prevent risk of fire or shock, do not expose the product to rain or moisture.
• Always install the product in a location with adequate ventilation, at least 20 in (50 cm) from adjacent surfaces.
- Be sure that no ventilation slots on the product's housing are blocked.
• Never connect the product to a dimmer.
• Make sure to replace the fuse with another of the same type and rating.
• Never carry the product from the power cord.
- The maximum ambient temperature (Ta) is 104 °F (40 °C). Do not operate the product at higher temperatures.
• In the event of a serious operating problem, stop using the product immediately.
- Never try to repair the product. Repairs carried out by unskilled people can lead to damage or malfunction. Contact the nearest authorized technical assistance center.
• This product is not intended for permanent installation.
- To eliminate unnecessary wear and improve its lifespan, during periods of non-use completely disconnect the product from power via breaker or by unplugging it.

Keep this User Manual for future use. If you sell the product to another user, be sure to give this document to the next owner.
2. INTRODUCTION
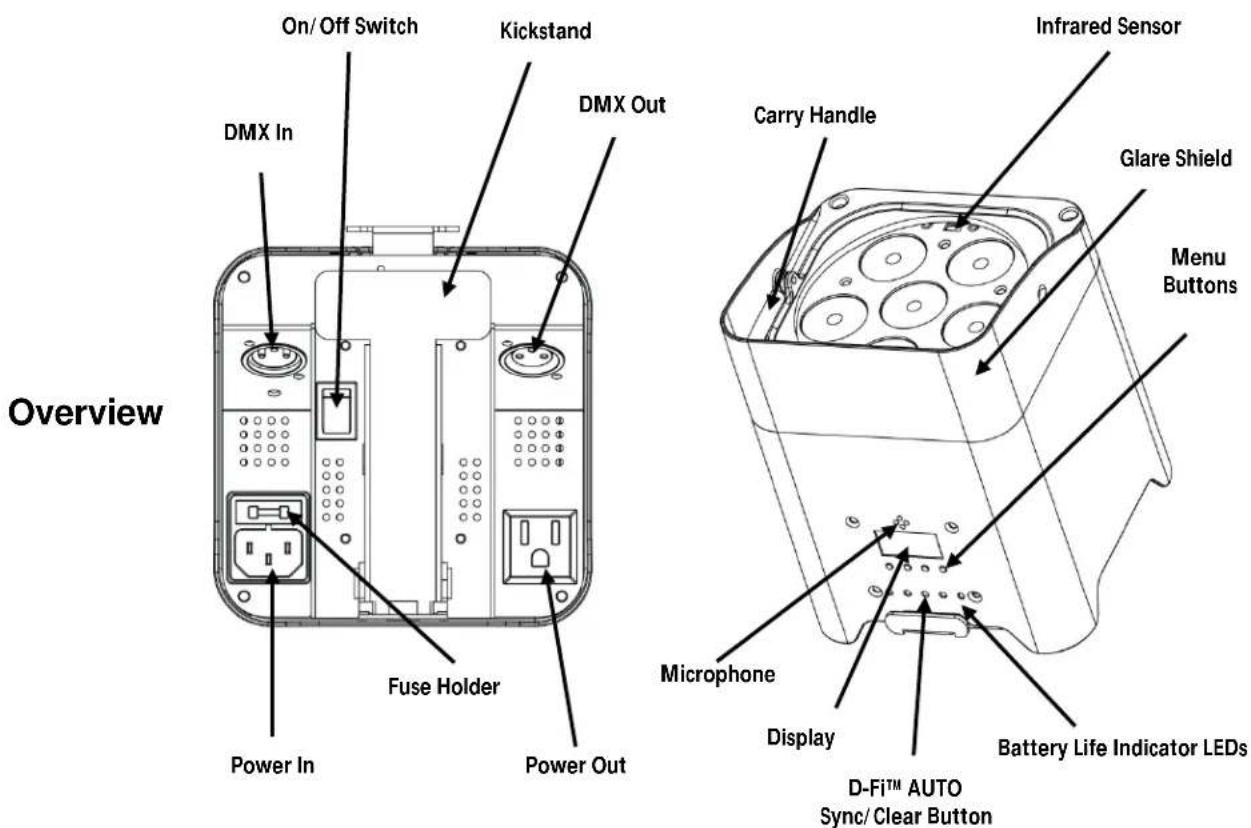
Description
The Freedom™ Par Tri-6 is a wireless, battery-operated, tri-color LED Par with a built-in D-Fi™ transceiver. It works with the FlareCON™ Air and IRC-6 for wireless triggering and control. You can wirelessly master/slave this fixture with other Freedom™ fixtures for a coordinated light show. Shine light where it is needed using the built-in adjustable kickstand. Extend the battery's lifespan with built-in discharge protection. The Freedom™ Par Tri-6's compact and lightweight design easily fits inside sticks of TRUSST®.


Dimensions

3. SETUP
AC Power
The Freedom™ Par Tri-6 has an internal auto-ranging power supply and it can work with an input voltage range of 100 to 240 VAC, 50/60 Hz.

Always connect the product to a protected circuit (circuit breaker or fuse). Make sure the product has an appropriate electrical ground to avoid the risk of electrocution or fire.

Never connect the product to a rheostat (variable resistor) or dimmer circuit, even if the rheostat or dimmer channel serves only as a 0 to 100% switch.
Fus Replacement
-
Disconnect the product from power.
-
Wedge the tip of a flat-head screwdriver into the slot of the fuse holder.
-
Pry the fuse holder out of the housing.
-
Remove the blown fuse from the holder.
-
Replace with a fuse of the exact same type and rating.
-
Insert the fuse holder back in place and reconnect power.

Disconnect the product from power before replacing the fuse.
Fuse Replacement Diagram
Spare Fuse holder (inside safety cap)


Always replace a blown fuse with another of the same type and rating.

A spare fuse is not included; however, the safety cap has room for a spare.
Power Linking
Daisy chaining products together through their Power In and Power Out sockets, called power linking, allows many products to be powered from one power outlet.

Up to 17 Freedom™ Par Tri-6 products can be power linked at 120 V, and up to 30 Freedom™ Par Tri-6 products can be power linked at 230 V.
Battery Power
The Freedom™ Par Tri-6 comes with a rechargeable lithium battery for cable-free operation.
Charging the Battery
The battery charges whenever the product is plugged into a power source. If the product is plugged in and not in operation, make sure the On/Off switch is in the Off position.

For optimal battery life, charge the Freedom™ Par Tri-6 battery for 24 hours prior to initial use.
Battery Life Indicator
The battery life indicators are the 4 small green LEDs on either side of the D-Fi™
![graph TD A["D-Fi™ AUTO Button"] --> B["100%"] A --> C["75%"] A --> D["50%"] A --> E["25%"]](/content/2026/05/980303/images/ff3862e3e1b00821c51527da99c2d89f0759bc3432394184da3b2b9249a3d37f.jpg)
Battery Run Time
| Maximum Run Time(all colors on) | Maximum Run Time(single color on) | Recharge Time |
| Up to 8 hours | Up to 20 hours | 6 hours |
Mounting
Before mounting the product, read and follow the safety recommendations indicated in Safety Notes.
Orientation
The Freedom™ Par Tri-6 has a compact design to fit perfectly inside the TRUSST® truss systems. It attaches to 35-50 mm truss without the need for a bracket, using an M12 threaded rigging point. Floor mounting is a cinch with a built-in adjustable kickstand. The product may be mounted in any position; however, place the product so there is at least 20" of space around it and it is accessible for programming and control panel operation.
Rigging
Rig the product from a structure or surface that can support the product's weight. See Technical Specifications in this manual for the product's weight.
When mounting the product overhead, always use a mounting clamp and safety cable. Mount the product securely to a rigging point, such as a pipe or truss. The CHAUVET® CH-05 safety cable is appropriate for this product.
When rigging the product onto a truss, you should use a mounting clamp of appropriate weight capacity. The Freedom™ Par Tri-6 has an M12 threaded mounting hole, which is appropriate for this purpose. For the Chauvet line of mounting clamps, go to www.chauvetlighting.com/cables-clamps-main.html/.
When mounting the product on the floor, make sure that the product and anycables are away from people and vehicles.
Mounting Diagram

4. OPERATION
Control Panel Operation
To access the control panel functions, use the four buttons located underneath the display.
| Button | Function |
| Selects an operation mode | |
| Scrolls up the list of options or selects a higher value | |
| Scrolls down the list of options or selects a lower value | |
| Activates a menu option or a selected value | |
| Auto-syncs D-FiTM or displays information about D-FiTM status |
Menu Map
The Menu Map outlines the functions available through the menu, the programming levels that can be entered, and a description for each function.
| Main Function | Programming Levels | Description | ||
| DMX Personality and Starting Address | 3-CH | d 1-d512 | Selects DMX personality and DMX starting value | |
| 4-CH | ||||
| 5-CH | ||||
| 9-CH | ||||
| Static Colors | C-- | C 1-C 7 | Selects 1 of 7 static colors | |
| Auto Programs | P-- | P 1-P 4 | Selects 1 of 4 auto programs | |
| Program Speed | S-- | S 1-S100 | Sets auto program speed (slow to fast) | |
| Sound-Active | Snd | Selects Sound-Active mode | ||
| Sound Sensitivity | SenS | u 0-u100 | Sets sound sensitivity (low to high) | |
| Custom Color Mixing | U-- | r 0-r255 | Red (0-100%) | |
| g 0-g255 | Green (0-100%) | |||
| b 0-b255 | Blue (0-100%) | |||
| Dimmer dIM | OFF | Sets the dimming speed mode: dIM1 (fast) to dIM3 (slow), or OFF | ||
| dIM1 | ||||
| dIM2 | ||||
| dIM3 | ||||
| Infrared SET | On | Turns infrared on or off | ||
| OFF | ||||
| 2.4 GHz D-FiTM S-tr | drAS | drAU | Automatically select receive frequency | |
| drCH | dr 1-dr16 | Manually select receive frequency | ||
| dtAS | dtAU | Automatically select transmit frequency | ||
| dtCH | dt 1-dt16 | Manually select transmit frequency | ||
DMX Linking
The Freedom™ Par Tri-6 operates in Master/Slave mode, or in DMX mode, both of which require DMX linking. In Master/Slave mode the master product sends DMX signals to the slaves. In DMX mode the lighting control board sends DMX signals to the products.
To DMX-link a number of Freedom™ Par Tri-6 using wireless D-Fi™, see D-Fi™ 2.4 GHz (DMX Mode Manual Sync).
To DMX link a number of Freedom™ Par Tri-6 using DMX cable
- connect the DMX cable from DMX Out of the board, to DMX In of the first product, or - connect the DMX cable from DMX Out of the master, to DMX In of the first slave.
Then connect another DMX cable from DMX Out of the first product/slave to DMX In of the next product/slave.
Continue connecting each subsequent product until all the products are part of the chain.
Information about DMX is in the DMX Primer, which is available from the Chauvet website www.chauvetlighting.com/download/.

Starting Address Master/Slave Mode
When DMX linking Freedom™ Par Tri-6 products for Master/Slave operation, the DMX controller is not a part of the DMX daisy chain and the master is the first product in the chain. See Master/Slave Mode for details.
To ensure full access to all channels in each DMX mode, the highest recommended DMX address is 501.
Master/Slave mode allows a single Freedom™ Par Tri-6 (the master) to control the actions of one or more Freedom™ Par Tri-6 units (the slaves) without a DMX controller.
The master will be set to operate in either an auto program or Sound-Active mode, while the slaves will be set to DMX starting address d 1. Once set and connected, the slaves will operate in unison with the master. Configure the units as indicated below.
Slaves:
- Press
- Press
to accept. - Set the DMX address to d 1.
- Connect the DMX input of the first slave to the DMX output of the master.
- Connect the DMX input of the subsequent slaves to the DMX output of the previous slave.
- Finish setting and connecting all the slaves.
Master:
- Set the master to operate in either an auto program or Sound-Active mode.
- Make the master the first unit in the DMX daisy chain.
- Configure all the slaves to Slave mode before connecting the master to the DMX daisy chain.
• Never connect a DMX controller to a DMX daisy chain of master and slaves.
• Make the master the first unit in the DMX daisy chain.
• Always put the male DMX connector (DMX Out) into the master.
• DO NOT connect more than 31 slaves to the master using DMX cable.
When selecting a starting DMX address, always consider the number of DMX channels the selected DMX mode uses. If you choose a starting address that is too high, you could restrict the access to some of the product's channels.
If unfamiliar with DMX, download the DMX Primer from www.chauvetlighting.com.
To select the DMX personality and starting address, do the following:
- Press
- Press
and d 1-d512 shows on the display. - Use
or to select the starting address. - Press
.
D-Fi™ 2.4 GHz (DMX Mode Manual Sync)
The Freedom™ Par Tri-6 series offers wireless control of 2 or more products with a single DMX controller. To manually set up the D-Fi™ 2.4 GHz syncing for DMX, do the following.
For the transmitting product:
- Press
- Press
. - Press
or until dtCH appears on the display. - Press
. - Use
or to select the transmitting signal (dt 1–dt16).
For the receiving product(s):
- Press
- Press
. - Press
or until drCH appears on the display. - Press
. - Use
or to select the receiving signal (dr 1-dr16). The channel number should match the transmitting signal you chose when setting up the transmitting product.

To sync multiple transmitters in one room, manually set each receiver and the designated transmitter to a specific frequency and then perform the syncing steps.
Freedom™ Par Tri-6 is fully compatible with the D-Fi™ 2.4 GHz wireless transceiver (transmitter/receiver) from Chauvet (sold separately).

For more detailed information about D-Fi™ 2.4 GHz functionality, refer to the D-Fi™ 2.4 GHz User Manual available at the Chauvet website www.chauvetlighting.com.

Manual syncing is recommended for best results.
D-Fi™ 2.4 GHz (DMX Mode Auto Sync)
The Freedom™ Par Tri-6 offers wireless control of 2 or more products with a single DMX controller. To automatically set up D-Fi™ 2.4 GHz syncing for DMX, do the following:
For the receiving product(s):
- Press
- Press
. - Press
or until drAS appears on the display. - Press
. - The display should show drAU.
For the transmitting product:
- Press
- Press
. - Press
or until dtAS appears on the display. - Press
. - The display should show dtAU.
Receiving units must be set up before the transmitting unit. Once the steps above are done, press and hold
You can then back out to a general menu level and configure the transmitting product to operate it with a DMX controller.
To configure your product to work with DMX, refer to the Starting Address section.

- To add additional Freedom™ products, turn the synced ones off and repeat the above steps with unsynced products. Once all products are synced, turn them all back on.
• Auto scan syncing must be done within a distance of about 32 ft (10 m). - Manual syncing is recommended for best results when adding products after initial system setup.
- If you are experiencing issues or need to improve signal quality, keep the line of sight between products unobstructed.
• Ensure that all linked products are configured to the same DMX personality.

Caution: D-Fi™ 2.4 GHz operation can be interrupted or inhibited by liquid masses between the transmitter and receiver such as water, snow, or people. For best results, keep the line of sight clear of any liquid mass.
Linking Products
![graph TD A["DMX Controller Board"] --> B["Wireless D-Fi™ Hub"] B --> C["DMX-compatible Brand X product"] C --> D["To more DMX compatible products"] A --> E["Freedom™ Par sends wireless DMX signal to DMX-compatible products wirelessly or via DMX cable"] E --> F["DMX-compatible Brand X product"]](/content/2026/05/980303/images/a56193315dcb89f1b51d91f24be618af7e9138e2080315845bb254ff4687e055.jpg)
DMX Channel Assignments and Values
The following tables show which DMX channels control which functions in each of the DMX personalities. Be sure to become familiar with these values when operating the product with a DMX controller.
| 9-CH Channel Function Value Setting | |||
| 1 | Dimmer | 000 Ü 255 | 0–100% |
| 2 | Red | 000 Ü 255 | 0–100% |
| 3 | Green | 000 Ü 255 | 0–100% |
| 4 | Blue | 000 Ü 255 | 0–100% |
| 5 | Manual Colors and Color Temperatures | 000 Ü 010 | No function |
| 011 Ü 030 | R: 100% G: 0–100% B: 0 | ||
| 031 Ü 050 | R: 100%—0 G: 100% B: 0 | ||
| 051 Ü 070 | R: 0 G: 100% B: 0–100% | ||
| 071 Ü 090 | R: 0 G: 100%–0 B: 100% | ||
| 091 Ü 110 | R: 0–100% G: 0 B: 100% | ||
| 111 Ü 130 | R: 100% G: 0 B: 100%–0 | ||
| 131 Ü 150 | R: 100% G: 0–100% B: 0–100% | ||
| 151 Ü 170 | R: 100%–0 G: 100%–0 B: 100% | ||
| 171 Ü 200 | R:100% G: 100% B: 100% | ||
| 201 Ü 205 | Color temperature 1 | ||
| 206 Ü 210 | Color temperature 2 | ||
| 211 Ü 215 | Color temperature 3 | ||
| 216 Ü 220 | Color temperature 4 | ||
| 221 Ü 225 | Color temperature 5 | ||
| 226 Ü 230 | Color temperature 6 | ||
| 231 Ü 235 | Color temperature 7 | ||
| 236 Ü 240 | Color temperature 8 | ||
| 241 Ü 245 | Color temperature 9 | ||
| 246 Ü 250 | Color temperature 10 | ||
| 251 Ü 255 | Color temperature 11 | ||
| 6 | Strobe | 000 Ü 010 | No function |
| 011 Ü 255 | Slow to fast | ||
| 7 | Auto and Sound Programs | 000 Ü 010 | No function |
| 011 Ü 060 | Auto program 1 | ||
| 061 Ü 120 | Auto program 2 | ||
| 121 Ü 180 | Auto program 3 | ||
| 181 Ü 240 | Auto program 4 | ||
| 241 Ü 255 | Sound-Active mode | ||
| 8 | Auto Speed | 000 Ü 255 | Program speed, slow to fast |
| 9 Dimmer Mode | 000 Ü 051 | Preset dimmer speed set in menu options | |
| 052 Ü 101 | Dimmer speed mode off | ||
| 102 Ü 152 | Dimmer speed mode 1, (fast speed) | ||
| 153 Ü 203 | Dimmer speed mode 2, (medium speed) | ||
| 204 Ü 255 | Dimmer speed mode 3, (slow speed) | ||
| 5-CH Channel | Function | Value | Percent/Setting |
| 1 | Dimmer | 000 Ù 255 | 0–100% |
| 2 | Red | 000 Ù 255 | 0–100% |
| 3 | Green | 000 Ù 255 | 0–100% |
| 4 | Blue | 000 Ù 255 | 0–100% |
| 5 Strobe | 000 Ù 010 | No function | |
| 011 Ù 255 | Slow to fast |
| 3-CH | Channel | Function | Value | Percent/Setting |
| 1 | Red | 000 Û 255 | 0–100% | |
| 2 | Green | 000 Û 255 | 0–100% | |
| 3 | Blue | 000 Û 255 | 0–100% |
| 4-CH Channel | Function | Value | CH. 2 | CH. 3 | CH. 4 |
| 1 | Blackout | 000 Ù 008 | Flash Speed000 Ù 249Sound-Active250 Ù 255 | ||
| Red | 009 Ù 028 | ||||
| Green | 029 Ù 048 | ||||
| Blue | 049 Ù 068 | ||||
| Green + Blue | 069 Ù 088 | ||||
| Red + Blue | 089 Ù 108 | ||||
| Red + Green | 109 Ù 128 | ||||
| Red + Green + Blue | 129 Ù 143 | ||||
| Color Chase 1 (R + G) | 144 Ù 152 | Run SpeedAutomatic000 Ù 127Sound-Active128 Ù 255 | |||
| Color Chase 2 (G + B) | 153 Ù 161 | ||||
| Color Chase 3 (R+G+B) | 162 Ù 170 | ||||
| Color Chase 4 (R+G+B+GB) | 171 Ù 179 | ||||
| Color Chase 5 (R+G+B+GB+RB) | 180 Ù 188 | ||||
| Color Chase 6(R+G+B+GB+RB+RG) | 189 Ù 197 | ||||
| Color Chase 7(R+G+B+GB+RB+RG+RGB) | 198 Ù 206 | ||||
| RGB Mode | 207 Ù 215 | Red(0–100%) | Green(0–100%) | Blue(0–100%) | |
| Color Snap | 216 Ù 224 | Fade Speed000 Ù 255 | |||
| Color Fade | 225 Ù 233 | Fade Speed000 Ù 255 | |||
| Auto Run(Sound-Active Only) | 234 Ù 255 | Run SpeedAutomatic000 Ù 127Sound-Active128 Ù 255 |
Configuration (Standalone)
Use standalone configuration to operate the product without a DMX controller. There are a variety of Standalone modes and they are powerful tools for making exciting looks.

Never connect a product operating in a standalone mode (Static, Sound-Active, Auto, or Infrared) to a DMX chain that includes a DMX controller. Products in standalone mode can transmit DMX signals that interfere with the DMX signals from the controller.
Sound-Active Mode
Sound-Active mode sets the product to respond to sounds and music.
To enable the Sound-Active mode, do the following:
- Press
- Press
.
Sound Sensitivity
To set the sound sensitivity, follow the instructions below:
- Press
- Use
or to select the desired sound sensitivity (u 0-u100, low to high). - Press
.

The product will respond only to low frequencies of music (bass and drums). If the product is not responding to sound, increase the sensitivity.
Auto Programs
Auto programs set the product to 1 of 4 preset color programs.
To set the product to an auto program, do the following:
- Press
- Press
and P 1-P 4 shows on the display. - Use
or to select the desired auto program, P 1-P 4. - Press
.
Program Speed
To set the auto program speed, follow the instructions below:
- Press
- Use
or to select the desired auto program speed (S 1–S100, slow to fast). - Press
.
Selecting the Dimmer Speed Mode
To select a dimmer speed mode, do the following:
- Press
-
Press
and one of the following shows on the display:
• OFF (dimmer speed off)
• dIM1 (dimmer speed mode 1, fast speed)
• dIM2 (dimmer speed mode 2, middle speed)
• dIM3 (dimmer speed mode 3, slow speed) -
Use
or to select the desired dimmer speed mode. Press . 4.
Static Colors
To select a preset static color, do the following:
- Press
- Press
. - Use
or to select the desired preset color (C 1-C 7). - Press
.
Custom Color Mixing
To custom mix a color, follow the instructions below:
- Press
- Press
and one of the following colors shows on the display: rXXX (red), gXXX (green), or bXXX (blue). - Press
repeatedly to select the desired color. - Use
or to select the desired color value (0–255). NOTE: Selecting 0 will turn the color off. - Press
to select color value and continue to the next color. - Repeat steps 3 to 5 until you create your desired color.
Infrared Mode
Infrared (IR) mode allows the product to be controlled with an infrared remote controller. The IRC-6 can remotely set the product to various modes; adjust the color, speed and sensitivity; and set the strobe.
The Freedom™ Par Tri-6 is compatible with the included IRC-6 from Chauvet. To enable use with the IRC-6, follow the instructions below:
- Press
- Press
and On (turns on the infrared sensor) or OFF (turns off the infrared sensor) shows on the display. - Press
or to select the desired option. - Press
.
IRC-6 Operations
Be sure the IRC-6 remote is pointing directly at the product and there is nothing in between the remote and the product.

Automatic Mode
Automatic mode will enable you to run the automatic programs on the product.
To turn on Automatic mode:
- Press
on the IRC-6. - Press <+> or <-> to choose between the four different auto programs.
To adjust the speed of the automatic program: - Press
on the IRC-6. - Press <%>.
- Press <+> or <-> to either increase or decrease the speed of the program.
Sound-Active Mode
Sound-Active mode will enable the product to respond to the music.
To turn on Sound-Active mode:
- Press
To adjust sound sensitivity in Sound-Active mode:
- Press
on the IRC-6. - Press <%>.
- Press <+> or <-> to either increase or decrease sound sensitivity.
Manual Color Control
To choose a specific color with the IRC-6:
- Press
on the IRC-6. - Press any number between <0> and <9> to choose your color.
To manually control the RGB percentage: - Press
on the IRC-6. - Press
, , or (red, green, or blue) to choose your color.
Note: The Freedom™ Par Tri-6 only contains red, green, and blue LEDs. The amber, white, and UV color options on the IRC-6 will only operate with fixtures capable of outputting these color lights. - Press <+> or <-> to increase or decrease the percentage of each color.
Miscellaneous Operation
To adjust the strobe rate of the program:
- Press
on the IRC-6. - Press <+> or <-> to increase or decrease the strobe rate.
- Press
again to turn off the strobe.
To choose a fade auto program:
- Press
repeatedly on the IRC-6 to choose between the two auto program fade options
To black out the lights: - Press
on the IRC-6. This will turn off all the lights until the button is pressed again.
Note: The IRC-6 will not respond to any inputs when the Black Out mode is activated. If the remote does not respond when a button is pressed, try pressing
5. TECHNICAL INFORMATION
Product Maintenance
Dust build-up reduces light output performance and can cause overheating. This can lead to reduction of the light source's life. To maintain optimum performance and minimize wear, clean the product at least twice a month. However, usage and environmental conditions may require more frequent cleaning.
To clean the product, follow the instructions below:
- Unplug the product from power.
- Wait until the product is at room temperature.
- Use a vacuum (or dry compressed air) and a soft brush to remove dust collected on the external surfaces and vents.
- Clean all external optics and transparent surfaces with a mild soap solution, ammonia-free glass cleaner, or isopropyl alcohol.
- Apply the solution directly to a soft, lint-free cotton cloth or a lens cleaning tissue.
- Softly wipe any dirt or grime to the outside edges of the external optics or transparent surface.
- Gently polish the external optics and transparent surfaces until they are free of haze and lint.

Always dry the lens surfaces carefully after cleaning them.
6. TECHNICAL SPECIFICATIONS
| Dimensions and Weight | Length | Width | Height | Weight |
| 5.4 in (138 mm) | 5.7 in (145 mm) | 7.2 in (184 mm) | 5.8 lb (2.6 kg) | |
| Note: Dimensions in inches rounded to the nearest decimal digit. | ||||
| Power | Input Voltage | Range | Voltage Selection | |
| Switching (internal) | 100–240 VAC, 50/60 Hz | Auto-ranging | ||
| Parameter | 120 VAC, 60 Hz | 230 VAC, 50 Hz | ||
| Consumption | 32 W | 31 W | ||
| Operating current | 0.5 A | 0.3 A | ||
| Power linking current (units) | 8 A (17 units) | 8 A (30 units) | ||
| Fuse | T 1 A, 250 V | T 1 A, 250 V | ||
| Power I/O | US/Canada | UK/Worldwide | ||
| Power input connector | IEC | IEC | ||
| Power output connector | Edison | IEC | ||
| Power cord plug | Edison (US) | Local plug | ||
| LED | Type | Power | Lifespan | |
| LED | 3 W | 50,000 hours | ||
| Color | Quantity | Current | ||
| Tri-color RGB | 6 | 600 mA | ||
| Photo Optic | Parameter | |||
| Field angle | 29° | |||
| Beam angle | 15° | |||
| Strobe rate | 0 to 17 Hz | |||
| Illuminance @ 2 m | 1,938 lux | |||
| Thermal | Maximum External Temp. | Cooling System | ||
| 104 °F (40 °C) Convection | ||||
| DMX | I/O Connectors | Connector Type | Channel Range | |
| 3-pin XLR | Sockets | 3, 4, 5 or 9 | ||
| Ordering | Product Name | Item Code | UPC Number | |
| FreedomTM Par Tri-6 | 03030812 | 781462211608 | ||


RETURNS
To return a product or request support:
• In the U.S., contact Chauvet World Headquarters (see Contact Us).
• In the UK or Ireland, contact Chauvet Europe Ltd. (see Contact Us).
• In Mexico, contact Chauvet Mexico (see Contact Us).
- In any other country, DO NOT contact Chauvet. Contact your distributor. See www.chauvetlighting.com for distributors outside the U.S., United Kingdom, Ireland, or Mexico.

If you live outside the U.S., United Kingdom, Ireland, or Mexico, contact your distributor of record and follow their instructions on how to return Chauvet products to them. Visit our website for contact details.
Call the corresponding Chauvet Technical Support office and request a Return Merchandise Authorization (RMA) number before shipping the product. Be prepared to provide the model number, serial number, and a brief description of the cause for the return.
You must send the merchandise prepaid, in its original box, and with its original packing and accessories. Chauvet will not issue call tags.
Clearly label the package with the RMA number. Chauvetwill refuse any product returned without an RMA number.

Write the RMA number on a properly affixed label. DO NOT write the RMA number directly on the box.
Before sending the product, clearly write the following information on a piece of paper and place it inside the box:
- Your name
- Your address
- Your phone number
- RMA number
• A brief description of the problem
Be sure to pack the product properly. Any shipping damage resulting from inadequate packaging will be your responsibility. FedEx packing or double-boxing is recommended.

Chauvet reserves the right to use its own discretion to repair or replace returned product(s).
CONTACT Us
WORLD HEADQUARTERS - Chauvet
General Information
Address: 5200 NW 108th Avenue
Sunrise, FL 33351
Voice: (954) 577-4455
Fax: (954) 929-5560
Toll free: (800) 762-1084
Technical Support
Voice: (954) 577-4455 (Press 4)
Fax: (954) 756-8015
Email: tech@chauvetlighting.com
World Wide Web www.chauvetlighting.com
UNITED KINGDOM AND IRELAND - Chauvet Europe Ltd.
General Information
Address: Unit 1C
Brookhill Road Industrial Estate
Pinxton, Nottingham, UK
NG16 6NT
Voice: +44 (0)1773 511115
Fax: +44 (0)1773 511110
Technical Support
Email: uktech@chauvetlighting.com
World Wide Web www.chauvetlighting.co.uk
MEXICO - Chauvet Mexico
General Information
Address: Av. Santa Ana 30
Parque Industrial Lerma
Lerma, Mexico C.P. 52000
Voice: +52 (728) 285-5000
Technical Support
Email: servicio@chauvet.com.mx
World Wide Web www.chauvet.com.mx
Outside the U.S., United Kingdom, Ireland, or Mexico, contact your dealer. Follow their instructions to request support or to return a product. Visit our website for contact details.
- TABLE OF CONTENTS
- BEFORE YOU BEGIN....3
- INTRODUCTION......5
- SETUP 7
- OPERATION....10
- TECHNICAL INFORMATION.... 19
- TECHNICAL SPECIFICATIONS .... 20
- RETURNS......21
- CONTACT US....22
- BEFORE YOU BEGIN
- WHAT IS
- INCLUDED
- UNPACKING INSTRUCTIONS
- CLAIMS
- SYMBOLS
- DISCLAIMER
- INTRODUCTION
- DESCRIPTION
- SETUP
- AC POWER
- FUS REPLACEMENT
- FUSE REPLACEMENT DIAGRAM
- POWER LINKING
- BATTERY POWER
- CHARGING THE BATTERY
- BATTERY LIFE INDICATOR
- BATTERY RUN TIME
- MOUNTING
- ORIENTATION
- RIGGING
- MOUNTING DIAGRAM
- OPERATION
- DMX LINKING
- STARTING ADDRESS MASTER/SLAVE MODE
- SLAVES
- MASTER
- D-FI™ 2.4 GHZ (DMX MODE MANUAL SYNC)
- D-FI™ 2.4 GHZ (DMX MODE AUTO SYNC)
- LINKING PRODUCTS
- DMX CHANNEL ASSIGNMENTS AND VALUES
- CONFIGURATION (STANDALONE)
- SOUND-ACTIVE MODE
- SOUND SENSITIVITY
- AUTO PROGRAMS
- PROGRAM SPEED
- SELECTING THE DIMMER SPEED MODE
- STATIC COLORS
- CUSTOM COLOR MIXING
- INFRARED MODE
- IRC-6 OPERATIONS
- AUTOMATIC MODE
- MANUAL COLOR CONTROL
- MISCELLANEOUS OPERATION
- TECHNICAL INFORMATION
- PRODUCT MAINTENANCE
- TECHNICAL SPECIFICATIONS
- RETURNS
- CONTACT US
- WORLD HEADQUARTERS - CHAUVET
- GENERAL INFORMATION
- TECHNICAL SUPPORT
- WORLD WIDE WEB WWW.CHAUVETLIGHTING.COM
- UNITED KINGDOM AND IRELAND - CHAUVET EUROPE LTD
- WORLD WIDE WEB WWW.CHAUVETLIGHTING.CO.UK
- MEXICO - CHAUVET MEXICO
- WORLD WIDE WEB WWW.CHAUVET.COM.MX
Brand : Chauvet
Model : Freedom Par Tri-6
Category : Effects machine