71015 - Cables for Computers and Peripherals iPort - Free user manual and instructions
Find the device manual for free 71015 iPort in PDF.


| Product Type | Cable for computers and peripherals |
| Brand | iPort |
| Model | 71015 |
| Connector Type | USB-A to USB-B (estimated) |
| Cable Length | 1.8 m (6 ft) |
| Data Transfer Rate | Up to 480 Mbps (USB 2.0) |
| Compatibility | PC, laptop, printer, scanner |
| Material | PVC jacket, copper conductors |
| Shielding | Aluminum foil + braid |
| Dimensions (Package) | 20 x 15 x 2 cm |
| Weight (Package) | 150 g |
| Color | Black |
| Warranty | 1 year |
| Certifications | CE, RoHS |
| Operating Temperature | -10°C to 60°C |
| Storage Temperature | -20°C to 70°C |
| Cleaning | Wipe with dry cloth; avoid liquids |
| Safety | Do not bend excessively; keep away from heat |
| Spare Parts Availability | Not applicable; non-repairable |
Frequently Asked Questions - 71015 iPort
User questions about 71015 iPort
0 question about this device. Answer the ones you know or ask your own.
Ask a new question about this device
Download the instructions for your Cables for Computers and Peripherals in PDF format for free! Find your manual 71015 - iPort and take your electronic device back in hand. On this page are published all the documents necessary for the use of your device. 71015 by iPort.
USER MANUAL 71015 iPort
natural_image
Simple black-and-white icon of a tablet device with no text or symbolsBOX CONTENTS:
Lock Tool
USB A - Lightning Cable

natural_image
Simple gray square shape on white background, no text or symbols present
INSTALLING IPAD INTO CASE
Step 1
Insert the lock tool in the side holes where indicated and pry shell apart from bezel by rotating the end of the lock tool towards you.
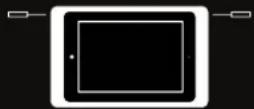

Step 2
Pull the shell apart from the bezel.
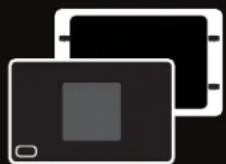
3
Step 3
Insert the Lightning cable into the iPad.

natural_image
Simple dark irregular shape on gray background with a white curved line ending in 'a' (no text or symbols)Step 5
Use a flathead screw driver or the security tool to slide the two retaining clips toward the center of iPad. This will secure the iPad to the Bezel.

natural_image
Simple diagram with a dark irregular shape inside a rectangular frame and two white arrows pointing outward (no text or symbols)Step 4
Insert iPad into the Bezel, camera side first. Insert the cable into cable retention as shown.
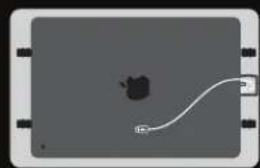
natural_image
Simple diagram showing a curved line with a dark irregular shape inside a rectangular frame (no text or symbols)Step 6
Insert the USB A cable into the USB port on the Shell.
While attaching the Shell, place the cable in the second retention clip on the inside of the Shell.

natural_image
Illustration of a device with a white rectangular area and a curved line, no text or symbols present.Step 7
Align the tabs of the Shell making sure the opening for the camera is aligned properly. Press each corner until all tabs securely snap into place.
Step 8
Use the provided lock tool to lock the top two corners of the Case. Turn screws COUNTER CLOCKWISE until stop.
*Note If intending to lock your Case to a BaseStation, ensure to also lock Case.

natural_image
Simple icon showing a gray square with a control knob and three downward arrows below (no text or symbols)
natural_image
Simple diagram with a gray square centered on a dark background, no text or symbols present.ATTACHING CASE TO BASESTATION & WALLSTATION
Place the Case in Portrait or Landscape. Ensure the Case is properly seated for secure mounting and charging.
Case can be charged in portrait or landscape on both the WallStation and BaseStation.
Dismount Case by pulling from left or right side.
Lock Case to BaseStation if desired using lock tool.

flowchart
graph LR
    A["0"] --> B["Button with 'Reset'"]
    B --> C["Square"]
    C --> D["Diode"]

natural_image
Pure electrical circuit lines without any symbolsREMOVE IPAD FROM CASE
Step 1
Unlock the security locks if applied. Insert the lock tool in the side holes where indicated and pry shell apart from bezel by rotating the end of the lock tool towards you.

natural_image
Pure electrical circuit lines without any symbolsStep 3
Slide the two retaining clips away from the iPad to free the iPad from the LuxePort Bezel.
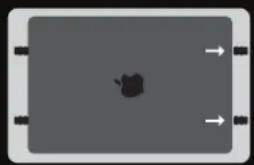
natural_image
Gray rectangular area with a small dark irregular shape and three white arrows pointing right (no text or symbols)Step 2
Pull the shell apart from the bezel, revealing the back of the iPad.

natural_image
Simple diagram with a gray square inside a black rectangle and white corner markers (no text or symbols)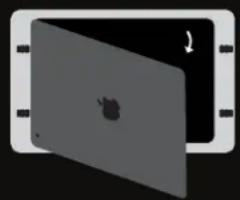
natural_image
Illustration of a computer monitor with an apple logo on the screen (no text or symbols)For more help and info please visit: iportproducts.com/luxeport
iPort
991 Calle Amanacer
San Clemente, CA 92673
United States of America
+1 949 226 5222


CAUTION: This product contains magnets. Do not place in direct proximity with magnetically sensitive objects such as credit cards or exposed hard drives. Persons with pace makers are not recommended to use this product.

CAUTION: Use products as directed. Unspecified use could result in injury.
Warranty can be found at iportproducts.com/warranty

33-7854
Brand : iPort
Model : 71015
Category : Cables for Computers and Peripherals