
ICM100T - Ice cream maker CUISINART - Free user manual and instructions
Find the device manual for free ICM100T CUISINART in PDF.


| Product Type | Ice Cream Maker |
| Brand | Cuisinart |
| Model | ICM100T |
| Capacity | 1.5 quarts (1.4 L) of frozen dessert; maximum unfrozen ingredient volume: 3.5 cups |
| Freezer Bowl Preparation | Must be frozen for at least 24 hours at 0°F (-18°C) before use |
| Churning Time | 15–25 minutes depending on recipe and volume |
| Maximum Continuous Operation | 30 minutes |
| Power Supply | 120 V, 60 Hz (polarized plug) |
| Motor Safety Feature | Automatic shutoff if motor overheats; reset by turning off and unplugging for 15 minutes |
| Lid | Transparent with integrated fill spout for adding ingredients during operation |
| Mixing Paddle | Included, mixes and aerates ingredients |
| Freezer Bowl Construction | Double-insulated walls with cooling liquid for even freezing |
| Locking Ring | Secures lid to base |
| Base | Sturdy base with ON/OFF switch |
| Materials | All food-contact materials are BPA free |
| Cleaning | Hand wash freezer bowl, lid, and paddle in warm soapy water; do not immerse motor base; do not use abrasive cleaners or dishwasher for freezer bowl |
| Storage | Freezer bowl can be stored in freezer; do not store frozen desserts in bowl for more than 30 minutes; transfer to airtight container |
| Warranty | Limited 18-month warranty (U.S. and Canada) for household use |
| Dimensions (Approx.) | 9.5 x 9.5 x 8.5 inches (24 x 24 x 22 cm) |
| Weight (Approx.) | 8.5 lbs (3.9 kg) |
Frequently Asked Questions - ICM100T CUISINART
User questions about ICM100T CUISINART
0 question about this device. Answer the ones you know or ask your own.
Ask a new question about this device
Download the instructions for your Ice cream maker in PDF format for free! Find your manual ICM100T - CUISINART and take your electronic device back in hand. On this page are published all the documents necessary for the use of your device. ICM100T by CUISINART.
USER MANUAL ICM100T CUISINART
natural_image
White TASTY Cuisinart food cooker with lid and side panel (no visible text or symbols on body)For your safety and continued enjoyment of this product, always read the User Guide carefully before using.
IMPORTANT SAFEGUARDS
When using an electrical appliance, especially when children are present, basic safety precautions should always be taken to reduce the risk of fire, electric shock, and/or injury, including the following:
- READ ALL INSTRUCTIONS BEFORE USING.
- To protect against risk of electric shock, do not place cord, plug, or motor in water or any other liquids.
- This appliance is not intended for use by persons (including children) with reduced physical, sensory, or mental capabilities, or lack of experience and knowledge, unless they are closely supervised and instructed concerning use of the appliance by a person responsible for their safety. Close supervision is necessary when any appliance is used by or near children. Children should be supervised to ensure that they do not play with the appliance.
- Turn the appliance OFF, then unplug from the outlet when not in use, before assembling or disassembling parts and before cleaning. To unplug, grasp the plug and pull from the outlet. Never pull from the power cord.
- Avoid contact with moving parts. Keep hands, hair and clothing, as well as spatulas and other utensils, away during operation to reduce the risk of injury and/or damage to the appliance.
- Do not operate any appliance with a damaged cord or plug, or after the appliance malfunctions or is dropped or damaged in any manner. Return the appliance to the nearest Cuisinart Repair Center for examination, repair, and electrical or mechanical adjustment.
- The use of attachments not recommended by Cuisinart may cause fire, electric shock or risk of injury.
- Do not use outdoors.
- Do not let cord hang over edge of table or counter, or touch hot surfaces.
- Keep hands and utensils out of freezer bowl
while in use to reduce the risk of injury to persons or to the appliance itself. DO NOT USE SHARP OBJECTS OR UTENSILS INSIDE THE FREEZER BOWL! Sharp objects will scratch and damage the inside of the freezer bowl. A rubber spatula or wooden spoon may be used when the appliance is in the OFF position.
-
This appliance is for household use. Any servicing other than cleaning and user maintenance should be done only by authorized Cuisinart Repair Personnel.
-
Do not use the freezer bowl on flames, hot plates or stoves. Do not expose it to a heat source; doing so may cause risk of fire, electric shock or injury. Do not wash in dishwasher.
-
Do not operate your appliance in an appliance garage or under a wall cabinet. When storing in an appliance garage, always unplug the unit from the electrical outlet. Not doing so could create a risk of fire, especially if the appliance touches the walls of the garage or the door touches the unit as it closes.
SAVE THESE INSTRUCTIONS
This appliance has a polarized plug (one blade is wider than the other). To reduce the risk of electric shock, this plug will fit in a polarized outlet only one way. If the plug does not fit fully in the outlet, reverse the plug. If it still does not fit, contact a qualified electrician. Do not attempt to defeat this safety feature.
SPECIAL CORD SET INSTRUCTIONS
A short power-supply cord is provided to reduce the risks resulting from becoming entangled in or tripping over a longer cord. Longer extension cords may be used if care is exercised in their use.
If a long, polarized extension cord is used, the marked electrical rating of the extension cord should be at least as great as the electrical rating of the appliance, and the longer cord should be arranged so that it will not drape over the countertop or tabletop, where it can be pulled on by children or animals, or tripped over.
CAUTION
- Do not immerse motor in water.
- To reduce the risk of fire or electric shock, do not disassemble the motor. Note: The motor does not contain any user-serviceable parts.
- Repairs should be made only by authorized personnel.
- Check voltage to be sure that the voltage indicated on the nameplate agrees with your voltage.
- Never clean with scouring powders or hard, abrasive implements.
TABLE OF CONTENTS
Important Safeguards 2
Features and Benefits 4
Before Using for the First Time ..... 5
Freezing Time and Bowl Preparation ..... 5
Making Frozen Desserts 5
Adding Ingredients 6
Safety Feature 6
Cleaning, Storage and Maintenance.... 6
Warranty....7
Recipe Tips 9
Recipes ....10
FEATURES AND BENEFITS
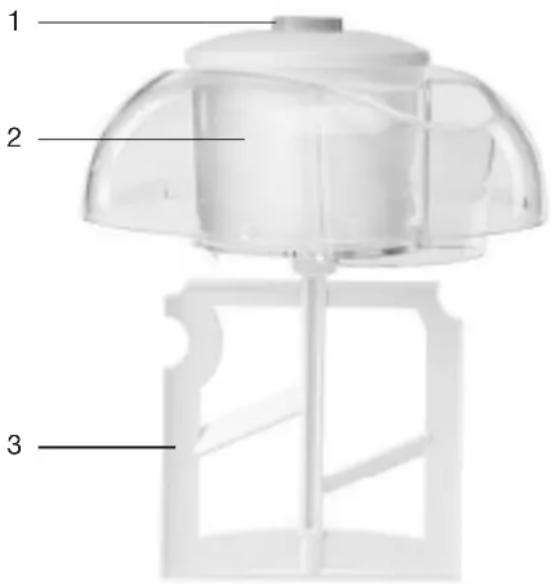
- ON/OFF Switch
- Motor and Transparent Lid with Integrated Fill Spout to Add Ingredients
Transparent to let you watch the freezing process as it progresses. Lid is designed to easily lock onto the base. Pour recipe ingredients through the spout. Also use to add ingredients like chips or nuts, without interrupting the freezing cycle.
- Mixing Paddle
Mixes and aerates ingredients in freezer bowl to create frozen desserts or drinks.
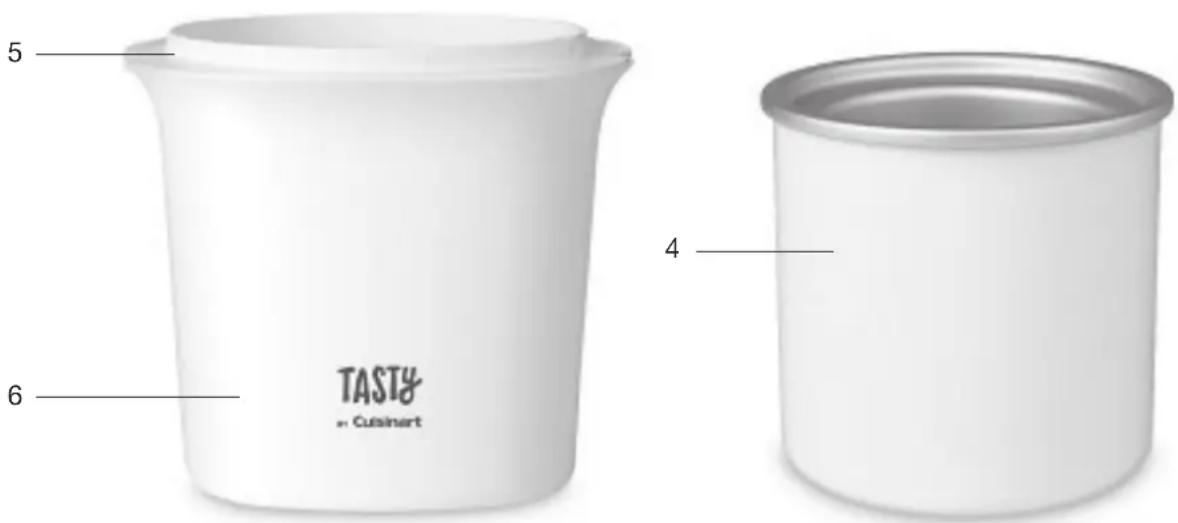
- Freezer Bowl
Contains cooling liquid between a double-insulated wall to create fast and even freezing. Double wall keeps the bowl cool and at an even temperature.
- Locking Ring
- Base
Strong enough to handle ice cream, frozen yogurt, sherbet, sorbet, and frozen drinks.
- BPA Free (not shown)
All materials that come in contact with food are BPA free.
BEFORE USING FOR THE FIRST TIME
DO NOT immerse the motor assembly in water. Wipe it with a damp cloth. Wash the lid, freezer bowl and mixing paddle in warm, soapy water to remove any dust or residue from the manufacturing and shipping process. DO NOT clean any of the parts with scouring cleaners or hard, abrasive implements.
FREEZING TIME AND BOWL PREPARATION
The freezer bowl must be completely frozen before you begin your recipe. Wash and dry the bowl before freezing. The length of time needed to reach the frozen state depends on how cold your freezer is. It is recommended that you place the freezer bowl in the back of your freezer where it is coldest. Freezer should be 0°F. Be sure to place the freezer bowl on a flat surface in its upright position for even freezing.
Generally, freezing time must be 24 hours or over 24 hours. Shake the bowl to determine whether it is completely frozen. If you do not hear the liquid within the bowl moving, the cooling liquid is therefore frozen. For the most convenient frozen desserts and drinks, leave your freezer bowl in the freezer at all times. Use the bowl immediately after removing from the freezer. It will begin to quickly defrost once it has been removed from the freezer.
Reminder: Your freezer should be set to 0^ F to ensure proper freezing of all foods.
MAKING FROZEN DESSERTS
- Prepare recipe ingredients from pages that follow or from your own recipe. If you use your own recipe, be sure it yields 112 quarts or less. Maximum capacity of unfrozen ingredients is 312 cups. 112 quarts is the maximum capacity of the freezer bowl.
- Remove the freezer bowl from the freezer. Place freezer bowl into the base.
NOTE: Bowl will begin to defrost quickly once it has been removed from freezer. Use it immediately after removing from freezer.
- Attach mixing paddle to motor assembly.
- Place the Motor/Lid onto the base and turn clockwise to lock into place.
- Press ON/OFF button to ON position, the mixing paddle will begin to turn.
- Immediately pour ingredients through ingredient spout.
NOTE: Ingredients must be added to the freezer bowl after unit is turned on.
- Frozen desserts will be done in 15–25 minutes. The time will depend on the recipe and volume of the dessert you are making. When the mixture has thickened to your liking, it is done. If you desire a firmer consistency, transfer the dessert to an airtight container and store in the freezer for two or more hours.
NOTE: Do not store frozen desserts in the freezer bowl. Desserts will stick to the sides of the freezer bowl and may damage the bowl. Store only in a freezer-safe, airtight container.
CAUTION
- When the mixing paddle begins to move back and forth, press ON/OFF button to OFF position. This means the dessert is frozen.
• Maximum continuous operating time is 30 minutes.
ADDING INGREDIENTS
Ingredients such as chips and nuts should be added about 5 minutes before the recipe is complete. Once the dessert has begun to thicken, comparable to a milkshake consistency, add the ingredients through the fill spout. Ingredients should be added very gradually, allowing them to fully incorporate before adding more through the spout. Nuts and other ingredients should be no larger than 12 inch.
SAFETY FEATURE
The Tasty™ by Cuisinart® Ice Cream Maker is equipped with a safety feature that automatically stops the unit if the motor overheats. This may occur if the dessert is extremely thick, if the unit has been running for an excessively long period of time, or if added ingredients (nuts, etc.) are in extremely large pieces. To reset the unit, put the ON/OFF switch in the OFF position and unplug the unit. Let the unit cool off for a minimum of 15 minutes. Freezer bowl will defrost. Can go with ice cream in the freezer for 30 minutes or less.
CLEANING, STORAGE AND MAINTENANCE
CLEANING
Clean the freezer bowl, mixing paddle and lid in warm, soapy water. DO NOT PUT FREEZER BOWL IN THE DISHWASHER. DO NOT CLEAN WITH ABRASIVE CLEANERS OR
IMPLEMENTS. Wipe base clean with a damp cloth. Dry all parts thoroughly.
STORAGE
DO NOT put freezer bowl in freezer if bowl is wet. DO NOT store lid, or base in freezer. You may store the freezer bowl in the freezer for convenient, immediate use. Do not store frozen desserts in the freezer bowl in the freezer for more than 30 minutes at a time. Transfer frozen desserts to a freezer-safe, airtight container for longer storage in the freezer.
MAINTENANCE
Any other servicing should be performed by an authorized service representative.
LIMITED 18-MONTH WARRANTY (U.S. AND CANADA ONLY)
This warranty is available to consumers only. You are a consumer if you own a Tasty ^™ by Cuisinart ^® Ice Cream Maker that was purchased at retail for personal, family or household use. Except as otherwise required under applicable law, this warranty is not available to retailers or other commercial purchasers or owners.
We warrant that your Tasty ^™ by Cuisinart ^® Ice Cream Maker will be free of defects in materials and workmanship under normal home use for 18 months from the date of original purchase. We recommend that you visit our website, www.cuisinart.com for a fast, efficient way to complete your product registration. However, product registration does not eliminate the need for the consumer to maintain the original proof of purchase in order to obtain the warranty benefits. In the event that you do not have proof of purchase date, the purchase date for purposes of this warranty will be the date of manufacture.
If your Tasty™ by Cuisinart® Ice Cream Maker should prove to be defective within the warranty period, we will repair it, or if we think necessary, replace it. To obtain warranty service, simply call our toll-free number, 1-800-726-0190, for additional information from our Consumer Service Representatives or send the defective product to Consumer Service at Cuisinart, 7475 North Glen Harbor Blvd., Glendale, AZ 85307.
To facilitate the speed and accuracy of your return, please enclose \$10.00 for shipping and handling of the product.
Please pay by check or money order made payable to Cuisinart (California residents need only supply proof of purchase and should call 1-800-726-0190 for shipping instructions).
NOTE: For added protection and secure handling of any Cuisinart product that is being returned, we recommend you use a traceable, insured delivery service. Cuisinart cannot be held responsible for in-transit damage or for packages that are not delivered to us. Lost and/or damaged products are not covered under warranty.
Please be sure to include your return address, daytime phone number, description of the product defect, product model number (located on bottom of product), original date of purchase, and any other information pertinent to the product's return.
CALIFORNIA RESIDENTS ONLY
California law provides that for In-Warranty Service, California residents have the option of returning a nonconforming product (A) to the store where it was purchased or (B) to another retail store that sells Cuisinart products of the same type.
The retail store shall then, at its discretion, either repair the product, refer the consumer to an independent repair facility, replace the product, or refund the purchase price less the amount directly attributable to the consumer's prior usage of the product. If the above two options do not result in the appropriate relief to the consumer, the consumer may then take the product to an independent repair facility if service or repair can be economically accomplished. Cuisinart and not the consumer will be responsible for the reasonable cost of such service, repair, replacement, or refund for nonconforming products under warranty.
California residents may also, according to their preference, return nonconforming products directly to Cuisinart for repair, or if necessary, replacement, by calling our Consumer Service Center toll-free at 1-800-726-0190.
Cuisinart will be responsible for the cost of the repair, replacement, and shipping and handling for such products under warranty.
BEFORE RETURNING YOUR CUISINART PRODUCT
If you are experiencing problems with your Cuisinart product, we suggest that you call our Consumer Service Center at 1-800-726-0190 before returning the product to be serviced. If servicing is needed, a Representative can confirm whether the product is under warranty and direct you to the nearest service location.
Your Tasty™ by Cuisinart® Ice Cream Maker has been manufactured to the strictest specifications and has been designed for use only in 120 volt outlets and only with authorized accessories and replacement parts. This warranty expressly excludes any defects or damages caused by attempted use of this unit with a converter, as well as use with accessories, replacement parts or repair service other than those authorized by
Cuisinart. This warranty does not cover any damage caused by accident, misuse, shipment or other than ordinary household use. This warranty excludes all incidental or consequential damages. Some states do not allow the exclusion or limitation of these damages, so these exclusions may not apply to you. This warranty gives you specific legal rights, and you may also have other rights, which vary from state to state.
Important: If the nonconforming product is to be serviced by someone other than Cuisinart's Authorized Service Center, please remind the servicer to call our Consumer Service Center at 1-800-726-0190 to ensure that the problem is properly diagnosed, the product is serviced with the correct parts, and the product is still under warranty.
RECIPE TIPS
The recipes that follow offer you a variety of options for delicious frozen desserts. You may create or use recipes of your own, as long as they yield no more than 112 quarts.
- Frozen desserts from the Tasty™ by Cuisinart® Ice Cream Maker use pure, fresh ingredients. Because of this, the desserts and drinks do not have the same characteristics as commercially prepared frozen desserts and drinks. Most store-bought versions use gums and preservatives to make them firmer. If you desire a firmer consistency, transfer the dessert to an airtight container and store in the freezer until desired consistency is reached, usually two or more hours.
- Some recipes use precooked ingredients. For best results, the mixture should be chilled overnight before using. Or, chill the recipe over an ice bath, until it is completely cooled, before using.
- To make an ice bath, fill a large container with ice and water. Place saucepan or other container into the ice bath. Cool precooked ingredients completely.
- Prior to freezing, most recipes may be stored in the refrigerator for up to 3 days.
- You may substitute lower-fat creams (e.g., half-and-half), milk (reduced fat or low-fat) as well as nondairy milks (soy, rice) for heavy cream and whole milk used in many recipes. However, keep in mind that the higher the fat content, the richer and creamier the result. Using lower-fat substitutes may change the taste, consistency and texture of the dessert. When substituting, be sure to use the same volume of the substitute as you would have used of the original item. For example, if the recipe calls for 2 cups of cream, use a total of 2 cups of the substitute (such as 1 cup cream 1 cup whole milk).
- You may substitute artificial sweeteners for sugar. If the recipe is to be precooked, add the sweetener after the heating process is complete and ingredients have cooked. Stir the mixture thoroughly to dissolve the sweetener.
- In recipes that use alcohol, add the alcohol during the last 2 minutes of the freezing process. Otherwise, the alcohol may impede the freezing process.
- When making sorbet, be sure to test the ripeness and sweetness of the fruit before you use it. The freezing process reduces the sweetness of the fruit, so that it will taste less sweet than the recipe mixture. If the fruit tastes tart, add sugar to the recipe. If the fruit is very ripe or sweet, reduce the amount of sugar in the recipe.
- The Cuisinart recipes will yield up to 1½ quarts of dessert. When pouring ingredients in through the fill spout, DO NOT fill the freezer bowl higher than the top of the mixing paddle. The ingredients will increase in volume during the freezing process.
- When making more than one recipe at a time, be sure the freezer bowl is completely frozen before each use. Additional freezer bowls may be purchased on the Cuisinart website (www.cuisinart.com).
- Make sure mixing paddle and lid are in place before turning on machine.
SIMPLE ICE CREAMS
Simple Vanilla Ice Cream
This ice cream can easily be dressed up by adding your favorite chopped candies or sprinkles at the end of churning.
Makes about 4½ cups
1 cup whole milk
^3/_4 cup granulated sugar
Pinch salt
2 cups heavy cream
1 tablespoon pure vanilla extract
-
In a medium bowl, use a hand mixer on low speed or whisk to combine the milk, sugar and salt until the sugar is dissolved. Stir in the heavy cream and vanilla extract. Cover and refrigerate 1 to 2 hours, or overnight.
-
Turn on the Tasty™ by Cuisinart® Ice Cream Maker; pour the mixture into the frozen freezer bowl and let mix until thickened, about 20 to 25 minutes. The ice cream will have a soft, creamy texture. If a firmer consistency is desired, transfer the ice cream to an airtight container and place in freezer for about 2 hours. Remove from freezer about 15 minutes before serving.
Nutritional information per serving ( 12 cup): Calories 246 (73% from fat) • carb. 14g • pro. 2g • fat 20g • sat. fat 13g • chol. 76mg • sod. 50mg • calc. 68mg • fiber 0g
Simple Chocolate Ice Cream
For a real treat, serve this with our Chocolate Sauce on page 18.
Makes about 4½ cups
^3/_4 cup cocoa powder, sifted
12 cup granulated sugar
14 cup packed dark brown sugar Pinch salt
^3/_4 cup whole milk
2 cups heavy cream
1 teaspoon pure vanilla extract
- In a medium bowl, whisk together the cocoa, sugars and salt. Add the milk and, using a
hand mixer on low speed or a whisk, beat to combine until the cocoa, sugars and salt are dissolved. Stir in the heavy cream and vanilla extract. Cover and refrigerate 1 to 2 hours, or overnight.
- Turn the Tasty™ by Cuisinart® Ice Cream Maker on; pour the mixture into the frozen freezer bowl and let mix until thickened, about 20 to 25 minutes. The ice cream will have a soft, creamy texture. If a firmer consistency is desired, transfer the ice cream to an airtight container and place in freezer for about 2 hours. Remove from freezer about 15 minutes before serving.
Nutritional information per serving ( 12 cup): Calories 287 (64% from fat) • carb. 23g • pro. 3g • fat 21g • sat. fat 13g • chol. 75mg • sod. 46mg • calc. 60mg • fiber 1g
Butter Pecan Ice Cream
The butter used to toast the pecans can be saved and used over pancakes or waffles.
Makes about 5 cups (ten 12 -cup servings)
4 tablespoons unsalted butter
1 cup roughly chopped pecans
1 teaspoon salt, plus 1 pinch, divided
1 cup whole milk
^3/_4 cup granulated sugar
2 cups heavy cream
1 tablespoon pure vanilla extract
- Melt the butter in a medium skillet. Add the pecans and 1 teaspoon of salt. Cook over medium-low heat until pecans are toasted and golden, stirring frequently, about 6 to 8 minutes. Remove from the heat, strain and reserve the pecans, allowing them to chill. The butter can be used for another use – delicious over pancakes or waffles.
- In a medium bowl, use a hand mixer on low speed or a whisk to combine the milk, sugar and pinch of salt until the sugar is dissolved. Stir in the heavy cream and vanilla extract. Cover and refrigerate 1 to 2 hours, or overnight.
- Turn the Tasty™ by Cuisinart® Ice Cream Maker on; pour the mixture into the frozen freezer bowl and let mix until thickened, about 20 to 25 minutes. When the mixture is
comparable to the thickness of a milkshake, after about 15 minutes, very slowly add the reserved chopped pecans and let mix in completely. The ice cream will have a soft, creamy texture. If a firmer consistency is desired, transfer the ice cream to an airtight container and place in freezer for about 2 hours. Remove from freezer about 15 minutes before serving.
Nutritional information per serving ( 12 cup): Calories 330 (79% from fat) • carb. 14g • pro. 3g
- fat 30g • sat. fat 15g • chol. 81mg • sod. 58mg
• calc. 68mg • fiber 1g
Fresh Strawberry Ice Cream
Best made when strawberries are at their peak of freshness, this ice cream is light, sweet and fruity.
Makes about 5 cups
1½ cups fresh strawberries, hulled*
12 cup whole milk
23 cup granulated sugar Pinch salt
1 12 cups heavy cream
1^1/2 teaspoons pure vanilla extract
-
Put the strawberries into the bowl of a food processor fitted with the chopping blade. Pulse strawberries until finely chopped. Reserve in bowl.
-
In a medium bowl, use a hand mixer on low speed or a whisk to combine the milk, sugar and salt until the sugar is dissolved. Stir in the heavy cream and vanilla extract. Stir in reserved strawberries with all juices. Cover and refrigerate 1 to 2 hours, or overnight.
-
Turn on the Tasty™ by Cuisinart® Ice Cream Maker; pour the mixture into the frozen freezer bowl and let mix until thickened, about 20 to 25 minutes. The ice cream will have a soft, creamy texture. If a firmer consistency is desired, transfer the ice cream to an airtight container and place in freezer for about 2 hours. Remove from freezer about 15 minutes before serving.
* Frozen strawberries (thawed) may be substituted if fresh strawberries are not available.
Nutritional information per serving ( 12 cup): Calories 188 (62% from fat) • carb. 16g • pro. 1g • fat 12g • sat. fat 9g • chol. 50mg • sod. 20mg • calc. 63mg • fiber 0g
Peanut Butter Cup Ice Cream
One of the easiest ice creams to make, the rich peanut butter flavors in this ice cream will have your friends and family in awe.
Makes about 5 cups
^3/4 cup good quality peanut butter (not natural)
12 cup granulated sugar
^3/_4 cup whole milk
2 cups heavy cream
1 teaspoon pure vanilla extract
1 cup chopped chocolate peanut butter cup candies (about 15 miniature peanut butter cups, quartered)
-
In a medium mixing bowl, use a hand mixer on low speed to combine the peanut butter and sugar until smooth. Add the milk and mix on low speed until the sugar is dissolved, about 1 to 2 minutes. Stir in the heavy cream and vanilla extract. Cover and refrigerate 1 to 2 hours, or overnight.
-
Turn on the Tasty™ by Cuisinart® Ice Cream Maker; pour the mixture into the freezer bowl and let mix until thickened, about 12 to 15 minutes. When the mixture is comparable to the thickness of a milkshake, after about 10 minutes, add the chopped candy through the top and let mix in completely. The ice cream will have a soft, creamy texture. If a firmer consistency is desired, transfer the ice cream to an airtight container and place in freezer for about 2 hours. Remove from freezer about 15 minutes before serving.
Nutritional information per serving (½ cup): Calories 383 (70% from fat) • carb. 22g • pro. 7g • fat 31g • sat. fat 14g • chol. 68mg • sod. 155mg • calc. 62mg • fiber 2g
Peppermint Ice Cream
Not your ordinary mint ice cream, our Peppermint calls for a lot of bright green, fresh mint for a real natural flavor.
Makes about 5½ cups
1 cup whole milk
2 cups packed fresh mint leaves
^3/_4 cup granulated sugar Pinch salt
2 cups heavy cream
2 teaspoons pure vanilla extract
1 cup chopped peppermint patties (about 10 to 12 bite-size patties)
- In a medium saucepan set over medium-low heat, bring the milk just to a boil. Remove from heat and add the mint leaves; let steep for 20 to 30 minutes. If you desire a milder mint flavor, strain and discard the mint leaves after steeping, but for a more intense ice cream, blend the milk/mint mixture using an immersion blender.
- Add the sugar and salt to the steeped milk/mint mixture. Use a hand mixer on low speed or a whisk to combine, beat until the sugar is dissolved. Stir in the heavy cream and vanilla extract. Cover and refrigerate, 1 to 2 hours, or overnight.
- Turn on the Tasty™ by Cuisinart® Ice Cream Maker; pour the mixture into the frozen freezer bowl and let mix until thickened, about 20 to 25 minutes. When the mixture is comparable to the thickness of a milkshake, after about 15 minutes, add the chopped candy through the top and let mix in completely. The ice cream will have a soft, creamy texture. If a firmer consistency is desired, transfer the ice cream to an airtight container and place in freezer for about 2 hours. Remove from freezer about 15 minutes before serving.
Nutritional information per serving ( 12 cup):
Calories 311 (52% from fat) • carb. 36g • pro. 2g
- fat 18g • sat. fat 11g • chol. 63mg • sod. 49mg
• calc. 70mg • fiber 1g
Banana Walnut Chip
Do not be intimidated by the multiple steps in this ice cream. The end result of frozen banana, toasted walnuts and flecks of chocolate makes it worth every minute.
Makes about 5 cups
12 cup whole milk
2 cups heavy cream
1 teaspoon pure vanilla extract
14 teaspoon salt
13 cup packed dark brown sugar
1 tablespoon water
2 tablespoons unsalted butter
1 large banana, cut into 12 -inch pieces
1 tablespoon dark rum
14 teaspoon fresh lemon juice
2 ounces bittersweet chocolate, roughly chopped ( 13 cup chips)
14 cup toasted walnuts, roughly chopped
- In a medium mixing bowl, combine the milk, cream, vanilla extract and salt, and mix well. Reserve.
- Heat the sugar with water in a large skillet until it begins to sizzle. Stir in the butter and heat until melted. Add the banana; cook for about 2 minutes, or until fragrant and softened. Carefully stir in the rum and cook for an additional 2 minutes, or until slightly thickened. Remove from heat. Using a slotted spoon, strain the banana/sugar mixture, reserving the sugar syrup and banana in separate bowls.
- Stir the lemon juice into the banana and then mix the banana into the steeped milk/cream. Cover and refrigerate mixture 1 to 2 hours, or overnight.
- Turn on the Tasty™ by Cuisinart® Ice Cream Maker; pour the banana mixture into the frozen freezer bowl and let mix until thickened, about 20 to 25 minutes.
- While ice cream is churning, melt the bittersweet chocolate in a bowl set over a pot of simmering water; reserve.
- When the mixture is comparable to the thickness of a milkshake, after about 15 minutes, gradually add the sugar syrup and then walnuts through the top of the ice cream maker; let mix until combined. Follow with drizzling the melted chocolate into the churning ice cream. The ice cream will have a soft, creamy texture. If a firmer consistency is desired, transfer the ice cream to an airtight container and place in freezer for about 2 hours. Remove from freezer about 15 minutes before serving.
Nutritional information per serving (based on 12 cup):
Calories 199 (67% from fat) • carb. 14g • pro. 2g
• fat 16g • sat. fat 9g • chol. 41mg • sod. 69mg
• calc. 34mg • fiber 1g
CUSTARD-STYLE ICE CREAMS
Vanilla Bean Ice Cream
For the true vanilla lover. Be sure to use fresh vanilla beans to capture the intense flavor.
Makes about 5 cups
1 12 cups whole milk
1 12 cups heavy cream
^3/4 cup granulated sugar, divided Pinch salt
1 whole vanilla bean, halved and seeds scraped
4 large egg yolks
1 teaspoon pure vanilla extract
-
In a medium saucepan set over medium-low heat, whisk together the milk, cream, half of the sugar, salt and the scraped vanilla bean (including the pod). Bring the mixture just to a boil.
-
While the milk/cream mixture is heating, combine the yolks and remaining sugar in a medium bowl. Using a hand mixer on low speed or a whisk, beat until mixture is pale and thick.
-
Once the milk/cream mixture has come to a slight boil, whisk about a third of the hot mixture into the yolk/sugar mixture. Add another third of the mixture, then return the combined mixture to the saucepan. Using a wooden spoon, stir the mixture constantly over low heat until it thickens slightly and coats the back of the spoon. This mixture must NOT boil or the yolks will overcook – the process should only take a few minutes.
-
Pour the mixture through a fine mesh strainer (discard the vanilla pod) and bring to room temperature. Stir in the vanilla extract. Cover and refrigerate 1 to 2 hours, or overnight.
-
Turn on the Tasty™ by Cuisinart® Ice Cream Maker; pour the mixture into the frozen freezer bowl and let mix until thickened, about 20 to 25 minutes. The ice cream will have a soft, creamy texture. If a firmer consistency is desired, transfer the ice cream to an airtight container and place in freezer for about 2 hours. Remove from freezer about 15 minutes before serving.
Nutritional information per serving (based on 12 cup):
Calories 228 (63% from fat) • carb. 18g • pro. 3g
- fat 16g • sat. fat 10g • chol. 128mg • sod. 50mg
• calc. 77mg • fiber 0g
Fresh Mint with Chocolate Cookies
Always a winning combination, fresh mint and chocolate take the forefront in this rich and creamy ice cream.
Makes about 5½ cups
1 12 cups whole milk
1 12 cups heavy cream
^3/4 cup granulated sugar, divided Pinch salt
1 12 teaspoons pure vanilla extract
2 cups packed fresh mint leaves
4 large egg yolks
1 cup crushed chocolate sandwich cookies (about 8 cookies)
- In a medium saucepan set over medium-low heat, whisk together the milk, cream, half of the granulated sugar, salt, and vanilla extract. Bring the mixture just to a boil. Remove from heat and add the mint leaves; let steep for 20 to 30 minutes. If you desire a milder mint flavor, remove and discard the mint leaves after steeping, but for a more intense ice cream, we recommend blending the milk/mint mixture using an immersion blender. After steeping, return the mixture just to a boil over medium-low heat.
- While the milk/cream/mint mixture is reheating, combine the yolks and remaining sugar in a medium bowl. Using a hand mixer on low speed or a whisk, beat until mixture is pale and thick.
-
Once the milk/cream/mint mixture has come to a slight boil, whisk about a third of the hot mixture into the yolk/sugar mixture. Add another third of the mixture, then return the combined mixture to the saucepan. Using a wooden spoon, stir the mixture constantly over low heat until it thickens slightly and coats the back of the spoon. This mixture must NOT boil or the yolks will overcook – the process should only take a few minutes.
-
Pour the mixture through a fine mesh strainer. Bring the ice cream base to room temperature. Cover and refrigerate 1 to 2 hours, or overnight.
-
Turn on the Tasty™ by Cuisinart® Ice Cream Maker; pour the mixture into the frozen freezer bowl and let mix until thickened, about 20 to 25 minutes. When the mixture is comparable to the thickness of a milk shake, after about 15 minutes, gradually add the crushed cookies through the top of the ice cream maker; let mix until fully combined.
-
The ice cream will have a soft, creamy texture. If a firmer consistency is desired, transfer the ice cream to an airtight container and place in freezer for about 2 hours. Remove from freezer about 15 minutes before serving.
Nutritional information per serving (based on 12 cup): Calories 278 (57% from fat) • carb. 26g • pro. 4g • fat 18g • sat. fat 10g • chol. 128mg • sod. 106mg • calc. 113mg • fiber 2g
Pistachio Ice Cream
We love this flavor in our Ice Cream Birthday Cake on page 17, or just scoop into your favorite cone.
Makes about 5 cups
1½ cups whole milk
1 whole vanilla bean, halved and seeds scraped
^2/_3 cup granulated sugar, divided
2 cups shelled, chopped, roasted, unsalted pistachios; divided
1½ cups heavy cream Pinch salt
4 large egg yolks
1 / 4 teaspoon pure almond extract
-
In a medium saucepan set over medium-low heat, stir together the milk, vanilla bean (including the pod), half of the sugar and 1 cup pistachios. Bring the mixture just to a boil. Remove from heat; let mixture steep for 1 to 2 hours. After steeping, add the cream and salt and gradually return the mixture just to a boil over medium-low heat.
-
When the milk/pistachio/cream mixture is reheating, combine the yolks and remaining sugar in a medium bowl. Using a hand mixer on low speed or a whisk, beat until mixture is pale and thick.
-
Once the milk/pistachio/cream mixture has come to a slight boil, whisk about a third of the hot mixture into the yolk/sugar mixture. Add another third of the mixture, then return the combined mixture to the saucepan. Using a wooden spoon, stir the mixture constantly over the low heat until it thickens slightly and coats the back of the spoon. This mixture must NOT boil or the yolks will overcook – the process should only take a few minutes.
-
Stir in the almond extract and pour the mixture through a fine mesh strainer (discard the vanilla pods and pistachios); bring to room temperature. Cover and refrigerate 1 to 2 hours, or overnight.
-
Turn on the Tasty™ by Cuisinart® Ice Cream Maker; pour the mixture into the frozen freezer bowl and let mix until thickened, about 20 to 25 minutes. When the mixture is comparable to the thickness of a milk shake, after about 15 minutes, add the remaining roasted pistachios through the opening at the top of the ice cream maker. The ice cream will have a soft, creamy texture. If a firmer consistency is desired, transfer the ice cream to an airtight container and place in freezer for about 2 hours. Remove from freezer about 15 minutes before serving.
Nutritional information per serving ( 12 cup): Calories 256 (65% from fat) • carb. 18g • pro. 4g • fat 19g • sat. fat 10g • chol. 128mg • sod. 51mg • calc. 84mg • fiber 1g
FROZEN YOGURTS
Rich Vanilla Frozen Yogurt
While part-skim or fat-free yogurt can be substituted, to get the real flavor and richness of this frozen yogurt, it is best to use the whole-milk variety.
Makes about 4 cups
1½ tablespoons light corn syrup
1½ tablespoons honey
3 tablespoons water
2 vanilla beans, split and seeds scraped
3 cups whole milk, plain Greek yogurt
1 teaspoon pure vanilla extract
^3/_4 cup granulated sugar Pinch salt
-
Put the corn syrup, honey, water and vanilla beans into a medium saucepan. Over medium-low heat, bring mixture to a boil, then simmer until reduced by about half. Strain (discarding vanilla pods); reserve.
-
In a large mixing bowl, whisk the yogurt, reserved honey/water/vanilla reduction, vanilla extract, sugar and salt together. Whisk until the sugar has dissolved. Cover and refrigerate 2 to 3 hours, or overnight.
-
Turn on the Tasty™ by Cuisinart® Ice Cream Maker; pour the mixture into the frozen freezer bowl and let mix until thickened, about 20 to 25 minutes. The frozen yogurt will have a soft, creamy texture. If a firmer consistency is desired, transfer the frozen yogurt to an airtight container and place in freezer for about 2 hours. Remove from freezer about 15 minutes before serving.
Nutritional information per serving ( 12 cup): Calories 208 (37% from fat) • carb. 28g • pro. 3g
- fat 9g • sat. fat 6g • chol. 23mg • sod. 64mg
• calc. 113mg • fiber 0g
Mango Frozen Yogurt
Be sure to use fresh, ripe mangoes. The better the mango, the better the frozen yogurt.
Makes about 5 cups
3 cups plain Greek yogurt
12 cup granulated sugar
2 mangoes, peeled, pitted and roughly chopped (about 12 - to 1-inch pieces)
1 teaspoon fresh lime juice, about 12 lime
-
In a large mixing bowl, whisk the yogurt and sugar together; reserve.
-
Using a blender, purée the mangoes with the lime juice and 1 cup of the yogurt mixture. Combine with the remaining yogurt/sugar mixture. Cover and refrigerate 1 to 2 hours, or overnight.
-
Turn on the Tasty™ by Cuisinart® Ice Cream Maker; pour the mixture into the frozen freezer bowl and let mix until thickened, about 20 to 25 minutes. The frozen yogurt will have a soft, creamy texture. If a firmer consistency is desired, transfer the frozen yogurt to an airtight container and place in freezer for
about 2 hours. Remove from freezer about 15 minutes before serving.
Nutritional information per serving ( 12 cup): Calories 154 (41% from fat) • carb. 20g • pro. 3g
- fat 7g • sat. fat 5g • chol. 18mg • sod. 41mg
• calc. 95mg • fiber 1g
Mixed Berry Frozen Yogurt
The tanginess of the yogurt comes through in this frozen treat.
Makes about 4½ cups
2 cups plain Greek yogurt
12 cup granulated sugar Pinch salt
1 teaspoon pure vanilla extract
12 ounces frozen mixed berries
1 tablespoon honey
1 tablespoon fresh lemon juice
-
In a large bowl, whisk the yogurt with the sugar, salt, and vanilla extract; reserve.
-
In a medium saucepan, heat the berries, honey and lemon juice on low until softened, about 10 minutes. Strain, discarding liquid, and cool. Once the berries are cooled, stir into the yogurt/sugar mixture. Cover and refrigerate 2 to 3 hours, or overnight.
-
Turn on the Tasty™ by Cuisinart® Ice Cream Maker; pour the mixture into the frozen freezer bowl and let mix until thickened, about 20 to 25 minutes. The frozen yogurt will have a soft, creamy texture. If a firmer consistency is desired, transfer the frozen yogurt to an airtight container and place in freezer for about 2 hours. Remove from freezer about 15 minutes before serving.
Nutritional information per serving ( 12 cup): Calories 123 (8% from fat) • carb. 27g • pro. 4g
- fat 1g • sat. fat 1g • chol. 3mg • sod. 73mg
• calc. 167mg • fiber 2g
SORBETS
Coconut Sorbet
Delicious when topped with toasted coconut or our Chocolate Sauce (page 18).
Makes about 5 cups
1 cup water
1 cup granulated sugar
1 whole vanilla bean, halved and seeds scraped
Pinch salt
2 cans (13.5 ounces each) unsweetened coconut milk
1. Combine the water, sugar, vanilla bean (including the pod) and salt in a medium saucepan set over medium-low heat. Bring mixture just to a boil and then remove from heat. Let mixture steep for 1 hour; strain (discarding pod).
2. Add the coconut milk to the strained mixture. Cover and refrigerate overnight.
3. Turn on the Tasty™ by Cuisinart® Ice Cream Maker; pour the mixture into the frozen freezer bowl and let mix until thickened, about 20 to 25 minutes. The sorbet will have a soft, creamy texture. If a firmer consistency is desired, transfer the sorbet to an airtight container and place in freezer for about 2 hours. Remove from freezer about 15 minutes before serving.
Nutritional information per serving (½ cup): Calories 213 (57% from fat) • carb. 23g • pro. 1g • fat 14g • sat. fat 13g • chol. 0mg • sod. 33mg • calc. 1mg • fiber 0g
Raspberry Sorbet
Not only is this sorbet sweet and refreshing, but the color makes a beautiful presentation on any menu.
Makes about 4½ cups
2 cups water
1¼ cups granulated sugar Pinch table salt
3 cups frozen raspberries, thawed
- Prepare a simple syrup with the water and sugar by combining both in a medium
saucepan set over medium-low heat. Cook mixture until the sugar is fully dissolved.
-
Once the simple syrup is ready, add the salt and the raspberries. Using an immersion blender, blend the mixture until smooth. Strain half of the mixture through a fine mesh strainer to remove the seeds. Use a spatula to aid in passing the purée through the strainer. Remove seeds and repeat with the second half. Cover and refrigerate 2 to 3 hours, or overnight.
-
Turn on the Tasty™ by Cuisinart® Ice Cream Maker; pour the mixture into the frozen freezer bowl and let mix until thickened, about 20 to 25 minutes. The sorbet will have a soft, creamy texture. If a firmer consistency is desired, transfer the sorbet to an airtight container and place in freezer for about 2 hours. Remove from freezer about 15 minutes before serving.
Nutritional information per serving ( 12 cup): Calories 128 (0% from fat) • carb. 33g • pro. 0g • fat 0g • sat. fat 0g • chol. 0mg • sod. 16mg • calc. 8mg • fiber 2g
FROZEN DESSERTS
Ice Cream Sandwich Cookies
A step above the traditional ice cream sandwich cookies. A perfect match for your favorite flavor. If you cannot find cocoa nibs, miniature chocolate chips can be substituted, or you can double the amount of pecans.
Makes 24 cookies (for 12 ice cream sandwiches)
1/3 cup cocoa powder, sifted
1 13 cups bread flour
^3/_4 teaspoon baking powder
14 teaspoon salt
1 tablespoon instant espresso powder
12 cup unsalted butter, room temperature and cubed
1 cup granulated sugar
1 large egg
1 teaspoon pure vanilla extract
3 tablespoons cocoa nibs (These can be found in most gourmet or cooking stores. If you cannot find them, substitute with coarsely chopped, toasted pecans or miniature chocolate chips.)
14 cup chopped pecans, toasted
- Preheat oven to 350^ F.
- Combine the cocoa powder, flour, baking powder, salt and espresso powder in a small bowl. Whisk to blend; reserve.
- Put the butter into the bowl of a stand mixer fitted with the mixing paddle (or use a hand mixer fitted with the mixing beaters). Using medium speed, cream until smooth. Gradually add the sugar and mix until creamy. Add the egg and vanilla extract and mix until combined. Add the dry ingredients and, using a low speed, mix until fully incorporated. Add the cocoa nibs and pecans and mix on low until just combined.
- Using a small ice cream scoop (about 1½ inches in diameter), scoop the dough onto a parchment paper-lined cookie sheet (each round should be about 2 tablespoons). Use a cup to flatten each cookie mound down.
- Bake in the preheated oven for about 15 to 20 minutes, or until the cookie looks dry, but not firm. Let cookies fully cool before assembling.
To assemble: Using a small ice cream scoop, scoop about 3 tablespoons of your favorite ice cream (softened) onto the flat part of one cookie. Place another cookie on top of the ice cream and press down until the ice cream just reaches the edge of the cookies. Continue with each set of cookies. Wrap each ice cream sandwich in plastic wrap and chill in a freezer until firm (about 20 minutes).
Nutritional information per serving (2 cookies, not including ice cream): Calories 225 (42% from fat) • carb. 31g • pro. 3g • fat 11g • sat. fat 6g • chol. 39mg • sod. 89mg • calc. 18mg • fiber 1g
Ice Cream Birthday Cake
We love this recipe with our pistachio ice cream, but any of your favorite flavors would work.
Makes 12 servings
6 tablespoons unsalted butter, cubed
3 ounces semisweet chocolate, chopped
40 chocolate wafer cookies (Nabisco brand works well), or 8 ounces of plain chocolate cookies
1 recipe Pistachio Ice Cream (page 14), softened, or 4 cups of your favorite flavor
12 cup chopped pistachios, toasted
- In a heatproof bowl set over a pot of simmering water, combine the butter and chocolate. Stirring occasionally, let heat until just melted. Reserve.
- Put the chocolate wafer cookies into the bowl of a food processor fitted with the chopping blade. Pulse until finely chopped. Add the melted butter/chocolate mixture through the feed tube of the processor and pulse until completely combined. Press two-thirds of the chocolate crumb mixture into the bottom and halfway up the sides of an 8-inch springform pan. Place in freezer; chill 10 to 15 minutes to let crust harden.
- Remove from freezer and spread half of the ice cream over the chilled chocolate crust. Cover directly with plastic wrap and return to freezer for about 30 minutes, or until just firm. Remove plastic wrap. Sprinkle the reserved chocolate crumb mixture over the chilled iced cream, press down gently, and return to freezer again to chill for about 30 minutes. Spread the remaining ice cream evenly over the top and smooth completely with an offset spatula. Cover with plastic wrap and chill in the freezer for a minimum of 4 hours, or overnight to completely firm the cake.
- Before serving, remove the plastic wrap and the ice cream cake from the springform pan. Sprinkle the chopped pistachios on top of the cake. Serve on chilled plates.
Nutritional information per serving:
Calories 483 (63% from fat) • carb. 38g • pro. 8g
- fat 35g • sat. fat 17g • chol. 182mg • sod. 176mg
• calc. 122mg • fiber 2g
SAUCES
Caramel Sauce
While we love this sauce on our ice creams, it can also be used as a dipping sauce for fruit and cake.
Makes about 34 cup
^3/_4 cup granulated sugar
12 teaspoon sea salt
14 cup water (enough so that the consistency when mixed with the sugar and salt is similar to wet sand)
1 tablespoon light corn syrup
13 cup heavy cream
3 tablespoons unsalted butter, cut into 12 -inch cubes
-
In a medium, heavy-bottomed saucepan, stir together the sugar, salt, water and corn syrup. Be sure to clean the inside walls of the pan if there is any sugar on the sides (a clean, wet pastry brush works best). Set over medium-low heat and cook until the sugar mixture turns a very light amber color (about 10 to 15 minutes). Keep a close eye on the caramel sauce, as it can burn easily.
-
Once the sugar mixture has a light amber color, take it off the stove and slowly and carefully stir in the cream. After the cream has been incorporated, slowly whisk in the butter, one piece at a time, continually whisking to emulsify until all the butter has been added. Use immediately, or keep warm over a pot of warm water.
Nutritional information per serving (2 tablespoons):
Calories 198 (46% from fat) • carb. 27g • pro. 0g
- fat 10g • sat. fat 7g • chol. 33mg • sod. 184mg
• calc. 9mg • fiber 0g
Chocolate Sauce
So much better homemade – you will be amazed by how easy it is to make.
Makes about 1 cup
1 cup semisweet chocolate (about 6 ounces), chopped
^3/_4 cup heavy cream
1½ tablespoons light corn syrup
12 teaspoon pure vanilla extract Pinch sea salt
Pinch ground cinnamon
-
Put the chocolate into a mixing bowl; reserve.
-
In a small, heavy-bottomed saucepan, combine the cream, corn syrup, vanilla extract, salt and cinnamon. Set over low heat and bring to a strong simmer. Immediately pour over the reserved chocolate and let sit for 5 minutes before whisking to combine. Use immediately, or keep warm over a pot of warm water.
Nutritional information per serving (2 tablespoons): Calories 229 (61% from fat) • carb. 21g • pro. 2g • fat 16g • sat. fat 10g • chol. 31mg • sod. 27mg • calc. 25mg • fiber 2g
Raspberry Sauce
This works well with more than just frozen desserts. Serve over pancakes or crêpes for your loved ones.
Makes about 1 cup
1 12-ounce bag frozen raspberries, thawed (about 2 12 cups)
2 to 3 tablespoons granulated sugar (depending on sweetness preference) Pinch sea salt Pinch orange zest
-
Put the raspberries into the bowl of a food processor fitted with the metal chopping blade; process for 15 seconds. Add remaining ingredients and process for an additional 45 seconds.
-
Strain through a fine mesh strainer and discard the seeds. Taste and adjust sugar amount to personal preference.
Nutritional information per serving (2 tablespoons):
Calories 36 (0% from fat) • carb. 9g • pro. 0g
- fat 0g • sat. fat 0g • chol. 0mg • sod. 17mg
• calc. 7mg • fiber 2g
NOTES
©2019 Buzzfeed
111 East 18th Street
New York, NY 10003
Tasty ^™ is a trademark of Buzzfeed, Inc
©2019 Cuisinart
East Windsor, NJ 08520
Printed in China
19CE059978
IB-16210
- IMPORTANT SAFEGUARDS
- SAVE THESE INSTRUCTIONS
- SPECIAL CORD SET INSTRUCTIONS
- CAUTION
- TABLE OF CONTENTS
- FEATURES AND BENEFITS
- BEFORE USING FOR THE FIRST TIME
- FREEZING TIME AND BOWL PREPARATION
- MAKING FROZEN DESSERTS
- ADDING INGREDIENTS
- SAFETY FEATURE
- CLEANING, STORAGE AND MAINTENANCE
- CLEANING
- STORAGE
- MAINTENANCE
- LIMITED 18-MONTH WARRANTY (U.S. AND CANADA ONLY)
- CALIFORNIA RESIDENTS ONLY
- BEFORE RETURNING YOUR CUISINART PRODUCT
- RECIPE TIPS
- SIMPLE ICE CREAMS
- Simple Vanilla Ice Cream
- Simple Chocolate Ice Cream
- Butter Pecan Ice Cream
- Fresh Strawberry Ice Cream
- Peanut Butter Cup Ice Cream
- Peppermint Ice Cream
- teaspoons pure vanilla extract
- cup chopped peppermint patties (about 10 to 12 bite-size patties)
- Banana Walnut Chip
- CUSTARD-STYLE ICE CREAMS
- Vanilla Bean Ice Cream
- Fresh Mint with Chocolate Cookies
- Pistachio Ice Cream
- FROZEN YOGURTS
- Rich Vanilla Frozen Yogurt
- Mango Frozen Yogurt
- Mixed Berry Frozen Yogurt
- SORBETS
- Coconut Sorbet
- Raspberry Sorbet
- FROZEN DESSERTS
- Ice Cream Sandwich Cookies
- Ice Cream Birthday Cake
- SAUCES
- Caramel Sauce
- Chocolate Sauce
- Pinch ground cinnamon
- Raspberry Sauce
- NOTES
Brand : CUISINART
Model : ICM100T
Category : Ice cream maker