
SCC Studio Control Center Project Series - Audio Interface ART - Free user manual and instructions
Find the device manual for free SCC Studio Control Center Project Series ART in PDF.


| Type | Studio Control Center |
| Model | SCC Studio Control Center Project Series |
| Brand | ART |
| Dimensions | 19" x 1.75" x 6.5" (rackmount, 1U) |
| Weight | 2.5 kg (5.5 lbs) |
| Power Supply | 12V DC, 500mA (external adapter included) |
| Inputs | 4 x balanced TRS, 2 x unbalanced RCA |
| Outputs | 2 x balanced XLR, 2 x balanced TRS, 1 x headphone |
| Frequency Response | 20 Hz - 20 kHz (±0.5 dB) |
| Signal-to-Noise Ratio | 105 dB |
| Total Harmonic Distortion | < 0.005% |
| Headphone Amplifier | 1/4" stereo output, 150 mW into 32 ohms |
| Talkback Microphone | Built-in electret condenser |
| Front Panel Controls | Input select, output select, volume, talkback |
| Construction | Steel chassis, black anodized aluminum front panel |
| Operating Temperature | 0°C to 40°C |
| Humidity | 10% to 80% non-condensing |
| Maintenance | Clean with soft dry cloth; avoid liquids |
| Safety | Use only supplied power adapter; keep away from moisture |
| Spare Parts | Available from ART authorized dealers |
Frequently Asked Questions - SCC Studio Control Center Project Series ART
User questions about SCC Studio Control Center Project Series ART
0 question about this device. Answer the ones you know or ask your own.
Ask a new question about this device
Download the instructions for your Audio Interface in PDF format for free! Find your manual SCC Studio Control Center Project Series - ART and take your electronic device back in hand. On this page are published all the documents necessary for the use of your device. SCC Studio Control Center Project Series by ART.
USER MANUAL SCC Studio Control Center Project Series ART
Studio Control Center
Project Series

User's Manual

APPLIED RESEARCH AND TECHNOLOGY
IMPORTANT SAFETY INSTRUCTIONS – READ FIRST
This symbol, wherever it appears, This symbol, wherever it appears, alerts alerts you to the presence of uninsulated you to important operating and maintenance dangerous voltage inside the enclosure. Voltage instructions in the accompanying literature that may be sufficient to constitute a risk of shock. Please read manual.

Read instructions:
Retain these safety and operating instructions for future reference. Heed all warnings printed here and on the equipment. Follow the operating instructions printed in this user guide.
Do not open:
There are no user serviceable parts inside. Refer any service work to qualified technical personnel only.
Power sources:
Only connect the unit to power of the type marked on the rear panel.
Power cord:
Use the power cord with the mains plug appropriate for your local mains supply as provided with the equipment. If the provided plug does not fit into your outlet consult your service agent. Route the power cord so that it is not likely to be walked on, stretched or pinched by items placed upon or against.
Ventilation:
Do not position the unit where the air required for ventilation is impeded. If the unit is to be operated in a rack, case or other furniture, ensure that it is constructed to allow adequate ventilation.
Moisture:
To reduce the risk of fire or electrical shock do not expose the unit to rain, moisture or use in damp or wet conditions. Do not place a container of liquid on it, which may spill into any openings.
Heat:
Do not locate the unit in a place close to excessive heat or direct sunlight, as this could be a fire hazard. Locate the unit away from any equipment, which produces heat such as: power supplies, power amplifiers and heaters.
Environment:
Protect from excessive dirt, dust, heat, and vibration when operating and storing. Avoid tobacco ash, drink spillage and smoke, especially that associated with smoke machines.
Handling:
To prevent damage to the controls and cosmetics avoid rough handling and excessive vibration. Protect the controls from damage during transit. Use adequate padding if you need to ship the unit. To avoid injury to yourself or damage to the equipment take care when lifting, moving or carrying the unit.
Servicing:
Switch off the equipment and unplug the power cord immediately if it is exposed to moisture, spilled liquid, objects fallen into opening, or the power cord or plug becomes damaged during a lightning storm or if smoke odor or noise is noted. Refer servicing to qualified technical personnel only.
Installation:
Install the unit in accordance with the instructions printed in the user guide.
Table of Contents:
INTRODUCTION .... 1
FRONT CONTROLS 2
INPUT MIX switches 2
OUTPUT SELECT switches....2
MONO switch....2
OUTPUT MUTE switch....2
INPUT LEVEL meter....2
HEADPHONE SOURCE switch 2
HEADPHONE LEVEL control....2
MASTER LEVEL control 2
REAR PANEL 3
Rear panel jacks....3
IN1 and IN2 jacks....3
IN3 jack....3
CUE IN jack ....3
OUT1-OUT3 jacks ....3
POWER switch 3
POWER jack....3
INPUT and OUTPUT TRIMS 4
LEVEL TRIMS 4
INPUT TRIMS....5
OUTPUT TRIMS....5
APPLICATIONS 6
Typical setup....6
Headphone output use....6
Mastering....6
WARRANTY INFORMATION......7
Limited Warranty....7
Exclusions....7
Service....7
SPECIFICATIONS......8
Table of Figures:
BLOCK DIAGRAM 1
FRONT PANEL CONTROLS 2
REAR PANEL JACKS....3
BOTTOM VIEW - TRIMMERS 4
INTRODUCTION
Thank you for purchasing the ART SCC Studio Control Center. The SCC is the easy way to reduce the clutter of wires in your project studio and provide a single knob to quickly control the volume on your studio monitors.
The SCC allows you to quickly select or mix up to three input sources. After you control the volume of the input selected, you can enable one to three outputs. A separate headphone monitor section allows you to monitor either the input selection or a fourth (cue) input that normally goes to the studio feed. Level trims on inputs and outputs let you switch between different sources or outputs without jumps in level, allowing you accurate comparisons between different monitors or sources.
The outputs, as well as two of the inputs, are balanced and support low noise performance. Two of the inputs (IN3 and Cue) are stereo inputs, typically driven by headphone outputs (Phone, iPad, etc.).
Although it is very reliable and easy to use, we ask that you take a moment to read the manual to get the best performance.
![graph TD A["LEFT IN 1 (balanced) RIGHT"] --> B["INPUT 1 TRIM"] C["LEFT IN 2 (balanced) RIGHT"] --> D["INPUT 2 TRIM"] E["IN 3 (stereo)"] --> F["INPUT 3 TRIM"] G["CUE INPUT (stereo)"] --> H["INPUT MIX"] H --> I["CUE INPUT"] I --> J["HEADPHONE LEVEL"] J --> K["HEADPHONE (stereo)"] L["IN 1"] --> M["(MIX…](/content/2026/05/980223/images/b31884a2d39714a9f5ba85d8607162ba63709f5fe8372d9296b0980dc975b38b.jpg)
Block Diagram
FRONT CONTROLS

Front panel controls
INPUT MIX switches
The INPUT MIX switches are push ON, push OFF. The switch caps light green when depressed (ON).
Note: you can trim the input signal levels individually to prevent level jumps between individual selections. Refer to the section "INPUT and OUTPUT Trims" for more information on this.
OUTPUT SELECT switches
The OUTPUT SELECT switches are push ON, push OFF. They light green when active. All outputs can be trimmed to optimize each output for its respective power amp sensitivity. Refer to the section "INPUT and OUTPUT Trims" for more information on this.
MONO switch
Depressing the MONO switch will sum the left and right channels of the input mix signal. This function is useful when auditioning a signal that may be listened to with a mono output device. NOTE: the MONO function does not affect the INPUT MIX signal sent to the headphone section.
OUTPUT MUTE switch
You can mute ALL of the outputs using the OUTPUT MUTE switch. This is useful when you need to reduce the audio level but want to quickly return to the previous volume level and speaker selection.
INPUT LEVEL meter
The INPUT LEVEL meter monitors the input mixer. This is used for ensuring a signal is present and trimmed to the correct level.
HEADPHONE SOURCE switch
This switch selects the input mix signal (when depressed) or the Cue input. This provides a way to monitor the signal usually sent to the control room (input mix) or the studio or recording musicians (Cue).
HEADPHONE LEVEL control
The HEADPHONE LEVEL control allows you to adjust the signal level at the headphone jack. You can completely mute the headphone audio by turning the control fully CCW.
MASTER LEVEL control
The large knob adjusts the output level of the signal present at OUT1, OUT2 and OUT3 only.
REAR PANEL

Rear Panel jacks
Rear panel jacks
The rear audio jacks on the SCC are all 1/4" TRS balanced (tip=+, ring = -, sleeve = gnd) except where noted.
IN1 and IN2 jacks
Inputs 1 and 2 are TRS balanced line inputs. These inputs can be individually trimmed for level over a 24dB range.
IN3 jack
Input 3 is a TRS unbalanced stereo line inputs. IN 3 can be connected to a headphone output or any other stereo line level source. This input can be trimmed for level over a 24dB range.
CUE IN jack
The CUE IN is a TRS unbalanced stereo line inputs. IN 3 can be connected to a headphone output or any other stereo line level source.
OUT1-OUT3 jacks
The output jacks of the SCC are TRS impedance balanced outputs with a 200 Ohm source impedance. They can be connected to either balanced or unbalanced inputs. You need to carefully adjust the output trims to guarantee the correct output levels for your device. Refer to the section "INPUT and OUTPUT Trims" for more information on trimming these outputs.
POWER switch
The POWER switch lights red when depressed and the correct power supply is present. The SCC has power up/down muting that monitors the power supply to minimize pops on power loss. It is recommended to power down power amps and powered monitors before powering down the SCC to prevent speaker damage.
POWER jack
The SCC is powered by an external 9 VAC/1000mA power supply to minimize noise and heat inside the unit. Use the power supply that came with the unit for the best performance.
INPUT and OUTPUT TRIMS
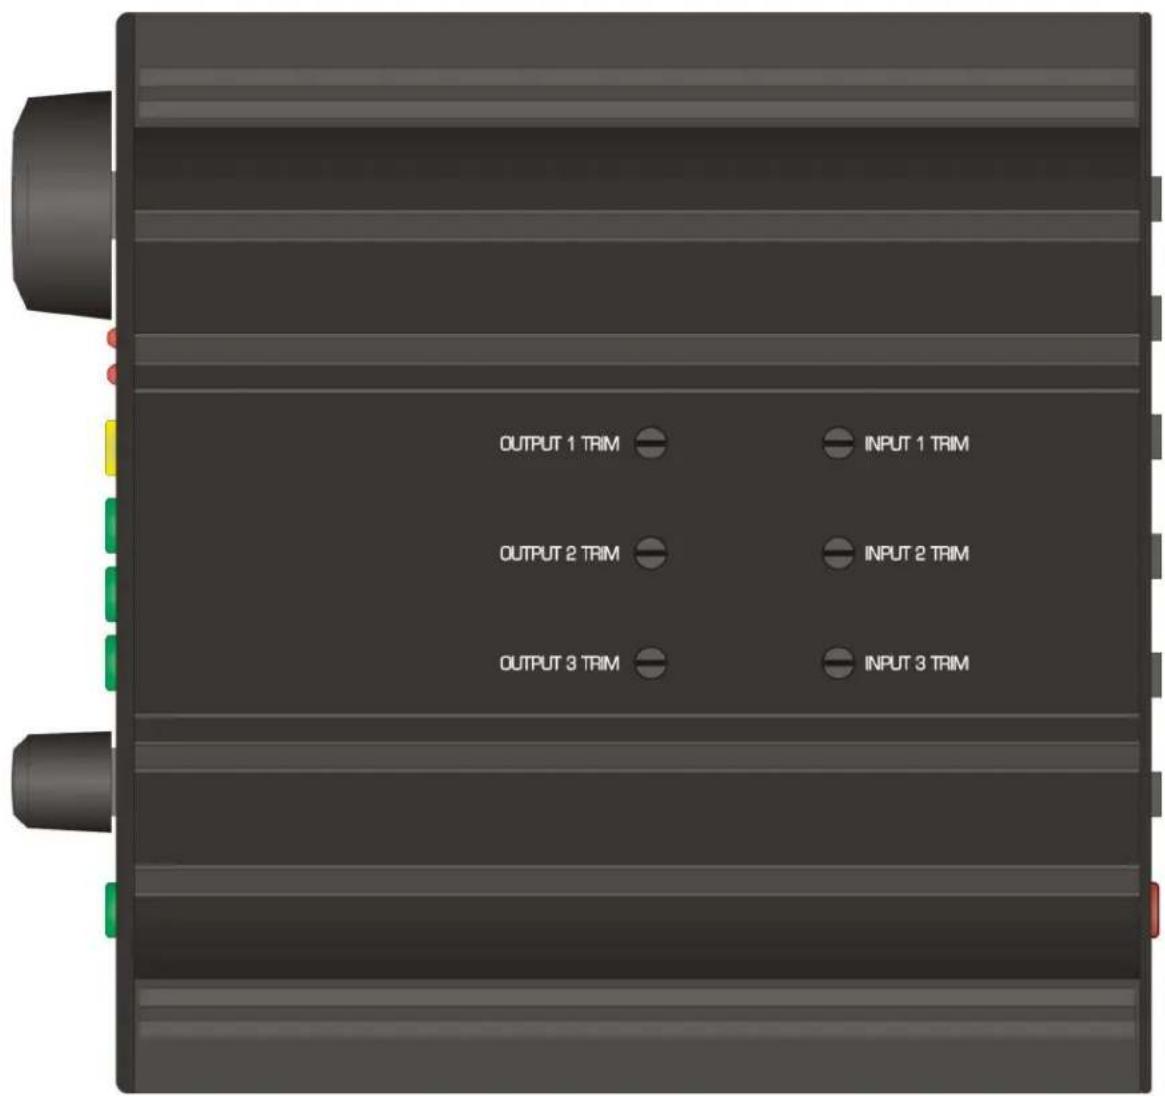
Bottom view - trimmers
LEVEL TRIMS
The Input trims are located on the bottom of the unit. Use a small flat blade screwdriver with a tip that is less than 1/4" wide to adjust each trimmer. Turning the trimmer clockwise (as you view the bottom of the unit) increases the gain.
The trimmers are easily accessed when the unit is on its side, allowing you to monitor the level meter while making adjustments.
INPUT TRIMS
Adjust each input trim by applying a signal to the corresponding input jack as you monitor the input level meter. Adjust the trimmer such that the Red LEDs light occasionally on the highest levels. After the initial adjustment, switch between the inputs and make sure that there are not big differences between different inputs. If differences exist, reduce the louder input's trimmer.
OUTPUT TRIMS
Ideally, the output trims should be set as high as possible to minimize noise. Most power amps allow this through the use of input level controls. A good starting point for the level controls of the power amp would be centered. This will probably change the sensitivity of the power amp by about 12-15 dB. If your amp has a 0.5V sensitivity spec, this level setting would increase it to 2.0V to 2.8V.
When the output trimmer is fully CCW, the maximum output level is 0.5V, when centered it is about 2.2V and when fully CW it is about 8V. If you are not sure what the sensitivity of your amp is, start with the SCC's output trimmer in the center.
To adjust the output trims, set the Master Level Control to 12 O'clock or lower to make sure that excessive levels are not preset. You can increase this later if required.
1) Enable the first output and set the first output trimmer based on either your amp's input sensitivity or set the SCC output trim to the center.
2) Compare this level to the next power amp/powered speaker and increase the lower of the outputs by turning its trimmer CW. If a trimmer is fully clockwise and its output is still not loud enough, you can reduce the other channel's output via its trimmer until the two channels are equal.
3) Repeat this for the third output if necessary.
APPLICATIONS
Typical setup
The SCC is designed to be used in a project studio. It interfaces between a recording interface and multiple monitors and headphones.
IN1 and IN2 connect to balanced or unbalanced line level outputs from the recording interface. IN3 interfaces with headphone outputs (Phones/ iPad, etc.) The CUE input connects to the recording interface headphone output you intend to use as a studio feed for recording musicians.
Note: When using headphone outputs as a source, make sure that the output level of the source is set to its maximum level for best results.
The SCC outputs connect to power amps or powered speakers. While they support balanced or unbalanced connections, we strongly suggest using balanced cables for the best performance. It is also helpful to turn down the level controls on power amps (and turn up the output trims on the SCC) to minimize the noise the cables could pick up.
Headphone output use
The front panel headphone output can be applied in a number of ways.
In a recording/tracking application it is used as an output to the musicians. The HEADPHONE SOURCE switch selects between a monitor mix for the musician (CUE input) or a playback mix (INPUT MIX).
It can also be used strictly in the control room for monitoring/mastering the session when speakers are not required. This frees up your recording interface headphone out for dedicated studio use.
Mastering
The SCC is the ideal tool for mastering. Once the different speakers are trimmed for level differences, you get ideal comparisons. You can even listen to multiple monitors simultaneously. This feature allows one of the outputs to be connected to a sub-woofer. Using this allows you to check the sound with and without a sub-woofer, possibly simulating typical car response.
The MONO switch is also a mastering tool useful in checking how your material will sound when not played in stereo.
WARRANTY INFORMATION
Limited Warranty
Applied Research and Technology will provide warranty and service for this unit in accordance with the following warrants:
Applied Research and Technology, (A R T) warrants to the original purchaser that this product and the components thereof will be free from defects in workmanship and materials for a period of three years from the date of purchase. Applied Research and Technology will, without charge, repair or replace, at its option, defective product or component parts upon prepaid delivery to the factory service department or authorized service center, accompanied by proof of purchase date in the form of a valid sales receipt.
Exclusions
This warranty does not apply in the event of misuse or abuse of the product or as a result of unauthorized alterations or repairs. This warranty is void if the serial number is altered, defaced, or removed.
A R T reserves the right to make changes in design or make additions to or improvements upon this product without any obligation to install the same on products previously manufactured.
A R T shall not be liable for any consequential damages, including without limitation damages resulting from loss of use. Some states do not allow limitations of incidental or consequential damages, so the above limitation or exclusion may not apply to you. This warranty gives you specific rights and you may have other rights, which vary from state to state.
For units purchased outside the United States, an authorized distributor of Applied Research and Technology will provide service.
Service
The following information is provided in the unlikely event that your unit requires service.
1) Be sure that the unit is the cause of the problem. Check to make sure the unit has power, all cables are connected correctly, and the cables themselves are in working condition. You may want to consult with your dealer for assistance in troubleshooting or testing your particular configuration.
2) If you believe the ART unit is at fault, go to www.artproaudio.com. You may contact Customer Service for more assistance, or directly request a Return Authorization for service in the “resources” area of the website.
3) If you are returning the unit for service, pack the unit in its original carton or a reasonable substitute. The original packaging may not be suitable as a shipping carton, so consider putting the packaged unit in another
4) Include, with your unit, a note with the RA number and your contact information including a daytime phone number, preferably attached to the top of the unit.
SPECIFICATIONS
Maximum Input Level: +21dBu balanced inputs
+20 dBu unbalanced inputs
Input Impedance: 9k Ohms balanced (CH1, CH2)
5k Ohms unbalanced (CH3, Cue)
Equivalent Input Noise: < -96 dBu (balanced inputs)
<-102dBu (Cue Input)
Output Connection: OUT1-OUT3 : 1/4-inch Balanced TRS
HEADPHONE: 1/4-inch Stereo TRS headphone jack
Max Output Level: +18dBu balanced (OUT1-OUT3)
HEADPHONE: 100mWx2 @100 ohms
Maximum Gain: +23 dB (balanced in-out)
+20dB (Cue input to Headphone output)
Frequency Response: 10-100kHz ± 0.5dB
THD: <0.004% @ 20-20kHz
CMRR: >50 dB
Chassis Type: All aluminum black anodized with integral rubber sides
Power Requirements: 9VAC @ 1000mA (external)
Dimensions: 1.75"H x 5.9"W x 6.5"D (44.5mm x 150mm x 165mm)
Weight: 2.5 lbs. (1.14 kg) with power supply and packaging
Note: 0 dBu = 0.775Vrms

APPLIED RESEARCH AND TECHNOLOGY
www.artproaudio.com E-mail: support@artproaudio.com
© 2015 Applied Research & Technology/ Yorkville Sound
- PROJECT SERIES
- USER'S MANUAL
- IMPORTANT SAFETY INSTRUCTIONS – READ FIRST
- READ INSTRUCTIONS
- DO NOT OPEN
- POWER SOURCES
- POWER CORD
- VENTILATION
- MOISTURE
- HEAT
- ENVIRONMENT
- HANDLING
- SERVICING
- INSTALLATION
- TABLE OF CONTENTS
- INTRODUCTION .... 1
- FRONT CONTROLS 2
- REAR PANEL 3
- INPUT AND OUTPUT TRIMS 4
- APPLICATIONS 6
- WARRANTY INFORMATION......7
- SPECIFICATIONS......8
- TABLE OF FIGURES
- INTRODUCTION
- FRONT CONTROLS
- INPUT MIX SWITCHES
- OUTPUT SELECT SWITCHES
- MONO SWITCH
- OUTPUT MUTE SWITCH
- INPUT LEVEL METER
- HEADPHONE SOURCE SWITCH
- HEADPHONE LEVEL CONTROL
- MASTER LEVEL CONTROL
- REAR PANEL
- REAR PANEL JACKS
- IN1 AND IN2 JACKS
- IN3 JACK
- CUE IN JACK
- OUT1-OUT3 JACKS
- POWER SWITCH
- POWER JACK
- LEVEL TRIMS
- INPUT TRIMS
- OUTPUT TRIMS
- APPLICATIONS
- TYPICAL SETUP
- HEADPHONE OUTPUT USE
- MASTERING
- WARRANTY INFORMATION
- LIMITED WARRANTY
- EXCLUSIONS
- SERVICE
- SPECIFICATIONS
- WWW.ARTPROAUDIO.COM E-MAIL: SUPPORT@ARTPROAUDIO.COM
Brand : ART
Model : SCC Studio Control Center Project Series
Category : Audio Interface