
T3 - Media player MANHATTAN - Free user manual and instructions
Find the device manual for free T3 MANHATTAN in PDF.


| Product Type | Media Player |
| Brand | Manhattan |
| Model | T3 |
| Dimensions (approx.) | 10 x 10 x 2.5 cm |
| Weight (approx.) | 200 g |
| Power Supply | 5V DC, 1A via USB |
| Power Consumption | 5 W (max) |
| Video Output | HDMI 1.4 |
| Max Video Resolution | 4K @ 30Hz |
| Audio Output | HDMI, Optical, 3.5mm jack |
| Storage | MicroSD slot, USB host |
| Supported Video Formats | MP4, AVI, MKV, MOV, WMV, FLV |
| Supported Audio Formats | MP3, WMA, AAC, WAV, FLAC |
| Supported Image Formats | JPEG, BMP, PNG, GIF |
| Network | Ethernet, Wi-Fi 802.11 b/g/n |
| Remote Control | Infrared remote included |
| Maintenance | Keep clean with dry cloth; avoid liquids |
| Safety | Do not expose to moisture or extreme temperatures |
| Spare Parts / Repairability | Official spare parts available; repairs by authorized service |
| General Information | User manual available on notice-facile.com in PDF |
Frequently Asked Questions - T3 MANHATTAN
User questions about T3 MANHATTAN
0 question about this device. Answer the ones you know or ask your own.
Ask a new question about this device
Download the instructions for your Media player in PDF format for free! Find your manual T3 - MANHATTAN and take your electronic device back in hand. On this page are published all the documents necessary for the use of your device. T3 by MANHATTAN.
USER MANUAL T3 MANHATTAN
Unpack the following from your Giftbox:

You Need
• A TV with an HDMI input.
- A TV aerial and cable. While some indoor (portable) aerials may pick up Freeview channels, for best results use a rooftop aerial.
- An internet connection using Wi-Fi or an Ethernet cable (not included) for apps and Freeview Play features.
Before you plug in, please read the Safety section of the Important Information booklet.
Connect Up
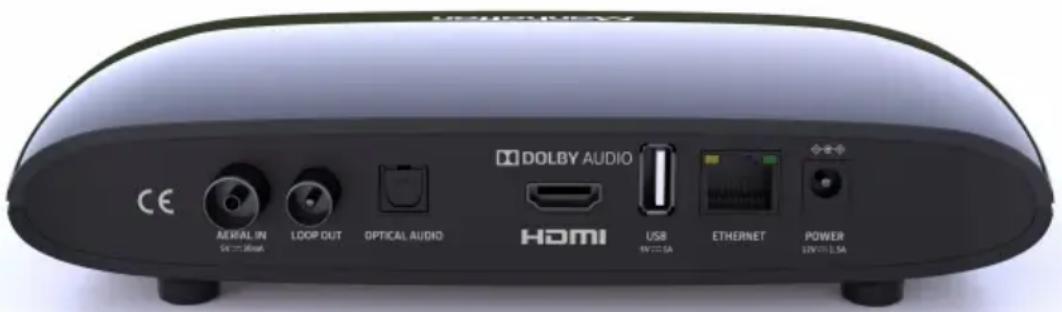
- Connect the cable from your aerial wall socket to your T3.
- Next, connect the T3 to your TV using the HDMI cable provided.
- An internet connection is required for apps, Freeview Play features and to receive software updates over the internet. Wi-Fi can be selected during initial setup but for high-bandwidth 4K content we recommend you connect your T3 to your internet router using an Ethernet cable (not included).
- Finally, plug the AC power adapter into a wall socket that is turned off, then connect the other end to the T3.

If you want to use your TV's tuner, connect an aerial cable from the T3's Loop Out socket to the aerial input of your TV. Please note that to conserve energy the Loop Out socket is disabled in standby by default. See page 15 for details.
Switch On
- Open the battery compartment cover on the back of the remote by sliding the cover. Insert the batteries, matching the + and – symbols to what is marked on the inside of the compartment. Replace the cover.
- Turn on the wall socket you connected your T3 to and the T3 will switch on.
- Turn on your TV set and choose the HDMI input you connected your Manhattan T3 to. Most TV remotes use a button labelled 'AV', 'SOURCE', 'INPUT' or ; with each press cycling through its inputs.

Your Manhattan remote can be easily programmed to control your TV's input, adjust its volume and turn it on and off. See page 17 for details.
Follow the on-screen instructions to set up your T3. It takes about 5 minutes, which is the perfect amount of time to read the rest of this Guide!

The T3 is designed to make it easy to access all the UK's most popular subscription-free channels, on demand programmes and apps.
Home
The Home screen shows all the menus and apps on your T3. Press HOME on your remote control at any time to go there.

An internet connection is required for apps and using the Featured, Watchlist and Search menus.
Using Menus
The directional pad changes the highlighted programme, app or button. Press OK to select it. In some cases pressing OK performs different functions and this is indicated by an on-screen hint. For example, you can press OK to:
• Watch a programme on now.
- Add a reminder for a programme on later.
- Display an options menu for a programme available on demand. You can choose to play it right away or add it to your Watchlist to watch later (see page 6).
When you want to leave a menu or app:
- Press BACK to return to the previous screen.
- Press EXIT from within a menu (e.g. TV Guide) to exit to live full-screen TV.
- Press EXIT from within an app (e.g. iPlayer) to go back to where you launched it.
The Channel Browser
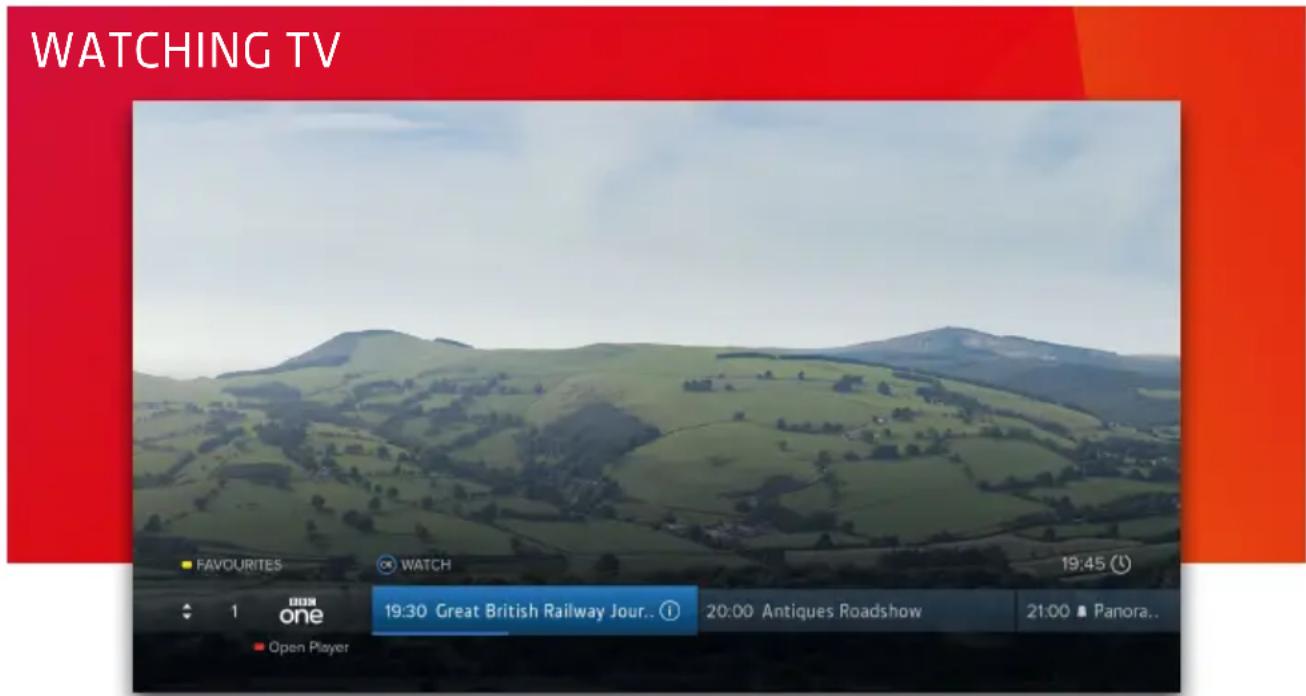
While watching TV, press OK to display the Channel Browser, then use the directional pad to browse what's on.
When a channel (e.g. ITV) has an associated app (e.g. ITV Hub), you can press to open it. Currently BBC iPlayer will open with the channel and other apps will open with their home screen.
Favourite channels can be quickly browsed by pressing to cycle through them. See page 12 for details of how to add or remove them.
Quickly Changing Channel
There are 3 ways to directly change channel while watching TV:
- Press P-UP or P-DOWN to change to the channel above or below
- Enter a channel number with the number buttons
- Press SWAP to change to the last channel you were watching
Volume & Accessibility
- Turn the volume up or down with +
- Mute and unmute the sound with
- Turn Subtitles and Audio Description on or off by pressing S/AD and selecting an on-screen option
FEATURED
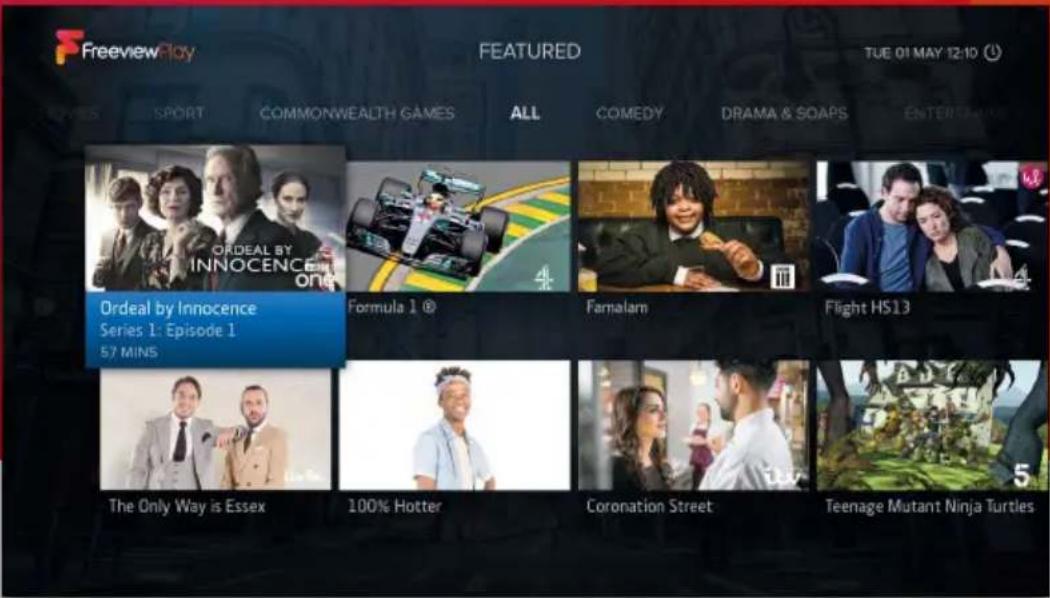
Browse top picks from all the UK's on demand players, neatly organised by genres such as Comedy, Movies and Sport. Programmes can be played instantly or added to your watchlist to watch later.
As well as selecting ‘Featured’ from the Home screen you can press FEATURED on your remote control at any time to go there.
WATCHLIST
Programmes available on demand can be saved to your Watchlist to watch later (see page 4, 'Using Menus'). Programmes can be watched at any time until they expire – this varies from programme to programme and is shown when a programme is highlighted.
Programmes on your Watchlist can be sorted by how recently you added them, alphabetically or by expiry. You can also see which programmes have expired within the last 14 days.
SEARCH

Find programmes from all the UK's on demand players in just a few taps. Use the on-screen keyboard to enter a programme's name and as you type the T3 will suggest what you're looking for. Select a suggestion or your search term to display the results.
The T3 makes it easy to quickly repeat previous searches:
- Up to the last 10 programmes you've searched for are listed when the search screen is initially shown.
- When your search results are shown, press to save the search. From the main search screen you can then press to display your list of saved searches.
As well as selecting 'Search' from the Home screen you can press on your remote control at any time to go there.
TV GUIDE

Use the TV Guide to browse what's on, plan your viewing up to seven days ahead and (for supported channels and programmes) catch up with the last seven days. On demand programmes can be found even when looking ahead as many are repeated.

An internet connection is required to browse and watch catch up programmes.
Available to play now on demand or add to your Watchlist

On demand programme saved to your Watchlist

Available soon on demand

Reminder set
Quickly Navigating
- Enter a channel number with the number buttons
- Press P-UP or P-DOWN to page up or down
- Hold LEFT or RIGHT to skip forwards or backwards through time
- Press ← or to skip 24 hours backwards or forwards
- Press to return to what's on now
Lists
The TV Guide can be filtered to show only Catch Up, HD, Radio or your Favourite channels. Press and then select a list. When your Favourites list is highlighted you can also choose to edit it.
PROGRAMME INFO

Press INFO when watching TV to display the description, genre and other key information for the programme you're watching. You can also press INFO to view detailed information for a programme whenever you see inext to its name or description.
Icons

Part of a series Subtitles


On Demand Audio Description


High Definition Sign Language


Surround sound

Guidance

In two or more parts

Unsuitable for viewing before the watershed
Browsing Series & Repeats
- If the programme is part of a series, press UP to browse all upcoming episodes in the schedule.
- If the programme is showing again on any channel, press DOWN to browse upcoming repeats in the schedule.
REMINDERS
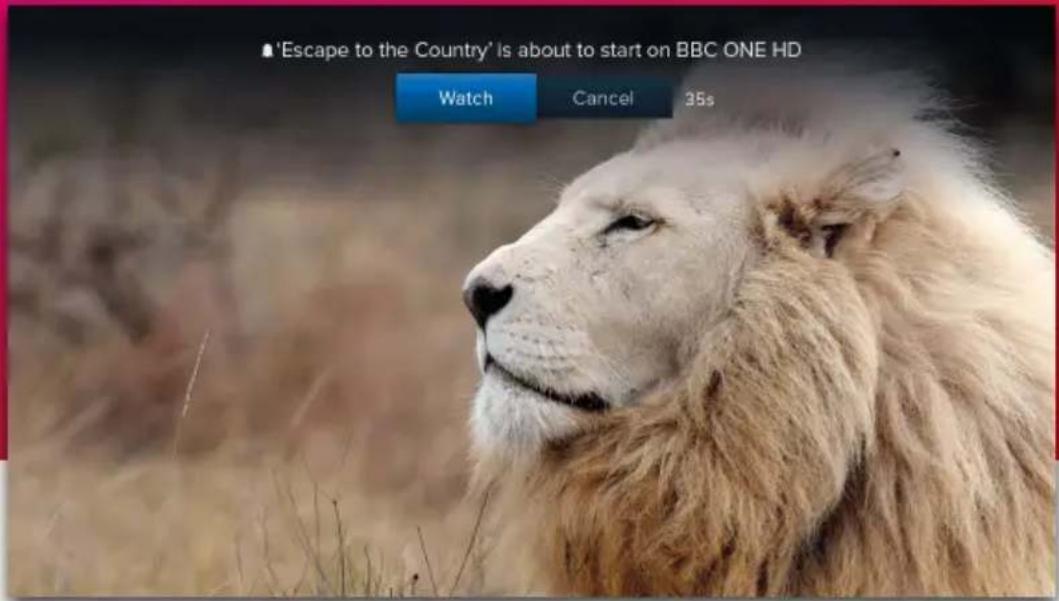
When an upcoming programme is highlighted in the TV Guide or the Channel Browser, press OK to add a reminder. To cancel it, press OK again.
Reminders are displayed just before a programme is scheduled to start. The T3 has a setting called ‘Reminder Auto Watch’ that is turned off by default, meaning:
• A reminder will only be displayed if the T3 is on
- You must choose to watch the programme before the reminder times out to change the channel
- If you don't, the reminder will be cancelled and the channel will not change
When 'Reminder Auto Watch' is turned on:
- If the T3 is in standby it will turn on for the reminder and the channel will change automatically
- If the T3 is turned on the reminder will be displayed as normal and after the reminder times out the channel will change automatically
You can change the 'Reminder Auto Watch' setting in 'Settings' → 'System'.
SETTINGS
You can view and change your T3's settings by pressing SETTINGS on your remote control or selecting the button located at the top right of the Home screen.
Picture & Sound
Resolution
The T3 supports resolutions up to 4K 'Ultra HD' (3840 x 2160 pixels or 2160p), which is four times the resolution of 'Full HD' (1920 x 1080 pixels or 1080p). When 'Resolution' is set to its default of 'Auto' the T3 reads the EDID identification data from your TV over HDMI and sets the optimum resolution.

REQUIREMENTS FOR 4K
For 4K content the T3 must be connected to a 4K TV's HDMI input that supports HDMI 2.0 and HDCP 2.2. If you have other devices connected in between such as an AV Receiver, Sound Bar or HDMI splitter, these must all also support 4K, HDMI 2.0 and HDCP 2.2. If they do not then only a lower resolution of 720p or 1080p can be used. The T3 includes a premium high speed HDMI cable. Using a sub-par cable for even one link may cause HDCP 2.2 to fail.
HDCP 2.2 is a content protection standard required for 4K. Some devices only support HDCP 2.2 on a single HDMI input, often labelled with 'HDCP 2.2'. If some inputs are labelled and others are not, assume any unlabelled input does not support HDCP 2.2. If all inputs support HDCP 2.2 there may be no labelling to indicate this and you will need to refer to the device's user manual to check.
You can check your TV's capabilities in 'Settings' → 'Information' → 'Audio/Video'.
During BBC iPlayer's 2018 trials of the World Cup and Wimbledon in 4K they recommended a minimum broadband speed of 40Mbps. In our testing about 25Mbps should be sufficient for 4K content from YouTube. Even if your broadband is fast enough, you may have other devices congesting your home network, especially using Wi-Fi, so we strongly recommend using a wired (Ethernet) connection for 4K.
Match Frame Rate
UK TV channels and on demand services transmit video at either 25 or 50 frames per second (fps). To ensure smooth playback of this video the T3 outputs at 50Hz (cycles per second). As YouTube also has videos at 24fps, 30fps and 60fps, they can appear jerky when played back at 50Hz. If you change ‘Match Frame Rate’ to ‘On’, the T3 will change the refresh rate of your TV to match the refresh rate of videos. Please note that each time the refresh rate changes your TV must change video modes which may cause a flash or flicker. Some TVs handle this better than others.
SETTINGS (CONT'D)
HDR
High Dynamic Range (HDR) enables content to be produced, transmitted and displayed with dramatically improved contrast and a much wider range of colours than previously. The T3 supports two different HDR standards called HDR10 and HLG. When ‘HDR’ is set to its default of ‘Auto’, the T3 reads the EDID identification data from your TV over HDMI to determine whether it supports them.
At the time of writing only the BBC iPlayer and YouTube apps have HDR content – the BBC use HLG whereas content on YouTube may use HDR10 or HLG. Unfortunately as these are very recent standards support for them varies greatly. Your TV must support:
• HDMI 2.0a for HDR10
• HDMI 2.0b for HDR10 and HLG
Most branded 2018 TVs now support HDMI 2.0b, HDR10 and HLG. However, there are many 4K Ultra HD TVs from prior years that do not support HDR. Please check with your manufacturer as many have released software updates to add or improve HDR support.
Some HDR TVs support HLG when using apps installed on the TV but only have HDMI 2.0a inputs and so do not identify to the T3 that they are capable of HLG. To get around this, try changing the T3's HDR setting to 'HDR10 & HLG', forcing the T3 to consider the HDR TV as HLG-capable.

ENABLING HDR ON YOUR HDR TV
Most TVs ship with HDR disabled by default. To enable it, check your user manual. The following steps work for recent TVs from these manufacturers:
Samsung: Menu → Picture → Picture Options → HDMI UHD Color → On → Restart
Sony: Home → Settings → External inputs → HDMI signal format → HDMI [select the input for T3] → Enhanced mode (TV will reboot)
Panasonic: Menu → Setup → HDMI HDR Setting → HDMI [select the input for T3] → On
LG: Models vary, check the manual for 'HDMI ULTRA DEEP COLOR' and turn on.
Menu Transparency
Adjusts the transparency of Manhattan menus and how clearly TV can be seen underneath. The default is ‘Dark’ but if you prefer you can set it to ‘Light’ or off completely.
Audio Output
When set to the default of ‘Auto’, the T3 reads the EDID identification data from the TV or device it is connected to by HDMI and automatically chooses the ‘Surround’ or ‘Stereo PCM’
mode. This normally works well but there can be issues when a TV doesn't correctly identify its capabilities. Issues can also occur when using other devices in the chain such as an AV Receiver, Sound Bar or HDMI splitter. If necessary you can manually change the mode:
Surround: Passes through and outputs surround sound when available and stereo when not. This mode is often also called 'Passthrough'.
Stereo PCM: Always outputs stereo sound. For HD programmes with surround sound it is converted to stereo.
Lip-Sync Delay
Sometimes when using external audio equipment the audio can be heard early and out of sync with the video. To fix this you can set a delay for the audio of up to 250ms.
Accessibility & Language
While watching TV you can turn Subtitles or Audio Description on or off by pressing the S/AD button and selecting an on-screen option. The ‘Accessibility & Language’ menu also has these options as well as additional options to:
- Choose your preferred Audio and Subtitle languages
- Adjust the Audio Description mix
Channels
Edit Favourites
Add or remove channels on your favourites list. Favourites can be quickly browsed in the Channel Browser (see page 5) and used to filter the TV Guide (see page 8).
Protected Channels
Select channels to be hidden and unavailable ('protected') during normal use. They can be temporarily unhidden by highlighting 'Protected Channels' and selecting the 'Show' option that appears to the right. After entering your PIN, all Protected Channels will be shown until the T3 next enters standby or you choose the option to hide them again.
Delete Channels / Smart Retune
Channels can be deleted entirely by selecting ‘Delete Channels’. To restore them, select ‘Smart Retune’ – this rescans for all channels while maintaining your regional selection as well as favourites and reminders for services that remain or are moved after the retune.
Internet
The T3 supports both wired (Ethernet) and Wi-Fi connections and automatically disables Wi-Fi when a wired connection is made. It remembers up to the 5 most recent Wi-Fi networks you've connected to and will try to connect to them in order.
- Select ‘Configure Network Settings’ to manually configure your network settings.
- Select ‘Clear Browsing Data’ to remove all data that has been downloaded over the internet. This will require you to re-sign in to all apps again.
PIN
During initial setup you will have created a PIN. This PIN is required to perform a factory reset (see page 15) and to manage protected channels (see above). You can also lock the Settings menu with your PIN by turning on 'PIN Protect Settings'. Please note that the 'Interactive PIN' setting applies to legacy interactive services and not apps – each app requires you to create a PIN within that app in order to protect content.
System
Standby Options → Auto Standby
The T3 will automatically go into standby if no buttons are pressed for 3 hours. The length of Auto Standby can be changed or it can be disabled altogether.
Standby Options → Standby Mode
In low-power ‘Sleep’ mode, the T3 maintains network connectivity and is always ready to instantly wake up. Power consumption when using Ethernet is under 1W and when using Wi-Fi is under 1.5W.
In ‘Max Energy Saver’ mode, the T3 consumes under 0.5W but requires much longer to wake up and does not maintain network connectivity.
The default ‘Smart’ mode will automatically select between ‘Sleep’ and ‘Max Energy Saver’ depending on network connectivity, TV signal and user interaction:
- When there is a network connection and TV signal, the T3 goes to ‘Sleep’ mode after the ‘Auto Standby’ duration
- When there is a network connection, no TV signal and no internet video playback, the T3 goes to ‘Sleep’ mode if no buttons are pressed for 20 minutes
- When there is no network connection but there is a TV signal, the T3 goes to ‘Max Energy Saver’ mode after the ‘Auto Standby’ duration.
Standby Options → Loop Out in Standby
During initial setup (see page 3) you may have connected an aerial cable between the Loop Out socket of your T3 and the aerial input your TV. To comply with EU regulations this is disabled in standby by default but you can turn it on if you prefer. Please note that 'Max Energy Saver' cannot be selected as the 'Standby Mode' when 'Loop Out in Standby' is on.
Software Updates
From time to time we may release software updates to add features or address bugs. When registering your T3 you can choose to be notified about updates by email. The T3 will automatically check for an update each night and install one if it's available. This can be disabled by turning ‘Automatic Updates’ to off. You can manually check for an update by selecting ‘Check for Update Now’.
Please note that updates will be released over the internet so we recommend keeping your T3 connected to the internet. If you can't connect your T3 to the internet, updates can be installed using a USB stick instead. Full information about the update and how to install it via USB will be available on our website.
5V Antenna Power
Some antennas that are installed with a signal amplifier need a power supply from the receiver or TV because they do not have their own. Turn this on to supply it with +5V DC.

Almost all normal aerial installations will not require this to be turned on. Only do so if instructed by your aerial's user guide or your installer.
Factory Reset
This resets your T3 back to its original factory settings. All settings, reminders, favourites and channels will be lost. All browsing data will be cleared and you'll be logged out of all apps.
Information
Learn important information about your T3, its software version, signal, network connection, audio/video connection and legal agreements/notices.
YOUR REMOTE

Change Blink Mode
By default, the LED on your Manhattan Remote blinks when a button is pressed. Toggle this off or on by holding the S/AD and '1' buttons for 3 seconds until the LED blinks.
CONTROL YOUR TV
Your Manhattan remote can be programmed to control the following functions on your TV:
- Standby
- AV (input selection). On most TV remotes this is labelled 'AV', 'SOURCE', 'INPUT' or .
• Volume Up/Down - Mute
IMPORTANT
- Please set the volume on your T3 to maximum before you continue. If you do not, the volume from your T3 will always be lower than it should be.
- Some TV's use non-standard remote signals and may not be supported.
Program your Manhattan Remote
- Press the bottom left (S/AD) and right (TEXT) buttons for 3 seconds.
»The Standby button lights up blue.
- Press the button on your Manhattan remote you want to program: Volume Up/Down, Mute, AV or TV ⏻.
»The Standby button starts blinking.
- Point the TV remote at your Manhattan remote from a distance of 5cm, then press and hold your chosen button on the TV remote.
» If the button is programmed, the light from the Standby button on the Manhattan remote turns off and then goes solid again after about a second.
» If the button fails to be programmed, the light from the Standby button flashes on and off 4 times to indicate a learning error and you are returned to Step 2.
- Repeat steps 2 and 3 for all the buttons to program.
- Press OK on your Manhattan remote to leave programming mode.

natural_image
Pure electrical circuit lines without any symbols
Manhattan Remote Your TV Remote 5 cm
Reset Your Remote
To clear all programmed buttons and return them to their original state, hold the S/AD and buttons for 3 seconds until the LED blinks.
TROUBLESHOOTING
| PROBLEM POSSIBLE CAUSE WHAT TO DO | ||
| There's no picture or sound and the T3's menus can't be seen | The HDMI cable may be disconnected. | Check the HDMI connections between the T3 and your TV. |
| The input the Manhattan T3 is connected to may not be selected on your TV. | Select the correct HDMI input (see your TV's manual for guidance). | |
| Your TV may not correctly communicate the resolutions it is capable of and an incompatible resolution may be selected. | Turn the T3 on and wait 30 secondsPress HOMEPress & hold '0' for 5 secondsThe T3 will try each resolution for 15 seconds: 1080p then 1080i then 720pSelect 'Confirm' when you see a picture | |
| The picture and sound keep breaking up or 'No Signal' is displayed on screen | Weak signal from your aerial. | Check your signal in 'Settings' → 'Information'. If it's weak or not present, get a professional to check your installation – your aerial may provide a better signal if it is realigned or moved somewhere else. We don't recommend using an indoor aerial. As a last resort, try using a signal amplifier or booster to improve reception. |
| Some TV aerials installed with a signal amplifier need a power supply from the receiver because they do not have their own. | If you have connected a signal amplifier, you can have the T3 supply it with a +5V DC supply by selecting the option in the System section of Settings. | |
| Channels not working after moving home | The new home is in a different Freeview transmission area. | Select 'Smart Retune' in 'Settings'→'Channels'. |
| You do not hear any audio on HD channels | HD channels are broadcast with Dolby Surround audio but your TV does not support it. | Change the 'Audio Output' setting to 'Stereo PCM' in 'Settings' → 'Picture & Sound'. |
| Your T3 switches off after 3 hours | The T3 is by default set to go to standby after 3 hours without interaction. | Turn 'Auto Standby' off or select a different duration in 'Settings' → 'System' → 'Standby Options'. |
| Video in apps buffers, stutters or stops altogether | Your broadband is not fast enough. A minimum speed of 3Mbps is recommended for internet video. Even if you have a faster connection, e.g. 16Mbps, other devices may be using it at the same time and reducing the speed available to the T3. | Check your broadband speed with your internet provider and try running an online speedtest on a computer or mobile device.If the speed you are getting is less than expected there may be other devices on your network using bandwidth. Try disconnecting them.Unfortunately, internet video will not work reliably if your connection is slower than 3Mbps. |
| Your T3 is using Wi-Fi and too many other devices are using your Wi-Fi at the same time. | Disconnect other devices from your Wi-Fi network. Alternatively, instead of using Wi-Fi, connect your T3 to your internet router with an Ethernet cable. | |
| The Wi-Fi signal from your internet router is poor. You can check the Wi-Fi signal by going to ‘Settings’ → ‘Internet’. | Try adjusting the location of your Wi-Fi router and/or its antenna(s). You can also try moving the T3 itself. Alternatively, instead of using Wi-Fi, connect your T3 to your internet router with an Ethernet cable. | |
| You can’t remember your PIN | You’ve forgotten it or someone has changed it. | Your PIN can be reset with the master PIN.Please contact us. |
| Your remote control does not work | The T3 is not turned on or its front is obstructed. | Ensure the front of the receiver is not obstructed. |
| Batteries are weak. Replace batteries in the remote control. | ||
| The volume & mute buttons on your T3 remote do nothing | They have been programmed to control the volume of another device (see p17). | Reset your T3 remote by following the instructions in ‘Reset Your Remote’ on p17. |
| Loop Out does not work in Standby | The ‘Loop Out in Standby’ setting is not turned on. | Turn it on in ‘Settings’ → ‘System’ → ‘Standby Options’. |
Manhattan

natural_image
Black electronic device labeled 'Manhattan' and 'FreeViewPro' with a blue indicator light at the bottom (no additional text or symbols visible)FreeviewPlay
The details in this guide are correct at the time of going to print and are for guidance only. Product features outlined are subject to change at any time without notice. © 2018 Manhattan TV Limited. Manhattan is a registered trademark of Manhattan TV Limited; registered company no. 2247629. The FREEVIEW words and logos are trade marks of DTV Services LTD. © DTV Services Ltd. v2 (22/11/18)
- You Need
- Connect Up
- Switch On
- Home
- Using Menus
- The Channel Browser
- Quickly Changing Channel
- Volume & Accessibility
- FEATURED
- WATCHLIST
- SEARCH
- TV GUIDE
- Quickly Navigating
- Lists
- PROGRAMME INFO
- Icons
- Browsing Series & Repeats
- REMINDERS
- SETTINGS
- Picture & Sound
- Resolution
- REQUIREMENTS FOR 4K
- Match Frame Rate
- SETTINGS (CONT'D)
- HDR
- ENABLING HDR ON YOUR HDR TV
- Menu Transparency
- Audio Output
- Lip-Sync Delay
- Accessibility & Language
- Channels
- Edit Favourites
- Protected Channels
- Delete Channels / Smart Retune
- Internet
- PIN
- System
- Standby Options → Auto Standby
- Standby Options → Standby Mode
- Standby Options → Loop Out in Standby
- Software Updates
- 5V Antenna Power
- Factory Reset
- Information
- YOUR REMOTE
- Change Blink Mode
- CONTROL YOUR TV
- IMPORTANT
- Program your Manhattan Remote
- Reset Your Remote
- TROUBLESHOOTING
- Manhattan
Brand : MANHATTAN
Model : T3
Category : Media player