
Professional Diamond Hone 2000 - Knife sharpener Chef's Choice - Free user manual and instructions
Find the device manual for free Professional Diamond Hone 2000 Chef's Choice in PDF.


| Product Type | Electric Knife Sharpener |
| Brand | Chef's Choice |
| Model | Professional Diamond Hone 2000 |
| Sharpening Stages | 3 (Coarse, Fine, Honing) |
| Abrasive Material | Diamond-coated discs |
| Knife Edge Angle | 20° (both sides) |
| Compatible Knives | Straight edge, serrated, and Asian style |
| Power Supply | AC 120V, 60 Hz |
| Dimensions (L x W x H) | 9.5 x 5.5 x 3.8 inches |
| Weight | 2.2 lbs |
| Housing Material | ABS plastic with non-slip base |
| Motor | Permanent magnet, 0.5 A |
| Auto-Stop Feature | Yes, prevents over-sharpening |
| Magnetic Knife Guide | Yes, holds knife at correct angle |
| Cleaning | Wipe with damp cloth; brush debris from discs |
| Replacement Parts | Model 2000 diamond discs available |
| Warranty | Limited lifetime against defects |
| Safety Rating | ETL certified |
Frequently Asked Questions - Professional Diamond Hone 2000 Chef's Choice
User questions about Professional Diamond Hone 2000 Chef's Choice
0 question about this device. Answer the ones you know or ask your own.
Ask a new question about this device
Download the instructions for your Knife sharpener in PDF format for free! Find your manual Professional Diamond Hone 2000 - Chef's Choice and take your electronic device back in hand. On this page are published all the documents necessary for the use of your device. Professional Diamond Hone 2000 by Chef's Choice.
USER MANUAL Professional Diamond Hone 2000 Chef's Choice
natural_image
Black-and-white photo of a Chefs Choice Professional knife shaver in 2000, with kitchen utensils and blade tools nearby (no visible text or symbols on main objects)Read instructions before use.
It is essential that you follow these
instructions to achieve optimal results.
imPortant saFEGuarDs
When using electrical appliances, basic safety precautions should always be followed including the following:
- Read all instructions. Every user should read this manual.
- To protect against electrical hazards, do not immerse the Chef's Choice® motor drive section in water or other liquid.
- Make sure only clean knife blades are inserted in the Chef's Choice® Model 2000.
- Unplug from outlet when not in use, before putting on or taking off parts and before cleaning.
- Avoid contacting moving parts.
- Do not operate any appliance with a damaged cord or plug or after the appliance malfunctions, or is dropped or damaged in any manner.
U.S. customers: You can return your sharpener to EdgeCraft's factory for service where the cost of repair or electrical or mechanical adjustment can be estimated. When the electrical cord on this appliance is damaged, it must be replaced by the Chef's Choice® distributor or other qualified service to avoid the danger of electrical shock.
Outside U.S.: Please return your sharpener to your local distributor where the cost of repair or electrical or mechanical adjustment can be estimated. If the supply cord of this appliance is damaged, it must be replaced by a repair facility appointed by the manufacturer because special tools are required. Please consult your local Chef'sChoice® distributor.
-
CAUTION! “This appliance may be fitted with a polarized plug (one blade is wider than the other). To reduce the risk of electric shock, this plug will fit in a polarized outlet only one way. If the plug does not fit fully in the outlet, reverse the plug. If it still does not fit, contact a qualified electrician. Do not modify the plug in anyway.”
-
The use of attachments not recommended or sold by EdgeCraft Corporation may cause fire, electric shock or injury.
-
The Chef's Choice® Model 2000 is designed to sharpen kitchen knives (including serrated knives), pocket knives and most sports knives. Do not attempt to sharpen “parrot beak” knives, scissors, ax blades or any blade that does not fit freely in the slots.
-
Do not let the cord hang over edge of table or counter or touch hot surfaces.
-
When in the “ON” position (Red flash on switch is exposed when “on”) the Chef’sChoice® should always be on a stable countertop or table.
-
WARNING: KNIVES PROPERLY SHARPENED ON YOUR CHEF'S CHOICE® WILL BE SHARPER THAN YOU EXPECT. TO AVOID INJURY, USE AND HANDLE THEM WITH EXTREME CARE. DO NOT CUT TOWARD ANY PART OF YOUR FINGERS, HAND OR BODY. DO NOT RUN FINGER ALONG EDGE. STORE IN A SAFE MANNER.
-
Do not use outdoors.
-
Close supervision is necessary when any appliance is used by or near children.
-
Do not use honing oils, water or any other lubricant with the Chef's Choice®.
-
SAVE THESE INSTRUCTIONS.
Congratulations on your selection of the Chef'sChoice® Professional Knife Sharpener Model 2000!
You will find this method of sharpening puts an exceptionally sharp and durable edge on all of your knives. It is backed by EdgeCraft—World Leader in Cutting Edge Technology®.
The Chef's Choice® Commercial Diamond Hone® Knife Sharpener Model 2000 incorporates advanced diamond abrasive and honing technology to produce the sharpest and most durable edges of any sharpener available today. With it you can develop a shaving-sharp edge on all your knives. Once your knives have been sharpened on the Model 2000, resharpening takes less than 1 minute.
Consequently, if the Model 2000 is conveniently located in your work area, you can resharpen so rapidly that you need not rely on the sharpening steel to tune up the edge.
UNPACKING AND PREPARING FOR OPERATION
The Model 2000 has a motor-drive section and a detachable Sharpening Module that is packed and shipped disassembled (See Figure 1).
To assemble the Model 2000, insert the Sharpening Module into the guide rails of the motor section, (Figure 2) and slide the module toward the motor housing until it locks in place. If the sections do not snap together easily & quickly, follow the instructions in the "Inserting" section, (Page 8) of this manual.

Figure 1. Model 2000 sharpener - disassembled.
DEscriPtion - moDEI 2000 sHarPEnEr
The Model 2000 sharpener uses a novel two-stage sharpening and honing process, where the knife is first sharpened with a pair of conical diamond-coated wheels and then honed with a pair of patented conical honing disks incorporating ultrafine abrasive particles. This creates a unique edge geometry that gives the edge extraordinary “bite” and sharpness and ensures it will stay sharp much longer than conventionally sharpened knives. The Sharpening Module, incorporating both the sharpening and honing stages, is a self-contained unit that can be removed for washing and sanitizing in a dishwasher or at the sink. It can be removed simply by depressing the release button (Figure 2) and sliding the module off the motor-drive section.
A powerful 150 watt motor operating at 1700 RPM is enclosed in the motor housing. Splined drive couplings attached to the shafts of the motor drive and the Sharpening Module permit their rapid engagement or disengagement.
In both the sharpening and honing stages, the edge must be sharpened on alternate strokes in the right and left slots (See Figure 3). Precise “Blade Guides” position and align the knife at the correct angle while plastic hold-down springs stabilize and secure the blade as it is pulled through each slot and makes contact with the abrasive wheels. The downward movement of the blade in each of the slots is limited and controlled by an Edge Stop Plate (Figure 3), made of a high-density polymer that serves both as a stop and as a micro-guide “slot” for the edge, without damaging the sharp edge being formed. There are Edge Stop Plates at the front and rear of the sharpening and honing stages. For best results, the knife edge should only just touch or lightly rest on the front Edge Stop Plate. Excessive downward pressure is unnecessary and will result in excessive cutting of the Edge Stop Plate. The edge need not rest on the rear Stop Plate for the entire sharpening and honing stroke.

Figure 2. Sharpening module is inserted on rails and slid toward the motor-drive section to engage motor-drive. To disengage, press release button and slide away from the motor-drive. See text.

Figure 3. Knife is inserted between the Blade Guide and the plastic spring until edge rests lightly on Edge Stop Plate.
The sharpening and honing disks are spring-loaded on their drive shaft to provide an optimum sharpening pressure that ensures rapid yet uniform sharpening along the length of the edge and minimizes the potential for gouging the edge.
The knife is first sharpened in Stage 1 with alternate pulls on each stroke in the right and left slots. Depending on the condition of the edge, it may be necessary to make only 2-3 alternating pairs of pulls in each slot. With a very dull or heavily steeled edge, it may be necessary to make as many as 10 alternating pairs of pulls before moving to Stage 2. In any event, whenever sharpening in Stage 1, proceed until a distinct and uniform burr is created on the edge along the entire blade length on each successive pull through the right and left slots. A burr (as shown in Figure 4) is a distorted and bent over edge created by the sharpening process. Its presence is a confirmation that the sharpening in Stage 1 is complete and the knife is ready to be honed in Stage 2.
It is important to know how to feel for the burr. It is relatively easy to feel by moving one or more fingers across and away from (not along or into) the edge. One convenient method of doing this is shown in Figure 5. Grip the blade as shown. Put the index finger and/or the middle finger in contact with the face of the blade and move it/them forward across and away from the edge. The burr will be detected only along the side opposite from the one last sharpened (for example, if the last pull was through the right slot of Stage 1, the burr will appear on the right side of the knife). There will be no burr on the opposite side of the knife edge until the knife is pulled through the other slot. Pull through other slot and make certain burr is created there. Caution: To avoid any danger of being cut, do not move fingers along the length of or into the blade edge.
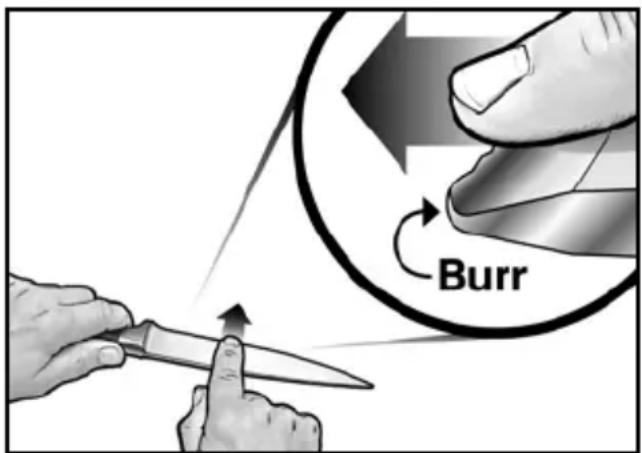
Figure 4. Feel for the burr (as shown) along entire blade edge before proceeding to Stage 2.

Figure 5. Burr can be detected by sliding fingers across and away from the edge. Caution! See text.
After developing a burr in Stage 1, the knife edge is honed in Stage 2. Using the same procedure as in Stage 1, the knife is pulled through, alternating in the left and right slots. The angle guides in this stage are set at a slightly larger angle than Stage 1, thus developing double-beveled facets along each side of the edge. The facet formed in this stage is very narrow and might best be described as a micro-bevel immediately adjacent to the edge itself. Normally only three pairs of alternating pulls in Stage 2 are sufficient. You will now find no trace of a burr and the edge will be extremely sharp.
Caution: The resulting edge is likely to be much sharper than you are accustomed to and must be handled with great care to avoid personal injury.
The sharpening and honing disks have a normal life of about 3000 resharpenings. You will observe a 2 to 3 fold decrease in the aggressiveness of the diamond wheels during this time.
Replacement sharpening modules are available from your distributor or the factory.
OPERATING PROCEDURE
Sharpening - Stage 1
- Turn the sharpener on. CLEAN THE KNIFE BEFORE SHARPENING. Accumulation of fat or grease on sharpening disk will reduce its effectiveness.
- Stand facing the front of the sharpener (facing the on/off switch side). Place the knife in Stage 1 in the slot between the plastic spring guide and the knife Blade Guide as shown in Figure 7, making sure the face of the knife blade is resting flat against the Blade Guide. You can start in either the right or left slot, but always alternate slots after each pull.
- Move the blade downward in the slot while slowly pulling it toward you until it contacts the rotating diamond disk. Make sure as you pull the knife down and forward through the slot that it is fully inserted and its edge rests lightly on the front Edge Stop Plate (as seen in Figure 6). Apply only just enough downward pressure to make contact with the front Stop Plate. Additional pressure is unnecessary and counterproductive. Do not be concerned about resting the knife edge on the Edge Stop Plate; it was designed so that it will not damage the knife's edge.
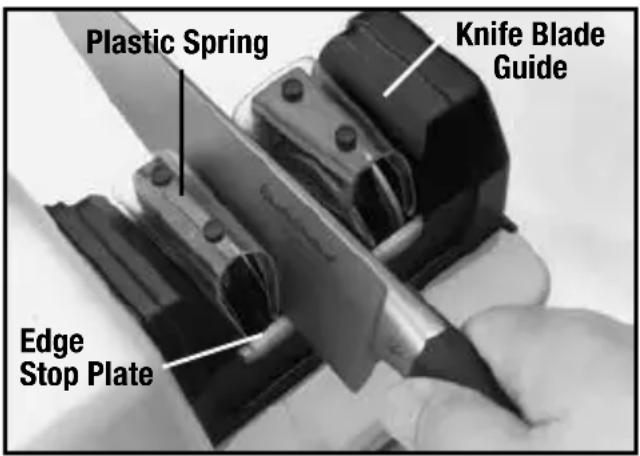
Figure 6. Sharpening in Stage 1: Knife is inserted between the knife Blade Guide and the plastic spring until edge rests lightly on Edge Stop Plate.
- Repeat Step 3 on each side of Stage 1, alternating in the right and left slots until you can feel a uniform burr along the entire length of the knife.
- Each pull should take about 4 to 6 seconds for an 8" knife. As you approach the tip of the knife, lift the handle slightly to keep that part of the edge parallel to the table. Continue to rest the edge lightly on the front Edge Stop Plate.
- Normally 2-3 pairs of alternating pulls in Stage 1 will be sufficient to create a burr, unless the knife is very dull or has been sharpened with a traditional steel since the last sharpening with the Model 2000. In the latter case, 5 or more pairs of alternating pulls in Stage 1 may be required to reform the edge facets and develop a burr. If you have difficulty creating a burr, pull the blade through the slots at a slower rate. Going slower is more helpful than many pulls.
- When you confirm that a burr is formed along the entire edge length on each successive pull, move to Stage 2.
Honing-stage 2
- MAKE CERTAIN THE KNIFE IS FREE OF FOOD, FAT OR OIL. Facing the front of the sharpener, place the knife in one slot of Stage 2 as shown in Figure 7 with the face of the knife blade lying flat against the Blade Guide.
- Move the knife into the slot downward and forward until it engages the honing disk. The knife edge should be gently seated on the Edge Stop Plate as it is pulled toward you.
- Repeat Step 2 on each side of Stage 2, alternating in the right and left slots for approximately 3 pulls on each side.
- Each pull should take about 4 to 8 seconds for an 8" knife. Again, as in Stage 1, slightly lift the handle as you approach the tip area, but continue to keep the edge in light contact with the Edge Stop Plate.
- Generally 3 alternating pairs of pulls are sufficient. Test the edge for sharpness by cutting a piece of paper or slicing a tomato and, if it is less than razor sharp, pull several more times in each slot of Stage 2. If the knife is not ultra-sharp, return to Stage 1 and develop a burr before repeating the honing sequence.

natural_image
Close-up of a knife cutting into a battery pack (no visible text or symbols)Figure 7. Honing in Stage 2 - Alternate pulls in left and right slots to create the final bevel. Knife edge rests lightly on Edge Stop Plate.
rEsHarPEninG
Normally you can resharpen rapidly with 3-5 pairs of alternating pulls through Stage 2 only. You will be able to resharpen 3-5 times just in Stage 2 before having to sharpen again in Stage 1. You may find it easier and faster to sharpen using Stage 2 for all resharpening rather than using a sharpening steel for periodic touch-up of the edge. Periodically, however, you will find it necessary to resharpen first in Stage 1 followed by Stage 2 in order to develop the shaving-sharp edge that should be created in Stage 2.
If a traditional sharpening steel is used repeatedly to tune up the edge between resharpenings on the Chef'sChoice® Model 2000, you will have to resharpen first in Stage 1, following the normal sharpening procedure and then hone in Stage 2. In this case it will take 3 or more alternating pairs of pulls in Stage 1 to achieve a uniform burr before proceeding to Stage 2.
In view of this, if you wish to improve productivity and reduce sharpening time, you should avoid using the traditional sharpening steel and rely on Stage 2 for fast resharpening.
Make sure the knife is free of food, fat or oil before resharpening in Stage 2.
sErratED KniVEs
While the Chef's Choice® Model 2000 is designed primarily for non-serrated knives, it will significantly improve the performance of serrated knives by honing the tips of the serrations. Two or three pairs of pulls, alternating through the left and right slots of Stage 2 (Honing) should be sufficient.
Caution: Do not use Stage 1 on serrated knives!
rEmoVinG, cIEaninG and insErtinG the sHarPEninG moDulE
When there is evidence of grease, fat, or food on any of the sharpening wheels or on the Sharpening Module where it cannot be readily removed, it is time to wash the module as described in the following section. We recommend knives always be cleaned before sharpening – at a minimum, wipe them down with a cloth in order to reduce the need for frequent cleaning of the Sharpening Module.
To remove the Sharpening Module, first make sure the motor switch is in the "OFF" position. Then press the release button while pulling the Sharpening Module away from the motor housing. (See Figure 8.) The Sharpening Module should remove easily.
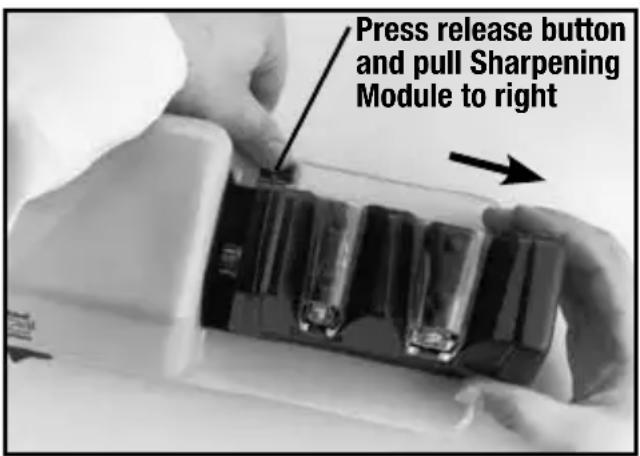
Figure 8. Sharpening Module is easily removed for cleaning.
CLEANING THE SHARPENING MODULE
This appliance is not to be cleaned with a water jet. (NEVER immerse the motor-drive section in water or spray it with water. When soiled, unplug it and wipe with a damp cloth). The Sharpening Module should be removed as described. It then can be cleaned by either of the following methods:
A. Washing by hand:
- Spray the wheels in each stage with liquid dishwasher detergent.
- Allow to soak for a few minutes in a pan, bucket or sink to loosen any attached food, etc.
- Rinse or spray under a strong stream of warm water.
-
Drain on paper towels. Blow dry if clean pressurized air is available.
-
CAUTION... do not towel dry; you may damage the plastic hold-down spring.
-
If diamond wheels are not shiny they may have grease on them. Put sharpening module throughdishwasher.
B. Dishwasher:
- Spray the wheels in each stage with liquid dishwasher detergent.
- Put in dishwasher on normal wash cycle.
- Allow unit to dry in the dishwasher, preferably in a position remote from the heaters.
Periodically remove any metal dust that has collected in the two collection cavities located below the sharpening and honing stages in the base of the sharpener (under the Sharpening Module.) With the Sharpening Module removed, simply invert the motor housing and shake the dust loose. Otherwise remove with a damp sponge. Do not use a water spray to remove the loose dirt.
INSERTING SHARPENING MODULE
To reinsert the Sharpening Module into the main motor housing, insert the shaft coupling end of the Sharpening Module into the guide rails at the right end of the sharpener. Then gently push the Sharpening Module (as in Figure 2) toward the motor housing until it locks in place. If it resists snapping into the locked position: (1) Pull the module away from the motor shaft until it fully disengages; (2) turn the motor switch on briefly; (3) then turn it off; (4) while the motor is coasting to a stop, push the Sharpening Module into place. It will then automatically snap into position when the spline coupling becomes properly aligned.
CHANGING THE EDGE STOP PLATES
The Edge Stop Plates, especially the pair in front of the sharpening and honing stages, will in time develop small cuts in the surface where the knife rests during sharpening. This is normal but the depth of the cuts can be minimized by applying just enough downward pressure to keep the edge in contact with the Plate. When these cuts approach 1/8" deep, the Edge Stop Plates should be turned over or replaced. The Plates generally can be removed simply with a pair of needle nose pliers or by prying them up and out gently with a pointed tool. They can be inverted, when worn, to expose a fresh edge for contact with the blade. With experience you will find that little or no pressure is necessary against these plates and that they will last a long time. Replacement Stop Plates are available directly from your distributor or from EdgeCraft (1-800-342-3255).
DRESSING THE STAGE 2 HONING WHEELS
If the Stage 2 honing wheels appear to be “glazing over” due to grease or other reasons, or if you believe these wheels are less aggressive, you can clean them with the diamond dresser supplied with your Model 2000 sharpener. This will restore the wheels to “like new” condition. To dress the wheels, turn on the sharpener and insert and pull through the dressing plate as shown in Figure 9. Insert the dresser between the plastic spring and against the knife guide - just as you would insert a short knife for sharpening - to make contact with the honing wheel and pull dresser plate through like a knife, pull twice through the right and left slots as shown in Figure 9. Pull through in 2-3 seconds. Remove plate when the process is completed.
HOW TO GET THE MOST OUT OF YOUR
Chef'sChoice® Model 2000
A. There is no maintenance required other than to clean the Sharpening Module periodically by putting it in the sink or dishwasher. It is unnecessary to clean this module simply because the honing wheels darken - that is normal. The wheels are self cleaning (through mild ablation) unless they become covered with fat and grease. The need for cleaning can be minimized by wiping your knives before and after sharpening as described in this manual. Do not immerse the motor-drive unit in water. Clean it only with a damp cloth. Periodically shake out the metal dust under the sharpening wheel as described under “cleaning...”
B. We suggest you locate the Model 2000 in a convenient place in your work area for rapid resharpening. A few quick passes through Stage 2 will restore your knife edge to razor sharpness.
C. Heavy cleavers (such as the ones made in Germany, France, etc.) can be sharpened on the Model 2000. However, because most of these cleavers are manufactured with an extremely blunt edge, it will require many pulls through Stage 1 to create the first bevel. Once sharpened, however, the cleaver will resharpen rapidly. Oriental cleavers are thinner and sharpen quickly on the Model 2000.

natural_image
Close-up of a hand holding a tool interacting with three metal clipers on a dark surface (no text or symbols visible)Figure 9. Dressing Stage 2 Honing Wheel.
D. Resharpen the knife in Stage 1 only when you cannot achieve satisfactory sharpness with a few pulls through Stage 2.
E. This sharpener is supplied with an abbreviated set of instructions printed on an adhesive backed plastic label. If you wish to keep these handy, remove backing and adhere to the top surface of the motor housing. Replacement labels are available from EdgeCraft.
F. Replacement parts can be ordered from your local distributor or from the factory. For customer service or assistance call 1-800-342-3255.
sErVicE
In the event post-warranty service is needed, return your sharpener to the EdgeCraft factory where the cost of repair can be estimated before the repair is undertaken.
Please include on a separate sheet inside the box: your return address, daytime telephone number and a brief description of the problem or damage to the sharpener. Retain a shipping receipt as protection against loss in shipment.
EdgeCraft
World Leader in Cutting Edge Technology®
EdgeCraft Corporation
825 Southwood Road, Avondale, PA 19311 U.S.A.
Customer Service (800) 342-3255 or 610-268-0500
Engineered and assembled in the U.S.A. www.chefschoice.com
This product may be covered by one or more EdgeCraft patents and/or patents pending as marked on the product.
Chef'sChoice®, EdgeCraft® and Diamond Hone® are registered trademarks of EdgeCraft Corporation, Avondale, PA.
Conforms to UL Std. 763 Certified to EN 60335-1, EN 60335-2
© EdgeCraft Corporation 2016
J16 I208960
Chef'sChoice®
natural_image
Black-and-white photo of a Chefs Choice Professional knife cutting into a 2000 serving, surrounded by kitchen utensils and blade tools (no text or symbols visible on main objects)natural_image
Close-up of a power switch with a knife inserted into its socket (no visible text or symbols)natural_image
Close-up of a hand holding three metal clip pens on a dark surface, no visible text or symbolsWorld Leader in Cutting Edge Technology®
EdgeCraft Corporation
825 Southwood Road, Avondale, PA 19311 U.S.A.
Customer Service (800) 342-3255 or 610-268-0500
© EdgeCraft Corporation 2016
J16 I208960
Chef'sChoice®
Професійна
natural_image
Black-and-white photo of a Chefs Choice Professional knife cutting into a 2000 serving kitchen appliance, surrounded by kitchen utensils and blade tools (no text or symbols visible on main objects)natural_image
Close-up of a hand holding a knife inserted into a device with visible wires (no text or symbols)natural_image
Close-up of a hand holding three metal clip pens, partially open with black plastic sheeting (no visible text or symbols)World Leader in Cutting Edge Technology®
EdgeCraft Corporation
825 Southwood Road, Avondale, PA 19311 U.S.A.
Customer Service (800) 342-3255 or 610-268-0500
© EdgeCraft Corporation 2016
J16 I208960



- imPortant saFEGuarDs
- When using electrical appliances, basic safety precautions should always be followed including the following:
- Congratulations on your selection of the Chef'sChoice® Professional Knife Sharpener Model 2000!
- UNPACKING AND PREPARING FOR OPERATION
- DEscriPtion - moDEI 2000 sHarPEnEr
- Caution: The resulting edge is likely to be much sharper than you are accustomed to and must be handled with great care to avoid personal injury.
- OPERATING PROCEDURE
- Sharpening - Stage 1
- Honing-stage 2
- rEsHarPEninG
- sErratED KniVEs
- rEmoVinG, cIEaninG and insErtinG the sHarPEninG moDulE
- CLEANING THE SHARPENING MODULE
- Washing by hand:
- Dishwasher:
- INSERTING SHARPENING MODULE
- CHANGING THE EDGE STOP PLATES
- DRESSING THE STAGE 2 HONING WHEELS
- HOW TO GET THE MOST OUT OF YOUR
- Chef'sChoice® Model 2000
- sErVicE
- EdgeCraft
- Chef'sChoice®
- Професійна
Brand : Chef's Choice
Model : Professional Diamond Hone 2000
Category : Knife sharpener