
Enado EN-A001-010 - Controller WyreStorm - Free user manual and instructions
Find the device manual for free Enado EN-A001-010 WyreStorm in PDF.


| Type of product | Controller |
| Brand | WyreStorm |
| Model | Enado EN-A001-010 |
| Dimensions (H x W x D) | 44 x 483 x 152 mm (1.7 x 19 x 6 in) |
| Weight | 2.0 kg (4.4 lb) |
| Power supply | 100-240 V AC, 50/60 Hz, 30 W |
| Control interfaces | RS-232, IR, Ethernet, USB |
| Supported protocols | TCP/IP, HTTP, Telnet, IR codes |
| Number of controlled devices | Up to 16 (via IR or RS-232) |
| Programming | Web-based GUI or proprietary software |
| Operating temperature | 0°C to 40°C (32°F to 104°F) |
| Storage temperature | -20°C to 60°C (-4°F to 140°F) |
| Humidity | 10% to 90% non-condensing |
| Mounting | 1U rackmount or tabletop |
| Maintenance | Keep dry; clean with soft cloth; avoid solvents |
| Safety | CE, FCC; use only supplied power adapter |
| Spare parts / repairability | Contact WyreStorm support; no user-serviceable parts |
| Warranty | 2 years limited |
Frequently Asked Questions - Enado EN-A001-010 WyreStorm
User questions about Enado EN-A001-010 WyreStorm
0 question about this device. Answer the ones you know or ask your own.
Ask a new question about this device
Download the instructions for your Controller in PDF format for free! Find your manual Enado EN-A001-010 - WyreStorm and take your electronic device back in hand. On this page are published all the documents necessary for the use of your device. Enado EN-A001-010 by WyreStorm.
USER MANUAL Enado EN-A001-010 WyreStorm
WyreStorm® Enado™ User Interface Controller
enado
ENA-001-010
WyreStorm Enado™ Controller with 16x IR, 4x RS232, 8x Ethernet and 4x I/O Sensors
Instruction Manual




Thank you for choosing this WyreStorm product.
Please read these instructions carefully before installing to avoid complications later.
Contents
1 Introduction
2 Features
3 Safety Precautions
4 Package Contents
5 Specifications
6 Panel Description
i. Front Panel Description
ii. Rear Panel Description
7 Typical Application
8 Connection
9 Basic Operation
i. Introduction to the Enado interface
ii. Launching the Enado interface
iii. Enado Live UI Elements
iv. Enado Configuration UI Elements
v. Previewing/Publishing a project
vi. Saving links to interface with different devices
10 Advanced Operation
i. Upgrading the Enado controller software
ii. Accessing the configuration UI guide
11 Additional information
12 Troubleshooting
13 FAQ
14 Maintenance
15 Product Service
16 Mail-in Service
17 Warranty
18 Warranty Limits & Exclusions
19 Disclaimer
20 Installation Reference log
21 Notes
1. Introduction
WyreStorm Enado redefines integrators' ability to control AV distribution systems by combining powerful hardware and intuitive, cross-platform software to create an end-to-end AV distribution and control system that is always on, updated and accessible.
The Enado Controller offers exceptional performance and capability within one compact unit, designed to offer high levels of functionality and power the Pro Plus utilises a unique software platform that scales to the highest level.
The system can be programmed via a simple but advanced web browser application and is designed to offer maximum control flexibility eliminating the requirement for proprietary applications. The powerful software can run on any client device that offers a compatible web interface making the controller ideal for both professional and residential control.
For further information on this product and other WyreStorm ranges, visit our website or download our latest product guide at wyrestorm.com
2. Features
- Full remote access, enables control and programming from any compatible web enabled device including smart phones, tablets, Smart TVs, PCs and Macs.
- Sleek, 1U design allows for installation flexibility in a rack, cabinet or on a shelf.
- Instantaneous, intuitive control from a smart phone, tablet, TV, PC or MAC browser.
- Advanced processor delivers exceptional performance and control of connected devices including video, audio, lighting etc.
- Extensive I/O to control devices through multiple IR, RS232 serial, IP and Sensor I/O.
For further information, wyrestorm.com
3. Safety Precautions

WARNING
To reduce the risk of fire, electric shock or product damage:
- Do not expose this apparatus to rain, moisture, sprays, drips or splashes and ensure that no objects containing liquids are placed on the apparatus, including cups, glasses and vases.
- Do not place this unit in a confined space such as enclosed shelving, cabinets or bookshelves. Ensure the unit is adequately ventilated.
- To prevent the risk of electric shock or fire hazard due to overheating, do not cover the unit or obstruct ventilation openings with material, newspaper, cardboard or anything that may restrict airflow into the unit.
- Do not install near external heat sources such as radiators, heat registers, boilers or any device that produces heat such as amplifiers or computers and do not place near sources of naked flame.
- Unplug apparatus from power supply during lightening storms or when unused for long periods of time.
-
Protect the power cable from being walked on, pinched or restricted in any way, especially at plug connections.
-
Only use attachments/accessories specified by the manufacturer.
-
Units contain non-servicable parts - Refer all servicing to qualified service personnel.
4. Package Contents
WyreStorm ENA-001-010 extender set comprising of:
1 x ENA-001-010 WyreStorm Enado controller
1 x Printed product manual*
8 x IR TX Y transmitter cable
8 x IR Link cable
1 x IR RX receiver cable
4 x RS232 male to female cable
2 x Mounting brackets
3 x 100-240v AC power cable: AUS, UK, US, EU
*Full manual also downloadable from product page at wyrestorm.com
5. Specifications
| Operating Temperature 32°F | to 95°F (0°C to 35°C) 10% to 90%, non-condensing |
| Storage Temperature -4°F to 140°F (-20°C to 70°C) 10% to 90%, non-condensing | |
| Dimensions (WxHxD) 440mm x 42.3mm x 261.6mm / 17.3" x 1.66" x 10.3" | |
| Weight Approx 3.74Kg / 8.24lbs (without accessories) | |
| Power Supply Input 100-240 V/AC | |
| Power Consumption ≤11.8W (Pair) | |
| IR Output Min/Max IR Frequency | 10K - 120K |
| USB Type | USB 2.0 |
| Ethernet | 10/100 |
| Sensor I/O | Input requires 12V |
6. Panel Description
i. Front Panel Description

1 IR blaster - IR TX
2 LED power indicator - lit when powered
3 LED work indicator - lit when working (set by software)
4 LED warn indicator - lit when warning (set by software)
5 IR IN - IR RX receiver input
6 IR blaster - IR TX (as 1)
7 Power switch - power on/off
ii. Rear Panel Description

1 Ground terminal
2 Power supply input
3 8 x port 10/100 Ethernet switch
4 1 x IR RX
5 16 x IR TX
6 4 x RS232
7 4 x Sensor I/O
8 1 x USB
7. Typical Application
Residential Application Example
In this example the Enado controller is centrally racked with the source components and WyreStorm MX-0808-PP-POH Matrix.
2-way IR is fed to and from the zones via HDBaseT so that local IR remotes can be used for the Set top box whilst Enado can control the screens in each zone.
Using the Y shape dual jack IR emitters supplied with the controller avoids having two IR emitters on the source device.
IR Link cables are used to connect the matrix TX to Enado. The RS232 lead should be a cross over or null-modem whilst the LAN cable should be straight through.
![graph TD subgraph ARC A["ARC"] --> B["AMP-001-010 AUDIO AMP & RECEIVER"] C["HDBT"] --> D["AMP-001-010 AUDIO AMP & RECEIVER"] E["CHDBT"] --> F["AMP-001-010 AUDIO AMP & RECEIVER"] G["CHDBT"] --> H["AMP-001-010 AUDIO AMP & RECEIVER"] I["PERSONAL AUDIO DEVICE"] --> J["MAC"] end subgraph RX-70-IR-POH HDB…](/content/2026/05/979833/images/6892b23c2f418f2b3ecefc842759193e39a688d512ebe413b8054a393c17dd51.jpg)
8. Connection
Do not connect the Enado Controller to the mains until you have made all the following connections.
1 Connect a good quality, well-terminated Cat5e/6 cable with RJ45 connectors wired to the 568B standard at both ends to the Enado Ethernet switch and the router or primary network switch. Ensure the cable is tested and measures less than 100m/328ft, with all connectors pushed securely to ports and supported by connector strain relief clips to prevent them from becoming loose.
The quality of cable and RJ45 termination is essential for successful distribution transmissions. Poor cable and terminations lead to intermittent performance and longer install times.
2 The IR TX receiver window on the front panel & the IR TX port on the rear of the Enado Controller are electronically linked and should not be used together.
Front IR RX Rear IR RX

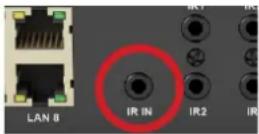
Rear IR IN should only be connected if it is not possible to receive IR signals via the front panel for learning, such as if the IR TX window is obstructed or the unit is enclosed so cannot receive an IR signal from a handset.
In such cases the rear IR TX receiver eye should be placed in clear line of site to the control device used to control.
3 The rear of the Enado controller has 16 x IR outputs used to control displays or other devices in zones and sources local to the controller, with the user able to designate the balance of output devices or local sources to be controlled through the system.
For example, if the application requires an even balance of inputs and outputs for control within an 8x8 matrix distribution, the user should connect 8 IR outputs from the Enado Controller to the IR RX ports of the matrix using the supplied mono IR Link cables to enable control of output devices in display zones.
4 The remaining 8 Enado IR outputs should be connected to sources local to the controller via the supplied Y IR emitters, with one jack connecting to the IR ports of the Enado Controller and the other connecting to the corresponding source IR TX ports on the matrix to enable IR pass-through.
! IR eyes should be attached with the adhesive backing directly over the infrared receiving area of sources, ensuring there is a clear line-of-sight with the remote control handset used to control. Location of the IR eye may need to be adjusted later to achieve best IR performance.
NOTE: Infrared windows can be seen by shining a flashlight onto the front of the device – the IR sensor will likely appear as a small round diode behind the fascia.
5 For integration of a control system, connect an RS232 cable between a matrix and the Enado Controller – serial control for up to 4 matrices is supported, with each matrix requiring individual RS232 connection to ports 1-4 of the Enado Controller.
6 Connection of trigger GPIO (General Purpose input/output) and sensor input system. See 6ii on Rear Panel description.
7 Connect the power supply, making sure to ground the chassis first to prevent electrical build up before turning on the power supply.
Required Cable Types:
- IR (to source): WyreStorm Enado 'Y' IR Emitter
- IR (Enado to matrix): WyreStorm IR Link cable (CAB-IR-LINK - 5v to 12v)
- RS232: Null modem
- Ethernet: Straight 'patch' lead
![graph TD A["KEY"] --> B["25W CLASS D AMP"] B --> C["Network Switch"] C --> D["HDMA"] D --> E["HDMA PASS-THROUGH CARD TO CONNECT TO ANOTHER MATRIX AND EXPAND DISTRIBUTION"] C --> F["enado"]](/content/2026/05/979833/images/c5875b251c0566b791adbd09f95f78ad982253307a4548472b3aceb975b95b0a.jpg)
CONNECTION

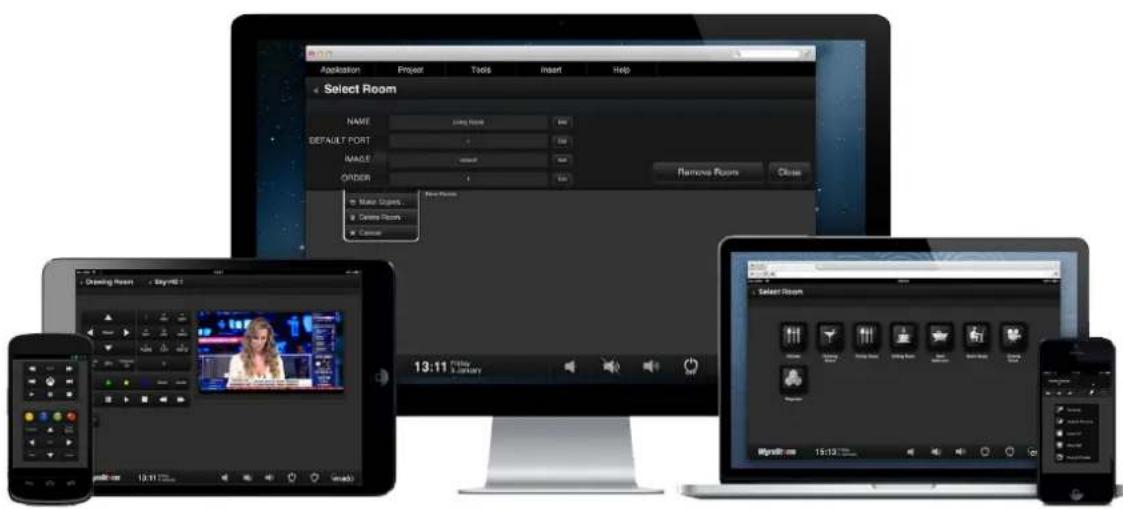
Full control of connected sources and displays through the Enado central controller from any global location via the multi-platform, browser-based Enado User Interface used in conjunction with any internet-enabled device.
9. Basic Operation
i. Introduction to the Enado Interface
On the Enado system, user interfaces (UIs) for both control and configuration are accessed through compatible standard web browsers. The UI that an end user sees to control the building is referred to as the 'Control UI' (or 'Live UI') in an Enado system. The user interface that the installer or system designer uses to configure/design a system is the 'Configuration UI'.
Both UIs are generated by the Enado controller.
There are different formats of Control UI for use on different sizes / types of control device. These include:
- The 'Standard UI', suitable for use on desktop computers, tablet computers, TVs, etc. with screen sizes greater than 5 inch/12.7cm. This is designed for viewing in landscape orientation only.
- The 'Compact UI', suitable for use on smart phones, small browsing devices/media players, etc. with screens under 5 inch/12.7cm. This is designed for viewing primarily in portrait format but can be viewed in landscape format, too.
Both 'Control' and the 'Configuration' UIs are designed to be operated using both a mouse and via a touch screen.
The Configuration Editor interface is designed for back-end and front end appearance to be replicated - so whatever the installer creates/edits in the back-end will be reflected in what the end user will see on the Control UI.
Both the Standard and Compact UIs use the same configuration data. The layout of the Standard UI can be freely designed using the configuration editor. The layout of the Compact UI layout is automatically generated from the data used in the Standard UI configuration with some Compact UI-specific configuration options. This allows quick and easy editing and creation of the different screen size formats without editing each format individually.
For more detailed information about how to use the Configuration UI please select the 'Editor User Manual' from the 'Help' menu of the Enado Configuration UI.
ii. Launching the Enado Interfaces
Once the controller is connected to the network & powered up, open a web browser on a device on the same network and type: http://myenado.home/enado/edit
There are many differences between the HTML5 implementations of different browsers. WyreStorm highly recommends the latest versions of the following browsers for accessing the Enado Configuration Interface:
-Firefox or Chrome for Windows
-Chrome or Safari for Mac.
! The behaviour of the Configuration interface cannot be guaranteed in other browsers and WyreStorm specifically does not recommend Internet Explorer.
The Control UI is compatible with any HTML5 compatible browser, including Internet Explorer.
Once the controller is connected to the network & powered up, open a web browser on a device on the same network and type: ipaddress/enado/edit.
If you do not know the IP address of the Enado Controller, log in to the router and check the connected devices IP table or alternatively use a network scanning app such as Fing from your smart phone (available free from your app store). The Enado controller will be listed as myenado.

To access the Live UI enter the IP address of the Enado controller into a web browser. The system will automatically forward you to the Live UI.
Until a project is published from the configuration interface, no Live UI will be available. See section 9v. Publishing a project.
iii. Enado Live UI Elements

- Room/Zone selector
- Activity/Device selector
- Activity Shortcuts
- Video Preview Element – live preview of selected Zone/Activity
- Full Screen Video Preview – press for full screen video preview
- Pause Video Preview - press to freeze frame video preview (no command sent to source device)
- Button Select group – all buttons in the UI are fully configurable so function, appearance and position are fully editable. Buttons presented here are for reference only and used to highlight the concept and graphical elements of the UI.
- Date & Time display - calculated from the display device
- Room/Zone Global controls - present in every activity page per room/zone
- System Settings - main access to system configuration and management
NOTE: See Enado Editor guide for full information on creating, configuring and managing the UI. Downloadable from the Enado product page at wyrestorm.com
iv. Enado Configuration UI Elements
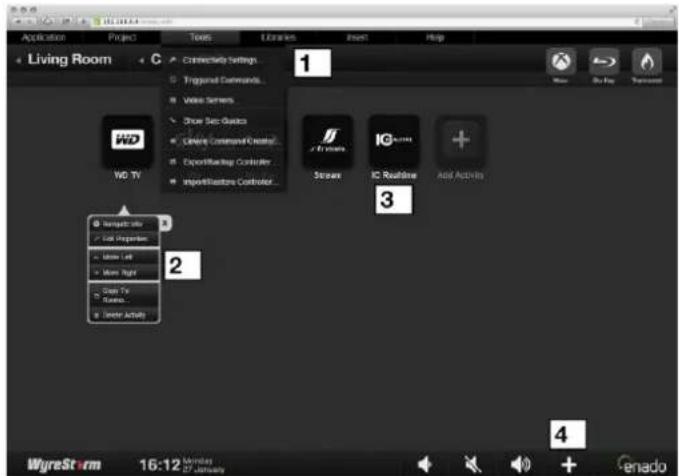
- Top menu - access system configuration and management
- Activity/Device Settings
- Quick Insert Activity/Device buttons - fully configurable
- Add Room/Zone Global - adds new global button to send commands to all relevant screens per room/zone
v. Previewing/Publishing a Project
Once created a project can be published from the Project menu by selecting Preview/Publish.

When the Preview/Publish window opens the select the required operation from the buttons to the right of the window.
vi. Saving links to the interface with different devices
PC, Mac & Linux web browser links to the Enado interface should be saved as standard bookmarks or favourites.
Ensure the bookmark address is saved as ipaddress/enado/edit. Saving the full URL will prevent the customer accessing the most recently published project.
From mobile devices, such as iOS, Android, Windows Phone & Blackberry devices, bookmarks should be saved to the UI from the devices web browser, ensuring that the option of save to home screen is selected when asked.
10. Advanced Operation
i. Updating the Enado controller software
Before starting a project it is highly recommended that the controller software is updated to the latest version. Full release notes are included with each release.
To update to the latest version:
- Select Update Manager from the Application menu.
- Click Check for Online Updates.
- Check the version number of available software is higher than the currently installed version and press Install.

The update process can take up to 30 seconds to complete after which your browser should automatically refresh & reopen the configuration UI. You will need to re-enter your configuration UI password that by default is password123.
Do not power on the Enado controller until the updating process has completed and the live & configuration UI's are accessible from a web browser.
ii. Accessing the configuration UI guide
To access the full Configuration UI guide Select Editor User Manual from the Help menu.
11. Additional Information
Further information about Enado including guides and templates are available at wyrestorm.com.
12. Troubleshooting
Many control issues are caused by environmental factors and are unique to the installation. Therefore the best method of troubleshooting is to trace the signal path and use appropriate test equipment at each stage to test cables and data integrity.
Here are some common issues that affect control data.
IR
- IR is susceptible to interference from direct & indirect sunlight, artificial lighting (particularly, but not limited to) halogen, Plasma, LED & LCD TVs. If any of these are present near the IR emitters or receivers in the system, it may result in poor IR transfer. Disconnect IR feeds from other areas to ensure they are not passing interference that could be flooding the source.
- The location of IR emitters is crucial to successful control. Check with the manufacturer for the accurate location of the IR receiver on the device and ensure it is positioned correctly.
- The integrity of IR data is only as good as the data that is entered into the Enado controller. Relearn codes that are causing issue and test them thoroughly from the device creator.
- If you are still unable to learn or send IR from the controller after checking these steps, please reboot the Enado controller.
RS232
- The most common fault with RS232 data transfer is incorrect baud rate settings. Check with the devices manufacturer to ensure the Enado controller has been configured with the correct settings on the correct output.
- Different devices have different requirements for the RS232 cables they use and the cables supplied with the Enado controller may not be appropriate for the selected device. Check the manufacturer's specification to ensure the cable meets the requirements for the device. The most common configuration of cable is null-modem or cross over as is supplied with Enado.
- It is highly recommended that a terminal application such as Hercules, HyperTerminal or REALTerm is used to test control of a device from a PC and to check the integrity of the data that is emitted from the controller.
- If you are not able to control a device from the PC please consult the devices manufacturer, manual or if you are unable to view RS232 commands from the controller with these apps, please reboot the Enado controller.
- Many devices will require special settings in order to respond to RS232 control, which are often manually set on the product being controlled and can possibly effect sleep modes and energy efficiency settings.
- Please consult the manufactures handbook of the device you wish to control to ensure it is correctly configured to receive RS232 control commands.
- Please also note that many products cannot be brought out of standby by RS232 commands.
TCP/IP
- Check if network devices are able to access the internet and network settings are properly configured. If internet access is not possible, ensure that the device has correct settings in each address field.
-
TCP/IP issues are most commonly IP address related. Devices with DHCP assigned addresses can renew to a different address. This may cause an IP address conflict if there are other devices with statically assigned addresses on the network. Central devices should where possible have static addresses assigned or have static addresses assigned via their MAC address in the router.
-
It is not uncommon for DHCP servers to crash and stop assigning new IP addresses after a DHCP lease expires. Resetting the DHCP server (commonly the router) will ensure it is operating properly and reassign all DHCP enabled clients with new non-conflicting addresses.
Sensor I/O
- The Sensor inputs on the Enado controller require a voltage of 12V to operate, they are not volt free. The outputs are volt free but will handle a voltage between 9 & 24V.
- It is very rare for Sensor I/O issues to occur that are not wiring related. Ensure that the connections have been properly made and re-terminate if necessary.
- Check the integrity of the cable & signal with a voltmeter to ensure it is passing and maintaining its voltage over the length of the cable.
- If you are still unable to send or receive Sensor I/O commands from the controller after checking these steps, please reboot the Enado controller.
13. FAQ
Can I use a hard button remote with Enado?
The Enado controller cannot be controlled itself by IR, instead it is recommend to use the IR pass-through on the WyreStorm matrix to integrate hard button remotes.
How do I make a smart phone or tablet only control Enado?
It is possible to configure iOS & Android devices to only control Enado and remove access to all other functionality through the use of Kiosk modes and apps. In iOS this functionality is built into the OS under Settings>General> Accessibility>Guided Access. On Android searching the Play store for "Kiosk" will display various options of which SureLock is recommended.
How many zones & devices can be controlled by Enado?
The Enado Controller has a large selection of control outputs but this can be extended using the Enado IO Ethernet & WiFi extenders. Any Enado system can have an unlimited number of zones (WyreStorm have tested up to 100) but by expanding the control outputs an unlimited number of devices can be controlled.
How many Enado controllers can I use in an installation?
Although any number of controllers can be used in a single install if required, it is recommended to have a single central controller and expand the I/O with IP extenders to prevent the user having several different interfaces on their device.
How can I expand the control outputs of the Enado controller?
The IR, RS232, Sensor & Relay Input & outputs can be extended using Enado I/O Ethernet or WiFi extenders.
How do I get video onto the network for display on Enado?
The Enado interfaces ability to display video requires an IP video source such as an Axis M70 series network video Encoder or IP CCTV camera.
A guide to installing & configuring the video feedback within Enado can be found at wyrestorm.com
14. Maintenance
Clean this unit with a soft, dry cloth only. Never use alcohol, paint thinner or other harsh chemicals.
15. Product Service
Provided Service:
1. Damage requiring service: This unit should be serviced by a qualified service personnel if:
- The power supply or AC adaptor has been damaged.
- Objects or liquid have gotten into the unit.
- The unit has been exposed to rain.
- The unit does not operate normally or exhibits marked change in performance.
- The unit has been dropped or the cabinet damaged.
2. Servicing Personnel: Do not attempt to service the unit beyond that described in these operating instructions. Refer all other servicing to authorised servicing personnel.
3. Replacement Parts: When parts need replacing, ensure parts approved by the manufacturer are used - either those specified by the manufacturer or parts possessing the same characteristics as the original parts.
Be aware - unauthorised substitutes may result in fire, electric shock, or other hazards and will invalidate your warranty.
- Safety Check: After repairs or service, ask the service personnel to perform safety checks to confirm the unit is in proper working condition. When shipping the unit carefully pack and send it prepaid, with adequate insurance and preferably in the original packaging. Please include a document or letter detailing the reason for return and include a daytime telephone number and/or email address where you can be contacted.
16. Mail-in-service
When shipping the unit, carefully pack and send it prepaid, with adequate insurance and preferably in the original packaging. Please include a document or letter detailing the reason for return and include a daytime telephone number and/or email address where you can be contacted.
If repair is required during the limited warranty period, the purchaser will be required to provide a sales receipt or other proof of purchase, indicating date and location of purchase as well as the price paid for the product. The customer will be charged for the repair of any unit received unless such information is provided.
17. Warranty
Should you feel your product does not function adequately due to defects in materials or workmanship, we (referred to as “the warrantor”) will, for the length of the period indicated below (starting from the original date of purchase) either:
a) Repair the product with new or refurbished parts. or
b) Replace it with a new or refurbished product.
Limited warranty period:
All WyreStorm products are covered by a 3 year PARTS and LABOUR warranty. During this period there will be no charge for unit repair, replacement of unit components or replacement of product if necessary.
The decision to repair or replace will be made by the warrantor. The purchaser must mail-in the product during
the warranty period. This limited warranty only covers the product purchased as new and is extended to the original purchaser only. It is non-transferable to subsequent owners, even during the warranty period.
A purchase receipt or other proof of original purchase date is required for the limited warranty service.
18. Warranty Limits & Exclusions
1. This Limited Warranty ONLY COVERS failures due to defects in materials or workmanship and DOES NOT COVER normal wear and tear or cosmetic damage.
The limited warranty also DOES NOT COVER damage that occurs in shipment or failures caused by products not supplied by the warrantor, failures resulting from accident, misuse, abuse, neglect, mishandling, misapplication, alteration, incorrect installation, set-up adjustment, implementation of/to consumer controls, improper maintenance, power line surge, lightening damage, modification, service by anyone other than a manufacturer-approved service centre or factory-authorised personnel, or damage attributable to acts of God.
2. There are no express warranties except as listed under “limited warranty coverage.” The warrantor is not liable for incidental or consequential damage resulting from the use of this product or arising out of any breach of this warranty.
For example: damages for lost time, the cost of having a person/persons remove or re-install previously installed equipment, travel to and from service location, loss of or damage to media, images, data or other recorded/stored content. The items listed here are not exclusive, but are for illustration only.
Parts and service not covered by this limited warranty are not the responsibility of the warrantor and should be considered the responsibility of the individual.
19. Disclaimer
WYRESTORM PUBLICATION DISCLAIMER
The material contained in this document consists of information that is the sole property of WyreStorm. This document is intended to provide information to allow interfacing to the relevant WyreStorm equipment by third party products.
WYRESTORM IS NOT RESPONSIBLE FOR MALFUNCTIONS AND/OR THE IN-OPERABILITY WHICH MAY BE CAUSED BY THE APPLICATION OF THIS INFORMATION, WHETHER EXPECTED OR NOT.
WyreStorm reserves the right to change software, control codes and specifications without notice.
WyreStorm will not be liable for any use of this information or any changes it may make to those products. The use of this information constitutes an agreement by the user to these limitations and exclusions.
20. Installation Reference Log
| Input # | IR TX | Input # | Ethernet RS232 Sensor I/O | |||||
| 1 | Cable # | 1 | Cable # Cable # | |||||
| 2 | Cable # | |||||||
| 3 | Cable # | 2 | Cable # Cable # | |||||
| 4 | Cable # | |||||||
| 5 | Cable # | 3 | Cable # Cable # | |||||
| 6 | Cable # | |||||||
| 7 | Cable # | 4 | Cable # Cable # | |||||
| 8 | Cable # | |||||||
| 9 | Cable # | 5 | ||||||
| 10 | Cable # | |||||||
| 11 | Cable # | 6 | ||||||
| 12 | Cable # | |||||||
| 13 | Cable # | 7 | ||||||
| 14 | Cable # | |||||||
| 15 | Cable # | 8 | ||||||
| 16 | Cable # | |||||||
21. Notes
WyreStorm®
wyrestorm.com
WyreStorm Offices
North America Office: 23 Wood Road, Round Lake, NY 12151
Tel: +1 518-289-1293
EMEA Office: Unit 22, Ergo Business Park, Swindon, Wiltshire, SN3 3JW, UK
Tel: +44 (0) 1793 230 343
WyreStorm Technical Support
US: +1 844-280-WYRE (9973)
UK:- +44 (0) 1793 230 343
Email: support@wyrestorm.com
WyreStorm Technologies reserve the right to change physical appearance or technical specification of this product at any time.
Visit wyrestorm.com for the latest information on products..
160330
- ENADO
- CONTENTS
- INTRODUCTION
- FEATURES
- SAFETY PRECAUTIONS
- WARNING
- PACKAGE CONTENTS
- SPECIFICATIONS
- PANEL DESCRIPTION
- FRONT PANEL DESCRIPTION
- II. REAR PANEL DESCRIPTION
- TYPICAL APPLICATION
- RESIDENTIAL APPLICATION EXAMPLE
- CONNECTION
- REQUIRED CABLE TYPES
- BASIC OPERATION
- INTRODUCTION TO THE ENADO INTERFACE
- II. LAUNCHING THE ENADO INTERFACES
- III. ENADO LIVE UI ELEMENTS
- IV. ENADO CONFIGURATION UI ELEMENTS
- PREVIEWING/PUBLISHING A PROJECT
- VI. SAVING LINKS TO THE INTERFACE WITH DIFFERENT DEVICES
- ENSURE THE BOOKMARK ADDRESS IS SAVED AS IPADDRESS/ENADO/EDIT. SAVING THE FULL URL WILL PREVENT THE CUSTOMER ACCESSING THE MOST RECENTLY PUBLISHED PROJECT
- ADVANCED OPERATION
- UPDATING THE ENADO CONTROLLER SOFTWARE
- II. ACCESSING THE CONFIGURATION UI GUIDE
- ADDITIONAL INFORMATION
- TROUBLESHOOTING
- IR
- RS232
- TCP/IP
- SENSOR I/O
- FAQ
- CAN I USE A HARD BUTTON REMOTE WITH ENADO
- HOW DO I MAKE A SMART PHONE OR TABLET ONLY CONTROL ENADO
- HOW MANY ZONES & DEVICES CAN BE CONTROLLED BY ENADO
- HOW MANY ENADO CONTROLLERS CAN I USE IN AN INSTALLATION
- HOW CAN I EXPAND THE CONTROL OUTPUTS OF THE ENADO CONTROLLER
- HOW DO I GET VIDEO ONTO THE NETWORK FOR DISPLAY ON ENADO
- MAINTENANCE
- PRODUCT SERVICE
- DAMAGE REQUIRING SERVICE: THIS UNIT SHOULD BE SERVICED BY A QUALIFIED SERVICE PERSONNEL IF
- SERVICING PERSONNEL: DO NOT ATTEMPT TO SERVICE THE UNIT BEYOND THAT DESCRIBED IN THESE OPERATING INSTRUCTIONS. REFER ALL OTHER SERVICING TO AUTHORISED SERVICING PERSONNEL
- REPLACEMENT PARTS: WHEN PARTS NEED REPLACING, ENSURE PARTS APPROVED BY THE MANUFACTURER ARE USED - EITHER THOSE SPECIFIED BY THE MANUFACTURER OR PARTS POSSESSING THE SAME CHARACTERISTICS AS THE ORIGINAL PARTS
- MAIL-IN-SERVICE
- WARRANTY
- LIMITED WARRANTY PERIOD
- WARRANTY LIMITS & EXCLUSIONS
- THIS LIMITED WARRANTY ONLY COVERS FAILURES DUE TO DEFECTS IN MATERIALS OR WORKMANSHIP AND DOES NOT COVER NORMAL WEAR AND TEAR OR COSMETIC DAMAGE
- THERE ARE NO EXPRESS WARRANTIES EXCEPT AS LISTED UNDER “LIMITED WARRANTY COVERAGE.” THE WARRANTOR IS NOT LIABLE FOR INCIDENTAL OR CONSEQUENTIAL DAMAGE RESULTING FROM THE USE OF THIS PRODUCT OR ARISING OUT OF ANY BREACH OF THIS WARRANTY
- DISCLAIMER
- WYRESTORM PUBLICATION DISCLAIMER
- WYRESTORM IS NOT RESPONSIBLE FOR MALFUNCTIONS AND/OR THE IN-OPERABILITY WHICH MAY BE CAUSED BY THE APPLICATION OF THIS INFORMATION, WHETHER EXPECTED OR NOT
- INSTALLATION REFERENCE LOG
- NOTES
- WYRESTORM®
- WYRESTORM OFFICES
- WYRESTORM TECHNICAL SUPPORT
Brand : WyreStorm
Model : Enado EN-A001-010
Category : Controller