
ER-604W - Hi-Fi System TOA - Free user manual and instructions
Find the device manual for free ER-604W TOA in PDF.


| Product Type | Hi-Fi System |
| Brand | TOA |
| Model | ER-604W |
| Dimensions (W x H x D) | Approx. 400 x 300 x 150 mm |
| Weight | Approx. 5 kg |
| Power Supply | AC 120 V, 60 Hz |
| Power Consumption | 60 W |
| Output Power | 2 x 30 W RMS |
| Frequency Response | 20 Hz – 20 kHz |
| Supported Media | CD, Cassette, AM/FM Radio |
| Inputs | Auxiliary (RCA), FM Antenna, AM Loop Antenna |
| Outputs | Speaker terminals (L/R), Headphone jack |
| Speaker Impedance | 4 – 8 ohms |
| Tuner Bands | AM (530-1600 kHz), FM (88-108 MHz) |
| CD Player | Plays CD, CD-R, CD-RW |
| Cassette Deck | Auto-reverse, Dolby B noise reduction |
| Remote Control | Included (batteries may not be included) |
| Display | LED backlit with clock |
| Sleep Timer | Yes, programmable |
| Cleaning Instructions | Wipe with a soft, dry cloth. Do not use solvents. |
| Safety Precautions | Keep away from moisture; ensure proper ventilation. |
| Spare Parts / Repairability | Contact TOA authorized service center for parts. |
Frequently Asked Questions - ER-604W TOA
User questions about ER-604W TOA
0 question about this device. Answer the ones you know or ask your own.
Ask a new question about this device
Download the instructions for your Hi-Fi System in PDF format for free! Find your manual ER-604W - TOA and take your electronic device back in hand. On this page are published all the documents necessary for the use of your device. ER-604W by TOA.
USER MANUAL ER-604W TOA
Please follow the instructions in this manual to obtain the optimum results from this unit. We also recommend that you keep this manual handy for future reference.
1. SAFETY PRECAUTIONS
- Be sure to read the instructions in this section carefully before use.
- Make sure to observe the instructions in this manual as the conventions of safety symbols and messages regarded as very important precautions are included.
- We also recommend you keep this instruction manual handy for future reference.

CAUTION
Indicates a potentially hazardous situation which, if mishandled, could result in moderate or minor personal injury, and/or property damage.
- Make sure that the volume control is set to minimum position before use. Loud noise produced when using the unit at high volume can impair hearing.
- Make sure to observe the following handling precautions so that a fire or personal injury does not result from leakage or explosion of the battery.
- Do not short, disassemble, heat nor put the battery into a fire.
- Avoid using both new and old batteries together.
- Do not solder a battery directly.
- Note correct polarity (positive and negative orientation) when inserting a battery in the unit.
- Avoid locations exposed to the direct sunlight, high temperature and high humidity when storing batteries.
2. GENERAL DESCRIPTION
TOA's ER-604W megaphone is a small, lightweight shoulder-held megaphone that is also supplied with a whistle. Its close-talking microphone features a press-to-talk switch and a volume control, which can be easily operated by hand. The ER-604W's External input terminals can also be connected to an optional wired microphone, headset microphone, CD player, MD player or cassette player to make public address announcements or play music.
3. HANDLING PRECAUTIONS
- The ER-604W megaphone is not waterproof. Avoid exposure to rain or environments where it may be splashed by water or other liquids.
- When the batteries are left loaded for long periods of time, be sure to check the batteries periodically for discharge and leakage.
- Immediately contact your TOA dealer if the following irregularities should occur.
- Smoke coming from the unit or a strange smell detected.
- Water or other foreign objects get inside the unit.
- No sound heard (after checking to be sure that the batteries are loaded in correct orientation, and satisfactorily charged).
To avoid catastrophic failure, make no further attempt to use the unit in these conditions.
- Avoid storing the unit in humid or dusty locations, in locations exposed to direct sunlight, near heaters, or exposed to sooty smoke, as these conditions may result in unit failure.
- Do not use the unit for extended periods of time with a distorted sound output. This could cause the speaker to become hot and possibly result in unit failure.
- Noise may be produced when a mobile phone is used in close proximity of the unit. However, this is not a failure. Use the mobile phone as far as possible from the unit.
- Use a tightly wrung-out damp cloth to clean the unit. If the unit becomes extremely dirty, use a cloth moistened in a neutral detergent and tightly wrung-out. Never use volatile liquids such as benzene or thinner to clean the unit, as these may deform or discolor its case.
4. NOMENCLATURE AND FUNCTIONS

CAUTION
Never use the megaphone pointed directly at a person's ears, as permanent hearing impairment could result. When testing, make sure that the speaker is pointed toward the ground.
[Microphone]
[Top (Operation Area)]
[Rear]
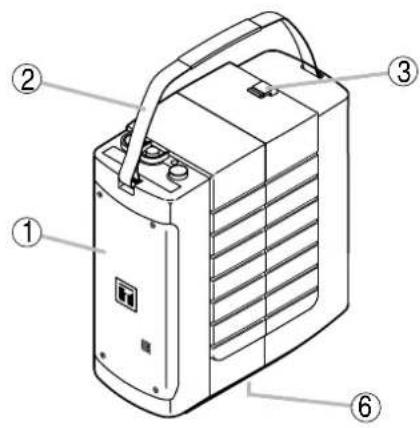
1. Speaker
2. Shoulder strap
Use this strap to hang the unit from the shoulder for transport or use.
3. Microphone hanger
Hook the microphone onto this hanger when not used.
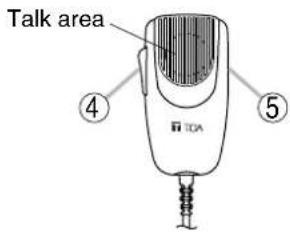
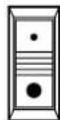
4. Talk switch
Press to talk (power turns ON). Release to turn the power OFF.
5. Volume control
Rotate upward to increase output volume.
↑ Volume High
6. Stand socket
The megaphone can be mounted on the optionally available ST-16 Speaker Stand using the screw mount located on its bottom surface. Mounting details are described in the ST-16 instruction manual.
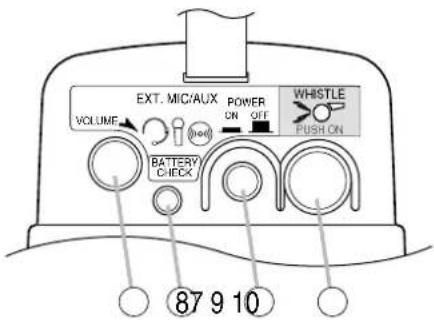
7. External input volume control [VOLUME]
Adjusts the volume of external equipment connected to the rear-mounted external input terminals (13) - (15).
8. Battery indicator LED [BATTERY CHECK]
To check the battery voltage, switch the External input power switch (9) to the ON position.
• Steadily lit: Sufficient battery voltage available.
- Flashing: Replace batteries.
9. External input power switch [POWER]
Press to turn the power ON for use with connected external equipment. Press again to turn the external power OFF.
Note: Power is constantly used while this switch is in the ON position. When not using external equipment, be sure to set this switch to the OFF position to prevent battery discharge.
10. Signal tone switch [WHISTLE]
A whistle tone sounds while this switch is pressed, and stops when released.
Note: Output volume is fixed, and cannot be adjusted with the volume control.
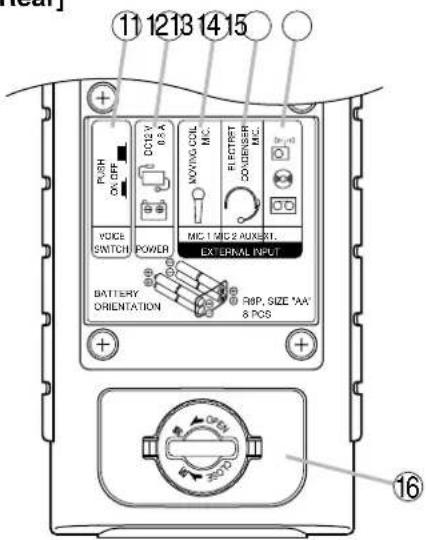
11. Voice switch [VOICE SWITCH]
Set this switch to the ON position when using connected external equipment to prevent battery discharge. (Normally set this switch to the OFF position.)
12. External power input terminal [EXT. POWER]
Use the supplied plug cord for external power supply.
13. General microphone input terminal [MIC 1]
A 6.3 mm phone jack. Unbalanced input.
14. Electret condenser microphone input terminal [MIC 2]
A 3.5 mm mini jack.
15. Auxiliary input terminal [AUX]
A 3.5 mm mini jack.
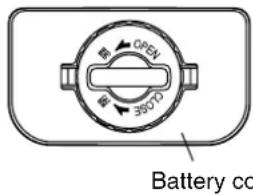
16. Battery cover
Install 8 R6 (C-cell) batteries. Remove the batteries from the unit when not used for extended periods of time.
5. BATTERY INSTALLATION
Step 1. Remove the battery cover (16) by unscrewing its knob counterclockwise.
Step 2. Insert 8 batteries, noting the battery polarity markings provided inside the receptacle.
Step 3. Correctly replace the cover, then secure with its screw knob slightly holding the battery cover.
6. USING THE SUPPLIED MICROPHONE
Step 1. Detach the microphone from the microphone hanger (3).
Step 2. Using the volume control (5), adjust the volume to an appropriate level that does not generate feedback when holding down the microphone talk switch (4).
Step 3. Speak into the microphone while holding it about 1 cm away from the mouth.
Notes
- Take care not to block the holes in the microphone's rear panel, as output volume could be drastically reduced.
- The microphone features an anti-bacterial treatment which helps keep it clean and sanitary.
Notes on Microphone Storage
Set the volume control (5) to the minimum position, and insert the microphone into the microphone hanger (3). If the microphone is inserted with the volume control set to the high volume position, when it is inserted into or detached from the hanger, the talk switch (4) could be accidentally pressed, causing feedback.
7. USING EXTERNAL EQUIPMENT
Step 1. Connect the external equipment.
1-1. When using a general-purpose microphone
Connect the moving coil-type microphone to the General microphone input terminal [MIC 1] (13).
1-2. When using a headset microphone
Connect the headset microphone to the Electret condenser microphone input terminal [MIC 2] (14).
Notes
- To avoid megaphone failures, do not connect any other equipment than an electret condenser microphone to these inputs.
- When using TOA's optional WH-4000A Headset Microphone, speak into the microphone while keeping it about 1 cm away from the mouth. Although the WH4000A Microphone has a lock knob for securing the plug, this lock knob is not used with the ER-604W Megaphone.
1-3. When using a CD, MD or cassette player
Connect the CD, MD or cassette player to the Auxiliary input terminal [AUX] (15) using the supplied 3.5 mm mini plug.
Note: When using the supplied mini plug, the connection cord and external equipment-side plug must be prepared separately.
Step 2. Set the External input power switch [POWER] (9) to the ON position.
Step 3. Adjust the volume with the External input volume control [VOLUME] (7).
Note: Connected external equipment can be used simultaneously. However, since the volume of each component cannot be individually adjusted by the megaphone, use each component's volume control for individual volume adjustment.
About the Voice switch (11) (normally set to the OFF position).
When using equipment connected to External input terminals (13) – (15), battery discharge can be prevented by setting the Voice switch to the ON position, thus allowing the unit to be used for longer periods of time. This is especially convenient when intermittently using an external microphone, since it can be used freely with no need to constantly turn its power switch ON and OFF.
When the Voice switch is in the ON position, the unit automatically switches to operation mode at the first detection of external input, and switches to Standby mode if no signal is received from the connected external equipment for a period of 2 – 3 seconds.
Notes
- Immediately after the Voice switch is turned ON, there may be a momentary loss of initial output, however this is not a failure. If this is not acceptable, leave the switch OFF.
- The Voice switch function cannot be used with the attached hand-held microphone.
8. USING THE EXTERNAL POWER SUPPLY
Using the supplied plug cord for external power, connect a 12 V battery or AC adapter (12 V, over 0.8 A) to the External power input terminal [EXT. POWER] (12) on the rear panel. Connect the white character side of the external power cord to the positive (+) terminal.
Notes
- When connecting to a 12 V battery, be sure to insert a 2 A fuse (separately available) for safety.
- Do not power the megaphone from a vehicle cigarette lighter socket while the engine is running. Potential fluctuations in battery voltage could cause unit failure.
To External power input terminal (12)
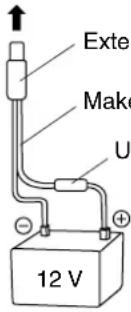
External power plug cord (supplied)
Make the white character side positive (+).
Use a 2 A fuse (procured separately).
9. SPECIFICATIONS
| Power Source R6 battery*1 x 8 (12 V DC)12 V DC / 0.8 A or more (AC adapter or DC power supply unit usable.) | |
| Rated Output 6 W | |
| Maximum Output 10 W | |
| Battery Life*2 | Voice: Approx. 10 hours (R6P manganese dioxide battery use)Whistle: Approx. 30 minutes (continuous use) |
| Audible Range*3 | Voice: 160 m (under noise level of 55 dB)Whistle: 160 m (under noise level of 55 dB) |
| Microphone Close-talking type, press-to-talk switch, volume control,Fixed to the microphone hanger on the unit's top panel. | |
| Signal Whistle, push switch activation | |
| Input | MIC 1: -40 dB*4, 1.5 kΩ, 6.3 mm phone jackMIC 2: -18 dB*4, 3 kΩ, 3.5 mm mini jack, phantom poweringAUX (auxiliary): -12 dB*4, 18 kΩ, 3.5 mm mini jackExternal power supply: 12 V DCONote: MIC 1, 2, and AUX inputs can be used at the same time. However, their individual volume cannot be adjusted as the unit's volume control is common to those inputs. |
| Other Function | Voice switch, battery check |
| Finish | Body, microphone: ABS resin, off-whiteShoulder pad, strap: Black |
| Dimensions 102 (w) x 258 (h) x 216 (d) mm (excluding shoulder strap) | |
| Weight | 1.6 kg (without batteries) |
*1 Batteries are optional.
^*2 Total time calculated on the assumption that the unit is used for 30 minutes a day.
*3 Based on the condition that the unit is operated in a quiet area using new batteries.
Distance varies depending on ambient conditions, such as battery voltage, ambient noise, wind direction, and obstacles.
^*4 0 dB = 1 V
Note: The design and specifications are subject to change without notice for improvement.
- Accessories
Dynamic microphone: DM series
Speaker stand: ST-16
- SAFETY PRECAUTIONS
- CAUTION
- GENERAL DESCRIPTION
- HANDLING PRECAUTIONS
- NOMENCLATURE AND FUNCTIONS
- Speaker
- Shoulder strap
- Microphone hanger
- Talk switch
- Volume control
- Stand socket
- External input volume control [VOLUME]
- Battery indicator LED [BATTERY CHECK]
- External input power switch [POWER]
- Signal tone switch [WHISTLE]
- Voice switch [VOICE SWITCH]
- External power input terminal [EXT. POWER]
- General microphone input terminal [MIC 1]
- Electret condenser microphone input terminal [MIC 2]
- Auxiliary input terminal [AUX]
- Battery cover
- BATTERY INSTALLATION
- USING THE SUPPLIED MICROPHONE
- Notes
- Notes on Microphone Storage
- USING EXTERNAL EQUIPMENT
- About the Voice switch (11) (normally set to the OFF position).
- USING THE EXTERNAL POWER SUPPLY
- SPECIFICATIONS
- - Accessories
Brand : TOA
Model : ER-604W
Category : Hi-Fi System