
CDI6372 - Dishwasher CDA - Free user manual and instructions
Find the device manual for free CDI6372 CDA in PDF.


| Product Type | Built-in Dishwasher |
| Brand | CDA |
| Model | CDI6372 |
| Width (cm) | 60 |
| Height (cm) | 85 |
| Depth (cm) | 60 |
| Weight (kg) | 45 |
| Power Supply | 220-240 V, 50 Hz |
| Power Consumption (W) | 1900 |
| Energy Efficiency Class | A+ |
| Place Settings | 12 |
| Noise Level (dB) | 46 |
| Number of Programs | 6 |
| Programs | Eco, Intensive, Quick, Glass, Normal, Rinse |
| Delay Start | Yes (1-24 hours) |
| Child Lock | Yes |
| Water Consumption per Cycle (L) | 10 |
| Drying System | Condensation |
| Salt and Rinse Aid Indicator | Yes |
| Adjustable Rack | Yes (upper rack height adjustable) |
Frequently Asked Questions - CDI6372 CDA
User questions about CDI6372 CDA
0 question about this device. Answer the ones you know or ask your own.
Ask a new question about this device
Download the instructions for your Dishwasher in PDF format for free! Find your manual CDI6372 - CDA and take your electronic device back in hand. On this page are published all the documents necessary for the use of your device. CDI6372 by CDA.
USER MANUAL CDI6372 CDA
Integrated dishwasher
Use and maintenance
Thank you for choosing this product.
This user manual contains important information on safety and instructions intended to assist you in the operation and maintenance of your appliance.
Please take the time to read this user manual before using your appliance and keep this book for future reference.
| Icon Type Meaning | ||
 | WARNINGSerious injury or death risk | |
 | RISK OF ELECTRIC SHOCK Dangerous voltage risk | |
 | FIRE Warning; Risk of fire / flammable materials | |
 | CAUTION Injury or property damage risk | |
 | IMPORTANT Operating the system correctly | |
CONTENTS
1 SAFETY INSTRUCTIONS .... 4
1.1 General Safety Warnings ....4
1.2 Installation Warnings ....5
1.3 During Usage....6
2 INSTALLATION 9
2.1 Machine Positioning 9
2.2 Water Connection....9
2.3 Water Inlet Hose....9
2.4 Drain Hose (Model Depending)....10
2.5 Electrical Connection 10
3 TECHNICAL SPECIFICATIONS....11
3.1 General Appearance .... 11
3.2 Technical Specifications ...... 11
4 BEFORE USING THE APPLIANCE 13
4.1 Preparing Your Dishwasher For First Use 13
4.2 Salt Usage (IF AVAILABLE)....13
4.3 Fill The Salt (IF AVAILABLE)....13
4.4 Test Strip....14
4.5 Water Hardness Table....14
4.6 Water Softener System....14
4.7 Setting ......14
4.8 Detergent Usage ....15
4.9 Filling The Detergent ....15
4.10 Using Combined Detergents 15
4.11 Rinse-aid Usage....15
4.12 Filling The Rinse-aid And Setting 16
5 LOADING YOUR DISHWASHER....17
5.1 Recommendations ....17
5.2 Alternative Basket Loads....21
6 PROGRAMME TABLE 22
7 THE CONTROL PANEL 24
8 CLEANING AND MAINTENANCE 28
8.1 Filters....28
8.2 Spray Arms ......28
8.3 Drain Pump....29
9 TROUBLESHOOTING .... 30
10 WARRANTY AND SERVICE....33
11 DECLARATION OF CONFORMITY....34
1 SAFETY INSTRUCTIONS
1.1 General Safety Warnings
- Read these instructions carefully before using your appliance and keep this manual for future reference.
⚠️ Please check the packaging of your machine before installation and the outer surface of the machine once the packaging has been removed. Do not operate the machine if it appears damaged or if the packaging has been opened.
- Packaging materials protect your machine from any damage that might occur during transportation. The packaging materials are environmentally friendly as they are recyclable. Use of recycled material reduces raw material consumption and decreases waste production.
This appliance can be used by children aged from 8 years and above, and by persons with reduced physical, sensory or mental capabilities or lack of experience and knowledge if they have been given supervision or instruction concerning the use of the appliance in a safe way and understand hazards involved. Children should not be allowed to play with the appliance.
⚠️ Remove packaging and keep it out of reach of children.
⚠️ Keep children away from detergents and rinse aids.
There may be some residue left in the machine after washing. Keep children away from the machine when it is open.
1.2 Installation Warnings
- Choose a suitable and safe place to install your machine.
- Only original spare parts should be used with the machine.
△! Unplug the machine before installation.
⚠️ Your machine must only be installed by an authorised service agent. Installation by anyone other than an authorised agent may cause your warranty to be void.
⚠️ Check that the indoor electrical fuse system is connected in line with safety regulations.
All electrical connections must match the values on the plate.
⚠️! Ensure the machine does not stand on the electrical supply cable.
⚠️Never use an extension cord or a multiple socket connection.
⚠️ The plug should be accessible after the machine is installed.
• After installation, run your machine unloaded for the first time.
The machine must not be plugged in during positioning.
△! Always use the coated plug supplied with your machine.
△△! If the electrical cable is damaged, it should only be replaced by a qualified electrician.
- Connect the hose directly to the water inlet tap. The pressure supplied by the tap should be a minimum of 0.03 MPa and a maximum of 1 MPa. If the pressure exceeds 1 MPa, a pressure relief valve must be fitted between the connection.
1.3 During Usage
- This machine is for domestic use only; do not use it for other purposes. Commercial use will void the guarantee.
⚠️Do not stand, sit or place loads on the open door the dishwasher.
⚠️Only use detergents and rinse aids produced specifically for dishwashers. Our company is not responsible for any damage that may occur due to misuse.
⚠️ Do not drink water from the machine.
Due to the danger of explosion, do not place any chemical dissolving agents into the machine's washing section.
- Check the heat-resistance of plastic items before washing them in the machine.
△! Only put items in the machine which are suitable for dishwashing, and take care not to overfill the baskets.
Do not open the door while the machine is in operation, hot water may spill out. Safety devices ensure the machine stops if the door is opened.
⚠️ The machine door should not be left open. It may cause accidents.
⚠️Place knives and other sharp objects in the cutlery basket in a blade-down position.
⚠️! For models with the automatic door-opening system, when the EnergySave option is active, the door will open at the end of a program. To prevent damage to your dishwasher, do not attempt to close the door for one minute after it has opened. For effective drying, keep the door open for 30 minutes after a programme has ended. Do not stand in front of the door after the auto-open signal sounds.
⚠ In the case of a malfunction, repair should only be performed by an authorised service company, otherwise the warranty will be void.
△! Before repair work, the machine should be disconnected from the mains. Do not pull the cable to unplug the machine. Switch off the water tap.
Operation at a low voltage will cause a decline in performance levels.
⚠️For safety, disconnect the plug once a program has finished.
To avoid an electric shock, do not unplug the machine with wet hands.
⚠️! Pull the plug to disconnect the machine from the mains, never pull on the cord.
2 INSTALLATION
2.1 Machine Positioning
When positioning the machine, place it in an area where dishes can be easily loaded and unloaded. Do not put the machine in an area where the ambient temperature falls below 0^ C.
Read all warnings located on the packaging before removing the packaging and positioning the machine.
Place the machine close to a water tap and drain. Take into consideration that the connections will not be altered once the machine is in position.
Do not hold the machine by its door or panel.
Leave an adequate distance around the machine to allow ease of movement when cleaning.
Ensure the water inlet and outlet hoses are not squeezed or trapped and that the machine does not stand on the electrical cable while positioning.
Adjust the feet so the machine is level and balanced. The machine should be placed on flat ground otherwise it will be unstable and the door of the machine will not close properly.
⚠️ Please install the decorative panel as indicated on the assembly sheet. Otherwise, the door may not open properly and steam leakage problem may occur.
2.2 Water Connection
We recommend fitting a filter to your water inlet supply in order to prevent damage to your machine due to contamination (sand, rust, etc.) from indoor plumbing. This will also help prevent yellowing and deposit formation after washing.
Note printing on the water inlet hose! If models are marked with 25^ , the water temperature may be max. 25^ C (cold
water).
For all other models:
Cold water preferred; hot water max. temperature 60 °C.
2.3 Water Inlet Hose
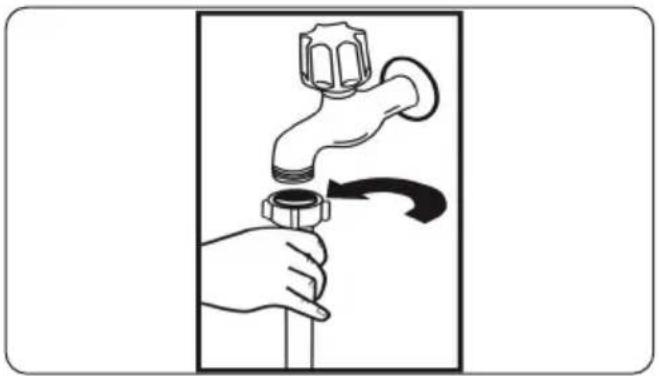
natural_image
Illustration of a hand holding a faucet with a valve, showing a curved arrow indicating motion (no text or symbols)WARNING: Use the new water inlet hose supplied with your machine, do not use an old machine's hose.
WARNING: Run water through the new hose before connecting.
WARNING: Connect the hose directly to the water inlet tap. The pressure supplied by the tap should be a minimum of 0.03 MPa and a maximum of 1 MPa. If the pressure exceeds 1 MPa, a pressure relief valve must be fitted between the connection.
WARNING: After the connections are made, turn the tap on fully and check for water leaks. Always turn off the water inlet tap after a wash program has finished.

natural_image
Diagram of a faucet with a valve and base, showing electrical connections (no text or labels)An Aquastop water spout is available with some models. Do not damage it or allow it to become kinked or twisted.
2.4 Drain Hose (Model Depending)
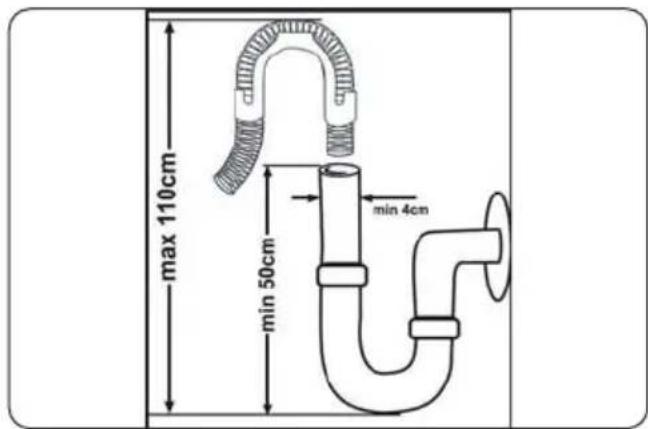
Connect the water drain hose directly to water drain hole or to the sink outlet spigot. This connection should be minimum 50 cm and maximum 110 cm from floor that dishwasher is placed.

IMPORTANT: Items will not wash
properly if a drain hose longer than 4 m is used.

2.5 Electrical Connection
WARNING: Your machine is set to operate at 220-240 V. If the mains voltage supply to your machine is 110 V, connect a transformer of 110/220 V and 3000 W between the electrical connection.

Connect the product to a grounded outlet protected by a fuse complying with the values in the "Technical Specifications" table".

The earthed plug of the machine must be connected to an earthed outlet supplied by suitable voltage and current.

In the absence of earthing installation, an authorised electrician should carry out an earthing installation. In the case of use without earthing installed, we will not be responsible for any loss of use that may occur.

The plug on this appliance may incorporate 13A fuse depending on the target country. (For Example UK, Saudi Arabia)
3 TECHNICAL SPECIFICATIONS


natural_image
Close-up of mechanical components with a numbered arrow pointing to a circular component (no text or symbols visible)3.1 General Appearance
- Upper basket with racks
- Upper spray arm
- Lower basket
- Lower spray arm
- Filters
- Rating plate
- Control panel
- Detergent and rinse-aid dispenser
- Salt dispenser
- Upper basket track latch
- Cutlery basket
- Turbo Drying Unit: This system enhances the drying performance of your dishes.
3.2 Technical Specifications
| Capacity 15 place settings | |
| DimensionsHeightWidthDepth | 820-870 (mm)598 (mm)570 (mm) |
| Net weight 39,2 kg | |
| Operating voltage / frequency | 220-240V50 Hz |
| Total current 10(A) | |
| Total power 1900(W) | |
| Water supply pressure | Maximum: 1(Mpa) Minimum:0.03 (Mpa) |
RECYCLING
- Some machine components and packaging consist of recyclable materials.
- Plastics are marked with the international abbreviations: (>PE<, >PP<, etc.)
- The cardboard parts consist of recycled paper. They can be put into waste paper containers for recycling.
- Material unsuitable for domestic waste must be disposed of at recycling centres.
- Contact a relevant recycling centre to obtain information about disposal of different materials.
PACKAGING AND THE ENVIRONMENT
- Packaging materials protect your machine from damage that may occur during transportation. The packaging materials are environmentally friendly as they are recyclable. The use of recycled material reduces raw material consumption and therefore decreases waste production.
CE Declaration of Conformity
We declare that our products meet the applicable European Directives, Decisions and Regulations and the requirements listed in the standards referenced.
Disposal of Your Old Machine
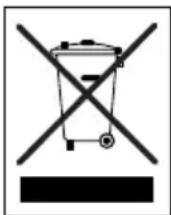
The symbol on the product or on its packaging indicates that this product may not be treated as household waste. Instead, it shall be taken to the applicable collection point for the recycling of electrical and electronic equipment. By ensuring this product is disposed of correctly, you will help prevent potential negative consequences for the environment and human health, which could otherwise be caused by inappropriate waste handling of this product. For more detailed information about recycling this product, please contact your local city office, your household waste disposal service or the shop where the product was purchased.
4 BEFORE USING THE APPLIANCE
4.1 Preparing Your Dishwasher For First Use
• Make sure the electricity and supply water specifications match the values indicated in the installation instructions for the machine.
- Remove all packaging material inside the machine.
- Set the water softener level.
- Fill the rinse aid compartment..
4.2 Salt Usage (IF AVAILABLE)
For a good washing function, the dishwasher needs soft, i.e. less calcareous water. Otherwise, White lime residues will remain on the dishes and the interior equipment. This will negatively affect your machine's washing, drying and shining performance. When water flows through the softener system, the ions forming the hardness are removed from the water and the water reaches the softness required to obtain the best washing result. Depending on the level of hardness of the inflowing water, these ions that harden the water accumulate rapidly inside the softener system. Therefore, the softener system has to be refreshed so that it operates with the same performance also during the next wash. For this purpose, dishwasher salt is used.
Machine can only be used by special dishwasher salt to soften the water. Do not use any small grained or powdered type of salts which can easily soluble. Using any other type of salt can damage your machine.
4.3 Fill The Salt (IF AVAILABLE)
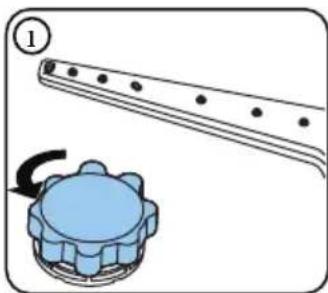
To add softener salt, open the salt compartment cap by turning it counter clockwise. (1) (2) At first use, fill the compartment with 1 kg salt and water (3) until it is almost overflowing. If available, using a funnel (4) will make filling easier. Replace the cap and close it. After every 20-30 Cycles add salt into your machine until it fills up (approx. 1 kg).
natural_image
Diagram showing a mechanical component with a gear and a rotating arrow, no text or symbols present.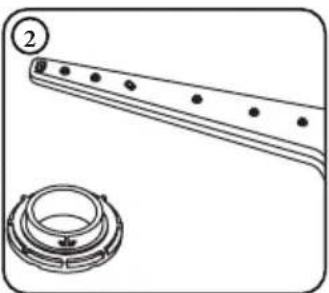
natural_image
Technical line drawing of a mechanical component with a circular detail view (no text or symbols)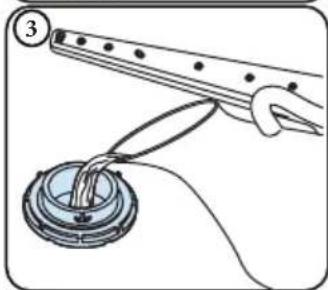
natural_image
Illustration of a hand holding a ruler above a circular component with wires, no text or symbols present
Only add water to the salt compartment on first use.
Use softener salt specifically produced for use in dishwashers.
When you start your dishwasher, the salt compartment is filled with water, therefore put the softener salt in prior to starting your machine.
If the softener salt has overflowed and you do not start the machine immediately, run a short washing program to protect your machine against corrosion.
4.4 Test Strip
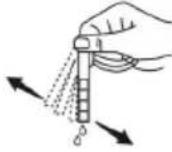
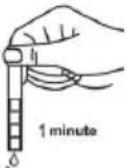
| Run water through the tap (1min.) | Keep the strip in the water (1sec) | Shake the strip. | Wait (1min.) | Set the hardness level of your machine. |
 |  |  |  |  |
NOTE: The level is set to 3 as default. If the water is well water or has a hardness level above 90 dF, we recommend that you use filter and refinement devices.
4.5 Water Hardness Table
| Level | German dH | French dF | British dE | Indicator |
| 1 | 0-5 0-9 | 0-6 L1 is shown on the display. | ||
| 2 | 6-11 10 | -20 7-14 L2 is shown on the display. | ||
| 3 | 12-17 2 | 1-30 15-21 L3 is shown on the display. | ||
| 4 | 18-22 3 | 1-40 22-28 L4 is shown on the display. | ||
| 5 | 23-31 4 | 1-55 29-39 L5 is shown on the display. | ||
| 6 | 32-50 5 | 6-90 40-63 L6 is shown on the display. |
4.6 Water Softener System
The dishwasher is equipped with a water softener which reduces the hardness in the mains water supply. To find out the hardness level of your tap water, contact your water company or use a test strip (if available).
4.7 Setting
In order to change the salt level, follow the below steps:
- Open the door of the machine.
- Turn on the machine, and press the Programme button as soon as the machine is turned on.
- Hold down the Programme button until "SL" disappears.
• The machine will display the last setting. - Set the level by pressing the Programme button.
- Turn off the machine to save the setting.
4.8 Detergent Usage
Only use detergents specifically designed for domestic dishwashers. Keep your detergents in cool, dry places out of reach of children.
Add the proper detergent for the selected program to ensure the best performance. The amount of detergent needed depends on the cycle, load size, and soil level of dishes.
Do not fill detergent into the detergent compartment more than required; otherwise you can see whitish streaks or bluish layers on glass and dishes and may cause glass corrosion. Continued use of too much detergent may cause machine damage.
Using little detergent can result in poor cleaning and you can see whitish streaksin hard water.
See the detergent manufacturer's instructions for a further information.
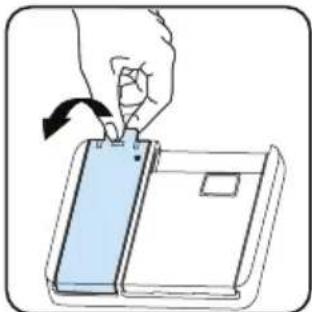
4.9 Filling The Detergent
Push the latch to open the dispenser and pour in the detergent.
Close the lid and press it until it locks in place. The dispenser should be refilled just before the start of each programme. If the dishes are heavily soiled, place additional detergent in the pre-wash detergent chamber.

natural_image
Illustration of a hand pressing down on a blue surface with a black arrow indicating the step (no text or symbols present)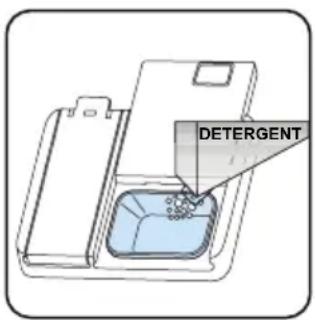
4.10 Using Combined Detergents
These products should be used according to the manufacturer's instructions.
Never put combined detergents into the interior section or the cutlery basket.
Combined detergents contain not only the detergent but also rinse-aid, salt replacement substances and additional components depending on the combination.
We recommend you do not use combined detergents in short programmes.
Please use powder detergents in such programmes.
If you encounter problems when using combined detergents, please contact the detergent manufacturer.
When you stop using combined detergents, make sure that water hardness and rinse aid settings are set to the correct level.
4.11 Rinse-aid Usage
The rinse aid helps to dry the dishes without streaks and stains. Rinse-aid is required for stain-free utensils and clear glasses. The rinse aid is automatically released during the hot rinse phase. If rinse aid dosage setting set too low, whitish stains remains on dishes and dishes do not dry and washed clean.
If rinse aid dosage setting set too height, you can see bluish layers on glass and dishes.
4.12 Filling The Rinse-aid And Setting
To fill the rinse aid compartment, open the rinse-aid compartment cap. Fill the compartment with rinse aid to the MAX level and then close the cap. Be careful not to overfill the rinse aid compartment and wipe up any spills.
In order to change the rinse aid level, follow the below steps before turning on the machine:
- Open the door of the machine.
- Turn on the machine, and press the Programme button as soon as the machine is turned on.
- Hold down the Programme button until "rA" disappears. Rinse aid setting follows water hardness setting.
• The machine will display the last setting. - Change the level by pressing the Programme button.
- Turn off the machine to save the setting. The factory setting is "4".
If the dishes are not drying properly or are spotted, increase the level. If blue stains form on your dishes, decrease the level.
natural_image
Illustration of a hand inserting a card into a device (no text or symbols present)
natural_image
Line drawing of a hand inserting a small lock into a device (no text or symbols)| Level Brightener Dose Indicator | ||
| 1 Rinse | aid not dispensed | r1 is shown on the display. |
| 2 1 dose | is dispensed | r2 is shown on the display. |
| 3 2 doses | are dispensed | r3 is shown on the display. |
| 4 3 doses | are dispensed | r4 is shown on the display. |
| 5 4 doses | are dispensed | r5 is shown on the display. |
5 LOADING YOUR DISHWASHER
For best results, follow these loading guidelines.
Loading the household dishwasher up to the capacity indicated by the manufacturer will contribute to energy and water savings.
Manual pre-rinsing of tableware items leads to increased water and energy consumption and is not recommended You can place cups, glasses, stemware, small plates, bowls, etc. in upper basket. Do not lean long glasses against one another or they cannot remain steady and may receive damage. When placing long stem glasses and goblets, lean them against the basket edge or rack and not against other items.
Place all containers such as cups, glasses and pots into the dishwasher with the opening facing downwards otherwise water can collect on items.
If there is cutlery basket in machine, you are recommended to use the cutlery grid in order to obtain the best result. Place all large (pots, pans, lids, plates, bowls etc.) and very dirty items in the lower rack.
Dishes and cutlery should not be placed above each other.

WARNING: Take care not to obstruct rotation of spray arms.

WARNING: Make sure after loading wishes do not prevent opening the gent dispenser.
5.1 Recommendations
Remove any coarse residue on dishes before placing the dishes in the machine. Start the machine with full load.

Do not overload the drawers or place dishes in the wrong basket.

WARNING: To avoid any possible
injuries, place long-handle and sharp-pointed knives with their sharp points facing down or horizontally on the baskets.
SOFT TOUCH
Top basket
Height Adjustable Rack
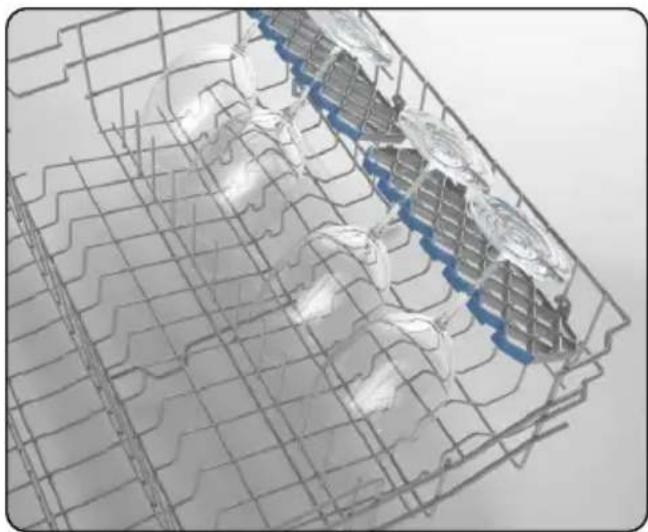
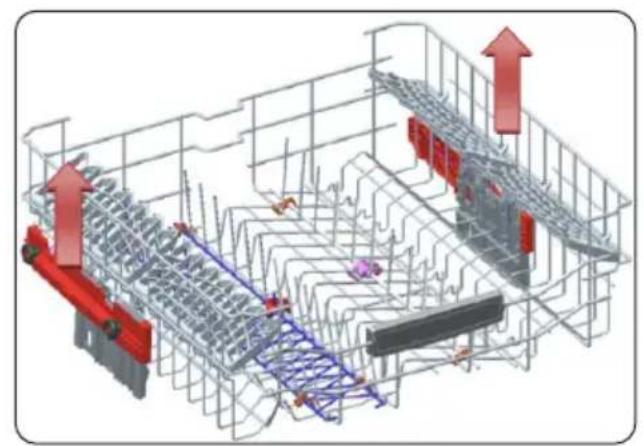
These racks are designed to increase the capacity of the top basket. You can place your glasses and cups on the racks. You can adjust the height of these racks. Thanks to this feature, you can place different sizes of glasses under these racks.
Thanks to height adjustment plastics mounted on the basket, you can use your racks in 2 different heights. In addition, you can place long forks, knives and spoons on these racks laterally, so that they do not block the revolution of propeller.
The soft touch feature on the racks serves to place the fine stemmed glass.
The wineglass is placed in the area shown at the picture.
natural_image
3D wireframe model of a mechanical or architectural structure with grid lines and internal components (no visible text or symbols)Foldable racks
Foldable racks on the upper basket are designed in order to let you place big items easier such as pots, pans, etc. If requested, each part can be folded separately, or all of them can be folded and larger spaces can be obtained. You can use foldable racks by raising them upwards, or by folding down.

natural_image
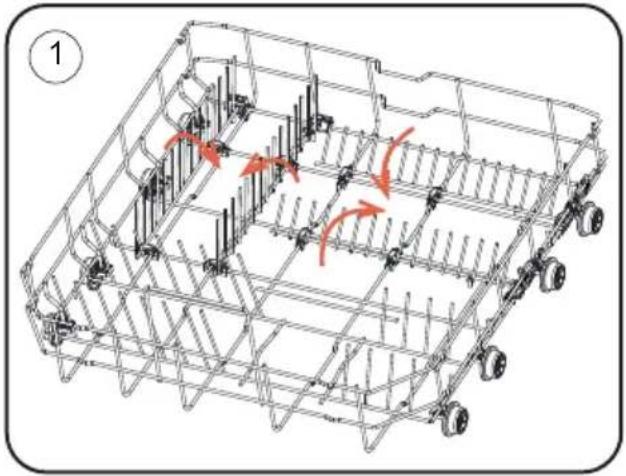
3D wireframe model of a mechanical assembly with internal components and directional arrows (no text or symbols)Four Folding Racks
The folding racks allow easier placement of larger items, such as pots and pans. Each section can be folded separately. The racks can be raised up, or folded down, as shown in the images.
natural_image
Technical line drawing of a mechanical frame structure with no visible text or symbols
natural_image
Technical line drawing of a multi-wheeled vehicle chassis with visible structural components and red directional arrows indicating movement or force (no text or symbols)Height Adjustment
The upper basket includes a mechanism which enables the height of the basket to be adjusted up (1) or down (2) without having to remove the basket. Hold the basket on both sides and pull it up or push it down, ensuring both sides of the upper basket are in the same position.
natural_image
3D architectural or engineering diagram showing structural framework with red arrows indicating upward motion (no text or symbols present)
natural_image
3D rendering of a red and gray mechanical component with wheels, enclosed within a steel framework (no text or symbols visible)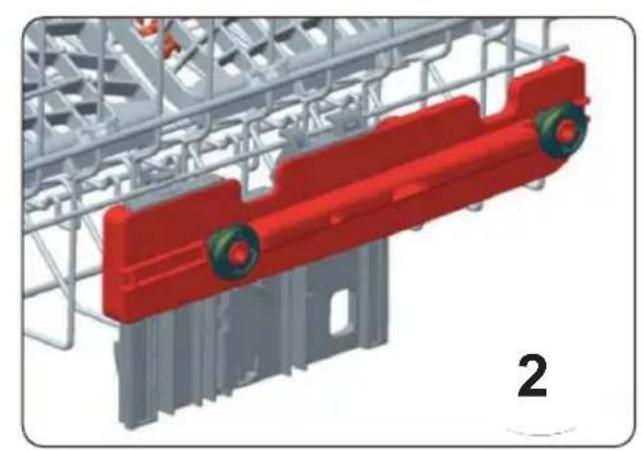
natural_image
3D mechanical assembly diagram showing red and gray components with green wheels, no visible text or symbolsHeight Adjustable Rack (peg type)
The foldable racks in the upper basket enable the placement of large items such as pots and pans. Each section can be folded separately. The foldable racks can be either raised up or folded down.

natural_image
3D wireframe diagram of a mechanical or structural component with internal channels and red directional arrows indicating movement or force (no text or symbols)Upper Cutlery Basket
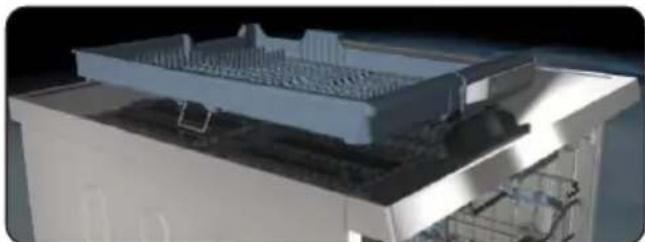
The upper cutlery basket is designed for the placement of large and small cutlery and utensils.

natural_image
Interior view of a multi-level kitchen appliance with grating and white cylindrical components (no visible text or symbols)The basket is easily removed from the dishwasher, therefore allows ease of use when removing your items, along with the basket, after washing.
natural_image
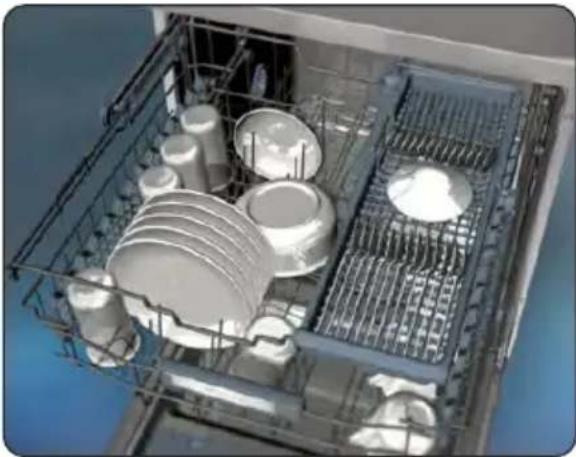
3D rendering of a mechanical assembly with internal components and mounting base (no visible text or symbols)The upper cutlery basket is composed of two pieces that can be separately removed. Remove the left or right section of the cutlery basket in order to obtain more space for items in the upper basket.
natural_image
Interior view of a kitchen appliance with multiple white kitchenware and metal grilles (no visible text or labels)
natural_image
Interior view of a stainless steel kitchen appliance with rack, storage compartments, and plastic containers (no visible text or symbols)WARNING: Knives and other sharp objects must be placed horizontally in the cutlery basket.
5.2 Alternative Basket Loads
Lower Basket

natural_image
Two 3D-rendered kitchenware baskets with cutouts and lids, no visible text or symbolsTop Basket

natural_image
3D diagram of a grid-based mechanical or electrical component assembly with no visible text or symbolsIncorrect Loads
Incorrect loading can cause poor washing and drying performance. Please follow the manufacturer's recommendations for a good performans result.

natural_image
3D rendered grid with a black 'X' symbol overlay, surrounded by white and blue spherical objects (no text or symbols)
natural_image
Technical diagram of a mechanical assembly with components and cross symbols (no readable text or labels)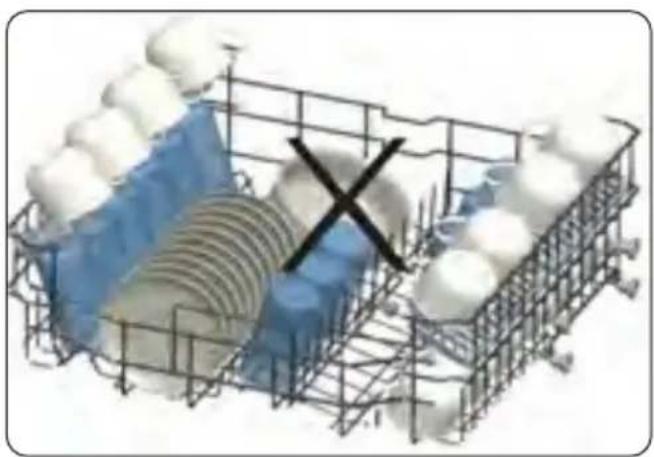
natural_image
3D wireframe model of a container with floating spheres and a central X mark, no text or symbols present
natural_image
3D wireframe model of a container with white and blue components, no visible text or symbols| P1 P2 P3 P4 P5 P6 P7 P8 | ||||||||
| Program Name: | Eco 50°C | Smart 60°C - 70°C | Steam Wash | Hygiene Pro 70°C | Duel Pro Wash 50°C | 30 minutes 40°C | 14 minutes | |
| Type of Soil: | Standard program for normally solled dishes with reduced energy and water consumptions. | Auto program dishes with daily using solids with healthy facilities cleaning by steam. | Suitable for heavily solid dishes with healthy solids faster program. | Suitable for heavily solid daily dishes with faster program. | Suitable for both lighty glassware on upper rack and healthy solids quickly wash. | Suitable for lighty solids and fresh dishes and suitable for 4 places settings. | Fastest program for lighty solids used dishes and recently suitable for 4 place settings. | |
| Level of Soil: Medium Heavy Heavy Heavy Light | ||||||||
| Amount of Detegent: A: 25 cm3 B: 15 cm3 | A A A A A A B | |||||||
| Program Duration (h:min) | 04:14 01:49 | -02:59 02:41 02:07 | 00:50 01:53 00:30 | 00:14 | ||||
| Electricity consumption (kWh/cycle) | 0.861 1.250 | -1.900 1.750 1.700 | 1.000 1.600 0.650 | 0.340 | ||||
| Water consumption (l/cycle) | 9.0 11.8 - 24.0 20.3 16.0 9.5 | 15.4 10.9 6.6 | ||||||
6 PROGRAMME TABLE
- The program duration may change according to the amount of dishes, the water temperature, the ambient temperature and selected additional functions.
- Values given for programmes other than the eco programme are indicative only
- Eco programme is suitable to clean normally soiled tableware, that for this use, it is the most efficient programme in terms of its combined energy and water consumption, and that it is used to assess compliance with the EU ecodesign legislation.
- Washing tableware in a household dishwasher usually consumes less energy and water in the use phase than hand dishwashing when the household dishwasher is used according to the manufacturer's instructions.
- Only use powder detergent for short programs.
- Short programs do not include drying.
- To assist drying, we recommend slightly opening the door after a cycle is complete.
- You can access the product database where the model information is stored by reading the QR code on the energy label.

NOTE: According to regulations 1016/2010 and 1059/2010, Eco program energy assumption values may differ. This table is in line with regulations 2019/2022 and 7/2022.
7 THE CONTROL PANEL

- On/Off button
- Programme button
- Display
- Half Load button
i. Upper Basket - Half Load led
ii. Lower Basket - Half Load led - Delay button
- Options button
iii. Extra Silent led
iv. Extra Dry led
v. Extra Fast led - Salt lack warning indicator
- Rinse Aid lack warning indicator
1. On/Off Button
Turn the machine on by pressing On/Off button. When machine is on, "--" will be shown on the Display (3).
2. Programme Button
Select a suitable programme for your dishes by pressing Programme button. The programme will start automatically when the door is closed.
3. Display
The Display shows the number and duration of the selected programme alternately and the remaining time during operation.
4. Half Load Button
Press the Half Load button to select the area of the dishwasher that contains the dishes to be washed. You can select both baskets, the upper basket only, or the lower basket only. Press the button until the led (i,ii) corresponding to the basket containing the dishes to be washed illuminates. Dishes in other areas will not be washed.
5. Delay Button
Press the Delay Start button to delay the start time of a programme for 1 hour up to 19 hours. Pressing once will delay the start time for 1 hour, and continuing to press the button will increase the delay duration. Press the Delay button to change or cancel the delayed start. If you turn off the machine after activating the delay time, the delayed time is cancelled.
6. Options Button
Press the Options button once to activate the Extra Silent option. Select Extra Silent option to decrease the water pressure, therefore providing a more sensitive and silent wash. This option can only be selected at the beginning of a programme. Extra Silent led (iii) will illuminate.
Press the Options button twice to activate the Extra Dry option. Select Extra Dry option to add extra drying steps to a programme in order to obtain drier dishes. This option increases water temperature of the final rinse step and duration of the drying step. Extra Dry led (iv) will illuminate.
Press the Options button three times to activate the Extra Fast option. Select the Extra Fast option to reduce the programme duration. The washing water temperature and pressure will increase to ensure an improved washing quality in a shorter duration. This option can only be selected at the beginning of a programme. Extra Fast led (v) will illuminate.

NOTE: If an extra feature has been used on the most recent wash programme, this feature will remain active on the next selected programme. To cancel this feature on the newly selected wash programme, press the feature button until the light on the button switches off.
7. Salt Lack Warning Indicator
When there is insufficient softening salt, the Salt Lack Warning Indicator will illuminate to indicate the salt chamber needs filling.
8. Rinse Aid Lack Warning Indicator
When there is insufficient rinse aid, the Rinse Aid Lack Warning Indicator will illuminate to indicate the rinse aid chamber needs filling.

NOTE: If you decide not to start the selected programme, please see the "Changing a Programme" and "Cancelling a Programme" sections.
Changing a Programme
Follow the steps below to change a programme while in operation.


NOTE: Open the door slightly at first to stop a programme before it is complete in order to avoid water spillage.
Cancelling a Programme
Follow the steps below to cancel a programme while in operation.

Switching the Machine Off
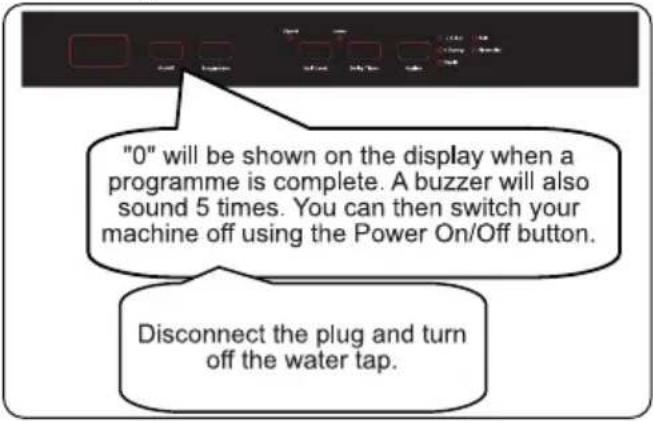

NOTE: Do not open the door before a programme is complete.

NOTE: Leave the door slightly open at the end of a wash programme to speed up drying.

NOTE: If the door of the machine is opened or the power is cut during operation, the program will continue when the door is closed or the power returns.
Buzzer Sound Control
To change the buzzer sound level, follow the below steps:
- Open the door and press Delay (5)
And Options (6) buttons simultaneously for 3 seconds. - When sound setting is recognized, buzzer gives a long sound and machine will display last set level, from "S0" to "S3".
- To decrease sound level press Delay button (5). To increase sound level, press Options button (6).
- To save the selected sound level, turn off the machine.
"S0" level means all voices are off. Factory setting is "S3".
Save Power Mode
To activate or deactivate Save Power Mode, follow the below steps:
- Open the door and press Half Load (4) and Delay (5) buttons simultaneously for 3 seconds.
- After 3 seconds, the machine will display last Setting, "IL1" or "IL0".
- When Save Power Mode is activated, "IL1" will be displayed. On this mode, interior lights will turn off 4 minutes after the door is opened, and the machine will turn off after 15 minutes of no activity in order to save energy.
- When Save Power Mode is deactivated "IL0" will be displayed. If Save Power Mode is deactive, interior lights will be on as long as the door is open, and the machine will always be on unless it is turned off by user.
- To save the selected setting, turn off the machine.
In factory setting, Save Power Mode is active.
Natural Ion Tech (Model Depending)
This function provides extra hygiene to the machine thanks to Ion Technology. Natural Ion Tech function is activated by pressing Half Load (4) button for 3 seconds. At the end of 3 seconds, “lon” will be displayed which indicates lonizer function is activated. The button is released after “lon” is displayed. If no intervention by user, 24 hour after activation of lonizer function, it is automatically cancelled.

NOTE: If machine is turned off, Ionizer action is cancelled.

NOTE: Natural Ion Tech function does work with any program.
Crystalight (Model Depending)
This technology which have Ion and Light Technology together, provides to extra hygiene. It prevents bad odor during a washing program that includes a drying step.
Crystalight function is activated or deactivated by pressing Half Load (4) button for 6 seconds. At the end of 6 seconds, "UV1" will be displayed which indicates Crystalight function is activated. When it is deactivated, at the end of 6 seconds, "UV0" will be displayed.
Crystalight setting follows Natural Ion Tech setting.
Default set is "UO".

NOTE: If user do not deactivate
Crystalight function at the end of program, it will remain active until the machine turns off.

NOTE: If Crystalight or Ionizer function active, ionizer led lights up like dimming and door is open.
Infoled 2.1 (Model Depending)
| LED Indicator State | of the Machine |
| Red, continuous | The machine is running a program. |
| Red, flashing A program is cancelled. | |
| Red, flashing rapidly | The machine has a fault. Refer to section "Automatic fault warnings and what to do". |
| Green, continuous A | program is finished. |
8 CLEANING AND MAINTENANCE
Cleaning your dishwasher is important to maintain the machine's service life Make sure that the water softening setting (If available) is done correctly and correct amount of detergent is used to prevent limescale accumulation. Refill the salt compartment when the salt sensor light comes on. Oil and limescale may build up in your Dishwasher over time. If this occurs:
- Fill the detergent compartment but do not load any dishes. Select a programme which runs at high temperature and run the Dishwasher empty. If this does not clean your Dishwasher sufficiently, use a cleaning agent designed for use with dishwashers.
• To extend the life of your dishwasher, clean the appliance regularly on each month - Wipe the door seals regularly with a damp cloth to remove any accumulated residue or foreign objects.
8.1 Filters
Clean the filters and spray arms at least once a week. If any food waste remains or foreign objects on the coarse and fine filters, remove them and clean them thoroughly with water.
a) Micro Filter b) Coarse Filter
c) Metal Filter

natural_image
Technical diagram of a mechanical assembly with a central component and a curved housing (no text or symbols)


natural_image
Technical line drawing of a mechanical assembly with a central component and mounting brackets (no text or symbols)To remove and clean the filter combination, turn it counter clockwise and remove it by lifting it upwards (1). Pull the coarse filter out of the micro filter (2). Then pull and remove the metal filter (3). Rinse the filter with lots of water until it is free of residue. Reassemble the filters. Replace the filter insert, and rotate it clockwise (4).
- Never use your dishwasher without a filter.
- Incorrect fitting of the filter will reduce the washing effectiveness.
- Clean filters are necessary for proper running of the machine.
8.2 Spray Arms
Make sure that the spray holes are not clogged and that no food waste or foreign object is stuck to the spray arms. If there is any clogging, remove the spray arms and clean them under water. To remove the upper spray arm undo the nut holding it in position by turning it clockwise and pulling it downwards. Make sure that the nut is properly tightened when refitting the upper spray arm.

natural_image
Technical line drawing of a mechanical assembly with gears and a central shaft (no text or symbols)8.3 Drain Pump
Large food residues or foreign objects which were not captured by the filters may block the waste water pump. The rinsing water will then be above the filter.

Warning Risk of cuts!
When cleaning the waste water pump, ensure that you do not injure yourself on pieces of broken glass or pointed implements.
In this case:
- First always disconnect the appliance from the power supply.
- Take out baskets.
- Remove the filters.
- Scoop out water, use a sponge if required.
- Check the area and remove any foreign objects.
- Install filters.
- Re-insert baskets.
9 TROUBLESHOOTING
| FAULT POSSIBLE CAUSE TROUBLESHOOTING | ||
| The programme does not start. | Your Dishwasher is not plugged in. Plug your Dishwasher in. | |
| Your Dishwasher is not switched on. | Switch your Dishwasher on by pressing the On/Off button. | |
| Fuse blown. Check your indoor fuses. | ||
| Water inlet tap is closed. Turn on the water inlet tap. | ||
| Your Dishwasher door is open. Close the Dishwasher door. | ||
| Water inlet hose and machine filters are clogged. | Check the water inlet hose and machine filters and make sure they are not clogged. | |
| Water remains inside the machine. | Water drain hose is clogged or twisted. | Check the drain hose, then either clean or untwist it. |
| The filters are clogged. Clean the filters. | ||
| The programme is not finished yet. Wait until the programme is finished. | ||
| Machine stops during washing. | Power failure. Check mains power. | |
| Water inlet failure. Check water tap. | ||
| Shaking and hitting noises are heard during a wash operation. | The spray arm is hitting the dishes in the lower basket. | Move or remove items blocking the spray arm. |
| Partial food wastes remain on the dishes. | Dishes placed incorrectly, sprayed water not reaching affected dishes. | Do not overload baskets. |
| Dishes leaning each another. | Place dishes as instructed in the section on loading your dishwasher. | |
| Not enough detergent used. | Use the correct amount of detergent, as instructed in the programme table. | |
| Wrong wash programme selected. | Use the information in the programme table to select the most appropriate programme. | |
| Spray arms clogged with food waste. | Clean the holes in the spray arms with thin objects. | |
| Filters or water drain pump clogged or filter misplaced. | Check the drain hose and filters are correctly fitted. | |
| FAULT POSSIBLE CAUSE | TROUBLESHOOTING | |
| Whitish stains remains on dishes. | Not enough detergent used. | Use the correct amount of detergent, as instructed in the programme table. |
| Rinse aid dosage and/or water softener setting set too low. | Increase rinse aid and/or water softener level. | |
| High water hardness level. Increase water softener level and add salt. | ||
| Salt compartment cap not closed properly. | Check that the salt compartment cap is closed properly. | |
| Dishes do not dry. | Drying option is not selected. Select a programme with a drying option. | |
| Rinse aid dosage set too low. Increase rinse aid dosage setting. | ||
| Rust stains form on the dishes. | Stainless-steel quality of the dishes is insufficient. | Use only dishwasher-proof sets. |
| High level of salt in wash water. | Adjust the water hardness level using water hardness table. | |
| Salt compartment cap not closed properly. | Check that the salt compartment cap is closed properly. | |
| Too much salt spilled in the Dishwasher while filling it with salt. | Use funnel while filling salt to the compartment to avoid spillage. | |
| A poor mains grounding. Consult a qualified electrician immediately. | ||
| Detergent remains in the detergent compartment. | Detergent was added when the detergent compartment was wet. | Make sure detergent compartment is dry before use. |
AUTOMATIC FAULT WARNINGS AND WHAT TO DO
| TROUBLE CODE | POSSIBLE FAULT WHAT TO DO | |
| FF | Water inlet system failure | Make sure the water inlet tap is open and water is flowing. |
| Separate the inlet hose from the tap and clean the filter of the hose. | ||
| Contact for service if the error continues. | ||
| F5 | Pressure system failure | Contact for service. |
| F3 | Continuous water input | Close the tap and contact for service. |
| F2 | Inability to discharge water | Water discharge hose and filters may be clogged. |
| Cancel the program. | ||
| If the error continues, contact for service. | ||
| F8 | Heater error | Contact for service. |
| F1 Overflow | Unplug the machine and close the tap. | |
| Contact for service. | ||
| FE Faulty electronic card Contact for service. | ||
| F7 Overheating Contact for service. | ||
| F6 Faulty heater sensor Contact for service. | ||
| HI High voltage failure Contact for service. | ||
| LO Low voltage failure Contact for service. | ||
The installation and repairing procedures should always carried out by the Authorised Service Agent in order to avoid possible risks. The manufacturer shall not be held liable for damages that may arise from procedures carried out by unauthorised persons. Repairs may be carried out by technicians only. If a component has to be replaced, ensure that only original spare parts are used.
Improper repairs or use of non-original spare parts may cause considerable damage and put the user at considerable risk.
Contact information for your customer service can be found on the back of this document. Function-relevant genuine spare parts according to the corresponding Ecodesign order can be obtained from Customer Service for a period of at least 10 years from the date on which your appliance was placed on the market within the European Economic Area.
10 Warranty and service
The manufacturer shall not be held liable for any damage caused by improper use of the product.
• Repairs carried out by unqualified persons may seriously endanger the appliance user
- Pursuant to Commission Regulation (EU) 2019/2022, The minimum availability period for spare parts necessary to repair the appliance is 7 or 10 years depending on the type and purpose of the spare part
- The list of spare parts and the ordering procedure are available on the websites of the manufacturer, importer or an authorised representative
- The minimum warranty period for the appliance offered by the manufacturer, importer or authorised representative is given in the warranty card
- The warranty shall be void if you make any independent adaptations or alterations, tamper with seals or other appliance safety devices or its parts or interfere with the appliance contrary to operating instructions
For more information about the product, please refer to the EU EPREL Product Database at https://eprel.ec.europea.eu.
Alternatively you can use your mobile device to scan the QR code on the energy label or enter the product model listed on the energy label in the EPREL search engine.
11 Declarations of Conformity:
This appliance has been manufactured to comply with all EU & UK statutory requirements and complies with all applicable legislation and the following European Directives:
• The Low Voltage Directive 2014/35/EU
• Electromagnetic Compatibility Directive 2014/30/EU
• ErP Directive 2009/125/EC
• Directive RoHS 2011/65/EC
The product has been marked with the UK and CE symbols.
IMPORTANT INFORMATION FOR CORRECT DISPOSAL OF THE PRODUCT IN ACCORDANCE WITH EC DIRECTIVE 2012/19/EU.
Please render the appliance unusable before disposal. This includes removing the plug and breaking the door fixings to prevent children being trapped inside the appliance during play, or any other risk of injury.
At the end of its working life, the product must not be disposed of as urban waste. It must be taken to a special local authority differentiated waste collection centre or to a dealer providing this service.
Disposing of a household appliance separately avoids possible negative consequences for the environment and health deriving from inappropriate disposal and enables the constituent materials to be recovered to obtain significant savings in energy and resources. As a reminder of the need to dispose of household appliances separately, the product is marked with a crossed-out wheeled dustbin. ✗
The CDA Group
Harby Road
Langar
Nottinghamshire
NG13 9HY
Sales Department
Phone: 01949 862010
Email: sales@cda.eu
CDA Customer Care
Phone: 01949 862012
Email: customer.care@cda.eu




- Thank you for choosing this product.
- CONTENTS
- SAFETY INSTRUCTIONS .... 4
- INSTALLATION 9
- TECHNICAL SPECIFICATIONS....11
- BEFORE USING THE APPLIANCE 13
- LOADING YOUR DISHWASHER....17
- PROGRAMME TABLE 22
- THE CONTROL PANEL 24
- CLEANING AND MAINTENANCE 28
- TROUBLESHOOTING .... 30
- WARRANTY AND SERVICE....33
- DECLARATION OF CONFORMITY....34
- SAFETY INSTRUCTIONS
- General Safety Warnings
- Installation Warnings
- During Usage
- INSTALLATION
- Machine Positioning
- Water Connection
- Water Inlet Hose
- Drain Hose (Model Depending)
- Electrical Connection
- TECHNICAL SPECIFICATIONS
- General Appearance
- Technical Specifications
- RECYCLING
- PACKAGING AND THE ENVIRONMENT
- CE Declaration of Conformity
- Disposal of Your Old Machine
- BEFORE USING THE APPLIANCE
- Preparing Your Dishwasher For First Use
- Salt Usage (IF AVAILABLE)
- Fill The Salt (IF AVAILABLE)
- Only add water to the salt compartment on first use.
- Test Strip
- Water Hardness Table
- Water Softener System
- Setting
- Detergent Usage
- Filling The Detergent
- Using Combined Detergents
- Rinse-aid Usage
- Filling The Rinse-aid And Setting
- In order to change the rinse aid level, follow the below steps before turning on the machine:
- LOADING YOUR DISHWASHER
- Recommendations
- SOFT TOUCH
- Top basket
- Height Adjustable Rack
- Foldable racks
- Four Folding Racks
- Height Adjustment
- Height Adjustable Rack (peg type)
- Upper Cutlery Basket
- Alternative Basket Loads
- Incorrect Loads
- THE CONTROL PANEL
- On/Off Button
- Programme Button
- Display
- Half Load Button
- Delay Button
- Options Button
- Salt Lack Warning Indicator
- Rinse Aid Lack Warning Indicator
- Changing a Programme
- Cancelling a Programme
- Buzzer Sound Control
- Save Power Mode
- Natural Ion Tech (Model Depending)
- Crystalight (Model Depending)
- CLEANING AND MAINTENANCE
- Filters
- Spray Arms
- Drain Pump
- Warning Risk of cuts!
- Warranty and service
- Declarations of Conformity:
- IMPORTANT INFORMATION FOR CORRECT DISPOSAL OF THE PRODUCT IN ACCORDANCE WITH EC DIRECTIVE 2012/19/EU.
Brand : CDA
Model : CDI6372
Category : Dishwasher