
BB3200 - Phone Accessories BINATONE - Free user manual and instructions
Find the device manual for free BB3200 BINATONE in PDF.


| Product Type | Cordless Telephone |
| Brand | Binatone |
| Model | BB3200 |
| Technology | DECT (Digital Enhanced Cordless Telecommunications) |
| Frequency Range | 1.88 - 1.9 GHz |
| Range (outdoor) | Up to 300 m |
| Range (indoor) | Up to 50 m |
| Standby Time | Approximately 100 hours |
| Talk Time | Approximately 10 hours |
| Battery Type | 2 x LR03/AAA NiMH (550 mAh) |
| Charging Time (first) | 15 hours |
| Phonebook Capacity | Up to 150 entries |
| Caller ID Memory | 29 entries |
| Speakerphone | Yes |
| Key Lock | Yes |
| Alarm | Yes (snooze function) |
| Display | LCD |
| Power Supply Base | 230 V AC, 50 Hz, Output 6 V DC, 200 mA |
| Maximum Handsets | 5 |
| Internal Calls | Yes |
| Three-Way Conference | Yes |
| Call Barring | Yes (up to 4 prefixes) |
| PIN Code Protection | Yes (default 0000) |
Frequently Asked Questions - BB3200 BINATONE
User questions about BB3200 BINATONE
0 question about this device. Answer the ones you know or ask your own.
Ask a new question about this device
Download the instructions for your Phone Accessories in PDF format for free! Find your manual BB3200 - BINATONE and take your electronic device back in hand. On this page are published all the documents necessary for the use of your device. BB3200 by BINATONE.
USER MANUAL BB3200 BINATONE
Cordless Telephone Article number 36-3445 Model BINATONE BB 3200
Please read the entire instruction manual before using and save it for future use. We apologise for any text or photo errors and any changes of technical data. If you have any questions concerning technical problems please contact our Customer Service Department (see address on reverse.)
Table of Contents
Contents 5
Safety 5
Read this first 6
Buttons 8
Display symbols 10
Installation 12
Connecting the unit to the phone jack
Connecting the charging station
Inserting the batteries
Recharging the batteries
Basic Operation 13
Turning the receiver on/off
Key lock
Setting time and date
Setting alarm
Making and answering calls 16
Making call
Answering call
Redialling of latest made call
Redialling from the caller id
Mute
Phone book (call from the phone book) 17
Displaying a stored number
Storing a number
Editing a number
Erasing a number
Erasing all numbers
Showing memory status
Storing latest dialled number
Caller id 22
New number in the list
Displaying number in the caller id
Erasing number in the caller id
Erasing all numbers in the caller id
Storing number from the caller id to the phone book
Ring signal, volume, and button tones 24
Adjusting the volume on the receiver
Changing the receiver's ring signal for external call
Changing the ring signal's strength for external call
Changing the receiver's ring signal for internal call
Changing the ring signal's strength for internal call
Changing the receiver's button tones
Warning signal for low battery
Warning tone for out of range
Using a system with several hand units 29
Making an internal call
Answering an internal call
Finishing an internal call
Forwarding an internal call
Arranging a three way call
Registration of hand units
Choose unit
De-register a hand unit
Adjusting the hand unit 33
Changing the hand unit's name
Auto reply
Changing the hand unit's language
Call barring
Reset to manufacturer's settings
Change the unit's settings 36
Choose calling type (tone or pulse)
Change PIN code
Reset to manufacturer's settings
Troubleshooting 38
Care and Maintenance 42
Disposal 42
Technical Specifications 42
Contents
- Main unit
- One lead for the base unit
- One adaptor for the base unit
- Wireless hand unit
- Charge station with mains connection
- Instruction manual
Keep the receipt; it serves as your guarantee.
Safety
- The base unit or the receiver may not be exposed to humidity. Electric equipment can cause serious damage if it is used when you are wet or are standing in water.
- If the base unit falls into water, do not try to pick it up before you have disconnected the adaptor from the wall socket and the phone lead from the phone jack. Then pick up the base unit using the disconnected leads.
- Do not use the phone outdoors during a thunderstorm, disconnect the base unit from the phone jack and wall socket during those circumstances. Damages caused by lightning is not covered by the guarantee.
Read this first
Choosing a location for the base unit and the charger
The base unit should be placed on a level surface in a location where:
- The adaptor reaches a vacant wall socket.
- The base unit's phone lead reaches a phone jack.
- It is not nearby another cordless phone, which may cause interference.
- It is not nearby a kitchen sink, tub, or shower, or anywhere else where it may be exposed to humidity.
- It is not nearby any electric equipment such as a e.g. fridge, dishwasher, microwave, fluorescent lamp, or TV.
Connecting to a power point
The base unit may only be used with the included adaptor. Use of another adaptor is contrary to EN609050 and voids the approvals received by the device.
Radio signals between the receiver and the base unit
To use the receiver and the base unit together you must create a radio signal between the two of them. Always be aware that:
- Large metal objects such as a fridge, a mirror, or an filing cabinet between the receiver and the base unit may block the radio signal.
- Other solid structures such as walls may reduce the strength of the signal.
Interferences
If the sound quality gets worse while moving during a call this is probably caused by interference between the receiver and the base unit. It may also happen because you are too close to another phone or electrical equipment.
- Move to another spot to avoid interference. If you do not move your call may be lost.
- Radio interferences in the surrounding are can sometimes cause a short interruption in the radio signal between the receiver and the base unit during a call.
Rande warning "Out of reach"
If you hear a warning signal during a call, and/or the sound in the speaker is weaken or unclear you may be moving outside of the base unit's range. Move closer to the base unit within 20 seconds until the warning signal stops, or your call may be lost.
Battery safety
Only use rechargeable batteries in the receiver. Never use non-rechargeable batteries, they can leak and cause damage.
Charging the batteries for the first time:
Before you start using the phone the first time, make sure the batteries have been fully charged for 15 hours.
Important – Emergency calls
- The cordless phone is not intended for emergency calls during a power outage.
- An alternative way to access emergency services should be planned for (this means that you should also have a phone that does not require the mains so that you can make a call during a power outage).
Buttons
LCD-display
INT
- Push to make an internal call (if you have more than one receiver).
- During a call, push to transfer a call to another receiver.
MENU/OK/MUTE
- Push to get to the menu functions the normal mode.
- Push to confirm selection.
- Push during a call to deactivate the microphone.
TALK/HANDSFREE
- Push to make or answer a call.
- During a call, push to activate/deactivate the speaker phone.
STAR/LOCK
- Push and hold for 1.5 sec to activate/deactivate the key lock.
- Push and hold when connecting a three-way call.
- In pulse tone mode, push to change to touch tone mode for the rest of the conversation.
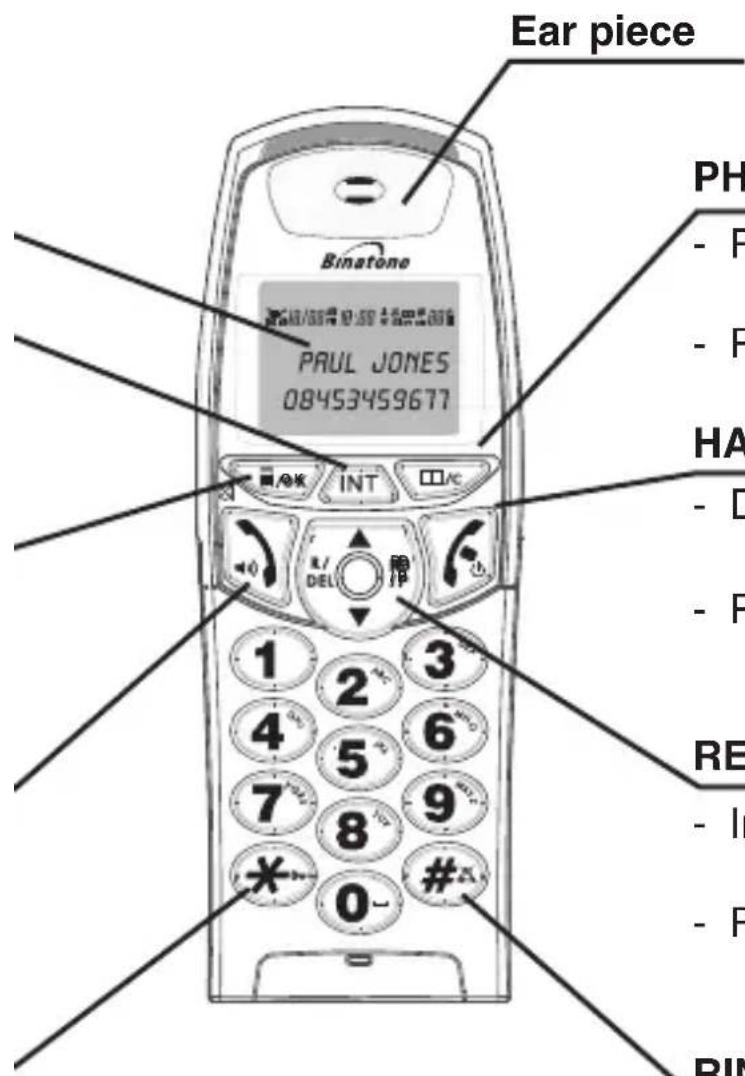
PHONEBOOK/EXIT
- Push to see the entries in the phone book.
- Push to leave current menu.
HANG UP/POWER ON/OFF/C
- During a call, push to end the call and resume normal mode.
- Push and hold for 3 seconds to turn on/off the receiver.
REDIAL/PAUSE
- In call mode, push to call the latest dialled number.
- Push to get to the list for latest called numbers.
RING ON/OFF
- Push and hold to turn off the receiver's ring signal.
RECALL/DELETE
- Push to erase while checking the memory.
- Push to erase a digit or letter while editing a number or name.
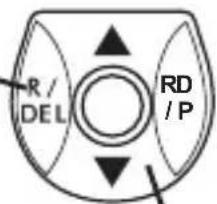
UP/DOWN
- Push during a call to adjust the volume in the ear piece. Push to scroll in the stored numbers or caller id list.
Display symbols
18/88 AM 18:88
PAUL JONES
08453459677
 | Signal strength- Displays the signal strength between the receiver and the base unit.- Flashes when the hand unit attempts to establish a radio link with the base unit. If this symbol flashes during a call, move closer to the base unit. |
 | Level for battery charge- When the symbol displays “almost empty”, place the receiver in the charger to charge the batteries.- During the charging the level increases as the battery charges. |
 | Call- Displayed during a call. |
| [WXT7] | Key lock.- Shown when the buttons are locked. |
 | Alarm- Shown when the alarm is activated.- Flashes when the alarm sounds. |
  | Ring signal turned off- Shown when the receiver's ring signal is turned off.Phonebook- Is shown when you are in the phonebook menu or when you search through the phonebook's memory. |
 | Voice mail message- Is shown when you have a new message in your voice mail. Voice mail is a paid service feature from your phone company. |
 | New missed call- Shown when you have a new missed call or when you skip through the list for new missed calls. |
| RPT NEW | Repeated new missed call- Shown when there is more than one missed call from the same number. |
 | Order- Shows the order in the list of missed calls or list of dialled numbers. |
 | Speaker phone- Is shown when the speaker phone is activated. |
 | A.M.- Shown between 24.00 and 12.00 noon when the clock is in 12-hour mode. |
 | P.M.- Shown between 12.00 noon and 24.00 when the clock is in 12-hour mode. |
Installation
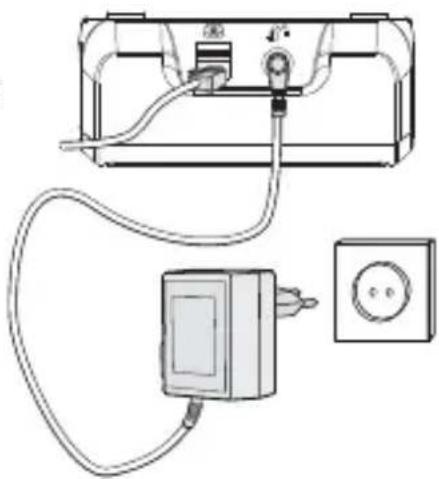
Connecting the unit to the phone jack
Connect the phone lead and the adaptor to the base unit as shown.
Connecting the charging station
Connect the adaptor to the charger as shown.
natural_image
Diagram of a wall-mounted electrical outlet connected to a power socket (no text or symbols present)Inserting the batteries
-
Open the battery compartment and insert 2x LR03/AAA batteries according to the figure and make sure the plus and minus poles correspond with the markings in the battery compartment.
-
Replace the battery holder's cover by sliding it into place and push to make sure it sits tight.

natural_image
Line drawing of a mobile phone casing with battery pack and indicator lights (no text or symbols)
natural_image
Line drawing of a mobile phone with a grille and ventilation slots (no text or symbols)Recharging the batteries
Before you use the receiver it is important that the batteries have been fully charged. The receiver beeps when it is correctly placed in the charger. Leave the receiver in the charger for 15 hours.
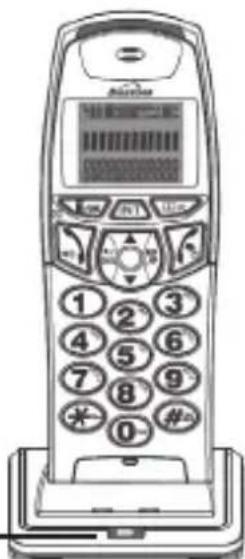
The battery indicator flashes
Basic Operation
Turning the receiver on/off
To shut off:
- Push and hold for 3 seconds until the display turns off.
To turn on the receiver again: - Push and hold charger. for 3 seconds or place the receiver in the
Key lock
Activating the keypad lock:
- Push ⭐ and hold for 2 seconds. The text HS LOCKED is shown quickly on the display and the symbol is lit up.
Unlocking the keypad:
- Push Ⓞ and hold for 2 seconds until disappears from the display.
N.B. When the receiver is turned off it is not possible to make calls from it, not even emergency calls.
When the receiver is turned off it will not ring for incoming calls, but the base unit will still ring. To answer a call when the receiver is turned off you need to turn it on again. Remember it may take a few seconds for the receiver to establish contact with the base unit.
When you do not need to use the receiver (e.g. night time or when you go out), replace it in the base unit or charger to keep the batteries charged.
Setting the time and date
- In standby mode, push 📄. PHONEBOOK is shown on the display.
- Push ▼3 times on. HS SETTINGS is shown.
- Push 🔥. ALARM is shown.
- Push ▼ 7 times on. DATE & TIME is shown.
- Push 📄, the year flashes. Set the year with ▲ and ▼.
- Confirm with 📄. The month flashes. Set the month with ▲ and ▼.
- Confirm with . The date flashes. Set the date with ▲ and ▼.
- Confirm with 📄. Hours flashe. Push ▲ and ▼ to set the hours and change AM/PM.
- Confirm with 📄. The minutes flash. Set the minutes with ▲ and ▼.
- Confirm with 📄. The display returns to the previous menu
- Push 📄 to go back to standby mode.
NB:
- The time format is HH:MM (12 hour display).
- The date format is MM/DD YYYY.
Setting the alarm
The alarm can be set to go off at a set time. The alarm rings for 45 seconds or until any of the buttons on the receiver is pushed. If “snooze” (repeated wake up) is activated the alarm is repeated every 5 minutes for an hour and displays a flashing alarm symbol.
-
In the waiting mode, push 📄. PHONEBOOK is shown on the display.
-
Push 3 times on ▼. HS SETTINGS is shown.
- Push ALARM is shown.
- Push ☐ OFF is shown (if the alarm has already been set).
- Push ▼ once. ON is shown.
- Push 📄, 12-00 AM is shown (e.g.) and the hours flashe. Adjust the hours with ▲ and ▼.
■ Confirm with 📄. The minutes flash.
Set the minutes with ▲ and ▼.
■ Confirm with ▶. AM/PM flashes.
Set AM/PM with ▲ and ▼.
■ Confirm with ☐/OK. SNOOZE ON is shown (repeated wake up). Push ▲ and ▼ to switch between SNOOZE ON or OFF
-
Confirm with 📄. The display returns to the previous menu
-
Push 📄 to go back to standby mode.
-
The ☑ symbol is shown when the alarm is activated.
NB:
- The alarm goes of at the set time. To turn off the alarm you must push any button on the receiver or put it in the charger. If you do not turn off the alarm it will continue ringing for 45 seconds. The alarm rings at the same time the following day.
- To turn off the alarm completely you must select OFF in point 4 (see above).
Making and answering calls
Making a call
- Enter the phone number. If you by mistake enter a wrong number, push 📄 to remove any digits from the display (to erase the entire numbers, push 📄/c).
- Push 📋 to call the dialled number.
- If you wish to set the receiver to speaker mode, push again, the symbol is shown in the top corner of the display.
- End the call by quickly pushing 📄 or return the receiver to the charger.
Answering a call
- When the receiver and the base unit ring, push 📄 to answer the call. The display shows LINE IN USE (if you have caller id the number is displayed also).
- End the call by quickly pushing 📄 or return the receiver to the charger.
Redialling of latest made calls
- Push the button.
- Push ▲ or ▼ to browse between the latest dialled numbers.
- Push 📋 to call the marked number.
Redialling using caller ID
- In standby mode, push ▲ or ▼ to browse between the latest incoming calls.
- Push 📋 to call the marked number.
Mute
- During call, push 📄 to turn off the microphone. The microphone turns off and those on the other end will not hear you.
- Push 📄 to turn on the microphone again.
Address book (calling from the address book)
You can store up to 150 entries in the phone book. Each entry can contain up to 20 digits. If you have caller id each number can be given its own ring signal. A name is entered using the number buttons. Each digit button contains a bank of letters according to the table below.
Example: If you want to enter the letter "A" you push ② once, push ② twice for the letter "B" etc.
To remove a letter, push 📄. Push and hold the button if you want to erase all the entire entry.
| 1 2 3 4 5 6 | 7 8 9 10 | 11 12 | 13 14 | |||||||
 | 1 _, ? ¿ i ! ” ( ) : | ; . | ||||||||
 | A B C | 2 à á â ä å | ||||||||
 | D | E F | 3 è é ê ë | |||||||
 | G | H | I 4 i í î ï | |||||||
 | J | K L | 5 | |||||||
 | M N O | 6 Ñ | ò ó ô ö | |||||||
 | P Q R S 7 | |||||||||
 | T | U | V 8 ù ú û ü | |||||||
 | W | X Y Z 9 | ||||||||
 | space | 0 + - @ | = / \ [ ] | |||||||
 | * | |||||||||
 | # | |||||||||
Menu Key
LIST – Shows stored numbers.
NEW ENTRY – Adds a new number
EDIT RECORD – Changes a current number
DEL RECORD – Removes a number
DELETE ALL – Removes all numbers in the phone book
MEM STATUS – Displays the amount of numbers in the phone book
Storing a number
- Push 📄. PHONEBOOK is shown on the display.
- Push 📄/ok. LIST is shown.
- Push ▼, NEW ENTRY is shown.
- Push 🔍, the curser flashes at the beginning of the name line.
- Type a name with the digit buttons according to the table above (max 12 symbols).
- Push 📄 to confirm the entry. The curser flashes at the beginning of the number line. Enter the phone number with the digit buttons (max 20 symbols).
- Confirm with 📄, the display shows MELODY 1.
- Choose the desired ring signal for the number with ▲ or ▼.
- Confirm with 📄, the number is stored in the phone book and the display returns to the previous menu.
- Push 📄 to return to standby mode.
Displaying stored numbers
There are two ways to display stored numbers in the phone book:
1. Speed button:
- In standby mode push book is displayed. once. The first post in the phone
- Use ▲ or ▼ to browse between the stored numbers.
2. Via the menu:
- Push 📄. PHONEBOOK is shown on the display.
- Push LIST is shown.
- Push 📄, the first phone book entry is displayed.
- Use ▲ or ▼ to browse between the stored numbers.
- Push 📄 to go back to standby mode.
Editing a number
- Push 📄. PHONEBOOK is shown on the display.
- Push 📄. LIST is shown.
- Push ▼ twice, EDIT RECORD is shown.
- Push ▼ or ▲ to choose a number for editing.
- Push 📄, the curser flashes at the end of the name line.
- Push ☐ to erase the letters in the name and use the digit buttons to type a new name.
- Push 📄 to confirm the enter name change. The curser flashes at the end of the phone number.
- Push ☑ to erase the digits and use the digit buttons to enter a new number.
- Confirm with 📄/8k, the display shows MELODY x.
- Choose the desired ring signal for the number with ▲ or ▼.
- Confirm with ☐/8k, the changes are stored and the display returns to the previous menu.
- Push 📄 to return to standby mode.
Erasing a number
- Push 📄. PHONEBOOK is shown on the display.
- Push 📄. LIST is shown.
- Push ▼ three times, DEL RECORD is shown.
- Push 📄, the first number in the phone book is shown.
- Push ▼ or ▲ to choose the number you want to erase.
- Push , CONFIRM? is shown.
- Push 📄 to confirm that you want to remove the number. The receiver sounds and the display returns to the previous menu.
- Push 📄 to return to standby mode.
Erasing all numbers
- Push 📄. PHONEBOOK is shown on the display.
- Push LIST is shown.
- Push ▼ four times, DELETE ALL is shown.
- Push , CONFIRM? is shown.
- Push 📄 to confirm that you want to erase all numbers. The receiver sounds and the display returns to the previous menu.
- Push 📄 to return to standby mode.
Showing memory status
- Push 📄. PHONEBOOK is shown on the display.
-
Push 📄. LIST is shown.
-
Push ▼ four times, MEM STATUS is shown.
- Push 📄/OK, the number of entries in the phone book is shown. Example: 05/150 where 05 shows the number of entries and 150 shows the total amount that can be entered.
- Push 📄 to return to the standby mode.
Storing the latest dialled numbers
- In standby mode, push RD/P once. The last dialled number is shown.
- Push ▼ or ▲ to choose the number you want to save.
- Push ☐/ek, ADD TO PB is shown.
- Push ☐/OK, the curser flashes at the beginning of the name line.
- Type a name with the digit buttons according to the table above (max 12 symbols).
- Push 📄 to confirm the entry. The curser flashes at the beginning of the line. Enter the phone number with the digit buttons (max 20 symbols).
- Confirm with 📄/OK, the display shows MELODY 1.
- Choose the desired ring signal to correspond to the number with ▲ or ▼.
- Confirm with 🔥, the number is stored in the phone book and the display returns to the previous menu.
- Push 📁 to return to standby mode.
Caller ID
If you have this service the caller's number will be displayed. If caller has a concealed number, or if someone is calling via a switchboard the number may not be shown. The phone saves the numbers from the 29 last incoming calls (regardless if you answered or not) so that you can call back later. When all 29 entries are filled, the next incoming number will overwrite the oldest number. If the number was concealed or not accessible no information will be saved.
New numbers on the list
- If you have a new missed call the symbol NEW is shown as well as the total number of new calls.
- If the new call is received from the same number is shown. RPT NEW
Showing a caller id number
- In the standby mode push once, PHONEBOOK is shown on the display.
- Push ▼ once, CALL LOG is shown.
- Push 🔍, RECEIVED is shown.
- Push 📄 again, the display shows information regarding the last incoming call. If the call is new the text NEW is shown in the top right corner along with # and a digit that indicates the call's position in the list. Also time and date for the call is shown.
- Use ▲ and ▼ to browse between the calls on the list.
- Push 📄 to return to standby mode.
- If you want to make a call from the list, push once while the number is shown on the display.
Erasing number in the caller id
- When the number you want to erase is shown on the display, push 📄 once. The number is erased and the next number on the list is shown.
Erasing all numbers in the caller id
- When the number is shown on the caller id, push 📄 once, ADD TO PB is shown on the display.
- Push ▲ and ▼ until DELETE ALL ? is shown.
- Push 📄, CONFIRM ? is shown.
- Push again to confirm that you want to erase all numbers.
- The display shows EMPTY and then returns to the standby mode.
Storing number from the caller id to the phone book
-
When the number is shown on the caller id, push 📄 once, ADD TO PB is shown on the display.
-
Push 📄 again, the curser flashes at the beginning of the name line.
-
Enter a name with the digit buttons according to the table above (max 12 symbols).
-
Push 📄 to confirm the entry. The curser flashes at the end of the number line.
-
Confirm with 📄, the display shows MELODY 1.
-
Choose the desired ring signal for the number with ▲ or ▼.
-
Confirm with 🔍, the number is stored in the phone book and the display returns to the previous menu.
-
Push 📁 to return to standby mode.
Ring signal, volume, and button tones
Adjusting the volume on the receiver
During a call, push ▲ to increase the volume or ▼ to decrease. The display shows current settings in steps from 1-5 (in the speaker mode 1-6).
Changing the receiver's ring signal for internal calls
There are 10 different ring signals to choose from for calls that are made between receivers connected to the same base unit.
- In the standby mode push once, PHONEBOOK is shown on the display.
- Push ▼ three times on, HS SETTINGS is shown.
- Push 📄/0.6, ALARM is shown.
- Push ▼ once, RING SETUP is shown.
- Push 🔥, INT RING is shown.
- Push 📄, MELODY is shown.
- Push 📄, MELODY 1 is shown.
- Choose the desired ring signal with ▲ or ▼. The displayed melody is played.
- Push to confirm.
- Push 📄 to return to the standby mode.
Changing the receiver's ring signal for external calls
There are 10 different ring signals to choose from for incoming external calls.
-
In standby mode push 📄 once, PHONEBOOK is shown on the display.
-
Push ▼ three times, HS SETTINGS is shown.
- Push 🔍, ALARM is shown.
- Push ▼ once, RING SETUP is shown.
- Push 🔍, INT RING is shown.
- Push ▼ once, EXT RING is shown.
- Push 📄, MELODY is shown.
- Push 📄, MELODY 1 is shown.
- Choose the desired ring signal with ▲ or ▼. The displayed melody is played.
- Push to confirm.
- Push 📁 to return to standby mode.
Changing the ring signal's strength for external calls
Ring volume for incoming external calls.
- In standby mode push once, PHONEBOOK is shown on the display.
- Push ▼ three times, HS SETTINGS is shown.
- Push 🔍, ALARM is shown.
- Push ▼ once, RING SETUP is shown.
- Push 🔍, INT RING is shown.
- Push ▼ once, EXT RING is shown.
- Push 📄, MELODY is shown.
- Push ▼, VOLUME is shown.
- Push 🔍, VOLUME 1 is shown.
-
Choose the desired ring volume with ▲ or ▼ (VOLUME1,2,3,4,5 or OFF).
-
Push 📄 to confirm.
- Push 📄 to return to standby mode.
Changing the ring signal's strength for internal calls
Adjusting the ring volume for calls that are made between receivers connected to the same base unit.
- In standby mode push once, PHONEBOOK is shown on the display.
- Push ▼ three times on, HS SETTINGS is shown.
- Push , ALARM is shown.
- Push ▼ once, RING SETUP is shown.
- Push 📄, INT RING is shown.
- Push 📄/OK, MELODY is shown.
- Push ▼, VOLUME is shown.
- Push 🔥, VOLUME 1 is shown.
- Choose the desired ring volume with ▲ or ▼ (VOLUME1,2,3,4,5 or OFF).
- Push 📄 to confirm.
- Push 📄 to return standby mode.
Changing the receiver's button tones
Turning button sound on or off.
- In standby mode push once, PHONEBOOK is shown on the display.
- Push ▼ three times, HS SETTINGS is shown.
-
Push 🔥, ALARM is shown.
-
Push ▼ twice, TONE SETUP is shown.
- Push 🔍, KEY TONE is shown.
- Push ON is shown.
- Use ▲ and ▼ to turn (OFF) or (ON) the button sound.
- Push to confirm.
- Push 📄 to return to standby mode.
Low battery warning signal
When the battery reaches a critical level the receiver gives a warning sound. This signal can be turned off in the menu.
- In standby mode push once, PHONEBOOK is shown on the display.
- Push ▼ three times, HS SETTINGS is shown.
- Push 🔒, ALARM is shown.
- Push ▼ twice, TONE SETUP is shown.
- Push 🔍, KEY TONE is shown.
- Push ▼ once, BATTERY LOW is shown.
- Push ON is shown.
- Use ▲ and ▼ to turn (OFF) or (ON) low battery warning signal.
- Push to confirm.
- Push 📄 to return to standby mode.
Out of range warning tone
When the receiver gets out of the range a warning signal sounds.
This signal can be turned off in the menu.
- In standby mode push once, PHONEBOOK is shown on the display.
- Push ▼ three times, HS SETTINGS is shown.
- Push 🔥, ALARM is shown.
- Push ▼ twice, TONE SETUP is shown.
- Push 🔥, KEY TONE is shown.
- Push ▼ twice, RANGE ALARM is shown.
- Push ☐, ON is shown.
- Use ▲ and ▼ to turn (OFF) or (ON) the warning signal.
- Push to confirm.
- Push 📄 to return to standby mode.
Using a system with several receivers
You can register several receivers for the base unit. Up to 5 receivers can be registered. With two or more registered receivers you can:
- Make internal calls from one receiver to another.
- Forward a call from one receiver to another.
- Change between external calls and internal calls.
- Arrange a three way call.
- Each receiver's number (HS 1 to HS 6) is shown on its display.
NB:
- Only one receiver can be connected to the external line at the same time.
If you are trying to make an external call between while a receiver is already connected to the line you will hear a busy tone, however you can still make an internal call to a vacant unit.
Making an internal call
- Push INT, a tone is heard and the display shows "HS ?".
- Enter the number of the which receiver you want to call (1-5).
- The other receiver rings and displays the caller's infpormation.
Answering an internal call
Answer the call on the other receiver by pushing 📋 or ⒽNT.
Ending an internal call
Push 📋 or place the receiver in the charger to end the call.
Forwarding an internal call
When you have made or answered an external call and want to forward it to another receiver:
- During a call, push INT and then enter the number of the receiver you want to connect to.
- The external call has to wait until someone answers.
- If the other person does not answer you can go back to the external call by pushing and holding again (after 30 seconds the call automatically goes back to the external call).
- When the other person answers, push 📄 to end and forward the current call.
- You can push 📄 to forward an external call before the other receivers answer your internal call. If the user has not answered after 60 seconds the external call goes to the other receivers and will ring for another minute. If the call is not answered it will be disconnected.
Arranging a three way call
When you simultaneously have an external and internal call you can arrange a three way call:
- During the call, push INT and then enter the number for which receiver you want to invite to a three way call.
- When the other receiver answers, push * to connect all three.
- Push 📄 to leave a three way call, the other receiver remains connected with the external call.
N.B. Three way calls only work if several receivers are registered to the base unit.
Registration of receivers
The receiver which is delivered with your base unit normally does not need to be registered, only with new receivers that have been bought separately. Each receiver can be registered for up to four base units, numbered 1 to 4. If the display on the receiver shows UNREGISTERED you must register it to the base unit.
-
In the standby mode push 📄 once. The display will show PHONEBOOK.
-
Push ▲ twice, REGISTRATION is shown.
-
Push ☐, BASE 1 is shown. If the receiver is already registered to a base unit a + sign is shown to the right of the base unit's name on the display.
-
Push ▼ to select a number for the base unit (BASE 1,2,3 or 4).
-
Push ☐, PIN ? is shown. Enter the base unit's PIN code. Preset code for the base unit is "0000".
-
Push 📄 to confirm. The search starts and the display show SEARCHING x.
-
Simultaneously push the •• button on the base unit until the indicator on the base unit starts flashing.
-
When registration is complete the receiver beeps to confirm. The receiver's name is shown on the display and the indicator on the base unit shuts off.
Choosing unit
If the receiver is registered for more than one base unit (up to 4) you can choose the base unit the receiver should be used with.
-
In standby mode push once, PHONEBOOK is shown on the display.
-
Push ▼ three times, HS SETTINGS is shown.
-
Push 📄/ok, ALARM is shown.
- Push ▼ eight times, SELECT BASE is shown.
- Push 📄. The display shows the name of the base unit the receiver is currently using to e.g. BASE 1+.
- Push ▲ or ▼ to choose between the available base units (BASE 1,2,3,4 or AUTO).
N.B.
- The receiver can only be registered to base units marked +.
- In the AUTO mode the base unit itself picks the strongest base unit.
- Push 📄 to confirm. The receiver searches for the selected base and the display shows SEARCHING x. The display returns to standby mode when the receiver is connected to the base unit.
Deregistering a hand unit
- In the standby mode push once, PHONEBOOK is shown on the display.
- Push ▼ twice, BS SETTINGS is shown.
- Push 📄, DELETE HS is shown.
- Push 📄 again, PIN ? is shown. Change the base unit's PIN code (preset code 0000).
- Confirm with OK. The display shows HS 1+.
- Push ▲ or ▼ to select the receiver you want to deactivate.
- Push 📂 to deactivate the selected receiver.
- The display on the deactivated receiver shows UNREGISTERED.
NB: It is not possible to deactivate the original receiver, only others. The original receiver must be deactivated from another receiver.
Adjusting the receivers
You can adjust the receiver settings by using the display menu.
Changing the receiver's name
Change the name that is shown in standby mode. It will make it easier to separate the receivers if you are using several.
- In standby mode push 📄 once, PHONEBOOK is shown on the display.
- Push ▼ three times, HS SETTINGS is shown.
- Push 🔍, ALARM is shown.
- Push ▼ four times, HS NAME is shown.
- Push 📄 and then use the digit buttons to enter the desired name/text. See the "phone book" section for further explanation of signs.
- Confirm with
- Push 📄 to return to standby mode.
Auto reply
Activating auto reply. If the receiver is placed in the charger you only need to pick it up to answer a call without pushing any buttons.
- In the standby mode push once, PHONEBOOK is shown on the display.
- Push ▼ three times, HS SETTINGS is shown.
- Push OK, ALARM is shown.
- Push five times on ▼, AUTO ANSWER is shown.
- Push ☑, ON or OFF shows depending on setting.
- Use ▲ or ▼ to select ON or OFF.
- Confirm with
- Push 📋 to return to standby mode.
Change the receiver's language
- In standby mode push 📄 once, PHONEBOOK is shown on the display.
- Push ▼ three times, HS SETTINGS is shown.
- Push 📄, ALARM is shown.
- Push ▼ three times, LANGUAGE is shown.
- Push ☐, ENGLISH is shown (preset language).
- Use ▲ or ▼ to select desired language.
- Confirm with
- Push 📄 to return to standby mode.
Call blocking
You can set call blocking on the receivers that are registered to your base unit. You can block up to four specific numbers, by entering the call prefix with up to four digits each.
With this alternative you need to programme the numbers first and then turn on and turn off the call blocking function. You can also block some types of calls, no external or international calls e.g.
When call blocking is on you cannot call a number and the display shows CALLS BARRED when any of the numbers are attempted to be called.
Activating call blocking:
- In the standby mode push once, PHONEBOOK is shown on the display.
- Push ▼ three times, HS SETTINGS is shown.
- Push 🔥, ALARM is shown.
- Push ▼ six times, BARRING is shown.
-
Push ☐, PIN ? is shown. Change the base unit's PIN code (preset code 0000).
-
Push again, OFF is shown.
- Use ▲ or ▼ to select ON or OFF.
- Push to confirm.
If you chose ON in the step above, NUMBER 1 will be shown (if a number has already been programmed it will show on the bottom line).
■ If you selected OFF, go to point 13.
9. Push 📄 and enter the number with the digit buttons.
Push R/DEL if you want to remove one or several digits.
10. Confirm with ☑, the display shows the number entered.
11. Use ▲ or ▼ to add more numbers to a vacant spot (e.g. NUMBER 2, NUMBER 3 etc.).
12. Push 📄 to add the number according to point 5, 9 & 10.
13. Push 📄 to return to standby mode.
Reset the manufacturer's settings
- In ▼ standby mode push once, PHONEBOOK is shown on the display.
- Push ▼ three times, HS SETTINGS is shown.
- Push 🔍, ALARM is shown.
- Push ▼ once, HS DEFAULT is shown.
- Push ☐, PIN ? is shown. Enter the PIN code (preset code 0000).
- Confirm the setting with 📄. The receiver restarts and searches for the base unit before returning to standby mode.
Changing the unit's settings
The preset tone (also called DTMF) is the most common type.
This normally does not need to be changed.
Choosing calling type (tone or pulse)
- In the standby mode push on the display.
once, PHONEBOOK is shown - Push ▼ twice, BS SETTINGS is shown.
- Push 📄, DELETE HS is shown.
- Push ▼, DIAL MODE is shown.
- Push 🔥, TONE is shown (preset option).
- Use ▲ or ▼ to switch between TONE and PULSE.
- Confirm with
- Push 📁 to return to standby mode.

Changing PIN code
The PIN code is used to protect some of the receivers and the base unit's settings from unauthorized acces. The preset PIN code at delivery is 0000 but may be changed if desired.
-
In standby mode push 📄 once, PHONEBOOK is shown on the display.
-
Push ▼ twice, BS SETTINGS is shown.
-
Push 📄, DELETE HS is shown.
-
Push ▼ three times, MODIFY PIN is shown.
-
Push ☐, PIN ? is shown. Change the base unit's PIN code (preset code 0000).
-
Push ☐, NEW PIN is shown. Enter a new code.
-
Push 📄, REPEAT is shown. Enter the same code again.
-
Confirm with
- Push 📁 to return to standby mode.
N.B. Write down your new PIN code. Without the PIN code you cannot make changes to the base unit.
Reset the manufacturer's settings
- In the standby mode push once, PHONEBOOK is shown on the display.
- Push ▼ twice on, BS SETTINGS is shown.
- Push 📄, DELETE HS is shown.
- Push ▼ four times on, BS DEFAULT is shown.
- Push ☐, PIN ? is shown. Change the base unit's PIN code (preset code 0000).
- Confirm the setting with 🔍. The base unit confirms with a signal and the receiver then returns to standby mode.
Troubleshooting
Check that:
- You have followed the installation guidelines.
- All units are correctly connected to the phone line and the mains.
- That the wall socket works.
- That the receiver's batteries are correctly inserted and are charged.
Common use
The receiver does not start:
- Check that the receiver's batteries are correctly inserted and are charged.
- Check that the charger is connected and the phone is charged in the charger.
The receiver works but cannot be connected to the base unit:
- Check that the base unit is connected to the mains.
- Make sure that the wall socket where the base unit is connected works.
- Register the receiver again to the base unit.
It is not possible to make or receive calls:
- If the receiver's display is not lit it may be turned off. Push to turn it on again.

- Check that the base unit's adaptor is correctly inserted. The base unit needs power in order for the phone to work properly.
- Make sure you are using the phone lead that was delivered with the phone. Other phone leads may not work.
- Move the receiver closer to the base unit.
- Check the battery level on the display. If it is low, place the receiver in the charger and recharge the batteries.
- Unplug the adaptor from the wall socket, wait few seconds and insert it again. That may solve the problem.
I cannot make a call:
- The receiver's key lock may be activated. Unlock the key lock before making a call.
- Call blocking may be activated.
Nothing happens when I push the buttons: .
- Check that the batteries are in the receiver. If the symbol for battery level is "low", recharge the batteries.
When I enter a number it appears on the display but I cannot make an external call:
- Try placing the receiver closer to the base unit or change the base unit's position. If possible place it on a higher location or away from other electric equipment.
- Call blocking may be activated.
The phone does not ring:
- Check that the base unit's adaptor is correctly inserted. The base unit needs power in order for the phone to work properly.
- Make sure you are using the phone lead that was delivered with the phone. Other phone leads may not work.
My call was lost when I was out of range. Now I cannot use my receiver:
- Move the receiver closer to the base unit before trying again.
There is interference and noise on the line:
- Move the receiver closer to the base unit or another location. Try moving the base unit so it is not nearby electrical equipment such as a TV or computer. You get the best results if you place the base unit as high as possible.
I hear a "beep" from the receiver when I make a call:
- You may be moving out of range of the base unit. Move closer or your call may be lost.
- Check the symbol for the battery level on the display. If it is low then recharge the batteries.
The function for caller id does not work:
- You must subscribe to caller id through your phone company. The person calling may have concealed number or from a network that does not support caller id (e.g. international calls or a switchboard).
I hear a busy tone when I try calling:
- If you have extra receivers registered to your base unit, check that another receiver is not being used.
The volume in the receiver is low when I call:
- Make sure the receiver is correctly placed in your ear. Adjust the volume by using ▲ or ▼.
The receiver does not work despite 15 hours charge:
- Remove the batteries and let them rest for a few seconds before replacing them. If the problem remains you may have to change the batteries.
The receiver's batteries discharge after an hour or two:
- Before the phone is used it should be charged for 15 hours.
- If the batteries are old they may have to be replaced.
- Clean the charging contacts with a clean cloth.
- Check the connection between the base unit and the wall socket.
I try charging the batteries but still get no warning that they are not fully charged:
- If the batteries are old they may have to be replaced. Dispose empty batteries in a safe manner, never burn them, and never place them in environments where they may explode.
- Never use non-rechargeable batteries, they can explode and cause damage.
If the problem remains...
- Disconnect all other connected devices to the same line and try making a call.
- Disconnect the base unit from the phone line and connect another phone to the main phone jack. Try making a call. If it works then the line works.
- If the receiver does not work and you are using a splitter, remove it and connect the phone directly to the phone jack. If the receiver does not work now the splitter might be broken.
- If you still cannot make a call the net may be at fault. Contact your telephone company.
Care and Maintenance
Use a soft damp cloth to clean the product. Never use solvents or strong detergents.
Disposal
Follow local ordinances when disposing of this product. If you are unsure of how to dispose of the product, please contact your municipality.
Technical Specifications
Standard DECT (Digital Enhanced Cordless Telecommunications)
Frequency Range 1.88 to 1.9 GHz (band width = 20 MHz)
Channel width 1.728 MHz
Range Up to 300 m outdoors; up to 50 m indoors
Operating time Standby mode: approx. 100 hours.
Talk time: approx. 10 hours.
Charge time for batteries: 15 hours the first time
Operating temperature 0 °C to 40 °C
Storage temperature -20 °C to 60 °C
Power supply
Receiver 2 x LR03/AAA-batteries (550 mAH, NiMH)
Base unit/charger Input voltage: 230 V AC, 50 Hz Output Voltage: 6 V DC, 200 mA
Declaration of Conformity

Hereby, Clas Ohlson AB declares that following product(s):
Cordless DECT Telephone
36-3445
Binatone Bigbutton BB3200
is in compliance with the essential requirements and other relevant provisions of Directive 1999/5/EC.
Article 3.1a (Safety): EN 60950-1
Article 3.1b (EMC): EN 301489-1 EN 301489-6
Article 3.2 (Radio): EN 301406
Insjön, Sweden, April 2009

Klas Balkow President
Clas Ohlson, 793 85 Insjön, Sweden
SVERIGE
KUNDTJÄNST Tel: 0247/445 00
Fax: 0247/445 09
E-post: kundtjanst@clasohlson.se
INTERNET www.clasohlson.se
NORGE
KUNDESENTER Tlf.: 23 21 40 00
Faks: 23 21 40 80
E-post: kundesenter@clasohlson.no
INTERNETT www.clasohlson.no
SUOMI
ASIAKASPALVELU Puh: 020 111 2222
Faksi: 020 111 2221
For consumer contact, please visit
www.clasohlson.co.uk and click on
customer service.
INTERNET www.clasohlson.co.uk


- Cordless Telephone Article number 36-3445 Model BINATONE BB 3200
- Table of Contents
- Ring signal, volume, and button tones 24
- Using a system with several hand units 29
- Adjusting the hand unit 33
- Change the unit's settings 36
- Troubleshooting 38
- Contents
- Safety
- Read this first
- Choosing a location for the base unit and the charger
- Connecting to a power point
- Radio signals between the receiver and the base unit
- Interferences
- Rande warning "Out of reach"
- Battery safety
- Charging the batteries for the first time:
- Important – Emergency calls
- Buttons
- INT
- MENU/OK/MUTE
- TALK/HANDSFREE
- STAR/LOCK
- PHONEBOOK/EXIT
- HANG UP/POWER ON/OFF/C
- REDIAL/PAUSE
- RING ON/OFF
- RECALL/DELETE
- UP/DOWN
- Display symbols
- Installation
- Connecting the unit to the phone jack
- Connecting the charging station
- Inserting the batteries
- Recharging the batteries
- Basic Operation
- Turning the receiver on/off
- To shut off:
- Key lock
- Activating the keypad lock:
- Unlocking the keypad:
- Setting the time and date
- NB:
- Setting the alarm
- Making and answering calls
- Making a call
- Answering a call
- Redialling of latest made calls
- Redialling using caller ID
- Mute
- Address book (calling from the address book)
- Menu Key
- Storing a number
- Displaying stored numbers
- Speed button:
- Via the menu:
- Editing a number
- Erasing a number
- Erasing all numbers
- Showing memory status
- Storing the latest dialled numbers
- Caller ID
- New numbers on the list
- Showing a caller id number
- Erasing number in the caller id
- Erasing all numbers in the caller id
- Storing number from the caller id to the phone book
- Ring signal, volume, and button tones
- Adjusting the volume on the receiver
- Changing the receiver's ring signal for internal calls
- Changing the receiver's ring signal for external calls
- Changing the ring signal's strength for external calls
- Changing the ring signal's strength for internal calls
- Changing the receiver's button tones
- Low battery warning signal
- Out of range warning tone
- Using a system with several receivers
- Making an internal call
- Answering an internal call
- Ending an internal call
- Forwarding an internal call
- Arranging a three way call
- Registration of receivers
- Choosing unit
- N.B.
- Deregistering a hand unit
- Adjusting the receivers
- Changing the receiver's name
- Auto reply
- Change the receiver's language
- Call blocking
- Activating call blocking:
- Reset the manufacturer's settings
- Changing the unit's settings
- Choosing calling type (tone or pulse)
- Changing PIN code
- Troubleshooting
- Check that:
- Common use
- The receiver does not start:
- The receiver works but cannot be connected to the base unit:
- It is not possible to make or receive calls:
- I cannot make a call:
- Nothing happens when I push the buttons: .
- When I enter a number it appears on the display but I cannot make an external call:
- The phone does not ring:
- My call was lost when I was out of range. Now I cannot use my receiver:
- There is interference and noise on the line:
- I hear a "beep" from the receiver when I make a call:
- The function for caller id does not work:
- I hear a busy tone when I try calling:
- The volume in the receiver is low when I call:
- The receiver does not work despite 15 hours charge:
- The receiver's batteries discharge after an hour or two:
- I try charging the batteries but still get no warning that they are not fully charged:
- If the problem remains...
- Care and Maintenance
- Disposal
- Technical Specifications
- Power supply
- Declaration of Conformity
- SVERIGE
- NORGE
- SUOMI
Brand : BINATONE
Model : BB3200
Category : Phone Accessories