
Eden LT-386 - Microphone Lauten Audio - Free user manual and instructions
Find the device manual for free Eden LT-386 Lauten Audio in PDF.


| Product Type | Large-diaphragm vacuum tube condenser microphone |
| Transducer Type | Dual 31.25mm large diaphragm pressure gradient |
| Polar Patterns | Omnidirectional, Cardioid, Figure-8 (selectable) |
| Circuit | Vacuum tube input, transformer balanced output |
| Frequency Range | 20Hz - 20kHz |
| Dynamic Range | 120dB minimum |
| Maximum SPL | 120dB at 0.5% THD @ 1kHz |
| Self-Noise | <20dB(A) |
| Sensitivity | 16mV/Pa or -36±2dB at 0dB=1V/Pa 1kHz |
| Impedance | <200 ohms |
| Special Features | Kick-shaper & Vocal-shaper high-pass filters, 3-stage Multi-voicing switch, polar pattern switch |
| Connectors | 5-pin XLR (mic to PSU), 3-pin XLR (PSU to preamp) |
| Power Requirements | Custom LT386PSU power supply, 100-240V AC, selectable 115V/230V |
| Mounting | Suspension shock mount included, requires heavy-duty weighted stand |
| Warranty | 3-year limited warranty (90 days on accessories) |
| Maintenance | Authorized technicians only; no user-serviceable parts |
| Cleaning | Lint-free cloth; mild mineral spirits for stains; nickel polish on head; avoid moisture inside grill |
| Safety | Use correct voltage; do not disassemble when powered; only use included PSU |
Frequently Asked Questions - Eden LT-386 Lauten Audio
User questions about Eden LT-386 Lauten Audio
0 question about this device. Answer the ones you know or ask your own.
Ask a new question about this device
Download the instructions for your Microphone in PDF format for free! Find your manual Eden LT-386 - Lauten Audio and take your electronic device back in hand. On this page are published all the documents necessary for the use of your device. Eden LT-386 by Lauten Audio.
USER MANUAL Eden LT-386 Lauten Audio
A message from the founder
Congratulations and thank you for your purchase of the Eden LT-386 multi-voicing, vacuum tube condenser microphone. Your microphone was designed and built with pride by Lauten Audio. We are dedicated to providing, Grammy® winning to novice, Producers, Engineers, and Musicians throughout the world with authentic, high quality, great sounding microphones. The Eden by Lauten Audio is our flagship and a very special microphone indeed. Each Eden is built, one by one, like great pieces of gear from the past.
Please enjoy exploring Eden, and know it was created with a great deal of pride.
Sincerely,

Brian Loudenslager Founder
IMPORTANT note about microphone stands
The Eden LT-386 is heavy compared to other microphones. YOU MUST use a high quality microphone stand that is weighted. If using a boom stand, the extension arm must have a counter weight, and the base must be weighted.

WARNING!

Only authorized Lauten Audio technicians should perform disassembly and maintenance on any part of this microphone or its accessories. Disassembling and modifying any part of this microphone may void its warranty.
Prior to using your microphone please check to ensure the voltage switch on the back of the power supply is set correctly for the voltage in your country.
For 100 to 120V set the voltage selector to 115V. For 220 to 240V set the voltage selector to 230V.
NEVER SUPPLY POWER TO THE MICROPHONE OR POWER SUPPLY WITH THE COVER OFF. SERIOUS INJURY CAN OCCUR.
NOTE: THERE ARE NO USER SERVICABLE PARTS INSIDE THE MICROPHONE OR POWER SUPPLY.
FOR SERVICE PLEASE SEND THE MICROPHONE OR POWER SUPPLY TO AN AUTHORIZED LAUTEN AUDIO SERVICE CENTER.
FOR INFORMATION ON HOW TO CONNECT THE MICROPHONE PLEASE REFER TO THE QUICK START GUIDE OR CONNECTIONS SECTION OF THE MANUAL.
REGISTER ONLINE TODAY AT: http://www.lautenaudio.com
Why You Should Register Your Product Today...
- Receive notifications of product updates via email
· Provide proof of purchase for insurance losses - Registration will help expedite warranty claims
If you have any questions you may also contact us at 1-877-721-7018 for US and Canada or visit our website to contact your local distributor/dealer.
Lauten Audio values your privacy. We will not share your information with any outside organization.
Warranty applies to products registered within 30-days of purchase from an authorized Lauten Audio dealer.
Serial Number: ____
Date of purchase: ____
Dealer Name: ____
Sales Person: ____
Table of Contents
- Safety & Contents
- Quick Start Guide/Sequence of Operation
• Product and feature descriptions
• Power Requirements - Connections
- Mounting
• Technical Specifications
• Frequency and Polar pattern plots - Care and cleaning
- Warranty
Safety & Contents
Please make sure the equipment your microphone will be connected to meets or exceeds the safety regulations in force in your country and is utilizing a ground lead.
Only authorized Lauten Audio technicians should perform disassembly and maintenance on any part of this microphone or its accessories. Disassembling and modifying any part of this microphone may void its warranty. NEVER DISASSEMBLE THE MICROPHONE WHEN POWER IS BEING SUPPLIED
FAILURE TO USE THE CORRECT VOLTAGE SETTING ON THE POWER SUPPLY WILL DAMAGE THE MICROPHONE!
Prior to using your microphone please check to insure the voltage switch on the back of the power supply is set correctly for the voltage in your country.
For 100 to 120V set the voltage selector to 115V. For 220 to 240V set the voltage selector to 230V.
NEVER SUPPLY POWER TO THE MICROPHONE OR POWER SUPPLY WITH THE COVER OFF. SERIOUS INJURY CAN OCCUR.
NOTE: THERE ARE NO USER SERVICABLE PARTS INSIDE THE MICROPHONE OR POWER SUPPLY.
FOR SERVICE PLEASE SEND THE MICROPHONE OR POWER SUPPLY TO AN AUTHORIZED LAUTEN AUDIO SERVICE CENTER.
FOR INFORMATION ON HOW TO CONNECT THE MICROPHONE PLEASE REFER TO THE QUICK START GUIDE OR CONNECTIONS SECTION OF THE MANUAL
Quick Start Guide/Sequence of Operation
- Inspect the shock mount bands to ensure they are securely attached and not cracked or broken.
- Securely attach the microphone in its mount to a high quality, weighted, microphone stand. It is easiest to spin the microphone stand post/arm to thread into the mount, rather than attempt to twist the entire microphone. Once the stand is securely threaded into the mount, tighten the wing nut at the shock mount elbow.
- Make sure the phantom power and gain on your recording interface/microphone preamp is turned off.
- Check that the proper voltage is selected on the back of the power supply for your country (i.e. 115V for U.S. and Japan, 230V for Europe) (Figure 1): Refer to "Power Requirement" section for more information.
- Make sure the on/off switch on the power supply is in the off position and then connect the power cord from the power supply to a power outlet (Figure 2).
- Place the power supply in a safe location where it will not be disturbed during the recording process.
- Connect the black, male, 5-pin connector of tube mic cable to the 5-pin female connector of the power supply.
- Connect the silver, female, end of the 5-pin tube mic cable to the bottom of the 5-pin male connector on the microphone.
- Securely connect the female end of a standard 3-pin XLR microphone cable to the 3-pin male connector on the power supply and the male end to your recording interface/microphone preamp/mixer.
- Select your preferred Multi-voicing, polar pattern, and high-pass selections on the microphone.
- Turn on the LT386PSU power supply (a red light will illuminate on the front of the power supply). Allow the microphone to warm up for 30 minutes.
- If you are using the microphone for vocals or voice, please use a high quality pop-filter. Any foreign materials getting onto the microphone capsule may damage it.
- Gradually increase the input gain on your recording interface or preamp to test and achieve your desired microphone input levels.
- Congratulations, you are ready to begin using your Eden LT-386 microphone.

Figure 1

Figure 2
Product and Feature Descriptions
This large-diaphragm vacuum tube condenser microphone has been thoughtfully designed with feedback from sound engineers working in recording studios for many years.
The microphone character was designed to offer a full and rich, low and mid-range, as well as smooth and unique high-mid and high frequencies. Using premium quality and reliable components, this microphone will withstand use in a recording studio for many years.
The electronic circuitry of the microphone exhibits less than 20dB of self-noise and a maximum SPL level of 120dB. The 31.25mm diaphragms are made of an ultra-thin plastic material with a layer of gold on one side. The body helps prevent RF interference allowing you to successfully use the microphone near transmitter stations and wireless microphones or other communications equipment.
The Eden LT-386 features three switches on each side and back of the microphone just below the microphone grill. These switches allow you to adjust the low-end; polar pattern and timbre (see Figures. 3, 4 and 5 below).
High-pass Switch
On the left side of the microphone we have our unique 2-stage, high-pass filter we call "Kick-shaper" and "Vocal-shaper" (Figure 3). These filters are uniquely tuned to shape the low-end for two of the most commons trouble areas when recording. In its default position there is no high-pass. Stage one, or the middle position, is the "Kick-shaper"; this was designed for kick-drums. With its very step cut of the low-end, it removes excess boominess that might actually take away from a big sounding kick. But feel free to try it on toms, vocals, guitars etc. Moving the switch to stage 2, or the bottom position, is the "Vocal-shaper" which is designed to clean up your vocal tracks for an amazingly smooth and classic sounding vocal track. Of course, it will be useful for many more sources as well.
Polar Pattern Switch
The polar pattern switch (Figure 4) is located on the right side of the microphone. The selectable polar patterns are figure-8 (top), cardioid (center), and omnidirectional (bottom). The ability to select different polar patterns allows this microphone to be used in many recording situations. Having the pattern switch on the microphone, allows you or the artist to quickly and easily make your selection.
Multi-voicing Switch
The Multi-voicing switch, located on the rear of the microphone, (Figure 5). makes Eden extremely diverse. The options are F (Forward), N (Neutral) and G (Gentle). Multi-voicing is a process that can only be achieved in the microphone itself. This is Lauten Audio's proprietary technology that uses three separate signal paths for unique frequency shaping. The multi-voicing functions in Eden are specifically designed and tuned to bring out the best in Eden. The Gentle position provides maximum control of bright or peaky sources or to achieve a very warm, vintage vibe. Throw in a high-pass filter and you'll think you have a completely different microphone. Neutral offers a nice even response with good control over S's and starts moving more toward a modern microphone but still wrapped in a vintage vibe. Lastly, Forward opens up the microphone for that familiar "air" of classic microphones from the past with our own modern touch that Lauten Audio is known for.
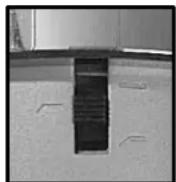
Figure. 3 High-pass filter

Figure. 4 Polar Pattern Switch
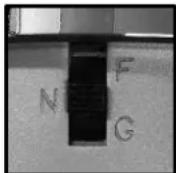
Figure 5. Multi-voicing switch
Power Requirements
The Eden LT-386 microphone requires power from the included LT386PSU power supply. This microphone will not work properly with any other power supply. Please make sure you select the proper power supply voltage (Figure 6) for your country (i.e. 115V for U.S. and Japan, 230V for Europe) located on the back of the LT386PSU power supply. Failure to select the proper voltage is dangerous and will damage the microphone.
Do not connect this microphone to any power source other than the included power supply.
Check for proper voltage selection on rear of power supply.
Voltage Selector
Before using your microphone or power supply, check to ensure the proper voltage is selected on the back of the power supply. If not, using a Philips head screw driver carefully remove the plastic safety cover over the voltage switch and select your correct voltage. Reattach the safety cover when complete.
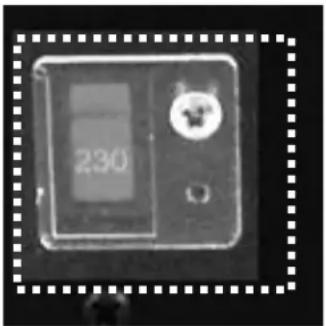
Figure 6. Voltage switch and safety cover
Connections
This microphone requires two connections, one from the microphone to the power supply's 5 pin female XLR connector and one from the power supply 3-pin XLR male to your recording interface, mixer or preamplifier. Always use a high quality 3-pin XLR microphone cable. The custom Lauten Audio cable with 5-pin XLR connectors is included with your microphone.
Connect the female end of the supplied 5-pin XLR cable to the bottom of the microphone and the male end of the 5-pin XLR cable to the female 5-pin XLR connector on the power supply. Connect the female end of a 3-pin XLR cable to the 3-pin male XLR connector on the power supply and the male end to your recording interface, mixer or preamplifier.
![graph TD A["3-pin XLR Cable"] --> B["Female Input"] C["5-pin XLR Cable"] --> D["Male Output"] E["5-pin XLR Cable"] --> F["Male"] G["5-pin XLR Cable"] --> H["Female"] I["5-pin XLR Cable"] --> J["Microphone"] style A fill:#f9f,stroke:#333 style C fill:#f9f,stroke:#333 style E fill:#f9f,stroke:#333 sty…](/content/2026/05/979627/images/64030c86bdcb330216b2929648cf4993185be4a109abb5c87c2d14dabc03bb62.jpg)
TIP: When disconnecting cable from power supply apply light downward pressure on 5-pin connector to help dislodge the lock

Mounting
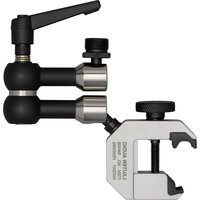
This microphone comes already attached to the suspension mount. It is not intended to be removed from this mount. To mount the microphone to a heavy duty, weighted stand we recommend the following sequence.
- Tighten the stand mount arm using the handle on the suspension mount (Figure 7).
- Loosen the microphone stands arm, and twist the stand arm into the threads of the suspension mounts arm. (Figure 8).
- Adjust and tighten stand arm securely testing to ensure the stand will not tip. Then adjust the suspension mount arms vertical angle as necessary.
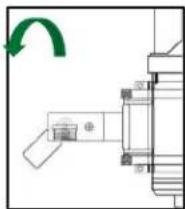
Figure 7
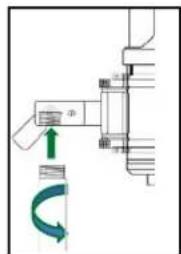
Figure 8
Removing microphone from mount
To remove the microphone from the mount you will need a 2.5mm hex screwdriver. While holding the microphone securely, loosen the two hex bolts on the inner clamping arms of the suspension mount (Figure 9). Remove the microphone by lifting it out of the inner clamping arms. Do not pull if forward·Figure 10).
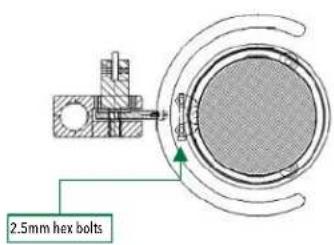
Figure 9

Figure 10
Technical Specifications
| Type: | 31.25mm dual large diaphragm pressure gradient transducer microphone |
| Polar Patterns: Omni | directional, Cardioid and Figure-8 (selectable) |
| Circuit: Vacuum tube | input and transformer balanced output |
| Frequency Range: 20Hz-20KHz | |
| Dynamic Range: 120dB minimum | |
| Impedance: < 200 ohms | |
| Max. SPL: 0.5%THD@1000Hz: 120dB | |
| Self-noise level: < 20dB(A) | |
| Sensitivity: 16mV/Pa | OR -36±2dB 0dB=1V/Pa 1000Hz |
| Special Features: | Kick-shaper & Vocal-shaper, (high-pass filters)3-stage Multi-voicingTM switchPolar pattern switch |
| Connector: | 5-pin XLR (PSU to microphone) and 3-pin XLR (PSU to Preamp) |
| Power Requirement: | Custom power supply (100v to 240v compatible) |
Frequency Response and Polar Pattern Plots
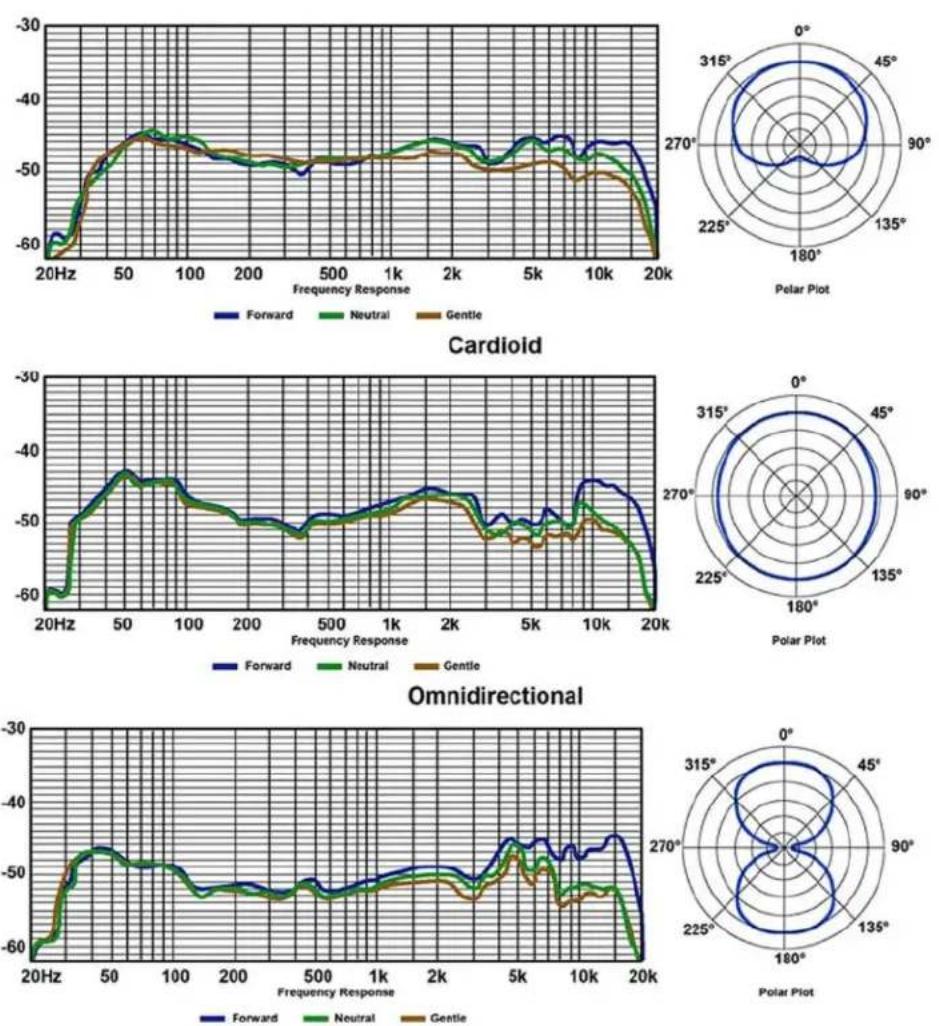
Figure-8
Care and Cleaning
Only authorized Lauten Audio technicians should perform disassembly and maintenance on any part of this microphone. Disassembling and modifying any part of this microphone by anyone other than an authorized technician will void its warranty.
NEVER DISASSEMBLE ANY PART WHEN POWER IS BEING SUPPLIED
This microphone is a precise and delicate instrument. Do not drop or allow the microphone to collide with other objects as this may damage the internal components.
The painted body surfaces of the microphone can be cleaned with a lint free, non-scratch cloth. For difficult stains, mild mineral spirits or alcohol on a lightly dampened, very soft cloth can be used. The nickel head can be polished with a very small amount of nickel polish.
Be VERY careful not to get any moisture or polish inside the microphone grill or microphone.
Warranty
This product has a 3-year limited warranty from the date of sale from an authorized Lauten Audio dealer or distributor.
Items limited to 90-day coverage include shock mount bands, cases, boxes, cables, and vacuum tubes.
A copy of your original sales receipt may be requested to verify the original purchase date. Please keep your receipt. To register your microphone, please visit LautenAudio.com for the most up-to-date registration method.
Warranty applies to products registered with-in 30-days of purchase from an authorized Lauten Audio dealer.
Lauten Audio
1817 HOURET CT.
MILPITAS, CA 95035
Phone: 877-721-7018
Web: www.lautenaudio.com
Email: crm@lautenaudio.com
© 2015 LAUTEN AUDIO™ ALL RIGHTS RESERVED

- IMPORTANT NOTE ABOUT MICROPHONE STANDS
- WARNING
- TABLE OF CONTENTS
- SAFETY & CONTENTS
- FAILURE TO USE THE CORRECT VOLTAGE SETTING ON THE POWER SUPPLY WILL DAMAGE THE MICROPHONE
- QUICK START GUIDE/SEQUENCE OF OPERATION
- PRODUCT AND FEATURE DESCRIPTIONS
- HIGH-PASS SWITCH
- POLAR PATTERN SWITCH
- MULTI-VOICING SWITCH
- POWER REQUIREMENTS
- DO NOT CONNECT THIS MICROPHONE TO ANY POWER SOURCE OTHER THAN THE INCLUDED POWER SUPPLY
- CHECK FOR PROPER VOLTAGE SELECTION ON REAR OF POWER SUPPLY
- VOLTAGE SELECTOR
- CONNECTIONS
- MOUNTING
- REMOVING MICROPHONE FROM MOUNT
- CARE AND CLEANING
- WARRANTY
Brand : Lauten Audio
Model : Eden LT-386
Category : Microphone