
SL3sat-T - Audio tuner VAIS Technology - Free user manual and instructions
Find the device manual for free SL3sat-T VAIS Technology in PDF.


| Product Type | Audio Interface Controller with built-in SiriusXM Satellite Radio interface |
| Compatible Vehicles | Toyota, Lexus, Scion (2001-2013, specific models) |
| Required External Module | SiriusXM SXV300 Tuner (sold separately) |
| Emulation Modes | SAT, CD Changer, MD Changer |
| Audio Input | Dedicated SiriusXM Satellite Radio input |
| Power Supply | 12V DC from vehicle (via factory harness) |
| Noise Isolation | Built-in Electronic Ground Noise Isolator |
| Circuit Protection | Resettable fuses for over-current protection |
| Control Method | Through factory head unit or steering wheel controls |
| Text Display | Supports channel number, song title, artist name (up to 16 characters each) |
| Presets | Up to 6 per SAT band (SAT1/SAT2/SAT3) or 10 in CD/MD mode |
| Sound Level Adjustment | Adjustable input level to match other sources |
| Programming | Switch-based emulation mode selection and firmware updates via dealer |
| Installation | Plug-and-play Y-harness connection to factory radio; requires disconnecting battery |
| Dimensions (approx.) | 3.5 x 2.5 x 1.0 inches (not officially specified) |
| Weight (approx.) | 3.5 oz (not officially specified) |
| Operating Temperature | Vehicle interior environment (not officially specified) |
| Warranty | 1 year limited warranty |
| Country of Origin | Designed in USA |
Frequently Asked Questions - SL3sat-T VAIS Technology
User questions about SL3sat-T VAIS Technology
0 question about this device. Answer the ones you know or ask your own.
Ask a new question about this device
Download the instructions for your Audio tuner in PDF format for free! Find your manual SL3sat-T - VAIS Technology and take your electronic device back in hand. On this page are published all the documents necessary for the use of your device. SL3sat-T by VAIS Technology.
USER MANUAL SL3sat-T VAIS Technology
Audio Interface Controller with built-in SiriusXM Satellite Radio interface
(SXV300 SiriusXM Tuner required)
TOYOTA • LEXUS • SCION

WARNING
DO NOT DISASSEMBLE OR ALTER
Doing so may result in an accident, fire or electric shock
Do not block your view
Do not mount product or any added audio and/or video equipment where it can block your view through the windshield or your view of dashboard indicators and displays.
Do not block the airbag
Do not mount product or any added audio and/or video equipment where it can obstruct the operation of any safety devices such as the airbag.
Distraction warning
Do not let product or any added audio and/or video equipment distract you while you are driving.
BEFORE WIRING, DISCONNECT THE CABLE FROM THE NEGATIVE BATTERY TERMINAL
Before starting any installation work, you must wait 90 seconds after turning the ignition switch to the LOCK position and disconnecting the negative (-) terminal from the battery. The supplemental restraint system (airbag) is equipped with a backup power source. If installation work is started less 90 seconds after disconnection of the negative (-) battery terminal, the SRS may deploy. When the negative (-) terminal cable is disconnected from the battery the clock and audio systems memory will be erased. Before starting installation work make a record of the clock and audio systems memory settings. When installation is complete, reset the clock and audio systems to their previous settings. Power tilt, power telescopic steering column, front power seats, power mirrors, and power shoulder belt anchorage are equipped with a memory function. The rear power seat is not equipped with a memory function. e and they can make a record of the memory contents, rear power seat is not equipped with the memory function. When installation is complete, it is necessary to readjust the features to their previous settings. Never use a backup power supply (such as another battery) during installation work to avoid losing these memory settings.

CAUTION
DO NOT SPLICE INTO ELECTRICAL CABLES
Never cut away cable insulation to supply power to other equipment. Doing so will exceed the current carrying capacity of the wire and result in fire or electric shock.
DO NOT ALLOW CABLES TO BECOME ENTANGLED IN SURROUNDING OBJECTS
Cables or wiring that obstruct or get caught on places such as the steering wheel, shift lever, brake pedals, etc. can be extremely hazardous.
DO NOT INSTALL IN LOCATIONS WITH HIGH MOISTURE OR DUST
Moisture or dust may result in product failure.
HAVE THE WIRING AND INSTALLATION DONE BY EXPERTS
The wiring and installation of this product requires special technical skills and experience.
USE ONLY SPECIFIED ACCESSORY PARTS
Use of other than specified parts may damage product internally.
FOLLOW THE OPERATIONAL AND INSTALLATION MANUALS.
YOU SHOULD READ AND FAMILIARIZE YOURSELF THOROUGHLY WITH THE FOLLOWING INFORMATION PRIOR TO INSTALLING AND USING THIS UNIT. IN ADDITION, YOU MUST CAREFULLY READ AND FOLLOW THE INSTALLATION SCHEMATICS/INSTRUCTIONS FOR THE PRODUCT AND THE VEHICLE IN WHICH IT IS BEING INSTALLED. FAILURE TO FOLLOW INSTALLATION INSTRUCTIONS MAY DAMAGE THE PRODUCT AND THE VEHICLE, WILL VOID THE PRODUCT WARRANTY, AND MAY VOID THE VEHICLE WARRANTY
CHECK YOUR LOCAL LAWS
Some States/Provinces or other governmental jurisdictions (such as cities) may have laws that prohibit the operation of a video screen within the sight of the Driver. If you have purchased such a product, you should use the product only in locations where it is legal to do so, and if you do use the product, set up the screen so it is only visible to passengers.
TROUBLESHOOTING
Should this product fail to operate properly, please contact your Dealer or our Customer Service Department at support@vaistech.com.
i IMPORTANT
This unit is an either face used to see for Toyota/Lexus head unit to control XM (SOLD SEPARATELY).
This unit is equipped with:
● Built-in Electronic Ground Noise Isolator to eliminate unwanted car engine noise.
- Resettable Fuses (provides protection for electronic circuits from over-current conditions)
About SiriusXM Satellite Radio Operation
● The unit may refuse to change the channel if your reception is going ON and OFF.
Please wait until your reception stabilizes in order for the unit to allow you to change the channel easily.
● Due to bad reception in some areas, SiriusXM Satellite Radio may not work and/or not able to display text.
- TEXT INFORMATION ONLY AVAILABLE FOR RADIOS WHICH SUPPORT SAT mode, CD or MD CHANGER WITH A CD-TEXT or MD-TEXT CAPABILITY. Please see attached chart to determine emulation that is compatible with your vehicle.
Connecting the units


natural_image
Simple line drawing of a cable and a rectangular object (no text or symbols)Vehicle Antenna

natural_image
Line drawing of a SiriusXM Tuner device with cable and connector (no text or symbols on the device itself)SiriusXM Tuner SXV300
Vehicle Antenna and SiriusXM Tuner SXV300 are included in SL3sat-TKIT only
SoundLinQ3
Model: SL3sat

Connecting SoundLinQ3 to head unit using 20-pin Y-harness

Connecting SoundLinQ3 to head unit using 12-pin Y-harness
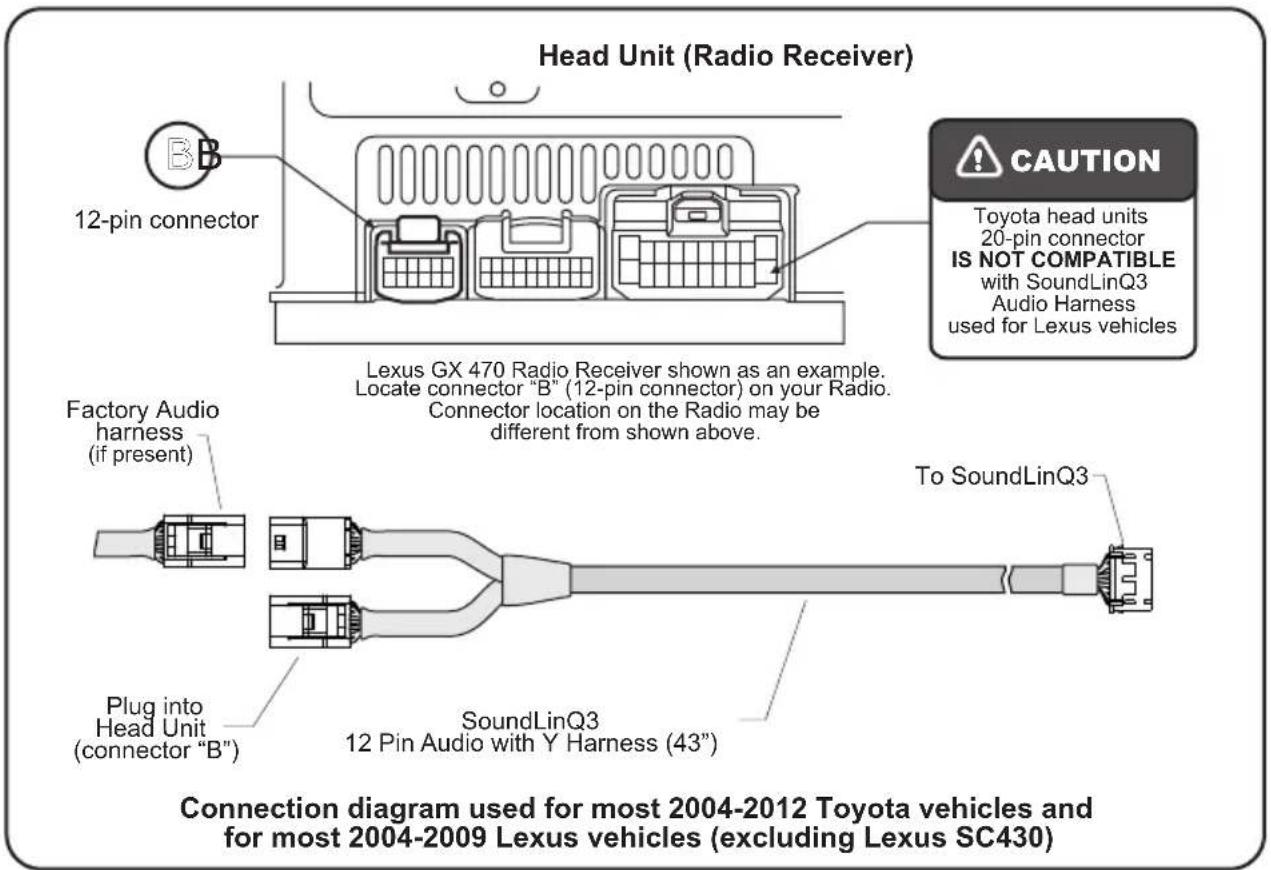

ATTENTION
Look into Application Guide Chart (enclosed) to determine which emulation to program your unit into.
Match year, make, and model of your car and cross reference it with MD, CD, or SAT emulation in EMULATION column.

IMPORTANT
We strongly recommend that you install the unit in an easily accessible location, so you can later upgrade the unit or re-program it in case of incorrect programming.
Installation
... Gain access to the back of your vehicle's Head Unit.
Find the same port as our Y-Harness (see "Connecting SoundLinQ3 to head unit")
... Disconnect the existing connector and plug in our Y-Harness connector into this port, then plug female end of Audio Harness to plug into your factory connector. Audio harness female connector is not used in some vehicles, in this case isolate unused plug to prevent accidental shortage to vehicle body.
... Plug the other end of Audio cable into designated port on this unit.
... Connect SiriusXM Satellite Radio Tuner interface cable as shown in the picture. (see "Connecting the units")
--- Setup proper Emulation Mode for the unit (see "Emulation Mode Selection")
... Turn the car on and check SoundLinQ3 functionality (especially Text capability) before the final assembly.
... Please mount this unit in an easily accessible location for upgrading and re-programming purposes.
... Secure the Head Unit in its original position.
Emulation Mode Selection (SAT emulation)
SAT Emulation Mode programming steps:
... Properly install this unit.
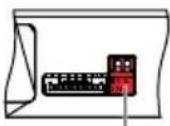
... Put "Left" programming switch in "DOWN" position.
... Put ignition switch into the "ACC" position.
Wait for long beep followed by a few short beeps. This may take up to one minute.
... Return programming switches into their default position (both switches "UP"). Wait up to 30 seconds until confirmation beep.
Put ignition switch into the "OFF" position. Wait at least 10 seconds.
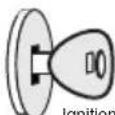
Put ignition switch into "ACC" or "ON" position.
... Check SoundLinQ3 for functionality, especially TEXT capabilities.

Left switch "DOWN"

"ACC" or "ON" position

Confirmation beep (Red LED blinks)

Both switches "UP"

up to 30 sec

Confirmation beep (Red LED blinks)
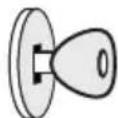
Ignition into "OFF" position

up to 10 sec
Emulation Mode Selection (CD and MD changer emulation)
MD Changer Emulation Mode programming steps:
... Properly install the unit.
... Put both programming switches in the "DOWN" position.
... Put ignition switch into the "ACC" position.
Wait for a long beep followed by a few short beeps. This may take up to one minute.
--- Return programming switches into their default position (both switches "UP"). Wait up to 30 seconds until confirmation beep.
... Put ignition switch into the "OFF" position. Wait at least 10 seconds.
... Put ignition switch into the "ACC" or "ON" position.
... Check SoundLinQ3 for functionality, especially TEXT capabilities.

Both switches "DOWN"

"ACC" or "ON" position

Confirmation beep (Red LED blinks)
Both switches "UP"

up to 30 sec

Confirmation beep (Red LED blinks)

Ignition into "OFF" position

up to 10 sec
CD Changer Emulation Mode programming steps:
... Properly install the unit.
... Put "Right" programming switch in the "DOWN" position.
... Put ignition switch into the "ACC" position.
Wait for a long beep followed by a few short beeps. This may take up to one minute.
--- Return programming switches into their default position (both switches "UP"). Wait up to 30 seconds until confirmation beep.
... Put ignition switch into the "OFF" position. Wait at least 10 seconds.
Put ignition switch into the "ACC" or "ON" position.
... Check SoundLinQ3 for functionality, especially TEXT capabilities.

Right switch "DOWN"

Ignition into "ACC" or "ON" position

Confirmation beep (Red LED blinks)

Both switches "UP"

up to 30 sec

Confirmation beep (Red LED blinks)
"OFF" position

up to 10 sec
i IMPORTANT
- Improper Emulation Mode setting may cause unit to be unrecognized by head unit.
- By activating "CD or MD Changer Emulation Mode" you force the unit to find proper location in the vehicle Audio/Video network.
Mounting unit using Velcro fasteners

NOTE
- Velcro Fasteners are not included
● VAIS Technology strongly recommend to ground unit to the car chassis for best results
SAT EMULATION
PAGES 9-12
CD CHANGER OR
MD CHANGER EMULATION
PAGES 13-17
SAT Emulation
Audio input dedicated for SiriusXM Satellite Radio can only be used for SiriusXM Radio control of SiriusXM Satellite Radio is Through your head unit or the steering wheel controls (explained below). supports the SiriusXMuner Model # SXV300.
Please see attached chart to determine which emulation mode is compatible with your vehicle.
By connecting this unit to the factory system you add a device (Satellite Radio interface). SAT1, SAT2, and SAT3 can be used for 6 presets each.
SAT Emulation
For Radio Integrated into Navigation System


Satellite Radio CH023 (SAT emulation) Satellite Radio CH001 (SAT emulation Text display)
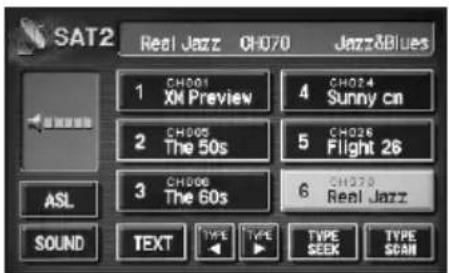
Satellite Radio SAT2 CH070 (SAT emulation)

Satellite Radio SAT3 CH004 (SAT emulation)


Satellite Radio SAT1 (Set 4/6) CH032 (SAT emulation) Satellite Radio SAT1 Ch033 Category Selection (SAT emulation)
Source Selection (SAT Emulation)
Select desired source by pressing the AM button on the head unit or MODE on the steering wheel control.
(See diagram below)
Head Unit:
To switch between unit sources, press the AM button on the head unit. The AM button will cycle through the following modes: AM radio, SAT1, SAT2, and SAT3. SAT1, SAT2 and SAT3 are presets for the satellite receiver.

Steering Wheel control:
To switch between unit sources, press the MODE button on the steering wheel control. The diagram below shows the order in which sources are selected.
(Diagram below assumes following sources are present).

flowchart
graph LR
    AM --> SAT1
    SAT1 --> SAT2
    SAT2 --> SAT3
    SAT3 --> FM1
    FM1 --> FM2
    FM2 --> TAPE
    TAPE --> TAPE
    TAPE -->|SAT Radio| AM
MANUAL TUNING
Use the TUNE knob on the head unit to select channels. You can rapidly scan channels by turning the knob faster in the direction you wish to scan.
CHANNEL SEEK
TRACK+ and TRACK-
Use the SEEK-TRACK button on the stereo head unit to select the next available channel. The unit will automatically skip channels that are not available.
CHANGING CATEGORIES
TYPE and TYPE
To change the category of channels you would like to listen to, press either the TYPE < or TYPE > button.
DISPLAYING SONG TITLE AND ARTIST NAME
To display the song title and artist name that is currently playing, press the TEXT button. If the information is available from the current satellite channel, it will be displayed. Song title and artist name can display a maximum of 16 alphanumeric characters each.
SELECTING PRESETS
To select a preset, press the desired preset button.
TYPE SCAN
Scan channels throughout the selected category.
Displayed Messages/Errors
-ANTENNA-
Antenna not connected or inoperable
-NO SIGNAL-
No signal or acquiring satellite signal
-TUNER ERR-
Satellite receiver is not connected or does not respond
Presets

Adding a new PRESET
... Select the desired channel
... Press and hold the preset button where you would like to store the current channel.
You will hear a beep when the channel has been stored in the preset location.
NOTE: Beep indicates successfully accomplished operation. If you do not hear a beep, please repeat the above steps.
Changing an existing PRESET
... Presets can be overwritten at any time using the same procedure as adding a new Preset.
Erasing PRESETS
... Presets can not be erased, but they can be overwritten at any time by following the procedure for Adding a new Preset.
Tuner Radio ID
Select Channel 255
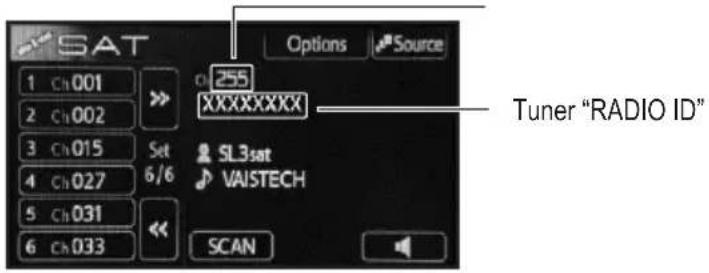
Satellite Radio Input Settings
You can adjust the input sound level of your satellite receiver. The sound level adjustment allows you to balance the volume control with other sources connected to your head unit (such as CD player, FM radio, etc), and eliminate possible distortions caused by high input levels.
Activate / Deactivate SETTINGS MODE
Go to SAT 3
... Tune to channel 255
... Press [Type Scan] 8 times to hear long beep (MUST be done within 1-2 seconds).
... Using AM or AM/SAT button reselect sources to cycles to SAT 3
Satellite Sound Level Adjustment
... Activate SETTINGS MODE
... To adjust the sound level, first you must select a source that is not connected to the SoundLinQ3 unit, such as CD player or FM radio. Set the volume to a comfortable level while listening to this source.
... Change the source to SAT1 or SAT2 and select a satellite channel to listen to.
... Change the source to SAT3.
... Press and hold the button labeled SAT Lev Adj or number 5 on the Radio with its own LCD. You will hear a short beep, and should then hear sound coming from the satellite receiver source.
... Now you will adjust the sound level to match the volume of the source you selected in step 1. To adjust the sound level, press either the TYPE < or TYPE > button.
... Once the sound level matches the volume of your source from step 1, press the SAT Lev Adj (or number 5 on the Radio with its own LCD) again to store the desired sound level in memory.
... Deactivate SETTINGS MODE
Preset #5


Satellite Radio Satellite Sound Level Adjustment Satellite Radio Input Setting
CD/MD Changer Emulation
Audio input dedicated for SiriusXM Satellite Radio cSatelliteReadied for integration. Control of SiriusXM Satellite Radio is Through your head unit or the steering wheel controls (explained below). supports the SiriusXTuner Model # SXV300.
This unit can be programmed in CD changer emulation mode, MD changer emulation mode or SAT Emulation. Please see attached chart to determine which emulation mode is compatible with your vehicle. By connecting this unit to the factory system you add a device (Satellite Radio interface). The Radio display will show device as a "CD/CD1/CD2" or "MD1".
CD changer emulation

MD changer emulation


For Radio Integrated into Navigation System

Satellite Radio CH081 (MD changer emulation)

Satellite SiriusXM Radio CH023 (MD changer emulation)
Head Unit Controls
Source Selection (CD/MD Emulation)
Select desired source by pressing DISC button on the head unit or MODE on the steering wheel control. (See diagram below)
Head Unit:
To switch between the unit sources you need to use the "DISC" or "CD" button on the radio (Diagram below assumes factory CD changer is present).

flowchart
graph LR
    A["CD"] --> B["CD1"]
    B --> C["CD"]
    D["SAT Radio"] --> A
    E["OR"] --> F["CD"]
    F --> G["MD1"]
    G --> H["CD"]
    H --> I["SAT Radio"]
Steering Wheel control:
To switch between the unit sources you need to use the "MODE" button on the steering wheel control. (Diagram below assumes following sources are present).

flowchart
graph LR
    AM --> FM1 --> FM2 --> TAPE --> CD --> CD1
    FM1 --> FM2 --> TAPE --> CD
    TAPE --> CD1
    CD1 --> SAT Radio
You must set the correct Display Mode, in order to display channel number and TEXT information correctly. ( See "Satellite Radio Input Settings" for details).
TRACK+ and TRACK-
Select Next/Previous channel (if the selected channel is not available, the unit will jump to the next available channel).

and

(SCROLL)
Speed channel selection +10, -10 (if the selected channel is not available, the unit will jump to the next available channel). If "DISC SCAN" mode is activated [SCROLL] buttons work as [DISC+] and [DISC-]*.
NOTE: Available only if PRESET CHANNELS are setup. This feature was created for vehicles which do not have [DISC+], [DISC-] buttons.
DISC+DISC
Used for PRESET CHANNEL selection.
NOTE: Assumed at least one PRESET CHANNEL exists (see "Presets").
NOTE: If PRESET CHANNEL list has not been previously set [DISC+] and [DISC-] work as [SCROLL] buttons.
SCAN
Used for setup purposes. (Please refer to "Display settings and Special Features").
DISC SCAN
Please see SCROLL buttons functionality.
NOTE: Buttons [DISC RPT], [RANDOM], [DISC RANDOM] are NOT Supported.

IMPORTANT
DISC RPT
To select whether Song Name or Artist Name displays first. We recommend using this feature especially for cars where Radio is not integrated into Navigation Screen.
Displayed Errors (available only with CD-Text or MD-Text capability)
-ANTENNA-
Antenna not connected or inoperable
-NO SIGNAL-
No signal or acquiring satellite signal
-TUNER ERR-
Satellite receiver is not connected or does not respond
Direct Entry Mode
SoundLinQ3 supports "Direct Entry Mode" only for vehicles with Radio integrated into Navigation System.

Simply touch numeric buttons to enter channel number in "Direct entry mode"
NOTE: Direct input isn't available for Radio with its own LCD Display
If you select a channel higher than 299 this unit will direct you to the channel according to the following example.
Example: If you select channel 567, the system will select channel 67. If channel 67 is not available the unit will switch to channel 1.
Presets
Adding a new PRESET
... Select the desired channel
... Press the [RPT] or [REPEAT] button 4 times (MUST BE DONE within 1-2 seconds). You will hear a beep.
SoundLinQ3 will store the current channel in the preset list. You can store up to 10 preset channels, and channels get recorded in sequential order.
NOTE: Beep indicates successfully accomplished operation. If you do not hear a beep, please repeat the above steps.
Changing an existing PRESET
... Selectrepresenting [DIBOKE, [DISC]douttons)
-- Select new desired channel (using the [TRACK+], [TRACK-] buttons, or use "Direct entry" on the Navigation screen (if supported). Make sure you do not select channels which already exist in "Presets list", because unit will move to another preset.
... Press the [RPT] or [REPEAT] button 4 times (MUST BE DONE within 1-2 seconds). You will hear a beep.
SoundLinQ3 will update the preset list.
NOTE: Beep indicates successfully accomplished operation. If you do not hear a beep, please repeat the above steps.
Erasing PRESETS
... Enter into "Satellite Radio Input Settings" Modé See "Satellite Radio Input Settings" for details)
... Press the [DISC RAND] or [DISC RANDOM] button one time to activate the "DISC RANDOM" function.
... Press the [DISC RAND] or [DISC RANDOM] button again to deactivate it.
SoundLinQ3 will produce a long beep as an confirmation of successful erasure.
Exit "Satellite Radio Input Settings" Mode ( See "Satellite Radio Input Settings" for details)
Satellite Radio Input Settings
Enter/Exit "Satellite Radio Input Settings" Mode
... Press the [SCAN] button 8 times (MUST BE DONE within 1-2 seconds) to enter "Satellite Radio Input Settings" Mode. You will hear a short beep as a confirmation.
SoundLinQ3 will use the "REPEAT" indicator (continuous blinks 2 times per second) on your head unit to confirm "Satellite Radio Input Settings" Mode is active.
... Press the [SCAN] button 8 times (MUST BE DONE within 1-2 seconds) to exit "Satellite Radio Input Settings" Mode. You will hear a short beep as a confirmation.
NOTE: In this mode you can setup Display Settings, Erase PRESETS list, and Adjust Sound Level for Satellite Radio Input.
Tuner Radio ID
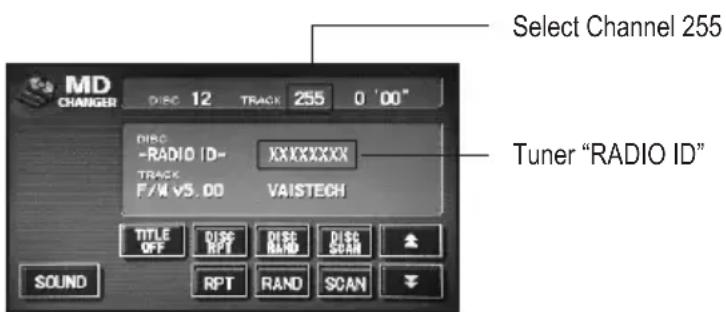
Display Settings
About Display Settings
SoundLinQ3 supports 8 types of Display Modes. Display Mode can ONLY be set up for the Satellite Radio source.
It is critical to setup, the correct Display Mode for the following reasons:
● For Channel information to be displayed correctly.
● For Text information to be displayed.
Display mode 1 - Minutes and Seconds used to display the selected channel number.
Minutes display hundreds, seconds display 00-99. DISC number and TRACK number are "invisible"
NOTE: This mode is preferred with CD changer emulation for Radio receivers with their own LCD.
Display mode 2 - Same as Display mode 1, except that DISC and TRACK number always display "1".
NOTE: Some Radio receivers refuse to display minutes and seconds if DISC or TRACK number are "invisible". Please use this mode if your Radio receiver displays only "CD1" on the LCD.
Display mode 3 - In this mode TRACK number is used to display hundreds, Minutes are used to display tens, Seconds are used to display single digits. DISC number is "invisible".
NOTE: This mode is most common for the radio integrated into the Navigation System.
Display mode 4 - In this mode TRACK number used to display hundreds, Minutes are used to display tens, Seconds are used to display single digits. DISC number is always "1".
Display mode 5 - Alternate variation of Display mode 1.
Display mode 6 - In this mode TRACK number is either 10, 11 or 12 where "0" from 10, "1" from 11 and "2" from 12 are used to display hundreds, Minutes are used to display tens, Seconds are used to display single digits. DISC number is always "12".
NOTE: This mode is most common for the radio integrated into the Navigation System which does not display Song Title in MD changer emulation mode (Alternative for Display Mode 3, allows Song Title to be displayed for channels less than 100).
Display mode 7 - In this mode TRACK number is either 10, 1 or 2 where "0" from 10, "1" and "2" are used to display hundreds, Minutes are used to display tens and single digits. DISC number is always "12".
Display mode 8 - In this mode TRACK number is either 10, 11 or 12 where "0" from 10, "1" from 11 and "2" from 12 are used to display hundreds, Minutes are used to display tens, Seconds are used to display single digits. DISC number is always "12".
NOTE: Alternative to Display Mode 7.
NOTE: Use Display mode 8 in MD changer emulation mode. In this mode TRACK number is used to display the channel number.
Changing Display Mode
... Enter into "Satellite Radio Input Settings" Mode ( See "Satellite Radio Input Settings" for details).
... Press [SCROLL UP] to switch between Display Modes.
--- Check channel 23, 81, 92, and 123, to confirm correct Display Mode selection.
--- Make sure both Disc Title and Track Title information is displayed correctly.
... Exit "Satellite Radio Input Settings" Mode ( See "Satellite Radio Input Settings" for details).
Display Settings
Displaying Channel Information
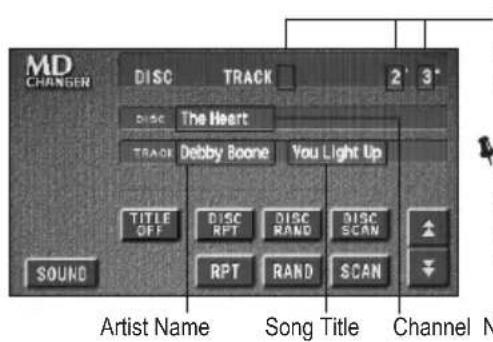
Track number, Minutes, and Seconds are used to display the selected satellite channel number.
NOTE: For cars with the Radio integrated into the Navigation System, "DISC" number MUST BE "invisible" or "12" in order to have all ten numbers available for "Direct entry".
NOTE: On some Radios both DISC number and TRACK number must be different from "0" or "invisible in order for TEXT to be displayed properly.

Minutes and Seconds are used to display selected satellite channel number.
NOTE: Present if MD-TEXT is supported by the Radio Receiver (may differ on Head units model and year)
NOTE: Please check channel 081, 092 and 123 to make sure those channel numbers are displayed properly.
Satellite Sound Level Adjustment
... Enter into "Satellite Radio Input Settings" Mode ( See "Satellite Radio Input Settings" for details).
... Select the desired satellite channel.
... Activate the "SCAN" function on your head unit.
... Set the desired volume at your head unit.
... While "SCAN" is active use [SCROLL UP] to increase volume and [SCROLL DOWN] to decrease volume.
Sound level [01..31] will be displayed as Seconds on you head unit.
... Deactivate "SCAN" function.
... Exit "Satellite Radio Input Settings" Mode ( See "Satellite Radio Input Settings" for details).
NOTE: Remember, a high sound level may result in noticeable sound distortion.
LICENSING AGREEMENT, DISCLAIMERS AND LIMITED WARRANTY VAIS TECHNOLOGY, LLC
LICENSE AGREEMENT
VAIS TECHNOLOGY- SoundLinQ3 (SL3i), (SL3x), (SL3s), (SL3sat)
for U.S.A. (hereinafter referred to as 'PRODUCT') and its related software
For Most Toyota/Lexus Vehicles 2001-2013; (hereinafter collectively referred to as 'PRODUCTS'). THIS IS A LEGAL AGREEMENT BETWEEN YOU, AS THE END USER, AND VAIS TECHNOLOGY, LLC ("VAIS"). PLEASE CAREFULLY READ THE TERMS AND CONDITIONS OF THIS AGREEMENT BEFORE USING THE VAIS PRODUCTS. BY USING THE VAIS PRODUCTS AND SOFTWARE INSTALLED ON THE VAIS PRODUCTS, YOU ARE AGREEING TO BE BOUND BY THE TERMS OF THIS AGREEMENT. THE AUDIO INTERFACE CONTROLLER AND THE AUDIO VIDEO INTERFACE CONTROLLER ARE ESSENTIALLY THE BRIDGE BETWEEN A VEHICLE, ITS EQUIPMENT, AND ANY 'AFTER-MARKET' EQUIPMENT SUBSEQUENTLY ADDED TO THE VEHICLE BY THE END-USER. THE EQUIPMENT SOLD TO YOU, THE END USER, IF PROPERLY INSTALLE D. IS A RESETTABLE TECHNOLOGY, WHICH WILL, UNDER NORMAL CIRCUMSTANCES, AUTOMATICALLY DISCONNECT IN THE EVENT OF ANY MALFUNCTION. SINCE VAIS DOES NOT INSTALL THIS EQUIPMENT, VAIS DISCLAIMS ANY LIABILITY FOR IMPROPER INSTALLATION OF THE VAIS TECHNOLOGY OR THE 'AFTER-MARKET' EQUIPMENT (INPUTS). FURTHER, THE 'END USER' ACKNOWLEDGES THAT THE PRODUCT AND ITS SOFTWARE ARE NOT INHERENTLY DANGEROUS AND DO NO T PROVIDE ANY INHERENT RISKS AND THEREFORE POTENTIAL DAMAGES TO THE END-USER, OTHER THAN 'Fitness for its Purpose'. Some radio receiver models may cause you to experience some technical difficulties, if the product does not operate properly please contact technical department promptly at support@vaistech.com.
1. GRANT OF LICENSE
VAIS grants to you a non-transferable, non-exclusive license to use the PRODUCT and its software installed on the VAIS product (the "PRODUCTS") and the related documentation solely for your own personal use or for internal use by your business, only on such VAIS PRODUCTS. You shall not copy, reverse engineer, translate, port, modify or make derivative works of the Software contained in the PRODUCT. You shall not loan, rent, disclose, publish, sell, assign, lease, sublicense, market or otherwise transfer the Software in the PRODUCT or use it in any manner not expressly authorized by this agreement. You shall not derive or attempt to derive the source code or structure of all or any portion of the Software in the PRODUCT by reverse engineering, disassembly, recompilation, or any other means. You shall not use the Software in the PRODUCT to operate a service bureau or for any other use involving the processing of data for other persons or entities. VAIS and its licensor(s) shall retain all copyright, trade secret, patent and other proprietary ownership rights to the Software in the PRODUCT. The PRODUCTS are Copyrighted/ Patented and/or at various stages of Pending and may not be copied, even if modified or merged with other products. You shall not alter or remove any copyright notice or proprietary legend contained in or on the PRODUCTS. You may transfer all of your license rights in the Software or the PRODUCT, the related documentation and a copy of this License Agreement And Warranty to another party, provided that the party reads and agrees to accept the terms and conditions of this License Agreement And Warranty.
2. OPERATIONAL WARNING AND SAFETY INSTRUCTIONS.
IMPORTANT NOTICE: YOU SHOULD READ AND FAMILIARIZE YOURSELF THOROUGHLY WITH THE FOLLOWING INFORMATION PRIOR TO INSTALLING AND USING THE -SoundLinQ3 (SL3i), (SL3x), (SL3s), (SL3sat) and its related software (THE "PRODUCTS").
IN ADDITION, YOU MUST CAREFULLY READ AND FOLLOW THE INSTALLATION SCHEMATICS/INSTRUCTIONS FOR THE PRODUCT AND THE VEHICLE IN WHICH IT IS BEING INSTALLED. FAILURE TO FOLLOW INSTALLATION INSTRUCTIONS MAY DAMAGE THE PRODUCT AND THE VEHICLE AND WILL VOID THE PRODUCT WARRANTY AND MAY VOID THE VEHICLE WARRANTY. (A copy of the installation schematics is included with the Product and can also be found on the VAIS TECHNOLOGY website at www.vaistech.com.)
FAILURE TO ABIDE BY THESE OPERATIONAL WARNINGS AND SAFETY INSTRUCTIONS COULD RESULT IN SERIOUS BODILY INJURY OR DEATH. IN ADDITION, FAILURE TO FOLLOW THESE INSTRUCTIONS MAY VOID THE PRODUCT WARRANTY AND COULD BECOME A BASIS FOR LIABILITY ON THE PART OF THE VEHICLE OPERATOR IN THE EVENT OF AN ACCIDENT WHICH RESULTS IN INJURY TO PERSONS OR PROPERTY. UNDER NO CIRCUMSTANCES WILL VAIS OR ITS IMMEDIATE AGENTS OR PRINCIPALS, BE LIABLE, FOR DAMAGES INCURRED TO THE PRODUCTS, THE VEHICLE OR ITS PASSENGERS, OR OTHER THIRD-PARTIES AS A RESULT OF FAILURE TO FOLLOW VAIS'S INSTALLATION INSTRUCTIONS.
A COPY OF THE 'OPERATIONAL WARNINGS AND SAFETY INSTRUCTIONS' IS TO BE KEPT WITH THE VEHICLE AT ALL TIMES.
3.DISCLAIMER AND LIMITATION OF WARRANTIES.
(A) EXCEPT AS OTHERWISE CONTAINED HEREIN, the PRODUCTS and related documentation are provided to you, "AS IS". IN NO EVENT SHALL VAIS BE LIABLE FOR ANY DAMAGES, CLAIM OR LOSS INCURRED BY YOU (INCLUDING WITHOUT LIMITATION, COMPENSATORY, INCIDENTAL, INDIRECT, SPECIAL, CONSEQUENTIAL, OR EXEMPLARY DAMAGES, LOST PROFITS, LOST SALES OR BUSINESS, EXPENDITURES, INVESTMENTS, OR COMMITMENTS IN CONNECTION WITH ANY BUSINESS, LOSS OF ANY GOODWILL, OR DAMAGES. THE TERM 'INCIDENTAL DAMAGES' REFERS TO THE EXPENSES OF TRANSPORTING THE PRODUCTS TO THE VAIS SERVICE CENTER, LOSS OF THE END-USERS [ORIGINAL PURCHASER'S] TIME, LOSS OF THE USE OF THE PRODUCT, BUS FARES, CAR RENTALS OR OTHER COSTS RELATED TO THE CARE AND CUSTODY OF THE PRODUCT. THE TERM 'CONSEQUENTIAL DAMAGES' REFERS TO THE COST OF REPAIRING OR REPLACING OTHER PROPERTY, WHICH IS DAMAGED WHEN THIS PRODUCT DOES NOT WORK PROPERLY.) RESULTING FROM THE USE OR INABILITY TO USE THE PRODUCTS, INCLUDING ANY DAMAGES INCURRED DUE TO THE NEGLIGENT OPERATION OF A MOTOR VEHICLE, IN CONJUNCTION WITH THE USE OF SAID PRODUCTS. THE END-USER ACKNOWLEDGES ITS RESPONSIBILITY FOR THE USE OF THE PRODUCT. THE ADDITION OF VAIS PRODUCTS AND ANY AFTER-MARKET EQUIPMENT MAY ENHANCE THE VALUE OF A VEHICLE OR CAUSE A THIRD-PARTY TO ILLEGALLY ATTEMPT TO REMOVE THE PRODUCTS AND AFTER-MARKET EQUIPMENT. VAIS DISCLAIMS ANY LIABILITY RELATE D TO SUCH THEFT AND POTENTIAL DAMAGE TO PROPERTY.IT IS THE END-USERS RESPONSIBILITY TO PROTECT ITS OWN PROPERTY.
THE END-USER FURTHER ACKNOWLEDGES THAT THE OPERATION OF A MOTOR VEHICLE IS AN INHERENTLY DANGEROUS ACTIVITY, AND BY ITS USE OF VAIS'S PRODUCTS, ACKNOWLEDG ES THAT THE PRODUCTS ARE REMOTELY RELATED TO SAID MOTOR VEHICLE OPERATION, AND THUS ANY DAMAGES CAUSED TO THE DRIVER OF THE VEHICLE, THE VEHICLE ITSELF OR ANY THIRD-PARTY AND ITS PROPERTY IS NO T THE RESPONSIBILITY OF VAIS, ITS AGENTS OR ITS PRINCIPALS AND IS THE SOLE RESPONSIBILITY OF THE DRIVER OF SAID VEHICLE.
YOU, THE END-USER, OR ANY OTHER DRIVER OF THE VEHICLE, IS SOLELY RESPONSIBLE FOR THE SAFE OPERATION OF THE VEHICLE AND THE SAFETY OF BOTH YOU AND THE PASSENGERS. FOR SAFETY PURPOSES, THE PRODUCT SHOULD NOT BE USED FOR THE DRIVER'S ENTERTAINMENT, WHILE THE VEHICLE IS BEING DRIVEN. SUCH USE COULD BE A DISTRACTION TO THE DRIVER, WHICH COULD CAUSE AN ACCIDENT LEADING TO SERIOUS INJURY OR DEATH. IF YOU, THE END-USER ALLOW ANOTHER PERSON TO USE THE VEHICLE, IT IS YOUR RESPONSIBILITY TO THOROUGHLY BRIEF THAT OTHER USER, ON THE SAFETY REQUIREMENTS FOR OPERATING THE VEHICLE AND THE PRODUCTS INSTALLED THEREIN.
(B) SAID DISCLAIMERS SHALL APPLY TO THE USE OF SAID PRODUCTS, EVEN IF VAIS HAS BEEN INFORMED OF, KNEW OF, OR SHOULD HAVE KNOWN OF THE LIKELIHOOD OF SUCH DAMAGES. THIS LIMITATION APPLIES TO ALL CAUSES OF ACTION IN THE AGGREGATE, INCLUDING WITHOUT LIMITATION: BREACH OF CONTRACT, BREACH OF WARRANTY, NEGLIGENCE, STRICT LIABILITY, MISREPRESENTATION AND OTHER TORTS. IF VAIS'S WARRANTY DISCLAIMER OR LIMITATION OF LIABILITY SET FORTH IN THIS AGREEMENT SHALL, OR FOR ANY REASON WHATSOEVER, BE HELD UNENFORCEABLE OR INAPPLICABLE, YOU AND ANY OTHER END USER AGREE THAT VAI S'S LIABILITY SHALL NOT EXCEED (50%) OF THE PRICE PAID FOR THE ENCLOSED VAIS PRODUCT.
Some states do not allow the exclusion or limitation of incidental or consequential damages, so the above limitation or exclusion may not apply to you. This Warranty Disclaimer and Limitation of Liability shall not be applicable to the extent that any federal, state or local law, which cannot be preempted, prohibits any provision of this Warranty.
(C) Some States/Provinces or other governmental jurisdictions (such as cities) may have laws that prohibit the operation of a video screen within the sight of the Driver. If you have purchased such a product, you should use the product only in locations where it is legal to do so, and if you do use the product, set up the screen only where it may be visible to passengers only. Although VAIS strongly recommends that Products not be used while the vehicle is in motion, it is your responsibility to determine whether the product can be used in any given location. Any use of the PRODUCTS where it is illegal to do so, may be used against you as evidence of negligence in the event of an auto accident or other traffic infraction.
4. THIRTY (30)- DAY MONEY BACK WARRANTY ONLY IF PURCHASED DIRECT FROM VAIS.
Any Product purchased directly from VAIS, referencing a Return Authorization Number (RAN) during the Thirty-(30) day period following shipment by VAIS, may be returned for a full refund of the purchase price actually paid, only if you have received damaged, defective or incorrectly shipped merchandise. The RAN number may be obtained from VAIS's Customer Support at (720) 733-2348, and is valid for only thirty- (30) days from its issuance. Said RAN must be noted on the outside of the returned PRODUCTS' packaging. The PRODUCTS must be returned in its original packaging, intact, without any evidence of tampering with the PRODUCTS or physical damage caused by the Customer (End-User).
WE WOULD STRONGLY RECOMMEND THAT THE ITEM BE SHIPPED INSURED, SINCE THE RISK OF LOSS DURING SHIPPING IS WITH THE END-USER. Re-stocking Fees may apply. Damage Fees if deemed caused by the End-User may apply. SHIPPING AND HANDLING OF THE END-USER IS NOT REFUNDABLE AND MUST BE PREPAID, FOR THIS WARRANTY TO BE APPLICABLE. END-USER SHALL ASSUME ALL RISK OF LOSS FOR THE SHIPPING OF THE PRODUCTS TO VAIS. PLEASE ALLOW UP TO EIGHT (8) WEEKS FOR VAIS TO CREDIT YOUR ACCOUNT.
5. LIMITED WARRANTY.
VAIS warrants that the PRODUCTS will be free from defects in materials and workmanship for a period of ONE (1) YEAR from the date of purchase. VAIS'S sole obligation under this warranty is to repair or replace at VAIS'S option, any PRODUCTS that VAIS shall have determined to be defective. Any replacement of parts, shall at the option of VAIS and at no additional charge to the end-user, be new or rebuilt/re-engineered replacement parts. Any replacement of PRODUCTS shall be with new or remanufactured equivalent PRODUCTS. The End-User is responsible for all shipping costs to VAIS, in connection with warranty service. VAIS will not be liable for any defects arising out of any modification of the PRODUCTS, or misuse, neglect, improper installation not in accordance with the specifications provided by VAIS, or if the product is used in violation of any applicable local, state or federal laws. It is the End Users responsibility to ascertain the existence and applicability of any local laws to the operation of the PRODUCTS, in any location where the PRODUCTS are being used. other causes beyond Seller's reasonable control.
A. WHO PERFORMS VAIS TECHNOLOGY'S WARRANTY COMPLIANCE.
VAIS Technology's professional technical department will perform VAIS warranty obligations.
B. WHAT YOU MUST DO
To obtain warranty performance, you must take the PRODUCTS, or deliver the PRODUCTS freight prepaid, to a VAIS Technology Authorized Service Center. If shipped, the PRODUCTS must be packaged so that it is protected from possible shipping damage. VAIS Technology will ship the PRODUCTS to you when warranty performance is completed. VAIS Technology will pay for shipping the PRODUCTS to you, if the product was repaired under the warranty and the Product was received by the Service Center during the warranty period, in which case the Product will be returned to you freight prepaid by VAIS. You must present to the Service Center, or include with your shipment, a dealer's bill of sale, or other original evidence, showing the date and place of purchase and describing the Product purchased to establish warranty eligibility. Be sure to include your return address and a written description of the problem and a daytime telephone number where you can be reached should the need arise.
SHIP TO: VAIS Technology
8811 American Way, Suite 125
Englewood, CO
80112
ATTENTION: SERVICE DEPARTMENT
For your own protection, you should obtain a proof of delivery receipt. Return shipping (that is, shipping back to the customer following repair or replacement), will be paid by the Seller unless repair or replacement is determined not to be covered by the warranty.
C. WHAT THE WARRANTY DOES NOT COVER. VAIS shall have no liability or obligation to Purchaser with respect to any PRODUCTS requiring service during the warranty period which is subjected to any of the following: abuse, improper operation, negligence, accident, modification, improper connections, failure of the end-user to follow the operating procedures outlined both herein, and in any user's manual, attempted repair by non-qualified personnel, Company or Association; operation of the Product outside of the published environmental and electrical parameters, or if such Product's original identification (trademark, serial number) markings have been defaced, altered, or removed. VAIS excludes from warranty coverage Products which have not been sold by VAIS or an Authorized VAIS Deale r to the Purchaser. VAIS also excludes from warranty coverage Products sold outside of the United States. All wires and connectors furnished with, or as part of the PRODUCTS is furnished "AS IS" (i.e., without any warranty of any kind), except where expressly provided otherwise in any documentation or license agreement furnished with the PRODUCTS.
Other Items Not covered Pursuant to this Warranty:
- Damage occurring during shipment of the product to VAIS for repair (claims must be presented to the carrier);
- Any cost or expense related to the removal or reinstallation of the product;
- Any Products which have been adjusted, altered or modified without VAIS's consent;
- Any Products that has been determined to contain an excessive amount of dust or dirt and any product that contains any other contaminants including liquid or foreign objects.
REPAIR OR REPLACEMENT AS PROVIDED IN THIS WARRANTY IS THE PURCHASER'S EXCLUSIVE WARRANTY REMEDY. IMPLIED WARRANTIES, INCLUDING THE WARRANTIES OF MERCHANTABILITY AND OF FITNESS FOR A PARTICULAR PURPOSE, SHALL NOT EXTEND BEYOND THE DURATION OF THE APPLICABLE PARTS WARRANTY PERIOD AND NO PERSON, COMPANY OR ASSOCIATION (INCLUDING AUTHORIZED DEALERS) IS AUTHORIZED TO ASSUME FOR VAIS ANY OTHER LIABILITY IN CONNECTION WITH THE SALE OF THE PRODUCT.
D. ALL WARRANTIES EXPRESS OR IMPLIED, ARE HEREBY DISCLAIMED BY VAIS, AND ANY SUCH WARRANTY IS DEEMED VOID, IN THE EVENT THE END-USER ATTEMPTS TO MODIFY THE PRODUCT OR PRODUCTS IN ANY WAY.
In addition, some states, do not allow limitations on how long an implied warranty lasts or the exclusion or limitation of incidental or consequential damages, so the above limitations or exclusion may not apply to you. This warranty gives you specific legal rights and you may have other rights, which may vary, from state to state. THE ABOVE WARRANTY TERMS AND CONDITIONS ARE VALID ONLY IN THE U.S.A.
IMPORTANT STEPS TO SAFEGUARD YOUR DATA AND PROPERTY :
Be sure to remove all third-party after market equipment, options, alterations, and attachments not warranted by VAIS Technolog y before sending the Product to VAIS for warranty service. VAIS IS NOT LIABLE FOR ANY LOSS OR DAMAGE TO THESE ITEMS.
6. OTHER PROVISIONS:
A. INDEMNIFICATION OF VAIS, ITS AGENTS AND EMPLOYEES. By Purchasing, Installing and Using the Products, You, the End-User, agree to indemnify, defend and hold harmless, VAIS, and its Affiliates, Directors, Officers, Agents and Employees from any Liabilities, Damage, Loss, Claim and Expense (including reasonable Attorney's Fees) arising out of the installation and use of the Products.
B. GOVERNING LAW. THIS AGREEMENT, and all Purchases hereunder shall be governed by, and construed under the laws of the State of Colorado, without regard to conflicts of law rules. You agree that the Courts of Colorado shall have exclusive jurisdiction over the Parties, for all disputes. Venue shall lie exclusively in either: (i) Arapahoe County District Court; or the U.S. District Court, District of Colorado.
C. NOT FOR RESALE NOR EXPORT ASSURANCES. You, the End-User certifies and agrees that the Products are being Purchased for the End-Users own use, and not for resale. The End-User further agrees that he/she/it will not remove components from Product for resale, unless he/she/it becomes certified as an official dealer of VAIS and enters into the appropriate 'Distribution Agreements' required by VAIS technology. The End-User further agrees that neither the software, nor any other technical date received from VAIS, nor the direct Product thereof, will be exported outside the United States, except as authorized and as permitted by VAIS and in accordance with the laws and regulations of the United States. If the software or Products rightfully obtained by you outside of the United States, you agree that you will not export the Software, Products, nor other technical data, received from VAIS; except as authorized and as permitted by VAIS, and in accordance with the laws and regulations of the United States. VAIS and the End-User recognize that violation of these provisions will result in damages to VAIS, in a substantial amount, which is not easily determined. If these provision are violated, the End-User shall be liable to VAIS in the amount of \$100/day, as liquidated damages and not as a penalty, commencing with the first day in which the end-user violates this provision and ending on the day in which such Products or its parts are recovered by VAIS.
D. FORCE MAJEURE ____. VAIS Technology shall not be liable for any delay or failure in performance caused by or resulting from acts of God, fire, flood, storms, earthquakes, tornadoes, other acts of nature, any accidents, riots, wars, government intervention, embargoes, strikes, labor difficulties, equipment failures, or any other causes beyond the control of VAIS Technology. Quantities are subject to availability. In the event of shortage, VAIS Technology may allocate sales and deliveries in its sole discretion.
E. WAIVER. Failure of VAIS Technology to insist upon strict performance of any provisions hereof shall not be deemed a waiver of its right and remedies.
F. SEVERABILITY: In the event that any of the provisions, or portions thereof, of this Agreement are held to be unenforceable or invalid by any court or tribunal of competent jurisdiction, the validity and enforceability of the remaining provisions, or portions thereof, shall not be affected thereby, and effect shall be given to the intent manifested by the provisions, or portions thereof, held to be enforceable and valid.
G. CONSTRUCTION: Throughout this Agreement the singular shall include the plural, and the plural shall include the singular, and masculine shall include the feminine wherever the context so requires.
H. COMPETENCY OF THE PARTIES. Each party is legally competent and fully authorized to execute this Agreement.
I. OPPORTUNITY TO REVIEW AGREEMENT WITH COUNSEL OF PARTIES OWN CHOOSING. You, the End-User acknowledge that YOU have had every right to consult a licensed attorney, and have done so to the extent of your desires, prior to entering into this Agreement, and: (a) has fully and carefully read and considered this Agreement prior to its execution; (b) has been sent to, or has had the opportunity to be fully apprised by his or her attorney of the legal effect and meaning of this document and all of its terms and conditions; (c) has had the opportunity to make whatever investigation or inquiry he/she deems necessary or appropriate in connection with the subject matter of this Agreement; (d) has been afforded the opportunity to negotiate as to any and all terms of this Agreement; and (e) is executing this Agreement voluntarily, free from any undue influence, coercion, duress or fraud of any kind.
J. BINDING EFFECT: Upon execution, this Agreement shall be binding and fully enforceable, and shall inure to the benefit of the parties hereto, their successors, personal representatives and heirs.
K. NOTICES: All notices, as may be required by this Agreement, shall be sent to the respective parties at the addresses set forth below. Appropriate registered or certified mailing to the parties may modify the place of notice.
L. ENTIRE AGREEMENT. These terms and conditions constitute the entire and exclusive agreement between you, the End-User and VAIS Technology, concerning the Products, and your purchase hereunder, and supercede all statements or other agreements, whether oral or written, between you and VAIS Technology. No change in this Agreement shall be effective, unless agreed to in writing by bot h, you, the end-user and VAIS.
IF YOU DO NOT AGREE WITH THESE TERMS, PLEASE RETURN THE VAIS PRODUCTS (INCLUDING THE SOFTWARE\* AND ANY WRITTEN MATERIALS) IN ORIGINAL CONDITION, AND IN ORIGINAL PACKAGE (INCLUDING SHIPPING BOX, AND ALL PACKAGING BELONGINGS USED FOR SECURE SHIPPING) WITHIN FIVE (5) BUSINESS DAYS OF RECEIPT OF THE PRODUCTS, TO THE PLACE FROM WHICH YOU PURCHASED THEM, FOR A FULL REFUND OF THE PURCHASE PRICE OF THE VAIS PRODUCTS.
* VALID FOR SPECIFIC VAIS PRODUCTS ONLY
| Make Model | Year | Audio System | Emulation text | SiriusXM Integration | ||||
| Pre-programmed by VAIS prior to shipping | Requires firmware flash by VAIS Dealer | |||||||
| Back of the radio Connection USB | SB Connection USB Con-ction | |||||||
| Toyota | ||||||||
| 4 Runnar | 2005-2013 | Without JBL CD Yes SL3sat-T | ||||||
| With JBL, Navigation or AM/SAT button SAT Yes SL3sat-T | ||||||||
| 2014-2016 | With factory USB -- GSR-101 GSR-001 GSR-U01 | |||||||
| 86 | 2017 | With factory USB -- GSR-101 GSR-001 GSR-U01 | ||||||
| Avalon | 2005-2011 | Without JBL CD Yes SL3sat-T | ||||||
| With JBL, Navigation or AM/SAT button SAT Yes SL3sat-T | ||||||||
| 2012-2014 | With Touch screen or AM/SAT button SAT Yes SL3sat-T | |||||||
| 2015 | With factory USB | GSR-101 GSR-001 GSR-U01 | ||||||
| Camry/Solara | 2005-2014* | Without JBL CD Yes SL3sat-T | ||||||
| With JBL, Navigation or AM/SAT button SAT Yes SL3sat-T | ||||||||
| 2014.5-2017 | With factory USB | GSR-101 GSR-001 GSR-U01 | ||||||
| 2018 | With factory USB | - | GSR-002 | GSR-U01 | ||||
| C-HR | 2018 | With factory USB | GSR-101 GSR-001 GSR-U01 | |||||
| Corolla/Matrix/Yaris | 2007-2011 | Without AM/SAT button | CD Yes SL3sat-T | |||||
| With AM/SAT button | SAT Yes SL3sat-T | |||||||
| 2012-2013 | With multi-touch display or SAT button | SAT Yes SL3sat-T | ||||||
| 2014-2018 With factory USB -- GSR-101 GSR-001 GSR-U01 | ||||||||
| FJ Cruiser | 2006-2011 | Without JBL CD Yes SL3sat-T | ||||||
| With JBL, Navigation or AM/SAT button SAT Yes SL3sat-T | ||||||||
| Highlander | 2007-2011 | Without JBL CD Yes SL3sat-T | ||||||
| With JBL, Navigation or AM/SAT button SAT Yes SL3sat-T | ||||||||
| 2012-2013 | With multi-touch display or SAT button SAT Yes SL3sat-T | |||||||
| 2014-2017 With factory USB -- GSR-101 GSR-001 GSR-U01 | ||||||||
| Land Cruiser | 2003-2004 | With Navigation | MD | Yes SL3sat-T | ||||
| 2005-2011 | All Packages | SAT Yes SL3sat-T | ||||||
| Prius | 2004-2011 | All Packages | SAT Yes SL3sat-T | |||||
| 2012 | Prius C | |||||||
| 2012-2014 | With Touch screen (except 2012 Prius C) SAT Yes SL3sat-T | |||||||
| 2015-2017 With factory USB | GSR-101 GSR-001 GSR-U01 | |||||||
| RAV4 | 2008-2011 | Without JBL CD Yes SL3sat-T | ||||||
| With JBL, Navigation or AM/SAT button SAT Yes SL3sat-T | ||||||||
| 2012 | With factory USB -- | |||||||
| 2013-2014 | With Touch screen or AM/SAT button SAT Yes SL3sat-T | |||||||
| 2014.5-2018 | With factory USB -- GSR-101 GSR-001 GSR-U01 | |||||||
| Sequoia | 2005-2011 | Without JBL CD No | SL3sat-T | |||||
| JBL | CD Yes SL3sat-T | |||||||
| With Navigation or AM/SAT button SAT Yes SL3sat-T | ||||||||
| Sienna | 2004-2005 | With Navigation | SAT Yes SL3sat-T | |||||
| 2006-2014 | Without JBL CD Yes SL3sat-T | |||||||
| With JBL, Navigation or AM/SAT button SAT Yes SL3sat-T | ||||||||
| 2015-2016 | With factory USB -- GSR-101 GSR-001 GSR-U01 | |||||||
| Tacoma | 2005-2011 | Without JBL CD Yes SL3sat-T | ||||||
| With JBL, Navigation or AM/SAT button SAT Yes SL3sat-T | ||||||||
| 2012-2013 | With Touch screen or AM/SAT button SAT Yes SL3sat-T | |||||||
| 2014-2017 With factory USB -- GSR-101 GSR-001 GSR-U01 | ||||||||
| Tundra | 2005-2006 | Without JBL CD No | SL3sat-T | |||||
| JBL | CD Yes SL3sat-T | |||||||
| With Navigation | SAT Yes SL3sat-T | |||||||
| 2007-2013 | All Packages | SAT Yes SL3sat-T | ||||||
| 2014-2015 With factory USB -- GSR-101 GSR-001 GSR-U01 | ||||||||
| Venza 2009-2014 | All Packages | SAT | Yes | SL3sat-T | ||||
| Scion | ||||||||
| All | 2005-2015 | With AM/SAT button SAT Yes SL3sat-T | ||||||
| Radio model T10015 -- GSR-011 | ||||||||
| Radio model T10015 with Add On Navigation -- GSR-012 | ||||||||
| IM, IC | 2016 | With factory USB -- GSR-101 GSR-001 GSR-U01 | ||||||
| iA | 2017 | With factory USB | GSR-093 | GSR-U01 | ||||
| Lexus | ||||||||
| GS 300/350/430/450H | 2001-2005 | All Packages | CD | No | SL3sat-L | |||
| 2006-2009 | SAT | Yes | ||||||
| ES 300/330/350 | 2002-2003 | With Navigation | MD | Yes | ||||
| 2004 | Without Navigation | CD | No | |||||
| With Navigation | CD Yes | |||||||
| 2005-2009 | All Packages | SAT | Yes | |||||
| GX 470 | 2003-2004 | With Navigation | MD | Yes | ||||
| Without Navigation | CD Yes | |||||||
| 2005-2009 | All Packages | SAT | Yes | |||||
| RX 300/330/400H/350 | 2001-2003 | With Navigation | CD | No | ||||
| 2004 | All Packages | CD Yes | ||||||
| 2005-2009 | All Packages | SAT | Yes | |||||
| LX 470/LX570 | 2004 | All Packages | MD | Yes | ||||
| 2005-2009 | SAT | Yes | ||||||
| LS 430 | 2001-2003 | All Packages | MD | Yes | ||||
| 2004-2006 | SAT Yes | |||||||
| LS 460 | 2007-2009 | With Navigation | N/A | N/A | ||||
| Without Navigation | N/A | N/A | ||||||
| SC 430 | 2002-2004 | All Packages | N/A | N/A | ||||
| 2005-2009 | SAT | Yes | ||||||
| IS 300/250/350 | 2001-2005 | All Packages | CD | No | ||||
| 2006-2009 | SAT | Yes | ||||||
© Copyright 2006-2018 VAIS Technology All right reserved.
Liability Disclaimer: This application guide is based on the testing results at the time of publishing. VAIS Technology can not be held liable for damages or injuries caused by, or resulting from use of this guide. Strictly adhere to all car manufacturer warnings that pertain to the disassembly, maintenance, or servicing of the vehicle and any of its associated part systems. VAIS Technology can not be responsible for discrepancies, or inconsistencies that may occur due to automobile manufacturing changes.
| Make Model | Year | Audio System | SiriusXM Integration | ||
| Pre-programmed by VAIS prior to shipping | Requires firmware flash by VAIS Dealer | ||||
| USB Connection USB Connection | |||||
| Alfa Romeo | |||||
| Giulia | 2018 | With Factory USB | GSR-A01 | GSR-U01 | |
| Stelvio | |||||
| Dodge / Chrysler / Flat /Jeep | |||||
| 200 | 2014-2018 | Uconnect 4.3 | GSR-051 | ||
| 500L | |||||
| Challenger | |||||
| Charger | |||||
| Cherokee Latitude | |||||
| Compass | Uconnect 3.0 | GSR-052 | GSR-U01 | ||
| Durango | |||||
| Grand Cherokee | |||||
| Journey | Uconnect 4 | GSR-053 | |||
| Pacifica | |||||
| RAM | |||||
| Renegade | |||||
| Spider 2017 GSR-093 | With Factory USB | ||||
| Ford | |||||
| C-Max 2014 | With factory USB port and SYNC | GSR-041*** | GSR-U01 | ||
| Edge 2014-2018 | |||||
| Escape 2014-2018 | |||||
| Explorer 2014-2018 | |||||
| Fiesta 2014-2017 | |||||
| Flex 2014-2018 | |||||
| Focus 2014-2018 | |||||
| Fusion 2014-2018 | |||||
| Mustang 2015-2018 | |||||
| Taurus 2014-2018 | |||||
| Transit 2014-2018 | |||||
| F-150 | 2014-2017 | ||||
| 2018 | 8" Screen | ||||
| 4.2" Screen and Sync 3 | GSR-042 | ||||
| Ecosport 2018 | 4.2" Screen and Sync 3 | ||||
| Notes: *** GSR-041 is not compatible with SYNC firmware CCPU version that starts with EE309. | |||||
| GM | |||||
| Colorado/Canyon | 2016-2017 GSR-G01 | 7" Screen with USB port (NOT 4.2" screen) | GSR-U01 | ||
| 2018 GSR-G03 | |||||
| Cruze | 2016-2017 GSR-G01 | With Factory USB | |||
| 2018 | GSR-G03 | ||||
| Equinox 2018 GSR-G01 | |||||
| Malibu | 2016-2017 GSR-G01 | With Touch Screen & Factory USB | |||
| 2018 GSR-G03 | With Touch Screen & Factory USB | ||||
| Silverado/Sierra | 2016-2017 | With Touch Screen Radio | GSR-G02 | ||
| With Non Touch Screen Radio | GSR-G03 | ||||
| 2018 GSR-G03 | With Touch Screen Radio | ||||
| Sonic | 2017 GSR-G01 | With Factory USB | |||
| 2018 GSR-G04 | |||||
| Spark | 2017 GSR-G03 | ||||
| Traverse 2018 GSR-G03 | |||||
| Terrain 2018 GSR-G04 | |||||
| Trax | 2016 GSR-G03 | ||||
| 2017 GSR-G01 | |||||
| 2018 GSR-G04 | |||||
| Honda | |||||
| Accord | 2013-2015 | With factory USB | GSR-021 | ||
| 2016-2017 | With factory USB | GSR-025 | GSR-U01 | ||
| 2018 | LX | GSR-025 | |||
| Sport | GSR-027 | ||||
| Civic | 2014 | Non Touch Screen Radio | GSR-021 | ||
| 2015 | Non Touch Screen Radio | GSR-024 | |||
| 2014-2015 | Touch Screen Radio | GSR-025 | GSR-U01 | ||
| 2016 | Touch Screen Radio | GSR-026 | |||
| 2017-2018 | With factory USB | GSR-025 | GSR-U01 | ||
| CRV | 2012-2016 | Non Touch Screen Radio | GSR-024 | ||
| 2015-2016 | Touch Screen Radio | GSR-025 | GSR-U01 | ||
| 2017-2018 | With factory USB | GSR-025 | |||
| CRZ | 2014 GSR-021 | With factory USB | |||
| Fit | 2015-2017 | 5" Screen Radio | GSR-021 | ||
| Touch 7" Screen / Non Touch | GSR-025 | GSR-U01 | |||
| 2018 GSR-025 | All Packages | ||||
| HRV | 2016-2018 | With factory USB | GSR-025 | ||
| Odyssey | 2014-2015 | GSR-023 | |||
| 2018 | GSR-025 | GSR-U01 | |||
| Pilot | 2013 2015 | GSR-022 | |||
| 2017-2018 | GSR-025 | GSR-U01 | |||
| Ridgeline | 2017-2018 | GSR-025 | |||
© Copyright 2006-2018 VAIS Technology All right reserved.
Liability Disclaimer: This application guide is based on the testing results at the time of publishing. VAIS Technology can not be held liable for damages or injuries caused by, or resulting from use of this guide. Strictly adhere to all car manufacturer warnings that pertain to the disassembly, maintenance, or servicing of the vehicle and any of its associated part systems. VAIS Technology can not be responsible for discrepancies, or inconsistencies that may occur due to automobile manufacturing changes.
8811 American Way, Suite 125. Englewood CO 80112
Tel: 720-733-2348 Fax: 720-528-7683 E-mail: info@vaistech.com
| Make Model | Year | Audio System | SiriusXM Integration | ||
| Pre-programmed by VAIS prior to shipping | Requires firmware flash by VAIS Dealer | ||||
| USB Connection USB Connection | |||||
| Hyundai | |||||
| Elantra 2018 GSR-H01 | With factory USB | GSR-U01 | |||
| Kona 2018 GSR-H02 | |||||
| Sonata 2018 HSR-H02 | |||||
| Tucson 2018 GSR-H01 | |||||
| Land Rover | |||||
| Evoque | 2015-2017 | 8" Screen Radio | GSR-L01 | GSR-U01 | |
| 10" Screen Radio | GSR-L02 | ||||
| Discovery Sport | 2017 | 8" Screen Radio | GSR-L01 | ||
| 10" Screen Radio | GSR-L02 | ||||
| Discovery 2017 GSR-L01 | 8" Screen Radio | ||||
| Mazda | |||||
| 3 | 2014-2015 | Non Touch Screen Radio | GSR-092 | ||
| 2016-2018 | Touch Screen Radio | GSR-093 | GSR-U01 | ||
| 6 | 2014-2015 | Non Touch Screen Radio | GSR-092 | ||
| 2016-2018 | Touch Screen Radio | GSR-093 | GSR-U01 | ||
| CX3 2016-2018 | Touch Screen Radio | ||||
| CX5 2016-2018 | Touch Screen Radio | ||||
| CX9 2016-2018 | Touch Screen Radio | ||||
| Miata/MX5 2017 | Touch Screen Radio | ||||
| Mercedes | |||||
| C Class 2015-2017 | With Factory USB | GSR-M01 | GSR-U01 | ||
| CLA 2015-2017 | |||||
| E Class 2015-2017 | |||||
| GLS 2017 | |||||
| GLE 2017 | |||||
| GLC 2016-2017 | |||||
| GLA 2016-2017 | |||||
| Motrls | 2016 | ||||
| Sprinter Van 2016 | |||||
| Nissan | |||||
| Altima 2016-2018 | With Factory USB | GSR-081 | GSR-U01 | ||
| Juke | 2015-2016 | ||||
| Maxima | 2015 | ||||
| Rogue 2014-2016 | |||||
| Sentra 2015-2018 | |||||
| Versa | 2015-2016 | ||||
| Z370 2015-2017 | |||||
| Porsche | |||||
| 911 | 2013-2014 | With Factory USB | GSR-061 | ||
| Cayenne 2011 2016 | |||||
| Macan 2015-2016 | |||||
| Panamera | 2011-2014 | ||||
| Subaru | |||||
| Forester | 2014-2015 | Non Touch Screen Radio model CF625UM | GSR-031 | ||
| 2015-2018 | Touch Screen Radio model 617UL,658UL,759UL | GSR-034 | |||
| Impreza/Crosstrek | 2013-2014 | With factory USB, Radio model CM621UB | GSR-032 | ||
| With factory USB, Radio model CM631UD | GSR-033 | ||||
| 2015-2016 | Radio # CM644UL, CM695UL, & PF3678 | GSR-034 | |||
| 2018 | Touch Screen Radio | GSR-035 | |||
| Crosstrek | 2017 | Touch Screen Radio | GSR-034 | ||
| Impreza | 2017 | Touch Screen Radio | GSR-035 | ||
| Outback | 2014 | With factory USB | GSR-031 | ||
| 2018 | With factory USB | GSR-035 | |||
| Legacy 2018 | Touch Screen Radio | GSR-035 | |||
| WRX 2014 | With factory USB | GSR-031 | |||
| Volkswagen | |||||
| Beetle 2016-2017 | With Factory USB | GSR-V01 | |||
| Jetta | 2016-2017 | ||||
| Passal 2016-2017 | |||||
© Copyright 2008-2018 VAIS Technology All right reserved.
Liability Disclaimer: This application guide is based on the testing results at the time of publishing. VAIS Technology can not be held liable for damages or injuries caused by, or resulting from use of this guide. Strictly adhere to all car manufacturer warnings that perform to the disassembly, maintenance, or servicing of the vehicle and any of its associated part systems. VAIS Technology can not be responsible for discrepancies, or inconsistencies that may occur due to automobile manufacturing changes.
- Audio Interface Controller with built-in SiriusXM Satellite Radio interface
- WARNING
- DO NOT DISASSEMBLE OR ALTER
- Do not block your view
- Do not block the airbag
- Distraction warning
- BEFORE WIRING, DISCONNECT THE CABLE FROM THE NEGATIVE BATTERY TERMINAL
- CAUTION
- DO NOT SPLICE INTO ELECTRICAL CABLES
- DO NOT ALLOW CABLES TO BECOME ENTANGLED IN SURROUNDING OBJECTS
- DO NOT INSTALL IN LOCATIONS WITH HIGH MOISTURE OR DUST
- HAVE THE WIRING AND INSTALLATION DONE BY EXPERTS
- USE ONLY SPECIFIED ACCESSORY PARTS
- FOLLOW THE OPERATIONAL AND INSTALLATION MANUALS.
- CHECK YOUR LOCAL LAWS
- TROUBLESHOOTING
- i IMPORTANT
- About SiriusXM Satellite Radio Operation
- Connecting the units
- Connecting SoundLinQ3 to head unit using 20-pin Y-harness
- Connecting SoundLinQ3 to head unit using 12-pin Y-harness
- ATTENTION
- IMPORTANT
- Installation
- Emulation Mode Selection (SAT emulation)
- Emulation Mode Selection (CD and MD changer emulation)
- NOTE
- SAT EMULATION
- CD CHANGER OR
- MD CHANGER EMULATION
- Source Selection (SAT Emulation)
- Head Unit:
- Steering Wheel control:
- MANUAL TUNING
- CHANNEL SEEK
- CHANGING CATEGORIES
- DISPLAYING SONG TITLE AND ARTIST NAME
- SELECTING PRESETS
- TYPE SCAN
- Displayed Messages/Errors
- Presets
- Adding a new PRESET
- Changing an existing PRESET
- Erasing PRESETS
- Tuner Radio ID
- Satellite Radio Input Settings
- Activate / Deactivate SETTINGS MODE
- Satellite Sound Level Adjustment
- CD/MD Changer Emulation
- Head Unit Controls
- Source Selection (CD/MD Emulation)
- (SCROLL)
- DISC RPT
- Direct Entry Mode
- Enter/Exit "Satellite Radio Input Settings" Mode
- Display Settings
- About Display Settings
- Changing Display Mode
- Displaying Channel Information
- LICENSING AGREEMENT, DISCLAIMERS AND LIMITED WARRANTY VAIS TECHNOLOGY, LLC
- LICENSE AGREEMENT
- GRANT OF LICENSE
- OPERATIONAL WARNING AND SAFETY INSTRUCTIONS.
- 3.DISCLAIMER AND LIMITATION OF WARRANTIES.
- THIRTY (30)- DAY MONEY BACK WARRANTY ONLY IF PURCHASED DIRECT FROM VAIS.
- LIMITED WARRANTY.
- WHO PERFORMS VAIS TECHNOLOGY'S WARRANTY COMPLIANCE.
- WHAT YOU MUST DO
- ATTENTION: SERVICE DEPARTMENT
- Other Items Not covered Pursuant to this Warranty:
- ALL WARRANTIES EXPRESS OR IMPLIED, ARE HEREBY DISCLAIMED BY VAIS, AND ANY SUCH WARRANTY IS DEEMED VOID, IN THE EVENT THE END-USER ATTEMPTS TO MODIFY THE PRODUCT OR PRODUCTS IN ANY WAY.
- IMPORTANT STEPS TO SAFEGUARD YOUR DATA AND PROPERTY :
- OTHER PROVISIONS:
- IF YOU DO NOT AGREE WITH THESE TERMS, PLEASE RETURN THE VAIS PRODUCTS (INCLUDING THE SOFTWARE\* AND ANY WRITTEN MATERIALS) IN ORIGINAL CONDITION, AND IN ORIGINAL PACKAGE (INCLUDING SHIPPING BOX, AND ALL PACKAGING BELONGINGS USED FOR SECURE SHIPPING) WITHIN FIVE (5) BUSINESS DAYS OF RECEIPT OF THE PRODUCTS, TO THE PLACE FROM WHICH YOU PURCHASED THEM, FOR A FULL REFUND OF THE PURCHASE PRICE OF THE VAIS PRODUCTS.
Brand : VAIS Technology
Model : SL3sat-T
Category : Audio tuner