
Mosaic Connect - Wireless pointer NEC - Free user manual and instructions
Find the device manual for free Mosaic Connect NEC in PDF.


| Type of product | Wireless pointer (presentation remote) |
| Brand | NEC |
| Model | Mosaic Connect |
| Dimensions (L x W x H) | Approximately 14 x 3 x 1.5 cm |
| Weight | Approximately 50 g (with batteries) |
| Power supply | 2 x AAA batteries (not included) |
| Wireless range | Up to 20 meters |
| Connectivity | 2.4 GHz RF wireless |
| Laser pointer | Class 2 laser, red beam |
| Presentation controls | Previous/next slide, black screen, full screen |
| Compatibility | Windows, macOS, Linux (plug and play) |
| Receiver | USB nano receiver, stored inside the pointer |
| Color | Black |
| Material | Plastic (ABS) |
| Operating temperature | 0°C to 40°C |
| Battery life | Approximately 12 months under normal use |
| Cleaning instructions | Wipe with a soft, dry cloth. Do not use liquids or abrasives. |
| Storage conditions | Keep in a dry, dust-free place, away from direct sunlight. |
| Safety precautions | Avoid direct eye exposure to laser. Keep out of reach of children. |
| Warranty | 2 years limited warranty |
Frequently Asked Questions - Mosaic Connect NEC
User questions about Mosaic Connect NEC
0 question about this device. Answer the ones you know or ask your own.
Ask a new question about this device
Download the instructions for your Wireless pointer in PDF format for free! Find your manual Mosaic Connect - NEC and take your electronic device back in hand. On this page are published all the documents necessary for the use of your device. Mosaic Connect by NEC.
USER MANUAL Mosaic Connect NEC
Purpose and Scope....4
- Overview....5
Hardware and Software Specifications .... 5
- Getting started....6
3.1 Installation....6
3.1.1 Receiver application 6
3.1.2Client application....6
3.2 Set-up Considerations....7
3.3 User Access Considerations 7
3.3.Admin user 7
3.3.2 Kiosk user 7
3.4 Accessing the System 8
3.4.Wi-Fi Helper....8
3.4. Cloud/LocalConnection 9
3.4.BIN Configuration 9
3.5 System Organization & Navigation.... 12
3.5.1 Sharing a screen 13
3.5.8 Sharing items 15
3.5.Bn-built Media player.... 16
3.6 Exit session 18
3.7 Error and recovery 18
List of figures
Figure 1: Hardware solution (Mosaic Connect Box) Figure 2: Software application ..... 5
Figure 3: Receiver and client connection ...... 6
Figure 4: Launch screen....7
Figure 5: Wi-Fi Helper setting screen....8
Figure 6: Cloud connections setting 9
Figure 7: Local connections setting....10
Figure 8: Receiver Home screen .... 10
Figure 9: Client application connection set-up screen....11
Figure 10: Web app Home screen....11
Figure 11: Client Mobile application connection set-up screen 12
Figure 12: Receiver home screen navigation .... 13
Figure 13: Sharing a screen from Desktop client.... 13
Figure 14: Sharing a screen from Mobile client.... 14
Figure 15: Sharing the Whiteboard from the Receiver .... 15
Figure 16: Whiteboard on client's screen.... 15
Figure 17: Sharing items ...... 16
Figure 18: Sharing a web link from Client ...... 17
Figure 19: Sharing a web link from Receiver 17
Figure 20: Network error....18
1. Introduction
This document helps a user to understand the steps to be performed to use the Mosaic Connect wireless presentation solution.
Purpose and Scope
This Product Manual provides all essential information for a user to make full and effective use of the Mosaic Connect application. The manual includes a description of the product functions and capabilities, contingencies and alternate modes of operation, and step-by-step procedures for system access and use.
In addition to this Introduction section, this manual contains three major sections:
Overview, describing the functionality provided by the software, including examples of utilization.
Getting started, describing how to install and make the software ready to be used. This section has been moved into a dedicated manual covering the full VLT software installation.
Error Messages and Recovery, provides a list of errors and diagnostic messages and possible recovery actions.
2. Overview
Mosaic Connect allows meeting attendees to wirelessly share content from any device to your meeting room display. It is simple to use. With one click you're wirelessly presenting.
It works with all modern laptops, tablets, phones and support for your browser. With a dedicated app for guests and extended browser support, your guests can also connect and present as easily as you do. The solution supports dual network connectivity and enables collaboration among users on primary and guest networks.
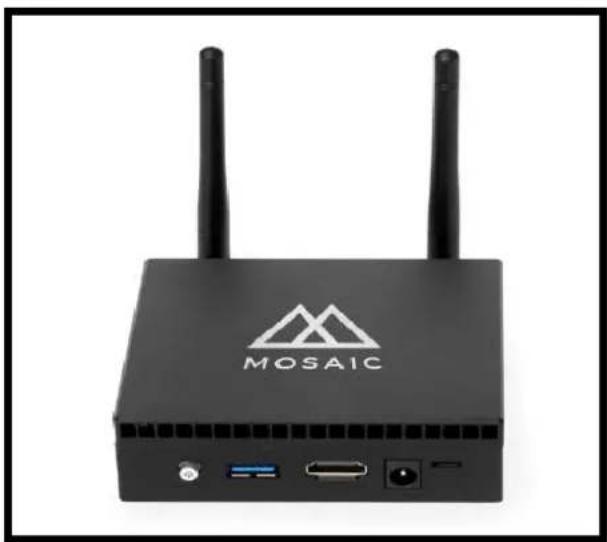
Mosaic Connect comes with content sharing tools that makes meeting room collaboration even easier. You can get the application as either a Windows Hardware box which you simply connect to your meeting room display. For your meeting rooms that have dedicated PCs, you can choose to deploy Mosaic Connect as a software-only solution.
natural_image
Black Mosaic wireless router with two antennas and ports (no visible text or symbols on body)Figure 1: Hardware solution (Mosaic Connect Box)

Figure 2: Software application
Hardware and Software Specifications
- Hardware: Cherry Trail Intel(R) Atom(TM) x5-Z8350 CPU @ 1.44GHz, 4010MB RAM, Intel HD Graphics 400.
• OS Windows 10 Enterprise - 64Gb Storage
• Recommended internet speed 3Mbps per device
3. Getting started
3.1 Installation
To use the application, a user requires a software client and a receiver (either hardware or software). The receiver application will be available on the main display(pre-installed) and meeting attendees then can connect to the main display via respective clients (need to install, please refer to 3.1.2) and follow on-screen instructions.

flowchart
graph TD
    A["Receiver (Main Display)"] --> B["Connect your device"]
    B --> C["connectmosaic.com"]
    B --> D["Connect"]
    C --> E["Clients"]
    D --> E
    E --> F["Windows"]
    E --> G["Apple"]
    E --> H["Android"]
    E --> I["Apple"]
    E --> J["Google"]
Figure 3: Receiver and client connection
3.1.1 Receiver application
Mosaic connect receiver software application is available for Windows and Android platform. It is already installed on InfinityBoard and CB series, can also be installed directly using executable files and apps. Also it comes pre-installed with hardware box.
3.1.2 Client application
Mosaic Connect client application is available as Desktop, Mobile as well as Web. With supports for Windows, Mac, Chrome, iOS, Android platforms. The Desktop Applications and Guest App can be downloaded via "connectmosaic.com" and mobile application can be found on the respective app stores. Web app is supported by Google Chrome.
3.2 Set-up Considerations
The application is designed to be always work on network (Local or Cloud). To optimize your access to the Mosaic connect:
- Please make sure the system is connected to the internet to make the app online.
- Use windows 10 or higher. (For receiver)
- Web application should be used via Google Chrome.
3.3 User Access Considerations
Connect Box (hardware solution) includes two account levels.
3.3.1 Admin user
Admin account can be used for network settings, app updates and to access all other computer applications and files.
Password: Kio\$kpass1
3.3.2 Kiosk user
The default user name is "Connect Box". The application can be directly accessed with this account. Password is not required.
Figure 4: Launch screen
3.4 Accessing the System
A user has 2 setting options to have different network sessions at receiver side i.e. on the main display.
3.4.1 Wi-Fi Helper
The following screenshot shows WiFi Helper, which can be accessed from the "Network & Connection" settings of Mosaic Connect Box.
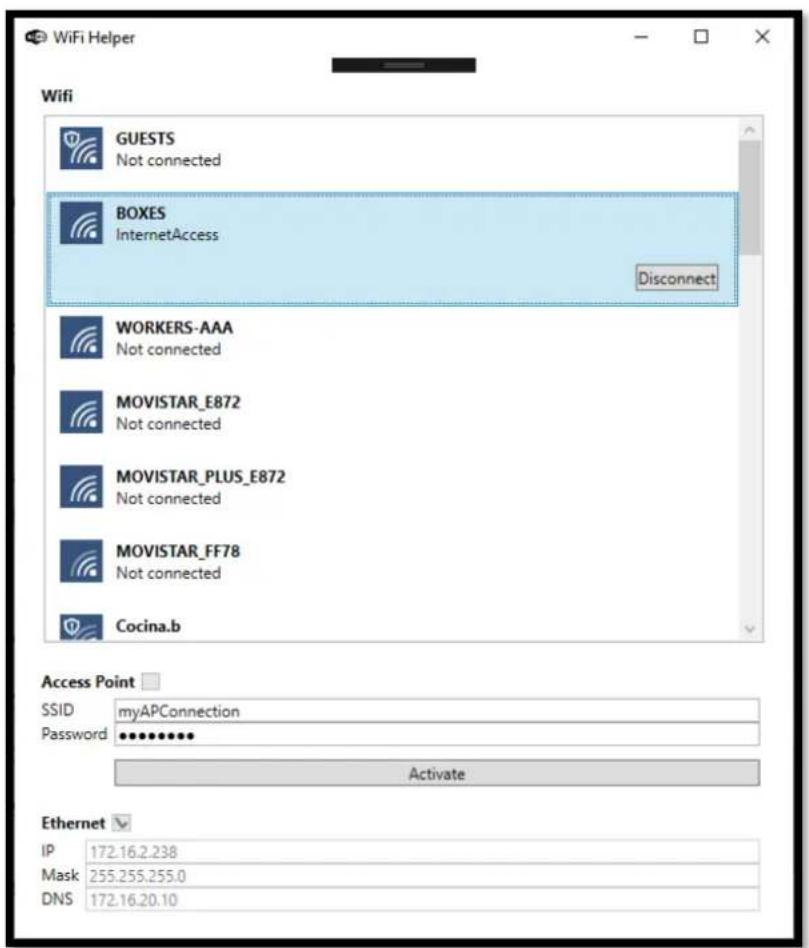
Figure 5: WiFi Helper setting screen
It lists all the Wi-Fi networks available. WiFi Helper allows users to enable or disable the device's access point. This can be achieved by entering a valid SSID and password (Both SSID and password need to be minimum 8 characters in length) while the device is connected to the internet, and pressing the option to "Activate". Button will turn blue when ready to activate. When this has been achieved, the access point checkbox will be checked to indicate that the access point has been enabled. Once the access point has been enabled internet can then be disabled.
3.4.2 Cloud/Local Connection
After the Mosaic Connect application/box is online, a different connection setting can be done via Settings ->Network & Connection ->Cloud connections
3.4.2.1 Cloud Connections [On] 6-Digit session ID is generated. This setting will allow users in network as well as outside the network to connect through cloud server. This configuration is required if users wants to connect through the Web-app.
3.4.2.2 Cloud Connections [Off] 10-Digit session ID is generated and it is considered as a Local network connection. Users inside the network are only allowed to connect to the session. User can connect through all Desktop and Mobile applications, also Guest app can be used.

Figure 6: Cloud connections setting
3.4.3 PIN Configuration
For more security, user can also set a PIN for the session through settings. Go to Settings ->Security -> Require Pin to connect [On/Off].
If it is set to "On", a 4 digit pin is also displayed on the main screen along with Session ID and attendee has to enter the same to connect to the session.

Figure 7: Local connections setting

Figure 8: Receiver Home screen
Once the receiver setting is done and connect app is online and running, attendees can connect to the session using client application on their respective devices, and up to 4 connections are allowed.
From any client (Windows/Guest/Android/Web) open the connect application. Enter the session ID displayed on the screen and PIN if required.

Figure 9: Client application connection set-up screen
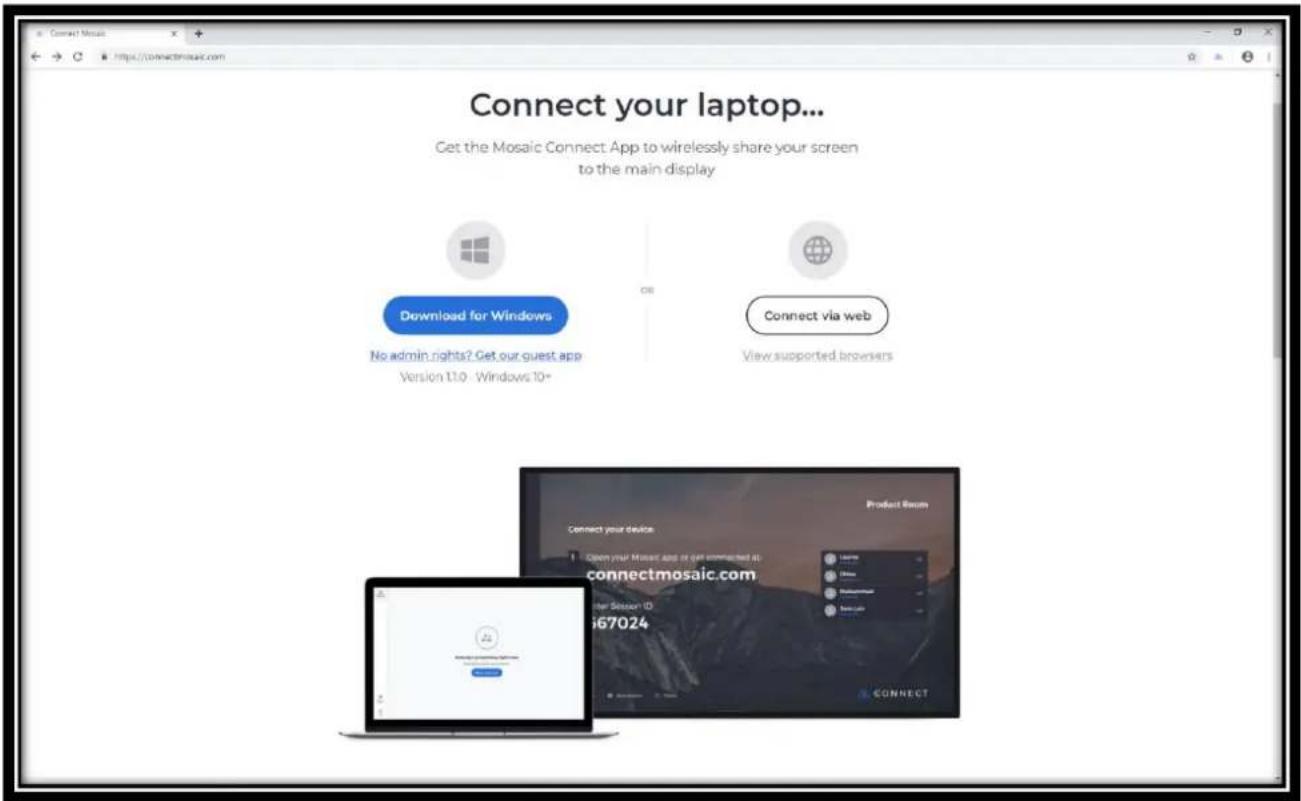
Figure 10: Web app Home screen
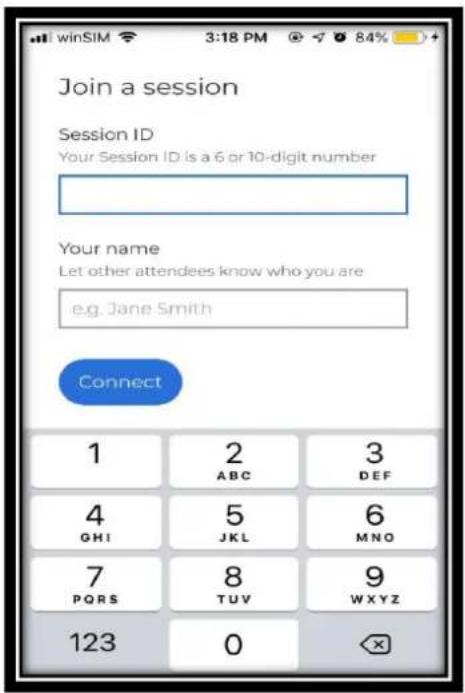
Figure 11: Client Mobile application connection set-up screen
3.5 System Organization & Navigation
Once the receiver is online and running, a screen with Session ID (6 or 10 digit) with or without PIN (depends on the setting) is displayed. The connect box's name is displayed on the upper right hand corner. A list of all attendees is displayed on the home screen. The Language, Display, Audio, Network & Connections, and Security all these options are available in the settings.

Figure 12: Receiver home screen navigation
3.5.1 Sharing a screen
Attendees can share their screen with "Become a presenter" option. For windows client presenter, the control can be taken from main display. For Mac presenter, the control from main display is not possible. The screen can also be shared from mobile and Web application.

Figure 13: Sharing a screen from Desktop client

Figure 14: Sharing a screen from Mobile client
Note: When presenting through iOS, there is an additional step which is required to "Start Broadcast".
The whiteboard solution is available and can be accessed through Connect receiver from the Menu on the left hand side. When selected, the screen with whiteboard and annotation tools allowing for extra collaboration and creativity during sessions.

Figure 15: Sharing the Whiteboard from the Receiver

Figure 16: Whiteboard on client's screen
3.5.2 Sharing items
Client and Receiver has the "Shared items" option, using which different files, links and videos can be shared with attendees. All shared items are kept under this option which
can be easily accessed and ready for view or download for all attendees. Different web links can be shared as well as presented on the screen with all attendees.
File formats supported –
• Audio(.mp3, .wav)
- Document(.doc, .docx, .xls, .xlsx, .ppt, .pptm, .pptx, .txt, .odt, .ods, .odp)
- Image (.jpg, .png)
- PDF (.pdf)
- Zip (.zip)

Figure 17: Sharing items
Note: Once the session is closed, all shared documents will be no longer available.
3.5.3 In-built Media player
The application has in-built media player, media files can be played from the receiver or client and runs smoothly with great quality. The supported file formats are (.avi, .mov, .mp4). The web links can be shared from shared items -> Links, and directly presented on the screen.

Figure 18: Sharing a web link from Client

Figure 19: Sharing a web link from Receiver
3.6 Exit session
The session can be disconnected by choosing "Exit" option from the respective applications. The session can also be terminated in between the meeting. If receiver exits, all attendees will be thrown out of the session automatically.
3.7 Error and recovery
Error message - "There's been a problem"

Figure 20: Network error
Recovery - After initial start up the internet configuration is required to be done via Admin user. Sign out from the default user and sign in into Admin user and connect to the internet which will make Mosaic connect app online.
If the problem still persists, please contact us at mailto:support@displaynote.com
- List of figures
- Introduction
- Purpose and Scope
- Overview
- Hardware and Software Specifications
- Getting started
- Installation
- Receiver application
- Client application
- Set-up Considerations
- User Access Considerations
- Admin user
- Kiosk user
- Accessing the System
- Wi-Fi Helper
- Cloud/Local Connection
- PIN Configuration
- System Organization & Navigation
- Sharing a screen
- Sharing items
- File formats supported –
- In-built Media player
- Exit session
- Error and recovery
Brand : NEC
Model : Mosaic Connect
Category : Wireless pointer