RB-StromPi3-Case - Computer Case Joy-It - Free user manual and instructions
Find the device manual for free RB-StromPi3-Case Joy-It in PDF.


| Product Type | Computer Case for Raspberry Pi with StromPi3 |
| Brand | Joy-It |
| Model | RB-StromPi3-Case |
| Compatible Models | Raspberry Pi 3 and 4 with StromPi3 and Battery Hat (incl. XL) |
| Material | Aluminum alloy with plastic components |
| Dimensions (approx.) | 120 x 80 x 40 mm |
| Weight (approx.) | 250 g |
| Power Supply | Via StromPi3 wide-range input (not included) |
| Cooling | Built-in fan with PWM control (Python script provided) |
| GPIO Access | Removable cover for easy access |
| Mounting | DIN rail mountable with included grub screws |
| Power Button | Supported via RB-StromPi3-PCB (requires modification on Rev 1.0) |
| Battery Hat Compatibility | 1000mAh or XL version with foam spacer for smaller version |
| Port Access | Interchangeable front covers for USB/Ethernet (Pi3 and Pi4) |
| Heat Sink | Included aluminum heat sink for CPU |
| Maintenance | Clean with a dry, soft cloth. Avoid moisture and solvents. |
| Safety | Ensure proper ventilation. Keep away from water and excessive heat. |
| Spare Parts & Repairability | Contact manufacturer for spare parts. Modular design allows component replacement. |
| General Information | Manufacturer: Joy-It. Support: service@joy-it.net, phone +49 (0)2845 98469-66. |
Frequently Asked Questions - RB-StromPi3-Case Joy-It
User questions about RB-StromPi3-Case Joy-It
0 question about this device. Answer the ones you know or ask your own.
Ask a new question about this device
Download the instructions for your Computer Case in PDF format for free! Find your manual RB-StromPi3-Case - Joy-It and take your electronic device back in hand. On this page are published all the documents necessary for the use of your device. RB-StromPi3-Case by Joy-It.
USER MANUAL RB-StromPi3-Case Joy-It
natural_image
Black rectangular device with ports and ventilation slots, no visible text or symbols on the body1. GENERAL INFORMATION
Dear costumer,
Thank you for buying our product. The structure and functions of the StromPi3 are explained in the following chapters. We show you which settings must be adjusted that the Raspberry Pi will work with the StromPi perfectly.
If you get any difficulties with the usage with the device, do not hesitate to contact us.
This high-quality aluminium case offers space for your Raspberry Pi incl. StromPi 3 and Battery Hat (-XL also). A removable cover above the GPIO bar keeps it easily accessible.
The RB-StromPi3-PCB allows the use of the power button function. In addition, the fan can be operated with this board and optionally controlled.
2. ASSEMBLY OF THE HOUSING
First you have to make sure which revision of the StromPi you have, you can use these pictures for reference:
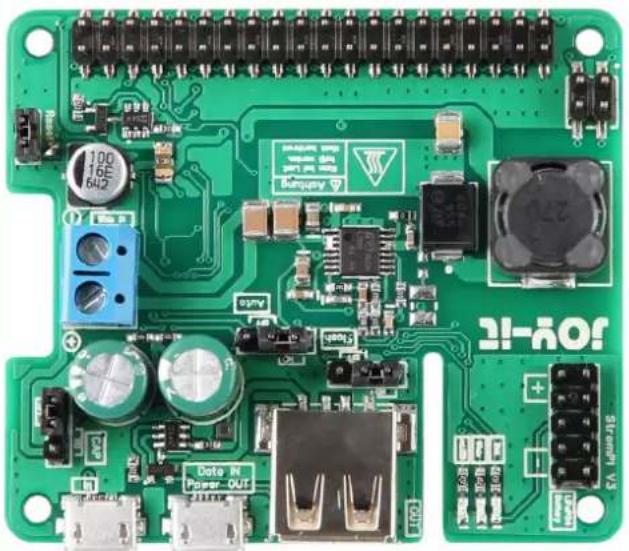
natural_image
Green printed circuit board with various electronic components and connectors (no readable text or symbols)Rev. 1.0
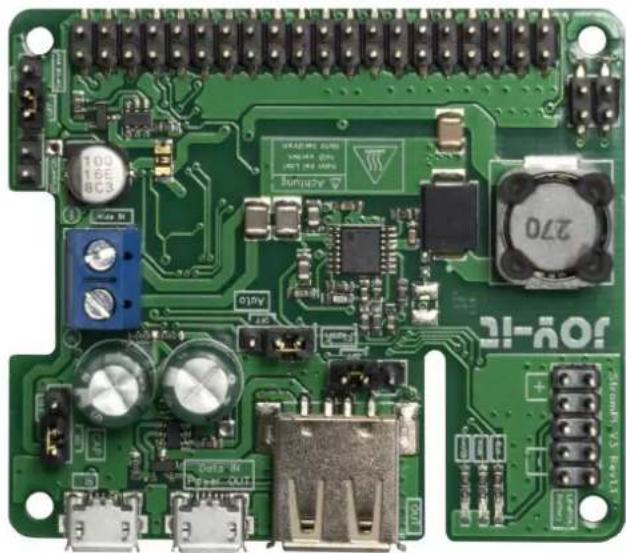
natural_image
Green printed circuit board with various electronic components and connectors (no readable text or symbols)Rev. 1.1
Please note that if you own the Rev 1.0 and want to use the PowerOnButton function, you must first perform the PowerOnButton modification described in the StromPi3 manual.
In Rev 1.1 this modification is already integrated.
The case is delivered with the Raspberry Pi 4 side panels already screwed on and must first be disassembled.
If you want to install a Raspberry Pi 3, you have to remove all parts.
If you want to use a Raspberry Pi 4, you can leave the side panel for the HDMI and power connections installed.
In both cases the fan must also be removed first.
Now screw the spacers with the nuts to your Raspberry Pi.
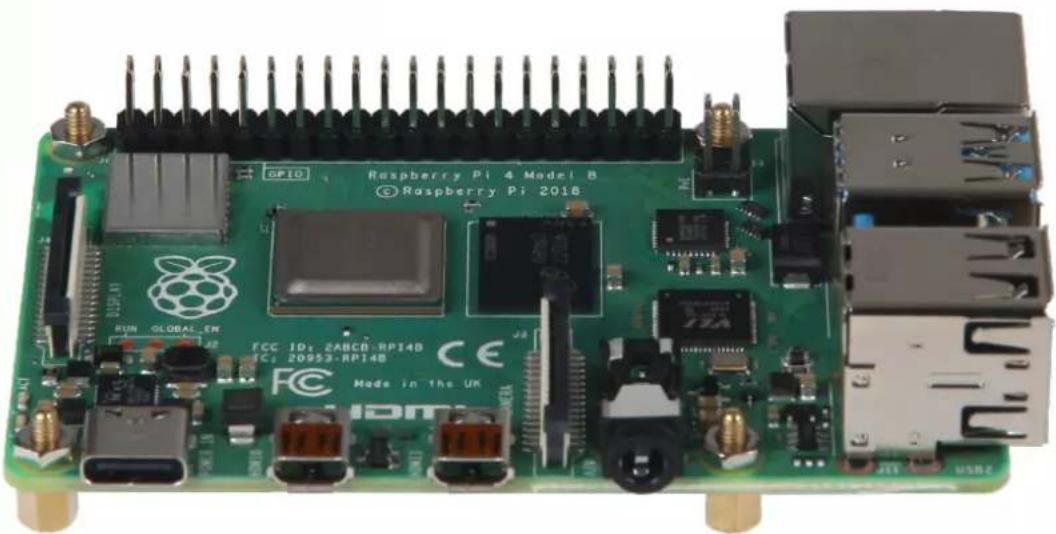
natural_image
Green Raspberry Pi 4 Model B board with visible components and connectors (no readable text or symbols beyond branding)Now put on the two plastic spacers, as shown in the picture.
Also remove the foil from the aluminium heat sink and put it on the CPU of the Raspberry Pis.
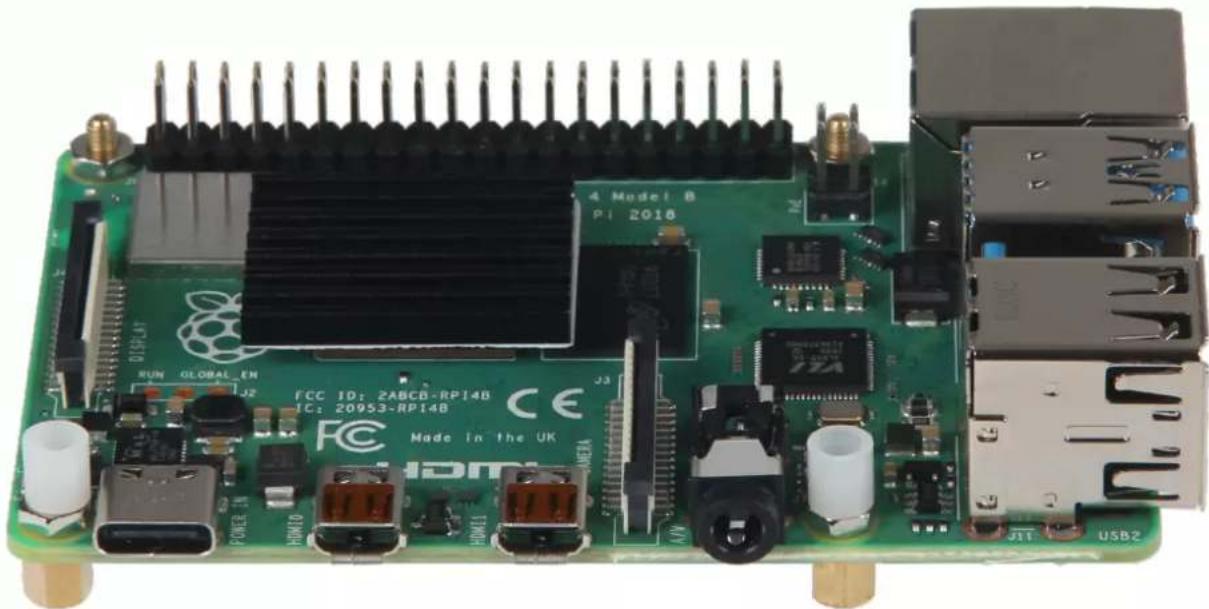
natural_image
Green Raspberry Pi 2018 integrated circuit board with visible components and connectors (no readable text or symbols beyond product labels)Now place your StromPi on the Raspberry Pi and connect the cable for the wide-range power supply.
Please note that, depending on the cable you use for this, you will have to insert it already through the hole provided in the back panel.
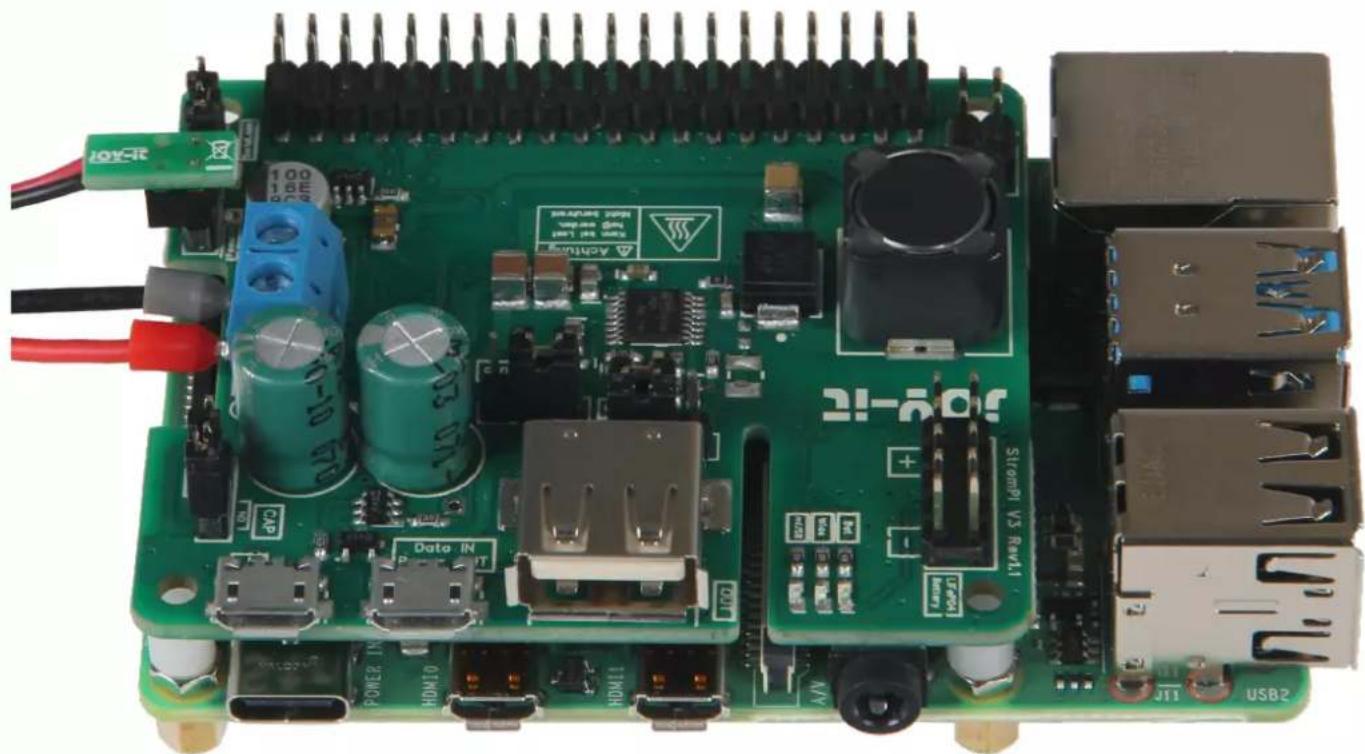
Also Connect the included cable to the reset pins of your StromPis as shown in the picture below. With the Rev 1.1 these are labeled Power On.
natural_image
Green Raspberry Pi circuit board with various components and connectors (no readable text or symbols)Now you can plug the Battery-HAT onto the StromPi.
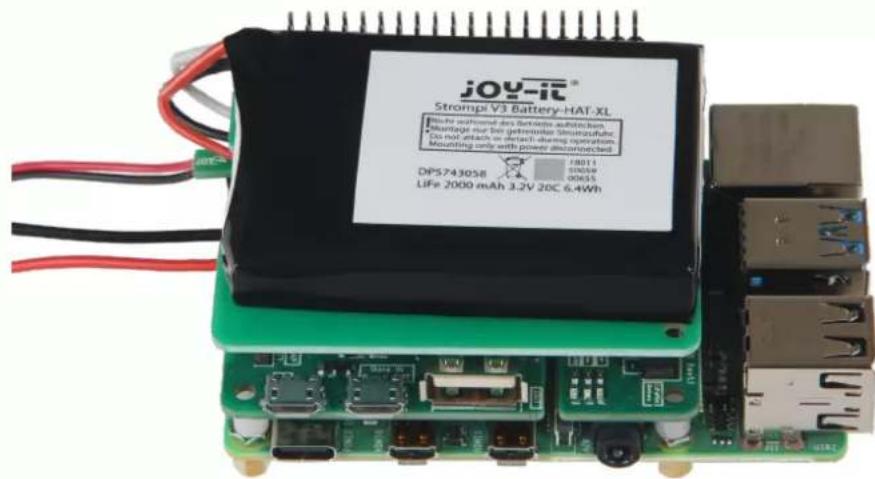
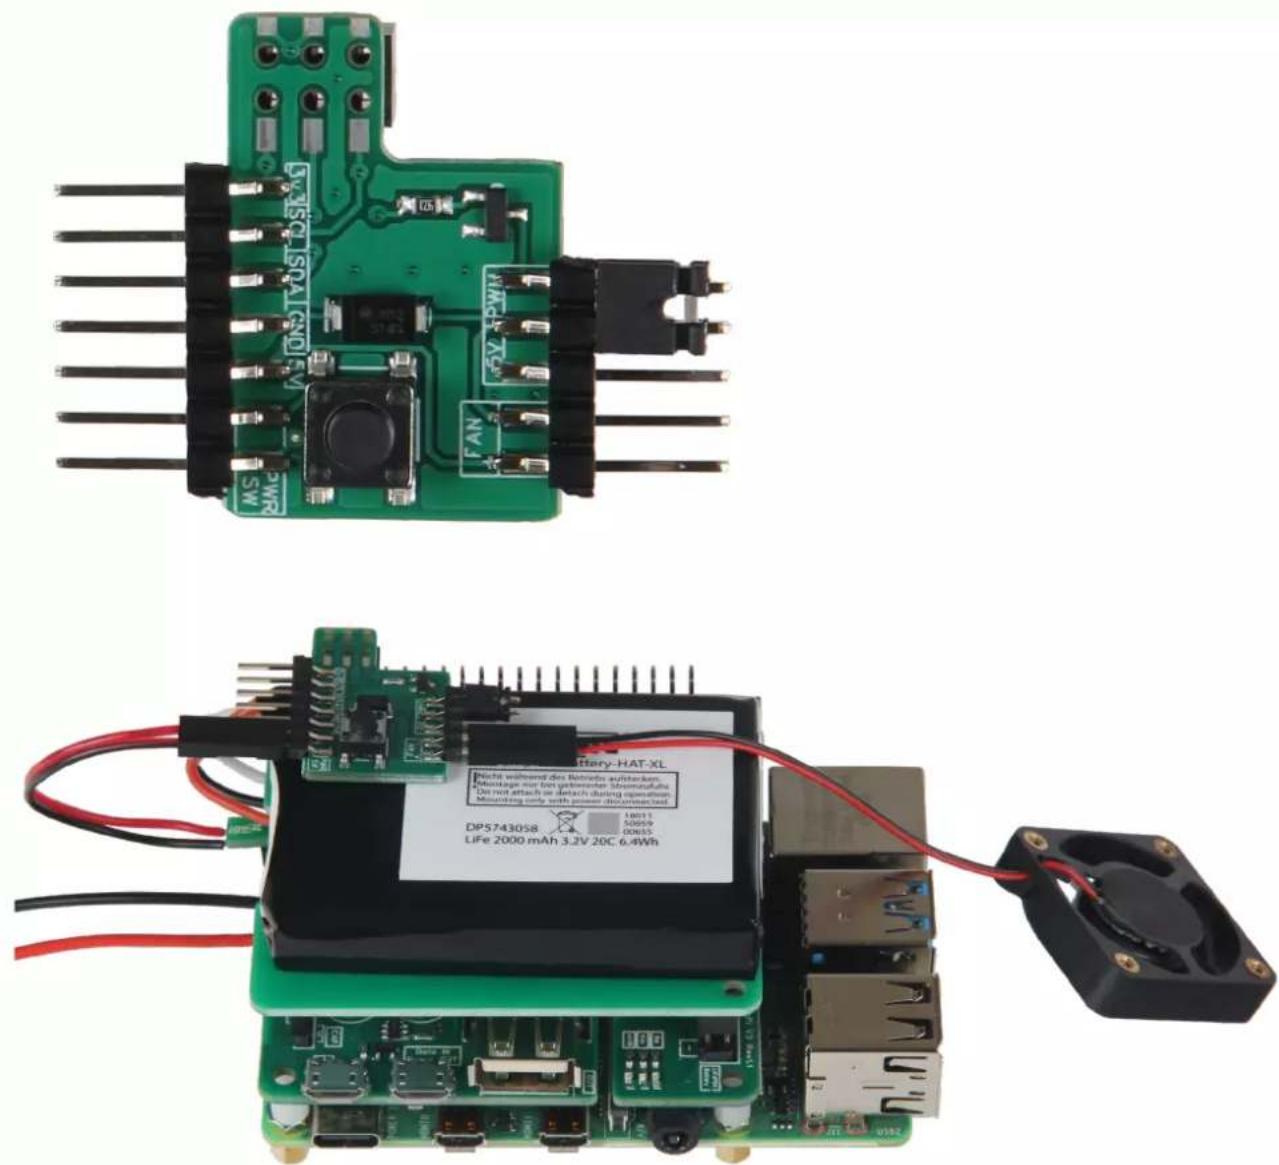
Next, plug the supplied circuit board onto the first pins of the Battery-HAT and connect the cables previously soldered to the StromPi to the lower two pins on the left side of the board. It does not matter which cable is plugged to which pin.
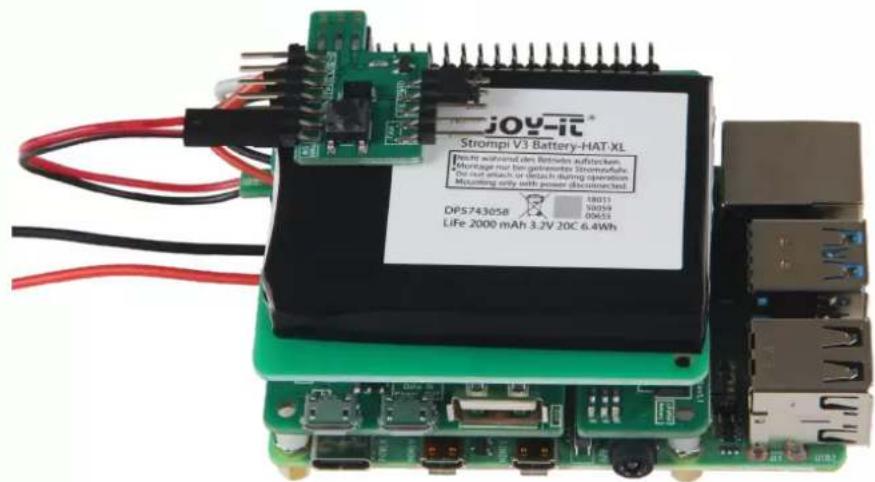
If you use the smaller 1000mAh Battery-HAT, you have to stick the supplied foam spacer on the board from below.
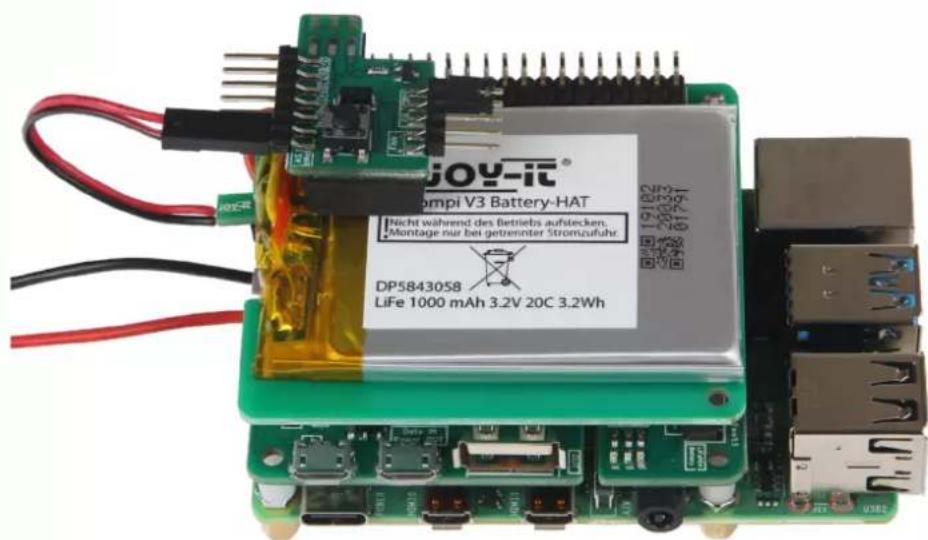
Now connect the fan to the lower two pins on the right side of the board. The red cable must be connected to the + pin and the black cable to the - pin.
You can either connect the fan permanently to 5V, which will cause it to rotate continuously at full power, or you can control the fan speed with a PWM signal, which allows you to make the fan speed dependent on the CPU temperature of the Raspberry Pi. To do this, set the jumper on the right side to either 5V or PWM.
natural_image
Two electronic circuit boards with labeled components and wiring, one showing a green PCB and the other a black device with red wires (no readable text or symbols)The fan should be aligned with the brass sleeves facing upwards, as shown in the picture. This way the fan blows the warm air out of the case.
A Python script for PWM fan control can be found at the end of this manual.
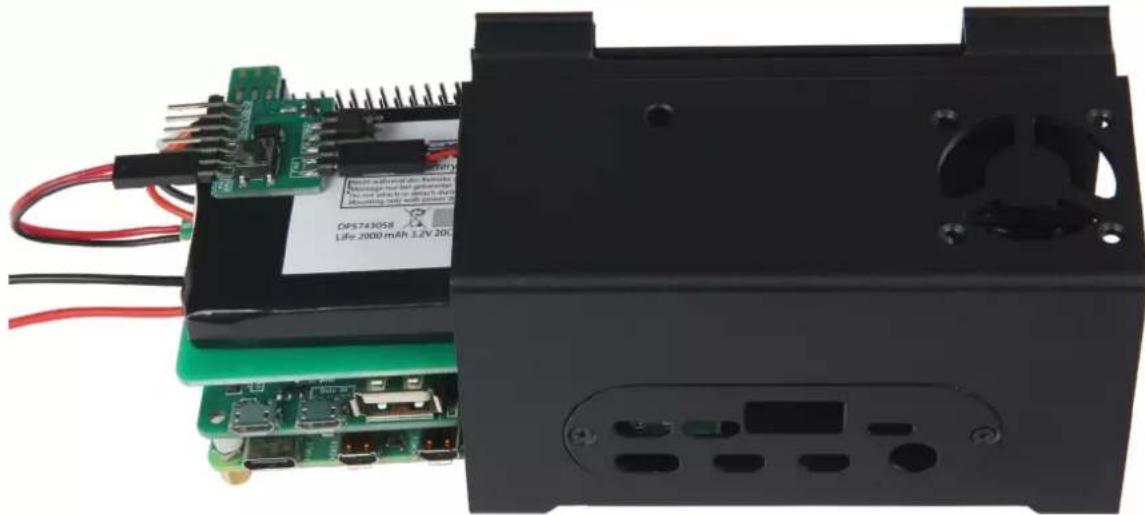
Now slide your Raspberry Pi into the housing.
natural_image
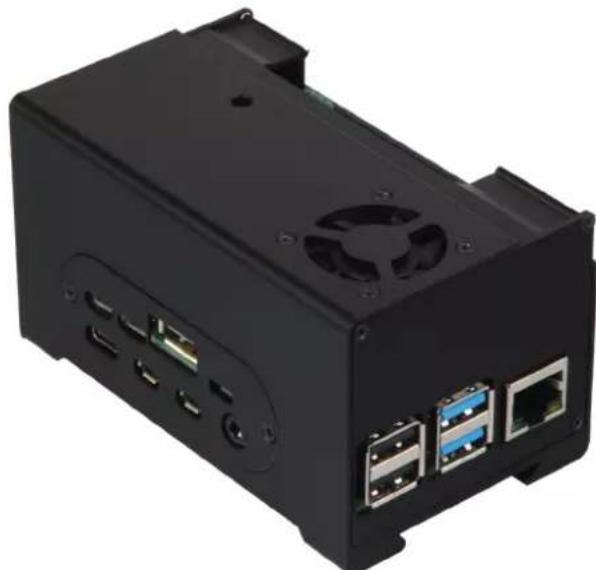
Interior view of an electronic device showing internal components including a circuit board, battery pack, and fan (no readable text or symbols)Screw the fan to the case with the long black screws. Make sure that no cable gets to the blades of the fan.
natural_image
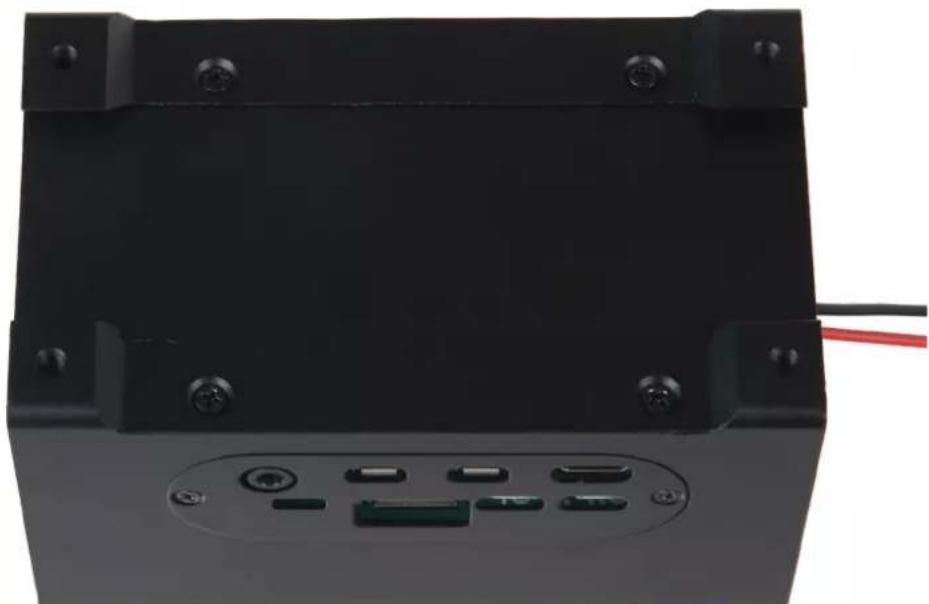
Black rectangular electronic device casing with ports and ventilation slots (no visible text or symbols)Now fix the Raspberry Pi with the thicker black screws from the bottom of the case.
natural_image
Close-up of a black electronic device rear panel with multiple ports and mounting holes (no visible text or symbols)Next, screw on the back cover for the wide-range input.
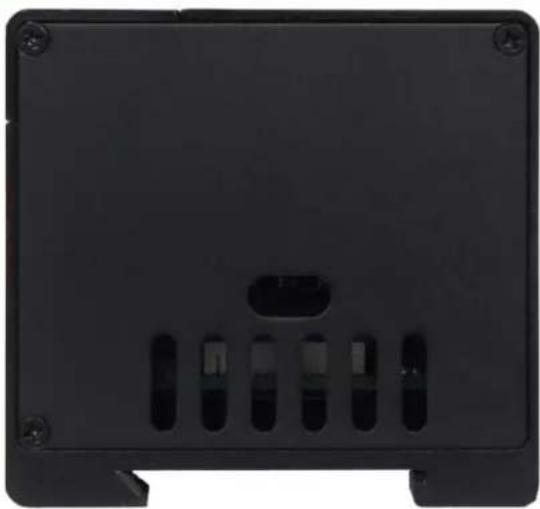
natural_image
Back view of a black electronic device casing with multiple slots and mounting holes (no text or symbols visible)Now insert the cover for the GPIO ports.
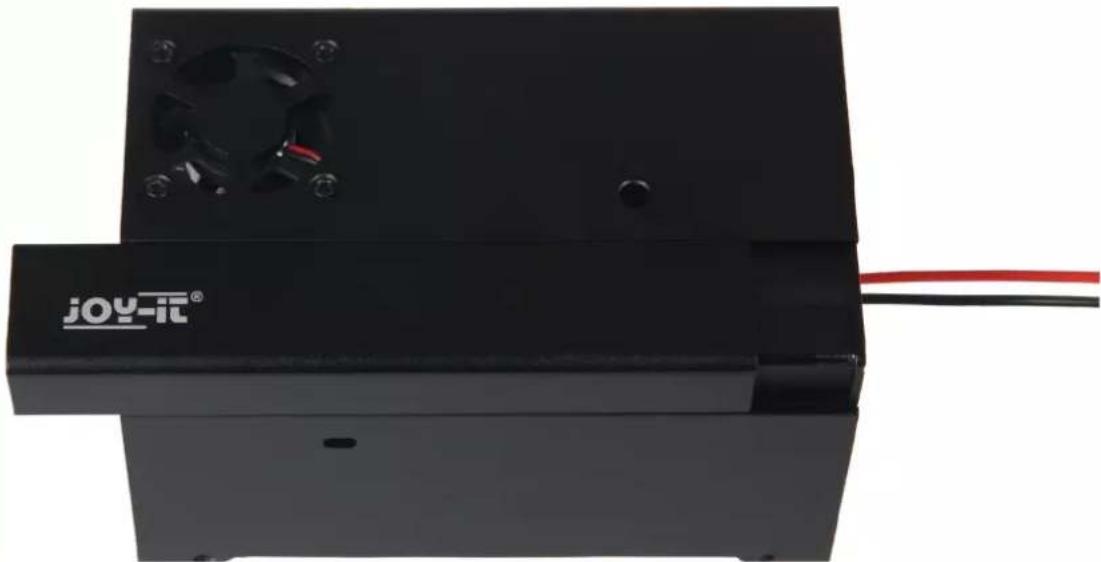
natural_image
Black JOY-IT® electronic device with red cable and fan (no visible text or symbols beyond branding)Install the front cover for the USB and Ethernet ports. Note that the Pi3 and Pi4 require different covers.
Pi 4
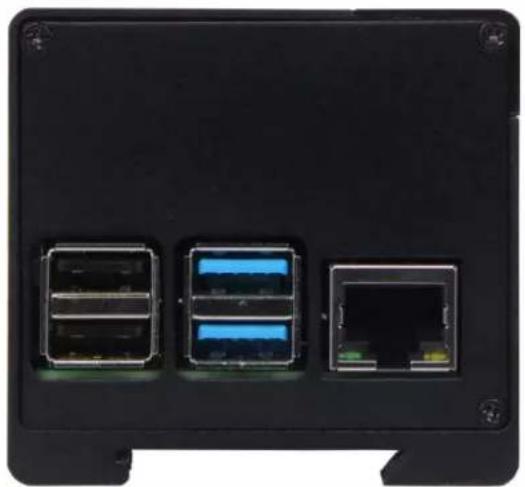
natural_image
Back panel of a black electronic device showing three ports: two connected to a network and one linked to a network interface (no text or symbols visible)Pi 3
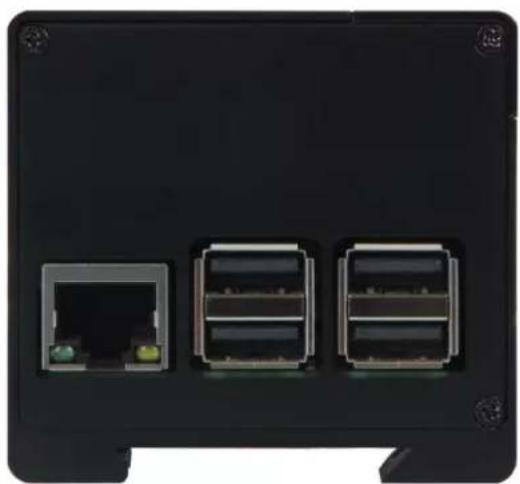
natural_image
Back view of a black electronic device showing three Ethernet ports with connectors (no text or symbols visible)If you want to mount the housing on a DIN rail,
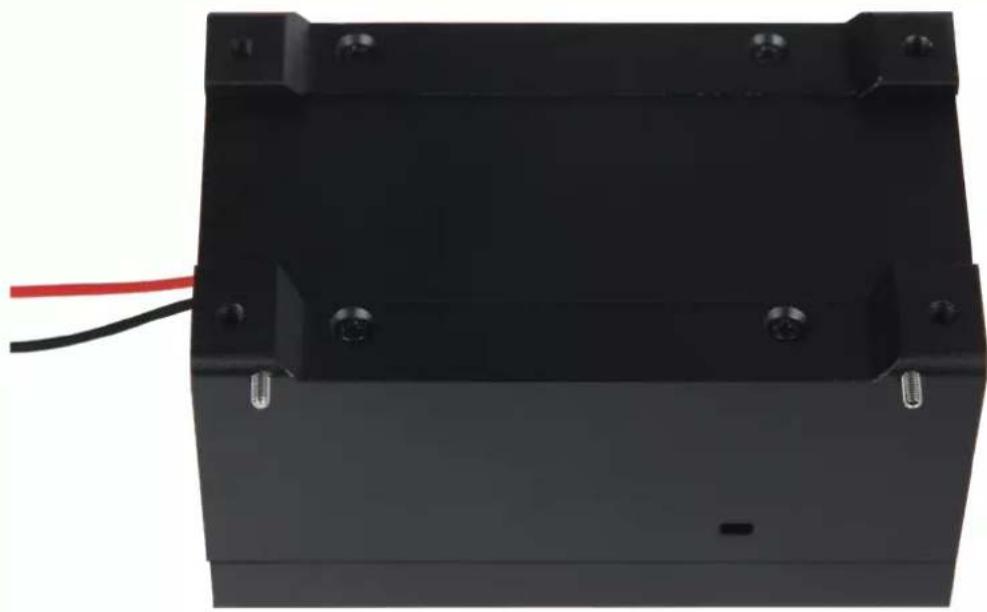
you can screw the two grub screws into the housing.
However, do not tighten the screws until you have placed the housing in the desired position on the DIN rail.
natural_image
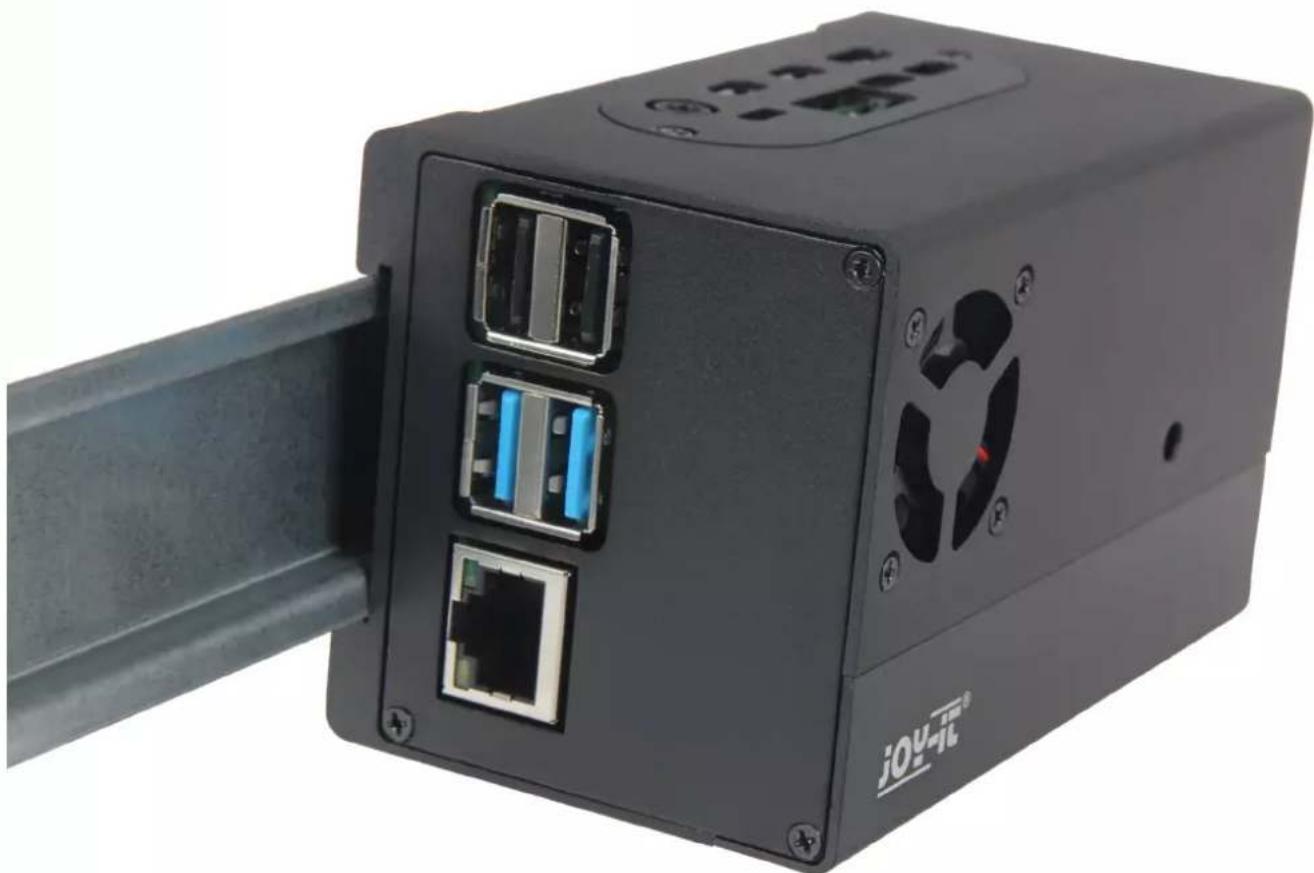
Black rectangular battery casing with red and black wires attached, no visible text or symbolsFor mounting on a DIN rail, first hook the lower side and then press the upper part.
You can still move the housing on the DIN rail. To fix it on the rail, tighten
natural_image
Close-up of a black Jouv-TE device with two Ethernet ports and a connector, showing internal wiring (no text or symbols visible on the device body)3. SOFTWARE FOR FAN CONTROL
This program controls the fan speed based on the CPU temperature.
To run the program, you must first download the required library. This is done with the following commands:
sudo apt-get update
sudo apt-get upgrade
sudo apt-get install python3-pip
sudo pip3 install gpio zero RPi.GPIO
from gpio zero import CPUTemperature, PWMLED
from time import sleep

led = PWMLED(2) # PWM-Pin (GPIO2)

startTemp = 55 # Temperature at which the fan switches on

pTemp = 4 # Proportional part
iTemp = 0.2 # Integral part

fanSpeed = 0 # Fan speed
sum = 0 # variable for i part

while True: # Control loop
    cpu = CPUTemperature() # Reading the current temperature values
    actTemp = cpu.temperature # Current temperature as float variable

    diff = actTemp - startTemp
    sum = sum + diff
    pDiff = diff * pTemp
    iDiff = sum * iTemp
    fanSpeed = pDiff + iDiff + 35

    if fanSpeed > 100:
    fanSpeed = 100
    elif fanSpeed < 35:
    fanSpeed = 0

    if sum > 100:
    sum = 100
    elif sum < -100:
    sum = -100

    # print(str(actTemp) + "C," + str(fanSpeed))
    led.value = fanSpeed / 100 # PWM Output

sleep(1)
To run the program automatically when the Raspberry Pis is started, carry out the following steps.
Enter the following command in the console:
sudo nano /etc/rc.local
Here you can add the script to the autostart. The following command must be inserted before the exit 0 command.
python3 /home/pi/Skriptname.py &
If you have not saved the script in the /home/pi/ directory, you will need to change the path accordingly.
GNU nano 3.2
/etc/rc.local
#!/bin/sh -e
#
<h1 id="rclocal">rc.local</h1>
#
<h1 id="this-script-is-executed-at-the-end-of-each-multiuser-runlevel">This script is executed at the end of each multiuser runlevel.</h1>
<h1 id="make-sure-that-the-script-will-exit-0-on-success-or-any-other">Make sure that the script will "exit 0" on success or any other</h1>
<h1 id="value-on-error">value on error.</h1>
#
<h1 id="in-order-to-enable-or-disable-this-script-just-change-the-execution">In order to enable or disable this script just change the execution</h1>
<h1 id="bits">bits.</h1>
#
<h1 id="by-default-this-script-does-nothing">By default this script does nothing.</h1>
#
<h1 id="print-the-ip-address">Print the IP address</h1>
_IP=$(hostname -I) || true
if [ "$_IP" ]; then
    printf "My IP address is %s\n" "$_IP"
fi

python3 /home/pi/fan_control.py &
exit 0
4. ADDITIONAL INFORMATION
Our information and take-back obligations according to the
Electrical and Electronic Equipment Act (ElektroG)

Symbol on electrical and electronic equipment:
This crossed-out dustbin means that electrical and electronic appliances do not belong in the household waste. You must return the old appliances to a collection point.
Before handing over waste batteries and accumulators that are not enclosed by waste equipment must be separated from it.
Return options:
As an end user, you can return your old device (which essentially fulfils the same function as the new device purchased from us) free of charge for disposal when you purchase a new device.
Small appliances with no external dimensions greater than 25 cm can be disposed of in normal household quantities independently of the purchase of a new appliance.
Possibility of return at our company location during opening hours:
Simac GmbH, Pascalstr. 8, D-47506 Neukirchen-Vluyn, Germany
Possibility of return in your area:
We will send you a parcel stamp with which you can return the device to us free of charge. Please contact us by e-mail at Service@joy-it.net or by telephone.
Information on packaging:
If you do not have suitable packaging material or do not wish to use your own, please contact us and we will send you suitable packaging.
5. SUPPORT
If there are still any issues pending or problems arising after your purchase, we will support you by e-mail, telephone and with our ticket support system.
E-Mail: service@joy-it.net
Ticket system: http://support.joy-it.net
Telephone: +49 (0)2845 98469-66 (10-17 o'clock)
For further information please visit our website:
www.joy-it.net
Brand : Joy-It
Model : RB-StromPi3-Case
Category : Computer Case