C2231 - Oven Caple - Free user manual and instructions
Find the device manual for free C2231 Caple in PDF.


| Product Type | Built-in Electric Oven |
| Brand | Caple |
| Model | C2231 |
| Energy Source | Electric |
| Installation Type | Built-in |
| Dimensions (H x W x D) | 595 x 595 x 550 mm |
| Oven Capacity | 66 L |
| Energy Efficiency Class | A |
| Temperature Range | 50°C - 250°C |
| Cooking Functions | Fan, Grill, Fan-Assisted Grill, Rotisserie (optional), Defrost |
| Control Type | Manual with Timer |
| Cleaning Type | Catalytic Liners (side panels) |
| Safety Features | Child Lock, Cool Touch Door, Automatic Switch-Off |
| Interior Light | Yes |
| Number of Shelves | 2 |
| Net Weight | 30 kg |
| Power Consumption (max) | 2.9 kW |
| Annual Energy Consumption | 85 kWh (typical) |
| Brand Origin | United Kingdom |
Frequently Asked Questions - C2231 Caple
User questions about C2231 Caple
0 question about this device. Answer the ones you know or ask your own.
Ask a new question about this device
Download the instructions for your Oven in PDF format for free! Find your manual C2231 - Caple and take your electronic device back in hand. On this page are published all the documents necessary for the use of your device. C2231 by Caple.
USER MANUAL C2231 Caple
Classic Single Oven Instruction Manual
C2231
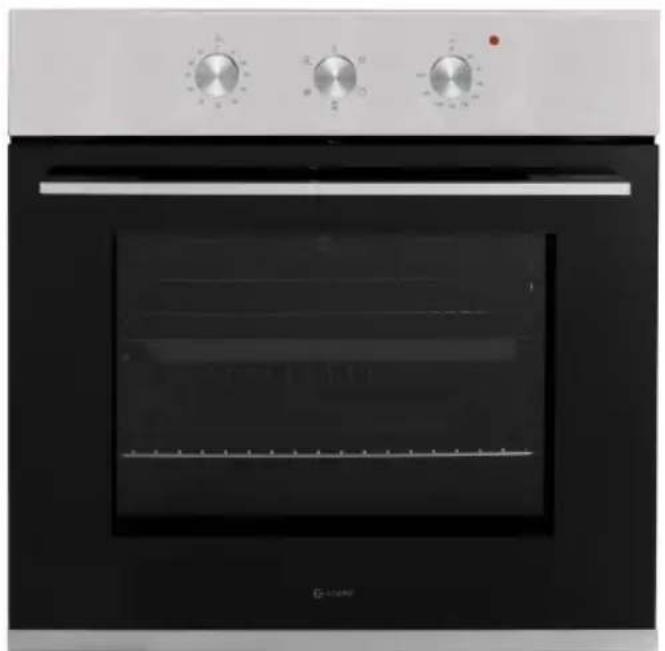
natural_image
Front view of a stainless steel oven with three rotary gauges (no visible text or labels)CONTENTS
Safety Warnings 3
Installation Warnings 7
Environmental Protection 10
Warranty 10
Installation 12
Oven Dimensions 12
Electrical Connection 13
Using your Oven 14
Cooking Guidelines 14
Oven Functions 15
Telescopic Runners (Optional Accessory) 16
Side Racks 16
Care and Maintenance 17
Replacing the Oven Lights 18
Troubleshooting 19
Removing the Oven Door 20
Removing the Glass Panels 21
Caple Contact Details 24
SAFETY INSTRUCTIONS
Read these instructions carefully and completely before using your appliance, keep it in a convenient place for reference when necessary.
-This appliance can be used by children aged from 8 years and above.
-Persons with reduced physical, sensory or mental capabilities or lack of experience and knowledge must be supervised and given appropriate instruction concerning the use of the appliance in a safe way and understand the hazards involved.
-Children shall not play with the appliance.
-Cleaning and user maintenance should not be carried out by children without supervision.
-The appliance is not intended to be operated by means of an external timer or separate remote control system.
WARNING:
-The appliance and its accessible parts become hot
-during use. Care should be taken to avoid touching heating elements.
-Children less than 8 years of age should be kept away unless continuously supervised.
-To prevent fire hazards do not store items on the -cooking surfaces.
-During use, handles can get hot.
-Do not use harsh abrasive cleaners or sharp metal scrapers to clean the oven door glass or any other surface of the appliance as it can scratch the surface which may result in the glass shattering or permanent damage to the surface.
-Do not use steam cleaners for cleaning the appliance.
-Ensure the appliance is switched off before replacing the light to avoid the possibility of electric shock.
CAUTION:
-Accessible parts may be hot when the cooking or grilling is in use. Young children should be kept away.
-Your appliance is produced in accordance with all applicable local and international standards and regulations.
-Maintenance and repair work must be made only by authorised Caple service technicians. Installation and repair work that is carried out by unauthorised technicians may endanger you.
-It is dangerous to alter or modify the specifications of the appliance in any way.
-Prior to installation, ensure that the local distribution conditions (electricity voltage and frequency) and the requirements of the appliance are compatible.
The requirements for this appliance are stated on the rating label.
-This appliance is designed only for cooking food and is intended for indoor use.
-This product is not designed for commercial use, it is a household appliance only. It is not intended to be used in:
- Staff kitchen areas in shops, offices and other working environments.
- Bed and breakfast type environments.
- By clients in hotels, motels and other residential type environments.
-Do not try to lift or move the appliance by pulling the door handle.
-All possible security measures have been taken to ensure your safety. Since the glass may break, you should be careful while cleaning to avoid scratching.
-Avoid hitting or knocking on the glass with accessories.
-Ensure that the supply cord is not wedged during the installation. If the supply cord is damaged, it must be replaced by a Caple service technician or similarly qualified persons in order to prevent a hazard.
-While the oven door is open, do not let children climb on the door or sit on it.
INSTALLATION WARNINGS
-Do not operate the appliance before it is fully installed.
-The appliance must be installed by an authorised technician.
-Caple is not responsible for any damage that may be caused by defective placement and installation by unauthorised persons.
-When unpacking the appliance, make sure that it is not damaged during transportation. In the case of any defect; do not use the appliance and contact your retailer or Caple Service immediately.
-Materials used for packaging (nylon, staplers, styrofoam etc) may cause harmful effects to children they should be disposed of immediately.
- Protect your appliance against atmospheric effects. Do not expose it to effects such as sun, rain, snow etc.
-The surrounding materials of the appliance (i.e. kitchen cabinet or furniture) must be able to withstand a minimum temperature of 120^ C.
DURING USAGE
-Before using the oven for the first time, heat the empty oven at max. temperature for 1 hour – removing any unpleasant smells and smoke caused by working residues and thermal insulation. Make sure you do this in a well ventilated area.
-During usage, the outer and inner surfaces of the oven get hot. While opening the oven door, step back to avoid the hot steam coming out of the oven as there may be a risk of burns.
-Do not put flammable or combustible materials in or near the appliance when it is operating.
-Always use oven gloves to remove and replace food in the oven.
-Pay close attention to the oven while cooking with solid or liquid oils as they could potentially catch fire when oven is hot.
-Never pour water on flames that are caused by oil. Cover the saucepan or frying pan with its lid in order to choke the flame and turn the oven off.
-If you know you will not be using the appliance for a while switch it off from the main supply and unplug it.
-The oven shelves and trays incline when pulled out. Be careful not to let hot liquid spill over.
-When the door of the oven is open, do not leave anything on it. It may unbalance your appliance or damage the door.
-Do not put anything heavy, flammable or ignitable (nylon, plastic bag, paper or cloth etc) into the oven. This includes cookware with plastic accessories (e.g. handles). Do not hang towels, dishcloths or clothes from the appliance or its handles.
-Do not use the oven for storage purposes.
-Do not touch the appliance with wet hands.
-Do not obstruct the ventilation openings.
-Do not allow supply cords from other small appliances to come into contact with the oven.
-Before operating the Pyrolytic function, ensure all internal shelves, trays and side racks are removed.
-Before use, remove all plastic films protecting some parts of the appliance (fascia - panel, parts in stainless steel, etc)
-Do not use the appliance to heat a room.
-When the appliance is not in use, we recommend you turn it off, and isolate it from the electrical supply.
DURING CLEANING AND
MAINTENANCE
-Always switch off the appliance from the mains isolating the electrical supply before any cleaning or maintenance.
-To maintain the efficiency and safety of your appliance, we recommend you always use original spare parts and to call only our authorised Caple Service agents in case of need.
ENVIRONMENTAL PROTECTION
Waste electrical products should not be disposed of with household waste. Please recycle where facilities exist. Check with your Local Authority or retailer for recycling advice. This appliance is marked according to the European directive on Waste Electrical and Electronic Equipment (WEEE).
By ensuring this product is disposed of correctly, you will help prevent potential negative consequences for the environment and human health, which could otherwise be caused by inappropriate waste handling of this product. The symbol on the product indicates that this product may not be treated as household waste. Instead it shall be handed over to the applicable collection point for the recycling of electrical and electronic equipment. Disposal must be carried out in accordance with local environmental regulations for waste disposal.
For more detailed information about treatment, recovery and recycling of this product, please contact your local council, your household waste disposal service or the retailer where you purchased the product.
WARRANTY
Your new appliance is covered by warranty. The warranty card is enclosed - if it is missing, you must provide the following information to your retailer in order to receive a replacement: date of purchase, model and serial number. Registration can also be completed online by visiting www.caple.co.uk.
Ensure you keep your warranty card safe, you may need to show it to Caple Service together with proof of purchase. If you fail to show your warranty card you will incur all repair charges.
Spare parts are only available from Caple Service and spare parts authorised centres.
TECHNICAL FICHE
This appliance conforms to all current and applicable energy regulations. To view the Technical Fiche that supports the energy labelling data, please visit the product page on our website www.caple.co.uk
CE DECLARATIONS OF CONFORMITY CE
This appliance has been manufactured to the strictest standards and complies with all applicable legislation, Low Voltage Directive (LVD) and Electromagnetic Compatibility (EMC).
UKCA DECLARATIONS OF CONFORMITY UK CA
This appliance has been manufactured to the strictest standards and complies with all applicable legislation.
IMPORTANT:
ISOLATE YOUR OVEN FROM THE ELECTRICAL SUPPLY BEFORE PERFORMING INSTALLATION OR MAINTENANCE.
Installation should be carried out according to the instructions by a professionally qualified person only.
The manufacturer declines all responsibility for any damage to persons, animals or materials due to incorrect installation.
FITTING THE APPLIANCE:
Fit the appliance into its surround (beneath a worktop or above another appliance in a tall housing) by inserting screws and plastic covers into the 2 holes (A - fig.3) that can be seen in the frame of the oven when the door is open.
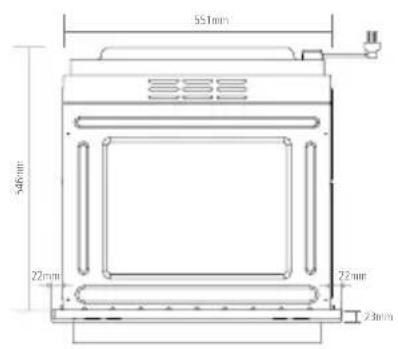
For the most efficient air circulation, the oven should be fitted according to the dimensions shown in fig. 1 & 2.
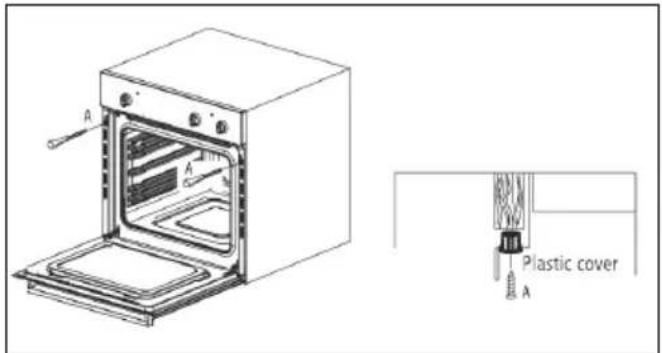
Fig3
The rear panel of the cabinet must be removed so that air can circulate freely. The panel to which the oven is fitted should have a gap of at least 70 mm at the rear for ventilation (fig.4 & fig.5).
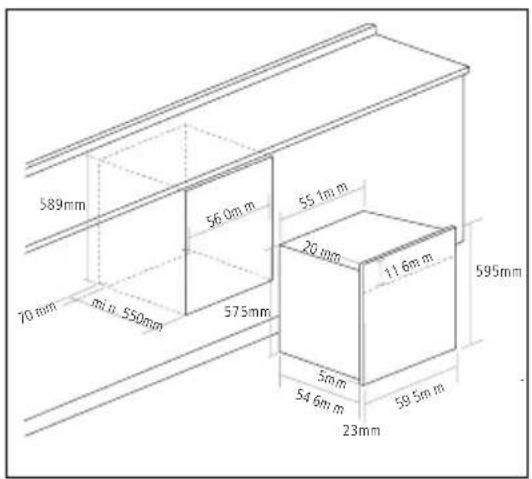
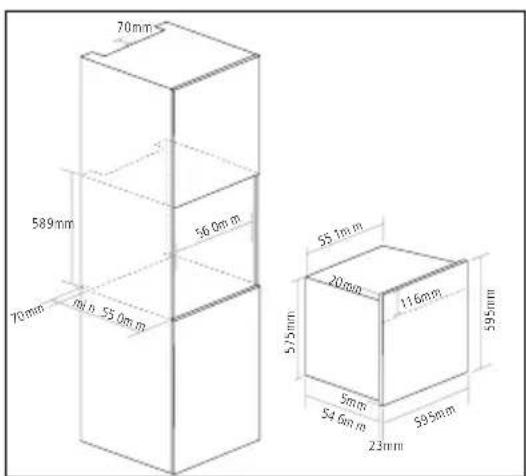
Fig1 Fig2
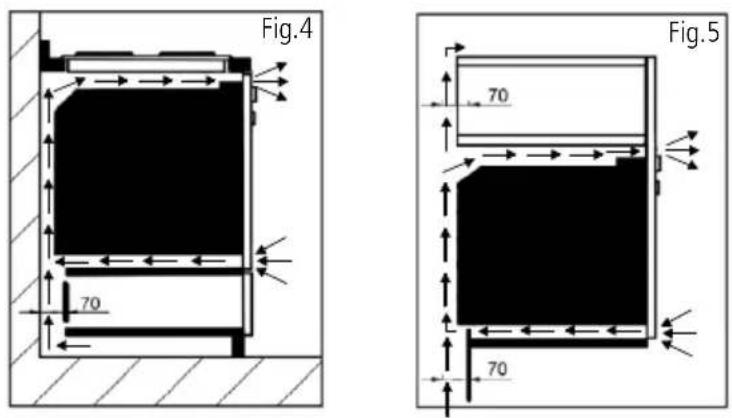
See below for full dimensional drawings of your oven to help with installation.
For a built-in oven to work well the cabinet must be of the right type.
The panels of the adjoining furniture should be heat resistant. Particularly when the adjoining furniture is made of veneered wood, the adhesives should be able to withstand a temperature of 120^ C. Plastic materials or adhesive which cannot withstand this temperature may become deformed or unstuck.
To comply with safety regulations, once the appliance has been fitted it should not be possible to make contact with the electrical parts.
All parts which offer protection should be fixed in such a way that they cannot be removed without the use of a tool.
OVEN DIMENSIONS
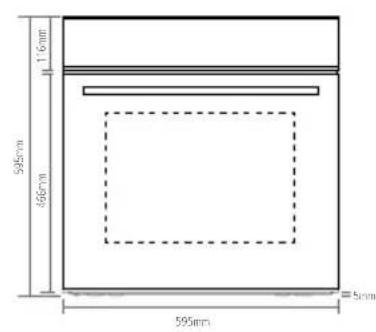
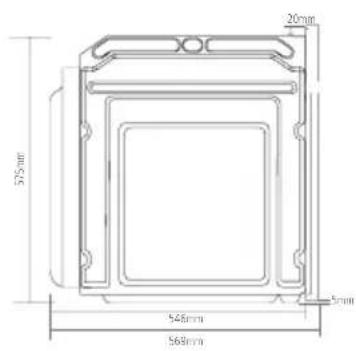
WARNING: THIS APPLIANCE MUST BE EARTHED
Check that the power rating of the mains supply is suitable for the maximum power of the appliance as indicated on the rating label.
The fuse rating for this appliance is 13amp.
The appliance is supplied with a mains lead it should be "Hard wired" as follows:
The "yellow/green" earth wire, which must be connected to a terminal, and has to be about 10mm longer than the other wire.
The neutral wire has to be connected to the terminal marked with a letter N.
The Live wire should only be connected to the terminal marked L.
Mains connection can also be made by fitting a double pole switch with a minimum gap between the contacts of 3mm, proportionate to the load and complying with the regulations in force.
The yellow/green earth wire should not be controlled by the switch.
When a double pole switch is used for mains supply connection it should be easily accessed, once the appliance is in position.
IMPORTANT:
The mains supply cable should be positioned so that it is never subjected to temperatures which are more than 50^ C above ambient temperature.
The electrical safety of the appliance can only be guaranteed when it has been correctly connected to a properly earthed mains electrical supply, as laid down in the current regulations for electrical safety.
The manufacturer cannot be held responsible for any damage to persons or objects due to lack of an earth connection.
The ovens are designed to operate with a mono-phase alternating current of 220-240V, 50Hz.
Before the installation of the appliance, check the specifications on the rating label.
USING YOUR OVEN
CONTROL PANEL:
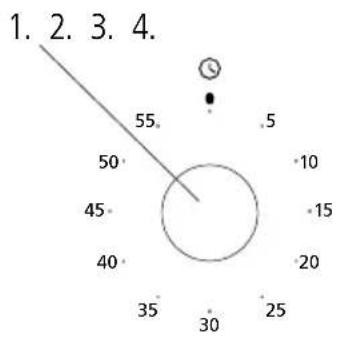
radar
| Position | Value | |---|---| | 1 | 55 | | 2 | 10 | | 3 | 15 | | 4 | 20 | | 5 | 25 | | 6 | 30 | | 7 | 35 | | 8 | 40 | | 9 | 45 | | 10 | 50 | | 11 | 55 | The chart displays a single data point at position 5. The axis labels are '1', '2', '3', '4' and their corresponding numeric values on the axes.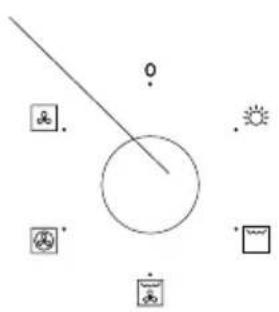
natural_image
Simple diagram with a circle, diagonal line, and various icons (sun, rain, water, etc.) without any text or labels.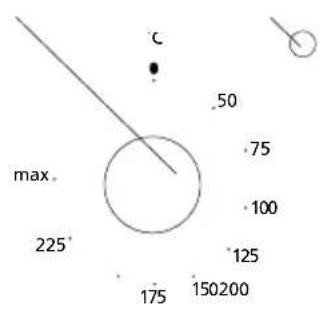
radar
| Angle (°) | Value | |---|---| | 0 | 50 | | 30 | 75 | | 60 | 100 | | 90 | 125 | | 120 | 150200 | | 150 | 175 | | 180 | max. | | 210 | 225 |- Minute minder knob
- Function control knob
- Temperature control knob
- Temperature indicator light
COOKING GUIDELINES
Set the function for the type of cooking required.
Preheat the oven, setting the thermostat to the required temperature. Once the oven has heated to the selected temperature, the orange temperature indicator light will go out. You can now insert the food.
This same light will appear again automatically during operation of the oven to indicate that the heating elements are on.
NOTE:
Remove the drip tray when using the oven for fan cooking, roasting etc. The tray should be left in place only when using the grill, as its purpose is to catch falling droplets of fat. Food should be placed in oven dishes with raised edges and positioned centrally under the grill.
OVEN FUNCTIONS
| LIGHT Internal oven light. | ||
| TURBO DEFROST | The air at ambient temperature is distributed inside the oven to speed up defrosting time. | |
| FAN HEAT | Both the fan and the circular heating element operate together. The fan evenly distributes the hot air (between 50°C and MAX) inside the oven. This is ideal for cooking several types of food e.g. meat and fish, at the same time without affecting taste and smell. It is also ideal for delicate pastries. | |
| GRILL | This function can be used for grilling and gratinating food. When grilling, the oven door must be closed. | |
| TURBO GRILL | This function can be used for grilling and gratinating food quicker than other grill functions. When grilling, the oven door must be closed. |
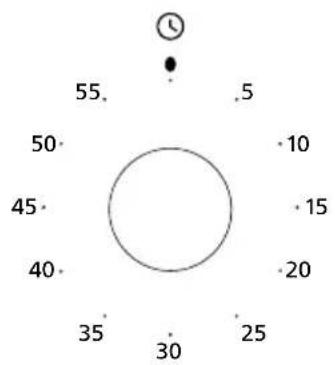
MINUTE MINDER
To set the Minute minder, turn the Minute minder knob clockwise to set the required time.
The Minute minder can be adjusted from 1 to 60 minutes.
An alarm will sound to inform you when the set time is up.
radar
| Direction | Value | |---|---| | Top | 10 | | Left | 55 | | Right | .5 | | Center | 0 | | Left | 50 | | Right | 10 | | Center | 15 | | Left | 45 | | Right | 20 | | Center | 35 | | Right | 25 | | Center | 30 |TELESCOPIC RUNNERS (OPTIONAL ACCESSORY)
To assemble the telescopic runners:
Remove the side racks (see section below and Fig.2)
Choose which shelf to use with the telescopic runner. Paying attention to the direction in which the runner is to be extracted, position joint 'B' and joint 'C' on the frame (see Fig.1).
Squeeze the bars together slightly and clip either end of the telescopic runners on to the side racks.
Finally, refit the side racks (See below and Fig.2)
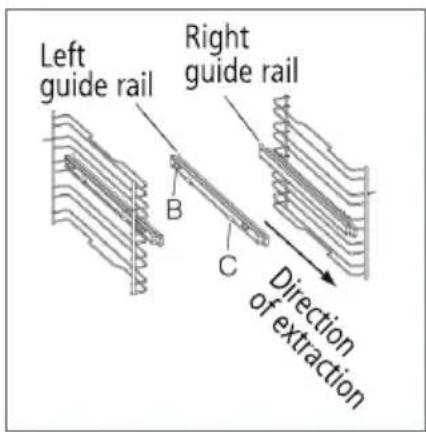
Figure 1.
NOTE:
Telescopic runners are optional accessories and are not included.
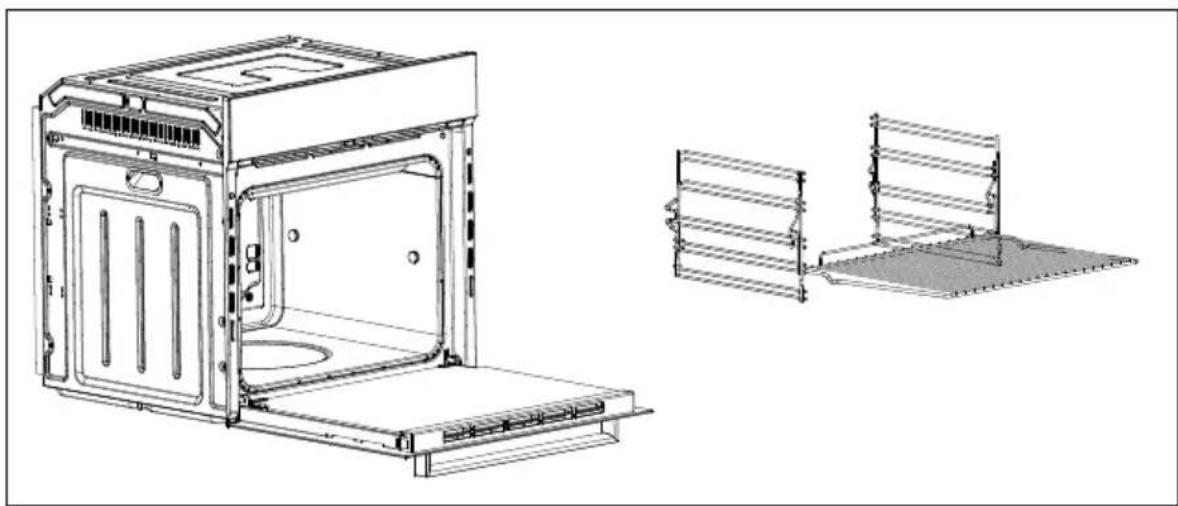
SIDE RACKS
Attach the side racks by pushing these onto the furthest steel clip and then clicking the other end onto the closest steel clip.
natural_image
Technical line drawing of a microwave oven and its internal structure (no text or symbols)Figure 2.
IMPORTANT:
Unplug your oven before cleaning, or performing maintenance!
To extend the life of your oven, it must be cleaned frequently, keeping in mind the following:
DO NOT USE STEAM EQUIPMENT TO CLEAN THE APPLIANCE
To protect against the risk of electrical shock, do not immerse the unit, cord or plug in water or other liquid, or sprinkle water to clean the appliance.
Don't clean the appliance when it is still hot. The inside and external surfaces of the oven should preferably be cleaned with a damp cloth when it has cooled down.
Wash all accessories in hot soapy water or in a dishwasher, wipe dry with a paper towel or cloth.
If you use your oven for an extended period of time, condensation may form.
Dry it using a soft cloth.
There is a rubber seal surrounding the oven opening which guarantees its perfect functioning. Check the condition of this seal on a regular basis. If necessary, clean it and avoid using abrasive products or objects to do so. Should it become damaged, please contact Caple service. We recommend you avoid using the oven until it has been repaired.
Never line the oven bottom with aluminium foil, as the consequent accumulation of heat could compromise the cooking and even damage the enamel.
Clean the glass door using a damp cloth and dry it with a soft cloth.
Do not use harsh abrasive cleaners or sharp metal scrapers to clean the oven door glass since they can scratch the surface, which may result in shattering of the glass.
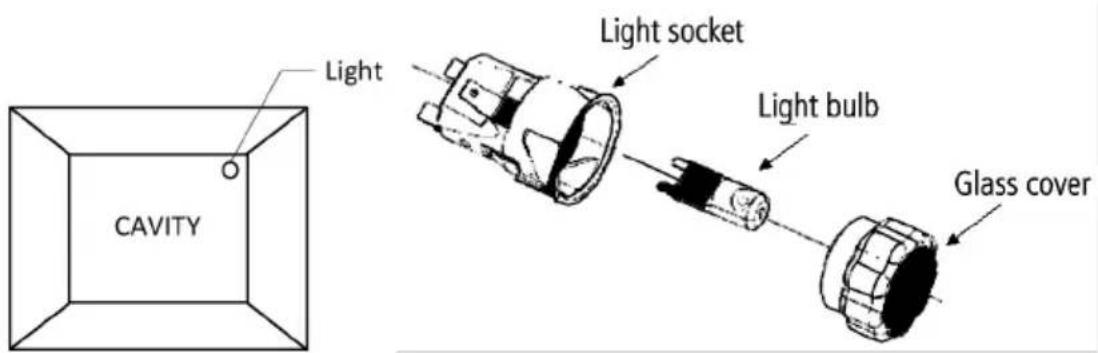
REPLACING THE OVEN LIGHT
Switch off your oven at the mains.
Remove the glass cover, by unscrewing this from the light socket.
Remove the light bulb by pulling it from the light socket and replace it with a similar bulb.
Remount the glass cover and reconnect the appliance to the power supply.
HALOGEN LIGHT CHARACTERISTICS
Voltage: AC220V-240V
Wattage: 25W
Cap: G9
DO NOT TOUCH the light bulb directly with your hands.
WARNING:
Ensure that the appliance is disconnected from the mains before replacing the light to avoid the possibility of electric shock.
| TROUBLES SOLUTION | |
| The oven does not operate | > Check it is switched on at the mains> There has been a power cut> The time is not set |
| The oven is not heating | > The thermostat is not turned to a temperature |
| The interior light does not illuminate | > Check the product is connected to the electrical supply and is switched on> Replace the bulb |
| Lower and upper parts of the oven are not cooking evenly | > Control the shelf location, cooking period and temperatures according to the manual |
If the problem still persists, please contact Caple service for assistance:
T - 0117 938 7420
E - service@caple.co.uk
USEFUL NOTES FOR BAKING
In the following table are some indicative hints for baking:
| FAULTS CAUSES REMEDIES | ||
| The upper crust is dark and the lower part too pale | Not enough heat from the bottom | > Use the natural convection position> Use deeper cake tins> Lower the temperature> Put the cake on a lower shelf |
| The lower part is dark and the upper crust too pale | Excessive heat from the bottom | > Use the natural convection position> Use lower side tins> Lower the temperature> Put the cake on a higher shelf |
| The outside is too cooked and the inside not cooked enough | Too high temperature | > Lower the temperature and increase the cooking time |
| The outside is too dry even though it is the right colour | Too low temperature | > Increase the temperature and reduce the cooking time. |
REMOVING THE OVEN DOOR
To make it easier to clean the inside of your oven, the oven door can be easily removed by proceeding as follows:
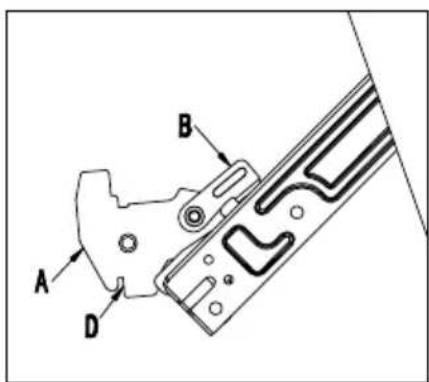
Open the door completely and lift the 2 levers "B" (Fig.1);
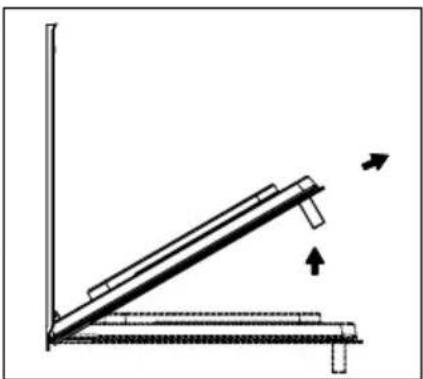
Now, shutting the door slightly, you can lift it out by pulling out the hooks "A" as shown in Fig.2.
To reassemble the door:
With the door in a vertical position, insert the two hooks "A" into the slots;
Ensure that seat "D" is hooked perfectly onto the edge of the slot (move the oven door backwards and forward slightly);
Keep the oven door open fully, unhook the 2 levers "B" downwards and then shut the door again.
natural_image
Diagram of a ladder leaning against a wall, showing force direction arrows (no text or labels)Fig.1 Fig.2
Scan the QR code below to access the 'How to video'.

REMOVING THE GLASS PANELS
The oven door is made up of 2 panes of glass with vents at the top and bottom. When the oven is operating, air is circulated through the door to keep the outer pane cool. If condensation has worked its way in between the glass panes, the door can be dismantled in order to clean in between the panes.
Remove the door from the oven (see 'Removing the door') and place it on a protective surface (e.g. on a table cloth) to prevent it getting scratched. The door handle should line up with the edge of the table. Make sure the glass lies flat to avoid breaking the glass during cleaning.
-
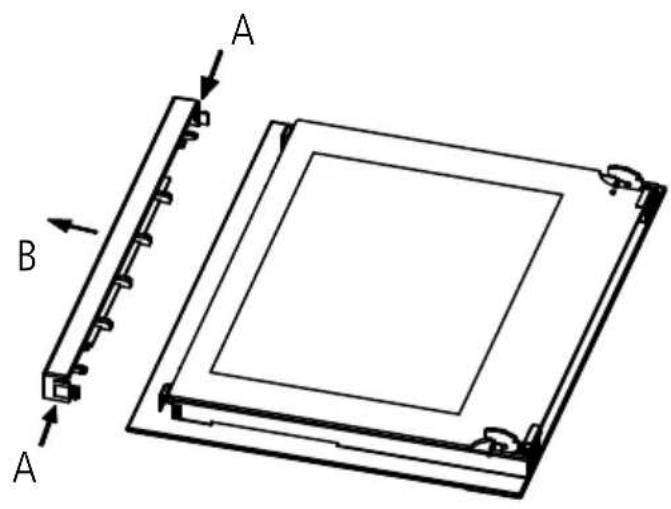
Press the button (A) on left and right side of door, take out top rail. (Fig.1)
-
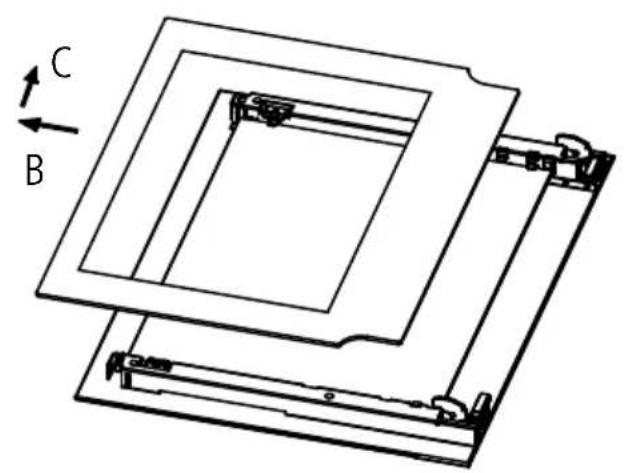
Take out inner glass slowly, following the direction of the arrow (B) then (C) (Fig.2)
Clean the glass panes and other parts with a damp microfibre cloth or a clean sponge and a solution of hot water with a little washing-up liquid. Wipe dry using a soft cloth and re-assemble following the above instructions in reverse.
natural_image
Technical diagram of a rectangular electronic component with labeled parts A and B, showing internal structure and mounting points (no text or symbols beyond labels)Fig.1 Fig.2
natural_image
Technical line drawing of a layered mechanical assembly with labeled components A, B, and C (no text or symbols beyond labels)NOTES:
NOTES:

caple
Caple Service
Fourth Way
Avonmouth
Bristol
BS11 8DW
T: 0117 938 1900
E: service@caple.co.uk
www.caple.co.uk
- Classic Single Oven Instruction Manual
- C2231
- CONTENTS
- SAFETY INSTRUCTIONS
- WARNING:
- CAUTION:
- INSTALLATION WARNINGS
- DURING USAGE
- DURING CLEANING AND
- MAINTENANCE
- ENVIRONMENTAL PROTECTION
- WARRANTY
- TECHNICAL FICHE
- CE DECLARATIONS OF CONFORMITY CE
- UKCA DECLARATIONS OF CONFORMITY UK CA
- IMPORTANT:
- FITTING THE APPLIANCE:
- OVEN DIMENSIONS
- WARNING: THIS APPLIANCE MUST BE EARTHED
- The yellow/green earth wire should not be controlled by the switch.
- USING YOUR OVEN
- CONTROL PANEL:
- COOKING GUIDELINES
- NOTE:
- OVEN FUNCTIONS
- MINUTE MINDER
- TELESCOPIC RUNNERS (OPTIONAL ACCESSORY)
- SIDE RACKS
- DO NOT USE STEAM EQUIPMENT TO CLEAN THE APPLIANCE
- REPLACING THE OVEN LIGHT
- HALOGEN LIGHT CHARACTERISTICS
- USEFUL NOTES FOR BAKING
- REMOVING THE OVEN DOOR
- REMOVING THE GLASS PANELS
- caple
Brand : Caple
Model : C2231
Category : Oven