
DBO482E - Oven Defy - Free user manual and instructions
Find the device manual for free DBO482E Defy in PDF.


| Product Type | Freestanding Electric Oven |
| Brand | Defy |
| Model | DBO482E |
| Dimensions (H x W x D) | Approx. 850 x 500 x 600 mm |
| Weight | Approx. 35 kg |
| Power Supply | 220-240 V ~ 50 Hz |
| Power Consumption | Approx. 2200 W |
| Oven Capacity | Approx. 60 Liters |
| Main Functions | Bake, Grill, Fan Assist, Defrost |
| Temperature Range | 50°C - 250°C |
| Timer | Up to 120 minutes with auto shut-off |
| Interior Light | Yes |
| Cleaning Type | Manual (enamel interior) |
| Safety Features | Child lock, Overheat protection |
| Door Type | Drop-down with cool-touch handle |
| Accessories Included | Baking tray, Wire shelf, Grill rack |
| Spare Parts Available | Yes (heating elements, thermostat, door seals) |
| Repairability Index | 7/10 (common parts and diagrams available) |
| Warranty | 2 years (standard) |
| Manual Formats | PDF download, online viewing |
Frequently Asked Questions - DBO482E Defy
User questions about DBO482E Defy
0 question about this device. Answer the ones you know or ask your own.
Ask a new question about this device
Download the instructions for your Oven in PDF format for free! Find your manual DBO482E - Defy and take your electronic device back in hand. On this page are published all the documents necessary for the use of your device. DBO482E by Defy.
USER MANUAL DBO482E Defy
natural_image
Line drawing of various household appliances including kitchen, washing machine, and monitor (no text or symbols)
natural_image
Illustration of various kitchen appliances including a microwave, oven, dishwasher, and kitchen utensil (no text or symbols)
Customer Care Line
(after sales service)
086 100 3339
Part number: 071999

Cooking
Instruction manual
- Important Safety Instructions 3
| General safety | 3 |
| Electrical safety | 3 |
| Intended use | 5 |
| Safety for children |
- General information 6
| Overview | 6 | |
| Parts | 7 | |
| Accessories | 7 | |
| Technical Specifications | 8 | |
- Installation 9
| Before installation | 9 |
| Built in oven cut outs | 10 |
| Installation and connection | 11 |
| First cleaning of the appliance | 12 |
| Initial heating | 12 |
| Tips for energy saving | 12 |
| Future transportation | 12 |
- How to use the oven 13
| General information about baking, roasting and grilling | 13 |
| How to operate the electric oven | 13 |
| Using the oven | 13 |
| Selector switch | 14 |
| How to operate the grill | 15 |
| Cooking times table | 15 |
- Maintenance and care 16
| General information | 16 |
| Cleaning the oven | 16 |
| Steam assisted cleaning | 16 |
| Removing the oven door | 17 |
| Replacing the oven light | 18 |
- Trouble Shooting 18
| 7. Branches | 19 |
| 8. Warranty | 20 |
Dear Customer,
Your new Defy oven was manufactured in a state of the art facility and has passed the strictest quality control procedures.
Please read this manual carefully before using your oven for the first time and then store it within easy reach for future reference.
This manual will provide you with information on how to operate and care for your oven to gain the maximum benefit from it.
We trust you will enjoy years of trouble free use.
EXPLANATION OF SYMBOLS

Important information

Warning—Hazardous situations

Warning—Electric shock

Caution; Warning for fire hazard

Caution; Warning for hot surfaces
PLEASE REGISTER YOUR PRODUCT AT
www.defy.co.za
DEFY APPLIANCES (PTY) LTD
P.O.BOX 12004
JACOBS
DURBAN
4026
SOUTH AFRICA
This section contains safety instructions that will help you avoid risk of injury and damage. All warranties will become void if you do not follow these instructions.
General safety
- This appliance is not intended for use by persons (including children) with reduced physical, sensory or mental capabilities or lack of experience and knowledge, unless they have been given supervision or instruction concerning the use of the appliance by a person responsible for their safety.
• Children must be supervised to prevent them from tampering with the appliance.
• Installation and repair procedures must always be performed by authorized service agents. The manufacturer shall not be held responsible for damages arising from procedures carried out by unauthorized persons which may also void the warranty. Before installation read the instructions carefully. - Do not operate the appliance if it is defective or has any visible damage.
- Make sure that the appliance function controls are switched off after every use.
Electrical safety
- If the appliance has a failure, it should not be operated unless it is repaired by an authorized service agent. There is a risk of an electric shock!
- Connect the appliance to an earthed outlet/line protected by a fuse of suitable capacity. Have the earth installation made by a qualified electrician.
- This appliance must be earthed and the manufacturer and the seller do not accept responsibility for any damage due to incorrect installation or electrical connection.
- Never wash down the appliance with water! There is the risk of electric shock!
- The appliance must be disconnected from the mains during installation, maintenance, cleaning and repair procedures.
- If the supply cord is damaged, it must be replaced by the manufacturer, its service agent or similarly qualified persons in order to avoid a hazard.
-
The appliance must be installed so that it can be completely disconnected from the network. The separation must be provided either by a mains plug, or a switch built into the fixed electrical installation according to construction regulations.
-
The rear surface of the oven gets hot when it is in use. Ensure that the electrical connection does not come into contact with the rear surface so as not to damage connections.
- Do not trap the mains cable between the oven door and frame, do not route it over hot surfaces as the cable insulation may melt and cause a fire as a result of a short circuit.
- Any work on electrical equipment must only be carried out by authorized and qualified persons.
- In case of any damage, switch off the appliance and disconnect it from the mains. To do this, switch off the circuit breaker at the wall.
- Ensure that the fuse rating is compatible with the appliance.
Appliance safety
- The appliance and its accessible parts become hot during use. Care must be taken to avoid touching heating elements inside the oven. Children must be kept away unless continually supervised.
- Never use the appliance when your judgment or coordination is impaired by the use of alcohol and/or drugs.
- Keep all ventilation slots clear of obstructions.
-
Use shelves as described on page 7.
-
Be careful when using alcoholic drinks in dishes. Alcohol evaporates at high temperatures and may ignite and cause fire when coming into contact with hot surfaces.
- Do not place any flammable materials close to the appliance as the sides may become hot during use.
- Do not heat closed tins and glass jars in the oven. The pressure build-up in the tin/jar may cause the tin/jar to burst.
- Do not place baking trays, dishes or aluminium foil directly onto the bottom of the oven. The heat accumulation may damage the bottom of the oven.
- Do not use harsh abrasive cleaners or sharp metal scrapers to clean the oven door glass as these may scratch the glass surface.
- Do not use steam cleaners to clean the appliance as this may cause an electric shock.
- Do not use the appliance if the front door glass has been removed or is cracked.
• Always use heat resistant oven gloves when putting in or removing dishes into/from the hot oven. - Ensure the appliance is switched off before replacing the lamp to avoid the possibility of an electric shock.
- Some models feature a protective film over stainless steel trim. This film must be carefully removed before using the appliance.
- Do not carry out any repairs or modifications on the appliance.
To prevent a fire hazard
- Ensure plug is well fitted into socket so that it does not spark.
- Do not extend or cut the power cable. Use only an original power cable. Do not use a damaged power cable.
- Ensure that there is no liquid or moisture on the socket where the appliance is plugged in.
Safety when working with electricity
• Defective electric equipment is one of the major causes of house fires
- Any work on electrical equipment and systems should only be carried out by authorized and qualified persons. If the appliance is damaged in any way, do not use it. Report the damage to your dealer, who will take the necessary corrective action.
• Make sure that the fuse rating is compatible with the appliance.
Intended use
- The appliance must only be used for domestic use and for the purposes for which it was designed. Commercial use will void the guarantee. This appliance is for cooking purposes only. It must not be used for other purposes, for example room heating.
- Do not use the appliance for warming plates under the grill, drying towels, dish cloths or similar textile products by hanging them on the oven door handle.
- The manufacturer shall not be liable for any damage caused by improper use or handling errors.
- The oven can be used for defrosting, baking, roasting and grilling food.
Safety for children
• Electrical appliances are dangerous to children. Keep children away from the appliance when it is operating and do not allow them to play with the appliance.
- Accessible parts of the appliance will become hot whilst the appliance is in use. keep children away until the appliance has cooled down.
- Do not place any items above the appliance that children may reach for.
- Ensure that packaging material is disposed of in a responsible manner. Plastic bags must be cut up to prevent children playing with them and accidentally suffocating.
- When the oven door is open do not load any heavy objects on it and do not allow children to sit on it. The appliance may overturn or the door hinges may be damaged.
SAVE THESE INSTRUCTIONS
Overview

flowchart
graph TD
    A["SELECTOR"] --> B["CLEAN ASSIST"]
    A --> C["GRILL"]
    A --> D["BOTTOM BAKE"]
    E["RINGER TIMER"] --> F["CONVENTIONAL BAKE"]
    E --> G["OVEN LIGHT"]
    H["THEORmostat"] --> I["The oven thermostat is marked at 70°C when set to this position the oven may be used to keep food warm."]
    J["EYE LEVEL OVEN"] --> K["Arrow pointing right"]
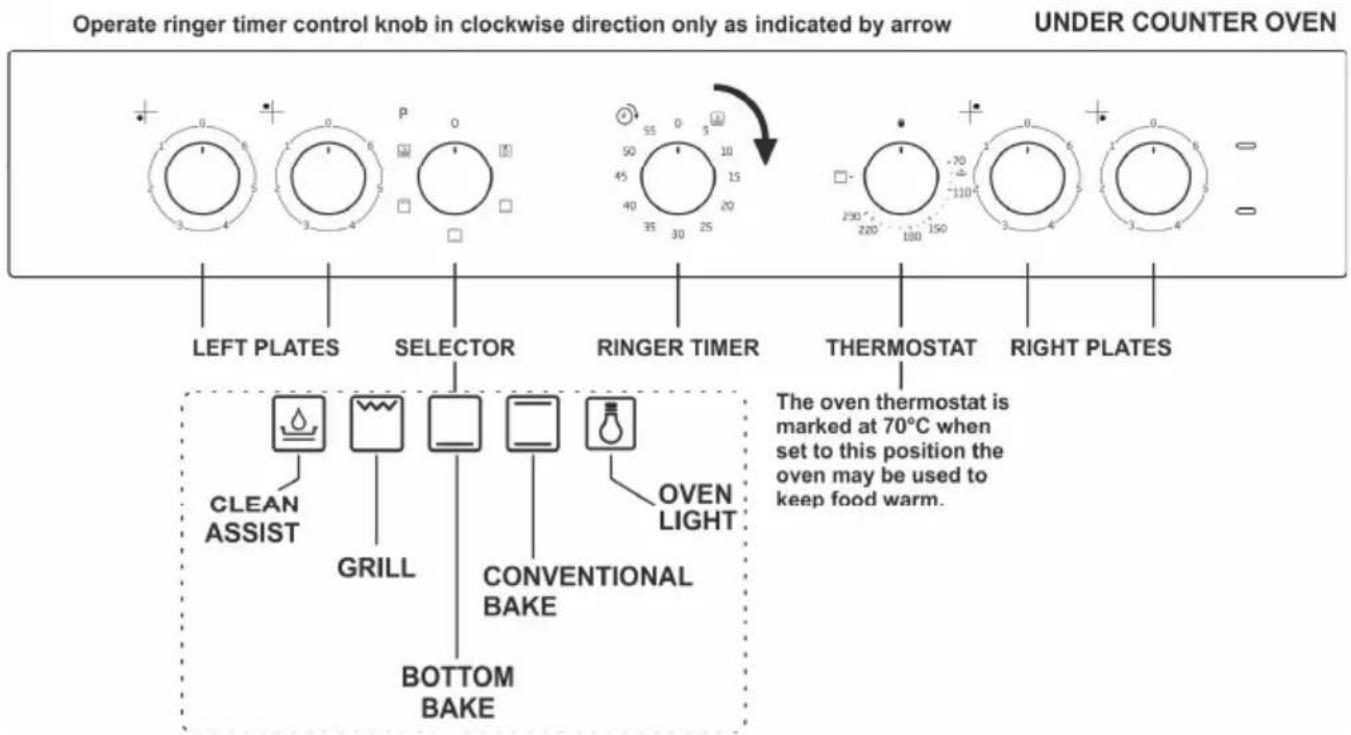
Parts

- Control Panel
- Top Heat Element
- Oven floor with hidden Bake element
- Steam Bath
- Removable Top Décor
- Oven Door
- Installation Clips
Accessories

Accessories supplied may vary depending on the model. Not all accessories in the user manual may be included with your appliance. Accessories may be purchased from Defy spares.
Wire Shelf
Used for roasting and for placing food to be baked, roasted or cooked in casserole dishes on to the desired shelf runner.
Placing the wire shelf and tray onto the shelf runners properly
It is important to place the wire shelf and/or tray onto the runner properly. Slide the wire shelf or tray between the runners and make sure that it is properly fitted before placing any food on it.

natural_image
Close-up of a black oven interior with two white arrows pointing to the lid (no text or symbols visible)Note:
Please ensure that the wire shelf profile is placed in the correct orientation for correct oven fitment.

natural_image
Simple line drawing of a rectangular plate with horizontal lines and a small protrusion at the top (no text or symbols)Oven tray
Suitable for large roasts, chicken portions and roast potatoes.
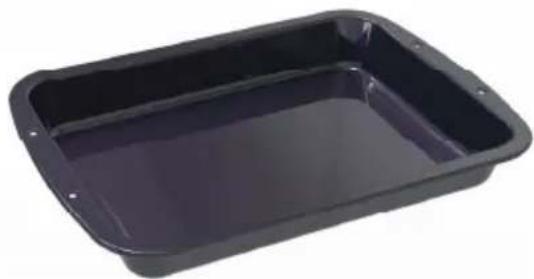
natural_image
Black rectangular tray with glossy finish, no visible text or symbolsBake tray
Suitable for baking purposes.

natural_image
Black rectangular baking tray with rounded edges and small holes (no text or symbols visible)| Technical Specifications | |
| Voltage / frequency 220-240V~ 50 Hz | |
| Maximum power consumption 2580W / 7590N | |
| Amperage 11 A / 33 A | |
| External dimensions (height / width / depth) 600 | mm x 594 mm x 564 mm |
| Installation dimensions (height / width / depth) Refer to page 10** | |
| Main oven Static oven | |
| Energy efficiency class* A | |
| Inner lamp 25 W | |
| Total power consumption 2425 W / 7425 W | |
| Total grill power consumption 1200 W | |
* Basics: Information on the energy label of electrical ovens is given in accordance with the EN 50304 standard. Those values are determined under standard load with bottom-top heater or fan assisted heating (if any) functions.
The energy efficiency class is determined according to function: Conventional bake mode.
** See Installation.


DANGER
Risk of scalding by hot steam! Take care when opening the oven door as steam may escape.

WARNING Hot surfaces may cause burns! Do not touch the hot surfaces of the appliance. Use oven gloves. Keep children away from the appliance.

DANGER Risk of fire by overheated oil! When heating oil, do not leave it unattended. Never try to extinguish a fire with water! When oil has caught fire, immediately cover the pot or pan with a lid. Switch off the hob if safe to do so and phone the fire service.

Figures in this manual are schematic and may not exactly match your appliance.
Values stated on the appliance labels or in the documentation accompanying it are obtained in laboratory conditions in accordance with relevant standards. Depending on operational and environmental conditions of the appliance, these values may vary.
The appliance must be installed by a qualified person in accordance with national regulations. Installation is the buyer's responsibility. The manufacturer accepts no liability for this service. Any action that the manufacturer has to take as a result of an erroneous installation will not be covered by the warranty.
 | Preparation of location and electrical installation for the appliance is the customer's responsibility. |
 | DANGER: The appliance must be installed in accordance with all local electrical regulations. |
| DANGER: Prior to installation, visually check if the appliance has any defects on it. If so, do not have it installed. Damaged appliances cause risks for your safety. |
Before installation
The appliance is intended for installation in household kitchen cabinets. A safety distance must be left between the appliance and the kitchen walls and furniture. See figures on following page: “Built in oven cut outs” (values in mm).
Cooking appliances generate considerable heat. The layout and materials of the mounting cabinet should take account of these characteristics.
- Surfaces, surrounding edges, synthetic laminates and adhesives immediately adjacent to the appliance should be able to withstand temperatures of up to 100°C without delaminating or discoloring.
- Kitchen cabinets must be set level and fixed.
- If there is a drawer beneath the oven, a shelf must be installed between the oven and drawer.
- Carry the appliance with at least two persons.
| Do not install the appliance next to refrigerators or freezers. The heat emitted by the appliance will lead to an increased energy consumption of cooling products. | |
| The door and/or handle must not be used for lifting or moving the appliance. | |
| Do not place any objects onto the appliance and move it in upright position. | |
| Check the general appearance of your appliance for any damages that might have occurred during transportation. |
Under-counter oven installation
- Note: The oven cavity must vent through the front only. Avoid gaps between the cavity sides and the underside of the worktop.
- Insert the oven into the cupboard.
- Open the door to expose the fixing holes in the side trims.
- Secure the oven by 4 countersunk screws (fasteners are not supplied).
- The hob should be installed in a ventilated cupboard fitted with a sturdy worktop.
- Secure the hob using the fixing brackets provided.
Note: Hob installation for under-counter oven
- Hobs have their own dedicated owner's manual, detailing installation and operating instructions.
- Do not discard the hob packaging before first retrieving this manual.
- Defy Slimline under-counter ovens may be installed at eye level if so desired.
- A wiring extension kit is available from the nearest Defy Service Centre.
- If you have an older level hob you must purchase a connector block adaptor kit from your nearest Defy spares outlet.
Final check
- Connect the oven and switch on the power.
- Check the functions.
Built in oven cut outs
Eye-level oven installation
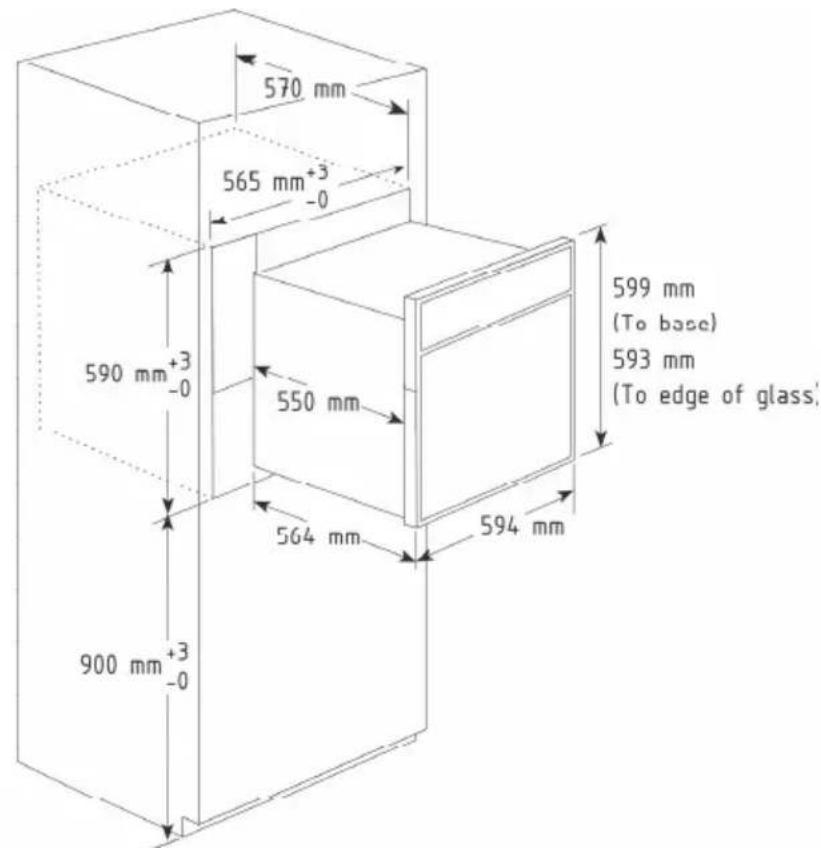
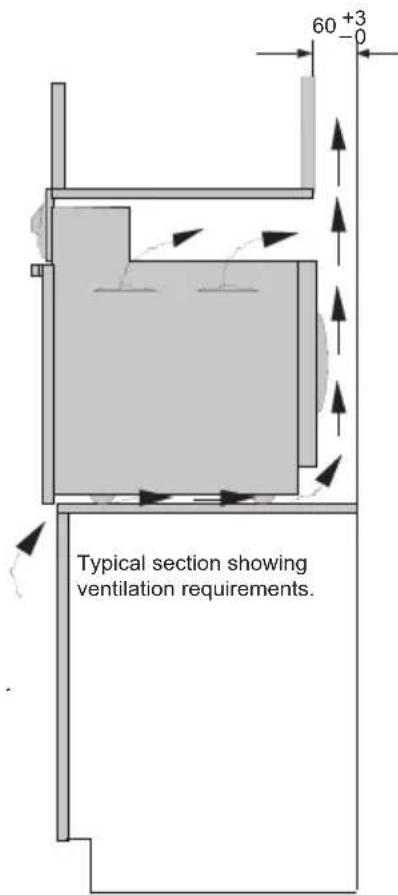
Under-counter oven installation


Securing the oven

natural_image
Diagram of a kitchen appliance with a screwdriver inserted into a door, showing internal components and a magnified view (no text or symbols)- Insert the oven into the cupboard.
- Open the door to expose the fixing holes in the side trims.
- Secure the oven by 4 countersunk screws (fasteners not supplied).
- Ensure that the oven is fixed to the cupboard as per diagram.
Installation and connection
The appliance must be installed in accordance with all electrical regulations.
Electrical installation
This appliance must be earthed and the manufacturer and the seller do not accept responsibility for any damage due to incorrect installation or electrical connection.
This appliance should not be connected through an earth leakage system.
Refer to S.A.N.S.10142
Support the oven in front of the aperture and make the electrical connection before installing. This will ensure enough cable length for subsequent servicing.
Connection to the power supply
The connection must be carried out by a licensed electrician, who will ensure that the oven is correctly connected and safely earthed. The rated current is printed on the serial number label attached to the oven side trim.
The appliance must be connected to the mains through a double pole isolating switch which has a minimum clearance between the contacts of 3 mm. in both poles.
A means for disconnection must be provided in the fixed wiring.
| DANGER: The appliance must be connected to the mains supply only by authorised and qualified persons. The appliances warranty period starts only after correct installation. The manufacturer shall not be held responsible for damages arising from procedures carried out by unauthorised persons. | |
| DANGER: Risk of electric shock, short circuit or fire by damage of the mains lead! The mains lead must not be clamped, bent or trapped or come into contact with hot parts of the oven. If the mains lead is damaged, it must be replaced by a qualified electrician. |

DANGER: Risk of electric shock! Before starting any work on the electrical installation, please disconnect the appliance from the mains supply.
Connecting the sprague to the oven
WARNING! ELECTRICAL CONNECTION MUST ONLY BE DONE BY A QUALIFIED ELECTRICIAN!
Purchase a standard plastic/metal saddle type bracket, capable of going around the 20 mm diameter sprague and with a hole pitch of 38 mm (Plastic) 45 mm (Metal), from your local hardware and 2 off 4.2 mm x 12 mm self tapping screws.

natural_image
Close-up of a white plastic bracket with two screws, one showing a circular label '1' (no text or symbols on the main subject)Feed the cables through the Sprague and connect to the mains terminal block of the appliance.

natural_image
Close-up of a medical or laboratory procedure setup with a white tubing and a black clamp, labeled with number 2 (no readable text or symbols)Place the plastic/metal saddle around the sprague and fasten via the 2 self tapping screws onto the factory pre punched holes adjacent to the mains terminal block of the appliance.

natural_image
Close-up of a medical or laboratory procedure setup with tubing and paper sheets (no visible text or symbols)First cleaning of the appliance

Surfaces might get damaged by some detergents or cleaning materials. Do not use aggressive detergents, cleaning powders/creams or any sharp objects during cleaning. Do not use harsh abrasive cleaners or sharp metal scrapers to clean the oven door glass since they can scratch the surface, which may result in the glass shattering.
- Remove all packaging materials.
- Before using the appliance to prepare food for the first time clean the cooking compartment and accessories.
Initial heating
Heat up the appliance for about 30 minutes and then switch it off. Thus, any production residues or layers will be burnt off and removed.

WARNING. Hot surfaces cause burns! The appliance may be hot when it is in use. Never touch the inner sections of the oven, heaters etc. Keep children away. Always use heat resistant oven gloves when placing or removing dishes into/from the hot oven.
Electric oven
- Take all baking trays and the wire shelf out of the oven.
- Close the oven door.
- Select Static position.
- Select the highest bake power; (See section on how to operate the electric oven).
- Operate the oven for about 30 minutes.
- Turn off your oven.
Grill oven
- Take all baking trays and the wire shelf out of the oven.
- The door must remain closed.
- Select the highest grill power; (See section on how to operate the grill).
- Operate the grill for about 30 minutes.
5. Turn off your grill.

Smoke and smell may emit for a couple of hours during the initial operation. This is quite normal. Ensure that the room is well ventilated to remove the smoke and smell. Avoid directly inhaling the smoke and the smell that emits.
Tips for saving energy
The following information will help you to use your appliance in an ecological way, and to save energy:
- Use dark coloured or enamel coated cookware in the oven since the heat transmission will be better.
- While cooking your dishes, perform a preheating operation if it is advised in the user manual or cooking instructions.
- Do not open the door of the oven frequently during cooking.
- Try to cook more than one dish in the oven at the same time whenever possible. You can cook by placing two cooking vessels onto the wire shelf.
- Cook more than one dish one after another. The oven will already be hot.
- You can save energy by switching off your oven a few minutes before the end of the cooking time. Do not open the oven door.
- Defrost frozen dishes before cooking them.
Future Transportation
- Keep the appliances original carton and transport the appliance in it. Follow the instructions on the carton. If you do not have the original carton, pack the appliance in bubble wrap or thick cardboard and tape it securely.
- To prevent the wire grill and tray inside the oven from damaging the oven door, place a strip of cardboard onto the inside of the oven door that lines up with the position of the trays. Tape the oven door to the side walls.
- Do not use the door or handle to lift or move the appliance.
General information on baking, roasting and grilling

DANGER:
Be careful when opening the oven door as steam may escape. Exiting steam can scald your hands, face and/or eyes
Tips for baking
Use non-sticky coated appropriate metal plates or aluminum vessels or heat-resistant silicone moulds. Make best use of the embossed shelf runners.
Place the baking mould in the middle of the shelf.
Select the correct embossed shelf runner position before turning the oven or grill on. Do not change the shelf position when the oven is hot. Keep the oven door closed.
Tips for roasting
Treating whole chicken, turkey and large pieces of meat with dressings such as lemon juice and black pepper before cooking will increase the cooking performance.
It takes about 15 to 30 minutes longer to roast meat with bones when compared to roasting the same size of meat without bones.
Each centimeter of meat thickness requires approximately 4 to 5 minutes of cooking time. Leave meat in the oven for about 10 minutes after the cooking time is over. The juice is better distributed all over the roast and does not run out when the meat is cut.
Fish should be placed on the middle or lower shelf in a heat-resistant plate.
Tips for grilling
When meat, fish and poultry are grilled, they quickly brown, develop a crust and do not dry out quickly. Flat pieces, meat skewers and sausages are particularly suited for grilling as are vegetables with high water content such as tomatoes and onions.
Distribute the pieces to be grilled on the wire shelf or in the baking tray on the wire shelf so that the space covered does not exceed the size of the grill element.
Slide the wire shelf or baking tray into the desired level of the oven. If you are grilling on the wire shelf, slide the baking tray to the lower rack to collect any fats. Add some water in the tray for easy cleaning.

Foods that are not suitable for grilling create a fire risk. Only grill food which is suitable for intensive grilling heat. Do not place the food too far in towards the back of the grill. This is the hottest area and fatty food may catch fire.
How to operate the electric oven
- Set the Temperature knob to the desired temperature.
- Set the Function knob to the desired operating mode.
» Oven heats up to the adjusted temperature and maintains it. During heating, temperature lamp stays on.
Switching off the electric oven
Turn the function knob and temperature knob to the off position.
Using the oven
Baking
This product is supplied with a chromed oven shelf and a roast pan. If required, additional shelves, roast pans and broiler may be purchased from Defy spares. Set the selector knob to the desired baking mode. See descriptions on page 14. Top and Bottom elements or Bottom element only. Set the oven thermostat to the required temperature.
The thermostat indicator light will glow and remain on until the oven has reached the selected temperature. The light will then switch off.
Thereafter place the food in the oven. During the baking cycle, the indicator light will switch on and off as the thermostat maintains the selected temperature.
After baking is completed, the thermostat and the selector knob must be turned to the "0" position in an anti clockwise direction.
Note:
The oven thermostat is marked to 70^ C. When set to this position, the oven may be used as a warmer. All ovens extract moisture from the food being cooked, especially so during the winter months. This is normal and not detrimental to the food or the oven.
Baking Guide:
Where possible, bake on the middle shelf position of the oven. The food must be placed in the centre of the wire shelf towards the oven door. Do not open the oven door until at least two thirds of the baking time has lapsed.
The roast pan must not be used for baking purposes.
Grilling
Both the wire shelf and roast pan may be used for grilling. The roast pan may also be used as a drip tray under the wire shelf. Position the shelf in the desired position below the grill element.
Set the selector switch and oven thermostat to their respective Grill positions.
The thermostat indicator light will glow. Preheat the grill element for about 5 minutes. Partially withdraw the shelf and place the food in the centre of the shelf. Slide the shelf back into position. Monitor the grilling to avoid burning the food. After grilling is completed, the oven thermostat and the selector switch must be returned to the "0" position in an anticlockwise direction.
Ringer timer
The ringer timer may be used for timing a cooking period of up to 60 minutes. First wind the timer by turning the knob fully clockwise. Return the knob to the desired time period. At the end of the this period the bell will ring. Note: If the timer is not first fully wound the bell may not ring.

Direction of Ringer Timer Function
The Ringer Timer Control Knob must be operated in a Clockwise Direction Only. Do NOT engage Ringer Timer Control Knob in Anti-Clockwise Direction.
Selector switch
| 0 | Off Switches the | Oven off |
 | Lamp Switches the | Oven lamp on |
 | Conventional Bake Heat is evenly distributed from the top and bottom element. | Baking is recommended on one level only. This mode is recommended for cakes, pastries and casseroles. |
 | Static Bake Heat is given off from the bottom element. | This mode is recommended for dishes that are cooked and require further cooking at the center or the base. |
 | Grill Heat is given off from the top element. | The thermostat must be on the maximum position. The oven door must be closed |
 | Steam Assisted Clean | Refer to Maintenance & Care section |
Tips for cooking vegetables
- If the vegetable dish runs out of juice and gets too dry, cook it in a pan with a lid instead of a tray. Closed vessels will preserve the juice of the dish.
- If the vegetables in a vegetable dish do not cook properly, boil the vegetables beforehand or prepare them like canned food and put in the oven.
For cooking that requires preheating, preheat at the beginning of cooking process until the thermostat lamp switches off.
Tips for baking cake
- If the cake is too dry, increase the temperature by 10^ and decrease the cooking time.
- If the cake is wet, use less liquid or lower the temperature by 10^ C.
- If the cake is too dark on top, place it on a lower rack, lower the temperature and increase the cooking time.
- If cooked well on the inside but sticky on the outside use less liquid, lower the temperature and increase cooking time.
Tips for baking pastry
- If pastry is too dry, increase the temperature by 10^ C and decrease the cooking time. Dampen the layers of dough with a sauce composed of milk, oil, egg and yoghurt.
- If pastry takes too long to bake, ensure that the thickness of the pastry prepared does not exceed the depth of the tray.
- If the upper side of the pastry gets browned, but the lower part is not cooked, make sure that the amount of sauce used for the pastry is not too much at the bottom of the pastry. Try to distribute the sauce equally between dough layers and top of the pastry for an even browning.
| Cook pastry in accordance with the mode and temperature given in the cooking table. If the bottom part is still not browned enough, place it on one lower rack the following time. |
| DANGER Risk of scalding by hot steam! Take care when opening the oven door as steam may escape. IMPORTANT: Grilling must be done with the oven door closed! |
How to operate the grill
Switching on the grill
- Turn the Function knob to the desired grill symbol.
- Select the desired grilling temperature.
- If required, perform a preheating of about 5 minutes.
» Temperature light turns on.
Switching off the grill
- Turn the Function knob to the Off position.
- Grill performance will decrease if the wire grill rests against rear part of the oven. Slide the wire shelf to the front section of the rack and position it with the help of the door in order to obtain the best grill performance.
 | Foods that are not suitable for grilling create a fire risk. Only grill food which is suitable for intensive grilling heat. Do not place the food too far in the back of the grill. This is the hottest area and fatty food may catch fire. |
- Note: First rack of the oven is at the bottom of the oven.
Cooking times table
| Dish Temp | (AC)ceCooking | tibshelf pos. | Function | ||
| Cupcakes 180 | °C 20 Mincupcake tin | 2 | |||
| Biscuits 180 | °C Bake | 2 | |||
| Scones 210 | °C Bake | 2 | |||
| Roast chicken (1.3 kg) | Roast pan | 1 | 180 °C 65 | Min | |
| Chicken breasts (150 g) | Roast pan | 4 | Max 20 Min | ||
| Pizza Wire | shelf 2 190 °C | 9-10 Min | |||
| Sponge cake | Cake tin 2 180 °C | 19 Min | |||
| Cheese puff | Bake tray 3 | 200 °C 20 Min | |||
| Pies Bake | tray 3 | 190 °C 30 Min | |||
| Quiche | Bake tray | 2 | Bake 200 °C Then 170°C | First 15 Min Then 15-20 Min |
General information
- Clean the appliance thoroughly after each use, making it easier to remove cooking residues and helps prevent these from burning on the next use of the appliance.
- Wipe down the cabinet, door, control panel, trims and handles with a damp, hot soapy cloth.
- Use only liquid household cleaners and avoid abrasive powders, scouring pads and caustic cleaners.
- Rinse and wipe down with a clean cloth.
Cleaning the oven
- Open the oven door and allow the oven to cool down.
- Clean the oven with a damp, hot soapy cloth. Do not use a steam cleaner.
- It may be necessary to soak burnt soils with a liquid cleaner to soften them before scrubbing them with a nylon brush or scouring sponge.
- Heavy soils on the bottom of the oven may require overnight soaking under a sponge liberally sprinkled with household ammonia. Remove the soil the following morning by washing normally.
- Always ensure that any excess liquid is thoroughly wiped off after cleaning and any spillage is immediately wiped dry.
- Do not use cleaning agents that contain acid or chloride to clean the stainless or inox surfaces and the handle. Use a soft cloth with a liquid detergent (not abrasive) to wipe these parts clean, paying attention to sweep in one direction.
| Do not use steam cleaners for cleaning, there is a risk of an electric shock. | |
| DANGER Hot surfaces may cause burns! Allow appliance to cool down before you clean it. | |
| DANGER Risk of electric shock! Switch off the electricity before cleaning the appliance to avoid an electric shock. |

The surface may get damaged by some detergents or cleaning materials. Do not use aggressive detergents, cleaning powder/cream or any sharp objects. Do not use any harsh abrasive cleaners or sharp metal scrapers to clean the oven door and glass since they can scratch the surface, destroy the glass and could result in the glass shattering.
Steam assisted cleaning Important!
Any food residue must be removed from the bottom of the cavity before you start steam assisted cleaning. Remove all oven accessories.
- Pour 100 ml of water into the emboss on the oven floor.
- Select the steam assisted cleaning function.
- Turn the oven on to Run this cycle for 5 minutes.
- At the end of the cycle, wait 5 minutes before opening the door.
- Open the door and wipe the inner surfaces of the oven with a damp sponge or cloth.
- Use warm water with washing liquid, a soft cloth or sponge to clean persistent dirt and wipe it with a dry cloth.
Important!
- Ensure that all water has been wiped away after steam assisted cleaning as this may damage your oven. Steam assisted cleaning must be performed in a cold oven.
- If you have grease or any other difficult to remove substance you may need to traditionally clean your oven (as per instructions in general information) after completing the steam assisted cleaning cycle.
- Use the steam assisted cleaning feature as soon as possible after spills occur. The longer a spill sits and dries in the oven, the more difficult it may be to remove.
Removing the oven door
Lift-off oven door
The oven door may be removed to improve oven access during cleaning.
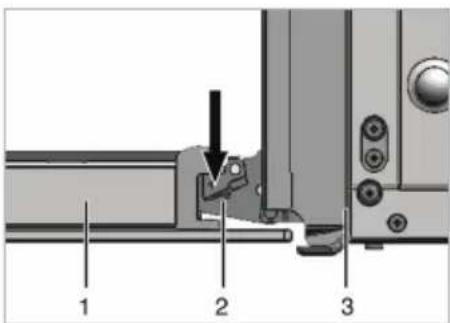
- Open the front door (1).
- Open the clips at the hinge housing (2) on the right and left hand sides of the front door by pressing them down as illustrated in the figure.
natural_image
Close-up of a mechanical component with a curved arrow indicating rotation (no text or symbols visible)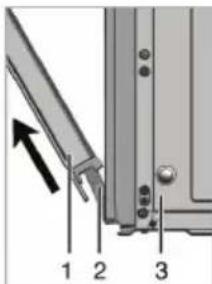
- Move the front door to half way.
- Remove the front door by pulling it upwards to release it from the left and right hinges.

Steps carried out during the removal process should be carried out in reverse order to install the door. Do not forget to close the clips at the hinge housing when reinstalling the door.
Cleaning the oven door
To clean the oven door, use warm water with washing liquid, a soft cloth or sponge to clean the product and then wipe it with a dry cloth.

Do not use any harsh abrasive cleaners or sharp metal scrapers for cleaning the oven door. They may scratch the surface and destroy the glass.
The front door inner glass is coated with an easy clean material. Do not use any harsh abrasive cleaners, hard metal scrapers, scouring pads or bleach to clean the front door inner glass as they may scratch the surface and destroy the coating material.
Removing the Oven Door Glass
The inner glass can be removed for cleaning.
A. Lift the top décor and remove from door.
B. Lift the glass to a 45 degree position and pull towards yourself. Clean the glass as per the instructions.

natural_image
Technical diagram showing mechanical assembly with arrows indicating direction (no text or symbols)
natural_image
Diagram of a tilted rectangular frame with an arrow indicating direction, no text or symbols present
Carrying handles
For ease of carrying there is a handle for holding the oven on each side panel.
Oven light
The oven light is switched on by the function selector switch and switches off when the knob is returned to 0.
Replacing the oven light
 | DANGER: Before replacing the oven lamp, ensure that the appliance is disconnected from mains and cooled down to avoid the risk of an electrical shock. Hot surfaces may cause burns! |
 | |
 | The oven lamp is a special electric light bulb that can resist up to 300°C. See Technical specifications for details. Oven lamps can be obtained from Authorised Service Agents. |
| Position of lamp might vary from the figure. |
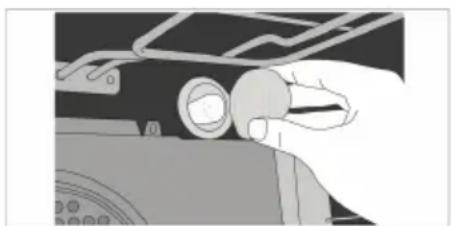
To replace a faulty light bulb, proceed as follows:
- Disconnect the product from mains.
- Turn the glass cover counter clockwise to remove it.
natural_image
Close-up of a car's dashboard and steering wheel (no visible text or symbols)- Remove the oven lamp by turning it counter clockwise and replace it with the new one.
- Install the glass cover.
Owner's responsibility
Since the following are not factory faults, they are the owner's responsibility.
- Damage to exterior finish.
- Breakage of glass and other components.
- Replacement of the light bulb.
- Damage through improper use or installation of the appliance.
-
Damage caused by moving the appliance.
-
Troubleshooting
| Oven emits steam when it is in use. | |
| It is normal that steam escapes during operation | >>> This is not a fault. |
| The appliance emits metal noises while heating and cooling. | |
| When the metal parts are heated, they may expand and cause noise. | >>> This is not a fault. |
| The appliance does not operate. | |
| The mains fuse is defective or has tripped. | Check fuses in the fuse box. If necessary, replace or reset them. |
| The appliance is not plugged into the wall socket. | >>> Check the plug connection. |
| Oven light does not work. | |
| Oven lamp is defective. | >>> Replace oven lamp. |
| Power is cut. | >>> Check if there is power. Check the fuses in the fuse box. If necessary, replace or reset the fuses. |
| Oven does not heat. | |
| Function and/or Temperature are not set. | >>> Set the function and the temperature with the Function and/or Temperature knob/key. |

If you have followed the instructions and still have a problem, contact the nearest Defy Technical Support Centre. They will be able to advise you on any aspect of the product or send a qualified technician to repair it. Never attempt to repair a defective appliance yourself.
Remember that you may be charged for a service call even during the warranty period if the fault is due to or caused by any of the above.
7. Branches
If you have followed the instructions and still have a problem, contact the customer care line on 086 100 3339. They will be able to advise you on any aspect of the appliance.
South African Branches:
BLOEMFONTEIN
Unit Number 5
Monument Business Park
50 Monument Road
Oranjesig
Bloemfontein
Bloemfontein.Service@defy.co.za
CAPE TOWN
5A Marconi Rd. Montague Gardens, 7441
CapeTown.Service@defy.co.za
DURBAN
135 Teakwood Road, Jacobs,
Durban, 4052
Durban.Service@defy.co.za
EAST LONDON
Robbie de Lange Road, Wilsonia,
East London, 5201
EastLondon.Service@defy.co.za
GAUTENG, MIDRAND
127 15th Road, Cnr Pharmaceutical & 15th Rd,
Midrand, Gauteng
Gauteng.Service@defy.co.za
POLOKWANE
87 Nelson Mandela Drive, Superbia 0699
Polokwane.Service@defy.co.za
PORT ELIZABETH
112 Patterson Road, North End, Port Elizabeth 6001
PortElizabeth.Service@defy.co.za
Sub-Saharan Africa Branches:
ZAMBIA: SOUTHGATE INVESTMENTS LTD
Plot 1606, Sheki Sheki Road
P.O. Box 33681
Lusaka, 10101, Zambia
Tel: +260 0211 242332/3
Fax: +260 0211 242933
sgiservicecentre@microlink.zm
NAMIBIA: ATLANTIC DISTRIBUTORS (PTY) LTD
10 Tienie Louw Street, Northern Industrial Area
P.O. Box 21158, Windhoek, Namibia
Tel: (061) 216162
Fax: (061) 216134
atlantic@mweb.com.na
ZIMBABWE: TRADECOMAFRICA
Trade Com Africa, 183 Loreley Crescent
Msasa, Harare, Zimbabwe
Tel: +263 4 486165/6
Cell: +263 772 469010
Cell: +263 772 469011
BOTSWANA: RAY MORGAN AGENCIES
RMA Service Centre, Plot 48, East Gate
Gaborone International Commerce Park
Kgale View, Gaborone
Botswana
Tel: +267 390 3996 / 390 3912
Fax: +267 318 7376
Cell: +267 7134 6539
service@rma.co.bw; raja@rma.co.bw
SWAZILAND: LYNDS DISTRIBUTORS
P.O Box 716, Mbabane, Swaziland, H100
Tel: (00268) 2515 4310/8
Fax: (00268) 2518 4318
MOZAMBIQUE: COOL WORLD. LDA
This certificate is issued by DEFY APPLIANCES (PTY) LTD manufacturers of Defy and Ocean products, hereinafter the Company, to the original purchaser only, of the appliance described on the certificate and shall constitute the only warranty given in respect of this appliance.
The Company warrants to the original purchaser that for a period of THREE YEARS from date of purchase the appliance is free from defect under normal domestic use, both in workmanship and material, subject to the following conditions.
- Repair or replacement of any part of this appliance, found by the Company to be defective, shall be at the election of the Company. The Company reserves the right to effect such service through any of its Service Divisions or Authorised Service Dealers. The cost of such service shall be borne by the Company in full, provided that the appliance is located no further than 50 km from a Company Service Centre or an Authorised Service Dealer. Where the appliance is located beyond the 50 km radius, the purchaser shall be liable for the standard travelling charges, as determined by the Company.
CARRY IN SERVICE Microwave ovens, Compact cookers and small appliances are repaired in our service centres and are not collected from the customers home. Faulty units must be delivered to the purchasing dealer or to the nearest Company Service Centre for warranty repairs. - Rusted or corroded plates, vitreous enamelware, fuses and lamps are specifically excluded from these warranties. It is an express condition of these warranties that the purchaser takes due care and attention in the use and maintenance of the appliance. Abuse, misuse in conflict with operating instructions, connection to incorrect voltages and subjection to commercial use shall release the Company from its obligations.
- This warranty shall become void and cease to operate if the appliance is dismantled by, or any repairs to the appliance are effected by any persons not duly authorised by the Company, or if substitute parts not approved by the Company are used in the appliance, or if the serial number of the appliance is removed.
- The Company shall not be responsible for damages resulting from fire, flood, civil disturbances or any Act of God. The Company shall not, in terms of these warranties be responsible nor held liable for any consequential loss or damage of any kind caused by or due to the failure or malfunction of the appliance. The Company shall not be responsible for damages caused by insect and/or animal infestation.
- The Company shall not be responsible for transportation or other costs other than those incurred within the provisions of Point 1 of this Certificate.
- For warranties in the Republic of South Africa and Sub-Saharan Africa, please contact the customer care line. Please refer to the previous page for respective South African branches and Sub-Saharan Africa branches.
- Where service is requested under warranty and no fault or defect can be found by the Company, all costs incurred will be for the purchaser's account.
- This Certificate as well as your invoice will serve as proof of purchase. For the purpose of warranty, it will be essential to produce this Certificate and invoice. Failure to do so, will render the purchaser liable for service costs.
KEEP THIS CERTIFICATE AND SALES INVOICE AS PROOF OF PURCHASE FOR WARRANTY PURPOSES.


- EXPLANATION OF SYMBOLS
- General safety
- Electrical safety
- Appliance safety
- To prevent a fire hazard
- Safety when working with electricity
- Intended use
- Safety for children
- SAVE THESE INSTRUCTIONS
- Parts
- Accessories
- Wire Shelf
- Placing the wire shelf and tray onto the shelf runners properly
- Note:
- Oven tray
- Bake tray
- DANGER
- Before installation
- Under-counter oven installation
- Note: Hob installation for under-counter oven
- Final check
- Built in oven cut outs
- Installation and connection
- Electrical installation
- Connection to the power supply
- Connecting the sprague to the oven
- First cleaning of the appliance
- Initial heating
- Electric oven
- Grill oven
- Turn off your grill.
- Tips for saving energy
- Future Transportation
- General information on baking, roasting and grilling
- DANGER:
- Tips for baking
- Tips for roasting
- Tips for grilling
- How to operate the electric oven
- Switching off the electric oven
- Using the oven
- Baking
- Baking Guide:
- Grilling
- Ringer timer
- Direction of Ringer Timer Function
- Tips for cooking vegetables
- Tips for baking cake
- Tips for baking pastry
- How to operate the grill
- Switching on the grill
- Switching off the grill
- General information
- Cleaning the oven
- Steam assisted cleaning Important!
- Important!
- Removing the oven door
- Lift-off oven door
- Cleaning the oven door
- Removing the Oven Door Glass
- Carrying handles
- Oven light
- To replace a faulty light bulb, proceed as follows:
- Owner's responsibility
- Branches
- South African Branches:
- BLOEMFONTEIN
- CAPE TOWN
- DURBAN
- EAST LONDON
- GAUTENG, MIDRAND
- POLOKWANE
- PORT ELIZABETH
- Sub-Saharan Africa Branches:
- ZAMBIA: SOUTHGATE INVESTMENTS LTD
- NAMIBIA: ATLANTIC DISTRIBUTORS (PTY) LTD
- ZIMBABWE: TRADECOMAFRICA
- BOTSWANA: RAY MORGAN AGENCIES
- SWAZILAND: LYNDS DISTRIBUTORS
- MOZAMBIQUE: COOL WORLD. LDA
- KEEP THIS CERTIFICATE AND SALES INVOICE AS PROOF OF PURCHASE FOR WARRANTY PURPOSES.
Brand : Defy
Model : DBO482E
Category : Oven