
EGE9TBK - Oven Euromaid - Free user manual and instructions
Find the device manual for free EGE9TBK Euromaid in PDF.


| Product Type | Oven |
| Brand | Euromaid |
| Model | EGE9TBK |
| Category | Oven |
| Energy Type | Electric |
| Dimensions (H x W x D) | 595 x 595 x 575 mm |
| Oven Capacity | 70 Liters |
| Weight | 35 kg |
| Power Rating | 2.8 kW |
| Cooking Functions | Grill, Fan Forced, Conventional, Defrost |
| Temperature Range | 50°C - 250°C |
| Timer | Electronic with auto shut-off |
| Display | LED |
| Cleaning Type | Hydrolytic (steam clean) with enamel interior |
| Safety Features | Child lock, cool touch door, auto shut-off |
| Door Type | Cool touch, double-glazed |
| Installation Type | Built-in |
| Spare Parts Availability | Available through authorized service centers |
| Warranty | 2 years |
| Energy Rating | A |
Frequently Asked Questions - EGE9TBK Euromaid
User questions about EGE9TBK Euromaid
0 question about this device. Answer the ones you know or ask your own.
Ask a new question about this device
Download the instructions for your Oven in PDF format for free! Find your manual EGE9TBK - Euromaid and take your electronic device back in hand. On this page are published all the documents necessary for the use of your device. EGE9TBK by Euromaid.
USER MANUAL EGE9TBK Euromaid
Thank you for choosing our product.
This appliance is easy to use; please read this manual carefully before installing and using the appliance. The correct indications in the manual are for the best installation, use and care of the appliance.
You will find that the clean lines and modern look of your oven blends in perfectly with your kitchen decor. The oven is easy to use and performs to a high standard.
We also make a range of products that will enhance your kitchen - such as cook tops, Range hoods, built- in hobs, built- in ceramic hobs and built- in ovens. These are models to complement your new oven.
We make every effort to ensure that our products meet all your requirements. Our customer relations department is at your disposal to answer all your questions and to listen to all your suggestions.
Please keep your receipt as proof of purchase.
Also please retain all documents related to the purchase of the product.
Index
Caution
Page. 4 - 5
Installation instructions:
- Clearances
- Anti Tilt chains
- Gas connection test
Page. 6
Page. 6
Page. 7 - 8
Page. 9
Electrical Connection
- Ventilation and gas connection
- Adaptation to different types of gas
- Setting the minimum flame
- Burner and injector characteristic table
Page. 10
Page. 10
Page. 10
Page. 11
Page. 12
Instructions for use
• Description of the main parts of the appliance
- Ignition and operation of the burners
- Recommendations
- Oven function
• Electronic programmer
Page. 12
Page. 12
Page. 13
Page. 13
Page. 14
Page. 15 - 16
Instructions for cooking
Maintenance and cleaning
Page. 17 - 19
Page. 19 - 20
Warranty
Page. 21
Notes
Page. 22 - 23
CAUTIONS
- This appliance must be installed by an authorised person in accordance with this instruction manual, AS/NZS 5601.1
- Gas installations (installation and pipe sizing), local gas fitting regulations, local electrical regulations, Building Code of Australia and any other government authority.
Very important: keep this instruction booklet with the appliance for handy references - This appliance is designed for use in private home. Please be aware that the front accessory could be hot to touch.
- This appliance is not intended for use by young children.
- Don't touch the heating elements inside the oven.
- When the grill is on all the accessible elements are hot, hence, keep children away from these elements.
- This appliance shall be installed only by authorised persons and in accordance with the manufacturer's installation instructions, local gas fitting regulations, municipal building codes electrical wiring, regulations, and local water supply regulations.
- Before switching the appliance on check that it is correctly regulated for the type of gas available (see relevant section).
- Do not use jet of steam for cleaning.
- Before maintenance or cleaning, disconnect the appliance from the mains and wait for it to cool down. When the burners are lit check that the flame is always regular. Before removing the saucepans turn the burners off.
- Servicing should be carried out only by authorised personnel.
- The use of a gas appliance produces heat and humidity in the room.
- Make sure that the room is well ventilated, keeping the natural ventilation outlets open or installing a ventilation hood with rain duct. If a gas appliance is used for a long time it may require extra ventilation (opening a window or increase the volume of exhaust).
- Never line the oven with aluminum sheets as the slots preset for keeping fast the thermionic exchange may clog, thus damaging the enamel.
- Be careful not to place saucepans with unstable or deformed bottoms on the burners to avoid overturning or spilling.
- If the mains of a burner is turned off accidentally, turn off the control knob. Only light the burner again after waiting at least a minute.
• Before using the oven, we suggest to:
o Remove all the special film covering the oven door glass (when provided)
o Heat the empty oven at max. Temperature for 45 minutes (to remove unpleasant smell and smoke caused by working residues and by the thermal insulation)
o Carefully clean inside the oven with soapy water and rinse it .
- For any repairs always contact an authorised Technical Customer Service Centre and ask for original spare parts. Repairs by untrained people can lead to damage.
- Keep packaging out of reach of children at all times.
• Always use oven gloves to remove and replace food in the oven. - Ensure that you support the grill pan when removing it from the oven.
- Don't let children sit down or play with the oven door.
- Do not use the drop down door as a stool to reach cabinets above.
- Do not remove the plug by pulling the cable.
DO NOT SPRAY AEROSOLS IN THE VICINITY OF THIS APPLIANCE WHILE IT IS IN OPERATION. I DO NOT STORE OR USE FLAMMABLE LIQUIDS OR ITEMS IN THE VICINITY OF THIS APPLIANCE. WHERE THIS APPLIANCE IS INSTALLED IN MARINE CRAFT OR IN CARAVANS, IT SHALL NOT BE USED AS A SPACE HEATER.
WARNING: In order to prevent tipping of the appliance, this stabilizing means must be installed. Refer to the instructions for installation.
During use the appliance becomes hot. Care should be taken to avoid touching heating elements inside the oven.
WARNING: Accessible parts may become hot during use. Young children should be kept away.
- Do not use harsh abrasive cleaners or sharp metal scrapers to clean the oven door glass since they can scratch the surface, which may result in shattering of the glass.
- This appliance is not intended for use by persons (including children) with reduced physical, sensory or mental capabilities, or lack of experience and knowledge, unless they have been given supervision or instruction concerning use of the appliance by a person responsible for their safety.
• Children should be supervised to ensure that they do not play with the appliance.
- If the supply cord is damaged, it must be replaced by the manufacturer, its service agent or similarly qualified persons in order to avoid a hazard.
- In the event of burner flames being accidentally extinguished, turn off the burner control and do not attempt to re-ignite the burner for at least 1 min.
DO NOT MODIFY THIS APPLIANCE DO NOT PLACE ARTICLES ON OR AGAINST THIS APPLIANCE
Not suitable for use with after-market lids or covers.
Fault finding
| Problem | Possible Cause | Solution |
| Burner will not light | Gas supply is off | Turn on gas supply to the appliance |
| Injector or burner port blockage in ignition area | Check that burners and injectors are clean | |
| Flames uneven or lifting | Burner ports blocked or wet | Clean or dry burner ports |
| Flames not staying on when knob released | Knob not held down long enough for flame safety guard to engage | Repeat lighting procedure and hold knob down for 10-15 seconds |
| Dirt or spillage on flame safety guard thermocouple | Clean thermocouple end | |
| Flame won't turn down sufficiently | Incorrect injector or control valve incorrectly adjusted | Check injector size to specifications in instructions and adjust valve by-pass |
This electric appliance complies with the following directives:
• 89/336/EEC (electromagnetic compatibility)
• 89/109/EEC (foodstuffs)
- 73/23/EEC + 93/68/EEC (low voltage)
• 2009/142/EC (Gas Appliance Directive)
Warning:
Never use the storage drawer set at the bottom of the range to store flammable substances or matters that cannot withstand heat such as: Wood, paper, spray cans, rags, etc.
Installation Instructions
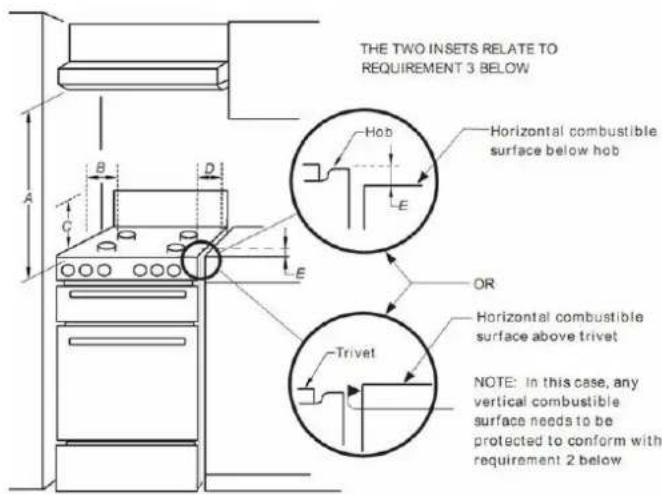
Overhead clearances—(Measurement A) Range hoods and exhaust fans shall be installed in accordance with the manufacturer's relevant instructions. However, in no case shall the clearance between the highest part of the hob of the gas cooking appliance and a range hood be less than 600 mm or, for an overhead exhaust fan, 750 mm.
Side clearances—(Measurements B, & C) Where B, measured from the periphery of the nearest burner to any vertical combustible surface, or vertical combustible surface covered with toughened glass or sheet metal, is less than 200 mm, the surface shall be protected to a height C of not less than 150 mm above the hob for the full dimension (width or depth) of the cooking surface area. Where the gas cooking appliance is fitted with a 'splashback', protection of the rear wall is not required.
Additional requirements for freestanding and elevated gas cooking appliances— (Measurements D & E). Where D, the distance from the periphery of the nearest burner to a horizontal combustible surface is less than 200 mm, then E shall be 10 mm or more, or the horizontal surface shall be above the trivet.
This appliance is suitable for connection with rigid pipe or flexible hose. The isolating manual shut-off valve connection point must be accessible when the appliance is installed. Gas inlet is located at the top rear, right OR left hand side, 50mm from the side edge. Overall dimensions 900mm wide, 600mm deep and 900mm high.
Natural Gas: the supplied regulator must be fitted to the appliance inlet connection. Gas pressure must be adjusted to 1.0 kPa when approximately 50% of the burners are on high flame, the appliance test point is located on the regulator.
LPG: the supplied test point adaptor must be fitted to the appliance inlet connection. Gas pressure must be adjusted to 2.75 kPa, the appliance test point is located on the test point adaptor. Alternative refer to page 9 for LPG test point.
Suitable for connection with a flexible hose assembly. The flexible hose assembly must be certified to AS/NZS 1869 class B or D, be of appropriate internal diameter for the total gas consumption, be kept as short as possible (not exceeding 1200mm), and must not be in contact with the floor or any hot or sharp surfaces. The hose assembly must not be subject to strain, abrasion, kinking or deformation.
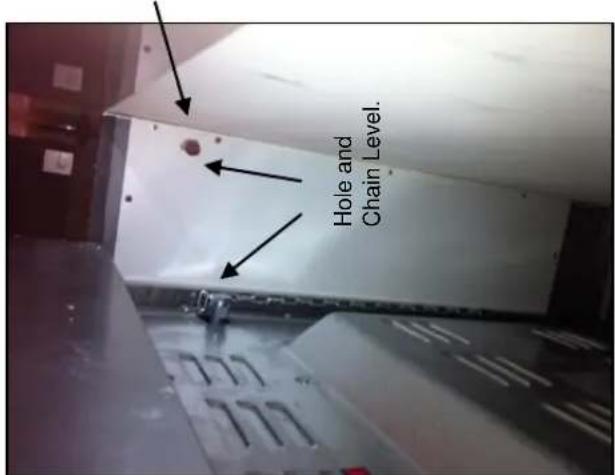
Anti tilt chains are located at the rear of the appliance and must be secured to the wall behind the appliance to prevent accidental tipping/tilting. The chain length must be as short as practicable to avoid appliance tilting forward and also diagonal to avoid appliance moving sideways.
NOTE: PLEASE REFER TO PAGES 7 & 8 FOR FURTHER INSTRUCTIONS ON INSTALLATION OF ANTI-TILT CHAINS.
Gas leakage and operation of the appliance must be tested by the installer before leaving. Check all burner flames are blue in colour, stable and completely ignite at both high and low flame settings with no appreciable yellow tipping, carbon deposition, lifting, floating, lighting back or objectionable odour. Test burners individually and in combination.
Where the data plate is obscured by cabinetry when the cooker is in the installed position, place the supplied duplicate data plate to a suitable adjacent surface or within the instruction manual for future reference.
THE MANUFACTURER DECLINES ANY AND ALL RESPONSIBILITIES FOR DAMAGES TO THINGS OR INJURIES TO PERSONS OR ANIMALS DERIVING FROM INCORRECT INSTALLATION OR USE OF THE EQUIPMENT.
Incorrect Installation
Accidental Tipping
Chains are provided as a preventative measure against accidental tipping. These chains must be fitted as part of the installers compliance. Failure for your installer to fit chains in accordance with the relevant installation code will make the installation of your upright cooker non compliant and classed as an illegal installation.
Incorrect Installation
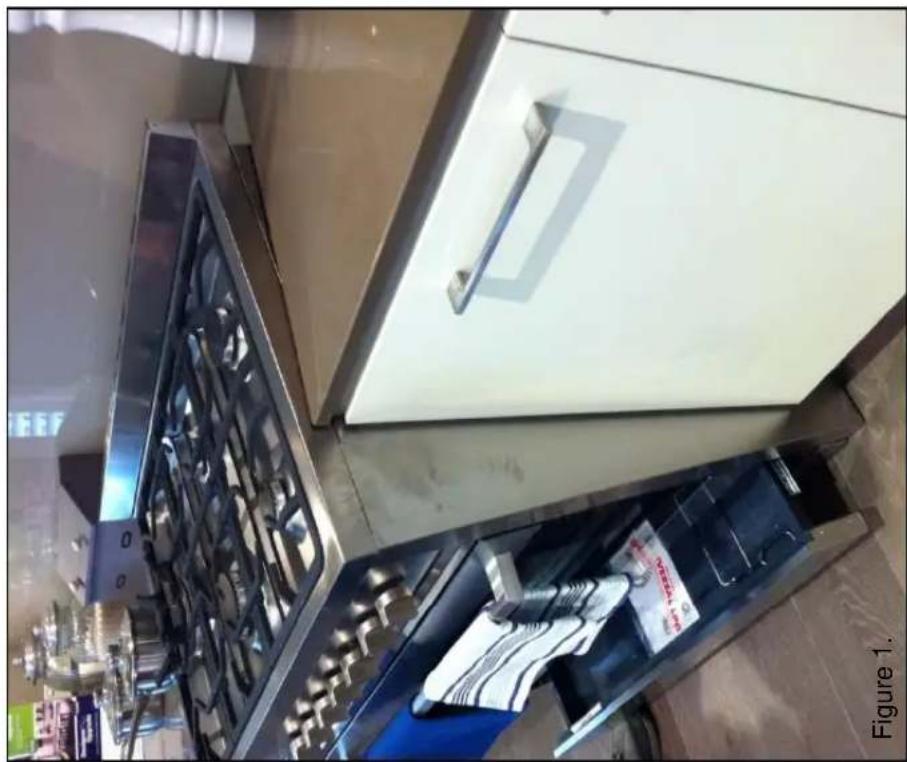
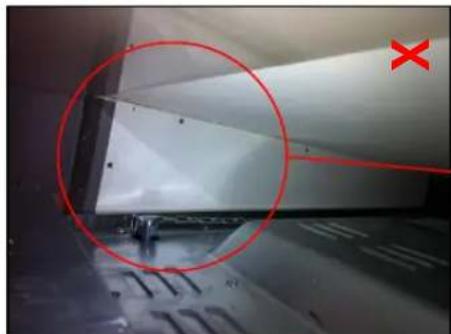
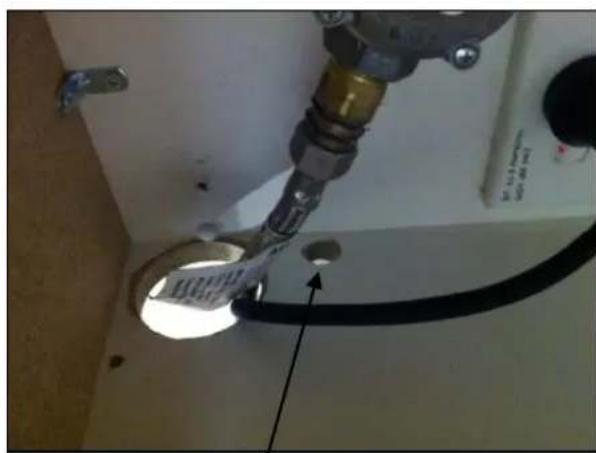
The photographs on this page are of one single kind of incorrect installation (although there are many) which does not have the chains sufficiently secured, figure 1. shows an example of how far forward a oven can tip when not secured properly. Note: Correct installation is part of the installers compliance.
natural_image
Modern kitchen oven with stainless steel stove and open door, no visible text or symbols on main subjectHole in cabinet too large,
Allowing the upright oven to tilt
forward
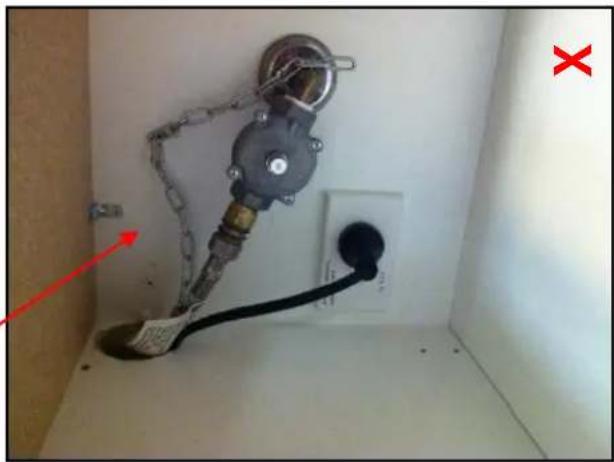
Loose Chain
natural_image
Interior view of a room with a black cable, mechanical components, and a red arrow pointing to a component (no text or symbols visible)Putting the chain into the adjacent cabinet is the preferred method provided there is no slackness in the chain..
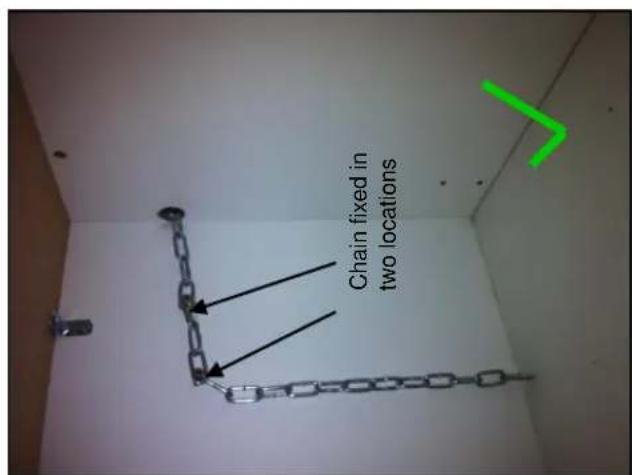
Some installations only have a single chain affixed. Both Chains must be fixed as part of the installers compliance. Failure to fix both chains will make the installation non compliant.
natural_image
Close-up of a white cabinet or shelf with a red circle highlighting a specific panel, and a red 'X' symbol in the corner (no readable text or symbols on the main subject)Left Side of oven, chain not attached
Correct Chain Installation
Right Side
natural_image
Close-up of a pipe fitting with a black cable inserted into a circular opening, mounted on a wall (no visible text or symbols)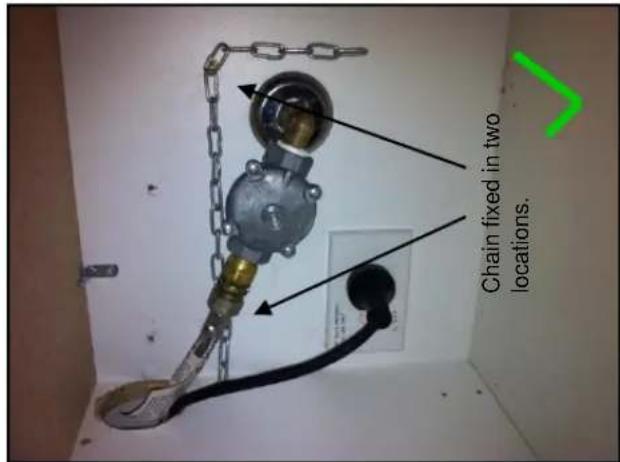
natural_image
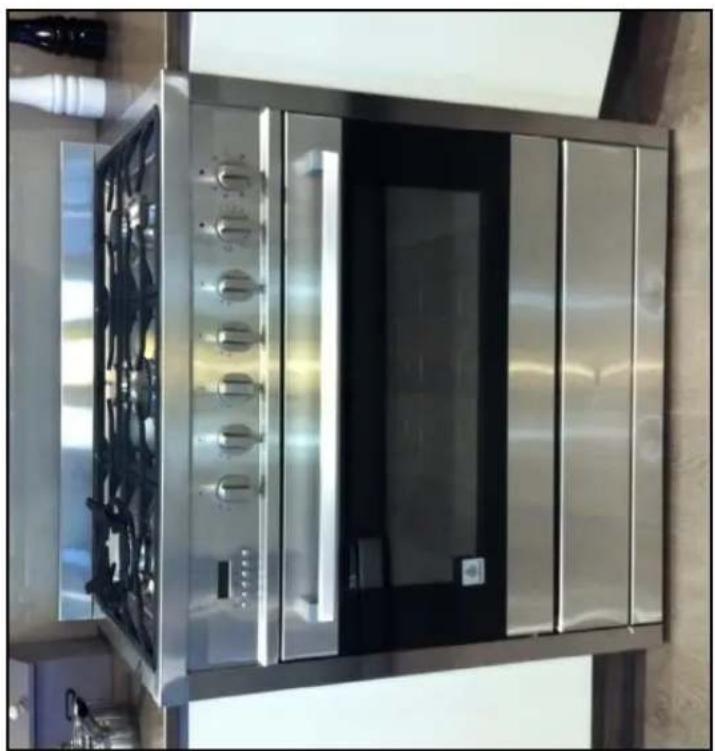
Modern stainless steel double boiler with multiple gas stove handles and open door (no visible text or symbols)Once the holes have been drilled the chains can be fed through and the upright can be fitted into position.
The chains then need to be pulled as tight as possible from inside the cabinet while at the same time being fixed to the rear of the cabinet using a self drilling wood screw. It is better to have the screw fixed closer to the hole for better support. The left and right side examples shown have two extra screws attached to the chain which makes the installation neater by keeping the chain off the shelf away from the gas and electricity supply, they will also provide added support.
At this point the oven will be secured in location and will not move forward at all, it is recommended that all upright oven chains be fitted in this way.
Installation forms part of the installers compliance and that are in line with regulations. Chains are designed to be installed to prevent cooker from tilting. They are not designed to replace parental supervision when the cooker is in use.
Left Side
Natural Gas (the appliance test point is located at the regulator)
The supplied regulator must be fitted to the appliance inlet connection. Gas pressure must be adjusted to 1.0 kPa when approximately 50% of the burners are on high flame.
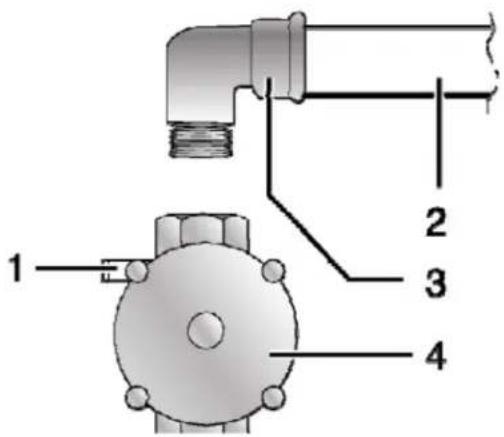
1 Test point location
2 Gas inlet pipe
3 Elbow
4 Regulator
Universal LPG (the appliance test point is located at the injector)
Gas pressure must be checked to confirm the appliance operating pressure is 2.75 kPa, the appliance test point is the rapid burner injector as shown below.
- Disconnect power.
- Light the auxiliary burner and set to high flame. Ensure all other burners are off.
- Zero manometer, then apply flexible tubing to seal over the Rapid burner injector, hold securely in place and check the gas pressure by pressing in the corresponding burner control knob in, then turning to high flame position.
- If the pressure is 2.75 kPa, reassemble the burner and perform the final checks as per this instruction manual.
- If the pressure is not 2.75 kPa, disconnect the appliance and check/adjust/replace the LPG cylinder regulator(s) as appropriate in accordance with AS/NZS 5601
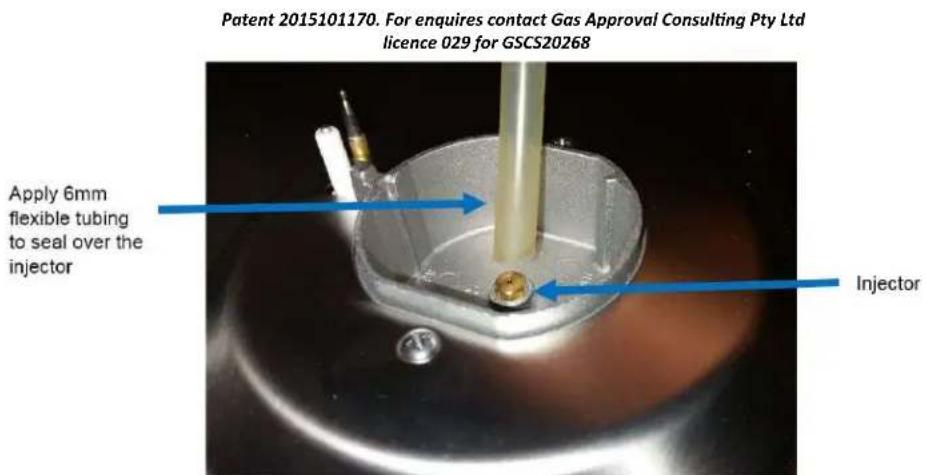
Patent 2015101170. For enquires contact Gas Approval Consulting Pty Ltd
ELECTRICAL CONNECTION
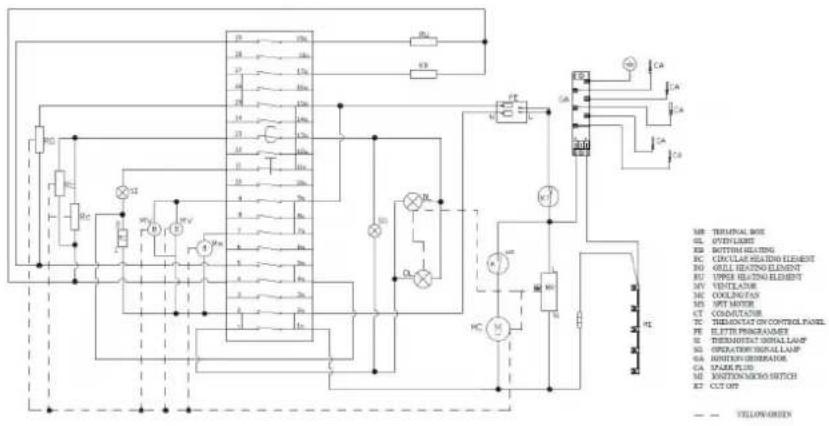
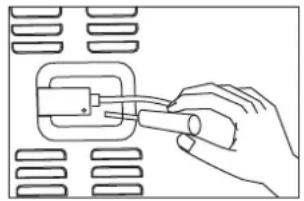
The appliance is fitted with an approved 15 Amp flexible cord and plug which must be connected to a correctly earthed socket outlet. The manufacturer is not liable for any direct or indirect damage caused by faulty installation or connection. It is therefore necessary that all installation and connection operations are carried out by qualified personnel complying with the local and general regulations in force.
The wire section on the cable must not be less than 1.5mm (3×1.5cable). Use only the special cables available at our service centers.
natural_image
Hand inserting a plug into a device panel (no text or symbols visible)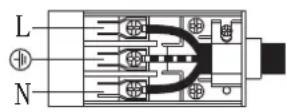
CONNECTION OF THE FEEDING CABLE TO THE MAINS
Connect the feeding cable to a plug suitable for the load indicated on the rating plate of the product. In case of a direct connection to the mains (cable without plug), it is necessary to insert a suitable omni polar switch before the appliance, with minimum opening between contacts of 3 mm (the grounding wire should not be interrupted by the switch). Before connecting to the mains, make sure that:
- The electrical counter, the safety valve, the feeding line and the socket are adequate to with stand the maximum load required (see rating plate).
- The supply system is regularly grounded, according to the regulations in force. The socket or the omni polar switch can easily be reached after the installation of the oven.
- After carrying out the connection to the mains, check that the supplying cable does not come into contact with parts subject to heating.
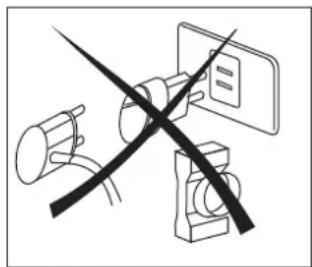
- Never use reductions, shunts, adaptors which can cause overheating or burning.
natural_image
Pure electrical circuit lines without any symbolsThe manufacturer is not liable for any direct or indirect damage caused by faulty installation or connection. It is therefore necessary that all installation and connection operations are carried out by qualified personnel complying with the local and general regulations in force.
Electrical features
- Oven light 2 x 25W
- Spit motor 4W
• Upper heating element 2200W - Bottom heating element 1800W
- Grill heating element 2900W
• Circular heating element 2 x 1600W - Ventilator motor 2 x 30W
- Cooling fan 11W
VENTILATION AND GAS CONNECTION
Refer to AS5601, in general the appliance should have adequate ventilation for complete combustion of gas, proper flueing and to maintain temperature of immediate surroundings within safe limits.
ADAPTATION TO DIFFERENT TYPES OF GAS
The appliance is factory set for Natural gas. The test point pressure should be adjusted to 1.0 kPa with 50% of the burners operating at maximum.
The appliance is set up to operate with the gas specified on the gas type label placed on the back of the appliance.
To perform these operations the qualified installer will follow the indications given in the "Adaptation to the various types of gas" section. For safer operation make sure that the supply pressure respects the values given in the "Table of burner and injector characteristics".
If installing for use with LPG, ensure a gas regulator suitable for a supply pressure of 2.75 kPa is part of the gas cylinder supply and the test point pressure is 2.75 kPa.
When satisfied with the operation of the cooker, please instruct the user on the correct method of operation. In case the appliance fails to operate correctly after all checks have been carried out, refer to the authorised service provider in your area.
To adapt the appliance to a gas different from that for which it was set up (see gas type label inside the warming compartment door) proceed as follows:
- remove the grids
remove the burners caps and burner heads
with a 7 mm socket spanner unscrew and remove the injectors.
replace the injectors with those supplied corresponding to the gas available (see burner and injector characteristics Table)
replace the various parts proceeding in reverse.
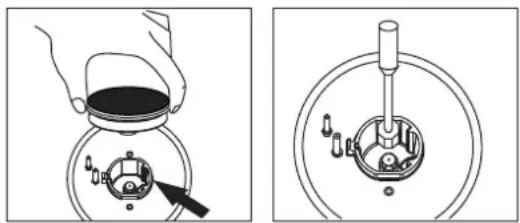
When converting from Natural Gas to LPG ensure that the NG regulator is removed and replaced with the Test Point Adaptor. A gas regulator suitable for a supply pressure of should be part of the gas cylinder supply and the appliance test point pressure must be 2.75 kPa
SETTING THE MINIMUM FLAME
The flame on the small output is regulated by the factory.
When the injectors have been replaced, it may be necessary to regulate the minimum flame again.
The operations necessary to set the minimum flame are as following:
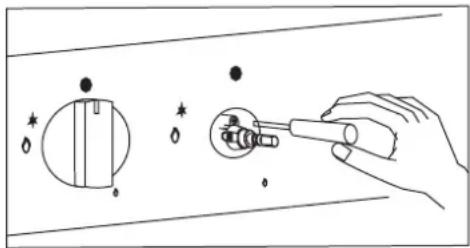
natural_image
Illustration of a hand using a tool to adjust a circular component with sparkles (no text or symbols)- light the burner
- turn the knob to the minimum position
• take out the knob (and gasket if there is one)
- LPG TO NG: Use a thin blade screwdriver to turn the by-pass screw located above left of the gas valve, shaft as shown right. Turn gently the by-pass screw clockwise to the end completely then turn it anti-clockwise 1 turn for the Triple ring, 7/8 turn for the Fish, 3/4 turn for the Rapid, 1/2 turn for the Semi-Rapid and 3/8 turn for the auxiliary.
- NG TO LPG: Use a thin blade screwdriver to turn the by-pass screw located above left of the gas valve shaft as shown right. Turn gently the by-pass screw clockwise to the end.
- put the knob back on and turn it quickly from the maximum position to the minimum position, checking that the flame does not go out
- for burners with safety valve make sure that the regulation obtained is sufficient to maintain heating of the thermocouple. If it is not, increase the minimum
THE BURNERS REQUIRE NO REGULATION OF THE PRIMARY AIR.
ANY OF THE FOLLOWING ARE CONSIDERED TO BE ABNORMAL OPERATION AND MAY REQUIRE SERVICING:
- Yellow tipping of the hob burner flame.
- Sooting up of cooking utensils.
- Burners not igniting properly.
- Burners failing to remain alight
- Burners extinguished by the oven door.
• Gas valves which are difficult to turn
IN CASE THE APPLIANCE FAILS TO OPERATE CORRECTLY, CONTACT THE AUTHORISED SERVICE PROVIDER IN YOUR AREA.
Injector size table:
| Upright | Burner | Gas Type | Injector Size (mm) | TPP (kPa) | NGC (MJ/h) |
| All models as applicable | Auxiliary | Natural gas | 0.93 | 1.0 | 3.6 |
| Semi-rapid | 1.16 | 6.3 | |||
| Rapid | 1.55 | 11.0 | |||
| Wok | 1.75 | 13.5 | |||
| Fish | 1.50 | 10.5 |
| Upright | Burner | Gas Type | Injector Size (mm) | TPP (kPa) | NGC (MJ/h) |
| All models as applicable | Auxiliary | Universal LPG | 0.57 | 2.75 | 3.6 |
| Semi-rapid | 0.71 | 6.3 | |||
| Rapid | 0.93 | 11.0 | |||
| Wok | 0.98 | 13.0 | |||
| Fish | 0.88 | 10.5 |
INSTRUCTIONS FOR USE
The use of a gas cooking appliance results in the production of heat and moisture in the room in which it is installed. Ensure that the kitchen is well ventilated: keep natural ventilation holes open or install a mechanical ventilation device (mechanical extractor hood).
Prolonged intensive use of the appliance may call for additional ventilation, for example opening of a window, or more effective ventilation, for example increasing the level of mechanical ventilation where present.
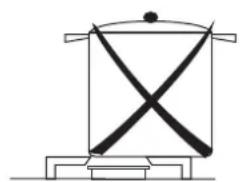
Do not place anything, e.g. flame tamer between pan and pan support. Do not remove the pan support and enclose the burner with a wok stand, only use the wok support supplied. Do not use large pots or heavy weights which can bend the pan support or deflect flame onto the hotplate. Locate pan centrally over the burner so that it is stable and does not overhang the appliance.
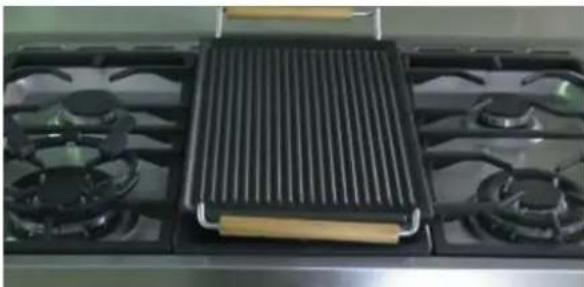
Griddle plate must only be located above the centre fish burner as shown. Caution: ensure plate is cool before removing.
natural_image
Close-up of a grater with three flanges and a wooden grater on top (no visible text or symbols)(gas cooking top side)
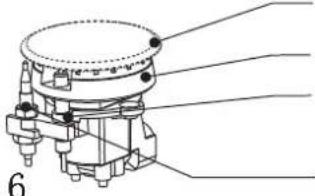
Description of the main parts of the appliance
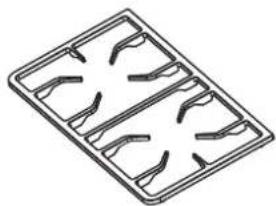
natural_image
Isometric line drawing of a rectangular tray with four curved slots and a central star-like pattern (no text or symbols)1
natural_image
Technical diagram of a mechanical assembly with labeled parts (no readable text or symbols)2
3
4
5
natural_image
Technical diagram of a mechanical assembly with concentric rings and mounting holes (no text or labels)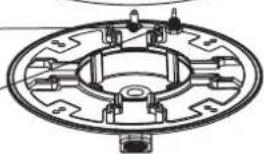
natural_image
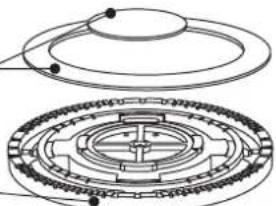
Technical line drawing of a circular mechanical component with mounting holes and internal features (no text or symbols)1 = grid
2 = burner cap
3 = burner head
4 = spark plug
5 = safety valve (for models equipped with a safety valve)
DESCRIPTION OF SYMBOLS

FRONT LEFT BURNER

FRONT CENTRAL BURNER

CENTRAL BURNER

REAR LEFT BURNER

REAR CENTRAL BURNER

ELECTRIC OVEN THERMOSTAT

FRONT RIGHT BURNER

LEFT CENTRAL BURNER

ELECTRIC OVEN FUNTION KNOB

REAR RIGHT BURNER

RIGHT CENTRAL BURNER
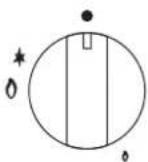
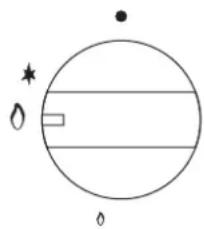
In order to ignite a burner, it is necessary to depress the knob while rotating it anti-clockwise, till the index is aligned with the position corresponding to the maximum gas delivery (i.e. the large flame symbol). As far as the models equipped with a safety valve are concerned, once the flame is lit hold the knob depressed for about 3-4 seconds till the device keeps the burner
automatically lit. If the burner fails to ignite, wait one minute
for the gas to dissipate before attempting to reignite. At this
moment it is possible to adjust the flame intensity by rotating
the knob anticlockwise from Such maximum position to the minimum
one (i.e. the small flame symbol).
In order to turn the burner off, rotate the knob clockwise bringing
the index back to the position corresponding to the closure symbol (●).
natural_image
Simple circular diagram with horizontal lines and symbols (no text or labels)RECOMMENDATIONS
In case of electric power failure, it is necessary to carry out the above-described operations by putting a gas lighter or a flame near the burner (in such an event, pay the utmost attention not to burn yourself).
The safety valve (for models where such item is provided) intervenes in case of accidental flame failure, blocking the gas delivery (e.g.: air draughts, spillage of liquids, etc.).
In any case, the ignition device must not be actuated for longer than 15 seconds. Should the ignition manoeuvre fail, or should the burner be accidentally turned off, immediately close the actuation knob and repeat the ignition after one minute at least.
Once the ignition has taken place, adjust the flame according to your needs.
Advice on the use of gas burners
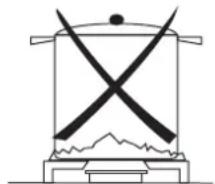
For lower gas consumption and a better yield, use saucepans with diameter suitable for the burners, avoiding the flame coming up round the side of the saucepan (see the Container Table). Use only flat-bottomed pans.
As soon as a liquid starts to boil, turn the flame down to a level sufficient to maintain boiling.
During cooking, when using fats and oils, be very careful because if they overheat they could catch fire.
natural_image
Simple line drawing of a mechanical or architectural component with intersecting beams and supports (no text or symbols)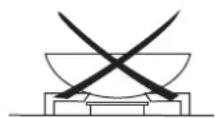
natural_image
Simple line drawing of a cross-shaped object on a base with a jagged base and smokestacks (no text or symbols)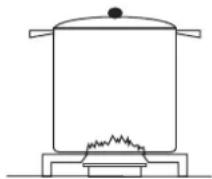
Container table (use flat-bottomed saucepans)
| Burner | min Saucepan (mm) | max Saucepan (mm) |
| Auxiliary | 90 | 160 |
| Semi-rapid | 130 | 180 |
| Fish pan | 310 × 140 | 380 × 230 |
| Rapid | 150 | 260 |
| Triple ring | 210 | 260 |
INSTRUCTIONS FOR USE
(OVEN FUNCTION)
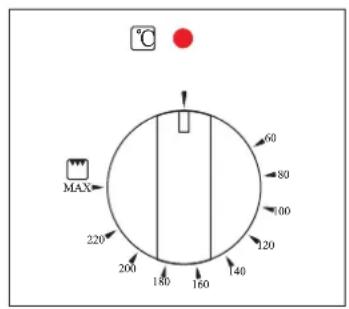
ELECTRIC OVEN THERMOSTAT KNOB
Selection of cooking temperature is carried out by turning the knob clockwise to the required temperature, between 60°C and MAX. If the appliance is with an electric oven, the warning light will come on when the oven is heating up. When it goes out it means that it reaches the required temperature. Regular flashing means that oven temperature is being constantly maintained at the programmed level.
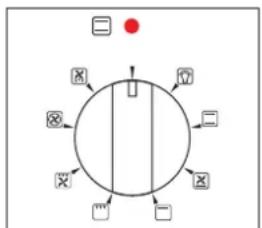
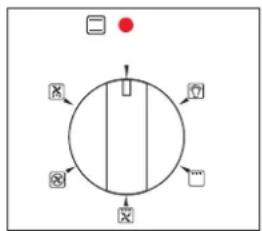
ELECTRIC OVEN CONTROL KNOB
Each of the functions listed below can be used only together with the correct temperature.
A
flowchart
graph TD
    A["Start"] --> B{Decision}
    B -->|Yes| C["Process Step 1"]
    B -->|No| D["Process Step 2"]
    C --> E["End"]
    D --> E
    E --> F["End"]
8-Function
5-Function
B
The selector B and thermostat A control is used to select the various oven functions and to choose the cooking temperatures best corresponding to the food to be cooked. During oven operation the lamp will always remain on.

The lamp of the oven is on, with no heating elements operated (electrical resistances). During oven operation the lamp will always remain on
TRADITIONAL COOKING
THERMOSTAT SELECTOR SWITCH FROM 60°C TO MAX

The heat is provided from the top and bottom elements. The oven must be preheated before the food is placed inside. Static cooking provides optimum results with: cakes, pizzas, bread and for gentle slow cooking of casseroles. Characteristics of static cooking: heat provided from above and below, cooking is possible only on middle shelf and should be centrally located in the oven.
DELICATE COOKING
THERMOSTAT SELECTOR SWITCH FROM 60°C TO MAX

Ideal for pastries and cakes with wet covering and little sugar and damp desserts in moulds. Excellent results can also be achieved in completing cooking at the bottom and with dishes requiring heat in the Lower area in particular. The plate is best inserted at bottom level.

TOP OVEN COOKING
THERMOSTAT SELECTOR SWITCH FROM 60°C TO MAX
Top oven - Use for brown food at the end of cooking.

GRILL COOKING
THERMOSTAT SELECTOR SWITCH FROM 60°C TO MAX
Grill Element - Use for toasting and melting cheese or browning. The cooking time should be no longer than 5 minutes. To operate, please select Full Grill Function along with the temperature.

FAN ASSISTED GRILL COOKING
THERMOSTAT SELECTOR SWITCH FROM 60°C TO 200°C
Use of the Grill Element and Fan. Use for grilling meats, vegetables and poultry. Preheat oven, place food on grill rack in baking tray and place in the middle of the oven. Other food may be cooked underneath whilst grilling. The oven door must be closed for all cooking methods

FAN FORCED COOKING
THERMOSTAT SELECTOR SWITCH FROM 60°C TO MAX
The circular heating element and fan come into operation and the heat is spread evenly to all shelf positions. Various types of food can be cooked on different shelves, naturally with the appropriate cooking times. The oven must be preheated before the foods are placed inside. Fan mode provides optimum results with: cakes (soft and thick), large quantities of foods and cooking various dishes simultaneously. To operate, please select Fan Forced function along with the temperature.
DEFROSTING
THERMOSTAT SELECTOR SWITCH ANY

The fan located on the bottom of the oven makes the air circulate at room temperature around the food. This is recommended for the defrosting of all types of food, but in particular for delicate types of food which do not require heat such as for example: ice cream cakes, cream or custard desserts, fruit cakes. By using the fan, the defrosting time is approximately halved. In the case of meat, fish and bread, it is possible to accelerate the process using the "Fan forced" and setting the temperature to 80 °CTO 10 0°C. The oven door must be closed for all cooking methods.
The turnspit (only available on certain models)

To start the turnspit, proceed as follows:
1 Place the oven tray on the 1st rack;
2 Insert the special turnspit support on the 2nd rack and position the spit by Inserting it through the special hole for the turnspit at the back of the oven;
3 Start the turnspit using electric oven control knob to select setting / / / .
ELECTRONIC PROGRAMMER
6 BUTTON DIGITAL CLOCK/TIMER
- Showing time (0:00-24:00) and minutes.
- The screen shows 3 flashing number and "AUTO" if the power is on .
- In order to set correct time, Press the ⏻ button fist, then + or - button to carry forward backward the figure until the exact time shows.
Manual operation setting
Press the ⏻ button to remove the flashing of "AUTO".
If "AUTO" is glittering (automatic or semi automatic program has been set), Press Ⓧ button to remove "AUTO" and then the manual operation process is on.
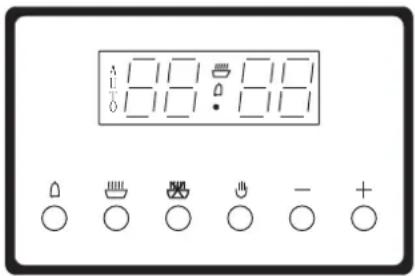
Automatic setting(set the full automatic starting and ending)
- Press button, set roast time.
- Press button, set roast finish time.
- Set tempeatures and roast modes by turning the thermostat knob and selector knob.
After the setting above, "AUTO" will be flashing, which means the roast process of the oven is set.
For example: if roast time takes 45 mintes and expect it will end at 14:00.
Press 📁 the roast time is to be 45minutes;Press 🌐 the roast is set to end 14:00.
After the above setting, the screen shows the real time(hour.minute) and flashing "AUTO", it means the set roast process is memorized automatically.
When the clock turns to be 13:15(or between 13:14-13:15,the oven will start automatically in the roast time,
and "AUTO" will be always flashing.
When the clock turns to be 14, the roast is done, the alarm is ringing and flashing "AUTO". After pressing the button, the ringing will stop.
Semi-automatic setting(set the time of automatic starting and ending)
A. Set the time limit of roast(10 hours maximum):
Press the 📄 button to set the time of roast; The oven starts immediately, 📄 and "AUTO" will flash. After the roast is finished, the roast operation process will be shut automatically. Then "AUTO" flashing, the alarm Rings. The ring will stop by pressing the 🔊 button.
B. Set the time of ending (23 hours 59 minutes maximum):
Press the button to set the time of ending; The oven starts immediately, and "AUTO" will flash. When the set time of ending comes, the roast operation process will be shut automatically. Then "AUTO" flashes, the alarm rings. The ring will stop by pressing the button.
Whenever the related button is pressed, the set roast process will be seen. Whenever the 📄 button is pressed, and carry backward the time to "0", the set roast process will be cancelled.
If button is pressed again, the oven will be in the manual operation process.
Timer:23hours 59minutes can be set as maximum.
When setting time, press the button, and then + or - button, until the required time shows on the screen. After the setting, the correct time (hour, minute) and the button will show on the screen and timing begins immediately.
Whenever the button is pressed, timing will be seen, When the set time reaches, the alarm will ring. The ringing will stop after pressing the button.
Notice: After pressing the related button, setting is supposed to be done in 5 seconds. In case of blackout, the set process as well as the real time(hour, Minute) will disappear. After the power is on again, three
"0" and "AUTO" shows on the screen, this mean the oven has been automatically reset.
Cooling ventilation: In order to cool down the exterior of the appliance, the model is equipped with a cooling fan, which comes on automatically when the oven is hot.
When the fan is on, a normal flow of air can be heard exiting between the door and the control panel.
Note: When cooking is done, the fan stays on until the oven cools down sufficiently.
3 BUTTON DIGITAL CLOCK /TIMER
This model has a digital display, 24hr clock with 3 control buttons. When the power is connected, the screen displays '12:00' and the bar above the √ symbol.
Adjusting the digital clock
To set the correct time, press the + or - button to advance forward or backward until the correct time is displayed. After 5 seconds it will start automatically or you can press the function button to make it work.
Digital Timer
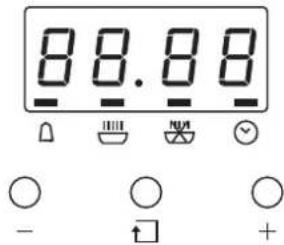
— Decrease time
Function
+ Increase time
Manual operation setting
Press the function button to select manual operation.
Automatic setting
Automatic setting of the oven allows you to select the end time, cooking time, temperature and cooking mode. The oven will switch on, cook according to the selected cooking mode and temperature and then switch off automatically.
- Press the function button repeatedly until the bar above ⏚ flashes, then press + or - button to set the time frame for baking.
- Press the function button repeatedly until the bar above ⏻ flashes and then press + or - button to set the time to switch off.
- Set cooking temperature and cooking mode by turning the thermostat knob and selector knob.
After these settings, the bars above 📄 and ⚡️ will flash, indicating that the automatic cooking feature of the oven is set.
For example: if cooking time takes 45 minutes and you want it to finish at 14:00:
- Press the function button repeatedly until the bar above 📄 flashes and set the cooking time 45 minutes.
- Press the function button repeatedly until the bar above 📋 flashes and set the finish time to 14:00.
After the above setting, the current time is displayed and the bars above 🏠 and 🚗 will flash indicating that the automatic cooking feature is set. When the clock displays 13:15, the oven will start cooking automatically. While cooking the bar will flash.
Timer
The digital countdown timer can be set up to 23 hours and 59 minutes maximum.
To set the timer, press the function button repeatedly until the bar above ☐ is displayed. Once the function button is released, the current time is displayed and the bar above ☐ flashes. When the function button is pressed the remaining time is displayed. When the set time is reached, ☐ disappears and the alarm will ring. To stop the alarm, press any button.
Note: After pressing the function button, timer settings should be done within 5 seconds.
In case of a power failure, all settings including the time display will be lost. When the power is returned, the bar above and '12:00' will be displayed.
INSTRUCTIONS FOR COOKING
OVEN COOKING
For a perfect cooking, it is necessary to pre-heat the oven to the preset cooking temperature. Only very fat meat can be placed into a cold oven. To minimise food splashes into the oven (which can produce smoke sometimes) deep baking dishes are recommended. Use instead highedged containers, preferably terracotta containers, put on the grate at about half the height of the oven. The table shows some examples of how to set the thermostat and the cooking time. The cooking times vary according to the type of food, its homogeneity and volume. We are sure that, after a few endeavours, the experience will suggest possible variations to the values shown on the table.
Practical hints to save energy
The oven can be switched off some minutes before cooking end; the residual temperature is enough to complete cooking. Open the oven door only when it is absolutely necessary; to check the cooking phase, look through the glass (the oven lamp is always on).
General Advice
The oven offers various kinds of heating:
- The traditional heating for the cooking of special roasts
- the fan forced heating for the cooking of cakes, biscuits and similar.
If the fan forced cooking is chosen, it is recommended to take advantage of it. Hence, cooking or roasts on more shelves is recommended to save time and energy.
Fan Assisted
A continuous circulation of warm air is created, which allows food to be placed and cooked on different shelves at the same time. The oven will reach the preset temperature in a very short time.
Traditional cooking
This is especially suitable for the cooking of meats/poultry that requires long, slow cooking as well as for the cooking of bread and sponge cakes. It is advisable to place the food to be cooked into the oven when the right cooking temperature is reached, that is to say when the pilot light of the thermostat extinguishes.
Grill cooking ✗
Delete, pre-heat the oven for about 5 minutes. During grill operation the heat comes from above; it is based on the infrared radiation and is fit for low thickness meat and for toasts. The meat and the fish to be grilled are to be slightly oiled and always placed on the grate; this is to be arranged on the nearest or on the farthest guide from the grill element, according to the thickness of the meat to be cooked. The table shows some examples of cooking times and food positions. The cooking times vary according to the type of food, its homogeneity and volume.
Cooking times
The table shows some examples for the adjustment of the thermostat and of the cooking time. The cooking times can vary according to the type of food, and volume. We are sure that, after a few endeavors, the experience will suggest possible variations to the values shown on the table.
REMARK: The times indicated in the table refer to the cooking of one portion only; for more than one portion, the cooking times should be increased by 5 -10 minutes.
TABLE OF COOKING TIMES
The table below provides indicative shelf positions for use with your oven. Please note, the temperature and cooking times are indicative only. According to different cooking habits, it may be necessary to make further modifications. Please add 15 minutes to the times indicated for preheating.
| Selector knob setting | Food to be cooked | Level from below | Temperature (°C) | Time in minutes(*) |
Traditional cooking | First courses | |||
| Lasagne | 2-3 | 210-230 | 30 | |
| oven-baked pasta | 2-3 | 210-230 | 40 | |
| MEAT | ||||
| Roast veal | 2 | 175-200 | 30-40/kg | |
| Roast b eef | 2 | 210-240 | 30-40/kg | |
| Roast pork | 2 | 170-200 | 30-40/kg | |
| Chicken | 2 | 170-200 | 45-60 | |
| Duck | 2 | 170-200 | 45-60 | |
| Goose-turkey | 2 | 140-170 | 45-60 | |
| Rabbit | 2 | 170-200 | 50-60 | |
| Leg of lamb | 1 | 170-200 | 15/kg | |
| Roast fish | 1-2 | 170-200 | According to dimensions | |
| Pizza | 1-2 | 210-240 40-45 | ||
| DESSERTS | ||||
| Meringue | 1-2 | 50-70 | 60-90 | |
| Slofty | 1-2 | 170-200 | 15-20 | |
| Ciambella | 1-2 | 165 | 35-40 | |
| Savoyards | 1-2 | 150 | 30-50 | |
| Brioches | 1-2 | 170-200 | 40-45 | |
| Fruit cake | 1-2 | 170-200 | 20-30 | |
 | Browing food to perfect cooking | 3-4 | 15 | 220 |
(*) With preheated oven
| Selector knob setting | Food to be cooked | Level from below | Temperature (°C) | Time in minutes |
Fan forced cooking | First courses | |||
| Lasagne | 2 | 190-210 | 20-25 | |
| Oven-baked pasta | 2 | 190-210 | 25-30 | |
| Creole rice | 2 | 190-220 | 20-25 | |
| MEAT | ||||
| Roast veal | 2 | 150-170 | 65-90 | |
| Roast pork | 2 | 150-160 | 70-100 | |
| Roasted beef | 2 | 160-170 | 65-90 | |
| Fillet of beef | 2 | 160-180 | 35-45 | |
| Fillet lamb | 2 | 130-150 | 100-130 | |
| Roast beef | 2 | 170-180 | 40-45 | |
| Roast chicken | 2 | 170 | 70-90 | |
| Roast duck | 2 | 160-170 | 100-160 | |
| Roast turkey | 2 | 150-160 | 160-240 | |
| Roast rabbit | 2 | 150-160 | 80-100 | |
| Roast hare | 2 | 160-170 | 30-50 | |
| Roast pigeon | 2 | 140-170 | 15-25 | |
| Fish | 2-3 | 150-170 | According to dimensions | |
| Pizza | 30-50210-2402-3 | |||
| DESSERTS(PASTRIES) | ||||
| Ciambella | 2-3 | 150-170 | 35-45 | |
| Fruit cake | 2-3 | 170-190 | 40-50 | |
| Sponge-cake | 2-3 | 190-220 | 25-35 | |
| Brioches | 2-3 | 160-170 | 40-60 | |
| Strudel | 1-2 | 150 | 25-35 | |
| Savoyard pudding | 2-3 | 160-170 | 30-40 | |
| Bread | 2-3 | 190-210 | 40 | |
| Toast | 1-2 | 220-240 | 7 | |
| Selector knob setting | Food to be cooked | Level from below | Time in minutes | |
Grilling  | Pork chops | 4 | First surface | Second surface |
| Fillet of pork | 3 | 7-9 | 5-7 | |
| Fillet of beef | 3 | 9-11 | 5-9 | |
| Liver | 4 | 9-11 | 9-11 | |
| Veal Escalopes | 4 | 2-3 | 2-3 | |
| Half chicken | 3 | 7-9 | 5-7 | |
| Sausages | 4 | 9-14 | 9-11 | |
| Meat-balls | 4 | 7-9 | 5-6 | |
| Fish fillets | 4 | 7-9 | 5-6 | |
| Toast | 4 | 5-6 | 3-4 | |
| 2-4 | 2-3 | |||
FAN OVEN

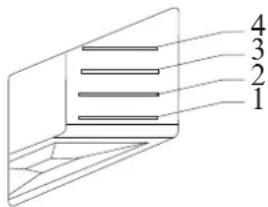
SHELF POSITIONS
Maintenance and Cleaning
Do not use jet of steam for cleaning.
Before any operation disconnect the appliance electrically. Wash the enameled parts with lukewarm water and detergent. Do not use abrasive products. Wash the burner spreader frequently with boiling water and detergent make sure to remove any deposits which could block the flame outlet. Rinse the stainless steel parts well with water and dry them with a soft cloth.
To clean the hob use slightly damp sponges and wiping cloths: if too much water is used it could penetrate the internal parts and damage electrical parts. The grids of the hob can be washed in the dishwasher.
For persistent stains use normal non-abrasive detergents, specific products commonly available on the market or a little hot vinegar. Clean the glass parts with hot water, avoiding the use of rough cloths.
Do not use stainless steel pads or acids for cleaning. To prevent lighting difficulties, carefully clean the lighting spark plugs regularly (ceramic and electrode).
Periodically if the knobs become difficult to turn, contact a qualified engineer to lubricate the taps. Contact a qualified engineer to deal with any other problems which may arise during use.
To keep the characteristics of brightness of the enameled parts for a long time it is necessary to clean the oven after each cooking. Once the oven is cold, you will be able to easily remove the fat deposits by means of a sponge or a cloth damp with warm soapy water or a common detergent. Never use abrasive cloths or sponges, that could irreparably damage the enamel. On white ovens even the parts of the dash board such as hand-grip and knob have to be cleaned each time because they may become yellow due to the emissions of fat vapors.
ALWAYS CLEAN THE APPLIANCE IMMEDIATELY AFTER ANY FOOD SPILLAGE.
Annual service by an authorised person is recommend if any of the following conditions are noticed: incomplete ignition, appreciable yellow tipping, carbon deposition, lifting, floating, lighting back or objectionable odour.
Contact: Glen Dimplex Australia Pty Ltd on Ph: 1300 556 816 or contact sales@glendimplex.com.au
THE GRIDS OF THE COOKING PLANE ARE EQUIPPED WITH SUITABLE RUBBER PADS, ITS PURPOSE IS BOTH PROVIDING BETTER STABILITY AND AVOIDING SCRATCHES ON THE PLANE SURFACES DURING USAGE.
AFTER A POSSIBLE GRID REMOVAL FOR CLEANING AND/OR MAINTE-NANCE NEEDS, WE RECOMMEND TO VERIFY THE PRESENCE OF SUCH RUBBER PADS AND TO PUT THE GRIDS BACK IN THEIR ORIGINAL POSITION
Cleaning the oven door
Unhooking the doors.
For a more thorough clean, you have to remove the oven door. Choose the removal and assemble method according to different structure of oven door purchased.
Proceed as follows:
- Open the door fully;
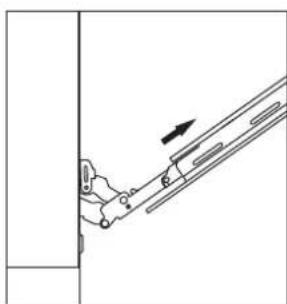
- Lift up and turn the small levers located on the two hinges;
Grip the door on the two external sides and close it approximately half way. Unlock the door by pressing on the clamps F, then pull the door towards you lifting it out of its seat. To replace the door, reverse this sequence.
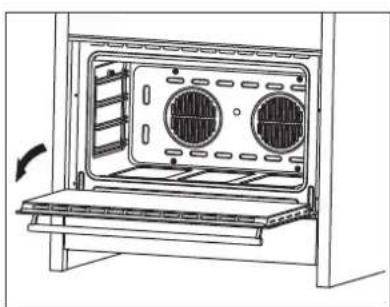
natural_image
Technical line drawing of a cabinet interior with ventilation grilles and fan openings (no text or symbols)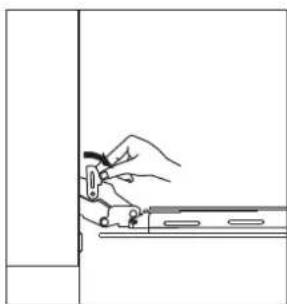
natural_image
Line drawing of a hand using a tool to adjust or install a component, no text or symbols present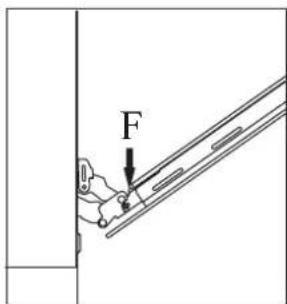
natural_image
Pure mechanical diagram showing a lever mechanism with an arrow indicating direction (no text or symbols)Replacing the oven bulb
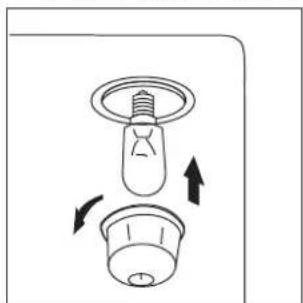
Once the oven has been electrically disconnected, unscrew the glass protection cap and the bulb, Always remember to use high temperatures (300/ E14) bulb for the oven. Reassemble the glass cap and reconnect the oven after replacing the bulb.
natural_image
Diagram of a light bulb with a circular base and two arrows indicating rotation or movement (no text or symbols)READ THE INSTRUCTION BOOKLET BEFORE INSTALLING AND USING THE APPLIANCE.
The manufacturer will not be responsible for any damage to property or to persons caused by incorrect installation or improper use of the appliance.
The manufacturer is not responsible for any inaccuracies, due to printing or transcription errors, contained in this manual. In addition, the appearance of the figures reported is also purely indicative.
The manufacturer reserves the right to make changes to its products when considered necessary and useful, without affecting the essential safety and operating characteristics.
Euromaid constantly seeks ways to improve the specifications and designs of their products.
Whilst every effort is made to produce up to date literature, this document should not be regarded as an infallible guide. Actual product only should be used to derive cut out sizes.
All Euromaid appliances must be installed by a qualified person/s with adherence to the relevant electrical, plumbing and gas codes, with compliance being issued as required by state or national legislation.
Additionally, all Euromaid upright cookers must have the anti-tilt device installed correctly in adherence to the relevant standards by the Licensed installer.
For maximum effectiveness and efficiency all range-hoods should be installed with the use of ductwork, by a licensed installer with adherence to the relevant state and national building codes and regulations.
All Euromaid appliances are for Domestic use only and must be installed by a licenced installer into Domestic Applications only, without exception and to the required Authorities guidelines. Any installation outside of this will VOID warranty. Alfresco areas are not a Domestic application.
WARRANTY
For full terms, conditions and warranty periods, or to register your product warranty, please visit our website www.euromaid.com.au
For service advice, please contact the Customer Care Centre by phone or email below.
Distributed by:
Glen Dimplex Australia Pty Ltd
1340 Ferntree Gully Road,
Scoresby 3179, Victoria
Australia
Ph: 1800 333 244
customer.care.ha@glendimplex.com.au
NOTES
NOTES
Distributed by:
Glen Dimplex Australia Pty Ltd
1340 Ferntree Gully Road,
Scoresby 3179, Victoria Australia
Ph: 1800 333 244
customer.care.ha@glendimplex.com.au
- Index
- Caution
- Installation instructions:
- Electrical Connection
- Instructions for use
- Instructions for cooking
- Maintenance and cleaning
- Warranty
- Notes
- CAUTIONS
- DO NOT MODIFY THIS APPLIANCE DO NOT PLACE ARTICLES ON OR AGAINST THIS APPLIANCE
- Warning:
- Installation Instructions
- Incorrect Installation
- Accidental Tipping
- Correct Chain Installation
- Natural Gas (the appliance test point is located at the regulator)
- Universal LPG (the appliance test point is located at the injector)
- CONNECTION OF THE FEEDING CABLE TO THE MAINS
- Electrical features
- VENTILATION AND GAS CONNECTION
- ADAPTATION TO DIFFERENT TYPES OF GAS
- SETTING THE MINIMUM FLAME
- DESCRIPTION OF SYMBOLS
- RECOMMENDATIONS
- (OVEN FUNCTION)
- ELECTRIC OVEN THERMOSTAT KNOB
- ELECTRIC OVEN CONTROL KNOB
- TRADITIONAL COOKING
- DELICATE COOKING
- TOP OVEN COOKING
- GRILL COOKING
- FAN ASSISTED GRILL COOKING
- FAN FORCED COOKING
- DEFROSTING
- THERMOSTAT SELECTOR SWITCH ANY
- ELECTRONIC PROGRAMMER
- BUTTON DIGITAL CLOCK/TIMER
- Automatic setting(set the full automatic starting and ending)
- BUTTON DIGITAL CLOCK /TIMER
- Adjusting the digital clock
- Manual operation setting
- Automatic setting
- Timer
- OVEN COOKING
- Fan Assisted
- Grill cooking ✗
- Cooking times
- TABLE OF COOKING TIMES
- Cleaning the oven door
- READ THE INSTRUCTION BOOKLET BEFORE INSTALLING AND USING THE APPLIANCE.
Brand : Euromaid
Model : EGE9TBK
Category : Oven