
HYTD300 - Construction Equipment HYUNDAI - Free user manual and instructions
Find the device manual for free HYTD300 HYUNDAI in PDF.


| Product Type | Mini Dumper (Pedestrian Controlled) |
| Model | Hyundai HYTD300 |
| Engine Type | Hyundai IC200 OHV 4-Stroke, 196cc |
| Engine Power | 4.8 kW (6.5 hp) at 3600 rpm |
| Fuel Type | Unleaded Petrol |
| Fuel Tank Capacity | 3.6 L |
| Engine Oil Capacity | 600 ml (SAE30 or 15W40) |
| Load Capacity | 300 kg |
| Drive System | Belt drive with clutch, 3 forward + 1 reverse gears |
| Steering | Left/right steering levers |
| Maximum Slope (Uphill) | 20° |
| Maximum Slope (Downhill) | 6° |
| Dimensions (L x W x H) | 1570 x 770 x 1030 mm |
| Net Weight | 179 kg |
| Sound Pressure Level | 81.5 dB(A) k=2 dB(A) |
| Measured Noise Level | 96.8 dB(A) |
| Guaranteed Noise Level | 101 dB(A) |
| Vibration Level (Left/Right) | 10.1 / 11.3 m/s² |
| Hopper Assistance | Gas spring for lifting/lowering |
| Starting System | Recoil starter |
| Safety Features | Engine on/off switch, fuel shut-off, safety decals, PPE required |
| Maintenance | Oil changes, gearbox oil every 50h, track tension adjustment, belt replacement |
| Spare Parts Available | Rubber track, drive belt, clutch cable, throttle cable, brake cable |
| Application | Transport of materials on construction sites, gardens, etc. |
Frequently Asked Questions - HYTD300 HYUNDAI
User questions about HYTD300 HYUNDAI
0 question about this device. Answer the ones you know or ask your own.
Ask a new question about this device
Download the instructions for your Construction Equipment in PDF format for free! Find your manual HYTD300 - HYUNDAI and take your electronic device back in hand. On this page are published all the documents necessary for the use of your device. HYTD300 by HYUNDAI.
USER MANUAL HYTD300 HYUNDAI

GENUINE PRODUCT OF HYUNDAI CORPORATION
natural_image
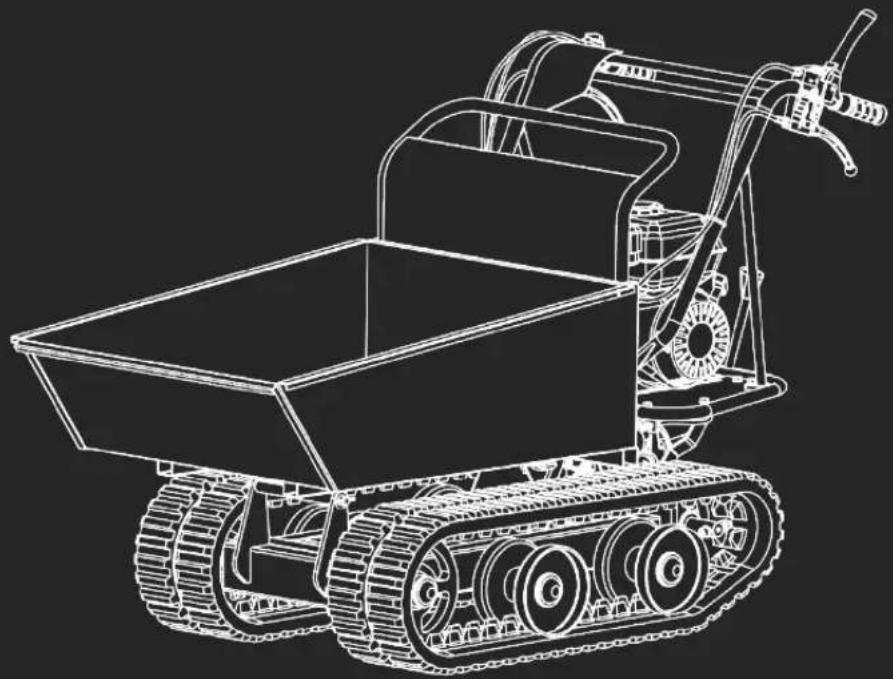
Line drawing of a tracked agricultural machine with a dump truck (no text or symbols)
CE UK CA
WARNING: Read the instructions carefully before use.
Iss:Nov/24
HYUNDAI
POWER PRODUCTS
Thank You For Purchasing Your HYUNDAI Product
We work very hard to give all of our customers the best possible service. If you have any problems, before leaving negative feedback, please contact us to give us a chance to resolve the issue.
We would be delighted if you left us positive feedback! Thank you for purchasing this product.
Rated Excellent on Trustpilot
This manual has been produced by Hyundai Power Products and should be kept with the product. Please read and understand these instructions before you use your product. Failure to do this may result in personal injury or damage to the product.
The safety precautions and warnings are to ensure your safety and protect you from harm or damage to the product.
The information contained in this manual was accurate at the time of production, however HYUNDAI Power Products may make modifications to the product without notification.
GENPOWER LTD
Isaac Way, London Road,
Pembroke Dock, UNITED KINGDOM, SA72 4RW
T: +44 (0) 1646 687 880 F: +44 (0) 1646 686 198
E: info@hyundaipowerproducts.co.uk
www.hyundaipowerproducts.co.uk
Contents
Symbols On The Machine....4-5
General Safety....6-14
Understand Your Machine......6
Personal Safety....6-7
Inspect Your Machine....7-8
Engine Safety....8
Work Area....8-9
During Use....9
Carbon Monoxide....10
General Fuel Safety....10-11
Batteries....12
Vibrations....12-13
Noise....13
Getting to Know The Machine....13
Personal Protective Equipment....14
Personal Protective Equipment....15
Getting Started....16
Assembly Safety....16
Unboxing Safety....16
Unboxing....17-18
What's In The Box....18
Assembly....19-21
Handlebar Assembly....19
Gas Spring (Optional)....19
Engine Oil And Fuel....20
Plow Blade (Optional)....20-21
Features 22-24
Preparation....25-26
Add Oil To Engine....25
Add Petrol To Engine....25-26
Before Each Use....26
Starting Procedure & Operation....27-28
Starting Procedure....27-28
Operating....28
Idle Speed....28
Stopping Procedure....29
After Each Use....29
Stopping Procedure....29
Emergency Stop....29
Troubleshooting....30
Specifications....31
Maintenance And Care....32-40
Safety....32
Routine Maintenance....33
Preventive Maintenance....33
Adjusting Clutch....34
Adjusting Steering....34-35
Lubrication....36
Tightening Tracks....36-37
Replacing Belt Drive....37-38
Storage....39
Environmental Protection....39
Recycling & Disposal......40
Spare Parts....41
Our Product Range......42
Useful Information....43
Our YouTube Channel....43
Warranty....43
Manual Updates....43
Returning Your Product....43
Leaving A Review....43
Ordering Spare Parts....43
Notes......44-46
Contact Us....47
Service Record....47
Declaration Of Conformity....48
Symbols On The Machine
We have provided safety messages in this manual and on the machine. This information alerts you to potential hazards that could hurt you or others. Please read these messages carefully. However, we may not have listed all of the possible hazards, you must also use your own judgement.

CAUTION!
Handle carefully. Ignoring the safety signs and warnings applied on the machine as well as ignoring the security and operating instructions can cause serious injuries and even lead to death.

INSTRUCTION MANUAL
Read and understand operator's manual before using the machine. Failure to follow instructions could result in death or serious injury.

EYE AND HEARING PROTECTION MUST BE WORN
Always wear safety glasses/goggles and/or face shields. Everyday eyeglasses have only impact resistant lenses; they are not safety glasses/goggles. Suitable safety hearing protection is recommended.

HAND PROTECTION MUST BE WORN
Protective electrically non-conductive gloves are highly recommended when working.

FOOT PROTECTION MUST BE WORN
Non-skid heavy duty footwear are highly recommended when working.

DO NOT REMOVE
Do not remove or tamper with the protection and safety devices.

DO NOT SMOKE
No smoking, sparks or flames.

DO NOT TOUCH
Do not touch parts that are hot from operation. Serious burns may result.

KEEP HANDS AWAY
keep your hands clear from all rotating parts.

DANGER
Never start or run the engine inside a closed area.

DANGER
The exhaust fumes are dangerous, containing carbon monoxide.

SLOPES
Do not operate on slopes with an angle over 20^ or tip loading at an inclined position.

BE AWARE
Objects may be thrown while in use.

TURN ENGINE OFF
Always turn off the engine before starting maintenance.
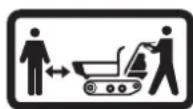
BYSTANDERS
Keep children and bystanders off and away.
Symbols On The Machine

RECYCLING AND DISPOSAL
This marking indicates that this product should not be disposed with other household wastes. To prevent possible harm to the environment or human health from uncontrolled waste disposal, recycle it responsibly to promote the sustainable reuse of material resources. To return your used device, please use the return and collection systems or check with your local authority or local stores for advice or environmental safe recycling.
CE UK CA
CE & UKCA symbols
This product complies with the applicable European and Uk directives and an evaluation method of conformity for these directives was done.

WARNING : READ THE INSTRUCTION BOOKLET THOROUGHLY BEFORE USING THE MACHINE. Keep for future reference and pass it on if the machine is loaned or sold to another user.
Understand Your Machine
- WARNING! You must read these instructions carefully before operating the machine. Make sure that you are familiar with the controls and properly operate the machine. You must learn how to stop the machine quickly. If you do not follow the warnings and instructions, it may result in fire and/or serious injury. Make sure to save all warnings and instructions for future reference.
- Read this manual and labels affixed to the machine to understand its limitations and potential hazards.
- Be thoroughly familiar with the controls and their proper operation. Know how to stop the machine and disengage the controls quickly.
- If the unit is to be used by someone other than original purchaser, or is to be loaned, rented, or sold, always provide this manual and any needed safety training before operation. The user can prevent and is responsible for accidents or injuries that may occur to themselves, to other people, or to property.
- Do not force the machine beyond its limits. Use the correct machine for your application.
- Know how to stop the engine quickly in case of emergency. Understand the use of all controls.
- ALL MAINTENANCE other than that listed in this manual, should be carried out by professionally trained and certified personnel.
Personal Safety
- WARNING! Never allow children or people unfamiliar with these instructions to use the product. Local regulations can restrict the minimum age of the operator.
- Keep children, pets, and other people not using the unit away from the work area. Be alert and shut off the unit if anyone enters work area. Keep children under the watchful care of a responsible adult.
- Stay alert, watch what you are doing and use common sense when operating the machine. Never operate the machine when unwell or tired, or if you have taken alcohol, medicine, drugs or any substances which may slow your reflexes and compromise judgement. A moment of inattention while operating the machine may result in serious personal injury.
- Appropriate Personal Protective Equipment (PPE), MUST be worn at all times when operating or repairing the machine. Always wear anti-slip and resistant work footwear and long pants while using the machine. Do not use the machine when barefoot, wearing sandals or similar lightweight footwear. Do not wear chains, bracelets or clothing that is loose fitting or hanging ties or cords. Tie long hair back. Always wear protective earplugs. Loose clothes, jewellery, or long hair can be caught in moving parts. Protect eyes, face, and head from objects that may be thrown from the unit. Always wear safety goggles or safety glasses with side shields when operating.
- Always keep hands and feet away from all moving parts during operation. Moving parts can cut or crush body parts.
General Safety
- Always keep hands and feet away from all pinch points.
- Do not touch parts that might be hot from operation. Allow parts to cool before attempting to maintain, adjust, or service.
- Do not overreach. Keep proper footing and balance at all times. This enables better control of the machine in unexpected situations. Extending your body too far can result in a loss of balance and you may fall which will result in injury.
- Never place any part of your body where it would be in danger if movement should occur during assembly, installation, and operation, maintenance, repairing or moving.
- Start the engine carefully according to instructions and with feet away from the moving parts.
- Do not place your hands or feet near or under rotating parts. Keep away from any discharge openings.
- Keep in mind that the operator or user is responsible for accidents, hazards or unexpected events involving the machine that occur to other people or their property. It is the responsibility of the user to assess the potential risk of the area where work is being carried out. The operator or user must take all necessary precautions to ensure their own safety and that of others, especially on slopes or rough, slippery and unstable ground.
Inspect Your Machine
- Check your machine before starting it. Keep guards in place and in working order. Make sure all nuts, bolts, etc., are securely tightened.
-
You must check the general condition of the machine before use.
-
Never operate the machine when it is in need of repair or is in poor mechanical condition. Replace damaged, missing, or failed parts before using it. Check for fuel leaks. Keep the machine in safe working condition.
- Do not use the machine if the engine's switch does not turn off the engine when running. Any petrol powered machine that can't be controlled with the engine switch is dangerous and must be replaced.
- Regularly check to see that keys and adjusting wrenches are removed from the machine area before starting it. A wrench or a key that is left attached to a rotating part of the machine may result in personal injury.
- Avoid accidental starting. Be sure the engine's switch is off before performing any maintenance or service on the unit. Performing maintenance or a service on a machine with its switch on invites accidents.
- If the machine should start to vibrate abnormally, stop the engine and check immediately for the cause. Vibration is generally a warning sign of trouble.
- Do not tamper with or disable safety systems.
- Only use manufacturer-recommended attachments.
- Before using, always visually inspect to see that the tools are not worn out or damaged. Replace worn out or damaged elements and bolts in set to preserve balance.
- Keep all nuts, bolts and screws tight to ensure the equipment is in safe working condition.
General Safety
- Keep the machine in good operating condition. Operating the machine in poor or questionable condition could result in serious injury.
- Be sure all safety devices are in working order and warning labels are in place. These items are installed for your safety.
Engine Safety
- This machine is equipped with an internal combustion engine. Do not use on, or near, forest-covered or brush-covered land unless the exhaust system is equipped with a spark arrester meeting applicable local, state, or federal laws.
- A spark arrester, if used, must be maintained in effective working order by the operator.
- Never start or run the engine inside a closed area. The exhaust fumes are dangerous, containing carbon monoxide, an odorless and deadly gas. Operate this unit only in a well-ventilated outdoor area. (See carbon monoxide safety).
- Do not tamper with the engine in an effort to get it to run at higher speeds. The maximum engine speed is preset by the manufacturer and is within safety limits.
- Keep a fire extinguisher on hand when operating this machine in dry areas as a precautionary measure.
- Never leave the operating position when the engine is running.
- The engine parts get very hot when running, do not touch. Danger of burns.
-
Follow the instructions to ignite the engine carefully whilst keeping feet away from moving parts.
-
Never incline the machine during ignition. Ignite the machine on a flat surface without obstacles or high grass.
- Do not over-rev the engine or change the engine settings.
- Never pick up or carry the machine while the engine is running.
- Stop the engine whenever you leave the machine, or before refuelling, when cleaning or while maintaining.
- Reduce the throttle setting during engine shut down and, if the engine is provided with a shut-off valve, turn the fuel off at the conclusion of working.
Work Area
- Make sure you thoroughly inspect the entire work area and remove all objects and anything that could be thrown by the machine or could damage the engine or machine (branches, stones, wire, toys, etc). Attempting to clear the work area whilst using the machine will reduce your concentration and creates a trip hazard. Any liquid spilled on the floor may result in you slipping.
- You must only work in daylight or with good artificial light in good visibility conditions. Keep people, children and animals away from the working area.
- Operate on flat, level ground.
- DO NOT work on wet ground. If there has been heavy rain on the working site, wait until the ground has dried up.
- Never park the machine in a place with unstable ground which could give way.
- You must pay special attention when approaching obstacles that could compromise visibility.
General Safety
- The maximum uphill angle of the machine is 20^ . The maximum downhill angle of the machine with the head downward is 6^ . Do not shift gears on slopes. You must work across the slope and not up and down it. When changing direction, you need to be careful that the wheels do not hit any obstacles (such as roots, branches, stones, etc) that can cause the machine to slide sideways or make you lose control of it.
- Find and locate all fixed objects in the ground, such as sprinkler systems, poles, water valves, bases for washing lines etc.
- Make sure that you check for hidden electrical cables or similar on the surface of the lawn. ALWAYS run the machine around these objects. NEVER intentionally run the machine over foreign objects.
- You must be careful near ravines, ditches or embankments.
- Exercise extreme caution when operating on or crossing gravel drives, walks, or roads. Stay alert for hidden hazards or traffic.
- Pay the utmost attention when working on frozen ground as the machine may tend to skid.
- Do not work in the rain or when there is a thunderstorm or lightning risk. If there is bad weather conditions, do not use the machine.
- On soft ground, drive at the first forward/ reverse gear. Do not rapidly accelerate, turn sharply or stop.
- When dumping the contents of the hopper, the centre of gravity will change continuously and the ground conditions will be essential for the stability of the machine. Use extra caution and control when dumping the hopper on e.g. wet clay.
During Use
- Always hold the unit with both hands when operating. Keep a firm grip on the handlebars. Be aware that the machine may unexpectedly bounce upward or jump forward if the machine should strike buried obstacles such as large rocks or roots.
- Do not operate the machine in confined areas where there may be a risk of crushing the operator between the machine and another object.
- Walk, never run with the machine. Be very careful when pulling the machine toward you. You must look behind you to make sure there are no obstacles before and during operations in reverse gear (if applicable). Do not allow the machine to pull you along, you must walk and never run.
- WARNING! If something breaks or an accident happens whilst working, you must turn off the engine immediately and move the machine away to prevent further damage. If an accident happens with injuries or third parties are injured, carry out the first aid measures most suitable for the situation immediately and contact the medical authorities for any necessary health care. Carefully remove any debris that might cause damage or harm persons or animals should it not be seen.
- The excessive speed of movement or the absence of maintenance have a significant influence on noise emissions and vibrations. It is necessary to take preventive steps to eliminate possible damage due to high levels of noise and stress from vibration. You must maintain the machine well, wear ear protection and take breaks from working.
- Keep a firm hold on the handlebars, they may tend to lift during clutch engagement.
- Disengage clutch lever before starting the engine.
Carbon Monoxide

DANGER

Engine exhaust fumes contain Carbon Monoxide. This is a poisonous gas and can kill in minutes. NEVER use inside a building or in an area with poor ventilation.

DANGER!
CARBON MONOXIDE IS A COLOURLESS, ODOURLESS GAS. INHALING THIS GAS CAN CAUSE DEATH OR SERIOUS LONG-TERM HEALTH PROBLEMS SUCH AS BRAIN DAMAGE.
Never operate the engine in a confined space where dangerous carbon monoxide fumes can develop. All ignition operations have to be effected in an open or well-ventilated area. Always remember that exhaust fumes are toxic.
The symptoms of carbon monoxide poisoning can include but are not limited to the following; Headaches, dizziness, nausea, breathlessness, collapsing or loss of consciousness.
Carbon monoxide poisoning symptoms are similar to flu, food poisoning, viral infections and simply tiredness. It is quite common for people to mistake this very dangerous poisoning for something else.
To avoid carbon monoxide poisoning DO NOT use Petrol/Diesel powered equipment inside any of the following; Home, garage, tent, camper van, mobile home, caravan or boat. DO NOT use in an enclosed area or moving vehicle. This is not exhaustive and if you are in any doubt contact your dealer.
If you think you have or someone around you has been affected by carbon monoxide poisoning; Get them fresh air immediately,
by leaving the affected area or by opening doors and windows. If safe and practical to do so make sure that the machine is turned off. DO NOT enter a room you suspect of having carbon monoxide present – instead call the emergency services.
Contact a Doctor immediately or go to Hospital – let them know that you suspect carbon monoxide poisoning.

General Fuel Safety

CAUTION!
ALL FUELS ARE HIGHLY FLAMMABLE AND PETROL VAPOUR IS EXPLOSIVE. TAKE EXTREME CARE WHEN HANDLING FUEL. KEEP FUEL OUT OF REACH OF CHILDREN.
General Safety
- Do not smoke each time fuel is handled.
• ALWAYS avoid inhaling fumes. - ALWAYS carry fuel in the correct and clearly marked container.
- ALWAYS wear correct, suitable and fit for purpose Personal Protective Equipment (PPE), suggested items are but not limited to safety gloves and overalls.
- To avoid sparking or arcing, keep grounded conductive objects – such as tools – away from exposed, live electrical parts and connections. These events could ignite fumes or vapors.
- Do not operate the machine with known leaks in the fuel system.
- Fire hazard - keep fuel away from all sources of ignition for example heaters, lamps, sparks from grinding or welding.
- DO NOT carry out hot work on tanks that have contained fuel.
General Safety
- ALWAYS keep the work area tidy.
- ALWAYS dispose of waste fuels correctly.
Spilled Fuel
- If you have spilled fuel, make sure you do not attempt to ignite the engine but move the machine away from the area of spilled fuel and avoid creating any source of ignition until the fuel has evaporated and fuel vapours have dissipated.
- When fuel is spilled on yourself or your clothes, wash your skin and change clothes immediately.
- ALWAYS clean up spills promptly using absorbent granules and a lidded bin.
Fueling / De-fueling
- ALWAYS fuel and de-fuel in a well ventilated area outside of buildings. Use a funnel to add fuel, only outdoors. Do not smoke during this and each time fuel is handled.
- Add fuel before igniting the engine, never remove the fuel tank cap or add fuel whilst the engine is running or when it is hot.
- When de-fueling ALWAYS use a proper fuel retriever.
- Never overfill the fuel tank. Engine heat can cause fuel to expand, never fill the tank to more than 1/2" below the bottom of the filler neck. This will provide space for fuel expansion.
- When refilling or draining the fuel tank, use an approved fuel storage container while in a clean, well-ventilated outdoor area. While adding fuel or operating the unit, do not smoke, and stay away from sparks, open flames, or other sources of ignition near the area of operation.
• Always stop the engine and allow it to cool before filling the fuel tank. Never remove the cap of the fuel tank or add fuel while the engine is running or when the engine is hot.
- Loosen the fuel tank cap slowly to relieve any pressure in the tank.
- ALWAYS keep the handles dry, clean and free of oil and fuel.
Storage
- Make sure to store fuel in special containers.
- Store fuel in containers specifically designed and approved for fuel storage.
- Store fuel in a cool, well-ventilated area, safely away from sparks, open flames, or other sources of ignition.
- Never store fuel – or a machine with fuel in the tank – inside a building where fumes may reach a spark, open flame, or any other source of ignition (such as a water heater, furnace, or clothes dryer). Allow the engine to cool before storing in any enclosure.
- Replace all fuel tank and container caps securely and wipe up spilled fuel. Never operate the unit without the fuel cap securely in place.

tteries (Where Present)
Batteries present a risk if they become damaged by the possible leaking of electrolyte. This electrolyte is an acid and can cause serious burn injuries. Care should be taken when working on or near them. NOTE the electrolyte may be in a liquid or gel form.
Should you come in to contact with electrolyte you should;
- Remove all clothing contaminated with electrolyte. If you cannot remove then saturate them in water.
- Get medical assistance as soon as possible.
You must advise the medical staff of the type of acid.
- Lead/acid battery = dilute sulphuric acid.
- Nickel/cadmium = potassium hydroxide alkali electrolyte.
- Use fresh running water to wash off excess electrolyte, continue this until medical assistance arrives. Make sure that you do not was the electrolyte to another part of your body or face.
- If electrolyte comes in to contact with Eyes the electrolyte needs to be immediately washed away with large amounts of water. Make sure that you do not wash the electrolyte to another part of your face or body.
- Gasses from charging batteries are highly flammable and great care should be taken to charge in well ventilated areas.

• There is an explosion risk if the battery terminals are short circuited, when connecting/disconnecting ALWAYS exercise great care so that the terminals or battery leads are NOT allowed to touch and cause a spark. ALWAYS use suitable insulated tools.
Vibrations (Where Applicable)
- Prolonged use of hand held (operated) machines will cause the user to feel the effects of/from vibrations. These vibrations can lead to white finger (Raynaud's phenomenon) or carpal tunnel syndrome. This condition reduces the ability of the hand to feel and regulate temperature, causing numbness and heat sensations and may cause nerve damage and circulatory tissue death.
- Not all factors that lead to white finger disease are known, but cold weather, smoking and other diseases that affect blood vessels
General Safety
and blood circulation as well as large and long-lasting impact of shocks are considered factors in the formation of white finger. Note the following to reduce the risk of white finger and carpal tunnel syndrome;
- Wear gloves and keep your hands warm.
• Take regular breaks. - All of the above precautions may help reduce the risk of white finger disease but not rule out the carpal tunnel syndrome. Long-term and regular users are therefore recommended to observe the condition of your hands and fingers. Seek medical attention immediately if any of the above symptoms should occur.
Noise (Where Applicable)
- The operating noise of the machine can damage your hearing. When wearing protection such as earplugs or ear defenders to protect your hearing. Long-term and regular users are advised to have hearing checked regularly. Be especially vigilant and cautious when wearing ear protection because your ability to hear alarm warnings will be reduced.
- Noise emissions for this equipment is unavoidable. Carry out noisy work at approved times and for certain periods. Limit the working time to a minimum. For your personal protection and protection of people working nearby it is also advisable for them to wear hearing protection.

• See Certificate of Conformity section
for Outdoor Noise declaration of conformity.
Getting To Know The Machine
The HYTD300 is a petrol mini dumper from Hyundai. The HYTD300 is powered by a 196cc petrol engine.
This machine is a pedestrian controlled. The machine is manufactured according to the latest safety requirements. Every precaution is only effective when it is followed exactly.
Improper Use
Any other usage not in keeping with the above mentioned ones may be hazardous and harm persons and/or damage things. Examples of improper use may include, but are not limited to:
- transporting people, children or animals on the machine
- letting yourself be transported by the machine
- using the machine to tow or push loads
For full specification, go to page 30 or visit www.hyundaipowerproducts.co.uk
Safety Information

Hydraulic Safety
Hydraulic systems on mini dumpers can present several safety concerns, primarily related to high-pressure fluid, mechanical movement, and the potential for equipment failure. Key hydraulic safety concerns include:
To mitigate the following risks, users should always safely operate the machine, conduct regular inspections; and wear personal protective equipment (PPE) such as gloves, goggles, and long sleeves. It's also crucial to ensure that any maintenance is done with the system fully depressurized.
High-Pressure Fluids Hazards
Injection Injuries: Hydraulic systems operate at high pressures, and a small leak or pinhole can release fluid at a high velocity, causing injection injuries if it penetrates the skin. These injuries are serious and require immediate medical attention.
Burns and Chemical Exposure: Hydraulic fluid can be very hot and may cause burns on contact. The fluids can also be harmful if inhaled or ingested; it can cause internal burns/bleeding, poisoning loss of limbs or death.
Chemical Exposure to Skin or Eyes: When skin is exposed to hydraulic fluid it can cause burns and/or irritation. IMMEDIATELY wash exposed skin with soap and water. Similarly eye exposure can cause burns and/or irritation, eyes should be flushed with water IMMEDIATELY
Risks of Hydraulic Failure
Unintended Movement: Hydraulic failures can result in uncontrolled movements of the dumper bed, leading to tip-overs or drops if it fails while raised.
Load Dropping: Hydraulic leaks or bursts can cause the bed to lower unexpectedly, putting anything under or around the load at serious risk.
Overheating: Overheating of hydraulic components can lead to system failure, leaks, or even fires in extreme cases.
Pinch and Crush Hazards
Moving Parts: Hydraulics control various moving parts in the dumper; these create pinch points where limbs or clothing could get caught.
Unexpected Pressure Release: When releasing or adjusting hydraulic components, residual pressure can suddenly move parts of the machine or components that are not safely depressurized.
Improper Maintenance
Improper Maintenance:
Faulty Components: Old, worn-out, or improperly fitted hydraulic components are more likely to leak or fail.
Loose Fittings and Connections: Regular inspection and tightening are necessary to prevent leaks and potential system failures, as loose connections can compromise the entire system.
Environmental Hazards
Environmental Hazards:
Hydraulic Fluid Spills: Spilled hydraulic fluid is hazardous to the environment and makes surfaces slippery, increasing the risk of slips and falls around the equipment.

Personal Protective Equipment
Appropriate Personal Protective Equipment (PPE), MUST be worn at all times when operating or repairing the machine. No protective equipment can ensure 100% protection.
When selecting PPE, make sure it's CE marked and it suits the user in terms of size, fit, etc. If more than one item of PPE is worn at the same time, make sure they can be used together, e.g. wearing safety glasses may disturb the seal of a respirator, causing air leaks.

HAND PROTECTION MUST BE WORN
Protective electrically non-conductive gloves are highly recommended when working.

FOOT PROTECTION MUST BE WORN
Non-skid heavy duty footwear are highly recommended when working.

HEARING PROTECTION MUST BE WORN
Suitable safety hearing protection is recommended.

EYE PROTECTION MUST BE WORN
Always wear safety glasses/goggles and/or face shields. Everyday eyeglasses have only impact resistant lenses; they are not safety glasses/goggles.

PROTECTIVE CLOTHING MUST BE WORN
Do not wear loose clothing, gloves, scarfs, neckties or jewellery (rings, wrist watches), which can be caught in moving parts.

HEAD PROTECTION MUST BE WORN
Wear a safety helmet with a safety visor.

FACE SHIELD MUST BE WORN
Wear a face shield to protect your face.

RESPIRATOR MUST BE WORN
Wear a respirator.
Unboxing & Assembly Safety
Unboxing Safety
⚠WARNING! Unboxing and assembling the machine should be done on a flat, stable surface with enough room. Disposal of the packaging should be done in accordance with the local regulations in force.
Carefully remove the product from the packaging and examine it for any sign of damage caused during shipping. Lay the contents out and check them. If any part is damaged or missing, you must not use the machine. Contact HYUNDAI Power Products immediately. You must keep the packaging material in case the machine needs to be returned or repaired.
WARNING! Some of the packaging material may be harmful to children. Keep out of reach of children.
Assembly Safety
CAUTION - This guide is meant to serve as a quick reference for operating your HYUNDAI machine. We always advise reading the manual in full before operation.
CAUTION - For OUTDOOR use ONLY. Petrol machines produce carbon monoxide – a poisonous, colourless and odourless gas that can cause serious injury or death. Petrol is highly flammable, always handle with extreme care and in a well ventilated area.
NOTE - Images may vary depending on model.
NOTE - The machine can be supplied with some parts already assembled. Prior to assembly, check all items have been received.
NOTE - This machine is shipped without fuel and oil and MUST be filled before use. Failure to do so may cause damage to the engine that will not be covered by warranty.
As soon as you have purchased your machine, we recommend that you fill out the information on page 46. If you need to contact an authorised dealer or customer service for information on servicing, you may need to provide this information.
There is also a service record so you can keep track of your machine service dates.
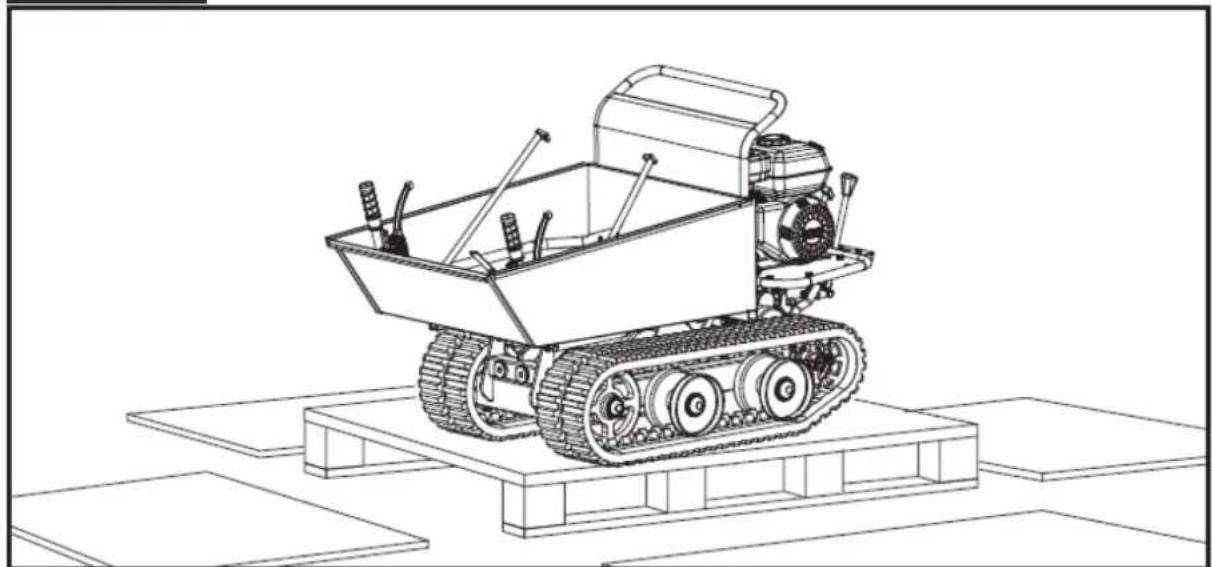
Unboxing

ou must read the unboxing safety on the previous page before you begin.
STEP 1

Use the screwdriver and hammer to open all the side locks.
STEP 2
natural_image
Line drawing of a tracked robotic vehicle on a platform (no text or symbols)Remove all the plywood plates, and remove all the loose parts on the bottom pallets.
Unboxing
What's In The Box
The HYTD300 comes partially assembled and is shipped in carefully packed packaging.
After all the parts have been removed from the package, you should have:
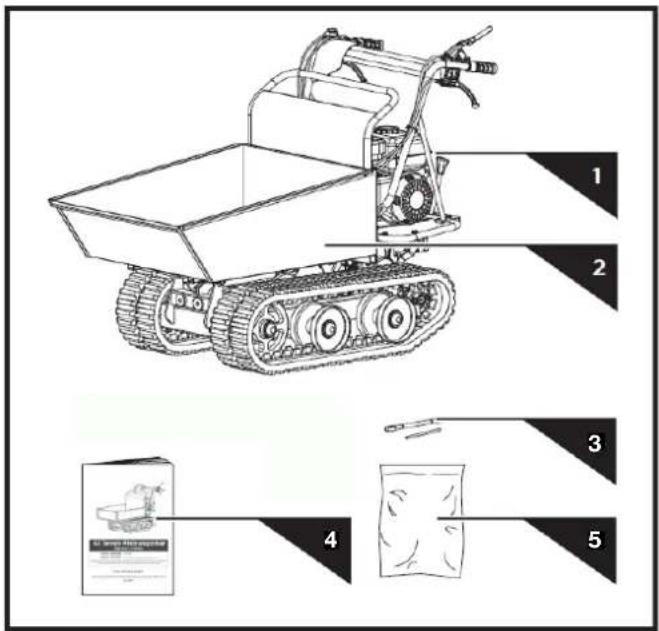
1 - Handles
2 - Machine
3 - Tools For Spark Plug Assembly
4 - Operator's Manual
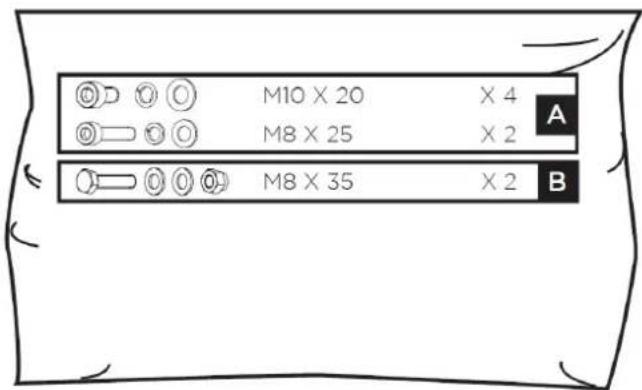
5 - Hardware Bag, Including:
Assembly

You must read the assembly safety before you begin.
Handlebar Assembly
STEP 1

Align the holes of the handlebar with the mount bracket and secure each with a spring washer, flat washer and a M10x20 bolt. Fasten each handlebar support onto the engine deck with a spring washer, flat washer and a M8x25 hex bolt.
Engine Oil & Fuel

OIL HAS BEEN DRAINED FOR PPING.

CAUTION!
Failure to fill engine sump with oil before starting engine will result in permanent damage and void warranty. Running the engine with low oil level will cause serious engine damage.
STEP 1
Add oil and fuel according to the instructions in this manual.
Assembly
Plow Blade (Optional)
STEP 1

Mount the mounting bracket to the blade using M8x30 hex bolts, washers and nuts.
STEP 2

Position the pivot bracket inside the mounting bracket and align with mounting bracket holes. Secure with M20x95 hex bolt, washers and nut.
STEP 3

Insert the shorter control lever into the longer lever. Align holes and fasten with M8x40 hex bolt, washers and nut.
STEP 4

Attach control lever to the guide tube. Line up holes and fasten with M8 x 35 bolt, washers and nut.
Insert the handle grip into the holder.
Secure the support bracket into the control lever with pin 10x60 and bridge clip.
Assembly
STEP 5

Install the already assembled plow blade to the machine as shown.
Features

Features
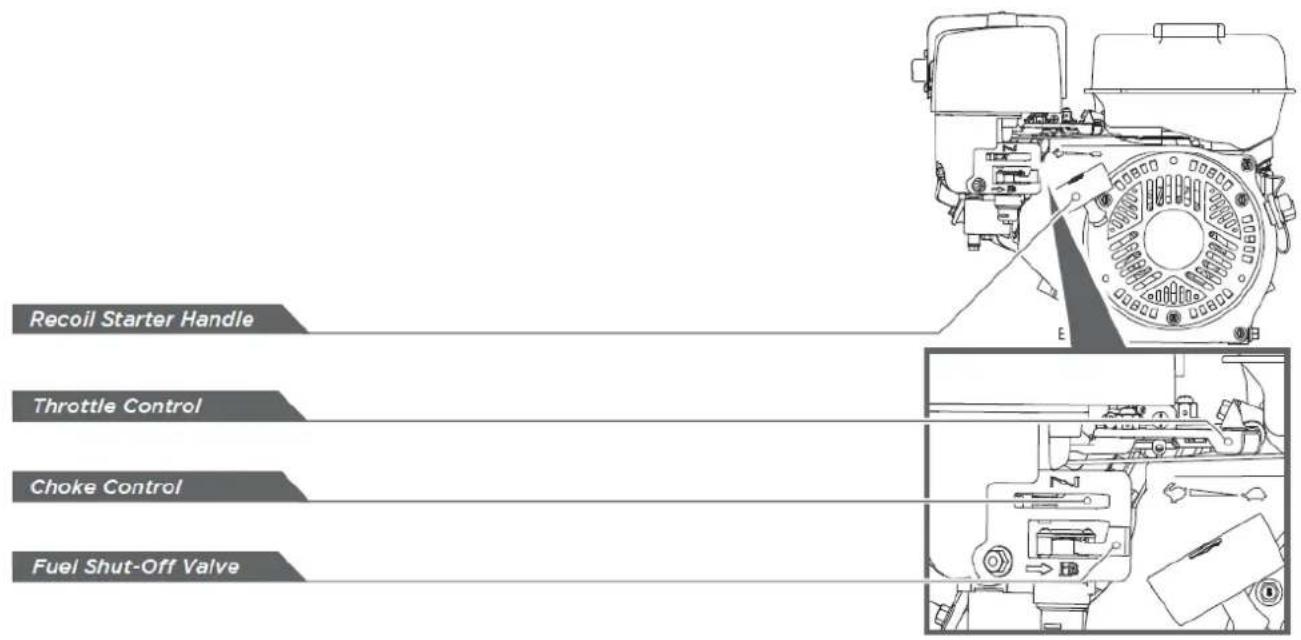
Gas Selection Lever
The gear selection lever has 4 positions: 3 forward speeds and 1 reverse. To change speeds, move the speed shift lever to the desired position. The lever locks in a notch at each speed selection.

flowchart
graph LR
    A["3"] --> B["2"]
    B --> C["1"]
    C --> D["N"]
    D --> E["R"]
Slower speeds are for heavier loads, while faster speeds are for transporting light loads or an empty hopper. It is recommended that you use a slower speed until you are familiar with the operation of the machine.
If the engine slows down under a load or the tracks slip, shift the machine into a lower gear.
If the front of the machine rides up, shift the machine into a lower gear. If the front continues to ride up, lift up on the handles.
Left/Right Steering Lever
Operate the lever to turn left/right.
⚠️ Operate the steering levers only at a reduced speed.
Gas Spring Assistance
The gas spring assistance provides support when lifting and lowering the hopper.
Engine On/Off Switch
The engine switch has two positions. OFF - engine will not start or run. ON - engine will start and run.
Recoil Starter Handle
The recoil starter handle is used to start the engine.
Fuel Shut-Off Valve
The fuel shut-off has two positions:
CLOSED (F) - Use this position to service, transport, or to store the unit.
OPEN (HD) - Use this position to run the unit.
Features
Throttle Control
The throttle control regulates the speed of the engine, and moves between FAST, SLOW, and STOP positions.
The throttle control will shut off the engine when it is moved to the STOP position.
Choke Control
The choke control is used to choke the carburetor and assist in starting the engine. The choke control slides between the CHOKE CLOSED | and CHOKE OPEN | positions.

ever use choke to stop engine.
Clutch Control Lever
Squeeze the control lever, clutch engaged. Release the lever, clutch disengaged.
Preparation
Add Oil To Engine
! THE MACHINE IS SHIPPED WITHOUT OIL. DO NOT START THE ENGINE BEFORE ADDING OIL.

CAUTION!
Failure to fill engine sump with oil before starting engine will result in permanent damage and void warranty. Running the engine with low oil level will cause serious engine damage.
STEP 1
Make sure the machine is on a flat, level surface.
STEP 2
Remove the oil filler cap and wipe the dipstick clean.

STEP 3
Refit the dipstick without screwing it down. Remove the dipstick and check the oil level. It should be up to the full mark of the dipstick.
STEP 4
If the level is low, use a funnel and fill with the recommended oil to the middle of the dipstick. DO NOT overfill.
STEP 5
Once the correct amount of oil has been added, refit the dipstick securely.

DO NOT OVERFILL
Check engine oil level daily and add as needed.
Add Petrol To Engine
CAUTION! ALL FUELS ARE FLAMMABLE
Always fuel and de-fuel in a well ventilated area away from sources of ignition.
!WARNING! Petrol is extremely flammable and is explosive under certain conditions. Refuel in a well-ventilated area with the engine stopped. Do not smoke or allow flames or sparks in the area where the engine is refuelled or the petrol is stored. You can be burned or seriously injured when handling fuel. Use extreme care.
STEP 1
The engine must be off and allowed to cool down completely before adding fuel.
STEP 2
Remove the fuel filler cap. Fill the fuel tank with fresh straight unleaded petrol. Allow a 25mm gap from the top of the tank. DO NOT mix petrol with oil.

IMPORTANT! DO NOT OVERFILL!
This equipment and/or its engine may include evaporative emissions control system components, required to meet EPA and/or CARB regulations, that will only function properly when the fuel tank has been filled to the recommended level. Overfilling may cause permanent damage to evaporative emissions control system components. Filling to the recommended level ensures a vapor gap required to allow for fuel expansion. Pay close attention while filling the fuel tank to ensure that the recommended fuel level inside the tank is not exceeded. Use a portable petrol container with an appropriately sized dispensing spout when filling the tank. Do not use a funnel or other device that obstructs the view of the tank filling process.
Preparation
STEP 3
After refuelling, make sure the tank cap is closed properly and securely. Be careful not to spill fuel when refuelling. Spilled fuel or fuel vapour may be ignited. If any fuel is spilled, make sure the area is dry before starting the engine. Avoid repeated or prolonged contact with skin or breathing of vapour.
Before Each Use
- Always ensure that the machine is in a safe working condition. Inspect the machine, check safety devices and guards and check all nuts, bolts and screws are secure.
- Check the oil level, go to page 24 for instructions.
- Fill the fuel tank with unleaded petrol. Go to page 24 for instructions.
Starting Procedure
CAUTION - For OUTDOOR use ONLY.
Petrol machines produce carbon monoxide – a poisonous, colourless and odourless gas that can cause serious injury or death. Petrol is highly flammable, always handle with extreme care and in a well ventilated area.
NOTE - This machine is shipped without fuel and oil and MUST be filled before use. Failure to do so may cause damage to the engine that will not be covered by warranty.
CAUTION! ALL FUELS ARE FLAMMABLE
Always fuel and de-fuel in a well ventilated area away from sources of ignition.
Starting Procedure
STEP 1
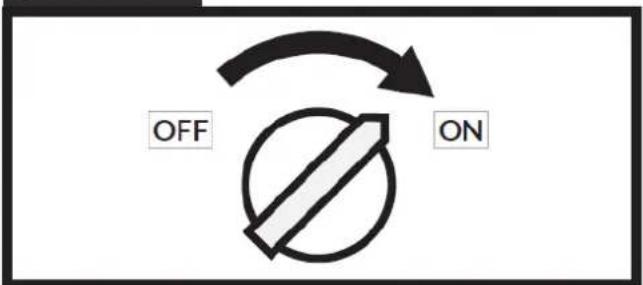
Move the engine switch to the ON position.
STEP 2

Open the fuel shut-off valve.
STEP 3

Move the choke lever to the CLOSED position. If the engine is hot, closing the choke is not necessary.
STEP 4

Move the throttle lever slightly to the FAST speed. The thumb lever on the right handlebar controls the throttle shown.
STEP 5
Pull the recoil starter until the engine starts. Return the recoil to the home position after each pull. Repeat the steps as needed. Once engine has started, set the throttle to the FAST position before you operate the unit.
Starting Procedure & Operating
IMPORTANT!
Rapid retraction of the starter cord (kickback) will pull your hand and arm toward the engine faster than you can let go. Personal injury could result.
Operating
- Engage gear before starting engine. You may need to rock machine back and forth slightly to allow gears to mesh.
- Start engine with machine in gear and red clutch lever UP (disengaged) position.
- To engage drive, push red clutch lever down.
- To change gear on the move, keep red clutch lever in DOWN (engaged) position and move gear lever firmly between gears.
- Ensure gear is fully engaged to avoid gears grating.
- When changing gear, always have the lefthand red clutch lever in the DOWN (engaged) position. This applies to both stationary (engine off) and on the move (engine on). The mini dumper has the steering levers on the handlebars and this makes steering very easy. To turn right or left, simply operate the corresponding right or left steering lever.
- The sensitivity of the steering increases in proportion to the speed of the machine and that with the empty machine, a light pressure on the lever is all that is needed to turn. While when the machine is loaded, more pressure is required.
-
The mini dumper has a maximum capacity of 300kg. However, it is advisable to assess the load and adjust it according to the ground on which the machine will be used.
-
It is therefore advisable to cover such stretches using low gear and taking extra care. In such situations, the machine should be kept in low gear for the whole stretch.
- Avoid sharp turns and frequent changes of direction while driving on the road, in particular on rough, hard terrains full of sharp, uneven points with a high degree of friction.
- Remember to be careful when working in adverse weather conditions (ice, heavy rain and snow) or on types of ground that could make the dumper unstable.
- Please note that as this is a tracked vehicle, it is subject to a considerable pitching movement when passing over bumps, holes and steps.
- When the clutch control lever is released, the machine will stop and brake automatically.
- If the machine is stopped on a steep slope, a wedge should be placed against one of the tracks.
Idle Speed
Set the throttle control lever to the SLOW position to reduce stress on the engine when work is not being performed. Lowering the engine speed will help extend the life of the engine, as well as converse fuel and reduce noise level.
Stopping Procedure
CAUTION - The engine and exhaust will remain hot for a while after use. Ensure the engine and exhaust has cooled before carrying out any maintenance, refuelling or storage.
After Each Use
- Examine the machine for damage.
- Clean the machine if necessary.
Stopping Procedure
STEP 1
Move the throttle lever to the SLOW ( ) position.
STEP 2
Let the engine idle for one or two minutes.
STEP 3
Turn the engine switch to the OFF position.
STEP 4
Turn the fuel valve lever to the OFF (F) position.
⚠️ Sudden stopping at a high speed under a heavy load is not recommended. Engine damage may result.
Do not move the choke control to CLOSE to stop the engine. Backfire or engine damage may occur.
Emergency Stop
STEP 1
Turn off the engine switch to the OFF position.
Troubleshooting

NOTE - Where necessary, all corrective actions should be carried out by suitably qualified
persons.
| Problem Possible Cause | Possible Solution | |
| Engine fails to start. 1. Spark plug wire disconnected.2. Out of fuel or stale fuel.3. Choke not in open position.4. Blocked fuel line.5. Fouled spark plug.6. Engine flooding. | 1. Attach spark plug wire securely to spark plug.2. Fill with clean, fresh unleaded petrol.3. Throttle must be positioned at choke for a cold start.4. Clean the fuel line.5. Clean, adjust gap, or replace.6. Wait a few minutes to restart, but do not prime. | |
| Engine runs erratically. 1. Spark plug wire loose.2. Unit running on CHOKE.3. Blocked fuel line or stale fuel.4. Vent plugged.5. Water or dirt in fuel system.6. Dirty air cleaner.7. Carburettor jets blocked. | 1. Connect and tighten spark plug wire.2. Move choke lever to OFF.3. Clean fuel line. Fill tank with clean, fresh unleaded petrol.4. Clear vent.5. Drain fuel tank. Refill with fresh fuel.6. Clean or replace air cleaner.7. Clean jets. | |
| Engine overheats. 1. Engine oil level low.2. Dirty air cleaner.3. Air flow restricted.4. Carburettor not adjusted properly. | 1. Fill crankcase with proper oil.2. Clean air filter.3. Remove housing and clean.4. Adjust carburettor. | |
| Machine does not move while engine is running. | 1. Gear is not properly selected.2. Driving tracks not tight enough. | 1. Ensure gear lever is not in-between two different gears.2. Tighten driving tracks. |
| One of the two tracks is blocked. | Foreign bodies have worked their way between the track and the frame. | Remove the foreign body. |
Specifications
NOTE - All machines are tested and inspected so there may be some residual oil left in the machine so please fill with caution.
| Model HYTD300 | |
| Engine Type HYUNDAI IC200 OHV 4-Stroke | |
| Engine Size 196cc / 6.5hp | |
| Nominal Power 4.8kW | |
| Engine Speed 3600rpm | |
| Fuel Tank Capacity 3.6L | |
| Fuel Type Unleaded Petrol | |
| Engine Oil Capacity 600ml | |
| Oil Type SAE30 or 15W40 Engine Oil | |
| Load Capacity 300kg | |
| Sound Pressure Level 81.5dB(A) k=2dB(A) | |
| Measured Noise Level 96.8dB(A) | |
| Guaranteed Noise Level 101dB(A) | |
| Vibration Level On Handlebar Grips Left 10.1m/s2 k=1.5m/ s2Right 11.3m/s2 k=1.5m/ s2 | |
| Net Weight 179kg | |
| Dimensions (L x W x H) 1570 x 770 x 1030mm | |
Safety
- WARNING - Before cleaning or doing maintenance work, you need to disconnect the spark plug cable and read the relevant instructions. You need to wear proper clothing and protective gloves whenever your hands are at risk.
- WARNING - If there are worn or damaged parts, never use the machine. Faulty or worn-out parts must be replaced and not repaired. You must only use original spare parts. The use of non-original and/or incorrectly fitted parts will jeopardize the safety of the machine. This may also cause accidents or personal injuries for which the manufacturer is under no circumstance liable or responsible.
- Any maintenance operations or adjustments not explained in this manual must be carried out by your Dealer or a specialised Service Centre with the necessary knowledge and equipment to ensure that the work is done correctly maintaining the machine's original safety level. Any operations performed in unauthorised centres or by unqualified persons will invalidate the Warranty and all obligations and responsibilities of the Manufacturer.
- Disconnect the spark plug cable and check for damage after each use.
- To be sure the machine is in safe working condition, keep all nuts, screws and bolts tight. Routine maintenance is essential for safety and for maintaining a high performance level.
- On a regular basis, check that the screws are properly tightened.
-
Be very careful during adjustment of the machine to prevent entrapment of the fingers between moving parts and fixed parts of the machine.
-
If any warning message stickers or instruction is damaged, replace them.
- Store the machine in a safe place, out of the reach of children.
- Do not store the machine with fuel in the tank in an area where the fuel vapours could reach an open flame, a strong heat source or a spark.
- Engine must be cooled down before storing.
- To reduce fire hazards, check there is no oil and/or fuel leaks on a regular basis.
- If you need to empty the fuel tank, this should be done outdoors once the engine has cooled down.
Maintenance & Care
Routine Maintenance
⚠️IMPORTANT - Routine and accurate maintenance is essential for maintaining original machine safety and performance levels.
Always stop the engine and unplug the spark plug before doing any repairs or maintenance.
Only use original spare parts: The use of non-original and/or incorrectly fitted parts will jeopardize the safety of the machine, may cause accidents or personal injuries for which the Manufacturer is under no circumstance liable or responsible.
- Wear strong protective gloves before cleaning, maintaining or making adjustments to the machine.
- Paint on internal chassis parts may start to flake over time due to abrasive action of cut grass. If this happens, you should touch-up with rust-proof paint to prevent rusting that could corrode the metal. You can also use a light oil or silicone spray to prevent rust.
- If you need to access the lower part of the scarifier, you must tilt the scarifier with the air filter facing up, following the relevant instructions, making sure that the machine is stable before performing any interventions.
- Make sure not to drip petrol onto the plastic parts to prevent damaging them and remove all traces of spilled petrol immediately. The warranty will not cover damage to plastic parts caused by petrol.
- It is highly recommended to change the engine oil regularly. This will ensure the machine will function properly over time. The oil can be discharged at a specialised servicing centre, or by using a syringe to suction the oil out through the filler spout, bearing in mind you may need to repeat the
operation several times in order to completely empty the tank. Remember to top-up with oil before using the machine again.
⚠️CAUTION - DO NOT use a hose pipe or pressure washer to clean the engine. Water can damage the engine or contaminate the fuel system.
Preventive Maintenance
STEP 1
Turn off the engine and disengage all command levers. The engine must be cool.
STEP 2
Keep the engine's throttle lever in its SLOW position and remove the spark plug wire from the spark plug and secure.
STEP 3
Inspect the general condition of the machine. Check for loose screws, misalignment or binding of moving parts, cracked or broken parts, and any other condition that may affect its safe operation.
STEP 4
Use a soft brush, vacuum or compressed air to remove all contaminants from the machine. Then use high quality light oil to lubricate all moving parts.
STEP 5
Check the spark plug wire regularly for signs of wear, and replace when needed.
Maintenance & Care
Adjusting Clutch
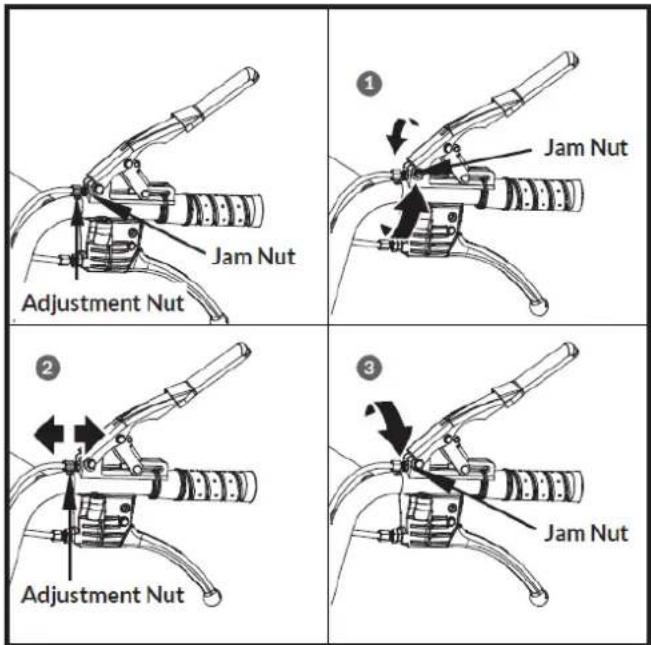
When the clutch begins to show wear, the handle reach will become wider, making it more difficult to reach. Follow these steps to return the clutch lever back to its original position.
STEP 1
Loosen the jam nut by turning it counter clockwise with 10mm wrench.
STEP 2
Tighten or loosen the cable by turning the cable adjustment nut clockwise or counter clockwise with 10mm wrench until you have reached your required tightness.
STEP 3
Once tightness is set, return the jam nut against the handle to hold the cable in place.
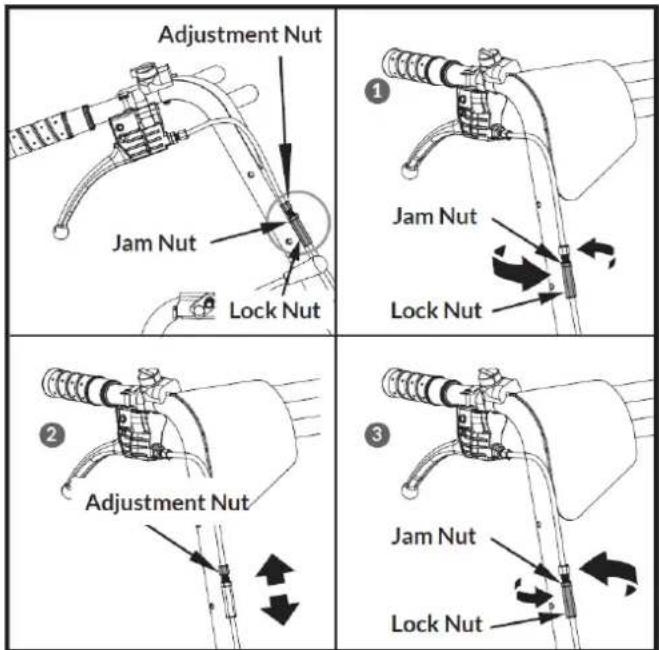
Adjusting Steering
If steering becomes difficult to engage follow these steps to adjust the cable tension.
STEP 1
Loosen the jam nut by turning it counter clockwise with 10mm wrench.
STEP 2
Tighten or loosen the cable by turning the cable adjustment nut clockwise or counter clockwise with 10mm wrench until you have reached your required tightness.
STEP 3
Once tightness is set, return the jam nut against the handle to hold the cable in place.
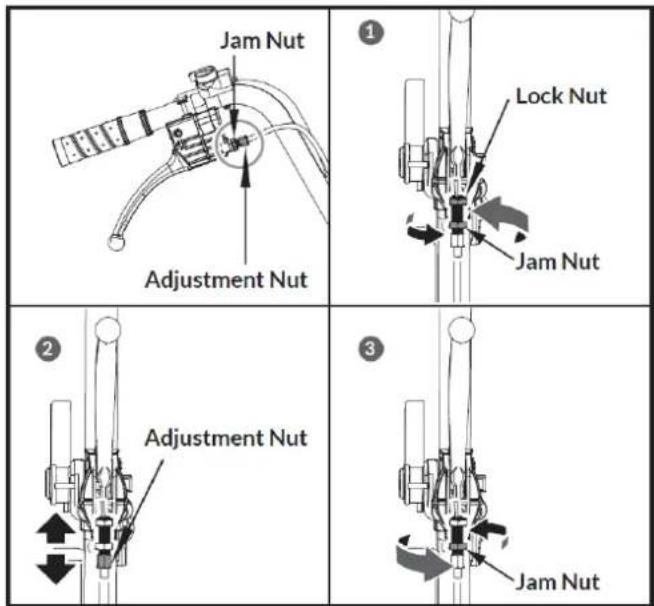
If the above adjustment does not create enough cable tension, follow the steps below:
STEP 1
Loosen the jam nut by turning it counter clockwise with 10mm wrench.
Maintenance & Care
STEP 2
Tighten or loosen the cable by turning the cable adjustment nut clockwise or counter clockwise with 10mm wrench until you have reached your required tightness.
STEP 3
Once tightness is set, return the jam nut against the handle to hold the cable in place.
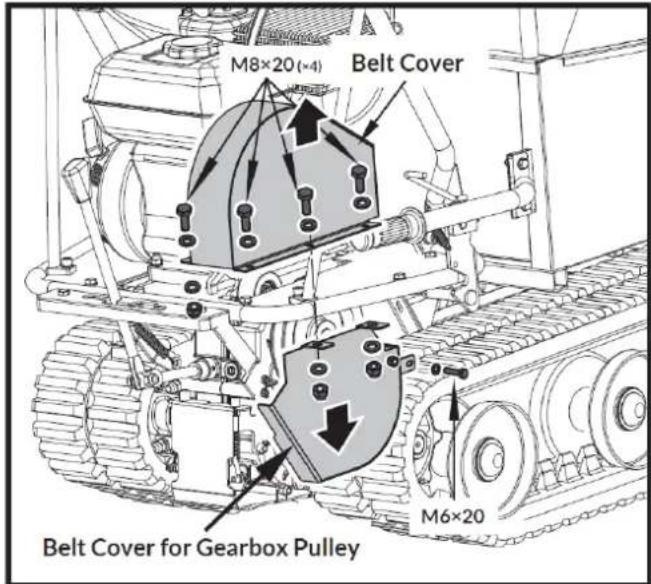
Replacing Drive Belt
STEP 1
Remove the belt covers as shown.
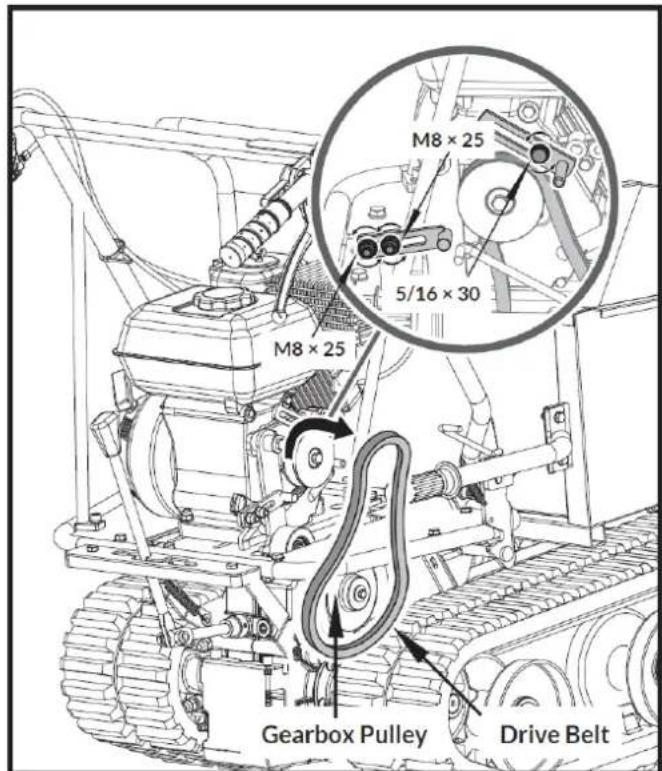
STEP 2
Loosen the two bolts M8x25 and one bolt 5/16x30 that fix the two belt blockers, no need to remove them. Pull out the belt.
Maintenance & Care

You may need to loosen the belt guide cket and slide back before removing :
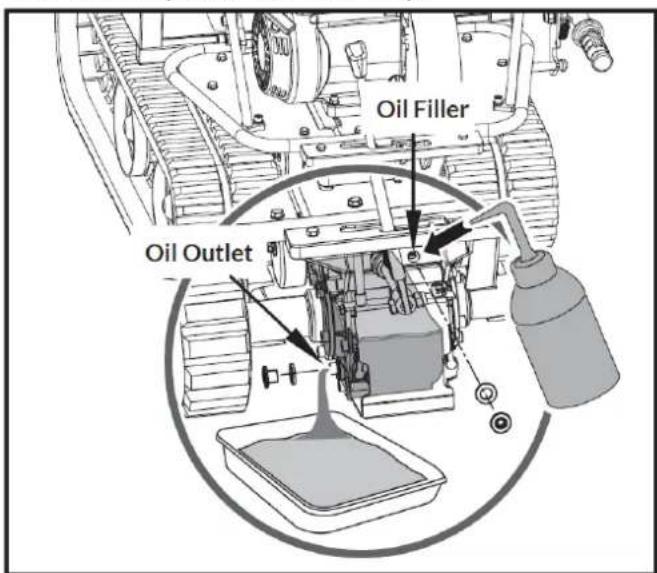
Lubrication
General Lubrication
Lightly lubricate all moving parts of the machine at the end of the season or every 25 operating hours.
Gearbox Lubrication
The gearbox is pre-lubricated and sealed at the factory. Unless there is evidence on the gearbox, no additional lubricate should be required until 50 hours of use.
After first 50 hours use, change all the gear oil. Capacity is 1.5L.
For future use, check the oil level after every 50 hours of use. If you remove the oil level plug and no oil flows out, please add oil and then screw the oil level plug.
Gear oil GL-5 or GL-6, SAE80W-90 is recommended. Do not use synthetic oil.
When replacing gear oil, the engine must be stopped and still warm. Unscrew the filter cap and the drain plug. When oil is drained, replace the draining plug, fill up with fresh oil, and then replace the filter cap.
Tightening Tracks
With use, tracks tend to loosen. When operating with loose tracks, they tend to slip over the driving wheel causing it to jump its housing, thus damaging wear to the housing.
To check track tightness, proceed as follows.
STEP 1
Set the machine on a flat surface with compact ground, or on asphalt or pavement.
STEP 2
Lift the machine and set it on blocks or supported rated for the weight of the machine so that the tracks are approximately 4" off the ground.
STEP 3
Measure the track midline vs. the horizontal line. The reading must not be more than 10cm\~15cm.

If the distance is greater, proceed as follows.
STEP 1
Use the tipping handle to tip the hopper and set it on the blocks or supports rated for the weight of the box.
Maintenance & Care
STEP 1
Use the tipping handle to tip the hopper and set it on the blocks or supports rated for the weight of the box.
STEP 2
Loosen locknut A.
STEP 3
Tighten bolt B until the correct tightness is restored.
STEP 4
Secure bolt B by tightening lockout A thoroughly.
STEP 5
Return the hopper to its original position.

Do not over-tighten your track. The adjustment of the track and the brakes are linked. The braking power will lessen the more the track is tightened.
⚠️ If the adjustment bolt has no more adjustment left, the tracks may have to be replaced.
Replacing Drive Belt
Check the condition of the tracks periodically. If any tack is cracked or frayed, it should be replaced as soon as convenient.
STEP 1
Lift up the hopper and insert a support rod for safety purposes.
STEP 2
Lift the machine and set it on blocks or supports rated for the weight of the machine so that the tracks are approximately 4" off the ground.
Maintenance & Care

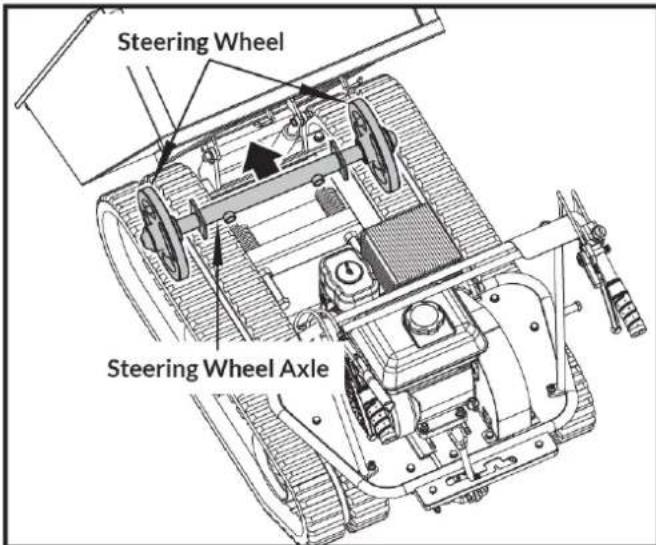
STEP 3
Loosen the adjusting bolts and pull the steering wheel axle toward the engine, then track will be loosen.

STEP 4
Pull out the whole track.

natural_image
Technical line drawing of a tracked robotic vehicle with visible tracks and control components (no text or symbols)When removing or installing the tracks, be careful not to get your fingers caught between the track and pulley.
Maintenance & Care
Storage
NOTE - If storing the machine for a period of 30 days or more, you must follow proper storage and winterisation guidelines to avoid any possible issues with your machine. Incorrect storage can lead to possible fueling or engine issues that will not be covered by the warranty.
The following steps should be taken to prepare your machine for storage.
-
Drain all the fuel from the fuel tank and then run the machine until it has completely run out of fuel to clear the remaining fuel from the fuel lines and carburetor.
-
Drain the oil from the engine whilst the engine is still warm. Refill with fresh oil.
-
Follow the maintenance section and check, service or replace serviceable items if required.
-
Use clean cloths to clean off the outside of the machine and to keep the air vents free of obstructions. Make sure all moving parts are lubricated with a light silicone based spray or grease.
-
Inspect for any loose or damaged parts. Repair or replace damaged parts and tighten loose screws, nuts or bolts.
-
Once all work above is carried out store the machine in a clean, cool and dry place away from sources of ignition and varying changes in temperature. DO NOT store a machine that has not been given time to fully cool down. Do not stack other items on top of the machine when in storage.
-
When the machine is to be next used, fill with fresh unleaded petrol and not petrol that has been stored for periods of more than 30 days.
Do not use strong detergents or petroleum based cleaners when cleaning plastic parts. Chemicals can damage plastics.
Do not store the machine with fuel in a non-ventilated area where fuel fumes may reach flame, sparks, pilot lights or any ignition sources.
Environmental Protection
-
Environmental protection should be a priority of considerable importance when using the machine, for the benefit of both social coexistence and the environment in which we live. Try not to cause any disturbance to the surrounding area.
-
You must comply with local regulations and provisions for the disposal of packaging, oils, petrol, filters, damaged parts or any elements which have a strong impact on the environment. This waste must not be disposed of as normal waste. It needs to be separated and taken to specified waste disposal centres where the material will be recycled.
-
You must comply with local regulations for the disposal of waste materials after mowing.
-
When disposing, do not pollute the environment with the machine, but hand it over to a disposal centre, in accordance with the local laws in force.
Recycling And Disposal

natural_image
Simple line drawing of a trash bin with crossed lines indicating no waste or discharge (no text or symbols)We do not offer a takeback scheme for the recovery of Waste Electrical Electronic Equipment (WEEE) & Batteries. Instead the responsibility to dispose of WEEE and/or Batteries is passed onto you by us.
So when it becomes necessary to dispose of your machine you must take it to your local Civic Amenity Site. For further information please contact your local Authority for disposal advice.
You MUST make sure that all unused oil and fuel is disposed of correctly either beforehand or at your local Civic Amenity Site.
Under NO circumstances must any fuel or oil be put down any drains.
Certain products contain WEEE waste which should not be disposed of in your domestic waste.
You MUST recycle WEEE in accordance with your local authority or recycling centre.
Certain products contain batteries which should not be disposed of in your domestic waste.
You MUST recycle batteries in accordance with your local authority or recycling centre.
Unwanted packaging and materials should be stored and taken to a recycling centre so it can be disposed of in a manner which is compatible with the environment.

This symbol means you should 'Reduce - Reuse - Recycle'
We are a Member of the VALPAK National Compliance Scheme and our registration number is RM08660
For further information about disposal please contact your Local Authority.
You can also get more advice and guidance about recycling at the following website http://www.recycle-more.co.uk
Should you pass this product on to another user either sold or loaned, you MUST pass on this user manual. This will make sure that all other users can use and maintain this machine safely.
Spare Parts
Only use original spare parts: The use of non-original and/or incorrectly fitted parts will jeopardize the safety of the machine, may cause accidents or personal injuries for which the Manufacturer is under no circumstance liable or responsible.
| Part Part Number | |
| Rubber Track 1105072 | |
| Drive Belt 1105028 | |
| Clutch Cable 1105001 | |
| Throttle Cable 1105007 | |
| Brake Cable 1105016 |
Our Product Range
Generators
Leisure Inverter, Petrol, Diesel And Built-In Motorhome Generators
Pressure Washers
Petrol, Diesel And Electric Pressure Washers
Water Pumps
Submersible, Clean And Dirty Water And Professional Chemical Water Pumps
Lawnmowers
Petrol, Cordless, Electric, Roller, Self Propelled And Electric Start Lawnmowers
Grass Trimmers And Brush Cutters
Petrol, Cordless And Wheeled Grass Trimmers And Brush Cutters
Chainsaws
Petrol, Cordless And Electric Chainsaws
Hedge Trimmers
Petrol And Cordless Hedge Trimmers
Leaf Blowers
Petrol, Electric, Cordless, Backpack And 3 -in-1 Leaf Blowers
Log Splitters
Horizontal, Vertical, Petrol And Electric Log Splitters
Wood Chippers
Petrol And Electric Start Wood Chippers
Tillers
Petrol Garden Tiller And Cultivator
Earth Augers And Trenchers
Petrol Earth Augers And Heavy Duty Trenchers
Compactor Plates
Petrol Compactor Plates
Cement Mixers
Portable Electric Cement Mixers
Mini Dumpers
4-Wheel Drive Mini Dumper / Power Barrow
Yard Sweeper
Self Propelled Yard Sweeper Power Brush
Scarifiers
Petrol Lawn Scarifier And Aerator
Stump Grinders
Petrol 4-Stroke Stump Grinders
Welders And Plasma Cutters
MIG, TIG, MMA, ARC Welders And Plasma Cutters
Power Tools And Tool Chests
Electric And Cordless Power Tools And Caster Mounted Tool Chests
Vacuum Cleaners
Wet And Dry Vacuum Cleaners
Engines
Petrol And Electric Start Engines
Battery Chargers / Starters
6V, 12V, 24V Battery Chargers, Jump Starters And Hydraulic Floor Jack
Air Compressors
Home, Domestic, DIY And Professional Use Air Compressors
Lighting Towers
Mobile Lighting Towers With Diesel Generators
And More
We Are Constantly Expanding Our Range With New Products
If you would like more information on any of these products, please contact our sales team on 01646 687880 or visit our website www.hyundaipowerproducts.co.uk
Useful Information
Check Out Our YouTube Channel
Our videos on YouTube include:
- Unboxing
- Assembly of your machine
• How to service your machine - Products in use
- 'How To' videos
- Product features
Go to www.hyundaisupport.co.uk or search 'Hyundai Power Products' in YouTube.
Warranty
Proof of purchase will be required before you make a warranty claim.
Full warranty terms and conditions can be found on the HYUNDAI POWER PRODUCTS website: www.hyundaipowerproducts.co.uk
Manual Updates
Our manuals are constantly being reviewed and updated. Should you find an error, omission or something unclear, please contact us for assistance.
We reserve the right to make any modifications without prior notice whenever necessary.
Our latest manuals are also placed online. All our manuals can be downloaded at: www.hyundaipowerproducts.co.uk
Returning Your Product
If you are returning your product, please contact the dealer for their returns policy.
Leaving A Review
We work very hard to give all of our customers the best possible service.
If you have any problems, before leaving negative feedback, please contact us to give us a chance to resolve the issue.
We would be delighted if you left us positive feedback!
To leave a review, please go to: uk.trustpilot.com/review/hyundaipowerequipment.co.uk
Ordering Spare Parts
Only use original spare parts: The use of non-original and/or incorrectly fitted parts will jeopardize the safety of the machine, may cause accidents or personal injuries for which the Manufacturer is under no circumstance liable or responsible.
Notes
Notes
Notes
Need Help? Talk To Our Experts
Contact Us
Our friendly aftersales team will be more than happy to help you.
Phone
Call our team on 01646 687880, open Monday-Friday 8.30am-5pm.
aftersales@hyundaipowerproducts.co.uk
Online Live Chat
Go to www.hyundaipowerproducts.co.uk
Live chat is open Monday-Friday from 8.30am-5pm.
Post
Genpower Limited, Isaac Way, Pembroke Dock, Pembrokeshire, SA72 4RW, UK.
As soon as you have purchased the machine, we recommend that you fill out the following. If you need to contact an authorised dealer or customer service for information on servicing, you may need to provide the following information.
The model number and serial number can be found on the grey specification sticker on the machine.
| Service Record | |
| 1st ServiceDate Of Service......Next Service Due...... | 2nd ServiceDate Of Service......Next Service Due...... |
| 3rd ServiceDate Of Service......Next Service Due...... | 4th ServiceDate Of Service......Next Service Due...... |
EC Declaration of Conformity
We hereby declare that the machine detailed in this declaration complies to all the relevant provisions of the following EC directives.
• 2006/42/EC The Machinery Directive
• 2014/30/EU Annex II Electromagnetic Compatibility Directive
• 2016/1628/EC The Emission of Gaseous and Particulate Pollutants from internal Combustion engines
• 2000/14/EC Noise Emissions in the Environment by Equipment for use Outdoors.
And is in conformity with the applicable requirements of the following documents:
• EN ISO 12100:2010 (MD)
• EN ISO 3691-6:2015/AC:2016
• EN ISO 3744:1995 and ISO 6395:1988
Declaration for 2000/14/EC Noise Emissions in the Environment by Equipment for use Outdoors.
Notified Body for EC Directive 2000/14/EC TÜV Rheinland (Shanghai) Co., Ltd.
| Model Type Engine Size Measured | Sound Power | Guaranteed Sound Power | Engine Output | ||
| HYMD500HYTD300HYTD500 | Mini Powered Dumper | 196cc 96.8dB(A) | 101dB(A) 4.8kW | ||
Product Details:
Brand: Hyundai
Model: HYMD500, HYTD300, HYTD500
Description: Mini Powered Dumper
Name and address of technical documentation holder and EU distributor: Genpower Ltd, Isaac Way, Pembroke Dock, Pembrokeshire, SA72 4RW, UK.

Signed

Llewellin,
Managing
Director
Date: 20/05/2020

GENUINE PRODUCT OF HYUNDAI CORPORATION
For Inquiries, Please Contact:
GENPOWER LTD
Isaac Way, London Road,
Pembroke Dock, UK, SA72 4RW.
T: +44 (0) 1646 687 880
E: info@hyundaipowerproducts.co.uk
www.hyundaipowerproducts.co.uk

- HYUNDAI
- POWER PRODUCTS
- Thank You For Purchasing Your HYUNDAI Product
- Rated Excellent on Trustpilot
- Contents
- Symbols On The Machine
- CAUTION!
- INSTRUCTION MANUAL
- EYE AND HEARING PROTECTION MUST BE WORN
- HAND PROTECTION MUST BE WORN
- FOOT PROTECTION MUST BE WORN
- DO NOT REMOVE
- DO NOT SMOKE
- DO NOT TOUCH
- KEEP HANDS AWAY
- DANGER
- SLOPES
- BE AWARE
- TURN ENGINE OFF
- BYSTANDERS
- RECYCLING AND DISPOSAL
- CE UK CA
- CE & UKCA symbols
- Understand Your Machine
- Personal Safety
- General Safety
- Inspect Your Machine
- Engine Safety
- Work Area
- During Use
- Carbon Monoxide
- DANGER!
- General Fuel Safety
- Spilled Fuel
- Fueling / De-fueling
- Storage
- tteries (Where Present)
- Vibrations (Where Applicable)
- Noise (Where Applicable)
- Getting To Know The Machine
- Improper Use
- Safety Information
- Hydraulic Safety
- High-Pressure Fluids Hazards
- Risks of Hydraulic Failure
- Pinch and Crush Hazards
- Improper Maintenance
- Improper Maintenance:
- Environmental Hazards
- Environmental Hazards:
- Personal Protective Equipment
- HEARING PROTECTION MUST BE WORN
- EYE PROTECTION MUST BE WORN
- PROTECTIVE CLOTHING MUST BE WORN
- HEAD PROTECTION MUST BE WORN
- FACE SHIELD MUST BE WORN
- RESPIRATOR MUST BE WORN
- Unboxing & Assembly Safety
- Unboxing Safety
- Assembly Safety
- Unboxing
- What's In The Box
- Assembly
- Handlebar Assembly
- Engine Oil & Fuel
- STEP 1
- Plow Blade (Optional)
- Features
- Gas Selection Lever
- Left/Right Steering Lever
- Gas Spring Assistance
- Engine On/Off Switch
- Recoil Starter Handle
- Fuel Shut-Off Valve
- Throttle Control
- Choke Control
- Clutch Control Lever
- Preparation
- Add Oil To Engine
- STEP 2
- STEP 3
- STEP 4
- STEP 5
- DO NOT OVERFILL
- Add Petrol To Engine
- IMPORTANT! DO NOT OVERFILL!
- Before Each Use
- Starting Procedure
- Starting Procedure & Operating
- IMPORTANT!
- Operating
- Idle Speed
- Stopping Procedure
- After Each Use
- Emergency Stop
- Troubleshooting
- Specifications
- Safety
- Maintenance & Care
- Routine Maintenance
- Preventive Maintenance
- Adjusting Clutch
- Adjusting Steering
- Replacing Drive Belt
- Lubrication
- General Lubrication
- Gearbox Lubrication
- Tightening Tracks
- Environmental Protection
- Spare Parts
- Our Product Range
- Generators
- Pressure Washers
- Water Pumps
- Lawnmowers
- Grass Trimmers And Brush Cutters
- Chainsaws
- Hedge Trimmers
- Leaf Blowers
- Log Splitters
- Wood Chippers
- Tillers
- Earth Augers And Trenchers
- Compactor Plates
- Cement Mixers
- Mini Dumpers
- Yard Sweeper
- Scarifiers
- Stump Grinders
- Welders And Plasma Cutters
- Power Tools And Tool Chests
- Vacuum Cleaners
- Engines
- Battery Chargers / Starters
- Air Compressors
- Lighting Towers
- And More
- Useful Information
- Check Out Our YouTube Channel
- Warranty
- Manual Updates
- Returning Your Product
- Leaving A Review
- Ordering Spare Parts
- Notes
- Need Help? Talk To Our Experts
- Contact Us
- Phone
- Online Live Chat
- Post
- EC Declaration of Conformity
- Product Details:
Brand : HYUNDAI
Model : HYTD300
Category : Construction Equipment