
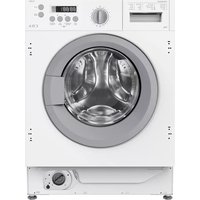
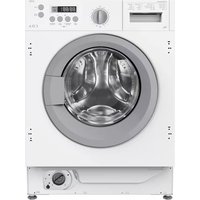
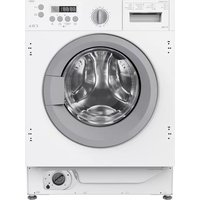
CI327 - Washing machine CDA - Free user manual and instructions
Find the device manual for free CI327 CDA in PDF.


| Product Type | Washing Machine |
| Brand | CDA |
| Model | CI327 |
| Load Capacity | 7 kg |
| Maximum Spin Speed | 1200 rpm |
| Dimensions (H x W x D) | 850 x 600 x 600 mm |
| Energy Class | A |
| Number of Programs | 15 |
| Control Type | Electronic |
| Display | LED |
| Noise Level (Wash/Spin) | 56 dB / 76 dB |
| Water Consumption per Cycle | 50 L |
| Annual Energy Consumption | 180 kWh |
| Safety Features | Child lock, overflow protection |
| Drum Material | Stainless steel |
| Door Diameter | 30 cm |
| Installation Type | Freestanding |
| Voltage / Frequency | 220-240 V / 50 Hz |
| Power Rating | 2000 W |
| Warranty | 2 years |
Frequently Asked Questions - CI327 CDA
User questions about CI327 CDA
0 question about this device. Answer the ones you know or ask your own.
Ask a new question about this device
Download the instructions for your Washing machine in PDF format for free! Find your manual CI327 - CDA and take your electronic device back in hand. On this page are published all the documents necessary for the use of your device. CI327 by CDA.
USER MANUAL CI327 CDA
Integrated washing machine Installation, use and maintenance
Contents:
3 Important information
5 - 6 Safety warnings
7 Recommendations
8 Before first use
10 Detergents and additives
11 Eco note and loading the washing machine
12 Control panel and programmes
13 Programme table
14 Programme details
16 Starting a wash programme & features
21 Choice of detergent
22 Care and maintenance
23 Cleaning the filter
25 Detergent drawer
26 - 28 Practical (cleaning) information
29 Display and failure codes
30 Troubleshooting
32 Installation (including transit bolt information)
33 Levelling
34 Connecting to the mains water supply
34 Drainage connection
35 Electrical information
37 Fitting the appliance
38 Fitting the furniture door
41 Final installation checks
42 Technical specifications
42 International washing symbols
43 Warranty and service
Important
This appliance must only be used for the purpose for which it is intended, i.e. domestic use. Any other use could be dangerous and may lead to premature failure of the appliance.
The CDA Group Ltd cannot be held responsible for injuries or losses caused by incorrect use or installation of this product. Please note that CDA reserve the right to invalidate the guarantee supplied with this product following incorrect installation or misuse of the appliance.
Under no circumstances should any external covers be removed for servicing or maintenance except by suitably qualified personnel. Do not use the appliance if the plug, the mains cord or the appliance itself is damaged. If the mains cord is damaged, you must have it replaced by the manufacturer, or an authorised service centre or similarly qualified person in order to avoid a hazard.
Appliance information:
Please enter the details on the appliance rating plate below for reference, to assist CDA Customer Care in the event of a fault with your appliance and to register your appliance for guarantee purposes.
| Appliance Model | |
| Serial Number |
EU Declarations of Conformity:
This appliance meets the requirements of all applicable EU directives with the corresponding harmonised standards which provide for CE marking.
IMPORTANT INFORMATION FOR CORRECT DISPOSAL OF THE PRODUCT IN ACCORDANCE WITH EC DIRECTIVE 2012/19/EU.
At the end of its working life, the product must not be disposed of as urban waste. It must be taken to a special local authority differentiated waste collection centre or to a dealer providing this service.
Disposing of a household appliance separately avoids possible negative consequences for the environment and health deriving from inappropriate disposal and enables the constituent materials to be recovered to obtain significant savings in energy and resources. As a reminder of the need to dispose of household appliances separately, the product is marked with a crossed-out wheeled dustbin.
Safety warnings
- If the plug or cord is damaged, do not connect the appliance to the mains power supply. If the cord is damaged it should be replaced by the manufacturer or appointed service agent in order to avoid a hazard. If the appliance is damaged, contact your retailer.
• To remove the plug from the socket, pull on the body of the plug, not the cable. - Do not plug the appliance in to the mains power supply with wet or damp hands, or when the sockets are wet or damp.
- Never touch the appliance with wet hands or feet.
- Never open the detergent drawer when a programme is running.
- Never force the appliance door open when a programme is running.
- Since the appliance can reach high temperatures while running, do not touch the drain hose or drained water during draining.
• In case of any failure, first unplug the appliance and close the water tap. - Repair on this appliance should only be undertaken by suitably qualified personnel.
- Keep the packing materials away from children to prevent risk of injury.
- Do not let children play with the washing machine.
- Keep pets away from the appliance.
• The appliance should not be installed on carpeted surfaces as this can block the air ventilation on the base.
Warnings
To avoid the risk of fire, electric shocks, injury or damage when using your washing machine, please take the following precautions:
- Please read all the instructions before using the washing machine.
- Do not wash items that have previously been cleaned, washed, soaked or treated with petrol, solvents for dry cleaning, other inflammable substances or explosives, as they produce fumes that could catch fire or explode.
- Do not add petrol, solvents for dry cleaning or other inflammable or explosive substances to the wash water as they produce fumes that could catch fire or explode.
- Do not repair or replace any part of the washing machine or try to carry out any type of servicing unless it is recommended in the maintenance instructions in the manual.
- Do not climb onto the machine or stand on the open porthole door.
- Do not use an extension lead or adaptor to connect your washing machine to the mains supply.
- Follow the washing instructions recommended by the manufacturer of the garment to be washed.
- Do not turn your washing machine on until you are sure that: It has been installed in accordance with the installation instructions. All the water, drainage, mains electricity and earth connections meet the local regulations and/or other applicable regulations.
Important: Ensure that the transit bolts have been removed prior to using the machine (see page 32).
Recommendations
• Residues of detergent or softener left in the detergent drawer for long periods will dry and stick to the detergent drawer. To prevent this put the detergent and softener into the detergent drawer just before washing.
- It is recommended that the pre-wash programme should only be used for very dirty clothes.
- Do not exceed the maximum loading capacity.
- When the machine is not in use, keep the water tap closed.
• The appliance is not intended for use by people (including children) with reduced physical, sensory or mental capabilities, or lack of experience and knowledge, unless they have been given supervision or instruction concerning use of the appliance by a person responsible for their safety. Children should be supervised to ensure that they do not play with the appliance.
- If the appliance is not to be used for prolonged periods of time, unplug the appliance, close the water tap and leave the door ajar to keep the inside of the machine dry and to prevent unpleasant odours from developing.
• As a result of the quality control procedures during production, a certain amount of water may remain in the appliance. This is normal and does not signify a fault.
- Do not remove the rating plate. The information on it is important.
- This appliance should not be installed in locations where the ambient temperature may fall below 0°C. Use in ambient temperatures below 0°C may damage the machine.
- The most energy and water efficient wash programmes are generally those that run at a low temperature and for a long time.
- Loading the washing machine to the full capacity indicated by the manufacturer for the respective wash programmes will save energy and water
Before first use
When your washing machine has been correctly installed, we recommend that you pre-clean the machine.
This is to check that the installation, the connections and the drainage are all correct, and to thoroughly clean the inside of the washing machine before any wash programmes are run.
Prior to pre-cleaning you should ensure the transit bolts have been removed.
- Select the Cotton 90°C programme (programme M) and add a normal dose of detergent into the detergent dispenser.
- Press the "Start / Pause" button.
Preparing garments for washing
- Wash lightly soiled garments using a short programme.
- Use a programme without prewash for medium-soiled garments.
- Wash heavily soiled garments using a long programme with prewash.
- Wash white and coloured loads separately.
• We recommend that small garments are placed in a wash bag.
• We recommend using the delicate programmes for sensitive fabrics. - Separate clothes according to their types (cotton, synthetic, sensitive, woollen, etc.), required washing temperatures and level of dirtiness.
- Since new coloured clothes may shed dye on the first wash, wash them separately.
-
Remove any foreign objects found on the items to be washed, for example curtain hooks and wires.
-
Fasten all zips and buttons.
- Turn garments, such as knitted fabrics, inside out.
- Before placing the clothes in the drum, make sure all the pockets are empty. Any small objects may block the drain pump.
• We recommend loading the washing machine to its full capacity for best water and energy efficiency. - Whenever possible, we recommend that you wash garments of different sizes within the same wash programme. This improves the washing action and also aids the correct distribution of the garments in the drum when spin-drying, and the washing machine will therefore be quieter.
Detergents and additives
Your washing machine's detergent dispenser has three sections as shown in figure 1.
Add the required amount of detergent and fabric softener into the specific sections of the detergent dispenser before starting the wash programme.

The detergent dispenser is
designed to allow the use of liquid detergents rather than adding them to the drum. You should only insert liquid detergent into the main wash detergent compartment and ensure that concentrated liquid detergent is diluted with an equal quantity of water before use.
- Liquid detergent should not be used on programmes with a prewash stage or when using the delay timer.
- For wash loads that require pre-washing, add 14 of the required powder detergent into the prewash section, and the remainder to the main detergent section.
- Do not exceed the “MAX” level in the fabric softener section and ensure that concentrated fabric softeners are diluted before use for best washing results and to help prevent clogging.
- Remember that the amount of detergent to be used will always depend on:
• The amount of clothes to be washed.
• How heavily the clothes are soiled.
- The hardness of the water (Information on water hardness in your area can be obtained from your local water board).
We recommend the use of a decalcifying product if the water hardness is high in your area.
Eco note
The use of more detergent than necessary will not improve your washing results. Many brands of detergent (and fabric softener/conditioner) contain phosphates which escape sewage treatment and can cause excessive algae growth in waterways. This in turn can pollute drinking water and cause marine life ‘dead zones’ which are underwater environments deprived of oxygen that are subsequently unable to support life. Please consider the environment and try to source an environmentally friendly brand.
Loading the washing machine
- Open the door.
- Remove any foreign objects from the appliance
- Add the items to be washed separately, ensuring they are loaded evenly.
- When closing the door, ensure that no item is trapped between the door and the door seal.
- Close the door securely, otherwise the programme will not start.
Control panel

Fig. 2


A Programme selector dial
C Delay timer button
E Spin speed button
G On/off button
B Display
D Temperature selection button
F Additional functions button
H Start/pause button
Programmes
PROGRAMMES
G Anti allergy
H Wool
Delicate
J Mixed
K Synthetic
L Sport
M. Cotton

MyChoice

natural_image
Simple rectangular outline with rounded corners and a top bar (no text or symbols)Fig. 3
Programme listing
The table below shows the extra functions and temperatures available for each wash programme.
| Programme | Default Temperature [°C] | Max spin speed [RPM] | Max load [KG] | Additional functions available Detergent drawer | Time [h:min] | Energy consumption [Wt] | Water consumption [L] | Number of rinses | |||||
| Delay | Extra rinse | Pre-wash | Pre-wash | Main wash | Fabric solventer | ||||||||
| Rapid 15' | Cold water | 800 2 | ✓ | X | ● | ○ | 00:15 30 | 34 2 | |||||
| Fast 45' | 40° 800 2 | ✓ ✓ | ✓ | ○ | ● | ○ | 00:45 | 700 34 2 | |||||
| Cotton 20° | 20° 1000 3.5 | ✓ | ✓ | X | ● | ○ | 01:01 95 | 43 2 | |||||
| Jeans | 60° 1000 7 | ✓ ✓ | ✓ | ○ | ● | ○ | 01:45 | 1250 64 2 | |||||
| Eco 40-60 | - 1400 7 | ✓ | X | ● | ○ | 03:25 | 785 58 2 | ||||||
| Cotton Intensive | 40° 800 7 | ✓ | X | ● | ○ | 03:48 | 670 49 2 | ||||||
| Rinse & Spin | - 1000 7 | ✓ | ✓ | X | X | ○ | 00:20 | 40 32 1 | |||||
| Spin | - 1000 7 | ✓ | XXX | 00:12 | 35 0 | - | |||||||
| Anti-Allergy | 60° 800 7 | ✓ ✓ | ✓ | ○ | ● | ○ | 01:43 | 1198 64 | 2 | ||||
| Wool | 40° 600 2 | ✓ | ✓ | X | ● | ○ | 01:07 | 650 34 | 3 | ||||
| Delicate | 30° 600 2.5 | ✓ | ✓ | X | ● | ○ | 00:50 | 220 37 2 | |||||
| Mixed | 40° 800 7 | ✓ ✓ | ✓ | ○ | ● | ○ | 01:20 | 808 | 70 2 | ||||
| Synthetic | 40° 1200 3.5 | ✓ ✓ | ✓ | ○ | ● | ○ | 03:18 | 765 43 | 2 | ||||
| Sport | 40° 800 3.5 | ✓ ✓ | ✓ | ○ | ● | ○ | 01:11 | 450 43 2 | |||||
| Cotton | 40° | 1400 7 | ✓ | ✓ | ✓ | ○ | ● | ○ | 03:49 | 1085 64 2 | |||
| MyChoice | - | - | - | - | - | - | - | - | - | - | - | - | - |
Use detergent if necessary
● Detergent required, without which washing will be ineffective
X Do not use detergent or fabric softener
Note: The temperatures and times listed above are an estimate and may differ from actual wash cycle time depending on water pressure, load size etc. The time is automatically updated during the wash cycle. Displaying the time for an extended time or abrupt changes are normal.
Programme details
Rapid 15 min
This programme is best suited for light loads with light soiling on a 15 minute cycle. This programme includes all wash cycles of main wash, rinse and spin
Fast 45 min
This programme is best suited for light loads with light soiling on a 5 minute cycle
Cotton 20
This programme can be used for daily washing where there is very light soiling and only a low temperature is required. The default temperature is 20^ C
Jeans
This programme is best suited to washing jeans. The default temperature is 60^ C
Eco 40 - 60
This programme is used to wash normally soiled cotton fabrics which can be washed at 40^ C or 60^ C on the same cycle
Cotton Intensive
This programme can be used for daily washing. The wash cycle is long and intensive and is best suited for cotton articles such as bed sheets, pillow cases etc
Rinse and Spin
This programme rinses the load and then spins it
Spin
Spin only programme. Soap water or rinse water is drained out before spinning commences
Anti Allergy
This program is designed for washing clothes for people with sensitive skin
Wool
This programme is suited for woolen items that are clearly labelled as machine washable. Select the appropriate temperature according to the garment's label(s). Also, ensure you use the correct detergents/additives
Delicate
This programme is suited for delicate garments. The intensity of the wash and drum rotation speed is gentler than other main cycles
Mixed
This programme is suited for mixed fabric loads that require a more intense cleaning cycle. Ensure label warnings on garments are conformed to
Synthetic
This programme is suited for slightly delicate garments and mixed loads. The default temperature is 40°C
Sport
This programme is suited for sportswear with a fair level of soiling
Cotton
This programme can be used for daily washing, the wash cycle is long and intensive. The default temperature is 40^ C
MyChoice
Press the ‘Spin speed button’ for approximately 3 seconds for the machine to remember the cycle/setup of your choice (if you have customised temperature, spin speed etc.). The default MyChoice cycle is Cotton. Once you have created and/or saved a cycle as per the above steps, this will be the MyChoice cycle thenceforth
Starting a wash programme & features
- Turn the ‘Programme selector dial’ to the required programme.
- Select the required spin speed using the ‘Spin speed button’.
- Select the wash temperature using the ‘Temperature selection button’.
- Select any required extra options, as detailed on the following pages.
- Press the 'Start / pause' button.
When a wash programme is in progress, the programme can be paused by pressing the ‘Start / pause’ button at any time. To resume the programme, press the ‘Start / pause’ button again.
Programme selection
To select a programme, turn the ‘Programme selector dial’ to the required programme, as detailed in the programme listing on page
13 and also on the detergent dispenser. The display will show the programme duration.
Spin speed selection
Each selected programme has its own preset spin speed, as shown in the programme listing on page 13.
If you press the ‘Spin speed button’ the currently set spin speed will show on the display. You can reduce this or switch it off completely if required by pressing the ‘Spin speed button’ a number of times. If you miss the speed you want you can come back round to it again by pressing a few more times.
A programme without final spin is used to prevent creasing when washing special fabrics.
Wash temperature selection
Each selected programme has its own preset wash temperature, as shown in the programme listing on page 13.
If you press the ‘Temperature selection button’ the currently set temperature will show on the display. You can change the wash temperature if required by pressing the ‘Temperature selection button’ a number of times. If you miss the temperature you want you can come back round to it again by pressing a few more times.
Extra functions
Extra functions can be selected once the programme has been set. To select any extra function, press the additional functions button. The programme table on page 13 shows the functions available for each programme. The programme time shown on the display will reduce or increase, according to the extra functions selected.
Delay timer
A delay of up to 24 hours can be added to the end time in half hour increments to allow the wash programme to finish at a convenient time. The delay time is to the end of the wash programme not the start of the programme.
The ‘Delay Timer’ function is not available for the ‘Spin’ programme.
To set the delay timer:
- Press the ‘Delay timer button’ (written ‘start delay’).
- Pressing the ‘Delay timer button’ again increases the delay by 30 minutes for each press, up to the maximum of 24 hours.
- Once the required time delay is shown on the display, the washing machine will set after approximately three seconds delay.
Extra rinse
This function adds an extra rinse cycle to the programme, which is ideal for large loads and garments belonging to people with sensitive skin. Please note: this function will increase the water consumption. Press the ‘Additional functions button’ once to select the extra rinse, the display will show an indicator next to the extra rinse writing.
Pre-wash
The prewash function prolongs the washing time by about 20 minutes. The main wash is then preceded by an additional wash cycle at a temperature of 30^ C. This function is recommended for heavily soiled laundry. Before starting the prewash function, detergent must be put in the detergent dispenser.
Start / Pause
Press the ‘Start / pause button’ to start the selected wash programme running, the indicator light stays on. If this is pressed again while the machine is running a programme the washer will pause and the indicator light will flash.
Child lock
The child lock function ensures that the programme will not be affected if any buttons are pressed accidentally.
The child lock function should be activated after the wash programme has been selected together with any extra functions.
To activate the child lock, press and hold ‘Temperature selection’ and ‘Spin speed’ buttons together for approximately 3 seconds.
The display will show the 🔊 symbol when the child lock is active
To deactivate the child lock, press and hold ‘Temperature selection’ and ‘Spin speed’ buttons together again for approximately 3 seconds.
Power cuts
If there is a power cut, when the electricity comes back on the washing programme will continue to run from where it stopped.
Switching the sound signal on/off
To activate this function, press and hold ‘Temperature selection’ for about 3 seconds. A sound will be heard to confirm the activation. To deactivate it simply press and hold the button again for 3 seconds.
Energy saving mode
About 10 minutes after the end of a wash programme, the display switches to energy saving mode. Instead of ‘End’ the display will blink ‘:’. The energy saving mode will also activate after about 10 minutes of the standby button being pressed if a programme has not been selected.
EN60456 testing details
| Programme | Max Load (kg) | Temp. (°C) | Energy Consumption (kWh) | Water Consumption (Litre) | Washing Time | Spin Performance |
 | 7 | 60 | 0.6749 | 4:40B | ||
 | 3.5 | 60 | 0.59 | 42 | 4:30 | - |
 | 3.5 | 40 | 0.51 | 42 | 4:30 | - |
Energy label program settings:
- "Cotton+ 40°C+Intensive + Max speed"
- "Cotton+ 60°C+Intensive + Max speed"
The standard 40^ and 60^ cotton programmes are suitable to clean normally soiled cotton laundry and they are the most efficient programmes in terms of combined energy and water consumption. The actual water temperature may differ from the declared cycle temperature.
Note: The wash cycle times that are quoted and shown by the LED display, are intended as a guide only. Please note that factors external to the machine, e.g. the temperature of your water supply, your water pressure etc. can affect the time it takes for the wash cycle to complete.
Choice of detergent
| Detergent / Additive | |||||
| Programme | Universal Colour | Delicate Special Softener | |||
| Wool --- L O | |||||
| Synthetic L/P | L/P L - O | ||||
| Hygiene L/P | L/P L - O | ||||
| Cotton L/P | L/P -- O | ||||
| Mix L/P | L/P -- O | ||||
| Delicate --- L - O | |||||
| Symbol Detergent / Additive Temperature Range (°C) | ||
| L | Liquid | 0 - 60 |
| P | Powder | 40 - 90 |
| O | Optional | - |
| - | Not applicable | - |
Notes:
The delayed start option is not recommended when using liquid detergent.
Refer to the detergent manufacturer's instructions for the correct amount to use.
Remember that modern detergents wash at lower temperatures than the more traditional formulations do.
Care and maintenance
Before beginning any care or maintenance you should always disconnect the appliance from the electricity supply, and also turn off the water supply. If a programme has been run recently, wait for the water in the appliance to cool down to prevent risk of scalding.
Water inlet filters
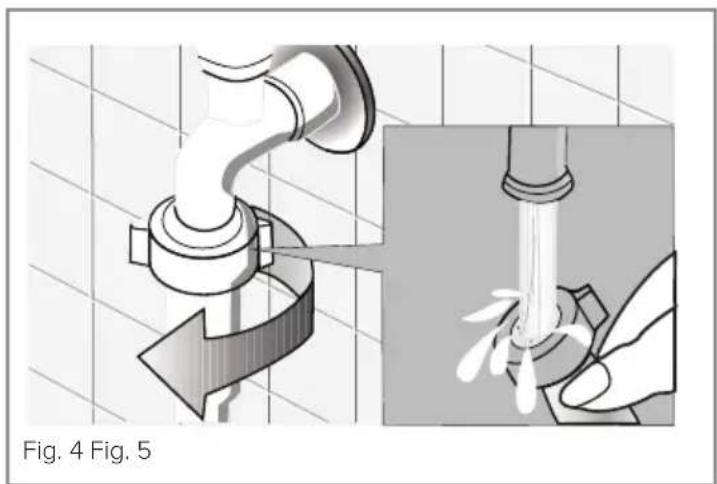
There are filters on the tap side of the water inlet hose and at the end of the water inlet valve. These filters prevent ingress of dirt or foreign objects into the machine through the water supply. These filters should be cleaned approximately once a year to ensure there is no interruption in the water supply to the machine.
- Remove the water inlet hose.
- Remove the filter on the water inlet valve using pliers.
- Remove the filter on the tap end of the water inlet hose manually, as well as the seal. Clean these.
• Clean the filters thoroughly using a brush. - Replace the filters and seals carefully, in the same way as they were removed.
natural_image
Diagram showing a pipe valve being inserted into a drain, with an inset close-up of the insertion (no text or symbols)
natural_image
Diagram of a pipe valve assembly with directional arrows indicating flow or movement (no text or symbols)
natural_image
Diagram showing a pipe valve being inserted into a sink with a magnified inset illustrating the process (no text or symbols present)
natural_image
Illustration of a hand using a tool to adjust a mechanical component (no text or symbols visible)Pump filter
The pump filter system helps to prevent the ingress of lint or foreign objects into the drain pump, reducing the risk of damage. The pump filter should be cleaned regularly, every two to three months at least.
To avoid injury, do not carry out this operation when the wash water is at a temperature over 30^ C. Disconnect the appliance from the power supply first.
To clean the filter (images on page 24):
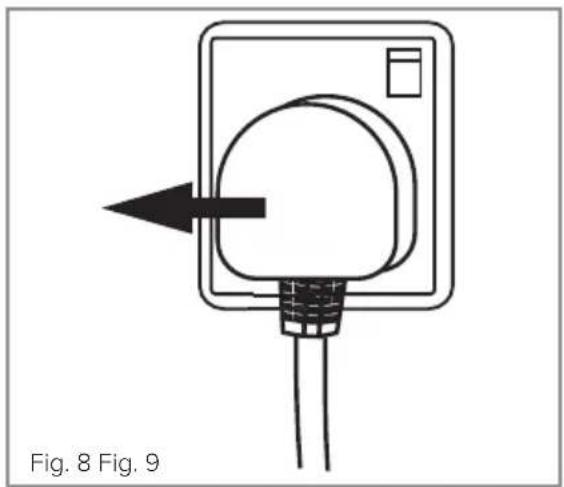
• Unplug the appliance.
- Place a container under the filter to collect the flow of remaining water from the machine.
- Loosen the filter cover by turning it slowly anti-clockwise until the remaining water has drained away.
- When all the water has drained out of the machine, turn the filter cover several times until the filter can be completely removed.
- Remove any objects caught in the filter and the housing.
- Clean the filter under running water.
- Refit the filter by turning it clockwise. Ensure the filter is properly fitted.
natural_image
Diagram of a device with a circular component and two wires, labeled Fig. 8 Fig. 9 (no text or symbols on the diagram itself)
natural_image
Illustration of a hand holding a mechanical component with an arrow indicating rotation (no text or symbols)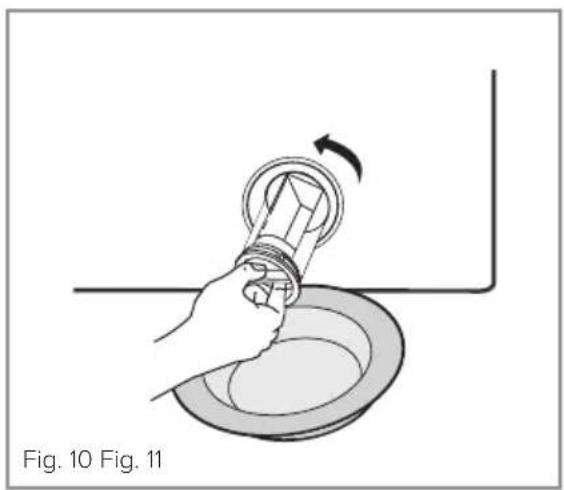
natural_image
Illustration of a hand holding a light bulb with a rotating arrow, placed on a circular plate (no text or symbols)
natural_image
Diagram of a device's internal components and parts, showing a valve with a circular component and three small parts below (no text or symbols)
natural_image
Illustration of a hand holding a tool with multiple vertical lines and a handle, labeled Fig. 12 (no text or symbols on the diagram itself)
natural_image
Illustration of a hand inserting a component into a device with an arrow indicating rotation (no text or symbols)Detergent drawer
Detergents may cause residue build up in the detergent drawer and the drawer housing over time. The drawer should be cleaned regularly to remove these residues. We also recommend you leave the appliance door and dispenser drawer open for a while after each wash. This will ventilate the areas and help to dry them out, helping to prevent midlew and mould forming. Only do this if practical to do so and take care around open doors. Warn others in the property of the hazard.

natural_image
Diagram of a mechanical device with internal compartments and directional arrows, labeled Fig. 14 (no text or symbols on the diagram itself)To remove the drawer:
• Pull the drawer out gently until it stops.
- To remove the drawer, press down on the blue syphon lid inside the drawer and remove from the housing, as shown in figure 4.
- Wash the drawer and syphon lid using warm water and a brush, ensuring all compartments are clean.
• Dry the drawer thoroughly and replace the syphon lid properly.
- Remove the residues from the drawer housing without letting them fall into the machine.
- Replace the detergent drawer inside the housing, reversing the steps above.
Please note - A dirty syphon will prevent the detergents from being taken in and leave water inside the detergent drawer compartments at the end of the wash.
Cleaning the washing machine exterior
The exterior of the washing machine should be cleaned with warm soapy water or a gentle cleaning agent. Do not use abrasive cleaning products or solvents.
It should then be dried thoroughly with a soft cloth.
Please note - wipe any detergent spills immediately to minimise the risk of damage to the washing machine exterior.
The drum
Do not leave metal objects such as coins inside the drum, as these can cause the formation of rust stains.
To remove rust stains, use a chlorine free cleaner and follow the manufacturer's warnings for the cleaner.
Never use abrasive products, such as scourers, to remove rust stains.
Limescale removal
If proprietary limescale removers are required, follow the manufacturer's warnings for the limescale remover.
Please note - Limescale removers contain acids which may affect the colour in clothes, as well as damaging the appliance.
Practical information
Alcoholic beverages: The stain should first be washed with cold water, then wiped with glycerine and water and be rinsed with water mixed with vinegar.
Shoe Polish: The stain should be slightly scratched without ruining the cloth, rubbed with detergent and rinsed. In case it is not eliminated, it should be rubbed with 1 part of pure alcohol (96 degrees) mixed in 2 parts of water and then washed with lukewarm water.
Tea and coffee: Stretch the stained area of your cloth on the top of a container and pour through water as hot as the type of cloth can endure. If the type of cloth is suitable, wash it with lye.
Chocolate and cocoa: Soak the item in cold water and rub with soap or detergent, wash it in the highest temperature that the type of cloth can endure. If there is still a stain left, wipe with oxygenated water (in proportion of 3%).
Tomato paste: After scraping the dried pieces without ruining the cloth, leave in cold water for about 30 minutes and wash by rubbing with detergent.
Meat/soup/egg: Eliminate the dried stain residues and wipe with a sponge or soft cloth dampened with cold water. Rub with detergent and wash with diluted lye.
Grease and oil stains: First wipe the residues. Rub the stain with detergent and then wash with lukewarm soapy water.
Mustard: First apply glycerine to the stained area. Rub with detergent and then wash. If the stain still does not disappear, wipe with alcohol (On synthetic and coloured cloth, a mixture of 1 part alcohol, 2 parts water should be used).
Blood stain: Soak the item in cold water for 30 minutes. If the stain still does not disappear, soak in a mixture of water and ammonia (3 table-spoons of ammonia in 4 litres of water) for 30 minutes.
Cream, ice-cream and milk: Soak the item in cold water and rub the stained area with detergent. If the stain has still not disappeared, apply diluted lye on the fabric. (Do not use lye on coloured clothes.)
Mould: Mould stains should be cleaned as soon as possible. The stain should be washed with detergent, and if it does not disappear, it should be wiped with oxygenated water (in proportion of 3%).
Ink: Hold the stained area under cold water and wait until the inky water completely runs off. Then rub with lemon juice and detergent diluted in water, wash after waiting for 5 minutes.
Fruit: Stretch the stained area of the item on the top of a container and pour cold water on it. Do not pour hot water on the stain. Wipe with cold water and apply glycerine. Wait for 1-2 hours and rinse after wiping with a few drops of white vinegar.
Grass stain: Rub the stained part with detergent. If the type of fabric is suitable for use of lye, wash it with lye. Rub your woollen items with alcohol. (For colour, use a mixture of 1 part pure alcohol and 2 parts of water).
Oil Paint: The stain should be eliminated before it dries by applying thinner on it. Then it should be rubbed with detergent and washed.
Burnt stain: If your cloth is suitable for use of lye, you can add lye into your washing water. For woollens, a cloth damped in oxygenated water should be covered on the stain and it should be ironed with a dry cloth on it. It should be washed after rinsing well.
Display and failure codes
Your machine is equipped with diagnostic systems which monitor wash progress and will intervene to protect the washing machine in the event of a fault.
| Display Reason Solution | ||
| E10 | Low water pressure, no water in the washing machine | Open the water valve, check the water inlet hose and filter, check water pressure |
| E21 | Water not draining properly | Check water drain pump and filter |
| E30 | The door is not closed | Remove any obstructions that may be stopping the door from fully closing |
In the event of any other fault with your washing machine, please follow the steps below:
- Unplug the machine.
- Close the water tap.
- Contact CDA Customer Care.
Troubleshooting
All repairs which must be done on the machine should only be performed by authorised service agents. When a repair is required for your machine or you are unable to eliminate the failure with the help of the information given below:
- Unplug the machine.
- Close the water tap.
- Contact CDA Customer Care.
| Fault Probable cause Methods of elimination | ||
| The machine will not start. | It is unplugged. Insert the plug into the socket. | |
| The fuse is damaged. Replace the fuse. | ||
| There is a fault with the power supply. | Check the power supply. | |
| The washer door is not properly closed. | Close the washer door. | |
| “Start / Pause” button has not been pressed. | Press the “Start / Pause” button. | |
| The machine does not fill with water. | Start / Pause” button has not been pressed. | Press the “Start / Pause” button. |
| Water tap is not turned on. Turn on the water tap. | ||
| Water pressure too low. Check water pressure. | ||
| The inlet hose is kinked. Check the inlet hose. | ||
| Water supply failure. Check the water supply. | ||
| Programme knob not set correctly. | Set the programme knob correctly. | |
| Washer door not properly closed | Close the washer door properly. | |
| Inlet hose filter is blocked. Unblock | the inlet hose filter. | |
| The machine is draining while being filled. | The height of drain hose is below 80cm. | Install drain hose at specified height of 80-100cm. |
| The drain hose is in water. Ensure the drain hose end is not immersed in water. | ||
| Fault Probable cause | Methods of elimination | |
| The machine does not drain water. | The drain hose is obstructed or bent. | Check the drain hose. |
| The pump filter is obstructed. Clean | the pump filter. | |
| The drain hose is above 100cm. Install drain hose at specified height of 80-100cm. | ||
| The machine is vibrating. | Not all transit bolts have been removed. | Remove all the transit bolts. |
| The machine is located on an uneven surface or is not levelled. | Ensure the machine is located on an even surface and is correctly levelled. | |
| There is only a small load in the machine. | This is not indicative of a fault. | |
| The washing machine is overloaded, or badly loaded. | Do not exceed the load capacity, and ensure the clothes are loaded evenly. | |
| The washing machine is leaning on a solid object. | Ensure the machine is installed away from other objects. | |
| The machine stops before completing its wash cycle. | Water or electricity failure. Check the power and water supplies. | |
| Operation stops for a period of time. | Washing machine gives an error message. | Check display codes. |
| Washing machine is in a soaking cycle. | Press the “Start / Pause” button again to cancel it. Consider a drain cycle. | |
| Excessive foam in the drum. | The detergent is not a low foaming type. | Check if the detergent is suitable. |
| Excessive amount of detergent used. | Reduce amount of detergent used. | |
| Washing time has changed automatically. | The washing programme duration has been changed. | This is not a fault and is a feature of the machine. |
| The machine fails to spin. | Unbalanced load. Add more clothes or try running the spin cycle again. | |
Installation
Transit bolts, located at the rear of the appliance, must be removed prior to using the appliance to prevent damage. There are four in total.
- Remove the back cover from the machine.
- Loosen the transit bolts using a suitable spanner by turning them anti-clockwise and then remove them.

natural_image
Diagram of a mechanical component with fluid flow lines and a labeled arrow, no readable text or symbols present.- Remove the bolts and plastic spacers that were retained by the transit bolts.
• Cover the bolt holes with the plastic plugs supplied.
Do not throw the transit bolts or plastic spacers away. If you need to move the washing machine after installation you should first replace the transit bolts and spacers.
Do not install your machine on rugs or similar surfaces.
For your machine to work quietly and without any vibration, it should be installed on a flat, non-slippery and solid surface.
The machine must be positioned on a solid support, such as the bare floor or a well-fitting riser, ensuring the machine is unable to fall when subjected to the typical vibrations generated by a washing machine.
The machine must not be fitted near heat sources, nor near
combustible materials such as coal or gas. Ensure that the power cord is not trapped in any way.
Levelling
To reduce the noise from the washing machine and to prevent unnecessary movement during use, ensure the washing machine is level, using the adjustable feet.
First, fix and level the rear feet. When they are properly fixed, secure the metal locknut tightly against the underside of the washing machine.
- Put the washing machine into its required position.
- Then level the front feet in the same way as the rear feet.

natural_image
Mechanical assembly diagram showing a wrench inserted into a mechanical component, with no visible text or symbols.Please note: Raising the washing machine too high can affect the stability of the appliance.
Do not use wooden blocks, packaging or any similar means to stabilise the appliance. Use only a flat, solid surface and the appliance's feet.
Connecting to the mains water supply
- Fit the seal included in the hose packing at the end of the water inlet hose on the tap side.
- Connect the water inlet hose to a 3/4” BSP water tap. Then securely tighten the connecting nut by hand.
• After connections are completed, check there are no leaks from the connection joints by turning on your tap completely.
For your washing machine to work properly, the mains water pressure must be between 0.05 and 1MPa (0.1 - 10 bar).
Drainage connection
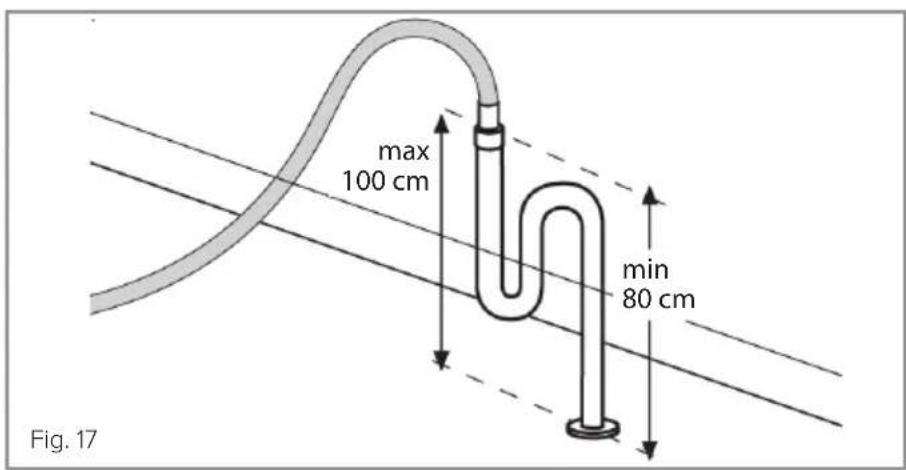
- It is recommended that you have a fixed drainage outlet 80 to 100 cm from the floor.
- Avoid the drain hose being too tight, kinked or restricted.
- The water outlet can either be connected to a water drain or to a sink outlet spigot (ensure the spigot is cut/opened). This connection should be a minimum of 80cm and a maximum of 100cm from the floor. The drain hose should be no longer than 4m in length to ensure good performance from the washing machine.
• After connecting the water supply, check to ensure there are no leaks.
The drain hose must be securely fastened to the outlet to prevent any risk of the drain hose becoming detached and causing flooding.
Once the appliance is connected to the water supply and the drain connection, ensure that the water inlet and drain hoses are not folded, twisted, crushed or elongated by stretching when moving the appliance into position.
Electrical information
Warning! This appliance must be earthed.

The mains lead of this appliance has been fitted with a BS 1363A 13 Amp fused plug. To change a fuse in this type of plug, follow the steps below:
- Remove the fuse cover and fuse.
- Fit a replacement 13A fuse, ASTA approved to BS 1362 type, into the fuse cover.
- Replace fuse cover.
Important: Do not use the appliance without the fuse cover in position.
How to connect an alternative plug
If the fitted plug is not suitable for your socket outlet, then it should be cut off and disposed of safely to prevent the risk of electric shock. A suitable alternative plug of at least 13 Amp rating to BS 1363 should be used.
As the colours of the wires in the mains lead of this appliance may not correspond with the coloured markings identifying the terminals in your plug, proceed as follows:-
- The wire which is coloured GREEN and YELLOW must be connected to the terminal which is marked with the letter (E) or by the Earth symbol 12 or coloured GREEN and YELLOW.
- The wire which is coloured BLUE must be connected to the terminal which is marked with the letter (N), or coloured BLACK.
- The wire which is coloured BROWN must be connected to the terminal which is marked with the letter (L) or coloured RED.
If in doubt regarding the electrical connection of this appliance, consult a qualified electrician. Do not shorten the supply cable, the appliance may require removing for servicing.
N.B. Ensure that the plug socket is situated in an easily accessible place.
The plug must be used with a specially earthed socket of 13 amperes. If there is no such socket in your house, please have one installed by an authorised electrician.
Appliance electrical rating: 1950W
Fitting the appliance
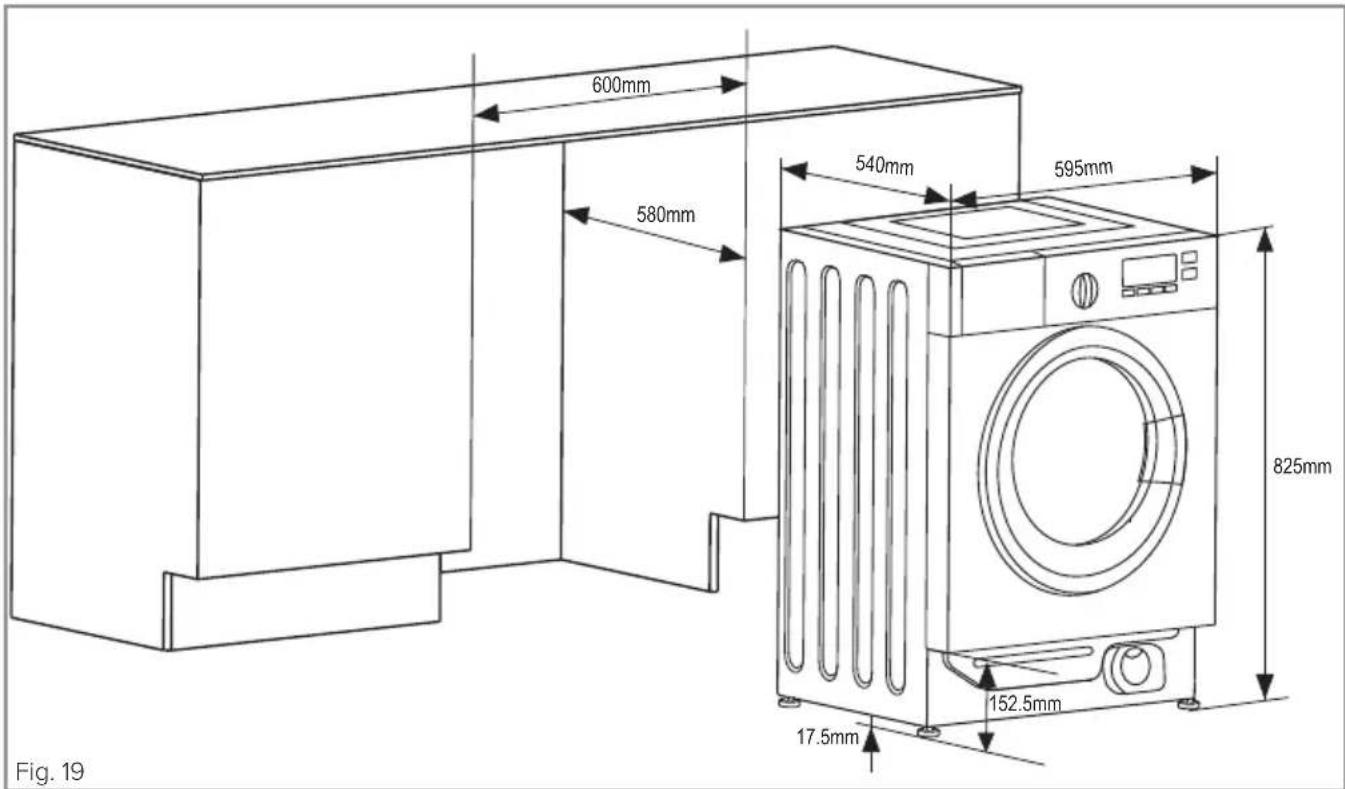
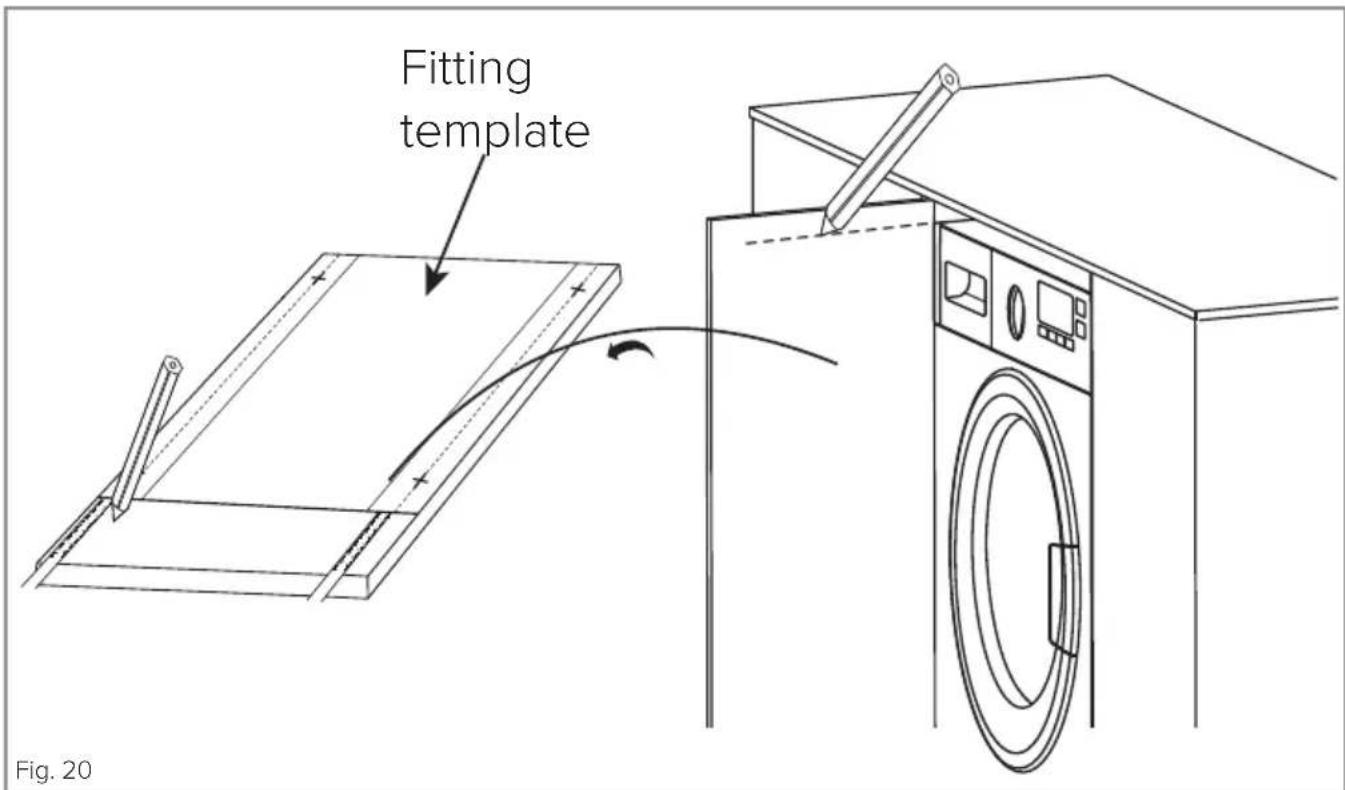
Position the fitting template on the door accordingly so that you can mark it based on the cupboard and washing machine height (see page 38).
Fitting the furniture (decor) door
The machine is supplied with a fitting template that aligns with the top of the décor door and has arrows cut out of it that point toward the door top. NOTE: If this template is aligned with the top of the décor door, the resultant position will align the décor door top with the top of the machine fascia.
The required height of the door top edge above the fascia panel, and hence the gap between décor door and worktop, can only be determined by the fitter after the final height adjustment of the machine has been determined. The final positioning of the template is therefore at the discretion of the fitter. The furniture door should be fitted to the casing of the washing machine using the hinges supplied. Any offsets should be accounted for.
CHECK THAT THE DECOR DOOR ALIGNS PROPERLY BEFORE DRILLING THE HINGE HOLES. RE-MARK IF NECESSARY.
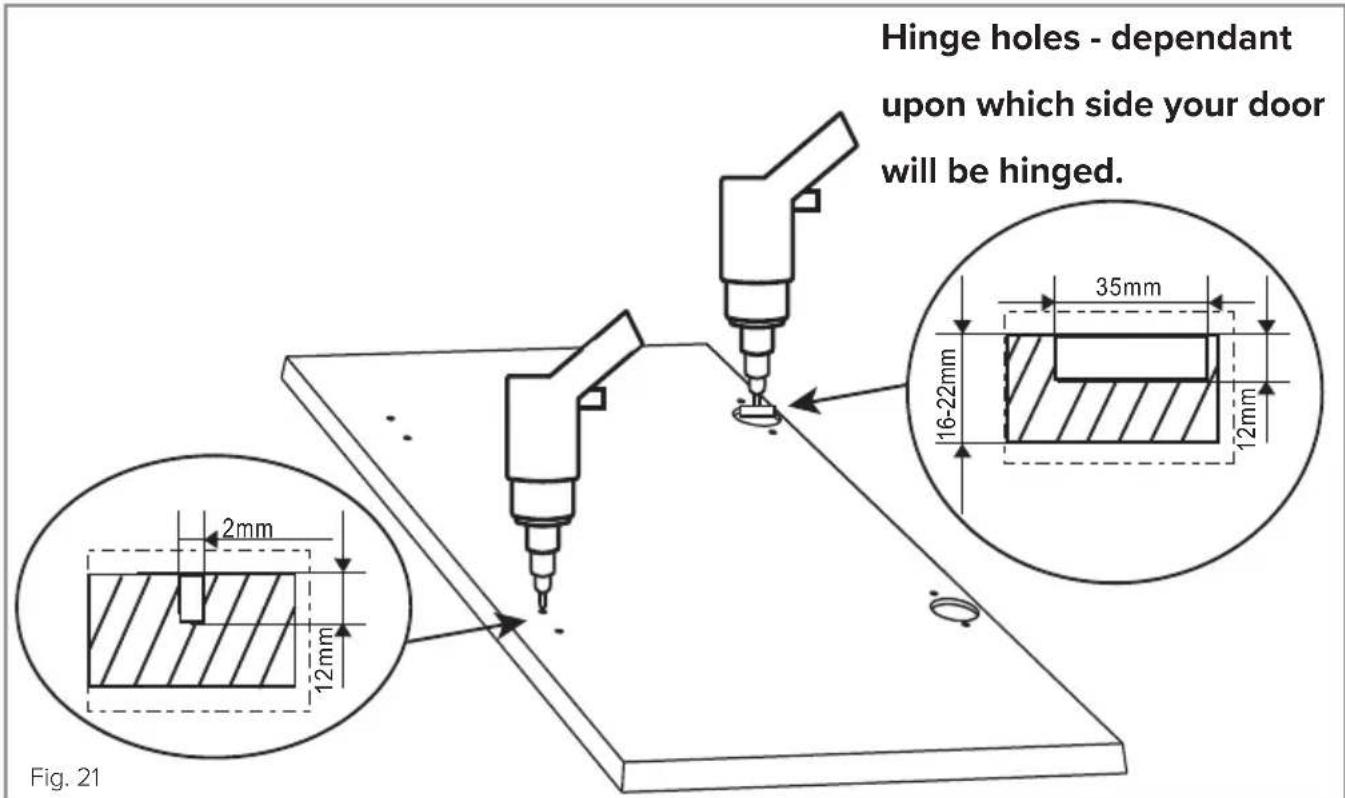
Drill the hinge and catch holes as per the diagram on the bottom of page 38. The sides that these holes shall need to be drilled will depend upon the style of the decor door and the side that you wish for it to be hinged upon. It is not uncommon for décor doors to have these holes already drilled, particularly when they are reversible.
Fix the magnetic catch assembly receivers (Fig. 23, page 40) to the front of the washing machine and the catch plates (CP in Fig. 22, page 40) to the furniture door.
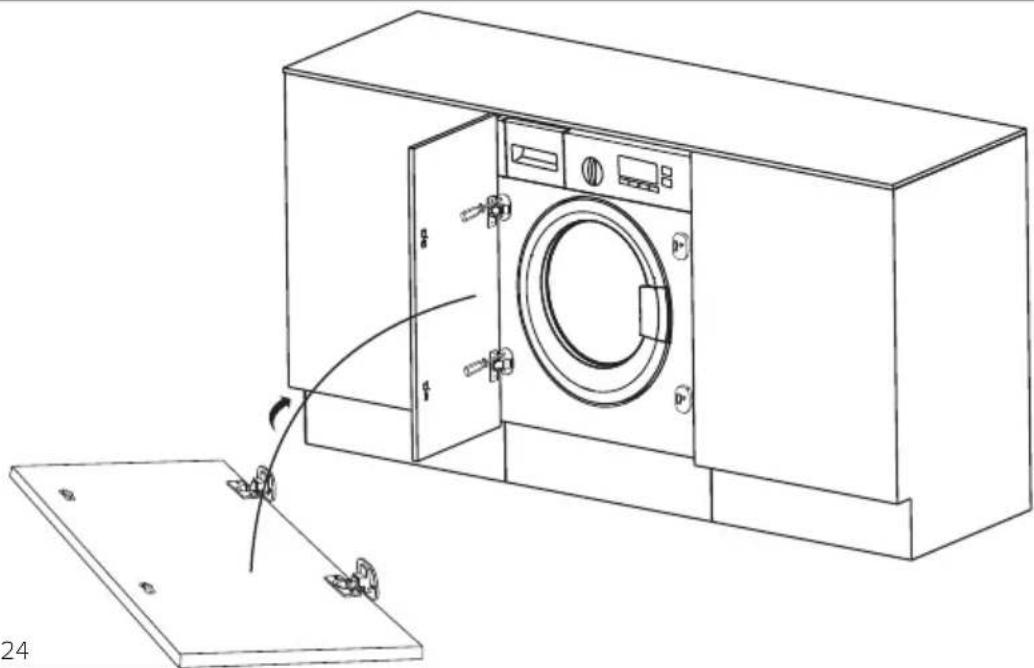
Provided all is properly aligned, fit the decor door (Fig. 24, page 40).

Fig. 22

natural_image
Line drawing of a washing machine with attached lockers, showing internal components and mounting bracket (no text or symbols)Fig. 23
natural_image
Line drawing of a washing machine with a door, showing internal components and a base plate (no text or symbols)Final installation checks
Run a quick test cycle to make sure the appliance fills, turns, drains etc. with no issues. If you encounter any issues, ensure that the install is as close to the below images as possible, depending on the install. Ensure that no hoses are kinked, water is on and sink spigots are cut, if applicable.


Technical specifications
| Maximum dry laundry capacity (kg) 7 | |
| Recommended loading (kg) See ‘Programme List’ (page 13) | |
| Height (cm) 82.5 | |
| Width (cm) 59,5 | |
| Depth (cm) 54.0 | |
International Washing Symbols
 |  |  | 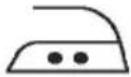 |
| Washing temperature | Do not wash in a washing machine | Lukewarm iron Medium hot iron | |
 | 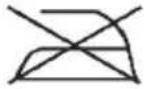 |  |  |
| Hot iron Do not iron Do not tumble | dry | Hang to dry | |
 |  | 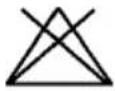 |  |
| Drip dry Dry flat Do not bleach | Handy to bleach | ||
 |  |  |
All of these are dry cleaning symbols. The letters are to instruct the cleaner what type of solvent to be used.
Garments bearing these symbols should not be washed in your machine unless the label says otherwise.


natural_image
Simple line drawing of a basin with crossed lines indicating water flow (no text or symbols)Wash up to 90 °C
Wash up to 60 °C
Wash up to 30 °C
Do not wash in a washing machine
Warranty and service
The manufacturer shall not be held liable for any damage caused by improper use of the product.
• Repairs carried out by unqualified persons may seriously endanger the appliance user
- Pursuant to Commission Regulation (EU) 2019/2023, The minimum availability period for spare parts necessary to repair the appliance is 7 or 10 years depending on the type and purpose of the spare part
- The list of spare parts and the ordering procedure are available on the websites of the manufacturer, importer or an authorised representative
- The minimum warranty period for the appliance offered by the manufacturer, importer or authorised representative is given in the warranty card
- The warranty shall be void if you make any independent adaptations or alterations, tamper with seals or other appliance safety devices or its parts or interfere with the appliance contrary to operating instructions
For more information about the product, please refer to the EU EPREL Product Database at https://eprel.ec.europea.eu.
Alternatively you can use your mobile device to scan the QR code on the energy label or enter the product model listed on the energy label in the EPREL search engine.
The CDA Group
Harby Road
Langar
Nottinghamshire
NG13 9HY
Sales Department
Phone: 01949 862010
Email: sales@cda.eu
CDA Customer Care
Phone: 01949 862012
Email: customer.care@cda.eu



- Contents:
- Important
- Appliance information:
- EU Declarations of Conformity:
- IMPORTANT INFORMATION FOR CORRECT DISPOSAL OF THE PRODUCT IN ACCORDANCE WITH EC DIRECTIVE 2012/19/EU.
- Safety warnings
- Warnings
- Recommendations
- Before first use
- Preparing garments for washing
- Detergents and additives
- Eco note
- Loading the washing machine
- Control panel
- Programmes
- Programme listing
- Programme details
- Rapid 15 min
- Fast 45 min
- Cotton 20
- Jeans
- Eco 40 - 60
- Cotton Intensive
- Rinse and Spin
- Spin
- Anti Allergy
- Wool
- Delicate
- Mixed
- Synthetic
- Sport
- Cotton
- MyChoice
- Starting a wash programme & features
- Programme selection
- Spin speed selection
- Wash temperature selection
- Extra functions
- Delay timer
- Extra rinse
- Pre-wash
- Start / Pause
- Child lock
- Power cuts
- Switching the sound signal on/off
- Energy saving mode
- EN60456 testing details
- Energy label program settings:
- Notes:
- Care and maintenance
- Water inlet filters
- Pump filter
- To clean the filter (images on page 24):
- Detergent drawer
- To remove the drawer:
- Cleaning the washing machine exterior
- The drum
- Limescale removal
- Practical information
- Display and failure codes
- Troubleshooting
- Installation
- Do not throw the transit bolts or plastic spacers away. If you need to move the washing machine after installation you should first replace the transit bolts and spacers.
- Levelling
- Connecting to the mains water supply
- Drainage connection
- The drain hose must be securely fastened to the outlet to prevent any risk of the drain hose becoming detached and causing flooding.
- Electrical information
- How to connect an alternative plug
- Appliance electrical rating: 1950W
- Fitting the appliance
- Fitting the furniture (decor) door
- CHECK THAT THE DECOR DOOR ALIGNS PROPERLY BEFORE DRILLING THE HINGE HOLES. RE-MARK IF NECESSARY.
- Final installation checks
- Technical specifications
- International Washing Symbols
- Warranty and service
Brand : CDA
Model : CI327
Category : Washing machine