
PX01001 - Thermostat / Timer DIMPLEX - Free user manual and instructions
Find the device manual for free PX01001 DIMPLEX in PDF.


| Product Type | Thermostat / Timer |
| Brand | Dimplex |
| Model | PX01001 |
| Dimensions (H x W x D) | Approx. 85 x 85 x 30 mm |
| Weight | Approx. 100 g |
| Power Supply | 230 V ~ 50 Hz |
| Max Load | 16 A (resistive), 3 A (inductive) |
| Temperature Range | 5°C to 30°C |
| Timer Functions | Daily/weekly programming, frost protection |
| Display Type | LCD screen with backlight |
| Control Type | Touch buttons or rotary dial |
| Mounting | Wall-mounted (flush or surface) |
| Protection Rating | IP20 |
| Certifications | CE, RoHS |
| Maintenance | Wipe with dry cloth; no liquids |
| Safety Features | Child lock, overheat protection |
| Spare Parts Available | Yes, contact Dimplex support |
| Repairability Index | N/A (professional installation recommended) |
| Warranty | 2 years (subject to terms) |
Frequently Asked Questions - PX01001 DIMPLEX
User questions about PX01001 DIMPLEX
0 question about this device. Answer the ones you know or ask your own.
Ask a new question about this device
Download the instructions for your Thermostat / Timer in PDF format for free! Find your manual PX01001 - DIMPLEX and take your electronic device back in hand. On this page are published all the documents necessary for the use of your device. PX01001 by DIMPLEX.
USER MANUAL PX01001 DIMPLEX
Please note that some of the contact details on this PDF document may not be current.
Please use the following details if you need to contact us:
Telephone: 0844 879 3588 Email: customer.services@gdcgroup.co.uk
The customer support section of our website also features a wide range of information which may be of use to you and is available 24 hours a day. It includes:
- Operating and installation instructions
- Easy 'How to use' guides for storage heaters
• Service and repairs
• Where to buy our products
• Literature downloads
• Heating requirement calculator
Visit - www.dimplex.co.uk/support
Press Button Delay Timer - Model No. PX01001
T0105/004/A
Main Dimensions
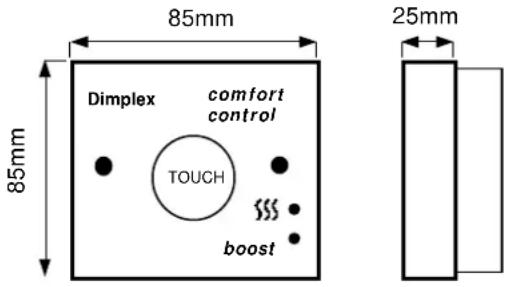
Ensure 500mm clearance from any heat source or draught.
Safety Warnings
- WARNING: DO NOT USE THIS APPLIANCE IN THE IMMEDIATE SURROUNDINGS OF A BATH, A SHOWER OR SWIMMING POOL
- WARNING: DO NOT USE WHERE EXCESSIVE DUST OR MOISTURE IS PRESENT
- WARNING: FOR USE IN NORMAL POLLUTION SITUATIONS ONLY
General Description
The PX01001 timer/thermostat can be used in conjunction with heating appliances. They may be flush or surface mounted using a standard 25mm box. The control is rated at 16A (250VAC) and can be used in conjunction with heating appliances with a maximum total input of 13 A resistive L.C. 230V - 50Hz. The controller cannot be used with a Quartz heater without a suitable in-line contactor. Control action: Type 1B
Operating Instructions
The PX01001 controls the room temperature by interrupting the power supply to the appliance, therefore the appliance should always be switched on and its thermostat set to maximum temperature. Note this will not be reached if the pre-determined maximum level is below that of the appliance thermostat setting.
boost
When the comfort mode is activated by pressing the centre of the control face, the green light illuminates. The comfort mode allows the room to be heated to a predetermined temperature for a pre-determined time period.
>>>
The red light indicates that the heater is operating. Note that the heater will remain on for a minimum of 1 minute.
The red light may also be illuminated in the set back mode when the PX01001 switches the heater on to maintain the predetermined background temperature.
Installation
Before undertaking installation work, ensure the electricity supply is disconnected from any relevant fixed wiring.
-
The control and heater should be installed in compliance with the IEE Wiring Regulations
-
The location of the control is important, it will not function correctly if above or within 500mm of a heat source or draught. Care must also be taken not to obscure the slots at the top or bottom of the control and that it is not exposed to direct bright sunlight or close to a lamp fitting. Best temperature accuracy will be achieved by mounting on an internal wall or partition.
- The pattress boxes (not provided) should have a depth of at least 25mm. Plastic pattress boxes with vertical pillars are not suitable.
Vertical tabs in metal pattress boxes should be removed. Ensure all entries into the pattress boxes are sealed to prevent draughts. - Before fitting to the mounting box setback temperature, comfort temperature and comfort period must be selected. To do this, adjust the appropriate dial on the reverse of the PCB.
- The supply cable is not provided and should therefore be selected to suit the appliance.
Warning: Although the control does not need an earth, the appliance probably does. Ensure that the mounting box is fitted with an earth terminal for earth continuity to the appliance. - To connect the control in circuit wire in to the clearly marked terminal block on the rear of the controller. The control must only be connected via fixed wiring.
- Secure the control to the pattress box such that there are no gaps between the controller and wall or pattress box.
Note: If tamperproof screws are required they should be M3 x 40mm long, counter sunk with a head diameter of no more than 6.5mm.
Installation contd..
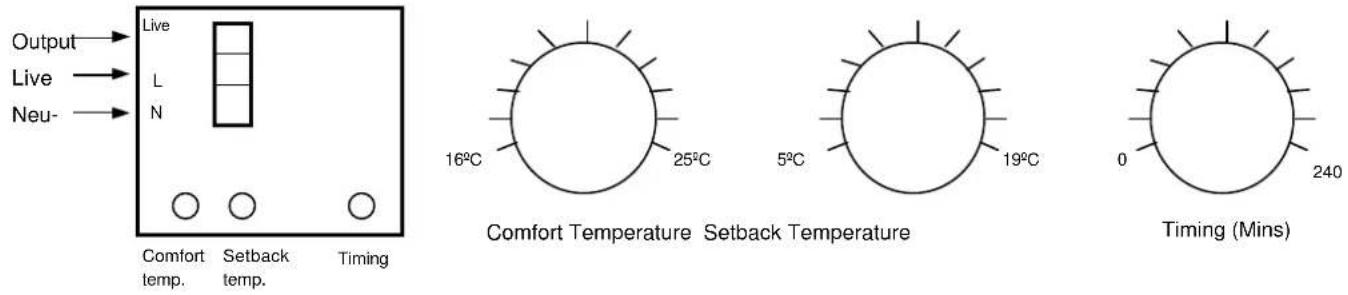
Wiring Diagram
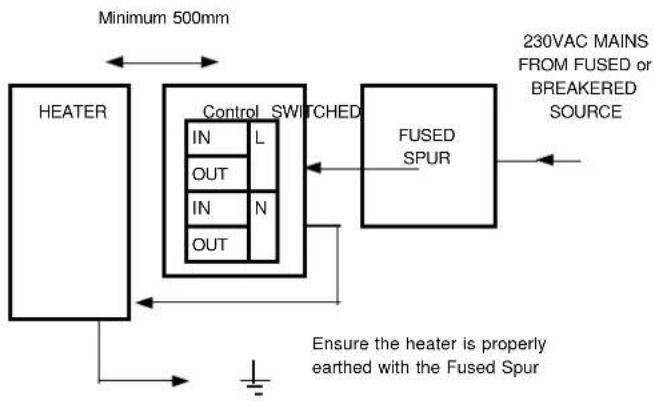
flowchart
graph TD
    A["HEATER"] --> B["Control"]
    B --> C["FUSED SPUR"]
    C --> D["230VAC MAINS FROM FUSED or BREAKERED SOURCE"]
    B --> E["SWITCHED"]
    E --> B
    B --> F["Minimum 500mm"]
    style A fill:#f9f,stroke:#333
    style D fill:#ccf,stroke:#333
    note right of B: "Ensure the heater is properly earthed with the Fused Spur"
Alternative
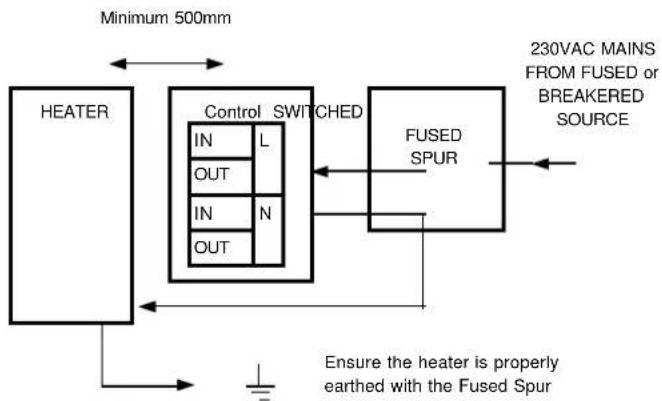
flowchart
graph TD
    A["HEATER"] --> B["Control SWITCHED"]
    B --> C["FUSED SPUR"]
    C --> D["230VAC MAINS FROM FUSED or BREAKERED SOURCE"]
    D --> E["Minimum 500mm"]
    B --> F["IN L"]
    B --> G["OUT"]
    B --> H["IN N"]
    B --> I["OUT"]
    style A fill:#f9f,stroke:#333
    style B fill:#ccf,stroke:#333
    style C fill:#cfc,stroke:#333
    style D fill:#fcc,stroke:#333
    note right of B: Ensure the heater is properly earthed with the Fused Spur
General Cleaning
WARNING
BEFORE UNDERTAKING CLEANING WORK ON THE
CONTROLLER OR APPLIANCE IMMEDIATELY DISCONNECT
THE ELECTRICITY SUPPLY BY SWITCHING OFF AT THE
ADJACENT DOUBLE POLE SWITCH.
The outside of the appliance should be wiped over with a soft damp cloth and then dried. Do not use detergents or abrasives.
After Sales Service
Your Dimplex Comfort Control is guaranteed for one year from date of purchase. We undertake to exchange or repair free of charge within this period, any part found to be defective.
Should you require after sales service, please get in touch with the supplier through whom you purchased the appliance, or your nearest Service Agent.
Please do not initially return a faulty appliance or part of an appliance to us as this may result in transit damage and/or delay in providing service. Let us know your difficulty quoting the model number and series of the appliance. We will then take the appropriate action.
Brand : DIMPLEX
Model : PX01001
Category : Thermostat / Timer