WI6136 - Wine cellar Caple - Free user manual and instructions
Find the device manual for free WI6136 Caple in PDF.


| Product Type | Undercounter Wine Cabinet |
| Brand | Caple |
| Model | WI6136 |
| Capacity | Up to 46 Bordeaux bottles (750ml) |
| Temperature Zones | Dual zone: Upper 5-10°C, Lower 10-18°C |
| Refrigerant | R600a (flammable) |
| Energy Class (Light Source) | G |
| Power Supply | 220-240V, 13A plug with earth |
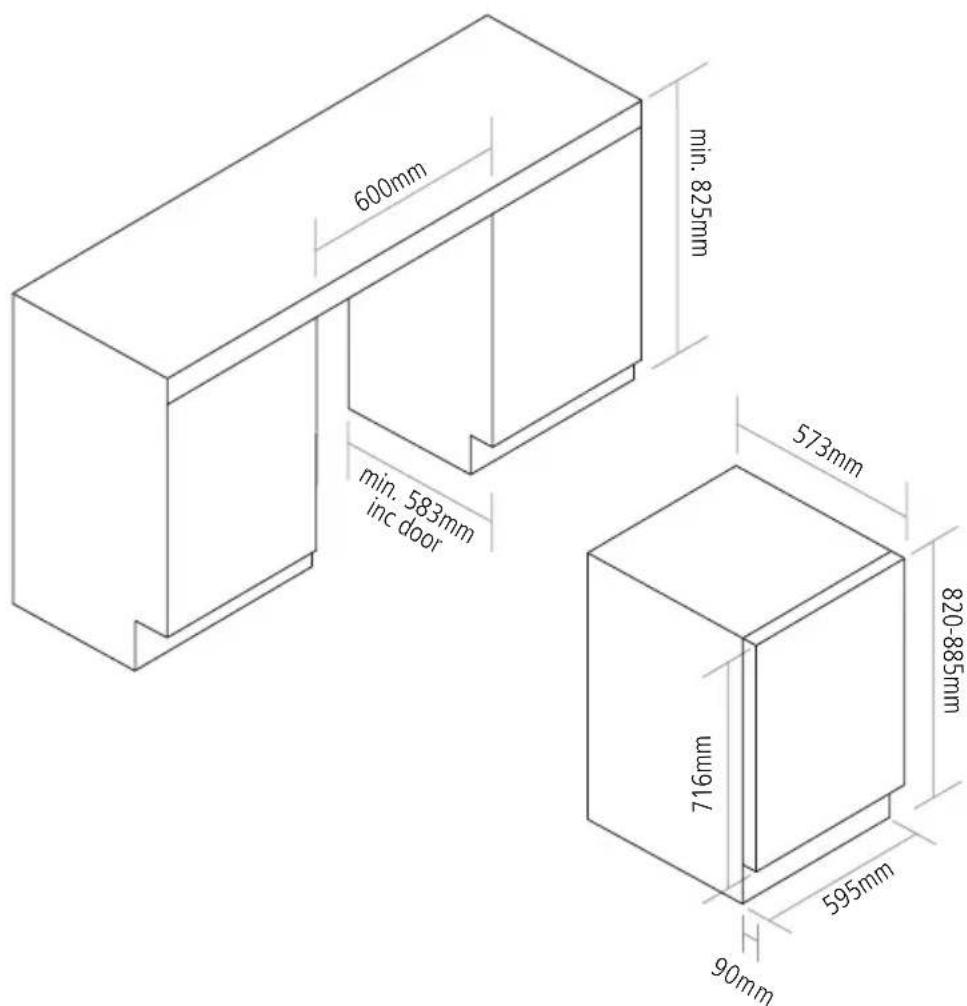
| Installation Dimensions | Height: 820mm, Width: 595mm, Depth: 570mm (approx) |
| Weight | Approx. 38 kg |
| Door Hinge | Reversible (right-hinged as delivered, left-hand kit included) |
| Control Type | Touch control panel with LED display |
| Interior Light | LED light, auto shut-off after 10 min or continuous mode |
| Shelves | Removable with notch design for bottle security |
| Defrost System | Auto-cycle defrost |
| Humidity Control | Built-in humidity system with optional water reservoir |
| Noise Level | Typical compressor noise, level not specified |
| Ambient Temperature Range | 16-32°C |
| Warranty | Standard manufacturer warranty (registration required) |
| Compliance | CE, UKCA, WEEE |
| Maintenance | Clean with warm water and mild detergent; do not use abrasive cleaners |
| Included Accessories | Door reversal kit, handle, fixing brackets, foot sliders, plinth grille |
Frequently Asked Questions - WI6136 Caple
User questions about WI6136 Caple
0 question about this device. Answer the ones you know or ask your own.
Ask a new question about this device
Download the instructions for your Wine cellar in PDF format for free! Find your manual WI6136 - Caple and take your electronic device back in hand. On this page are published all the documents necessary for the use of your device. WI6136 by Caple.
USER MANUAL WI6136 Caple
Undercounter Wine Cabinet Instruction Manual
natural_image
Interior view of a kitchen appliance with a double-bouted refrigerator and glassware (no visible text or symbols)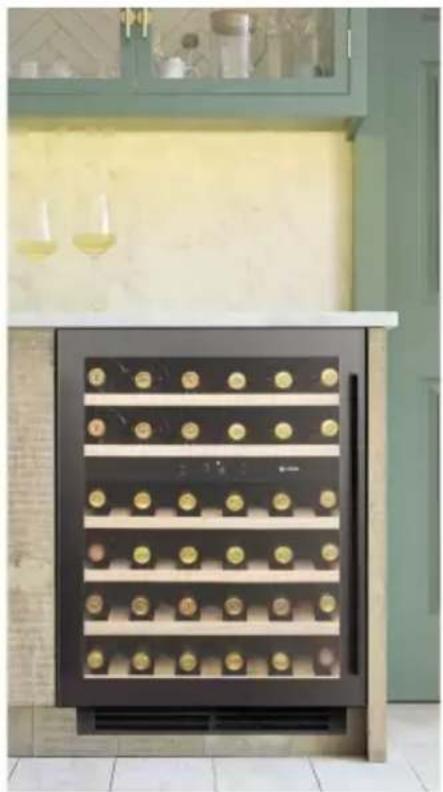
natural_image
Interior kitchen with a double-bone wine cabinet filled with 20 bottles, mounted on a white shelf (no visible text or symbols)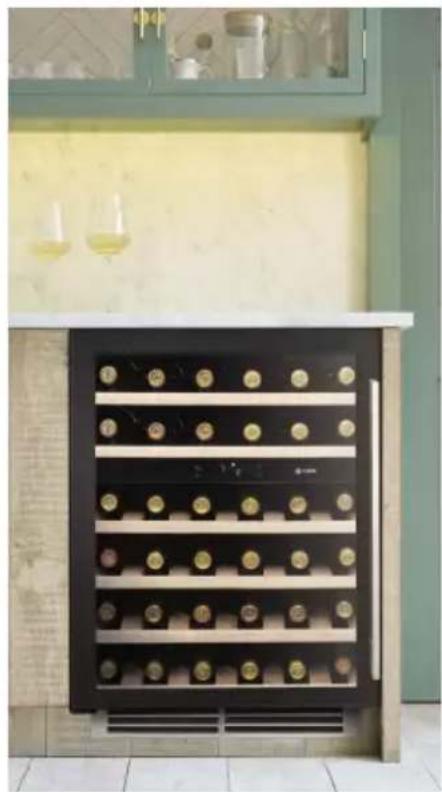
natural_image
Interior kitchen cabinet with black double-bouted wine rack and glassware on top (no visible text or symbols)CONTENTS
Introduction 3
Safety Instructions 4
Environmental Protection 8
Installation 9
Operating Your Wine Cabinet 11
Control Panel 12
Using The Shelves 14
How To Change The Door Opening 15
Installing The Handle 17
Installing The Full Height Plinth Grille 18
Fitting A Kitchen Plinth 19
Wine Bottle Stacking 20
Installation Dimensions 21
Installing The Top Fixing Bracket 22
Using The Foot Sliders 23
Care and Maintenance 24
Troubleshooting 26
Recommended Temperatures 28
Caple Contact Details 32
Thank you for choosing this Caple Wine Cabinet.
To ensure that you get the best results from your new wine cabinet, we strongly suggest that you read this instruction manual thoroughly before use. If treated with care, your Caple product should give you years of trouble-free use.
To register ownership, please ensure you complete and return the guarantee card supplied with the appliance or visit www.caple.co.uk and register here.
This instruction manual is designed to provide you with all the required information related to the installation, use and maintenance of the appliance.
Please read this manual carefully before using your appliance. It contains important safety advice; it explains how to use and look after your appliance so that it will provide you with many years of reliable service.
Should a fault arise, please first consult the "Troubleshooting" section. You can often rectify minor problems yourself, thus saving unnecessary service costs.
Please keep this manual in a safe place and pass it on to new owners for their information and safety.
WARNINGS
- To prevent damaging the door gasket, make sure the door is fully open when pulling shelves out of the rail compartment.
- The appliance must be positioned so that the plug is accessible. Release the electric cord and move your cabinet to its final location. Do not move your cabinet while loaded with wine as you may distort the body.
- The wine cabinet should be installed in a suitable place in order to avoid touching the compressor.
- After unpacking, make sure that the appliance is in perfect order. If you have any doubt, do not use it and contact your retailer.
- If the supply cord is damaged, it must be replaced by a Caple service agent or a similarly qualified person in order to avoid a hazard.
- This product is not designed for commercial use, it is a household appliance only.
- This appliance is intended to be used in household and similar applications such as:
Staff kitchen areas in shops, offices and other working environments.
Farm Houses.
By clients in hotels, motels and other residential type environments.
Bed and breakfast type environments.
- This appliance is intended to be used exclusively for the storage of wine.
IMPORTANT
Caple cannot be held liable for any non compliance with these instructions.
ELECTRICAL SHOCK HAZARD
- Read all instructions before using the wine cabinet.
- DANGER or WARNING: Risk of child entrapment.
- Before you throw away your old wine cabinet: Take off the door, leaving the shelves in place so that children cannot easily climb inside.
- Never allow children to operate, play with, or crawl inside the appliance.
- Never clean appliance parts with flammable fluids. The fumes can create a fire hazard or explosion.
- Do not store or use gasoline or any other flammable vapours and liquids in the vicinity of this or any other appliance. The fumes can create a fire hazard or explosion.
- The refrigerant of this appliance is R600a, flammable and explosive articles should not be put in or near the cabinet, to avoid the risk of fire or explosion.
- Cleaning and user maintenance shall not be made by children without supervision.
- When positioning the appliance, ensure the supply cord is not trapped or damaged.
- This appliance can be used by children aged from 8 years and above and persons with reduced physical, sensory or mental capabilities or lack of experience and knowledge if they have been given supervision or instruction concerning use of the appliance in a safe way and understand the hazards involved. Children shall not play with the appliance.
- Do not locate multiple portable socket-outlets or portable power supplies at the rear of the appliance.
- Do not use plug adapter.
- Store wine in sealed bottles.
- Do not overload the cabinet.
- Do not open the door unless necessary.
- Do not cover shelves with aluminium foil or any other shelf material which may prevent air circulation.
- Should the wine cabinet be stored without use for long periods it is suggested, after careful cleaning, to leave the door ajar to allow air to circulate inside the cabinet in order to avoid possible formations of condensation, mould or odours.
- Keep ventilation openings, in the appliance enclosure or in the built-in structure, clear of obstruction.
- Do not damage the refrigerant circuit.
- Do not use electrical appliances inside the storage compartments of the appliance, unless they are the type recommended by the manufacturer.

Symbol ISO 7010 W021
Warning; Risk of fire / flammable materials
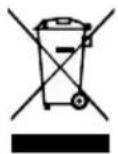
ENVIRONMENTAL PROTECTION
Waste electrical products should not be disposed of with household waste. Please recycle where facilities exist. Check with your Local Authority or retailer for recycling advice. This appliance is marked according to the European directive on Waste Electrical and Electronic Equipment (WEEE).
By ensuring this product is disposed of correctly, you will help prevent potential negative consequences for the environment and human health, which could otherwise be caused by inappropriate waste handling of this product. The symbol on the product indicates that this product may not be treated as household waste. Instead it shall be handed over to the applicable collection point for the recycling of electrical and electronic equipment. Disposal must be carried out in accordance with local environmental regulations for waste disposal.
For more detailed information about treatment, recovery and recycling of this product, please contact your local council, your household waste disposal service or the retailer where you purchased the product.
WARRANTY
Your new appliance is covered by warranty. The warranty card is enclosed - if it is missing, you must provide the following information to your retailer in order to receive a replacement: date of purchase, model and serial number. Registration can also be completed online by visiting www.caple.co.uk.
Ensure you keep your warranty card safe, you may need to show it to Caple Service together with proof of purchase. If you fail to show your warranty card you will incur all repair charges.
Spare parts are only available from Caple Service and spare parts authorised centres.
CE DECLARATIONS OF CONFORMITY CE
This appliance has been manufactured to the strictest standards and complies with all applicable legislation, Low Voltage Directive (LVD) and Electromagnetic Compatibility (EMC).
UKCA DECLARATIONS OF CONFORMITY UK CA
This appliance has been manufactured to the strictest standards and complies with all applicable legislation.
TECHNICAL FICHE
This appliance conforms to all current and applicable energy regulations. To view the Technical Fiche that supports the energy labelling data, please visit the product page on our website www.caple.co.uk
BEFORE USING YOUR WINE CABINET
Remove the exterior and interior packing.
IMPORTANT:
Before connecting the wine cabinet to the power source, let it stand upright for at least 12 hours. This will reduce the possibility of a malfunction in the cooling system from handling during transportation.
Clean the interior surface with lukewarm water using a soft cloth.
Make sure to turn the unit off and unplug it from the outlet.
NOTE
To protect the appliance in transit and delivery the door is packed tightly against the cabinet. When first installed this can mean the door seal appears thinner on one side of the door due to compression, this is normal and once out of the box it will relax over a short period of time and the door will return to the normal position. If you wish to speed up the process you can gently warm the seal with a hair dryer on a low temperature setting. This can help relax the seal helping it return to normal thickness a little faster.
INSTALLATION OF YOUR WINE CABINET
Place your wine cabinet on a floor that is strong enough to support it when it is fully loaded.
To level your wine cabinet, adjust the front levelling leg at the bottom of the cabinet.
Ensure it is perfectly level, as this will minimise any vibrations.
This appliance uses flammable refrigerant. Never damage the cooling pipework during transportation.
Locate the wine cooler away from direct sunlight and sources of heat (ovens, hobs, heaters, radiators, etc.). Never clean appliance parts with flammable fluids. The fumes can create a fire hazard or explosion. When disposing your appliance, please choose an authorised disposal site.
Avoid locating the unit in moist areas.
It is fitted with a power cord having an earth wire terminating in a 13amp plug.
Ensure the product is correctly ventilated (see page; 15 & 16).
Consult a qualified electrician or service engineer if the earthing instructions are not completely understood.
Plug the wine cabinet into an exclusive, properly installed-grounded wall outlet. Do not under any circumstances cut or remove the third (ground) pin from the plug. Any questions concerning power and/or grounding should be directed toward a certified electrician or Caple service.
WARNING:
Incorrect earthing can result in the risk of electric shock.
Please use the cabinet within ambient temperatures between 16-32°C, if the ambient temperature is higher or lower than this, it will cause the temperature to fluctuate in the cabinet, possibly preventing it from reaching 5-18°C.
SETTING THE TEMPERATURE
The temperature setting is range as below:
Upper compartment: 5 - 10°C
Lower compartment: 10 - 18°C
When the system enters the temperature set up. With each press on the △ key, the temperature setting of the upper zone will decrease by 1 °C. When the temperature setting reaches the lower limit of 5°C, the temperature will return to 10°C. Each press on the ▽ and the temperature setting of the lower zone will decrease by 1°C. When the temperature setting reaches the lower limit 10°C, the temperature will return to 18°C.
If you wish to view the actual temperature inside the wine cabinet. Please press the or key and hold for 3-5 seconds. The actual temperature of the upper zone or the lower zone will be displayed on the control board. After 5 seconds the temperature will return to display the set temperature.
Flashing LED = Cabinet Temperature
Steady LED = Set Temperature
NOTE:
If the unit is unplugged, power lost or turned off, you must wait 3 to 5 minutes before restarting the unit. If you attempt to restart before this time delay, the wine cabinet will not start.
When you use the wine cabinet for the first time or you restart the cabinet after having been shut off for a long time, there could be a few degrees variance between the temperature you select and the one indicated on the LED readout. This is normal and it is due to the length of the activation time. Once the wine cabinet has been running for a few hours everything will be back to normal.
CONTROL PANEL
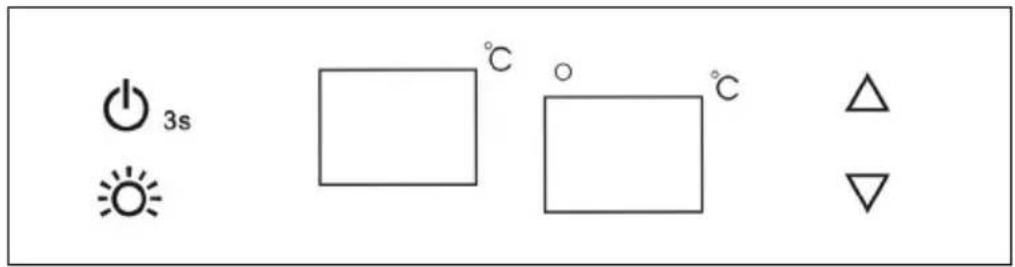
○ Indicator light illuminates to signify the cooling mode is currently in operation
TOUCH CONTROL KEYS

Switches the interior light ON/OFF

To switch the appliance ON/OFF
(press and hold this buttons for approximately 3 seconds)
This button controls the upper compartment temperature zone.
Each press of the button will decrease the temperature in increments of 1^ C. When the temperature reaches the minimum 5^ C it jumps up to the maximum of 10^ C.
This button controls the lower compartment temperature zone.
Each press of the button will decrease the temperature in increments of 1^ C. When the temperature reaches the minimum 10^ C it jumps up to the maximum of 18^ C.
UPPER WINDOW
Displays the temperature in the upper compartment.
LOWER WINDOW
Displays the temperature in the lower compartment.
INTERNAL LIGHT
In order to reduce energy consumption, the LED light within this wine cabinet will automatically switch off after 10 minutes. If you would prefer the LED light to remain on continuously, this is possible. Please press and hold the key for 5 seconds, the display will show "LP". After 4 seconds the display will revert back to normal and the light will remain on until manually switched off.
If you would like to revert back and conserve energy (recommended), press and hold the key for 5 seconds, the display will show "LF". After 4 seconds the display will revert back to normal, and the light will automatically switch off after 10 minutes.
LIGHT SOURCE ENERGY CLASS
This product contains a light source of energy efficiency class G
USING THE SHELVES
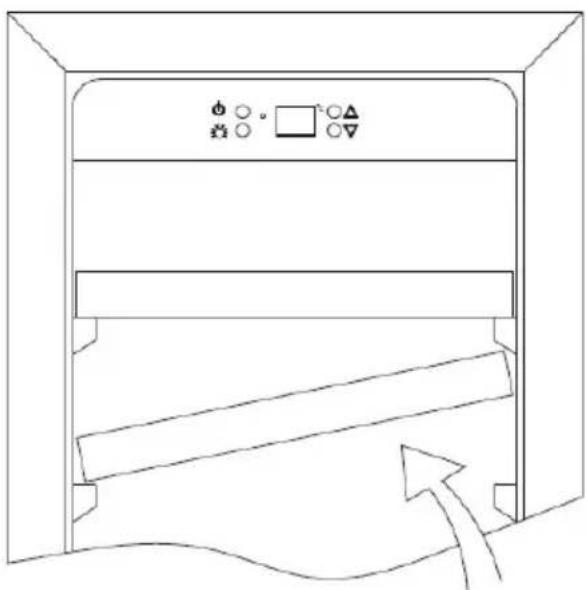
To prevent damaging the door gasket, make sure to have the door opened fully when pulling shelves out of the rail compartment.
For easy access to the storage content, you must pull the shelves approximately 1/3 out of the rail compartment, however this unit was designed with a notch on each sides of the shelf tracks to prevent bottles from falling.
REMOVING OR INSTALLING SHELVES
To install or remove a shelf, tilt the shelf as per the diagram and simply pull out, or push in the shelf until it sits on the support brackets securely.
Visit our Caple website to view a 'How to video' on this. www.caple.co.uk
natural_image
Line drawing of a cabinet or rack with directional arrows indicating movement, no text or symbols presentScan the QR code below to access the 'How to video'

HOW TO CHANGE THE DOOR OPENING
This appliance has reversible doors but is delivered with a right hinged door. The left hand hinge kit comes with the unit (in the box), should you wish to reverse the hinge on your unit follow the directions below:
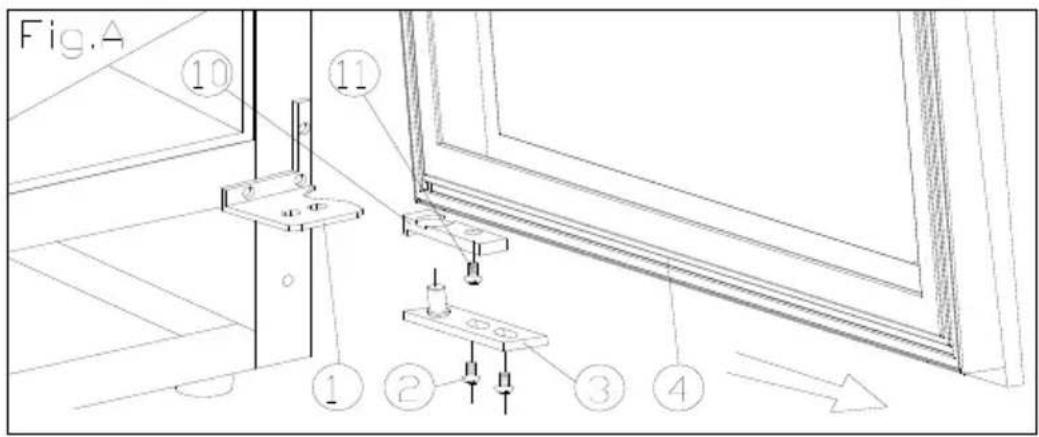
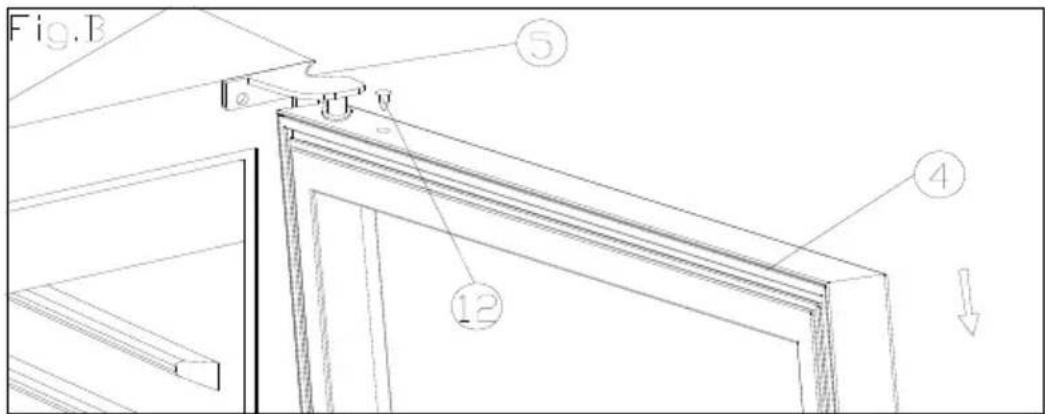
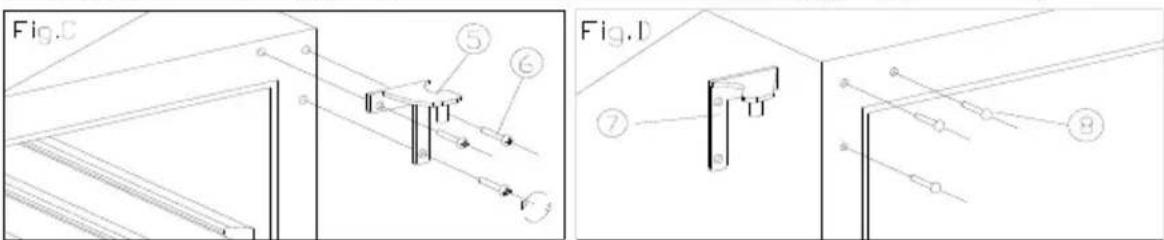
- Lower hinge (Right)
- Door
- Top hinge (Left)
-
Door limit device
-
Screws
- Top hinge (Right)
- Decorative plugs
- Screw
3 .Door axis
6. Hinge Screws
9. Lower hinge (Left)
12. Plug
- Open the door to 90 degrees, take out 2 screws (2) from lower door axis (3), remove the door (4), then pull out the door and door axis (Fig. A).
- Put the door down safely and take out the plug (12) from top of door frame, unscrew 1 screw (11) at bottom and remove the door limit device (10), then install the door limit device (10) at top of door frame, please use spare plug (12) to block the hole at top of door frame. (Fig. A/B)
- Take out 3 hinge screws (6) from top hinge (right) (5) and remove it. (Fig. C)
- Remove decorative nail (8) from left top of cabinet and install spare top hinge (Left) (7) at left top of cabinet with 3 screws. (Fig. D)
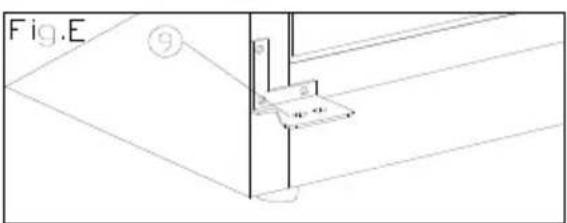
- According above procedure, install spare lower hinge (left) (9). (Fig. E)
- The door revolves 180 degrees, install the door with same way it was removed and fix it with door aligned.
- Block the hole at right top of cabinet with spare decorative plugs (8).
INSTALLING THE HANDLE
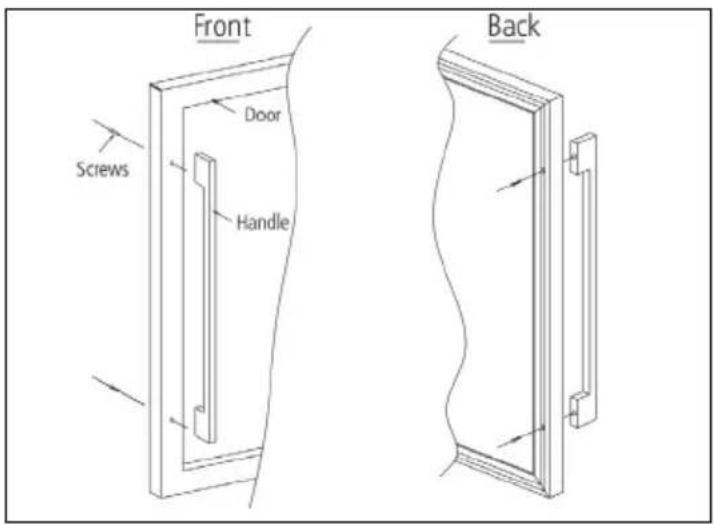
Remove the door gasket on the drilled holes side to install the handle. (see below drawing). Fix the handle to the screws and push the gasket back into place.
Visit our caple website to view a 'How to video' at WWW.CAPLE.CO.UK
Scan the QR code below to access the 'How to video'

INSTALLING THE FULL HEIGHT PLINTH GRILLE
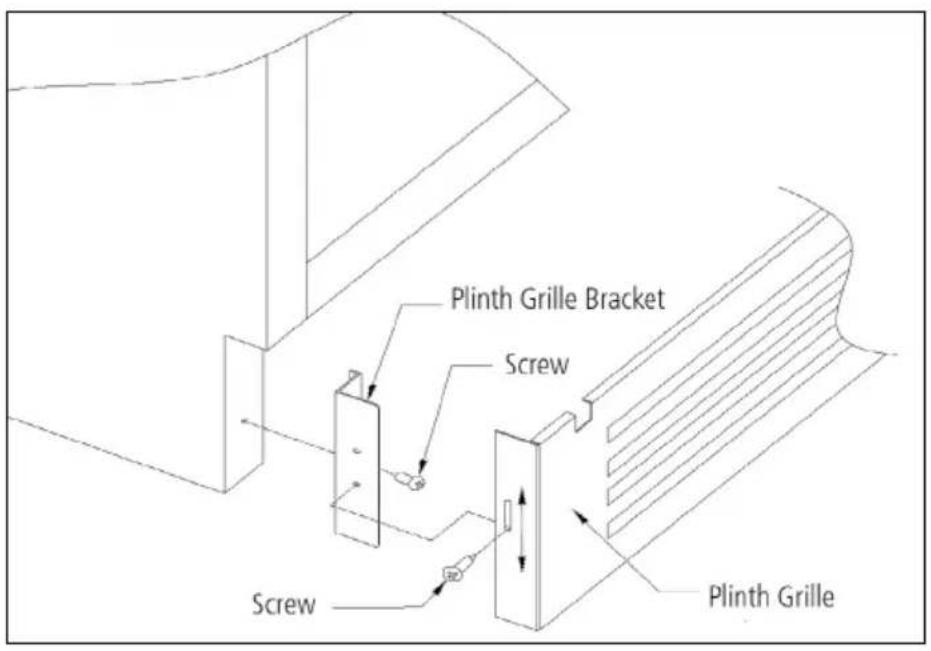
Take out the full height plinth grille and the brackets from the accessories box. Fix the brackets to the cabinet with screws provided and fix both sides of the grille to the brackets with the 2 supplied screws as shown in below diagram.
NOTE: To be installed with a 150mm plinth height.
If you wish to reduce your plinth height, the smaller, slot-on plinth grille (see page 16) should be used.
Full height plinth grille only included with WI6135 and WI6135GM.
FITTING A KITCHEN PLINTH
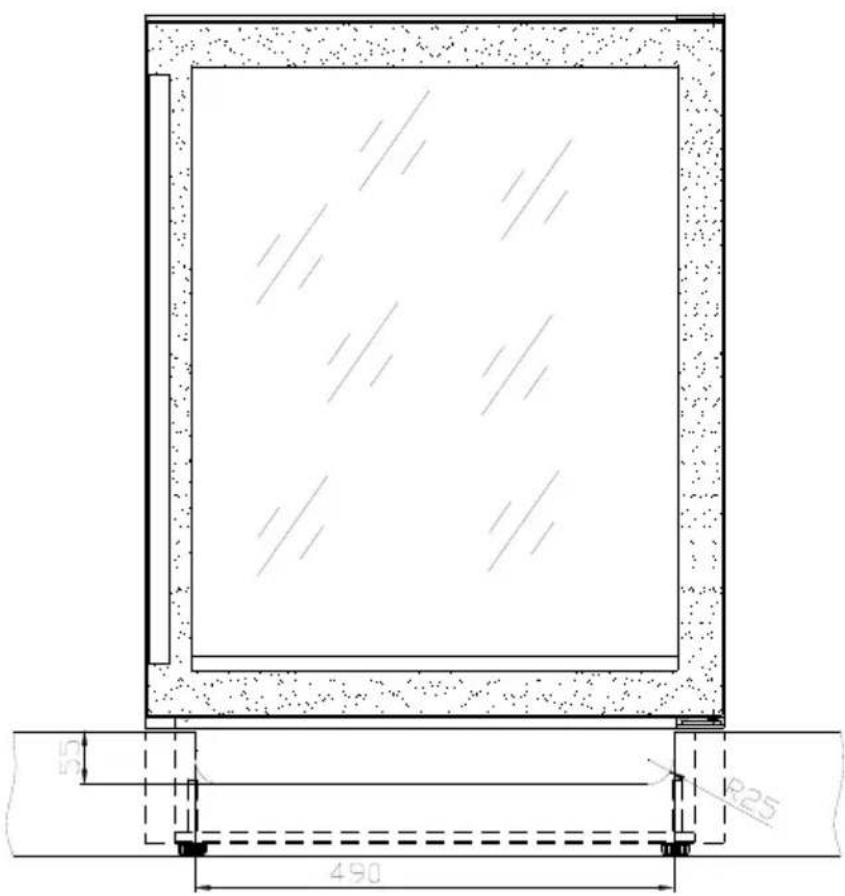
This model is also supplied with a slot-on plinth grille if the previous method/grille is not preferred. A H55mm vent slot is required in the plinth to ensure air is able to ventilate correctly. See diagram below.
WINE BOTTLE STACKING
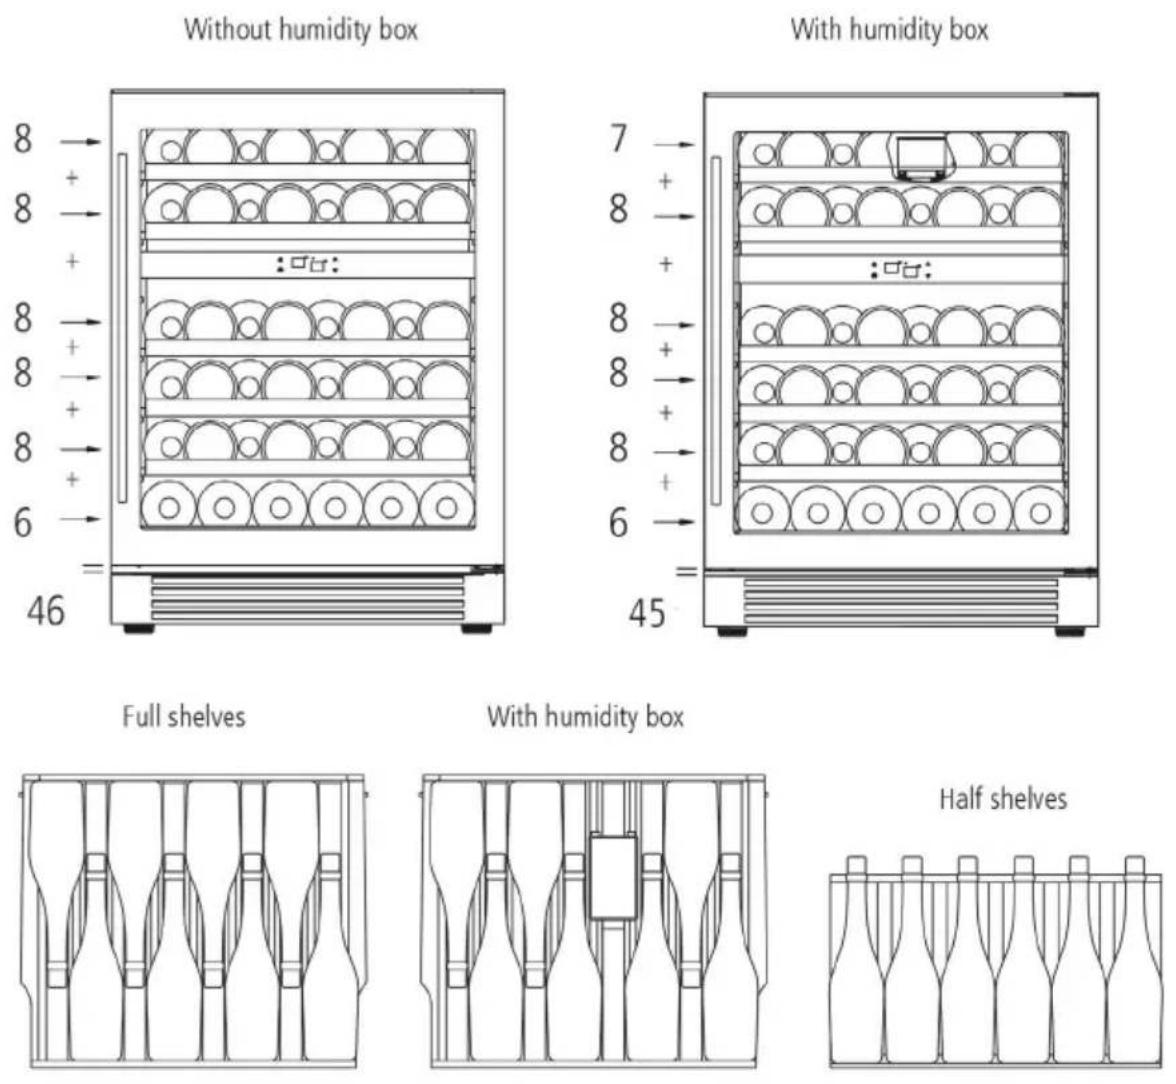
Stores max. 46 Bordeaux style bottles 750ml.
NOTE:
If you wish to store other style bottles i.e champagne, the maximum storage capacity will be less than as shown above.
Shelves may also need to be removed to allow more bottles to be stored.
INSTALLING THE TOP FIXING BRACKET
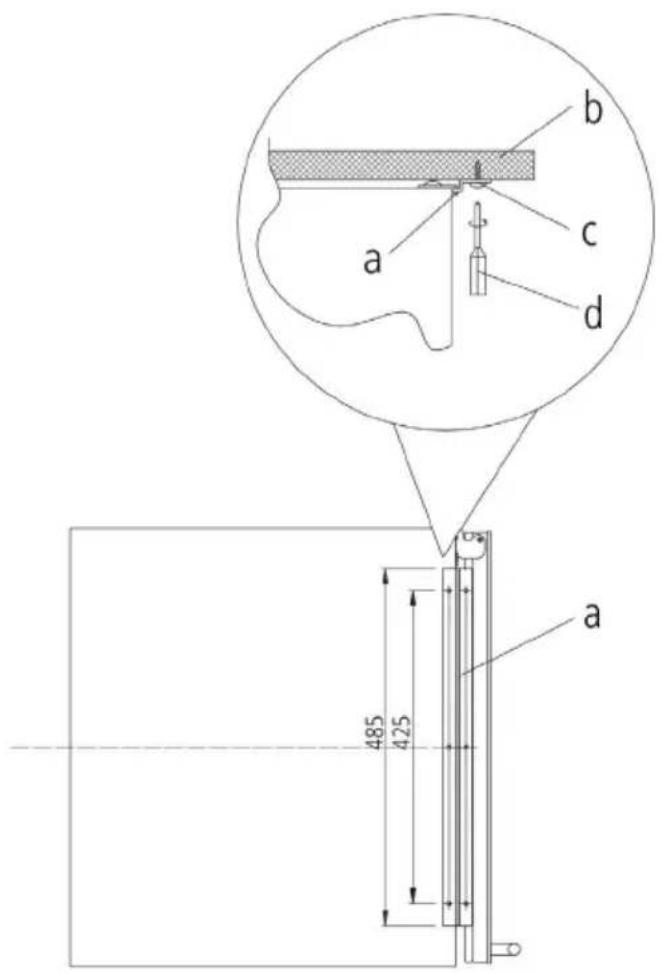
This bracket will keep the product secure and help prevent it moving when in use.
After installing the wine cabinet, please open the door, adjust the fixing bracket and fix this into the work surface with three screws using a screwdriver.
A. Top Fixing Bracket
B. Work Surface
C. Screw
D. Screwdriver
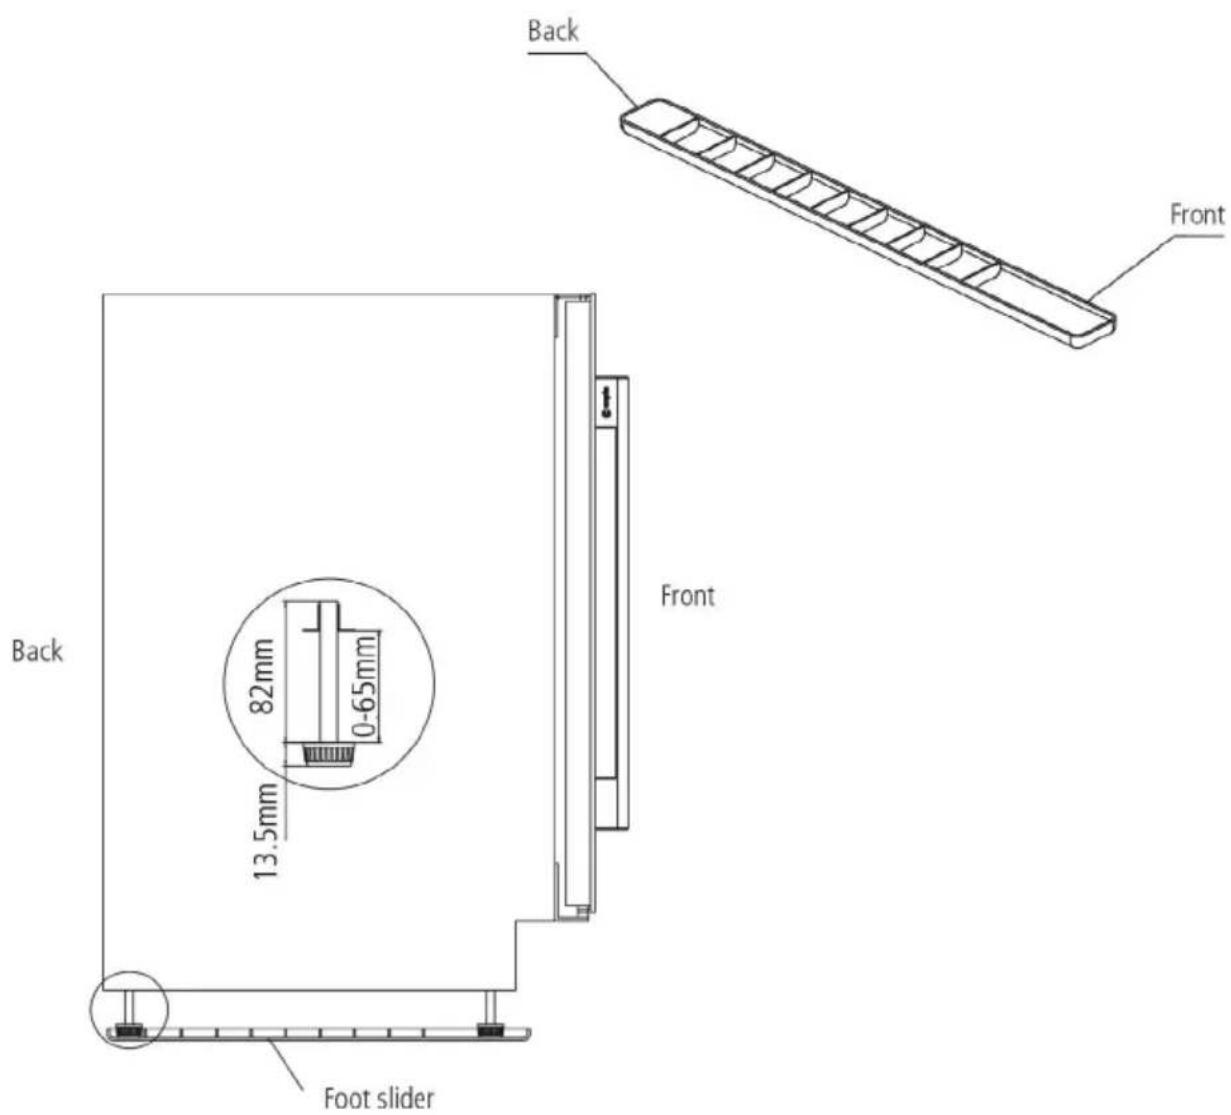
If you want to adjust the height over 820mm, please install the product using the foot sliders provided. These are provided to help prevent the feet catching on the floor when sliding the appliance into the aperture. Place the back foot in the location marked 'Back' below and the front foot in the location marked 'Front'. Once fitted to both sides of the wine cabinet the appliance can be gently positioned into the aperture, taking care not to place excess pressure on the feet when locating the cabinet.
CARE AND MAINTENANCE
CLEANING YOUR WINE CABINET
Turn off the power, unplug the appliance, and remove all items including shelves and rack.
Wash the inside surfaces with a warm water and baking soda solution. The solution should be about 2 tablespoons of baking soda to 2 pints of water.
Wash the shelves with a mild detergent solution.
Wring excess water out of the sponge or cloth when cleaning area of the controls, or any electrical parts.
Wash the outside cabinet with warm water and mild liquid detergent. Rinse well and wipe dry with a clean soft cloth.
POWER FAILURE
Most power failures are corrected within a few hours and should not affect the temperature of your appliance if you minimise the number of times the door is opened. If the power is going to be off for a longer period of time, you need to take the proper steps to protect your contents.
HOLIDAY
SHORT HOLIDAYS: Leave the wine cabinet operating during holidays of less than three weeks.
LONG HOLIDAYS: If the appliance will not be used for several months, remove all items and turn off the appliance. Clean and dry the interior thoroughly. To prevent odour and mould growth, leave the door open slightly (blocking it open if necessary).
MOVING YOUR WINE CABINET
Remove all items.
Securely tape down all loose items (shelves) inside your appliance.
Turn the adjustable leg up to the base to avoid damage.Tape the door shut.
Be sure the appliance stays secure in the upright position during transportation. Also protect outside of appliance with a blanket, or similar item.
ENERGY SAVING TIPS
The wine cabinet should be located in the coolest area of the room, away from heat producing appliances, and out of the direct sunlight.
CLOSING THE DOOR
Close the door with care as slamming the door puts excess stress on the appliance and can cause the door to bounce open slightly. If this is not noticed, it can cause excess moisture to build up in the cabinet which in extreme cases can lead to the evaporation tray overflowing.
TROUBLESHOOTING GUIDE
You can solve many common wine cabinet problems easily, saving you the cost of a possible service call. Try the suggestions below to see if you can solve the problem before calling Caple Service.
| PROBLEM POSSIBLE CAUSE | |
| The wine cabinet does not operate Not plugged in.The appliance is turned off.The circuit breaker tripped or a blown fuse. | |
| The wine cabinet is not cold enough | Check the temperature control setting.External environment may require a higher setting.The door is opened too often.The door is not closed completely.The door gasket does not seal properly. |
| The compressor turns on and off frequently | The room temperature is hotter than normal.A large amount of contents has been added to the wine cabinet.The door is opened too often.The door is not closed completely.The temperature control is not set correctly.The door gasket does not seal properly. |
| The light does not work Not plugged in. | The circuit breaker tripped or a blown fuse.The bulb has burned out.The light button is "OFF". |
| Vibrations Check that the appliance is even | |
| The Wine cabinet seems to make too much noise. | The rattling noise may come from the flow of the refrigerant, which is normal. As each cycle ends, you may hear gurgling sounds caused by the flow of refrigerant in your wine cabinet.Contraction and expansion of the inside walls may cause popping and crackling noises.The wine cabinet is not level. |
| The door will not close properly The wine cabinet is not level.The door was reversed and not properly installed.The gasket is dirty.The shelves are out of position. | |
If the above table has not solved the problem please contact Caple Service by phone on
0117 938 7420 or by email service@caple.co.uk
DEFROSTING/CONDENSATION
Your wine cabinet is designed with an "Auto-cycle" defrost system. When the RUN cycle is OFF, the refrigerated surface of the wine cabinet (interior rear wall) defrosts automatically. The defrosted water is channelled into a drain pan which is located at the back of the cabinet next to the compressor from where it evaporates.
HUMIDITY SYSTEM
The wine cabinet is equipped with a system for maintaining the correct level of humidity. If humidity is too low, insert the small plastic reservoir on to the top shelf. Fill this reservoir 3/4 full with water. Check the water level occasionally and refill as necessary.
RECOMMENDED STORAGE TEMPERATURES:
| DRINK TYPE | RECOMMENDED TEMPERATURE |
| For storing all types of wines 12°C to 14°C |
RECOMMENDED DRINKING TEMPERATURES:
| DRINK TYPE | RECOMMENDED TEMPERATURE |
| Champagne NV, Sparkling 6°C | |
| Champagne Vintage 10°C | |
| Dry White Semillon, Sauvignon Blanc 8°C | |
| Dry White Gewürztraminer, Riesling 10°C | |
| Dry White Chardonnay 10°C | |
| Vintage Chardonnay 14°C | |
| Sweet White Sauternes Monbazillac, Late Harvest ice wine | 10°C |
| Sweet whites vintage Sauternes 14°C | |
| Beaujolais 13°C | |
| Red Pinot Noir 16°C | |
| Vintage Pinot Noir red 18°C | |
| Red Cabernet, Merlot, French, Australian, New Zealand, Chilean, Argentinean, Italian, Spanish, Californian | 18°C |
| Red Grenache, Syrah 16°C |
NOTES:
NOTES:
NOTES:

caple
Caple Service
Fourth Way
Avonmouth
Bristol
BS11 8DW
T: 0117 938 1900
E: service@caple.co.uk
www.caple.co.uk
- Undercounter Wine Cabinet Instruction Manual
- CONTENTS
- WARNINGS
- IMPORTANT
- ELECTRICAL SHOCK HAZARD
- ENVIRONMENTAL PROTECTION
- WARRANTY
- CE DECLARATIONS OF CONFORMITY CE
- UKCA DECLARATIONS OF CONFORMITY UK CA
- TECHNICAL FICHE
- BEFORE USING YOUR WINE CABINET
- IMPORTANT:
- NOTE
- INSTALLATION OF YOUR WINE CABINET
- WARNING:
- SETTING THE TEMPERATURE
- NOTE:
- CONTROL PANEL
- TOUCH CONTROL KEYS
- UPPER WINDOW
- LOWER WINDOW
- INTERNAL LIGHT
- LIGHT SOURCE ENERGY CLASS
- USING THE SHELVES
- REMOVING OR INSTALLING SHELVES
- HOW TO CHANGE THE DOOR OPENING
- INSTALLING THE HANDLE
- INSTALLING THE FULL HEIGHT PLINTH GRILLE
- FITTING A KITCHEN PLINTH
- WINE BOTTLE STACKING
- INSTALLING THE TOP FIXING BRACKET
- CARE AND MAINTENANCE
- CLEANING YOUR WINE CABINET
- POWER FAILURE
- HOLIDAY
- MOVING YOUR WINE CABINET
- ENERGY SAVING TIPS
- CLOSING THE DOOR
- TROUBLESHOOTING GUIDE
- DEFROSTING/CONDENSATION
- HUMIDITY SYSTEM
- caple
Brand : Caple
Model : WI6136
Category : Wine cellar