
ASP20E - Electric fireplace DIMPLEX - Free user manual and instructions
Find the device manual for free ASP20E DIMPLEX in PDF.


| Product Type | Electric Fireplace |
| Brand | Dimplex |
| Model | ASP20E |
| Dimensions (WxDxH) | Approx. 60 x 20 x 50 cm |
| Weight | Approx. 10 kg |
| Power Supply | 220-240 V, 50 Hz |
| Power Consumption (Heat) | 1500 W |
| Power Consumption (Flame Only) | 200 W |
| Heat Output | 1500 W |
| Flame Effect | LED with adjustable brightness |
| Thermostat | Adjustable |
| Remote Control | Included |
| Safety Features | Overheat protection, cool-touch glass |
| Installation | Freestanding or built-in |
| Maintenance | Clean with damp cloth; avoid abrasives |
| Spare Parts Available | LED bulbs, remote, fuses |
| Repairability | Heater and LEDs replaceable |
| Certifications | CE, RoHS |
| Noise Level | Silent (fan may produce low noise) |
| Warranty | 2 years |
Frequently Asked Questions - ASP20E DIMPLEX
User questions about ASP20E DIMPLEX
0 question about this device. Answer the ones you know or ask your own.
Ask a new question about this device
Download the instructions for your Electric fireplace in PDF format for free! Find your manual ASP20E - DIMPLEX and take your electronic device back in hand. On this page are published all the documents necessary for the use of your device. ASP20E by DIMPLEX.
USER MANUAL ASP20E DIMPLEX
The product complies with the European Safety Standards EN60335-2-30 and the European Standard Electromagnetic Compatibility (EMC) EN55014, EN60555-2 and EN60555-3. These cover the essential requirements of EEC Directives 2006/95/EC and 2006/108/EC
Optiflame Electric Inset Fire
Introduction
Thank you for choosing this Dimplex electric fire. Please read this information guide carefully in order to safely install, use and maintain your product.
Important Safety Advice
When using electrical appliances, basic precautions should always be followed to reduce the risk of fire, electrical shock and injury to persons, including the following:
1. OVERHEATING
WARNING: In order to avoid overheating, do not cover the heater. Do not place material or garments on the heater, or obstruct the air circulation around the heater. The heater carries a DO NOT COVER warning.
2. DAMAGE.
If the appliance is damaged, check with the supplier before installation and operation. If the supply cord is damaged it must be replaced by the manufacturer or service agent or a similarly qualified person in order to avoid a hazard.
3. LOCATION
Do not use outdoors.
Do not use in the immediate surroundings of a bath, shower or swimming pool.
Do not locate the heater immediately below a fixed socket outlet or connection box.
Ensure that furniture, curtains or other combustible material are positioned no closer than 1 metre from the heater.
Although this heater conforms with safety standards, we do not recommend its use on deep pile carpets or on long hair type of rugs.
4. PLUG POSITIONING
The appliance must be positioned so that the plug is accessible.
Keep the supply cord away from the front of the heater.
5. USE OF OTHER CONTROLS
Do not use this heater in series with a thermal control, a program controller, a timer or any other device that switches on the heat automatically, since a fire risk exists when the heater is accidentally covered or displaced.
6. UNPLUGGING
In the event of a fault unplug the device. Unplug the device when not required for long periods.
7. OWNER/USER
This appliance can be used by children aged from 8 years and above and persons with reduced physical, sensory or mental capabilities or lack of experience and knowledge if they have been given supervision or instruction concerning use of the appliance in a safe way and understand the hazards involved. Children shall not play with the appliance. Cleaning and user maintenance shall not be made by Children without supervision. Children of less than 3 years should be kept away unless continuously supervised. Children aged from 3 years and less than 8 years shall only switch on/off the appliance provided that it has been placed or installed in its intended normal operating position and they have been given supervision or instruction concerning use of the appliance in a safe way and understanding the hazards involved. Children aged from 3 years and less than 8 years shall not plug in, regulate and clean the appliance or perform user maintenance.
CAUTION - Some parts of this product can become very hot and cause burns. Particular attention has to be given where children and vulnerable people are present.
8. ELECTRICITY
WARNING – THIS APPLIANCE MUST BE EARTHED.
This heater must be used on an AC \~ supply only and the voltage marked on the heater must correspond to the supply voltage. Before switching on, please read the safety advice and operating instructions.
Technical Information
Model No: ASP20E, DLS20, DLS20BN, DLS20CH, ELD20E, SIV20E
Heat Output 230V 240V
| Nominal Heat Output P | Nom | 1.7 - 1.9 kW | |||
| Minimum Heat Output P | min | 0.9 - 1 kW | |||
| Maximum Continuous Heat Output P | max.c | 1.7 - 1.9 kW | |||
Auxiliary Electricity Consumption
| In Standby mode el | SB | 0.02 | - | 0.02 W |
with mechanic thermostat room temperature control.
General Information
Unpack the heater carefully and retain the packaging for possible future use, in the event of moving or returning the fire to your supplier. Loose coals (and/or pebbles) are packed separately within the carton. When the heater is assembled the coals (or pebbles) are placed on top of the fuel bed.
The fire incorporates a flame effect, which can be used with or without heating, so that the comforting effect may be enjoyed at any time of the year. Using the flame effect on its own only requires little electricity.
The heater is designed for use inset into a 407mm (16") or 457mm (18") wide by 559mm (22") high fireplace opening or can be freestanding - see section 'Installation Instructions'.
A 2kw fan heater is discreetly positioned in the canopy of the fire provides heating in cold weather. Switching allows half or full heat. A distance of 1 metre (39") must be maintained between the front of the heater and any surrounding furniture, overhanging curtains or other obstructions.
Before connecting the heater check that the supply voltage is the same as that stated on the heater.
Please note: Used in an environment where background noise is very low, it may be possible to hear a sound which is related to the operation of the flame effect. This is normal and should not be a cause for concern.
Installation Instructions
This section describes how to set up your electric fire. Your electric fire is designed to be used in a fireplace opening or placed against a wall anywhere in the room.
When installing this appliance in an existing fireplace opening, we recommend that an open chimney flue is blocked off. We recommend that non-flammable materials are used to block off the chimney flue. This procedure is important for the efficient operation of the heating unit and will also reduce heat loss up the chimney.
At the rear of the fire, an adjustable foot is provided for levelling the fire where the fire is being installed on an uneven surface. You can adjust the foot by removing the two screws and refitting the foot in the required position.
All fires are supplied with a hook and rawl plug to provide extra stability to the fire and to prevent it from accidentally being knocked over. The rawl plug supplied is suitable for use in block walls (other wall types may need alternative rawl plugs).
These fires have been supplied with a metal surround spacer already fitted to the product, see Fig 1. This spacer can be removed from the fire if you would like to position the fire fully inset in a fireplace. In order to remove the metal surround, unscrew the four fixing screws at the rear of the product, see Fig. 2. The steps below can be used to install the above fire models with or without the metal spacer fitted.
- Measure and mark the installation position of the hook. This position is indicated by 'Y' in Fig. 3 (the hook can be positioned on either side of the fire).
- Drill the hole for the rawl plug and position the rawl plug in the hole.
- Screw hook into the rawl plug to the depth as shown in Fig. 4.
- Position the fire alongside the hook and then lift the fire up and over the hook so that the top edge of the slot on the fire engages with the hook.
Operating the Fire
This section describes how to activate your fire using the manual controls.
CONTROLS
The heater controls are located on the canopy, towards the top of the fire. (On some models, the hinged canopy cover must be raised to access the controls).
Three switches provide a choice of heat settings. A switch is in the ON position when the red indicator mark on the switch is visible.
Switch 1 - Controls the electricity supply to the heater and the flame effect. (Note: This switch must be in the ON position for the heater to operate.)
Switch 2 - Provides 1kW heat output.
Switch 3 - Provides 2kW heat output when switched with switch 2.
SETTING THE THERMOSTAT
Set all switches to the ON position. Turn the thermostat knob to MAX to warm the room rapidly. When the room temperature has reached the desired level, turn the thermostat knob back slowly until the thermostat clicks off. The heater will then maintain the room temperature at the chosen level.
Note: Should your heater fail to come on when the thermostat is at a low setting, this may be due to the room temperature being higher than the thermostat setting.
Maintenance
WARNING: ALWAYS DISCONNECT FROM THE POWER SUPPLY BEFORE CLEANING THE HEATER.
CLEANING
Before commencing cleaning, unplug the heater and allow it to cool. The surfaces of the heater should be given an occasional wipe with a dry soft cloth. Do not use detergents, abrasive cleaning powder or polish on the metal body of the heater.
The glass screen should be cleaned carefully with a chamois leather. Do not use proprietary cleaners.
To remove any accumulation of dust or fluff, the soft brush attachment of a vacuum cleaner should occasionally be used to clean the outlet grille of the fan heater located under the canopy.
To clean the fuel effect, remove the coal/pebbles and wash in warm water. The plastic tray should be wiped clean with a damp cloth. When dry replace the coal/pebbles and arrange for best effect.
LED LAMPS
This fire is fitted with LED (Light Emitting Diode) bulbs in place of traditional incandescent bulbs. These generate the same light levels as traditional bulbs, but use a fraction of the energy consumed. These lamps cannot be replaced.
SAFETY CUT-OUT
For your safety, this appliance has been fitted with a thermal cut-out. In the event that the product overheats, the cut-out switches the heat off automatically.
To bring the heat back into operation, remove the cause of the overheating, then unplug or turn off the electrical supply to the heater for up to 10 minutes. When the heater has cooled sufficiently, re-connect and switch on the heater.
Additional Information
AFTER SALES SERVICE
Your product is guaranteed for one year from the date of purchase. Within this period, we undertake to repair or exchange this product free of charge (excluding lamps & subject to availability) provided it has been installed and operated in accordance with these instructions. Your rights under this guarantee are additional to your statutory rights, which in turn are not affected by this guarantee.
Should you require after sales information or assistance with this product please go to www.dimplex.co.uk where you will find our self help guide by clicking on "After Sales".
Alternatively, ring our help desk on 0844 879 3588 (UK) or 01 842 4833 (R.O.I.). Spare parts are also available on the website www.dimplex.co.uk.
Please retain your receipt as proof of purchase
RECYCLING
For electrical products sold within the European Community. At the end of the electrical products useful life it should not be disposed of with household waste. Please recycle where facilities exist. Check with your Local Authority or retailer for recycling advice in your country.
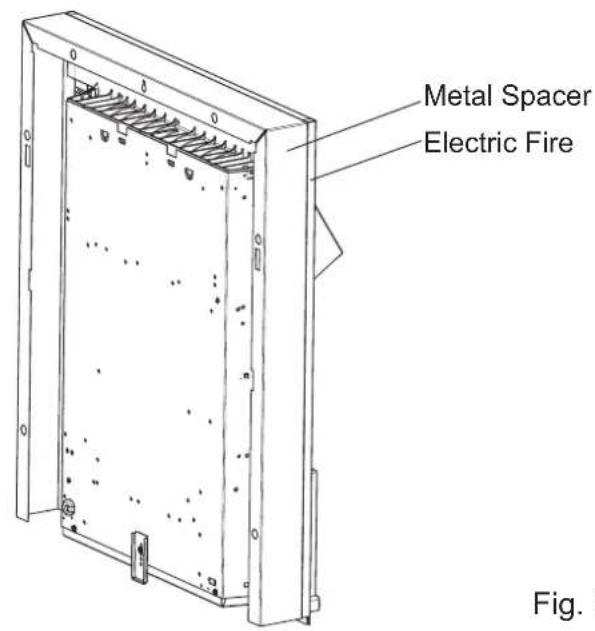
Fig. 1
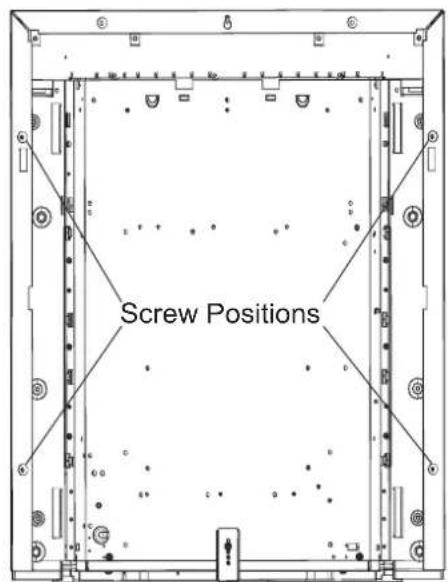
Fig. 2
Note: All dimensions are shown in millimeters.
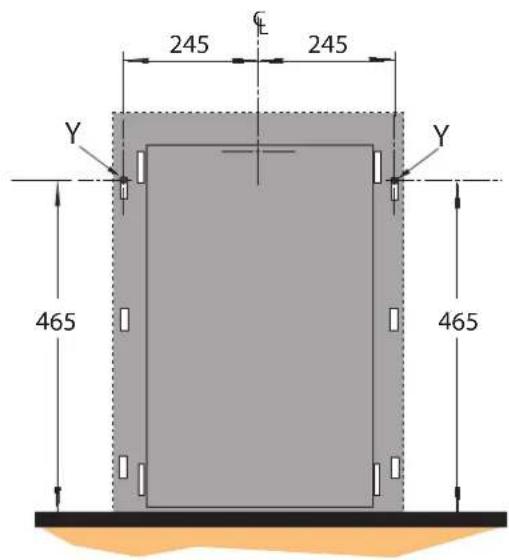
Fig. 3
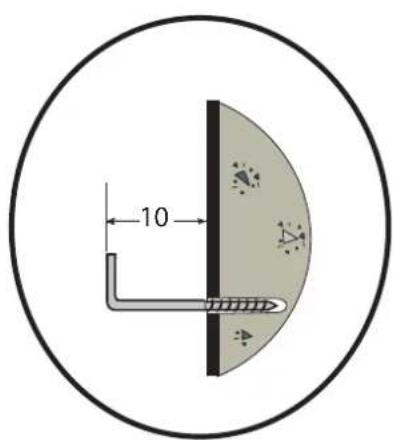
Fig. 4
| Dimplex | United Kingdom |
| Millbrook House | TEL: 0844 879 3588 |
| Grange Drive | FAX: 0844 879 3583 |
| Hedge End | WEB: www.dimpex.co.uk |
| Southampton | |
| Hampshire. | Republic of Ireland |
| SO30 2DF | TEL: 01 8424833 |
- Optiflame Electric Inset Fire
- Introduction
- Important Safety Advice
- OVERHEATING
- DAMAGE.
- LOCATION
- PLUG POSITIONING
- USE OF OTHER CONTROLS
- UNPLUGGING
- OWNER/USER
- ELECTRICITY
- WARNING – THIS APPLIANCE MUST BE EARTHED.
- Technical Information
- General Information
- Installation Instructions
- Operating the Fire
- CONTROLS
- SETTING THE THERMOSTAT
- Maintenance
- WARNING: ALWAYS DISCONNECT FROM THE POWER SUPPLY BEFORE CLEANING THE HEATER.
- CLEANING
- LED LAMPS
- SAFETY CUT-OUT
- Additional Information
- AFTER SALES SERVICE
- RECYCLING
Brand : DIMPLEX
Model : ASP20E
Category : Electric fireplace